ECO mode INFINITI FX35 2008 Workshop Manual
[x] Cancel search | Manufacturer: INFINITI, Model Year: 2008, Model line: FX35, Model: INFINITI FX35 2008Pages: 3924, PDF Size: 81.37 MB
Page 220 of 3924

DTC P1762 DIRECT CLUTCH SOLENOID VALVE
AT-147
< SERVICE INFORMATION >
D E
F
G H
I
J
K L
M A
B
AT
N
O P
DTC P1762 DIRECT CLUTCH SOLENOID VALVE
DescriptionINFOID:0000000001327283
Direct clutch solenoid valve is controlled by the TCM in response to signals sent from the PNP switch, vehicle
speed sensor and accelerator pedal positi on sensor (throttle position sensor). Gears will then be shifted to the
optimum position.
CONSULT-III Reference Val ue in Data Monitor ModeINFOID:0000000001327284
On Board Diagnosis LogicINFOID:0000000001327285
Diagnostic trouble code “P1762 D/C SOLENOID/CIRC” with CONSULT-III or 2nd judgement flicker without
CONSULT-III is detected under the following conditions.
When TCM detects an improper voltage drop when it tries to operate the solenoid valve.
When TCM detects as irregular by comparing target value with monitor value.
Possible CauseINFOID:0000000001327286
Harness or connectors
(Solenoid circuit is open or shorted.)
Direct clutch solenoid valve
DTC Confirmation ProcedureINFOID:0000000001327287
CAUTION:
Always drive vehicle at a safe speed.
NOTE:
If “DTC Confirmation Procedure” has been previously performed, alw ays turn ignition switch OFF and
wait at least 10 seconds before performing the next test.
After the repair, perform the following procedure to confirm the malfunction is eliminated.
WITH CONSULT-III
1. Turn ignition switch ON.
2. Select “SELECTION FROM MENU” in “DATA MONI TOR” mode for “TRANSMISSION” with CONSULT-III
and check monitor “ACCELE POSI”, “SLCT LVR POSI” and “GEAR”.
3. Touch “START”.
4. Start engine.
5. Drive vehicle and maintain the following conditions for at least 5 consecutive seconds. ACCELE POSI: 1.5/8 - 2.0/8
SLCT LVR POSI: “D” position
GEAR: “1” ⇒ “2” (D/C ON/OFF)
Driving location: Driving the vehic le uphill (increased engine load) will help maintain the driving
conditions required for this test.
6. If DTC is detected, go to AT-147, "
Diagnosis Procedure".
WITH GST
Follow the procedure “WITH CONSULT-III”.
Diagnosis ProcedureINFOID:0000000001327288
1.CHECK INPUT SIGNAL
With CONSULT-III
1. Turn ignition switch ON.
2. Select “MAIN SIGNALS” in “DATA MONITOR” mode for “TRANSMISSION” with CONSULT-III.
3. Start the engine.
Item name Condition Display value (Approx.)
D/C SOLENOID Direct clutch disengaged. Refer to
AT- 1 8
. 0.6 - 0.8 A
Direct clutch engaged. Refer to AT- 1 8
.0 - 0.05 A
:
Page 222 of 3924

DTC P1767 HIGH AND LOW REVERSE CLUTCH SOLENOID VALVE
AT-149
< SERVICE INFORMATION >
D E
F
G H
I
J
K L
M A
B
AT
N
O P
DTC P1767 HIGH AND LOW REVER SE CLUTCH SOLENOID VALVE
DescriptionINFOID:0000000001327295
High and low reverse clutch solenoid valve is controlled by the TCM in response to signals sent from the PNP
switch, vehicle speed sensor and accelerator pedal positi on sensor (throttle position sensor). Gears will then
be shifted to the optimum position.
CONSULT-III Reference Val ue in Data Monitor ModeINFOID:0000000001327296
On Board Diagnosis LogicINFOID:0000000001327297
Diagnostic trouble code “P1767 HLR/C SOL/CIRC” with CO NSULT-III or 8th judgement flicker without CON-
SULT-III is detected under the following conditions.
When TCM detects an improper voltage drop when it tries to operate the solenoid valve.
When TCM detects as irregular by comparing target value with monitor value.
Possible CauseINFOID:0000000001327298
Harness or connectors
(Solenoid circuit is open or shorted.)
High and low reverse clutch solenoid valve
DTC Confirmation ProcedureINFOID:0000000001327299
CAUTION:
Always drive vehicle at a safe speed.
NOTE:
If “DTC Confirmation Procedure” has been previously performed, alw ays turn ignition switch OFF and
wait at least 10 seconds before performing the next test.
After the repair, perform the following procedure to confirm the malfunction is eliminated.
WITH CONSULT-III
1. Turn ignition switch ON.
2. Select “SELECTION FROM MENU” in “DATA MONI TOR” mode for “TRANSMISSION” with CONSULT-III
and check monitor “ACCELE POSI”, “SLCT LVR POSI” and “GEAR”.
3. Touch “START”.
4. Start engine.
5. Drive vehicle and maintain the following conditions for at least 5 consecutive seconds. ACCELE POSI: 1.5/8 - 2.0/8
SLCT LVR POSI: “D” position
GEAR: “2” ⇒ “3” (HLR/C ON/OFF)
Driving location: Driving the vehic le uphill (increased engine load) will help maintain the driving
conditions required for this test.
6. If DTC is detected, go to AT-149, "
Diagnosis Procedure".
WITH GST
Follow the procedure “WITH CONSULT-III”.
Diagnosis ProcedureINFOID:0000000001327300
1.CHECK INPUT SIGNAL
With CONSULT-III
1. Turn ignition switch ON.
2. Select “MAIN SIGNALS” in “DATA MONITOR” mode for “TRANSMISSION” with CONSULT-III.
3. Start the engine.
Item name Condition Display value (Approx.)
HLR/C SOL High and low reverse clutch disengaged. Refer to
AT- 1 8
. 0.6 - 0.8 A
High and low reverse clutch engaged. Refer to AT- 1 8
.0 - 0.05 A
:
Page 224 of 3924

DTC P1772 LOW COAST BRAKE SOLENOID VALVE
AT-151
< SERVICE INFORMATION >
D E
F
G H
I
J
K L
M A
B
AT
N
O P
DTC P1772 LOW COAST BRAKE SOLENOID VALVE
DescriptionINFOID:0000000001327307
Low coast brake solenoid valve is turned ON or OFF by the TCM in response to signals sent from the PNP
switch, vehicle speed sensor and accelerator pedal positi on sensor (throttle position sensor). Gears will then
be shifted to the optimum position.
CONSULT-III Reference Val ue in Data Monitor ModeINFOID:0000000001327308
On Board Diagnosis LogicINFOID:0000000001327309
Diagnostic trouble code “P1772 LC/B SOLENOID/CIRC” with CONSULT-III or 7th judgement flicker without
CONSULT-III is detected when TCM detects an improper voltage drop when it tries to operate the solenoid
valve.
Possible CauseINFOID:0000000001327310
Harness or connectors
(Solenoid circuit is open or shorted.)
Low coast brake solenoid valve
DTC Confirmation ProcedureINFOID:0000000001327311
NOTE:
If “DTC Confirmation Procedure” has been previously performed, alw ays turn ignition switch OFF and
wait at least 10 seconds before performing the next test.
After the repair, perform the following procedure to confirm the malfunction is eliminated.
WITH CONSULT-III
1. Turn ignition switch ON.
2. Select “SELECTION FROM MENU” in “DATA MONI TOR” mode for “TRANSMISSION” with CONSULT-III
and check monitor “MANU MODE SW” and “GEAR”.
3. Touch “START”.
4. Start engine.
5. Drive vehicle and maintain the following conditions for at least 5 consecutive seconds.
MANU MODE SW: ON
GEAR: “1” or “2” (LC/B ON/OFF)
6. If DTC is detected, go to AT-151, "
Diagnosis Procedure".
WITH GST
Follow the procedure “WITH CONSULT-III”.
Diagnosis ProcedureINFOID:0000000001327312
1.CHECK INPUT SIGNAL
With CONSULT-III
1. Turn ignition switch ON.
2. Select “SELECTION FROM MENU” in “DATA MONI TOR” mode for “TRANSMISSION” with CONSULT-III.
3. Start engine.
4. Read out the value of “ON OFF SOL” while driving.
Item name Condition Display value
ON OFF SOL Low coast brake engaged. Refer to
AT- 1 8
.ON
Low coast brake disengaged. Refer to AT- 1 8
.OFF
Item name Condition Display value
ON OFF SOLLow coast brake engaged. Refer to
AT- 1 8
.ON
Low coast brake disengaged. Refer to AT- 1 8
.OFF
3AA93ABC3ACD3AC03ACA3AC03AC63AC53A913A773A893A873A873A8E3A773A983AC73AC93AC03AC3
3A893A873A873A8F3A773A9D3AAF3A8A3A8C3A863A9D3AAF3A8B3A8C
Page 226 of 3924

DTC P1774 LOW COAST BRAKE SOLENOID VALVE FUNCTIONAT-153
< SERVICE INFORMATION >
DE
F
G H
I
J
K L
M A
B
AT
N
O P
DTC P1774 LOW COAST BRAKE SOLENOID VALVE FUNCTION
DescriptionINFOID:0000000001327313
Low coast brake solenoid valve is turned ON or OFF by the TCM in response to signals sent from the PNP
switch, vehicle speed sensor and accelerator pedal positi on sensor (throttle position sensor). Gears will then
be shifted to the optimum position.
This is not only caused by electrical malfunction (cir cuits open or shorted) but also by mechanical malfunc-
tion such as control valve sticking, improper solenoid valve operation.
CONSULT-III Reference Val ue in Data Monitor ModeINFOID:0000000001327314
On Board Diagnosis LogicINFOID:0000000001327315
Diagnostic trouble code “P1774 LC/B SOLENOID FNCT” with CONSULT-III or 7th judgement flicker without
CONSULT-III is detected under the following conditions.
When TCM detects that actual gear ratio is irr egular, and relation between gear position and condition of
ATF pressure switch 2 is irregular during depressing accelerator pedal. (Other than during shift change)
When TCM detects that relation between gear position and condition of ATF pressure switch 2 is irregular during releasing accelerator pedal. (Other than during shift change)
Possible CauseINFOID:0000000001327316
Harness or connectors
(Solenoid and switch circuits are open or shorted.)
Low coast brake solenoid valve
ATF pressure switch 2
DTC Confirmation ProcedureINFOID:0000000001327317
CAUTION:
Always drive vehicle at a safe speed.
NOTE:
If “DTC Confirmation Procedure” has been previously performed, alw ays turn ignition switch OFF and
wait at least 10 seconds before performing the next test.
After the repair, perform the following procedure to confirm the malfunction is eliminated.
WITH CONSULT-III
1. Start engine.
2. Accelerate vehicle to maintain the following conditions. MANU MODE SW: ON
GEAR: “1” or “2” (LC/B ON/OFF)
3. Perform step “2” again.
4. Turn ignition switch OFF, then perform step “1” to “3” again.
5. Check “SELF-DIAG RESULTS” mode for “TRANS MISSION” with CONSULT-III. If DTC (P1774) is
detected, go to AT-153, "
Diagnosis Procedure".
If DTC (P1772) is detected, go to AT-151, "
Diagnosis Procedure".
WITH GST
Follow the procedure “WITH CONSULT-III”.
Diagnosis ProcedureINFOID:0000000001327318
1.CHECK INPUT SIGNALS
Item name Condition Display value
ON OFF SOLLow coast brake engaged. Refer to
AT- 1 8
.ON
Low coast brake disengaged. Refer to AT- 1 8
.OFF
ATF PRES SW 2 Low coast brake engaged. Refer to
AT- 1 8
.ON
Low coast brake disengaged. Refer to AT- 1 8
.OFF
3AA93ABC3ACD3AC03ACA3AC03AC63AC53A913A773A893A873A873A8E3A773A983AC73AC93AC03AC3
3A893A873A873A8F3A773A9D3AAF3A8A3A8C3A863A9D3AAF3A8B3A8C
Page 228 of 3924

DTC P1815 MANUAL MODE SWITCHAT-155
< SERVICE INFORMATION >
DE
F
G H
I
J
K L
M A
B
AT
N
O P
DTC P1815 MANUAL MODE SWITCH
DescriptionINFOID:0000000001327319
Manual mode switch is installed in A/T device. It sends manual mode switch, shift up and shift down switch
signals to TCM.
TCM sends the switch signals to unified meter and A/ C amp. by CAN communication line. Then manual mode
switch position is indicated on the A/T indicator. For inspection, refer to AT-166
.
CONSULT-III Reference Value in Data Monitor ModeINFOID:0000000001327320
On Board Diagnosis LogicINFOID:0000000001327321
Diagnostic trouble code “P1815 MANU MODE SW/CIR” with CONSULT-IIII is detected when TCM monitors
Manual mode, Non manual mode, Up or Down switch signal, and detects as irregular when impossible input
pattern occurs 1 second or more.
Possible CauseINFOID:0000000001327322
Harness or connectors (These switches circuit is open or shorted.)
Manual mode select switch (Into control device)
Manual mode position select switch (Into control device)
DTC Confirmation ProcedureINFOID:0000000001327323
NOTE:
If “DTC Confirmation Procedure” has been previously performed, alw ays turn ignition switch OFF and
wait at least 10 seconds before performing the next test.
After the repair, perform the following procedure to confirm the malfunction is eliminated.
WITH CONSULT-III
1. Turn ignition switch ON.
2. Select “ECU INPUT SIGNALS” in “DATA MONITO R” mode for “TRANSMISSION” with CONSULT-III.
3. Start engine.
4. Drive vehicle and maintain the following conditions for at least 2 consecutive seconds. MANU MODE SW: ON
5. If DTC is detected, go to AT-158, "
Diagnosis Procedure".
Item name Condition Display Value
MANU MODE SW Manual shift gate position (neutral) ON
Other than the above OFF
NON M-MODE SW Manual shift gate position OFF
Other than the above ON
UP SW LEVER selector lever: + side ON
Other than the above OFF
DOWN SW LEVER selector lever: - side ON
Other than the above OFF
3AA93ABC3ACD3AC03ACA3AC03AC63AC53A913A773A893A873A873A8E3A773A983AC73AC93AC03AC3
3A893A873A873A8F3A773A9D3AAF3A8A3A8C3A863A9D3AAF3A8B3A8C
Page 299 of 3924

AT-226
< SERVICE INFORMATION >
ON-VEHICLE SERVICE
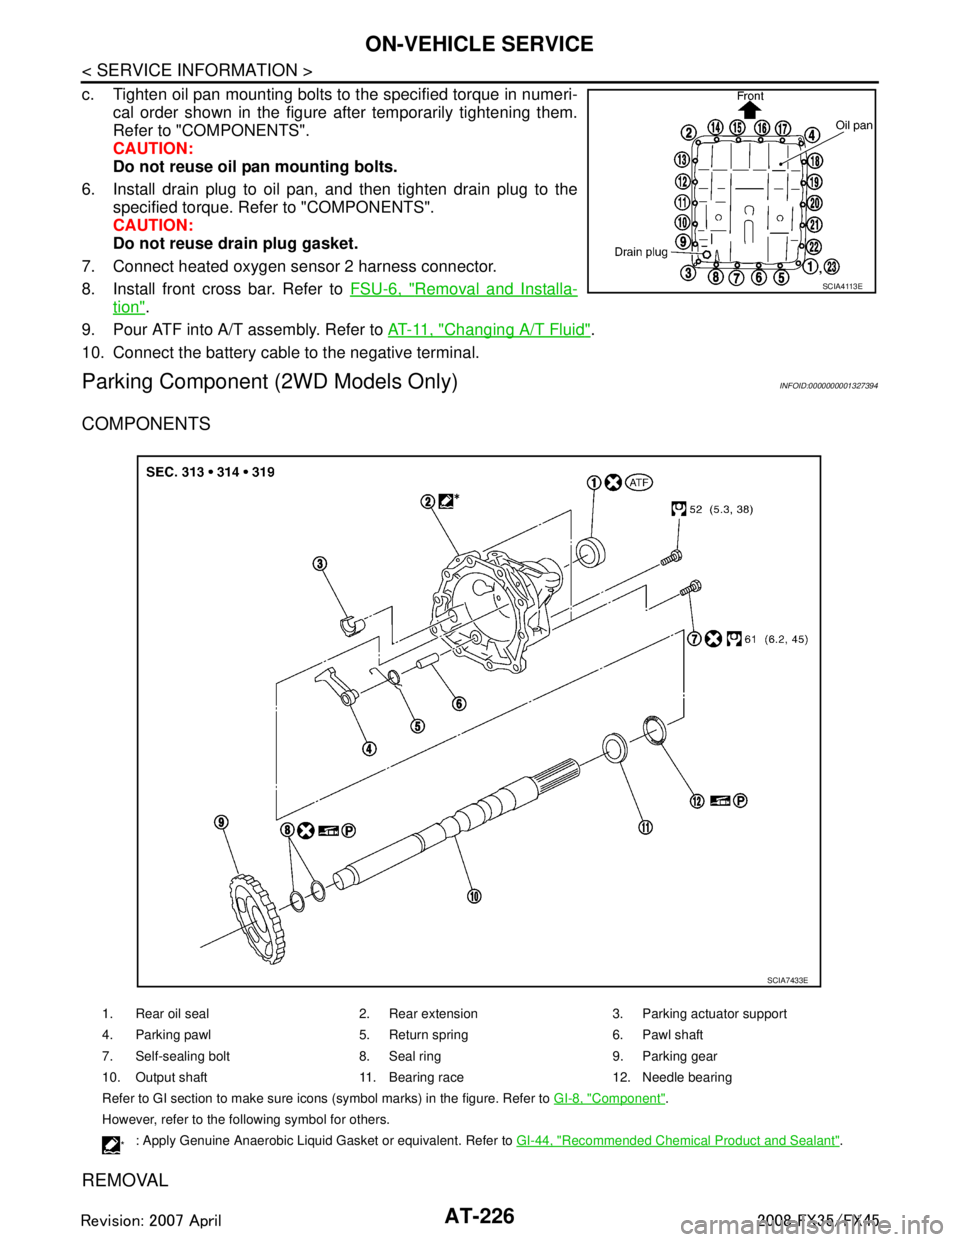
c. Tighten oil pan mounting bolts to the specified torque in numeri-cal order shown in the figure after temporarily tightening them.
Refer to "COMPONENTS".
CAUTION:
Do not reuse oil pan mounting bolts.
6. Install drain plug to oil pan, and then tighten drain plug to the specified torque. Refer to "COMPONENTS".
CAUTION:
Do not reuse drain plug gasket.
7. Connect heated oxygen sensor 2 harness connector.
8. Install front cross bar. Refer to FSU-6, "
Removal and Installa-
tion".
9. Pour ATF into A/T assembly. Refer to AT- 11 , "
Changing A/T Fluid".
10. Connect the battery cable to the negative terminal.
Parking Component (2WD Models Only)INFOID:0000000001327394
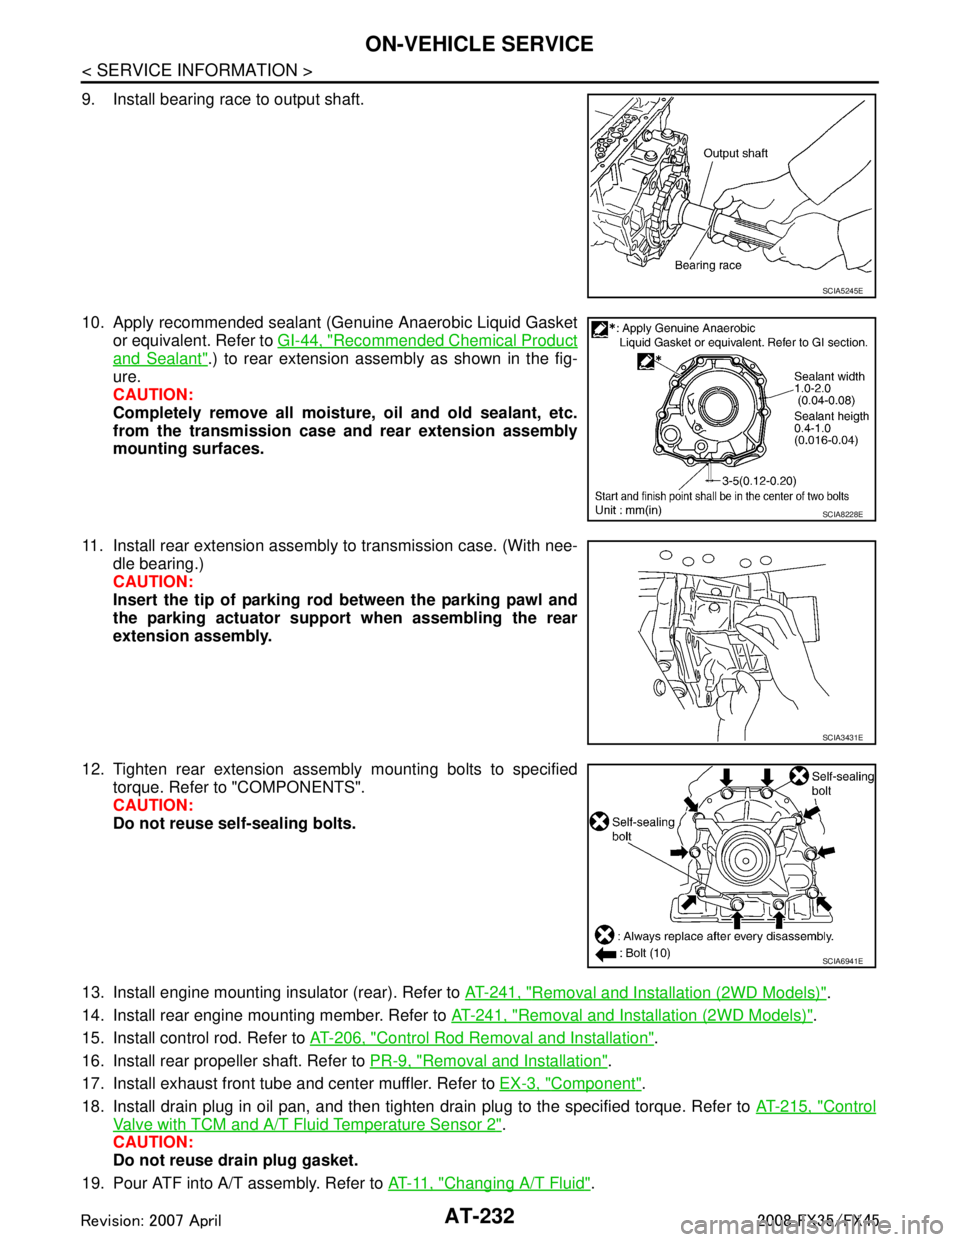
COMPONENTS
REMOVAL
SCIA4113E
1. Rear oil seal 2. Rear extension 3. Parking actuator support
4. Parking pawl 5. Return spring 6. Pawl shaft
7. Self-sealing bolt 8. Seal ring 9. Parking gear
10. Output shaft 11. Bearing race 12. Needle bearing
Refer to GI section to make sure icons (symbol marks) in the figure. Refer to GI-8, "
Component".
However, refer to the following symbol for others.
*: Apply Genuine Anaerobic Liquid Gasket or equivalent. Refer to GI-44, "Recommended Chemical Product and Sealant".
SCIA7433E
3AA93ABC3ACD3AC03ACA3AC03AC63AC53A913A773A893A873A873A8E3A773A983AC73AC93AC03AC3
3A893A873A873A8F3A773A9D3AAF3A8A3A8C3A863A9D3AAF3A8B3A8C
Page 305 of 3924

AT-232
< SERVICE INFORMATION >
ON-VEHICLE SERVICE
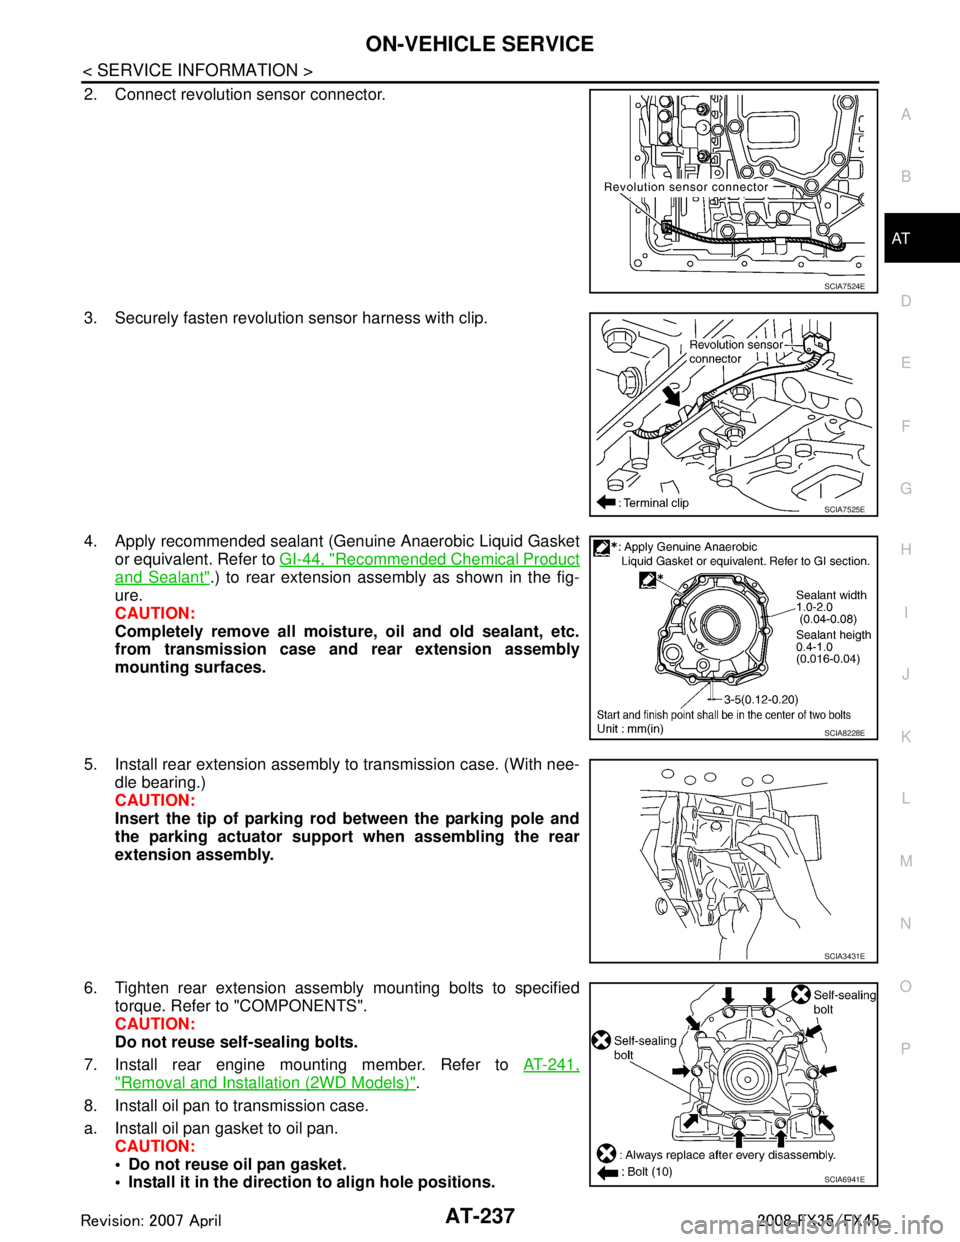
9. Install bearing race to output shaft.
10. Apply recommended sealant (Genuine Anaerobic Liquid Gasketor equivalent. Refer to GI-44, "
Recommended Chemical Product
and Sealant".) to rear extension assembly as shown in the fig-
ure.
CAUTION:
Completely remove all moisture, oil and old sealant, etc.
from the transmission case and rear extension assembly
mounting surfaces.
11. Install rear extension assembly to transmission case. (With nee- dle bearing.)
CAUTION:
Insert the tip of parking rod between the parking pawl and
the parking actuator support when assembling the rear
extension assembly.
12. Tighten rear extension assembly mounting bolts to specified torque. Refer to "COMPONENTS".
CAUTION:
Do not reuse self-sealing bolts.
13. Install engine mounting insulator (rear). Refer to AT-241, "
Removal and Installation (2WD Models)".
14. Install rear engine mounting member. Refer to AT-241, "
Removal and Installation (2WD Models)".
15. Install control rod. Refer to AT-206, "
Control Rod Removal and Installation".
16. Install rear propeller shaft. Refer to PR-9, "
Removal and Installation".
17. Install exhaust front tube and center muffler. Refer to EX-3, "
Component".
18. Install drain plug in oil pan, and then tighten drain plug to the specified torque. Refer to AT-215, "
Control
Valve with TCM and A/T Fluid Temperature Sensor 2".
CAUTION:
Do not reuse drain plug gasket.
19. Pour ATF into A/T assembly. Refer to AT- 11 , "
Changing A/T Fluid".
SCIA5245E
SCIA8228E
SCIA3431E
SCIA6941E
3AA93ABC3ACD3AC03ACA3AC03AC63AC53A913A773A893A873A873A8E3A773A983AC73AC93AC03AC3
3A893A873A873A8F3A773A9D3AAF3A8A3A8C3A863A9D3AAF3A8B3A8C
Page 310 of 3924

ON-VEHICLE SERVICEAT-237
< SERVICE INFORMATION >
DE
F
G H
I
J
K L
M A
B
AT
N
O P
2. Connect revolution sensor connector.
3. Securely fasten revolution sensor harness with clip.
4. Apply recommended sealant (Genuine Anaerobic Liquid Gasket or equivalent. Refer to GI-44, "
Recommended Chemical Product
and Sealant".) to rear extension assembly as shown in the fig-
ure.
CAUTION:
Completely remove all moisture, oil and old sealant, etc.
from transmission case and rear extension assembly
mounting surfaces.
5. Install rear extension assembly to transmission case. (With nee- dle bearing.)
CAUTION:
Insert the tip of parking rod between the parking pole and
the parking actuator suppor t when assembling the rear
extension assembly.
6. Tighten rear extension assembly mounting bolts to specified torque. Refer to "COMPONENTS".
CAUTION:
Do not reuse self-sealing bolts.
7. Install rear engine mounting member. Refer to AT-241,
"Removal and Installation (2WD Models)".
8. Install oil pan to transmission case.
a. Install oil pan gasket to oil pan. CAUTION:
Do not reuse oil pan gasket.
Install it in the direction to align hole positions.
SCIA7524E
SCIA7525E
SCIA8228E
SCIA3431E
SCIA6941E
3AA93ABC3ACD3AC03ACA3AC03AC63AC53A913A773A893A873A873A8E3A773A983AC73AC93AC03AC3
3A893A873A873A8F3A773A9D3AAF3A8A3A8C3A863A9D3AAF3A8B3A8C
Page 387 of 3924

AT-314
< SERVICE INFORMATION >
ASSEMBLY
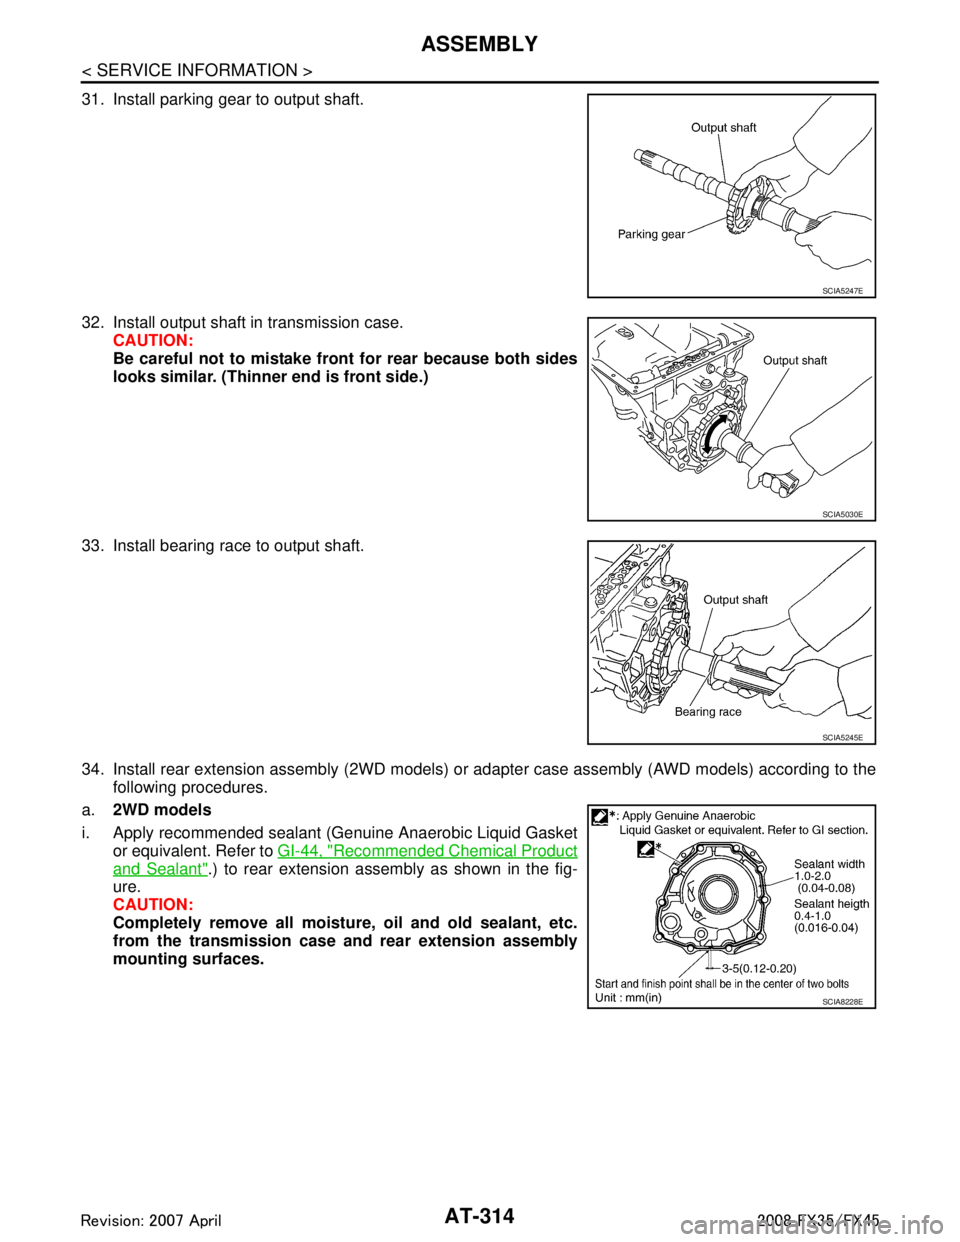
31. Install parking gear to output shaft.
32. Install output shaft in transmission case.CAUTION:
Be careful not to mistake front for rear because both sides
looks similar. (Thinner end is front side.)
33. Install bearing race to output shaft.
34. Install rear extension assembly (2WD models) or adapter case assembly (AWD models) according to the following procedures.
a. 2WD models
i. Apply recommended sealant (Genuine Anaerobic Liquid Gasket or equivalent. Refer to GI-44, "
Recommended Chemical Product
and Sealant".) to rear extension assembly as shown in the fig-
ure.
CAUTION:
Completely remove all moisture, oil and old sealant, etc.
from the transmission case and rear extension assembly
mounting surfaces.
SCIA5247E
SCIA5030E
SCIA5245E
SCIA8228E
3AA93ABC3ACD3AC03ACA3AC03AC63AC53A913A773A893A873A873A8E3A773A983AC73AC93AC03AC3
3A893A873A873A8F3A773A9D3AAF3A8A3A8C3A863A9D3AAF3A8B3A8C
Page 403 of 3924

AT-330
< SERVICE INFORMATION >
SERVICE DATA AND SPECIFICATIONS (SDS)
SERVICE DATA AND SPECIFICATIONS (SDS)
General SpecificationINFOID:0000000001327413
*1: Refer to MA-9, "Fluids and Lubricants".
Vehicle Speed at Which Gear Shifting OccursINFOID:0000000001327414
2WD MODELS
At half throttle, the accelerator opening is 4/8 of the full opening.
AWD MODELS
At half throttle, the accelerator opening is 4/8 of the full opening.Applied model
VQ35DE engine VK45DE engine
2WD AWD
Automatic transmission model RE5R05A
Transmission model code number 91X3A 91X3B 96X1C
Stall torque ratio 2.0 : 1 1.85 : 1
Transmission gear ratio 1st 3.540 3.827
2nd 2.264 2.368
3rd 1.471 1.520
4th 1.000 1.000
5th 0.834 0.834
Reverse 2.370 2.613
Recommended flui d Genuine NISSAN Matic J ATF*1
Fluid capacity 10.3 liter (10-7/8 US qt, 9-1/8 Imp qt)
CAUTION:
Use only Genuine NISSAN Matic J ATF. Do not mix with other ATF.
Using ATF other than Genuine NISSAN Matic J ATF will deteriorate in driveability and A/T durability, and may damage the A/T, which is not covered by the warranty.
Engine model VQ35DE
Throttle position Vehicle speed km/h (MPH)
D
1→ D2D2→D3D3→D4D4→D5D5→D4D4→D3D3→D2D2→D1
Full throttle 68 - 72
(42 - 45) 106 - 114
(66 - 71) 164 - 174
(102 - 108) 235 - 245
(146 - 152) 231 - 241
(144 - 150) 144 - 154
(89 - 96) 89 - 97
(55 - 60) 43 - 47
(27 - 29)
Half throttle 54 - 58
(34 - 36) 84 - 90
(52 - 56) 127 - 135
(79 - 84) 159 - 167
(99 - 104) 104 - 112
(65 - 70) 75 - 83
(47 - 52) 35 - 41
(22 - 25) 11 - 1 5
(7 - 9)
Engine model VQ35DE
Throttle position Vehicle speed km/h (MPH)
D
1→ D2D2→D3D3→D4D4→D5D5→D4D4→D3D3→D2D2→D1
Full throttle 62 - 66
(39 - 41) 96 - 104
(60 - 65) 149 - 159
(93 - 99) 213 - 223
(132 - 139) 209 - 219
(130 - 136) 131 - 141
(81 - 88) 81 - 89
(50 - 55) 39 - 43
(24 - 27)
Half throttle 49 - 53
(30 - 33) 76 - 82
(47 - 51) 115 - 123
(71 - 76) 144 - 152
(89 - 94) 95 - 103
(59 - 64) 67 - 75
(42 - 47) 32 - 38
(20 - 24) 11 - 1 5
(7 - 9)
Engine model VK45DE
Throttle position Vehicle speed km/h (MPH)
D
1→ D2D2→D3D3→D4D4→D5D5→D4D4→D3D3→D2D2→D1
3AA93ABC3ACD3AC03ACA3AC03AC63AC53A913A773A893A873A873A8E3A773A983AC73AC93AC03AC3
3A893A873A873A8F3A773A9D3AAF3A8A3A8C3A863A9D3AAF3A8B3A8C