brake sensor INFINITI M35 2006 Factory Service Manual
[x] Cancel search | Manufacturer: INFINITI, Model Year: 2006, Model line: M35, Model: INFINITI M35 2006Pages: 5621, PDF Size: 65.56 MB
Page 2397 of 5621
![INFINITI M35 2006 Factory Service Manual EC-854
[VK45DE]
TROUBLE DIAGNOSIS
Revision: 2006 January2006 M35/M45
VEHICLE SPEED
[km/h] or [MPH]The vehicle speed computed from the
vehicle speed signal sent from TCM is
displayed.
IDL A/V LEARN
INFINITI M35 2006 Factory Service Manual EC-854
[VK45DE]
TROUBLE DIAGNOSIS
Revision: 2006 January2006 M35/M45
VEHICLE SPEED
[km/h] or [MPH]The vehicle speed computed from the
vehicle speed signal sent from TCM is
displayed.
IDL A/V LEARN](/img/42/57023/w960_57023-2396.png)
EC-854
[VK45DE]
TROUBLE DIAGNOSIS
Revision: 2006 January2006 M35/M45
VEHICLE SPEED
[km/h] or [MPH]The vehicle speed computed from the
vehicle speed signal sent from TCM is
displayed.
IDL A/V LEARN
[YET/CMPLT]
Display the condition of idle air volume
learning
YET: Idle air volume learning has not
been performed yet.
CMPLT: Idle air volume learning has
already been performed successfully.
TRVL AFTER MIL
[km] or [mile]
Distance traveled while MIL is activated.
A/F S1 HTR (B1)
[%]
Air fuel ratio (A/F) sensor 1 heater control
value computed by ECM according to the
input signals.
The current flow to the heater becomes
larger as the value increases. A/F S1 HTR (B2)
[%]
AC PRESS SEN
[V]
The signal voltage from the refrigerant
pressure sensor is displayed.
VHCL SPEED SE
[km/h] or [mph]
The vehicle speed computed from the
vehicle speed signal sent from combina-
tion meter is displayed.
SET VHCL SPD
[km/h] or [mph]
The preset vehicle speed is displayed.
MAIN SW
[ON/OFF]
Indicates [ON/OFF] condition from MAIN
switch signal.
CANCEL SW
[ON/OFF]
Indicates [ON/OFF] condition from CAN-
CEL switch signal.
RESUME/ACC SW
[ON/OFF]
Indicates [ON/OFF] condition from
RESUME/ACCELERATE switch signal.
SET SW
[ON/OFF]
Indicates [ON/OFF] condition from SET/
COAST switch signal.
BRAKE SW1
[ON/OFF]
Indicates [ON/OFF] condition from ASCD
brake switch signal.
BRAKE SW2
[ON/OFF]
Indicates [ON/OFF] condition of stop
lamp switch signal.
DIST SW
[ON/OFF]
Indicates [ON/OFF] condition from DIS-
TANCE switch signal.
CRUISE LAMP
[ON/OFF]
Indicates [ON/OFF] condition of CRUISE
lamp determined by the ECM according
to the input signals.
SET LAMP
[ON/OFF]
Indicates [ON/OFF] condition of SET
lamp determined by the ECM according
to the input signals.
FAN DUTY
Indicates a command value for cooling
fan. The value is calculated by ECM
based on input signals.
AC EVA TEMP
Indicates A/C evaporator temperature
sent from “unified meter and A/C amp.”.
AC EVA TARGET
Indicates target A/C evaporator tempera-
ture sent from “unified meter and A/C
amp.”. Monitored item
[Unit]ECM
INPUT
SIG-
NALSMAIN
SIG-
NALSDescription Remarks
Page 2513 of 5621
![INFINITI M35 2006 Factory Service Manual EC-970
[VK45DE]
DTC P0130, P0150 A/F SENSOR 1
Revision: 2006 January2006 M35/M45
If the indication is constantly approx. 1.5V and does not fluctuates, go to EC-975, "Diagnostic Procedure" .
If INFINITI M35 2006 Factory Service Manual EC-970
[VK45DE]
DTC P0130, P0150 A/F SENSOR 1
Revision: 2006 January2006 M35/M45
If the indication is constantly approx. 1.5V and does not fluctuates, go to EC-975, "Diagnostic Procedure" .
If](/img/42/57023/w960_57023-2512.png)
EC-970
[VK45DE]
DTC P0130, P0150 A/F SENSOR 1
Revision: 2006 January2006 M35/M45
If the indication is constantly approx. 1.5V and does not fluctuates, go to EC-975, "Diagnostic Procedure" .
If the indication fluctuates around 1.5V, go to next step.
4. Select “A/F SEN1 (B1) P1276” (for DTC P0130) or “A/F SEN1 (B2) P1286” (for DTC P0150) of “A/F
SEN1” in “DTC WORK SUPPORT” mode with CONSULT-II.
5. Touch “START”.
6. When the following conditions are met, “TESTING” will be dis-
played on the CONSULT-II screen.
If “TESTING” is not displayed after 20 seconds, retry from
step 2.
7. Release accelerator pedal fully.
NOTE:
Never apply brake during releasing the accelerator pedal.
8. Make sure that “TESTING” changes to “COMPLETED”.
If “TESTING” changed to “OUT OF CONDITION”, retry from
step 6.
9. Make sure that “OK” is displayed after touching “SELF-DIAG
RESULT”.
If “NG” is displayed, go to EC-975, "
Diagnostic Procedure" .
Overall Function CheckNBS005DT
Use this procedure to check the overall function of the A/F sensor 1 circuit. During this check, a 1st trip DTC
might not be confirmed.
WITH GST
1. Start engine and warm it up to normal operating temperature.
2. Drive the vehicle at a speed of 80 km/h (50 MPH) for a few minutes in the suitable gear position.
3. Set D position, then release the accelerator pedal fully until the vehicle speed decreases to 50 km/h (30
MPH).
NOTE:
Never apply brake during releasing the accelerator pedal.
4. Repeat steps 2 to 3 for five times.
5. Stop the vehicle and turn ignition switch OFF.
6. Wait at least 10 seconds and restart engine.
7. Repeat steps 2 to 3 for five times.
8. Stop the vehicle and connect GST to the vehicle.
ENG SPEED 1,300 - 3,200 rpm
Vehicle speed More than 64 km/h (40 MPH)
B/FUEL SCHDL 1.0 - 8.0 msec
Selector lever D position
SEF576Z
SEF577Z
SEF578Z
Page 3077 of 5621
![INFINITI M35 2006 Factory Service Manual EM-14
[VQ35DE]
ENGINE ROOM COVER
Revision: 2006 January2006 M35/M45
ENGINE ROOM COVERPFP:14049
ComponentsNBS004MS
Removal and InstallationNBS004MT
REMOVAL
CAUTION:
Do not damage or scratch cover when INFINITI M35 2006 Factory Service Manual EM-14
[VQ35DE]
ENGINE ROOM COVER
Revision: 2006 January2006 M35/M45
ENGINE ROOM COVERPFP:14049
ComponentsNBS004MS
Removal and InstallationNBS004MT
REMOVAL
CAUTION:
Do not damage or scratch cover when](/img/42/57023/w960_57023-3076.png)
EM-14
[VQ35DE]
ENGINE ROOM COVER
Revision: 2006 January2006 M35/M45
ENGINE ROOM COVERPFP:14049
ComponentsNBS004MS
Removal and InstallationNBS004MT
REMOVAL
CAUTION:
Do not damage or scratch cover when installing or removing.
Refer to EM-19, "INTAKE MANIFOLD COLLECTOR" for removal and installation of engine cover.
Refer to EM-17, "AIR CLEANER AND AIR DUCT" for removal and installation of air duct (inlet).
Remove the washer tank cap before removing the engine room cover (RH).
Remove the engine room covers (RH and LH) by lifting the clipped point using a clip driver.
Major parts and inspection points under each cover are as follows; (numbered as in figure)
1. Upper side of engine assembly
2. Battery, relay box
3. Power steering fluid reservoir tank, engine coolant reservoir tank, relay box
4. Engine assembly front side, drive belts, cooling fan
5. Mass air flow sensor, air cleaner case
6. Brake master cylinder, brake booster
INSTALLATION
Installation is the reverse order of removal.
1. Engine cover 2. Battery cover 3. Engine room cover (RH)
4. Air duct (inlet) 5. Engine room cover (LH) 6. Brake master cylinder cover
A. Clip (secure at back surface)
PBIC3824E
Page 3236 of 5621
![INFINITI M35 2006 Factory Service Manual ENGINE ROOM COVER
EM-173
[VK45DE]
C
D
E
F
G
H
I
J
K
L
MA
EM
Revision: 2006 January2006 M35/M45
ENGINE ROOM COVERPFP:14049
ComponentsNBS004OI
Removal and InstallationNBS004OJ
REMOVAL
CAUTION:
Do not da INFINITI M35 2006 Factory Service Manual ENGINE ROOM COVER
EM-173
[VK45DE]
C
D
E
F
G
H
I
J
K
L
MA
EM
Revision: 2006 January2006 M35/M45
ENGINE ROOM COVERPFP:14049
ComponentsNBS004OI
Removal and InstallationNBS004OJ
REMOVAL
CAUTION:
Do not da](/img/42/57023/w960_57023-3235.png)
ENGINE ROOM COVER
EM-173
[VK45DE]
C
D
E
F
G
H
I
J
K
L
MA
EM
Revision: 2006 January2006 M35/M45
ENGINE ROOM COVERPFP:14049
ComponentsNBS004OI
Removal and InstallationNBS004OJ
REMOVAL
CAUTION:
Do not damage or scratch cover when installing or removing.
Refer to EM-179, "INTAKE MANIFOLD" for removal and installation of engine cover.
Refer to EM-177, "AIR CLEANER AND AIR DUCT" for removal and installation of air duct (inlet).
Remove the washer tank cap before removing the engine room cover (RH).
Remove the engine room covers (RH and LH) by lifting the clipped point using a clip driver.
Major parts and inspection points under each cover are as follows; (numbered as in the figure)
1. Upper side of engine assembly
2. Battery, relay box
3. Power steering fluid reservoir tank, engine coolant reservoir tank, relay box
4. Engine assembly front side, drive belts, cooling fan
5. Mass air flow sensor, air cleaner case
6. Brake master cylinder, brake booster
INSTALLATION
Installation is the reverse order of removal.
1. Engine cover 2. Battery cover 3. Engine room cover (RH)
4. Air duct (inlet) 5. Engine room cover (LH) 6. Brake master cylinder cover
A. Clip (secure at back surface)
PBIC3294E
Page 3364 of 5621

FRONT WHEEL HUB AND KNUCKLE
FAX-5
C
E
F
G
H
I
J
K
L
MA
B
FA X
Revision: 2006 January2006 M35/M45
FRONT WHEEL HUB AND KNUCKLEPFP:40202
On-Vehicle Inspection and ServiceNDS000FF
Make sure that the mounting conditions (looseness, backlash) of each component and component conditions
(wear, damage) are normal.
WHEEL BEARING INSPECTION
Move wheel hub and bearing assembly in the axial direction by hand. Make sure there is no looseness of
wheel bearing.
Rotate wheel hub and make sure that is no unusual noise or other irregular conditions. If there is any of
irregular conditions, replace wheel hub and bearing assembly
Removal and InstallationNDS000FG
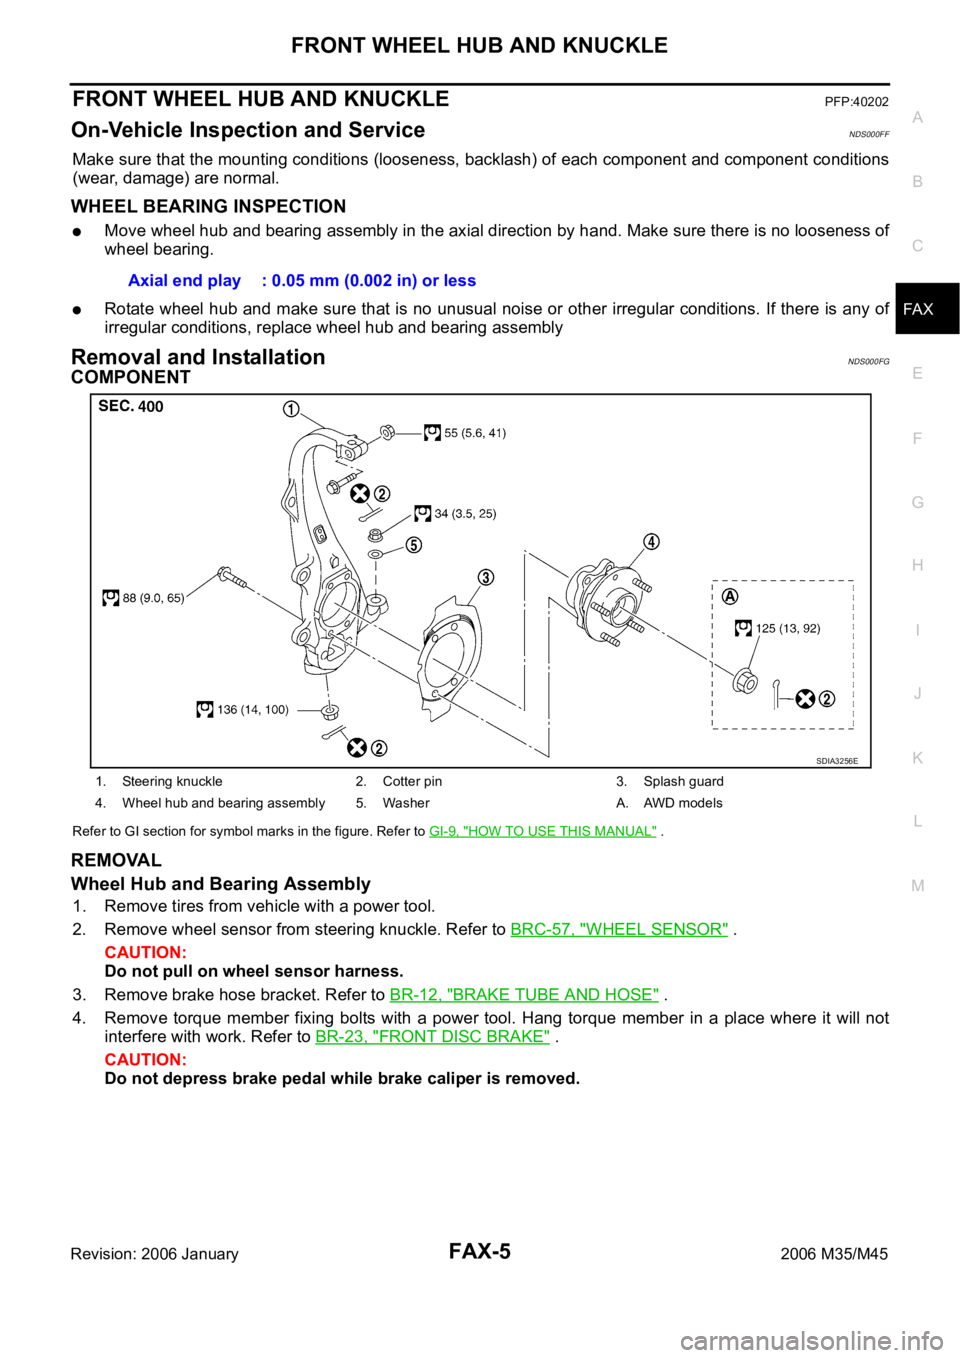
COMPONENT
Refer to GI section for symbol marks in the figure. Refer to GI-9, "HOW TO USE THIS MANUAL" .
REMOVAL
Wheel Hub and Bearing Assembly
1. Remove tires from vehicle with a power tool.
2. Remove wheel sensor from steering knuckle. Refer to BRC-57, "
WHEEL SENSOR" .
CAUTION:
Do not pull on wheel sensor harness.
3. Remove brake hose bracket. Refer to BR-12, "
BRAKE TUBE AND HOSE" .
4. Remove torque member fixing bolts with a power tool. Hang torque member in a place where it will not
interfere with work. Refer to BR-23, "
FRONT DISC BRAKE" .
CAUTION:
Do not depress brake pedal while brake caliper is removed.Axial end play : 0.05 mm (0.002 in) or less
1. Steering knuckle 2. Cotter pin 3. Splash guard
4. Wheel hub and bearing assembly 5. Washer A. AWD models
SDIA3256E
Page 3367 of 5621

FAX-8
FRONT DRIVE SHAFT
Revision: 2006 January2006 M35/M45
FRONT DRIVE SHAFTPFP:39100
On-Vehicle Inspection and ServiceNDS000FH
Check drive shaft mounting point and joint for looseness and other damage.
Check boot for cracks and other damage.
CAUTION:
Replace entire drive shaft assembly when noise or vibration occur from drive shaft.
DRIVE SHAFT BOOT REPLACEMENT
1. Remove tires from vehicle with a power tool.
2. Remove wheel sensor from steering knuckle. Refer to BRC-57, "
WHEEL SENSOR" .
CAUTION:
Do not pull on wheel sensor harness.
3. Remove brake hose bracket. Refer to BR-12, "
BRAKE TUBE AND HOSE" .
4. Remove torque menber fixing bolts with a power tool. Hang torque menber in a place where it will not
interfere with work. Refer to BR-23, "
FRONT DISC BRAKE" .
NOTE:
Do not depress brake pedal while brake caliper is removed.
5. Remove disc rotor. Refer to FA X - 5 , "
Removal and Installation" .
6. Remove cotter pin, then loosen hub lock nut with a power tool.
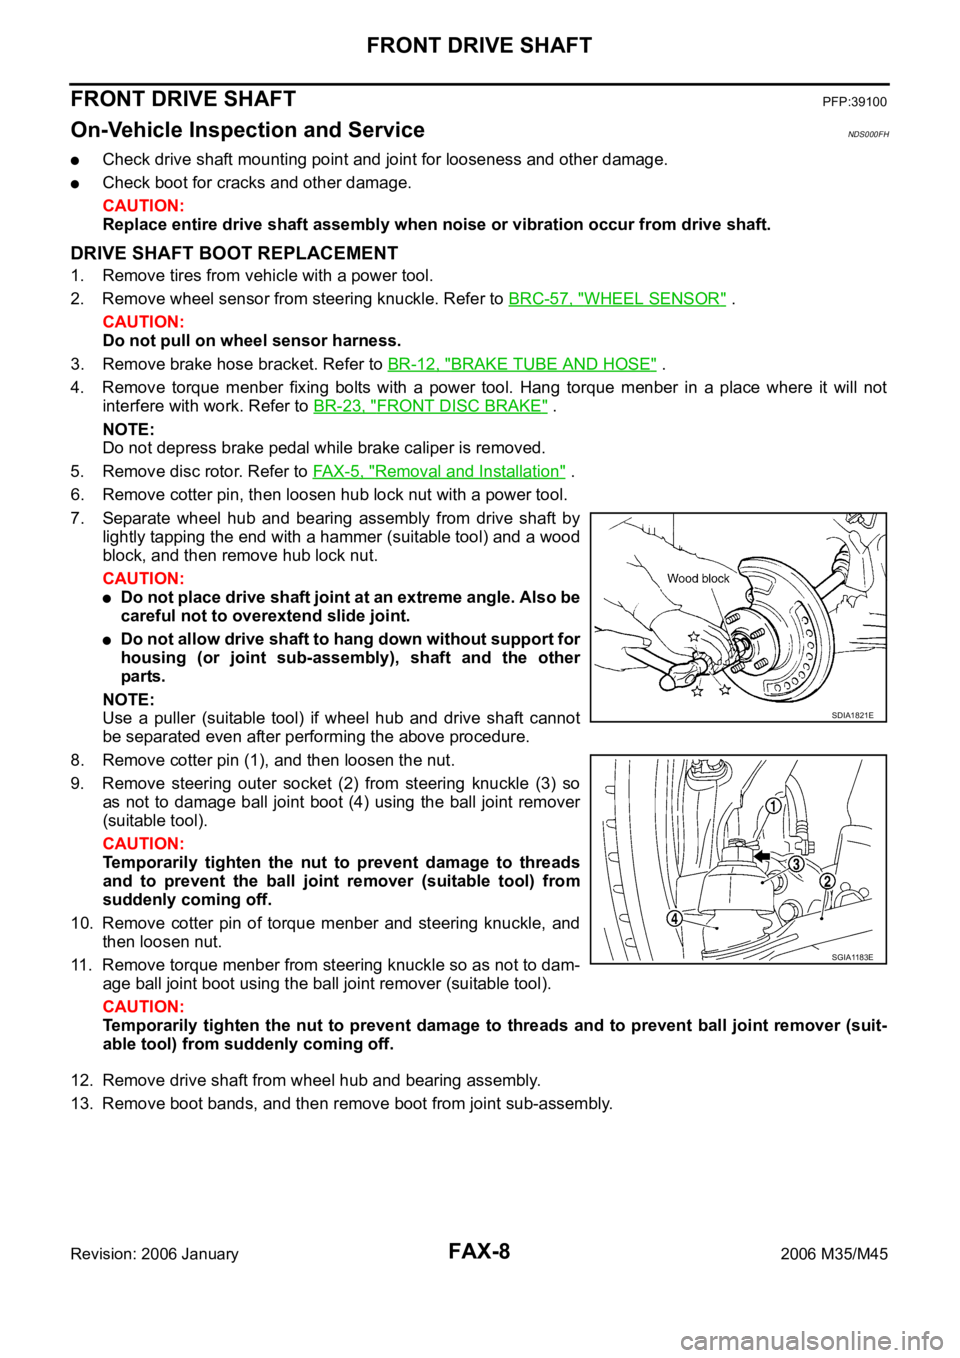
7. Separate wheel hub and bearing assembly from drive shaft by
lightly tapping the end with a hammer (suitable tool) and a wood
block, and then remove hub lock nut.
CAUTION:
Do not place drive shaft joint at an extreme angle. Also be
careful not to overextend slide joint.
Do not allow drive shaft to hang down without support for
housing (or joint sub-assembly), shaft and the other
parts.
NOTE:
Use a puller (suitable tool) if wheel hub and drive shaft cannot
be separated even after performing the above procedure.
8. Remove cotter pin (1), and then loosen the nut.
9. Remove steering outer socket (2) from steering knuckle (3) so
as not to damage ball joint boot (4) using the ball joint remover
(suitable tool).
CAUTION:
Temporarily tighten the nut to prevent damage to threads
and to prevent the ball joint remover (suitable tool) from
suddenly coming off.
10. Remove cotter pin of torque menber and steering knuckle, and
then loosen nut.
11. Remove torque menber from steering knuckle so as not to dam-
age ball joint boot using the ball joint remover (suitable tool).
CAUTION:
Temporarily tighten the nut to prevent damage to threads and to prevent ball joint remover (suit-
able tool) from suddenly coming off.
12. Remove drive shaft from wheel hub and bearing assembly.
13. Remove boot bands, and then remove boot from joint sub-assembly.
SDIA1821E
SGIA1183E
Page 3370 of 5621

FRONT DRIVE SHAFT
FAX-11
C
E
F
G
H
I
J
K
L
MA
B
FA X
Revision: 2006 January2006 M35/M45
34. Install wheel sensor to steering knuckle. Refer to BRC-57, "WHEEL SENSOR" .
35. Tighten the hub lock nut to the specified torque. Refer to FA X - 5 , "
COMPONENT" .
36. Install cotter pin.
37. Install tires to vehicle.
Removal and InstallationNDS000FI
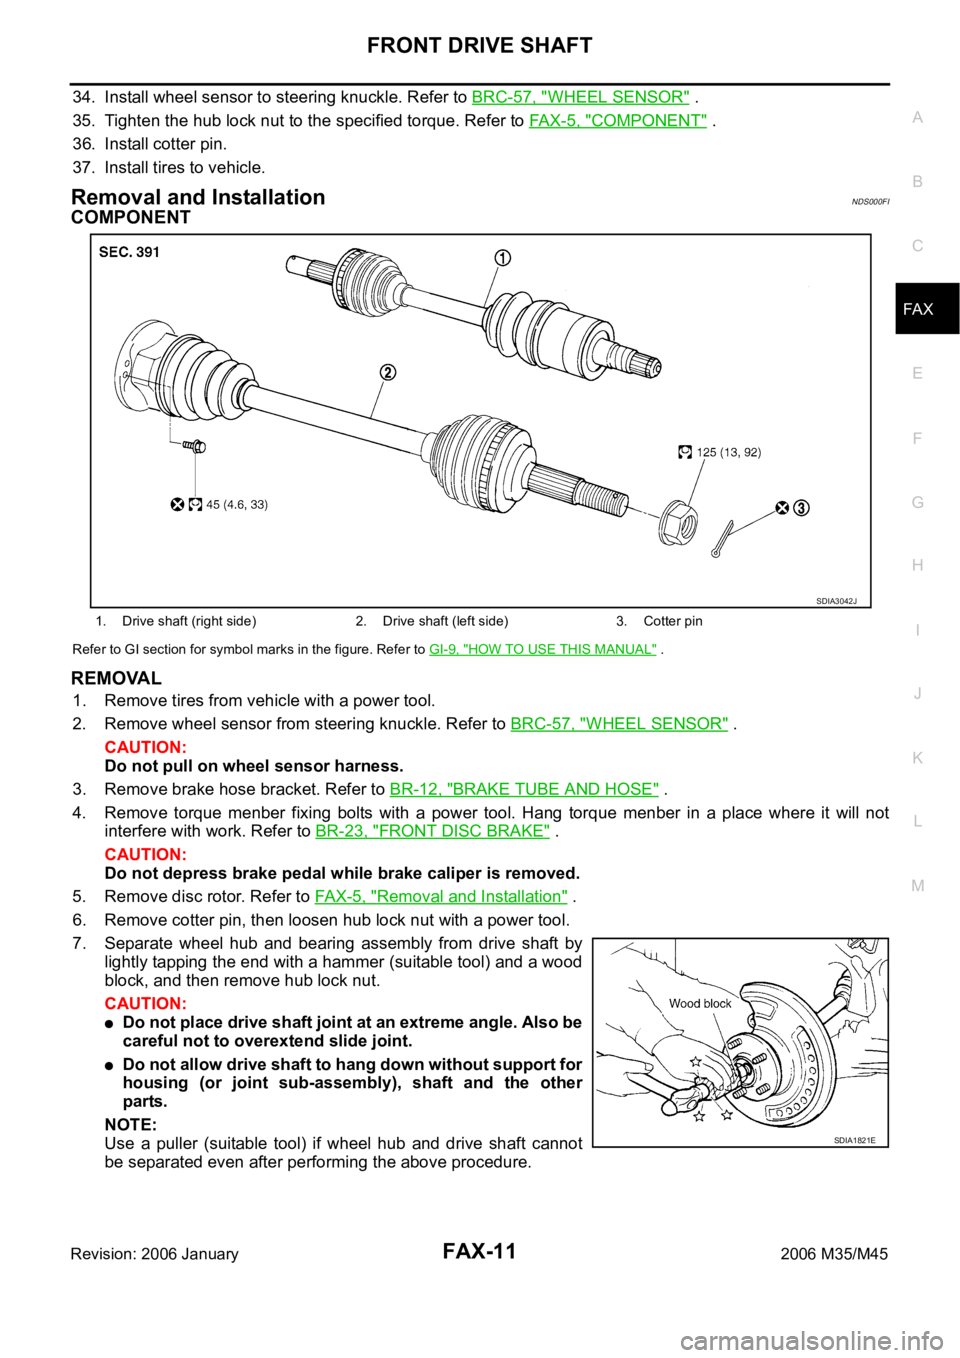
COMPONENT
Refer to GI section for symbol marks in the figure. Refer to GI-9, "HOW TO USE THIS MANUAL" .
REMOVAL
1. Remove tires from vehicle with a power tool.
2. Remove wheel sensor from steering knuckle. Refer to BRC-57, "
WHEEL SENSOR" .
CAUTION:
Do not pull on wheel sensor harness.
3. Remove brake hose bracket. Refer to BR-12, "
BRAKE TUBE AND HOSE" .
4. Remove torque menber fixing bolts with a power tool. Hang torque menber in a place where it will not
interfere with work. Refer to BR-23, "
FRONT DISC BRAKE" .
CAUTION:
Do not depress brake pedal while brake caliper is removed.
5. Remove disc rotor. Refer to FAX-5, "
Removal and Installation" .
6. Remove cotter pin, then loosen hub lock nut with a power tool.
7. Separate wheel hub and bearing assembly from drive shaft by
lightly tapping the end with a hammer (suitable tool) and a wood
block, and then remove hub lock nut.
CAUTION:
Do not place drive shaft joint at an extreme angle. Also be
careful not to overextend slide joint.
Do not allow drive shaft to hang down without support for
housing (or joint sub-assembly), shaft and the other
parts.
NOTE:
Use a puller (suitable tool) if wheel hub and drive shaft cannot
be separated even after performing the above procedure.
1. Drive shaft (right side) 2. Drive shaft (left side) 3. Cotter pin
SDIA3042J
SDIA1821E
Page 3423 of 5621

FL-10
FUEL TANK
Revision: 2006 January2006 M35/M45
FUEL TANKPFP:17202
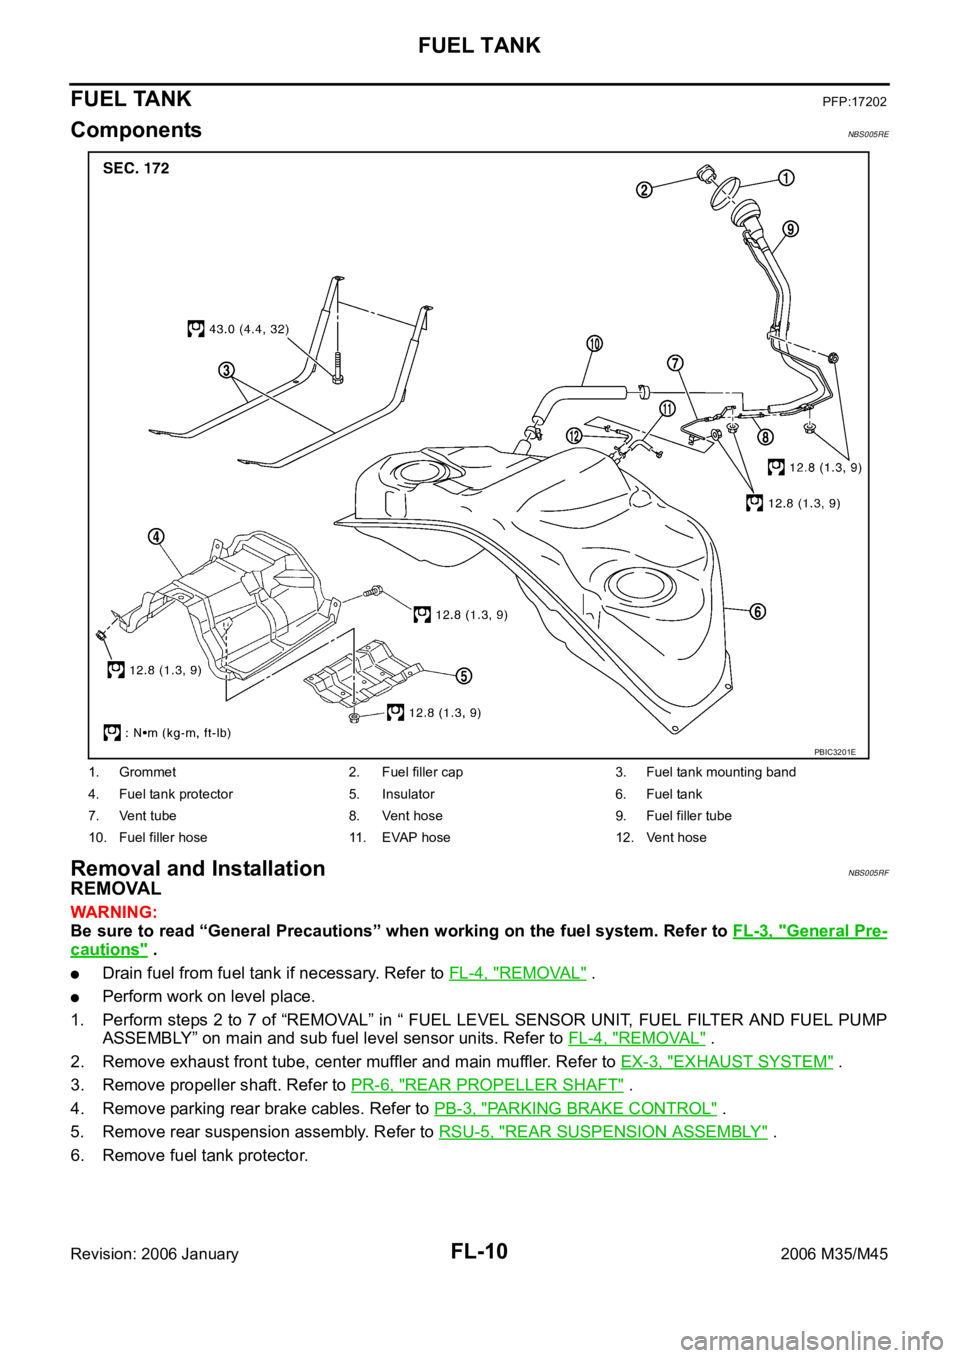
ComponentsNBS005RE
Removal and InstallationNBS005RF
REMOVAL
WAR NING :
Be sure to read “General Precautions” when working on the fuel system. Refer to FL-3, "
General Pre-
cautions" .
Drain fuel from fuel tank if necessary. Refer to FL-4, "REMOVAL" .
Perform work on level place.
1. Perform steps 2 to 7 of “REMOVAL” in “ FUEL LEVEL SENSOR UNIT, FUEL FILTER AND FUEL PUMP
ASSEMBLY” on main and sub fuel level sensor units. Refer to FL-4, "
REMOVAL" .
2. Remove exhaust front tube, center muffler and main muffler. Refer to EX-3, "
EXHAUST SYSTEM" .
3. Remove propeller shaft. Refer to PR-6, "
REAR PROPELLER SHAFT" .
4. Remove parking rear brake cables. Refer to PB-3, "
PARKING BRAKE CONTROL" .
5. Remove rear suspension assembly. Refer to RSU-5, "
REAR SUSPENSION ASSEMBLY" .
6. Remove fuel tank protector.
1. Grommet 2. Fuel filler cap 3. Fuel tank mounting band
4. Fuel tank protector 5. Insulator 6. Fuel tank
7. Vent tube 8. Vent hose 9. Fuel filler tube
10. Fuel filler hose 11. EVAP hose 12. Vent hose
PBIC3201E
Page 3436 of 5621
![INFINITI M35 2006 Factory Service Manual FRONT SUSPENSION ASSEMBLY
FSU-9
[2WD]
C
D
F
G
H
I
J
K
L
MA
B
FSU
Revision: 2006 January2006 M35/M45
Refer to GI section for symbol marks in the figure. Refer to GI-9, "HOW TO USE THIS MANUAL" INFINITI M35 2006 Factory Service Manual FRONT SUSPENSION ASSEMBLY
FSU-9
[2WD]
C
D
F
G
H
I
J
K
L
MA
B
FSU
Revision: 2006 January2006 M35/M45
Refer to GI section for symbol marks in the figure. Refer to GI-9, "HOW TO USE THIS MANUAL"](/img/42/57023/w960_57023-3435.png)
FRONT SUSPENSION ASSEMBLY
FSU-9
[2WD]
C
D
F
G
H
I
J
K
L
MA
B
FSU
Revision: 2006 January2006 M35/M45
Refer to GI section for symbol marks in the figure. Refer to GI-9, "HOW TO USE THIS MANUAL" .
Removal and Installation NES000ID
REMOVAL
1. For VK45DE engine models, disconnect related electric wires and hoses from engine assembly to remove
front suspension member with engine assembly. Refer to EM-244, "
ENGINE ASSEMBLY" .
2. Remove cowl top panel and hood. Refer to EI-18, "
COWL TOP" , EI-17, "HOOD" .
3. For VQ35DE engine models, install engine slinger, and then hoist engine. Refer to EM-113, "
Removal and
Installation (2WD Models)" .
4. Remove tires from vehicle with a power tool.
5. Remove wheel sensor from steering knuckle. Refer to BRC-57, "
WHEEL SENSOR" .
CAUTION:
Do not pull on wheel sensor harness.
6. Remove brake hose bracket. Refer to BR-12, "
BRAKE TUBE AND HOSE" .
7. Remove undercover with a power tool.
8. Remove cotter pin (1), and then loosen the nut.
9. Remove steering outer socket (2) from steering knuckle (3) so
as not to damage ball joint boot (4) using the ball joint remover
(suitable tool).
CAUTION:
Temporarily tighten the nut to prevent damage to threads
and to prevent the ball joint remover (suitable tool) from
suddenly coming off.
10. Remove the mounting nut on the upper side of stabilizer con-
necting rod with a power tool, and then remove stabilizer con-
necting rod from transverse link.
11. Separate steering gear assembly and lower joint. Refer to PS-13, "
STEERING COLUMN" .
12. Remove rack stay. Refer to FSU-8, "
Components" .
13. Remove steering hydraulic piping bracket from front suspension member. Refer to PS-38, "
HYDRAULIC
LINE" .
14. Remove the mounting nut and bolt on the lower side of shock absorber with a power tool, and then
remove shock absorber from transverse link.
15. Remove cotter pin of transverse link and steering knuckle, and then loosen nut.
16. Set jack under front suspension member.
17. Remove transverse link from steering knuckle so as not to damage ball joint boot using the ball joint
remover (suitable tool)
CAUTION:
Temporarily tighten the nut to prevent damage to threads and to prevent ball joint remover (suit-
able tool) from suddenly coming off.
18. Remove the mounting nuts of engine mounting insulator. Refer to EM-113, "
ENGINE ASSEMBLY" .
19. Remove the mounting bolts of member bracket, and then remove member bracket from front suspension
member with a power tool. Refer to FSU-8, "
Components" .
20. Remove the mounting nut and bolts of member stay, and then remove member stay from front suspension
member and vehicle with a power tool.
21. Remove the mounting nut of front suspension member with a power tool. Refer to FSU-8, "
Components" .
22. For VQ35DE engine models, gradually lower a jack to remove front suspension assembly from vehicle.
1. Shock absorber mounting bracket 2. Bound bumper 3. Rubber seat
4. Coil spring 5. Shock absorber 6. Upper link
7. Steering knuckle 8. Transverse link 9. Washer
10. Steering stopper bracket 11. Stabilizer connecting rod 12. Stabilizer bar
13. Stabilizer bushing 14. Stabilizer clamp 15. Front suspension member
16. Rack stay 17. Member stay 18. Member bracket
19. Clamp 20. Cotter pin 21. Stopper rubber
SGIA1183E
Page 3438 of 5621
![INFINITI M35 2006 Factory Service Manual COIL SPRING AND SHOCK ABSORBER
FSU-11
[2WD]
C
D
F
G
H
I
J
K
L
MA
B
FSU
Revision: 2006 January2006 M35/M45
COIL SPRING AND SHOCK ABSORBERPFP:55302
Removal and InstallationNES000IE
REMOVAL
1. Remove tir INFINITI M35 2006 Factory Service Manual COIL SPRING AND SHOCK ABSORBER
FSU-11
[2WD]
C
D
F
G
H
I
J
K
L
MA
B
FSU
Revision: 2006 January2006 M35/M45
COIL SPRING AND SHOCK ABSORBERPFP:55302
Removal and InstallationNES000IE
REMOVAL
1. Remove tir](/img/42/57023/w960_57023-3437.png)
COIL SPRING AND SHOCK ABSORBER
FSU-11
[2WD]
C
D
F
G
H
I
J
K
L
MA
B
FSU
Revision: 2006 January2006 M35/M45
COIL SPRING AND SHOCK ABSORBERPFP:55302
Removal and InstallationNES000IE
REMOVAL
1. Remove tires from vehicle with a power tool.
2. Remove harness of wheel sensor from shock absorber. Refer to BRC-57, "
WHEEL SENSOR" .
CAUTION:
Do not pull on wheel sensor harness.
3. Remove brake hose bracket. Refer to BR-12, "
BRAKE TUBE AND HOSE" .
4. Remove the mounting nut on the upper side of stabilizer connecting rod with a power tool, and then
remove stabilizer connecting rod from transverse link.
5. Remove mounting nut and bolt on the lower side of shock absorber with a power tool, and then remove
shock absorber from transverse link.
6. Remove cotter pin of transverse link and steering knuckle, and then loosen nut.
7. Remove transverse link from steering knuckle so as not to damage ball joint boot using the ball joint
remover (suitable tool).
CAUTION:
Temporarily tighten the nut to prevent damage to threads and to prevent ball joint remover (suit-
able tool) from suddenly coming off.
8. Remove the mounting nuts of shock absorber mounting bracket, then remove shock absorber from vehi-
cle.
INSTALLATION
Installation is the reverse order of removal. For tightening torque, refer to FSU-8, "Components" .
Perform final tightening of bolt and nut at the shock absorber lower side (rubber bushing), under unladen
conditions with tires on level ground. Check wheel alignment. Refer to FSU-6, "
Wheel Alignment Inspec-
tion" .
Adjust neutral position of steering angle sensor after checking wheel alignment. Refer to BRC-6, "Adjust-
ment of Steering Angle Sensor Neutral Position" .
Check wheel sensor harness for proper connection. Refer to BRC-57, "WHEEL SENSOR" .
Disassembly and AssemblyNES000IF
DISASSEMBLY
CAUTION:
Do not damage shock absorber piston rod when removing components from shock absorber.
1. Install strut attachment [SST] to shock absorber and secure it in
a vise.
CAUTION:
When installing the strut attachment to shock absorber,
wrap a shop cloth around strut to protect it from damage.
SEIA0296E