wiring INFINITI M35 2006 Factory Service Manual
[x] Cancel search | Manufacturer: INFINITI, Model Year: 2006, Model line: M35, Model: INFINITI M35 2006Pages: 5621, PDF Size: 65.56 MB
Page 5468 of 5621

PRECAUTIONS
TF-3
C
E
F
G
H
I
J
K
L
MA
B
TF
Revision: 2006 January2006 M35/M45
PRECAUTIONSPFP:00001
Precautions for Supplemental Restraint System (SRS) “AIR BAG” and “SEAT
BELT PRE-TENSIONER”
NDS000D3
The Supplemental Restraint System such as “AIR BAG” and “SEAT BELT PRE-TENSIONER”, used along
with a front seat belt, helps to reduce the risk or severity of injury to the driver and front passenger for certain
types of collision. This system includes seat belt switch inputs and dual stage front air bag modules. The SRS
system uses the seat belt switches to determine the front air bag deployment, and may only deploy one front
air bag, depending on the severity of a collision and whether the front occupants are belted or unbelted.
Information necessary to service the system safely is included in the SRS and SB section of this Service Man-
ual.
WAR NING :
To avoid rendering the SRS inoperative, which could increase the risk of personal injury or death
in the event of a collision which would result in air bag inflation, all maintenance must be per-
formed by an authorized NISSAN/INFINITI dealer.
Improper maintenance, including incorrect removal and installation of the SRS, can lead to per-
sonal injury caused by unintentional activation of the system. For removal of Spiral Cable and Air
Bag Module, see the SRS section.
Do not use electrical test equipment on any circuit related to the SRS unless instructed to in this
Service Manual. SRS wiring harnesses can be identified by yellow and/or orange harnesses or
harness connectors.
PrecautionsNDS000D4
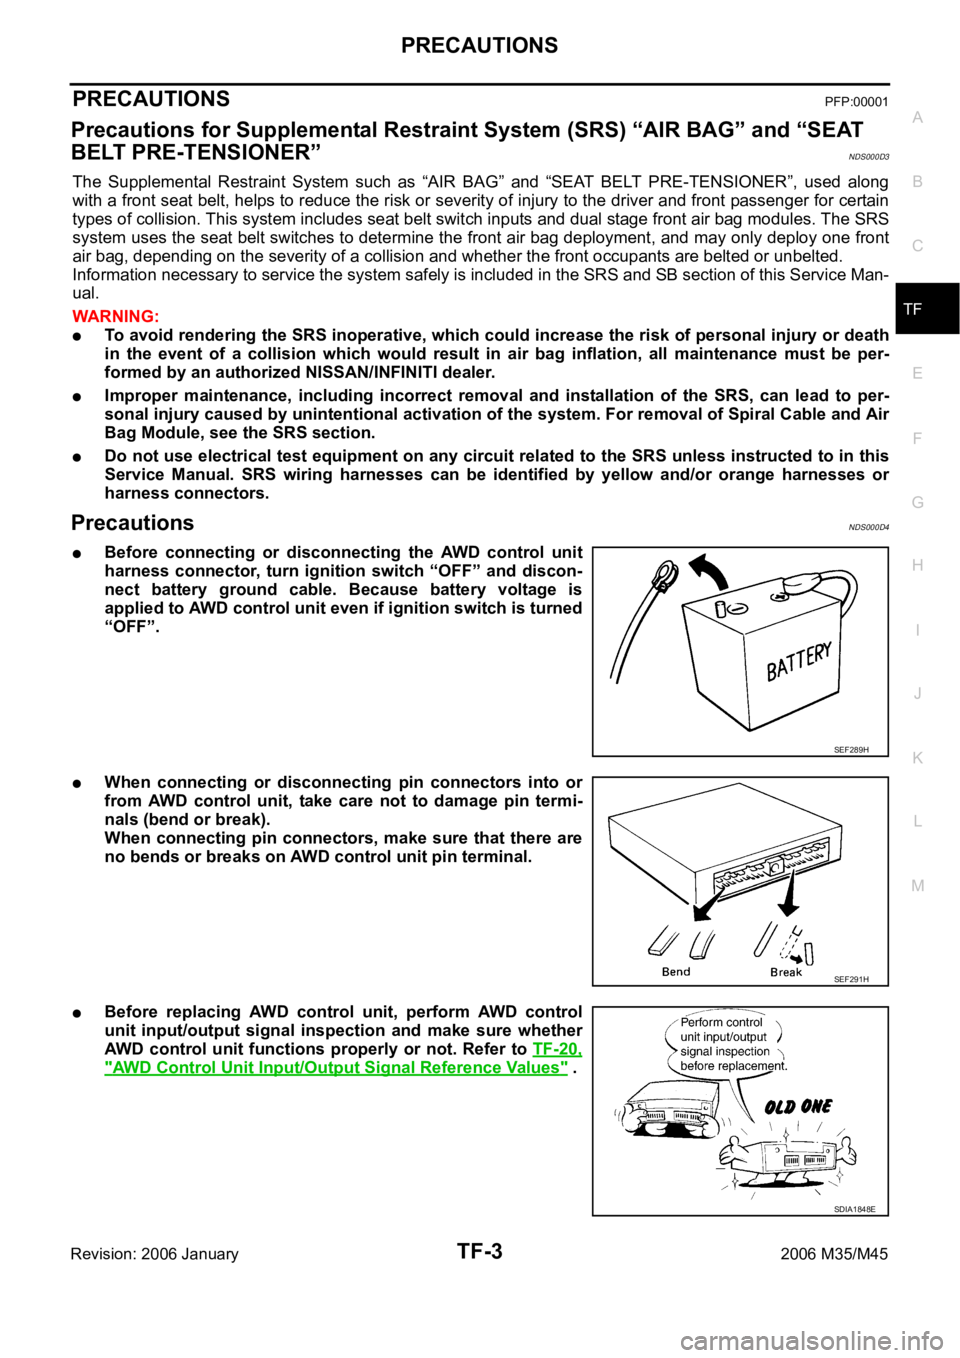
Before connecting or disconnecting the AWD control unit
harness connector, turn ignition switch “OFF” and discon-
nect battery ground cable. Because battery voltage is
applied to AWD control unit even if ignition switch is turned
“OFF”.
When connecting or disconnecting pin connectors into or
from AWD control unit, take care not to damage pin termi-
nals (bend or break).
When connecting pin connectors, make sure that there are
no bends or breaks on AWD control unit pin terminal.
Before replacing AWD control unit, perform AWD control
unit input/output signal inspection and make sure whether
AWD control unit functions properly or not. Refer to TF-20,
"AWD Control Unit Input/Output Signal Reference Values" .
SEF289H
SEF291H
SDIA1848E
Page 5478 of 5621

AWD SYSTEM
TF-13
C
E
F
G
H
I
J
K
L
MA
B
TF
Revision: 2006 January2006 M35/M45
COMPONENTS FUNCTION DESCRIPTION
CAN CommunicationNDS000DE
SYSTEM DESCRIPTION
CAN (Controller Area Network) is a serial communication line for real time application. It is an on-vehicle mul-
tiplex communication line with high data communication speed and excellent error detection ability. Many elec-
tronic control units are equipped onto a vehicle, and each control unit shares information and links with other
control units during operation (not independent). In CAN communication, control units are connected with 2
communication lines (CAN H line, CAN L line) allowing a high rate of information transmission with less wiring.
Each control unit transmits/receives data but selectively reads required data only.
For details, refer to LAN-34, "
CAN Communication Unit" .
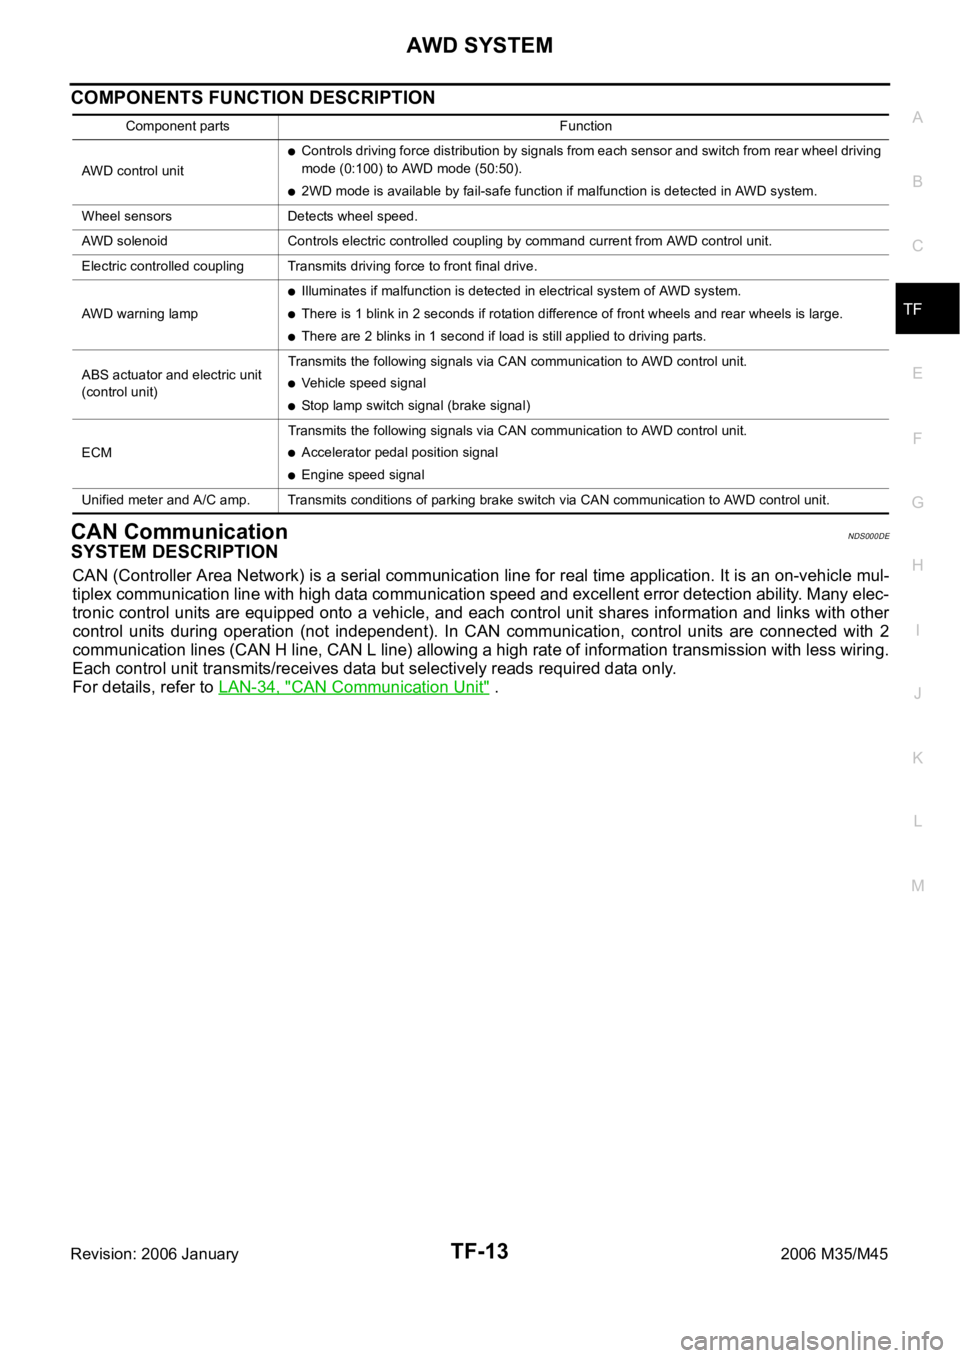
Component parts Function
AWD control unit
Controls driving force distribution by signals from each sensor and switch from rear wheel driving
mode (0:100) to AWD mode (50:50).
2WD mode is available by fail-safe function if malfunction is detected in AWD system.
Wheel sensors Detects wheel speed.
AWD solenoid Controls electric controlled coupling by command current from AWD control unit.
Electric controlled coupling Transmits driving force to front final drive.
AWD warning lamp
Illuminates if malfunction is detected in electrical system of AWD system.
There is 1 blink in 2 seconds if rotation difference of front wheels and rear wheels is large.
There are 2 blinks in 1 second if load is still applied to driving parts.
ABS actuator and electric unit
(control unit)Transmits the following signals via CAN communication to AWD control unit.
Vehicle speed signal
Stop lamp switch signal (brake signal)
ECMTransmits the following signals via CAN communication to AWD control unit.
Accelerator pedal position signal
Engine speed signal
Unified meter and A/C amp. Transmits conditions of parking brake switch via CAN communication to AWD control unit.
Page 5482 of 5621

TROUBLE DIAGNOSIS
TF-17
C
E
F
G
H
I
J
K
L
MA
B
TF
Revision: 2006 January2006 M35/M45
Wiring Diagram — AWD —NDS000DJ
TDWT0018E
Page 5526 of 5621

WT-1
ROAD WHEELS & TIRES
E SUSPENSION
CONTENTS
C
D
F
G
H
I
J
K
L
M
SECTION WT
A
B
WT
Revision: 2006 January2006 M35/M45
ROAD WHEELS & TIRES
PRECAUTIONS .......................................................... 3
Precautions .............................................................. 3
PREPARATION ........................................................... 4
Special Service Tools [SST] ..................................... 4
Commercial Service Tools ........................................ 4
NOISE, VIBRATION AND HARSHNESS (NVH)
TROUBLESHOOTING ................................................ 5
NVH Troubleshooting Chart ..................................... 5
ROAD WHEEL ............................................................ 6
Inspection ................................................................. 6
ALUMINUM WHEEL ............................................. 6
STEEL WHEEL ..................................................... 6
ROAD WHEEL TIRE ASSEMBLY .............................. 7
Balancing Wheels (Bonding Weight Type) ............... 7
REMOVAL ........................................................
..... 7
WHEEL BALANCE ADJUSTMENT ...................... 7
Rotation .................................................................... 8
LOW TIRE PRESSURE WARNING SYSTEM ............ 9
System Components ................................................ 9
System Description .................................................. 9
TRANSMITTER ..................................................... 9
RECEIVER .......................................................
... 10
LOW TIRE PRESSURE WARNING CONTROL
UNIT .................................................................... 10
LOW TIRE PRESSURE WARNING LAMP ......... 10
DISPLAY UNIT ..................................................... 11
CAN COMMUNICATION .......................................... 12
System Description ................................................ 12
TROUBLE DIAGNOSES .......................................... 13
How to Perform Trouble Diagnoses ....................... 13
BASIC CONCEPT ............................................... 13
Schematic .............................................................. 14
Wiring Diagram — T/WARN — .............................. 15
Control Unit Input/Output Signal Standard ............. 18
ID Registration Procedure ...................................... 19
ID REGISTRATION WITH ACTIVATION TOOL ... 19
ID REGISTRATION WITHOUT ACTIVATION
TOOL .................................................................. 20
Transmitter Wake Up Operation ............................. 21
WITH TRANSMITTER ACTIVATION TOOL ........ 21CONSULT-II Function (AIR PRESSURE MONI-
TOR) ....................................................................... 21
FUNCTION .......................................................
... 21
CONSULT-II SETTING PROCEDURE ................ 21
WORK SUPPORT MODE ................................... 22
SELF-DIAG RESULT MODE ............................... 22
DATA MONITOR MODE ...................................... 23
ACTIVE TEST MODE ......................................... 23
LOW TIRE PRESSURE WARNING CONTROL
UNIT PART NUMBER ......................................... 24
Diagnosis Procedure with Warning Lamp Function
(Without CONSULT-II) ............................................ 24
DESCRIPTION .................................................... 24
FUNCTION .......................................................
... 24
LOW TIRE PRESSURE WARNING LAMP DIAG-
NOSTIC CHART .................................................. 24
How to Perform Trouble Diagnosis for Quick and
Accurate Repair ...................................................... 26
INTRODUCTION ................................................. 26
WORK FLOW ...................................................... 26
Preliminary Check .................................................. 27
Trouble Diagnosis Chart ......................................... 28
SELF-DIAGNOSIS .............................................. 28
DIAGNOSIS CHART BY SYMPTOM .................. 29
TROUBLE DIAGNOSIS FOR SELF-DIAGNOSTIC
ITEMS ........................................................................ 30
Inspection 1: Transmitter no Data ........................... 30
MALFUNCTION CODE NO. 21, 22, 23, 24 ......... 30
Inspection 2: Receiver Data Error .......................... 31
MALFUNCTION CODE NO. 25, 26, 27, 28 ......... 31
Inspection 3: Transmitter Pressure Data Error ....... 32
MALFUNCTION CODE NO. 35, 36, 37, 38 ......... 32
Inspection 4: Transmitter Function Code Error ....... 32
MALFUNCTION CODE NO. 41, 42, 43, 44 ......... 32
Inspection 5: Transmitter Battery Voltage Low ....... 33
MALFUNCTION CODE NO. 45, 46, 47, 48 ......... 33
Inspection 6: Receiver ID No Registration .............. 33
MALFUNCTION CODE NO. 51 ........................... 33
Inspection 7: Vehicle Speed Signal ........................ 34
Page 5537 of 5621

WT-12
CAN COMMUNICATION
Revision: 2006 January2006 M35/M45
CAN COMMUNICATIONPFP:23710
System DescriptionNES000JT
CAN (Controller Area Network) is a serial communication line for real time application. It is an on-vehicle mul-
tiplex communication line with high data communication speed and excellent error detection ability. Many elec-
tronic control units are equipped onto a vehicle, and each control unit shares information and links with other
control units during operation (not independent). In CAN communication, control units are connected with 2
communication lines (CAN H line, CAN L line) allowing a high rate of information transmission with less wiring.
Each control unit transmits/receives data but selectively reads required data only.
Refer to LAN-34, "
CAN COMMUNICATION" .
Page 5540 of 5621

TROUBLE DIAGNOSES
WT-15
C
D
F
G
H
I
J
K
L
MA
B
WT
Revision: 2006 January2006 M35/M45
Wiring Diagram — T/WARN —NES000JW
TEWT0027E
Page 5568 of 5621

WW-1
WIPER, WASHER & HORN
K ELECTRICAL
CONTENTS
C
D
E
F
G
H
I
J
L
M
SECTION WW
A
B
WW
Revision: 2006 January2006 M35/M45
WIPER, WASHER & HORN
PRECAUTION ............................................................ 3
Precautions for Supplemental Restraint System
(SRS) “AIR BAG” and “SEAT BELT PRE-TEN-
SIONER” .................................................................. 3
FRONT WIPER AND WASHER SYSTEM .................. 4
Components Parts and Harness Connector Loca-
tion ........................................................................... 4
System Description .................................................. 4
OUTLINE ............................................................... 5
LOW SPEED WIPER OPERATION ...................... 5
HIGH SPEED WIPER OPERATION ..................... 6
INTERMITTENT OPERATION .............................. 6
AUTO STOP OPERATION .................................... 7
WASHER OPERATION ......................................... 7
MIST OPERATION ................................................ 7
FAIL-SAFE FUNCTION ......................................... 7
COMBINATION SWITCH READING FUNCTION ..... 8
CAN Communication System Description ............... 11
CAN Communication Unit ....................................... 11
Schematic .............................................................. 12
Wiring Diagram — WIPER — ................................ 13
Terminals and Reference Values for BCM ............. 17
Terminals and Reference Values for IPDM E/R ..... 21
How to Perform Trouble Diagnoses ....................... 21
Preliminary Check .................................................. 22
CHECK POWER SUPPLY AND GROUND CIR-
CUIT .................................................................... 22
CONSULT-II Functions (BCM) ............................... 23
CONSULT-II BASIC OPERATION ....................... 23
WORK SUPPORT ............................................... 24
DATA MONITOR ................................................. 24
ACTIVE TEST ..................................................... 25
CONSULT-II Functions (IPDM E/R) ....................... 26
CONSULT-II BASIC OPERATION ....................... 26
DATA MONITOR ................................................. 27
ACTIVE TEST ..................................................... 27
Front Wiper Does Not Operate .............................. 28
Front Wiper Does Not Return to Stop Position (After
Front Wiper Operate for 10 Seconds, They Stop for
20 Seconds, and After Repeating the Operations Five Times, They Become Inoperative) .................. 31
Front Wiper Does Not Return to Stop Position When
Front Wiper Motor Operates at Low Speed (After
Front Wiper Operate for 10 Seconds, They Stop for
20 Seconds, and After Repeating the Operations
Five Times, They Become Inoperative) .................. 33
Front Wiper Does Not Return to Stop Position When
Front Wiper Motor Operates at HIGH Speed (After
Front Wiper Operate for 10 Seconds, They Stop for
20 Seconds, and After Repeating the Operations
Five Times, They Become Inoperative) .................. 34
Only Front Wiper LO Does Not Operate ................. 36
Only Front Wiper HI Does Not Operate .................. 37
Only Front Wiper Intermittent Does Not Operate ... 39
Front Wiper Interval Time Is Not Controlled by Vehi-
cle Speed ................................................................ 39
Front Wiper Intermittent Operation Switch Position
Cannot Be Adjusted .............................................
... 40
Wiper Does Not Wipe When Front Washer Operates
... 40
Front Wiper Does Not Stop ..................................... 41
Removal and Installation of Front Wiper Arms,
Adjustment of Wiper Arms Stop Location ............... 42
REMOVAL ........................................................
... 42
INSTALLATION ................................................... 42
ADJUSTMENT .................................................... 42
Removal and Installation of Front Wiper Drive
Assembly ................................................................ 43
REMOVAL ........................................................
... 43
INSTALLATION ................................................... 43
Disassembly and Assembly of Front Wiper Drive
Assembly ................................................................ 43
DISASSEMBLY ................................................... 44
ASSEMBLY ......................................................... 44
Washer Nozzle Adjustment .................................... 44
Washer Tube Layout .............................................. 45
Removal and Installation of Front Washer Nozzle ... 45
REMOVAL ........................................................
... 45
INSTALLATION ................................................... 45
Inspection for Washer Nozzle ................................. 46
Page 5569 of 5621

WW-2Revision: 2006 January2006 M35/M45 CHECK VALVE INSPECTION ............................. 46
Inspection of Front Wiper and Washer Switch Circuit ... 46
Removal and Installation of Front Wiper and Washer
Switch ..................................................................... 46
REMOVAL ........................................................
... 46
INSTALLATION .................................................... 46
Removal and Installation of Washer Tank .............. 47
REMOVAL ........................................................
... 47
INSTALLATION .................................................... 47
Removal and Installation of Washer Pump ............. 48
REMOVAL ........................................................
... 48
INSTALLATION .................................................... 48
CIGARETTE LIGHTER ............................................. 49
Wiring Diagram — CIGAR — ................................. 49
Removal and Installation ........................................ 50
REMOVAL ........................................................
... 50
INSTALLATION .................................................... 50POWER SOCKET ..................................................... 51
Wiring Diagram — P/SCKT — ................................ 51
Removal and Installation of Center Console Box
Power Socket .......................................................... 52
REMOVAL ............................................................ 52
INSTALLATION .................................................... 52
Removal and Installation of Center Console Box
Rear Side Power Socket ......................................... 52
REMOVAL ............................................................ 52
INSTALLATION .................................................... 52
HORN ........................................................................ 53
Wiring Diagram — HORN — .................................. 53
Removal and Installation ......................................... 54
REMOVAL ............................................................ 54
INSTALLATION .................................................... 54
Page 5570 of 5621

PRECAUTION
WW-3
C
D
E
F
G
H
I
J
L
MA
B
WW
Revision: 2006 January2006 M35/M45
PRECAUTION PFP:00011
Precautions for Supplemental Restraint System (SRS) “AIR BAG” and “SEAT
BELT PRE-TENSIONER”
NKS003WA
The Supplemental Restraint System such as “AIR BAG” and “SEAT BELT PRE-TENSIONER”, used along
with a front seat belt, helps to reduce the risk or severity of injury to the driver and front passenger for certain
types of collision. This system includes seat belt switch inputs and dual stage front air bag modules. The SRS
system uses the seat belt switches to determine the front air bag deployment, and may only deploy one front
air bag, depending on the severity of a collision and whether the front occupants are belted or unbelted.
Information necessary to service the system safely is included in the SRS and SB section of this Service Man-
ual.
WAR NING :
To avoid rendering the SRS inoperative, which could increase the risk of personal injury or death
in the event of a collision which would result in air bag inflation, all maintenance must be per-
formed by an authorized NISSAN/INFINITI dealer.
Improper maintenance, including incorrect removal and installation of the SRS, can lead to per-
sonal injury caused by unintentional activation of the system. For removal of Spiral Cable and Air
Bag Module, see the SRS section.
Do not use electrical test equipment on any circuit related to the SRS unless instructed to in this
Service Manual. SRS wiring harnesses can be identified by yellow and/or orange harnesses or
harness connectors.
Page 5578 of 5621

FRONT WIPER AND WASHER SYSTEM
WW-11
C
D
E
F
G
H
I
J
L
MA
B
WW
Revision: 2006 January2006 M35/M45
Wiper Dial Position Setting
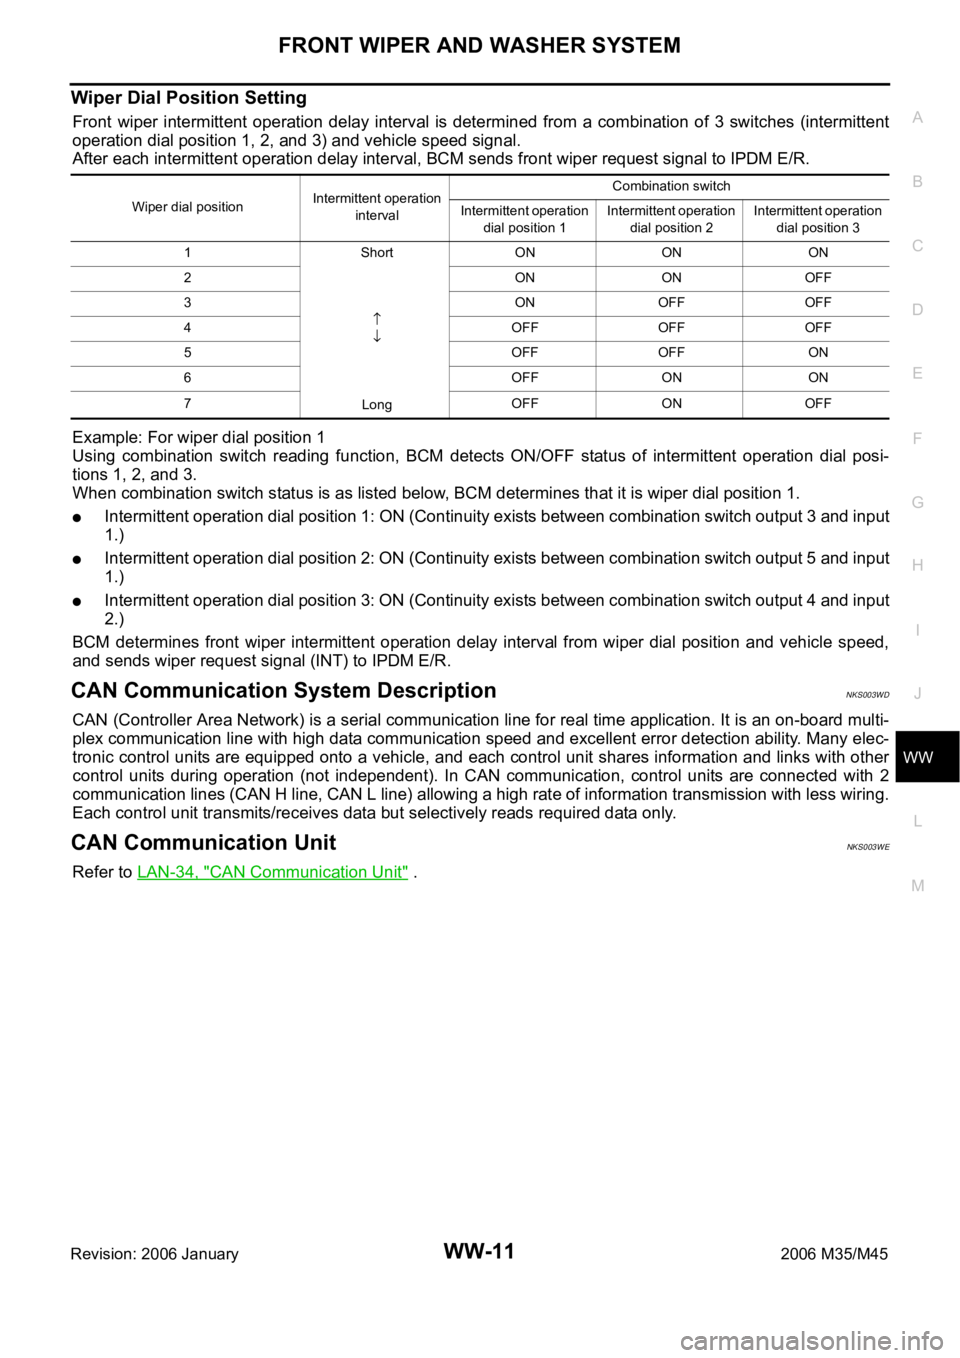
Front wiper intermittent operation delay interval is determined from a combination of 3 switches (intermittent
operation dial position 1, 2, and 3) and vehicle speed signal.
After each intermittent operation delay interval, BCM sends front wiper request signal to IPDM E/R.
Example: For wiper dial position 1
Using combination switch reading function, BCM detects ON/OFF status of intermittent operation dial posi-
tions 1, 2, and 3.
When combination switch status is as listed below, BCM determines that it is wiper dial position 1.
Intermittent operation dial position 1: ON (Continuity exists between combination switch output 3 and input
1.)
Intermittent operation dial position 2: ON (Continuity exists between combination switch output 5 and input
1.)
Intermittent operation dial position 3: ON (Continuity exists between combination switch output 4 and input
2.)
BCM determines front wiper intermittent operation delay interval from wiper dial position and vehicle speed,
and sends wiper request signal (INT) to IPDM E/R.
CAN Communication System DescriptionNKS003WD
CAN (Controller Area Network) is a serial communication line for real time application. It is an on-board multi-
plex communication line with high data communication speed and excellent error detection ability. Many elec-
tronic control units are equipped onto a vehicle, and each control unit shares information and links with other
control units during operation (not independent). In CAN communication, control units are connected with 2
communication lines (CAN H line, CAN L line) allowing a high rate of information transmission with less wiring.
Each control unit transmits/receives data but selectively reads required data only.
CAN Communication UnitNKS003WE
Refer to LAN-34, "CAN Communication Unit" .
Wiper dial positionIntermittent operation
intervalCombination switch
Intermittent operation
dial position 1Intermittent operation
dial position 2Intermittent operation
dial position 3
1Short
LongON ON ON
2ONONOFF
3ONOFFOFF
4 OFF OFF OFF
5OFFOFFON
6 OFF ON ON
7 OFF ON OFF