brake sensor INFINITI M35 2006 Factory Repair Manual
[x] Cancel search | Manufacturer: INFINITI, Model Year: 2006, Model line: M35, Model: INFINITI M35 2006Pages: 5621, PDF Size: 65.56 MB
Page 245 of 5621
AT-166
DTC P1774 LOW COAST BRAKE SOLENOID VALVE FUNCTION
Revision: 2006 January2006 M35/M45
Diagnostic ProcedureNCS001OS
1. CHECK INPUT SIGNALS
With CONSULT-II
1. Start engine.
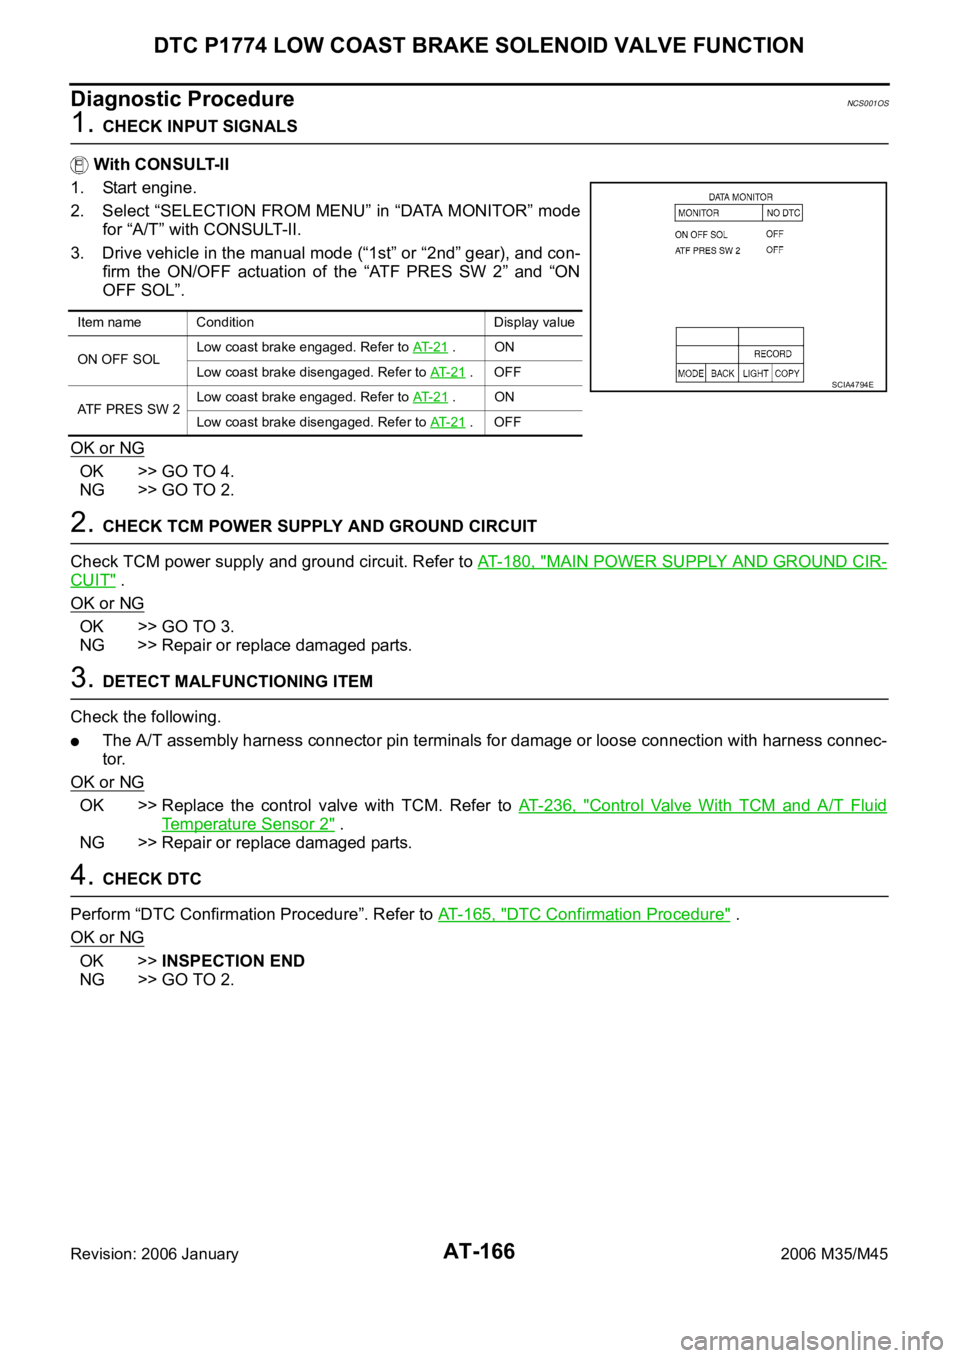
2. Select “SELECTION FROM MENU” in “DATA MONITOR” mode
for “A/T” with CONSULT-II.
3. Drive vehicle in the manual mode (“1st” or “2nd” gear), and con-
firm the ON/OFF actuation of the “ATF PRES SW 2” and “ON
OFF SOL”.
OK or NG
OK >> GO TO 4.
NG >> GO TO 2.
2. CHECK TCM POWER SUPPLY AND GROUND CIRCUIT
Check TCM power supply and ground circuit. Refer to AT- 1 8 0 , "
MAIN POWER SUPPLY AND GROUND CIR-
CUIT" .
OK or NG
OK >> GO TO 3.
NG >> Repair or replace damaged parts.
3. DETECT MALFUNCTIONING ITEM
Check the following.
The A/T assembly harness connector pin terminals for damage or loose connection with harness connec-
tor.
OK or NG
OK >> Replace the control valve with TCM. Refer to AT- 2 3 6 , "Control Valve With TCM and A/T Fluid
Temperature Sensor 2" .
NG >> Repair or replace damaged parts.
4. CHECK DTC
Perform “DTC Confirmation Procedure”. Refer to AT- 1 6 5 , "
DTC Confirmation Procedure" .
OK or NG
OK >>INSPECTION END
NG >> GO TO 2.
Item name Condition Display value
ON OFF SOLLow coast brake engaged. Refer to AT- 2 1
. ON
Low coast brake disengaged. Refer to AT- 2 1
. OFF
ATF PRES SW 2Low coast brake engaged. Refer to AT- 2 1
. ON
Low coast brake disengaged. Refer to AT- 2 1
. OFF
SCIA4794E
Page 252 of 5621
DTC P1841 ATF PRESSURE SWITCH 1
AT-173
D
E
F
G
H
I
J
K
L
MA
B
AT
Revision: 2006 January2006 M35/M45
Diagnostic ProcedureNCS001P6
1. CHECK INPUT SIGNAL
With CONSULT-II
1. Start engine.
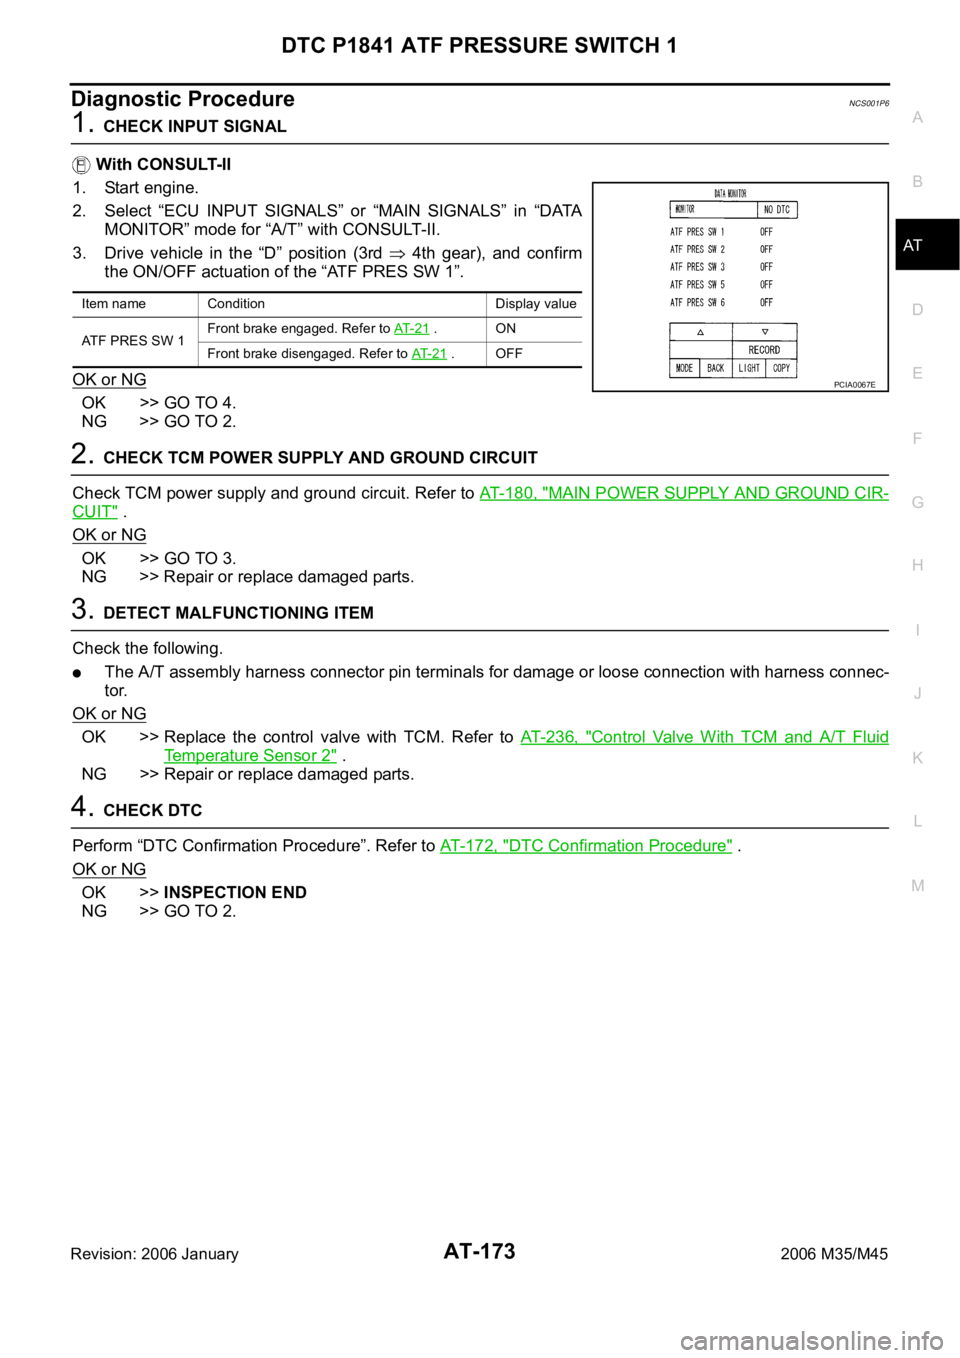
2. Select “ECU INPUT SIGNALS” or “MAIN SIGNALS” in “DATA
MONITOR” mode for “A/T” with CONSULT-II.
3. Drive vehicle in the “D” position (3rd
4th gear), and confirm
the ON/OFF actuation of the “ATF PRES SW 1”.
OK or NG
OK >> GO TO 4.
NG >> GO TO 2.
2. CHECK TCM POWER SUPPLY AND GROUND CIRCUIT
Check TCM power supply and ground circuit. Refer to AT-180, "
MAIN POWER SUPPLY AND GROUND CIR-
CUIT" .
OK or NG
OK >> GO TO 3.
NG >> Repair or replace damaged parts.
3. DETECT MALFUNCTIONING ITEM
Check the following.
The A/T assembly harness connector pin terminals for damage or loose connection with harness connec-
tor.
OK or NG
OK >> Replace the control valve with TCM. Refer to AT- 2 3 6 , "Control Valve With TCM and A/T Fluid
Temperature Sensor 2" .
NG >> Repair or replace damaged parts.
4. CHECK DTC
Perform “DTC Confirmation Procedure”. Refer to AT- 1 7 2 , "
DTC Confirmation Procedure" .
OK or NG
OK >>INSPECTION END
NG >> GO TO 2.
Item name Condition Display value
ATF PRES SW 1Front brake engaged. Refer to AT- 2 1
. ON
Front brake disengaged. Refer to AT- 2 1
. OFF
PCIA0067E
Page 299 of 5621
AT-220
TROUBLE DIAGNOSIS FOR SYMPTOMS
Revision: 2006 January2006 M35/M45
Vehicle Does Not Decelerate by Engine BrakeNCS001QK
SYMPTOM:
No engine brake is applied when the gear is shifted from the 2nd to 1st gear.
DIAGNOSTIC PROCEDURE
1. CHECK SELF-DIAGNOSTIC RESULTS
Perform self-diagnosis. Refer to AT- 9 2 , "
SELF-DIAGNOSTIC RESULT MODE" , AT- 1 0 3 , "TCM SELF-DIAG-
NOSTIC PROCEDURE (NO TOOLS)" .
Is any malfunction detected by self-diagnostic results?
YES >> Check malfunctioning system. Refer to AT- 9 2 , "SELF-DIAGNOSTIC RESULT MODE" , AT- 1 0 4 ,
"Judgement Self-diagnosis Code" .
NO >> GO TO 2.
2. CHECK A/T FLUID LEVEL
Check A/T fluid level. Refer to AT-13, "
Checking A/T Fluid" .
OK or NG
OK >> GO TO 3.
NG >> Refill ATF.
3. CHECK CONTROL LINKAGE
Check control linkage.
Refer to AT-228, "Checking of A/T Position" .
OK or NG
OK >> GO TO 4.
NG >> Adjust control linkage. Refer to AT-227, "
Adjustment of A/T Position" .
4. CHECK MANUAL MODE SWITCH
Check manual mode switch. Refer to AT-167, "
DTC P1815 MANUAL MODE SWITCH" .
OK or NG
OK >> GO TO 5.
NG >> Repair or replace damaged parts.
5. CHECK A/T FLUID CONDITION
1. Remove oil pan. Refer to AT-236, "
Control Valve With TCM and A/T Fluid Temperature Sensor 2" .
2. Check A/T fluid condition. Refer to AT- 5 3 , "
A/T Fluid Condition Check" .
OK or NG
OK >> GO TO 6.
NG >> GO TO 9.
6. DETECT MALFUNCTIONING ITEM
Check malfunction items. If any items are damaged, repair or replace damaged parts. Refer to AT- 6 4 ,
"Symptom Chart" (Symptom No.58).
OK or NG
OK >> GO TO 7.
NG >> Repair or replace damaged parts.
Page 312 of 5621
A/T SHIFT LOCK SYSTEM
AT-233
D
E
F
G
H
I
J
K
L
MA
B
AT
Revision: 2006 January2006 M35/M45
3. DETECT MALFUNCTIONING ITEM
Check the following.
Harness for short or open between battery and stop lamp switch harness connector E124 terminal 1
Harness for short or open between stop lamp switch harness connector E124 terminal 2 and shift lock
relay E35 terminal 2
10A fuse [No.20, located in the fuse block (J/B)]
Stop lamp switch
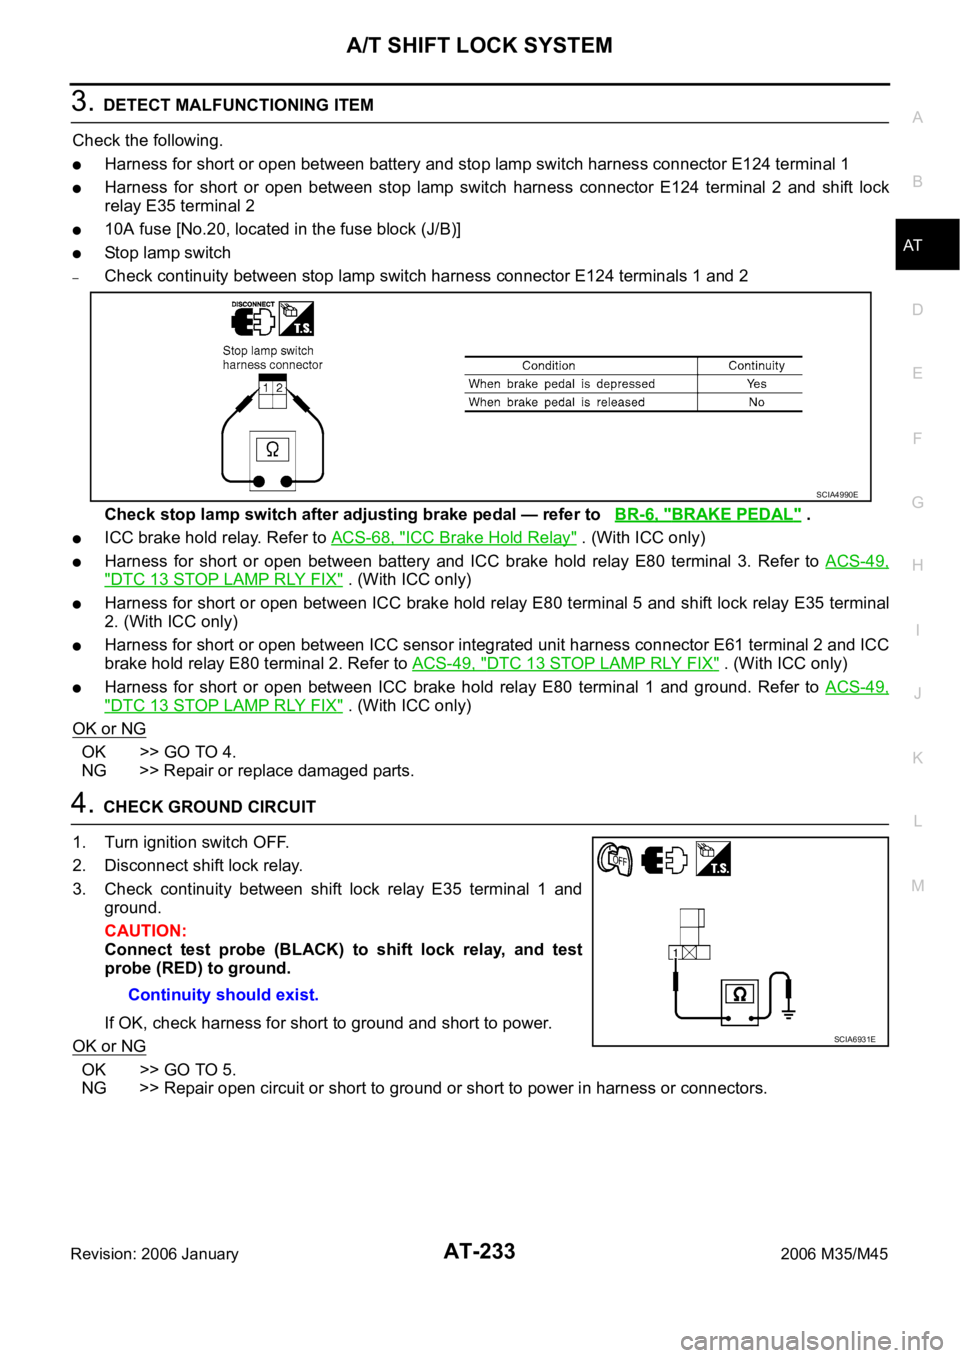
–Check continuity between stop lamp switch harness connector E124 terminals 1 and 2
Check stop lamp switch after adjusting brake pedal — refer to BR-6, "
BRAKE PEDAL" .
ICC brake hold relay. Refer to ACS-68, "ICC Brake Hold Relay" . (With ICC only)
Harness for short or open between battery and ICC brake hold relay E80 terminal 3. Refer to ACS-49,
"DTC 13 STOP LAMP RLY FIX" . (With ICC only)
Harness for short or open between ICC brake hold relay E80 terminal 5 and shift lock relay E35 terminal
2. (With ICC only)
Harness for short or open between ICC sensor integrated unit harness connector E61 terminal 2 and ICC
brake hold relay E80 terminal 2. Refer to ACS-49, "
DTC 13 STOP LAMP RLY FIX" . (With ICC only)
Harness for short or open between ICC brake hold relay E80 terminal 1 and ground. Refer to ACS-49,
"DTC 13 STOP LAMP RLY FIX" . (With ICC only)
OK or NG
OK >> GO TO 4.
NG >> Repair or replace damaged parts.
4. CHECK GROUND CIRCUIT
1. Turn ignition switch OFF.
2. Disconnect shift lock relay.
3. Check continuity between shift lock relay E35 terminal 1 and
ground.
CAUTION:
Connect test probe (BLACK) to shift lock relay, and test
probe (RED) to ground.
If OK, check harness for short to ground and short to power.
OK or NG
OK >> GO TO 5.
NG >> Repair open circuit or short to ground or short to power in harness or connectors.
SCIA4990E
Continuity should exist.
SCIA6931E
Page 390 of 5621
DISASSEMBLY
AT-311
D
E
F
G
H
I
J
K
L
MA
B
AT
Revision: 2006 January2006 M35/M45
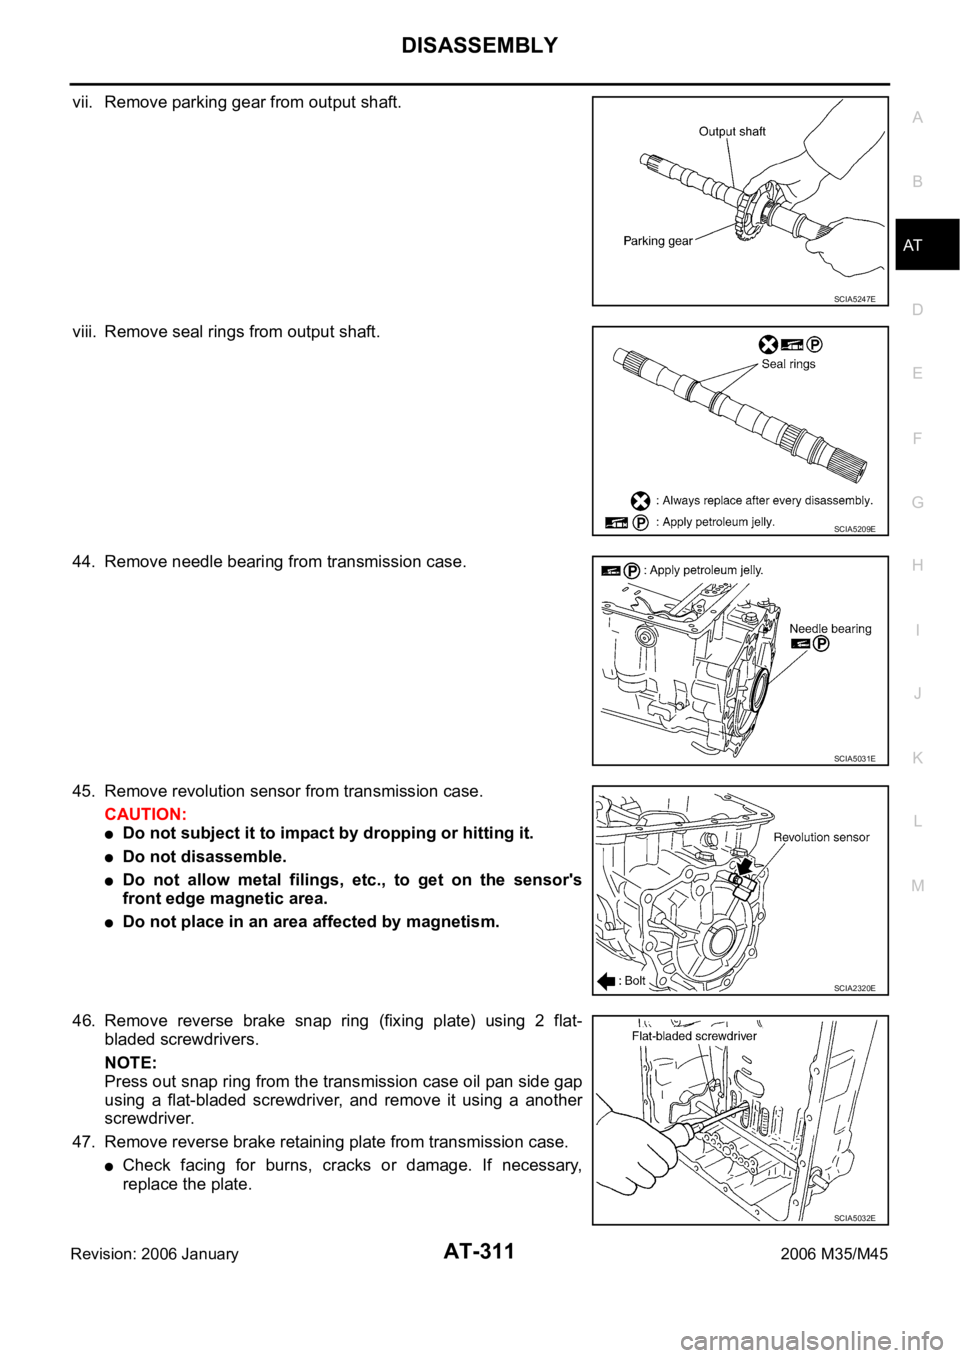
vii. Remove parking gear from output shaft.
viii. Remove seal rings from output shaft.
44. Remove needle bearing from transmission case.
45. Remove revolution sensor from transmission case.
CAUTION:
Do not subject it to impact by dropping or hitting it.
Do not disassemble.
Do not allow metal filings, etc., to get on the sensor's
front edge magnetic area.
Do not place in an area affected by magnetism.
46. Remove reverse brake snap ring (fixing plate) using 2 flat-
bladed screwdrivers.
NOTE:
Press out snap ring from the transmission case oil pan side gap
using a flat-bladed screwdriver, and remove it using a another
screwdriver.
47. Remove reverse brake retaining plate from transmission case.
Check facing for burns, cracks or damage. If necessary,
replace the plate.
SCIA5247E
SCIA5209E
SCIA5031E
SCIA2320E
SCIA5032E
Page 439 of 5621
AT-360
ASSEMBLY
Revision: 2006 January2006 M35/M45
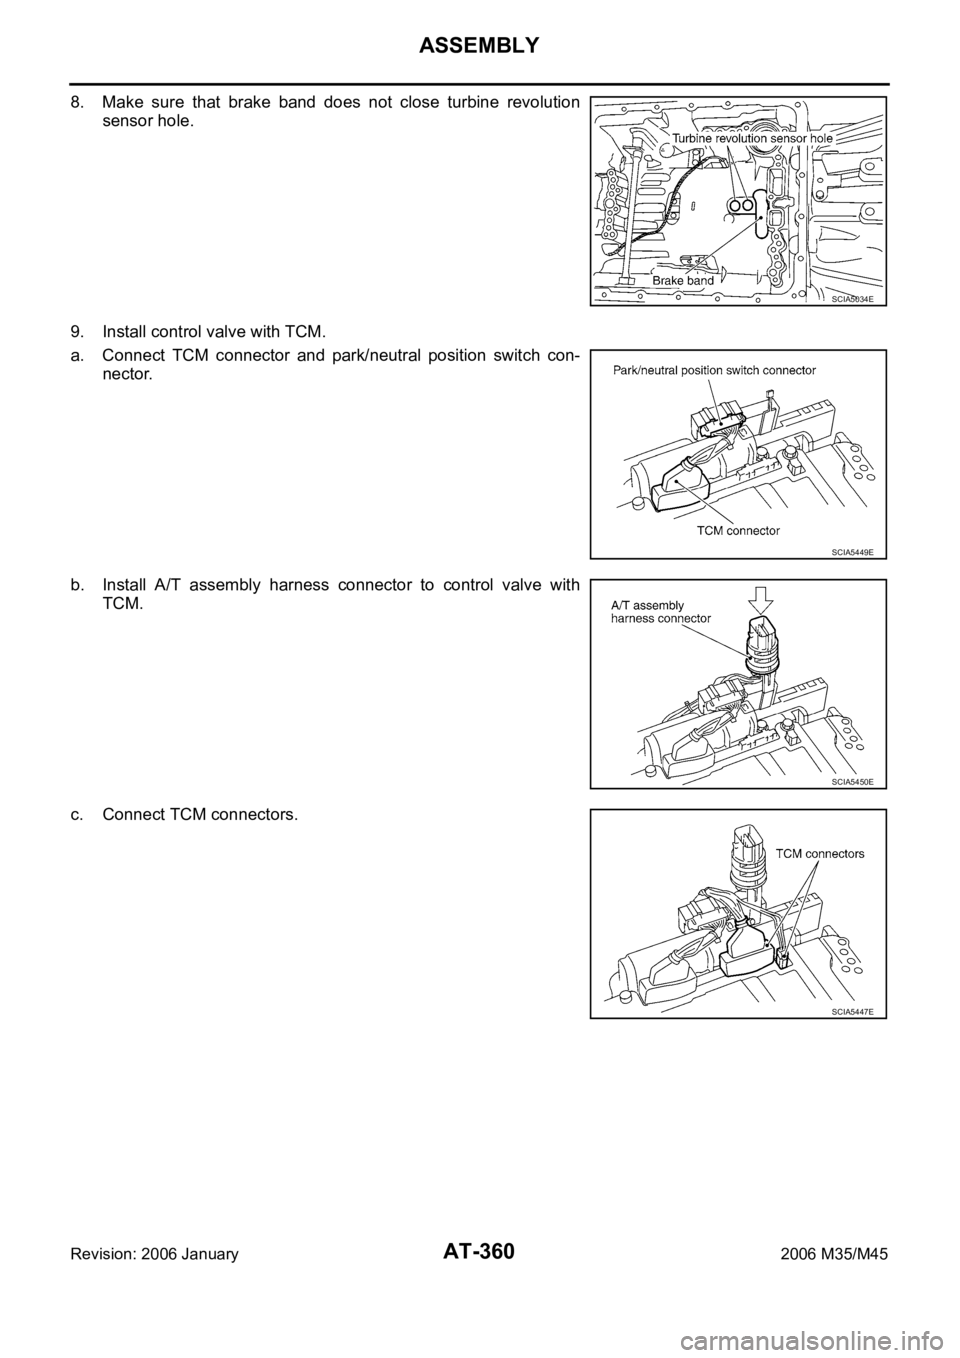
8. Make sure that brake band does not close turbine revolution
sensor hole.
9. Install control valve with TCM.
a. Connect TCM connector and park/neutral position switch con-
nector.
b. Install A/T assembly harness connector to control valve with
TCM.
c. Connect TCM connectors.
SCIA5034E
SCIA5449E
SCIA5450E
SCIA5447E
Page 446 of 5621

SERVICE DATA AND SPECIFICATIONS (SDS)
AT-367
D
E
F
G
H
I
J
K
L
MA
B
AT
Revision: 2006 January2006 M35/M45
Turbine Revolution SensorNCS001RJ
Vehicle Speed Sensor A/T (Revolution Sensor)NCS001RK
Reverse BrakeNCS001RL
*: Always check with the Parts Department for the latest parts information.
Total End PlayNCS001RM
BEARING RACE FOR ADJUSTING TOTAL END PLAY
*: Always check with the Parts Department for the latest parts information. Name ConditionData
(Approx.)
Turbine revolution
sensor 1When running at 50 km/h (31 MPH) in 4th speed with the closed throttle position signal “OFF”.
1.3 kHz
Turbine revolution
sensor 2When running at 20 km/h (12 MPH) in 1st speed with the closed throttle position signal “OFF”.
Name Condition Data (Approx.)
Revolution sensor When running at 20 km/h (12 MPH). 185 Hz
Model code number 97X06, 97X07, 98X1A, 98X0E, 95X12, 95X7A
Number of drive plates6
Number of driven plates6
Clearance mm (in) Standard 0.7 - 1.1 (0.028 - 0.043)
Thickness of retaining platesThickness mm (in) Part number*
4.2 (0.165)
4.4 (0.173)
4.6 (0.181)
4.8 (0.189)
5.0 (0.197)
5.2 (0.205) 31667 90X14
31667 90X15
31667 90X16
31667 90X17
31667 90X18
31667 90X19
Total end play mm (in) 0.25 - 0.55 (0.0098 - 0.0217)
Thickness mm (in) Part number*
0.8 (0.031)
1.0 (0.039)
1.2 (0.047)
1.4 (0.055)
1.6 (0.063)
1.8 (0.071)31435 95X00
31435 95X01
31435 95X02
31435 95X03
31435 95X04
31435 95X05
Page 1283 of 5621
BR-8
BRAKE PEDAL
Revision: 2006 January2006 M35/M45
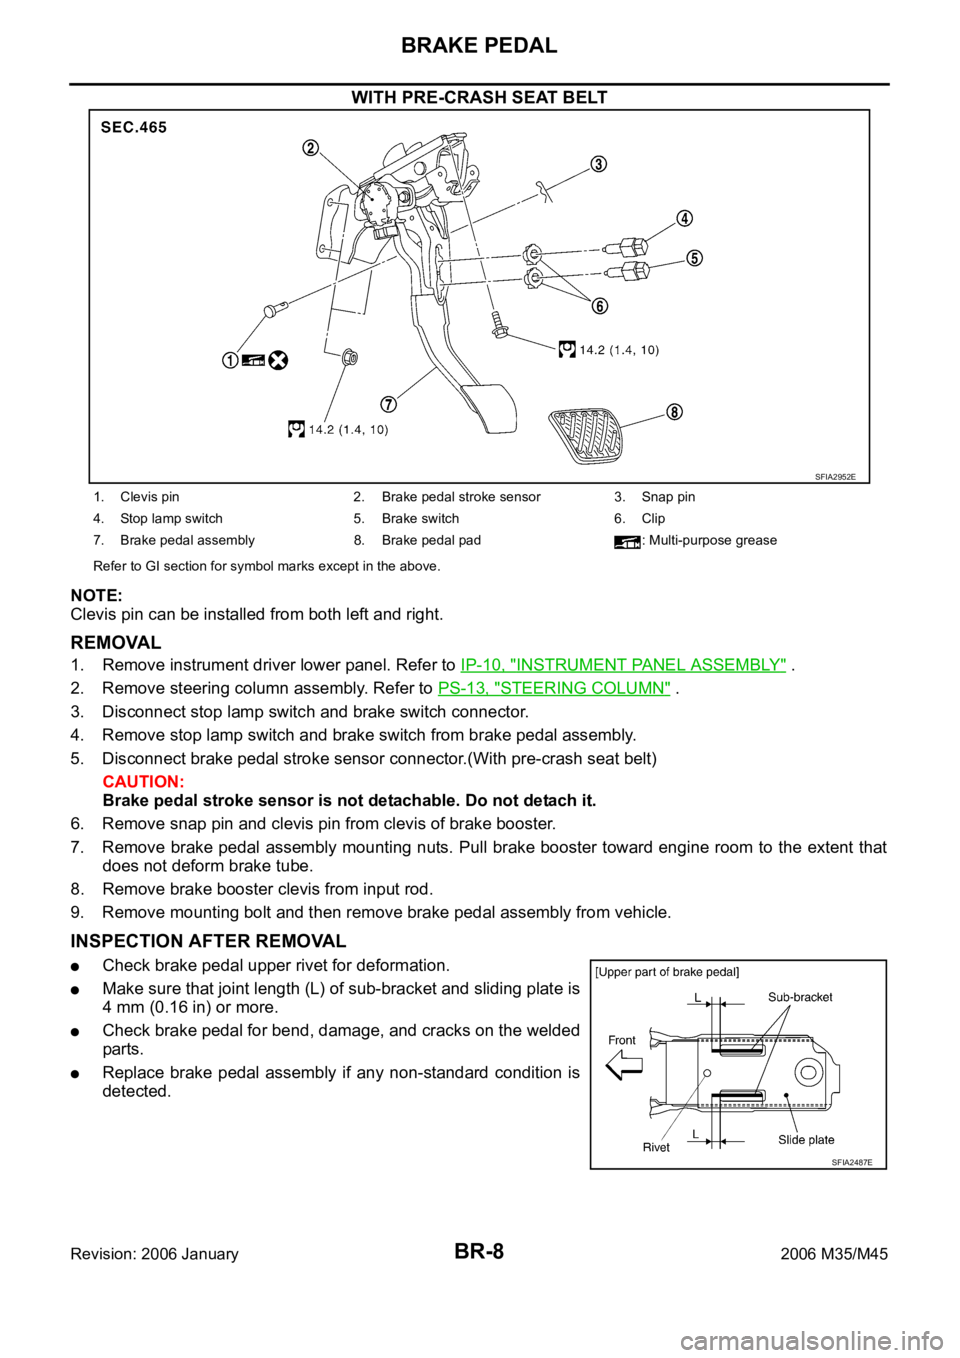
WITH PRE-CRASH SEAT BELT
NOTE:
Clevis pin can be installed from both left and right.
REMOVAL
1. Remove instrument driver lower panel. Refer to IP-10, "INSTRUMENT PANEL ASSEMBLY" .
2. Remove steering column assembly. Refer to PS-13, "
STEERING COLUMN" .
3. Disconnect stop lamp switch and brake switch connector.
4. Remove stop lamp switch and brake switch from brake pedal assembly.
5. Disconnect brake pedal stroke sensor connector.(With pre-crash seat belt)
CAUTION:
Brake pedal stroke sensor is not detachable. Do not detach it.
6. Remove snap pin and clevis pin from clevis of brake booster.
7. Remove brake pedal assembly mounting nuts. Pull brake booster toward engine room to the extent that
does not deform brake tube.
8. Remove brake booster clevis from input rod.
9. Remove mounting bolt and then remove brake pedal assembly from vehicle.
INSPECTION AFTER REMOVAL
Check brake pedal upper rivet for deformation.
Make sure that joint length (L) of sub-bracket and sliding plate is
4 mm (0.16 in) or more.
Check brake pedal for bend, damage, and cracks on the welded
parts.
Replace brake pedal assembly if any non-standard condition is
detected.
SFIA2952E
1. Clevis pin 2. Brake pedal stroke sensor 3. Snap pin
4. Stop lamp switch 5. Brake switch 6. Clip
7. Brake pedal assembly 8. Brake pedal pad : Multi-purpose grease
Refer to GI section for symbol marks except in the above.
SFIA2487E
Page 1298 of 5621
FRONT DISC BRAKE
BR-23
C
D
E
G
H
I
J
K
L
MA
B
BR
Revision: 2006 January2006 M35/M45
FRONT DISC BRAKEPFP:41000
On-Board InspectionNFS000PB
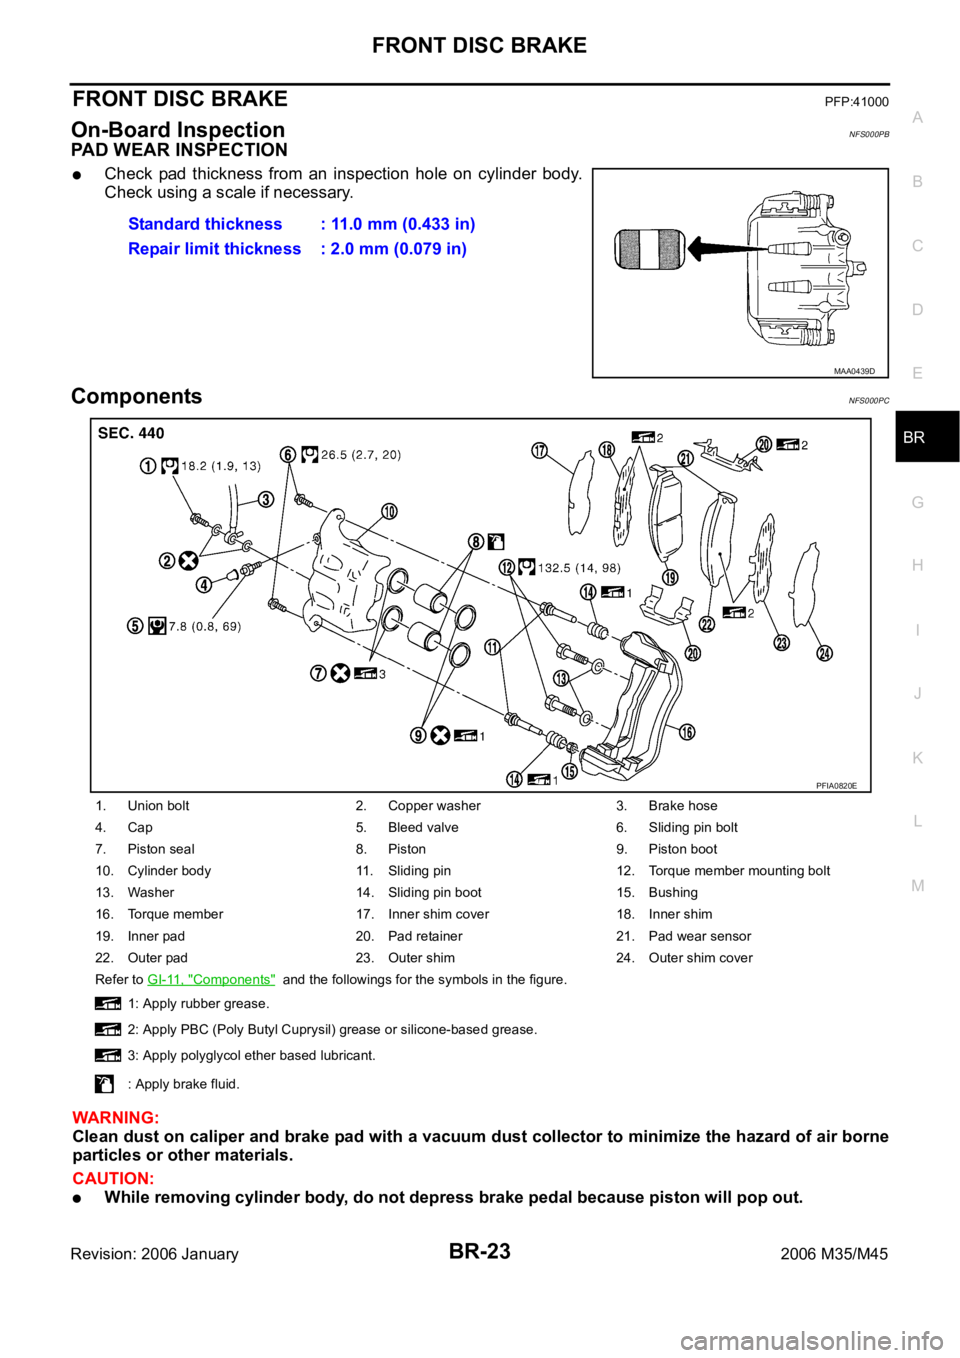
PAD WEAR INSPECTION
Check pad thickness from an inspection hole on cylinder body.
Check using a scale if necessary.
ComponentsNFS000PC
WAR NING :
Clean dust on caliper and brake pad with a vacuum dust collector to minimize the hazard of air borne
particles or other materials.
CAUTION:
While removing cylinder body, do not depress brake pedal because piston will pop out. Standard thickness : 11.0 mm (0.433 in)
Repair limit thickness : 2.0 mm (0.079 in)
MAA0439D
1. Union bolt 2. Copper washer 3. Brake hose
4. Cap 5. Bleed valve 6. Sliding pin bolt
7. Piston seal 8. Piston 9. Piston boot
10. Cylinder body 11. Sliding pin 12. Torque member mounting bolt
13. Washer 14. Sliding pin boot 15. Bushing
16. Torque member 17. Inner shim cover 18. Inner shim
19. Inner pad 20. Pad retainer 21. Pad wear sensor
22. Outer pad 23. Outer shim 24. Outer shim cover
Refer to GI-11, "
Components" and the followings for the symbols in the figure.
1: Apply rubber grease.
2: Apply PBC (Poly Butyl Cuprysil) grease or silicone-based grease.
3: Apply polyglycol ether based lubricant.
: Apply brake fluid.
PFIA0820E
Page 1299 of 5621
BR-24
FRONT DISC BRAKE
Revision: 2006 January2006 M35/M45
It is not necessary to remove bolts on torque member and brake hose except for disassembly or
replacement of caliper assembly. In this case, hang cylinder body with a wire so as not to stretch
brake hose.
Do not damage piston boot.
If any shim is subject to serious corrosion, replace it with a new one.
Always replace shim and shim cover as a set when replacing brake pads.
Keep rotor free from brake fluid.
Burnish the brake pads and disc rotor mutually contacting surfaces, after refinishing or replacing
rotors, after replacing pads, or if a soft pedal occurs at very low mileage. Refer to BR-28, "
BRAKE
BURNISHING PROCEDURE" .
Removal and Installation of Brake PadNFS000PD
REMOVAL
1. Remove tires from vehicle with power tool.
2. Remove lower sliding pin bolt.
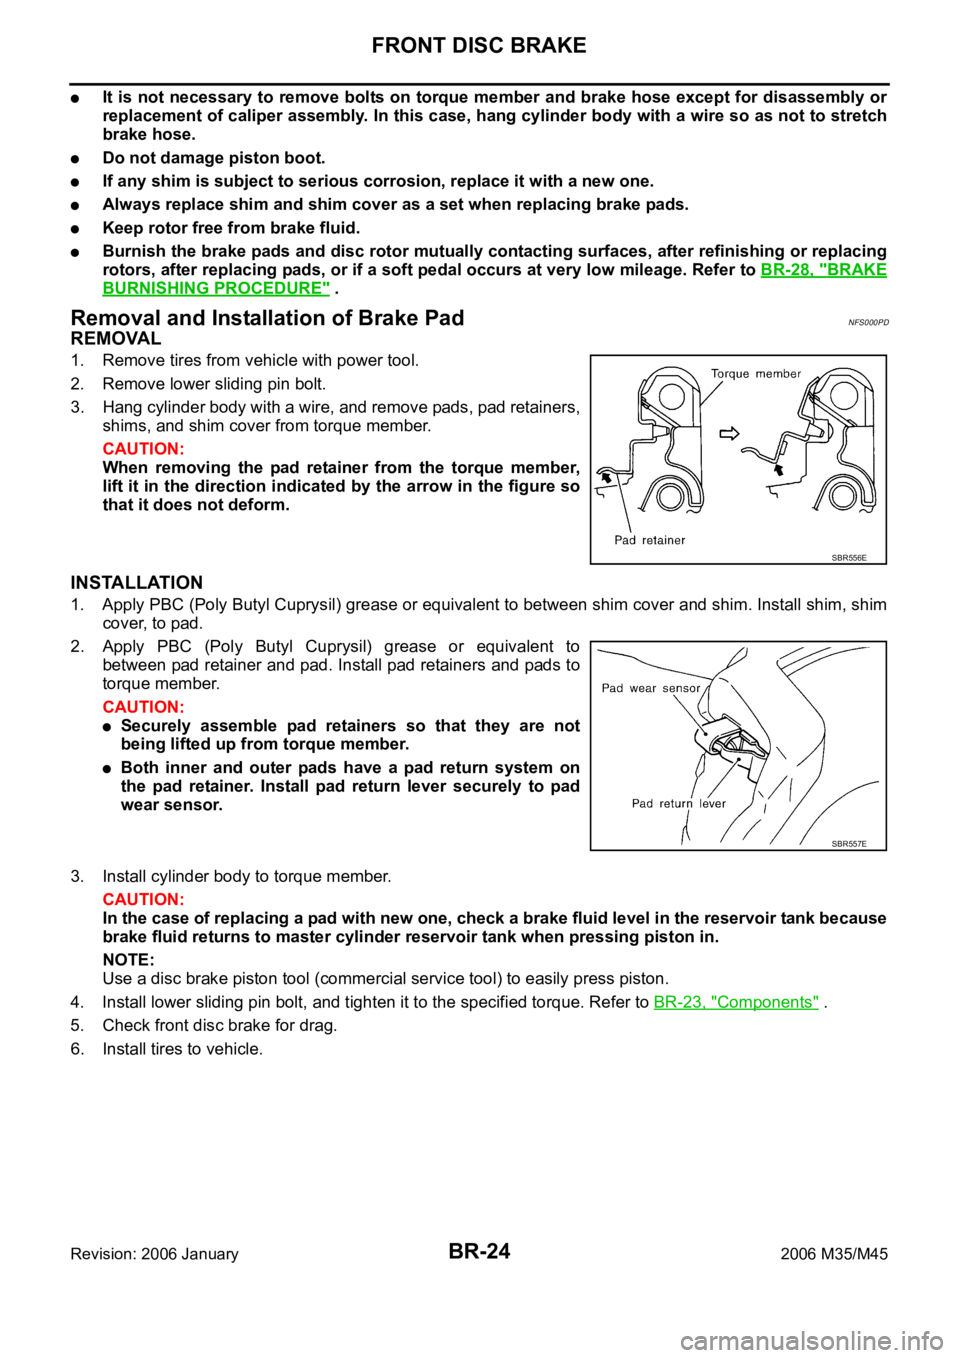
3. Hang cylinder body with a wire, and remove pads, pad retainers,
shims, and shim cover from torque member.
CAUTION:
When removing the pad retainer from the torque member,
lift it in the direction indicated by the arrow in the figure so
that it does not deform.
INSTALLATION
1. Apply PBC (Poly Butyl Cuprysil) grease or equivalent to between shim cover and shim. Install shim, shim
cover, to pad.
2. Apply PBC (Poly Butyl Cuprysil) grease or equivalent to
between pad retainer and pad. Install pad retainers and pads to
torque member.
CAUTION:
Securely assemble pad retainers so that they are not
being lifted up from torque member.
Both inner and outer pads have a pad return system on
the pad retainer. Install pad return lever securely to pad
wear sensor.
3. Install cylinder body to torque member.
CAUTION:
In the case of replacing a pad with new one, check a brake fluid level in the reservoir tank because
brake fluid returns to master cylinder reservoir tank when pressing piston in.
NOTE:
Use a disc brake piston tool (commercial service tool) to easily press piston.
4. Install lower sliding pin bolt, and tighten it to the specified torque. Refer to BR-23, "
Components" .
5. Check front disc brake for drag.
6. Install tires to vehicle.
SBR556E
SBR557E