torque INFINITI M35 2006 Factory Repair Manual
[x] Cancel search | Manufacturer: INFINITI, Model Year: 2006, Model line: M35, Model: INFINITI M35 2006Pages: 5621, PDF Size: 65.56 MB
Page 356 of 5621

TRANSMISSION ASSEMBLY
AT-277
D
E
F
G
H
I
J
K
L
MA
B
AT
Revision: 2006 January2006 M35/M45
INSPECTION
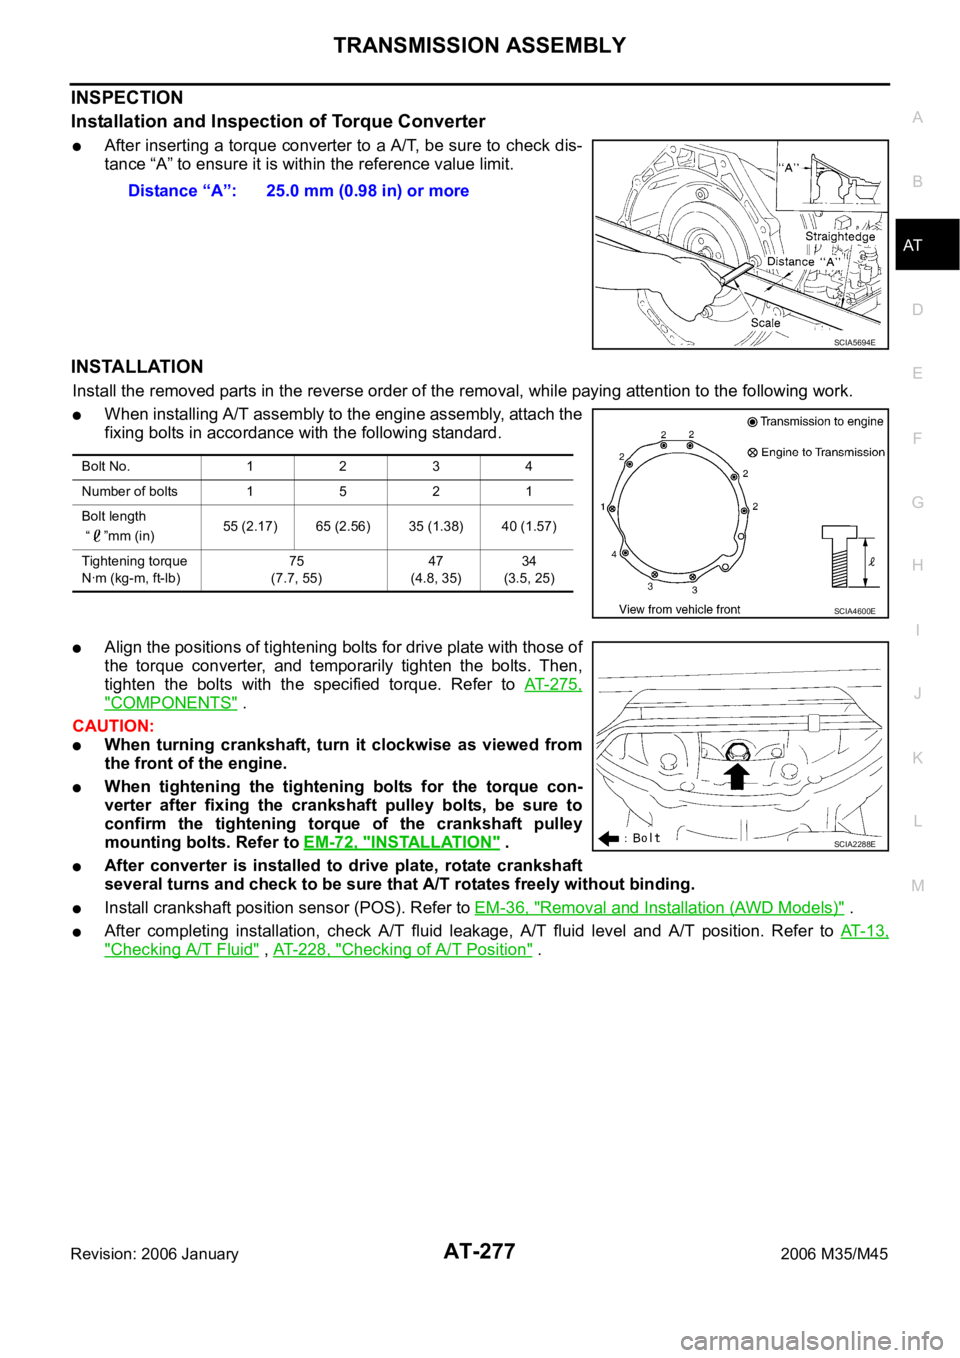
Installation and Inspection of Torque Converter
After inserting a torque converter to a A/T, be sure to check dis-
tance “A” to ensure it is within the reference value limit.
INSTALLATION
Install the removed parts in the reverse order of the removal, while paying attention to the following work.
When installing A/T assembly to the engine assembly, attach the
fixing bolts in accordance with the following standard.
Align the positions of tightening bolts for drive plate with those of
the torque converter, and temporarily tighten the bolts. Then,
tighten the bolts with the specified torque. Refer to AT- 2 7 5 ,
"COMPONENTS" .
CAUTION:
When turning crankshaft, turn it clockwise as viewed from
the front of the engine.
When tightening the tightening bolts for the torque con-
verter after fixing the crankshaft pulley bolts, be sure to
confirm the tightening torque of the crankshaft pulley
mounting bolts. Refer to EM-72, "
INSTALLATION" .
After converter is installed to drive plate, rotate crankshaft
several turns and check to be sure that A/T rotates freely without binding.
Install crankshaft position sensor (POS). Refer to EM-36, "Removal and Installation (AWD Models)" .
After completing installation, check A/T fluid leakage, A/T fluid level and A/T position. Refer to AT- 1 3 ,
"Checking A/T Fluid" , AT-228, "Checking of A/T Position" . Distance “A”: 25.0 mm (0.98 in) or more
SCIA5694E
Bolt No. 1 2 3 4
Number of bolts 1 5 2 1
Bolt length
“ ”mm (in)55 (2.17) 65 (2.56) 35 (1.38) 40 (1.57)
Tightening torque
Nꞏm (kg-m, ft-lb)75
(7.7, 55)47
(4.8, 35)34
(3.5, 25)
SCIA4600E
SCIA2288E
Page 358 of 5621

OVERHAUL
AT-279
D
E
F
G
H
I
J
K
L
MA
B
AT
Revision: 2006 January2006 M35/M45
1. O-ring 2. Oil pump cover 3. O-ring
4. Oil pump housing 5. Self-sealing bolt 6. Torque converter
7. Converter housing 8. Oil pump housing oil seal 9. Bearing race
10. Needle bearing 11. O-ring 12. Front carrier assembly
13. Needle bearing 14. Snap ring 15. Front sun gear
16. Snap ring 17. Bearing race 18. Needle bearing
19. 3rd one-way clutch 20. Seal ring 21. Input clutch assembly
22. Needle bearing 23. Rear internal gear 24. Brake band
25. Mid carrier assembly 26. Needle bearing 27. Bearing race
28. Rear carrier assembly 29. Needle bearing 30. Mid sun gear
31. Seal ring 32. Rear sun gear 33. 1st one-way clutch
34. Snap ring 35. Needle bearing 36. High and low reverse clutch hub
37. Snap ring 38. Bearing race 39. Needle bearing
Refer to GI section to make sure icons (symbol marks) in the figure. Refer to GI-11, "
Components" .
However, refer to the following symbols for others.
:Apply Genuine RTV silicone sealant or equivalent. Refer to GI-48, "
Recommended Chemical Products and Sealants" .
Page 359 of 5621

AT-280
OVERHAUL
Revision: 2006 January2006 M35/M45
VK45DE models
SCIA7069E
1. O-ring 2. Oil pump cover 3. O-ring
4. Oil pump housing 5. Self-sealing bolt 6. Torque converter
Page 377 of 5621

AT-298
DISASSEMBLY
Revision: 2006 January2006 M35/M45
DISASSEMBLYPFP:31020
DisassemblyNCS001R3
CAUTION:
Do not disassemble parts behind Drum Support. Refer to AT- 1 7 , "
Cross-Sectional View (VQ35DE Mod-
els for 2WD)" , AT- 1 8 , "Cross-Sectional View (VK45DE Models for 2WD)" , AT- 1 9 , "Cross-Sectional
View (AWD Models)" .
1. Drain ATF through drain plug.
2. Remove torque converter by holding it firmly and turing while
pulling straight out.
3. Check torque converter one-way clutch using a check tool as
shown at figure.
a. Insert a check tool into the groove of bearing support built into
one-way clutch outer race.
b. When fixing bearing support with a check tool, rotate one-way
clutch spline using a screwdriver.
c. Make sure that inner race rotates clockwise only. If not, replace
torque converter assembly.
4. Remove converter housing from transmission case.
CAUTION:
Be careful not to scratch converter housing.
SCIA5010E
SCIA3171E
SCIA4634E
Page 399 of 5621

AT-320
REPAIR FOR COMPONENT PARTS
Revision: 2006 January2006 M35/M45
3. Using the drift, install oil pump housing oil seal to the oil pump
housing until it is flush.
CAUTION:
Do not reuse oil seal.
Apply ATF to oil seal.
4. Install oil pump housing to oil pump cover.
5. Tighten bolts to the specified torque in numerical order shown in
the figure after temporarily tightening them. Refer to AT- 3 1 8 ,
"COMPONENTS" .
SCIA5313E
SCIA6329E
Page 419 of 5621
![INFINITI M35 2006 Factory Repair Manual AT-340
ASSEMBLY
Revision: 2006 January2006 M35/M45
ASSEMBLYPFP:00000
Assembly (1)NCS001RA
1. As shown in the figure, use a drift [22 mm (0.87 in) dia. commer-
cial service tool] to drive manual shaft INFINITI M35 2006 Factory Repair Manual AT-340
ASSEMBLY
Revision: 2006 January2006 M35/M45
ASSEMBLYPFP:00000
Assembly (1)NCS001RA
1. As shown in the figure, use a drift [22 mm (0.87 in) dia. commer-
cial service tool] to drive manual shaft](/img/42/57023/w960_57023-418.png)
AT-340
ASSEMBLY
Revision: 2006 January2006 M35/M45
ASSEMBLYPFP:00000
Assembly (1)NCS001RA
1. As shown in the figure, use a drift [22 mm (0.87 in) dia. commer-
cial service tool] to drive manual shaft oil seals into the transmis-
sion case until it is flush.
CAUTION:
Apply ATF to manual shaft oil seals.
Do not reuse manual shaft oil seals.
2. Install detent spring and spacer in transmission case. Tighten
detent spring and spacer bolts to the specified torque. Refer to
AT-278, "
Components" .
3. Install manual shaft to transmission case.
4. Install parking rod to manual plate.
SCIA5259E
SCIA5248E
SCIA5716E
SCIA5220E
Page 424 of 5621

ASSEMBLY
AT-345
D
E
F
G
H
I
J
K
L
MA
B
AT
Revision: 2006 January2006 M35/M45
24. Install revolution sensor to transmission case. Tighten revolution
sensor bolt to the specified torque. Refer to AT- 2 7 8 , "
Compo-
nents" .
CAUTION:
Do not subject it to impact by dropping or hitting it.
Do not disassemble.
Do not allow metal filings, etc., to get on the sensor's
front edge magnetic area.
Do not place in an area affected by magnetism.
25. Assemble rear extension assembly (VQ35DE models for 2WD) or output shaft & companion flange com-
plement (VK45DE models for 2WD) or adapter case assembly (AWD models) according to the following
procedures.
a.VQ35DE models
i. As shown in the figure, use the drift to drive rear oil seal into the
rear extension (2WD models) or adapter case (AWD models)
until it is flush.
CAUTION:
Apply ATF to rear oil seal.
Do not reuse rear oil seal.
ii. Install return spring (1) to parking pawl (2).
SCIA2320E
SCIA5477E
SCIA6180J
Page 427 of 5621

AT-348
ASSEMBLY
Revision: 2006 January2006 M35/M45
iii. Install output shaft in transmission case.
CAUTION:
Be careful not to mistake front for rear because both sides
looks similar. (Thinner end is front side.)
iv. Install bearing race to output shaft.
v. Apply recommended sealant (Genuine Anaerobic Liquid Gasket
or equivalent. Refer to GI-48, "
Recommended Chemical Prod-
ucts and Sealants" .) to rear extension assembly as shown in
the figure.
CAUTION:
Completely remove all moisture, oil and old sealant, etc.
from the transmission case and rear extension assembly
mounting surfaces.
vi. Install rear extension assembly to transmission case.
CAUTION:
Insert the tip of parking rod between the parking pawl and
the parking actuator support when assembling the rear
extension assembly.
vii. Tighten rear extension assembly bolts to the specified torque.
Refer to AT-278, "
Components" .
CAUTION:
Do not reuse self-sealing bolts.
SCIA5030E
SCIA5245E
SCIA5212E
SCIA5029E
SCIA6941E
Page 429 of 5621

AT-350
ASSEMBLY
Revision: 2006 January2006 M35/M45
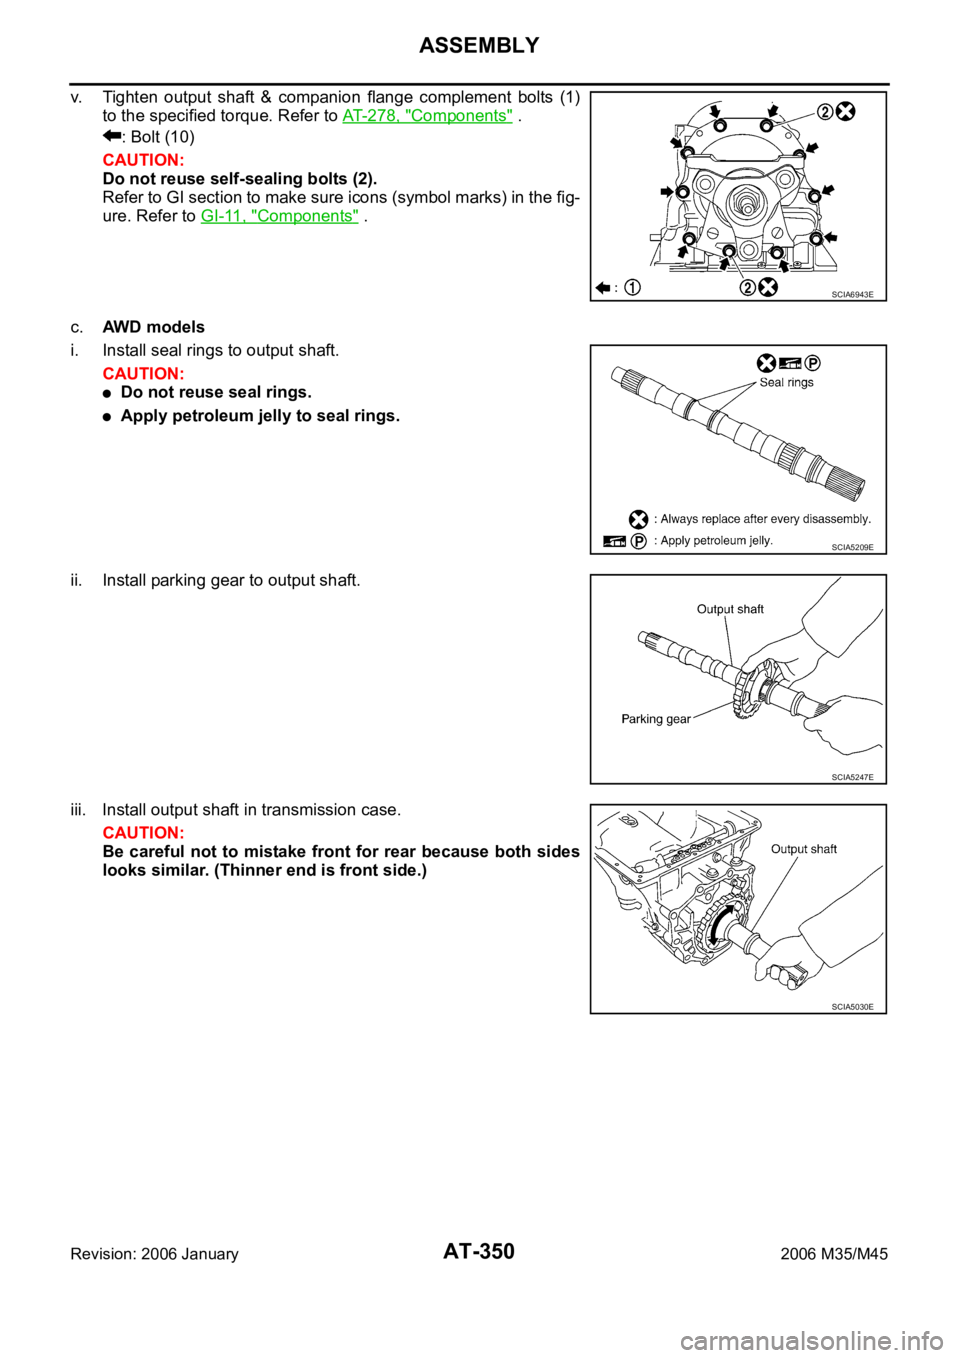
v. Tighten output shaft & companion flange complement bolts (1)
to the specified torque. Refer to AT-278, "
Components" .
: Bolt (10)
CAUTION:
Do not reuse self-sealing bolts (2).
Refer to GI section to make sure icons (symbol marks) in the fig-
ure. Refer to GI-11, "
Components" .
c.AWD m o d e l s
i. Install seal rings to output shaft.
CAUTION:
Do not reuse seal rings.
Apply petroleum jelly to seal rings.
ii. Install parking gear to output shaft.
iii. Install output shaft in transmission case.
CAUTION:
Be careful not to mistake front for rear because both sides
looks similar. (Thinner end is front side.)
SCIA6943E
SCIA5209E
SCIA5247E
SCIA5030E
Page 430 of 5621

ASSEMBLY
AT-351
D
E
F
G
H
I
J
K
L
MA
B
AT
Revision: 2006 January2006 M35/M45
iv. Install bearing race to output shaft.
v. Install gasket onto transmission case.
CAUTION:
Completely remove all moisture, oil and old gasket, etc.
from the transmission case and adapter case assembly
mounting surfaces.
Do not reuse gasket.
vi. Install adapter case assembly to transmission case.
CAUTION:
Insert the tip of parking rod between the parking pawl and
the parking actuator support when assembling the adapter
case assembly.
vii. Tighten adapter case assembly bolts (1) to the specified torque.
[With bracket (2).] Refer to AT-278, "
Components" .
: Bolt (10)
CAUTION:
Do not reuse self-sealing bolts (3).
Refer to GI section to make sure icons (symbol marks) in the fig-
ure. Refer to GI-11, "
Components" .
SCIA5245E
SCIA5231E
SCIA5186E
SCIA6910E