headlamp INFINITI M35 2006 Factory Service Manual
[x] Cancel search | Manufacturer: INFINITI, Model Year: 2006, Model line: M35, Model: INFINITI M35 2006Pages: 5621, PDF Size: 65.56 MB
Page 22 of 5621
![INFINITI M35 2006 Factory Service Manual LASER BEAM AIMING ADJUSTMENT
ACS-13
[ICC]
C
D
E
F
G
H
I
J
L
MA
B
ACS
Revision: 2006 January2006 M35/M45
LASER BEAM AIMING ADJUSTMENTPFP:00026
OutlineNKS004CM
Adjust the laser beam aiming every time th INFINITI M35 2006 Factory Service Manual LASER BEAM AIMING ADJUSTMENT
ACS-13
[ICC]
C
D
E
F
G
H
I
J
L
MA
B
ACS
Revision: 2006 January2006 M35/M45
LASER BEAM AIMING ADJUSTMENTPFP:00026
OutlineNKS004CM
Adjust the laser beam aiming every time th](/img/42/57023/w960_57023-21.png)
LASER BEAM AIMING ADJUSTMENT
ACS-13
[ICC]
C
D
E
F
G
H
I
J
L
MA
B
ACS
Revision: 2006 January2006 M35/M45
LASER BEAM AIMING ADJUSTMENTPFP:00026
OutlineNKS004CM
Adjust the laser beam aiming every time the ICC sensor integrated unit is removed or installed.
CAUTION:
Adjust laser beam aiming at a horizontal place as far as 12 m (39 ft) forward the vehicle can be
seen.
Adjust laser beam aiming 5 seconds after starting engine.
Never view ICC sensor integrated unit body window directly during laser beam aiming adjustment.
Follow the CONSULT-II when adjusting the laser beam aiming (laser beam aiming adjustment can-
not be operated without CONSULT-II).
Never ride on vehicle during laser beam aiming adjustment.
Idle and turn headlamps OFF during laser beam aiming adjustment.
PreparationNKS004CN
Adjust the tire pressure to the specified value.
See that there is no load in the vehicle.
Coolant, engine oil filled up to correct level and full fuel tank.
Shift the gear into “P” position and release the parking brake.
Clean the ICC sensor integrated unit with a soft cloth.
Remove the front bumper grille. Refer to EI-13, "Removal and
Installation of Front Bumper Grille" .
Outline of Adjustment ProcedureNKS004CO
1. Set up the ICC target board [KV99110100 (J-45718)].
2. Adjust the sensor following the procedure on CONSULT-II. (Turn manually the screw for up-down position
adjustment. ICC sensor integrated unit automatically adjust the right-left position.)
Setting the ICC Target BoardNKS004CP
Accurate ICC target board setting is required for the laser beam aiming adjustment.
CAUTION:
ICC system does not function normally if laser beam aiming is not accurate.
ADJUSTING HEIGHT OF THE TARGET
1. Attach a triangle scale at 28 mm (1.10 in) below the center.
PKIB8350E
PKIB8351E
Page 925 of 5621
BCS-4
BCM (BODY CONTROL MODULE)
Revision: 2006 January2006 M35/M45
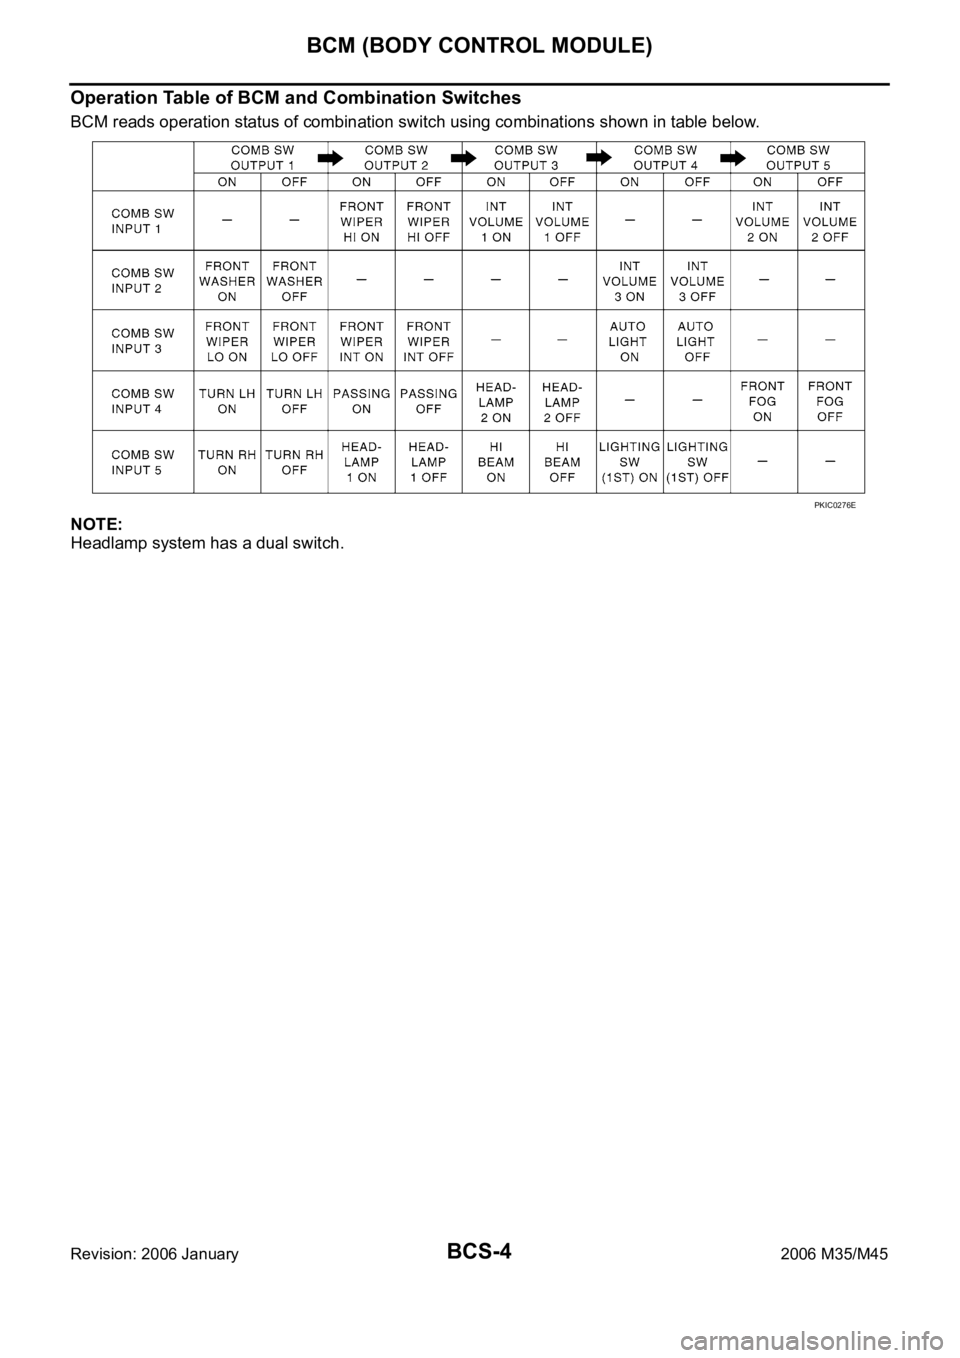
Operation Table of BCM and Combination Switches
BCM reads operation status of combination switch using combinations shown in table below.
NOTE:
Headlamp system has a dual switch.
PKIC0276E
Page 929 of 5621
BCS-8
BCM (BODY CONTROL MODULE)
Revision: 2006 January2006 M35/M45
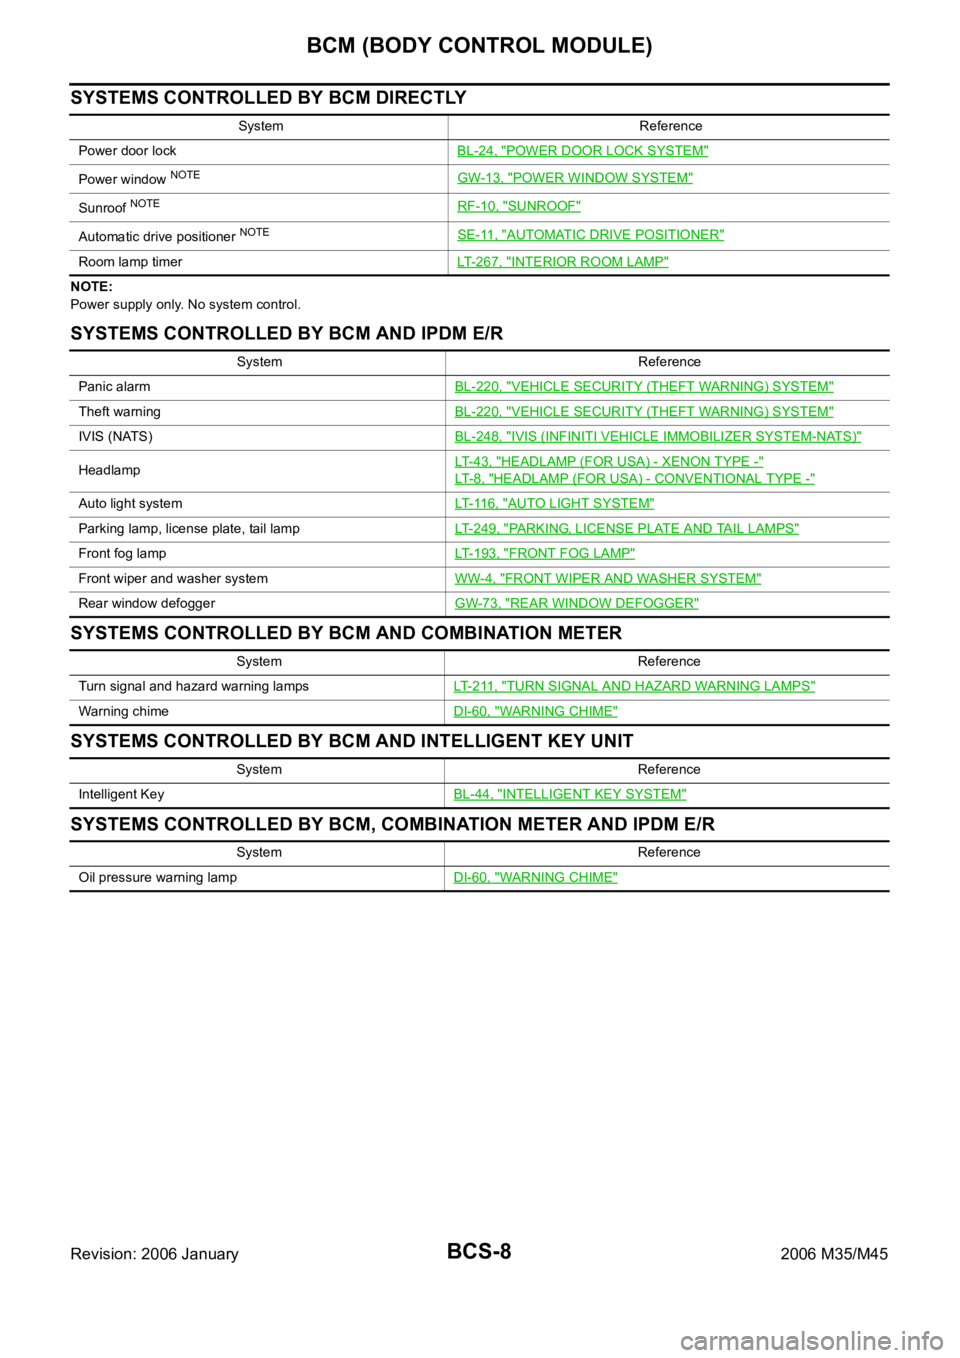
SYSTEMS CONTROLLED BY BCM DIRECTLY
NOTE:
Power supply only. No system control.
SYSTEMS CONTROLLED BY BCM AND IPDM E/R
SYSTEMS CONTROLLED BY BCM AND COMBINATION METER
SYSTEMS CONTROLLED BY BCM AND INTELLIGENT KEY UNIT
SYSTEMS CONTROLLED BY BCM, COMBINATION METER AND IPDM E/R
System Reference
Power door lockBL-24, "
POWER DOOR LOCK SYSTEM"
Power window NOTEGW-13, "POWER WINDOW SYSTEM"
Sunroof NOTERF-10, "SUNROOF"
Automatic drive positioner NOTESE-11, "AUTOMATIC DRIVE POSITIONER"
Room lamp timerLT-267, "INTERIOR ROOM LAMP"
System Reference
Panic alarmBL-220, "
VEHICLE SECURITY (THEFT WARNING) SYSTEM"
Theft warningBL-220, "VEHICLE SECURITY (THEFT WARNING) SYSTEM"
IVIS (NATS)BL-248, "IVIS (INFINITI VEHICLE IMMOBILIZER SYSTEM-NATS)"
HeadlampLT- 4 3 , "HEADLAMP (FOR USA) - XENON TYPE -"
LT- 8 , "HEADLAMP (FOR USA) - CONVENTIONAL TYPE -"
Auto light systemLT- 11 6 , "AUTO LIGHT SYSTEM"
Parking lamp, license plate, tail lampLT-249, "PARKING, LICENSE PLATE AND TAIL LAMPS"
Front fog lampLT-193, "FRONT FOG LAMP"
Front wiper and washer systemWW-4, "FRONT WIPER AND WASHER SYSTEM"
Rear window defoggerGW-73, "REAR WINDOW DEFOGGER"
System Reference
Turn signal and hazard warning lampsLT- 2 11 , "
TURN SIGNAL AND HAZARD WARNING LAMPS"
Warning chimeDI-60, "WARNING CHIME"
System Reference
Intelligent KeyBL-44, "
INTELLIGENT KEY SYSTEM"
System Reference
Oil pressure warning lampDI-60, "
WARNING CHIME"
Page 930 of 5621

BCM (BODY CONTROL MODULE)
BCS-9
C
D
E
F
G
H
I
J
L
MA
B
BCS
Revision: 2006 January2006 M35/M45
MAJOR COMPONENTS AND CONTROL SYSTEM
NOTE:
*1: Functions only when the Intelligent Key is inserted in key slot.
*2: With navigation system
*3: Without navigation systemSystem Input Output
Intelligent Key system Intelligent Key unit
All door locking actuator
Trunk lid opener actuator
Turn signal lamp (LH, RH)
Combination meter
Power door lock system
Power window main switch (door lock and unlock switch)
Power window sub switch (passenger side)
(door lock and unlock switch)All-door locking actuator
Power supply (IGN) to power win-
dow, sunroofIgnition power supply Power window and sunroof system
Power supply (BAT) to power
window, sunroof and power seatBattery power supplyPower window, sunroof system and
power seat
Panic alarm
Key slot
Intelligent KeyIPDM E/R
Theft warning system
All-door switch
Hood switch
Intelligent Key
Power window main switch (door lock and unlock switch)
IPDM E/R
Security indicator lamp
Auto light system
Optical sensor
Combination switchIPDM E/R
Battery saver control
Ignition switch
Combination switchIPDM E/R
Headlamp
Tail lamp
Front fog lampCombination switch IPDM E/R
Turn signal lamp Combination switch
Turn signal lamp
Combination meter
Hazard lamp Hazard switch
Turn signal lamp
Combination meter
Room lamp timer
Key switch
Power window main switch (door lock and unlock switch)
Front door switch driver side
All-door switchInterior room lamp
Key warning chime*
1Key switch
Front door switch driver sideCombination meter (warning buzzer)
Light warning chime
Combination switch
Front door switch driver sideCombination meter (warning buzzer)
Seat belt warning chime
Combination meter [Seat belt buckle (driver side) switch]
Ignition switchCombination meter (warning buzzer)
Vehicle-speed-sensing intermit-
tent wiper
Combination switch
Unified meter and A/C amp.IPDM E/R
Rear window defogger
Multifunction switch
NAVI control unit*2
AV control unit*3
IPDM E/R
Page 935 of 5621

BCS-14
BCM (BODY CONTROL MODULE)
Revision: 2006 January2006 M35/M45
4. Select the desired part to be diagnosed on the “SELECT TEST
ITEM” screen.
ITEMS OF EACH PART
: Applicable
NOTE:
CONSULT-II displays systems equipped in the vehicle.
PKIC0325E
System and item CONSULT-II displayDiagnostic test mode (Inspection by part)
WORK
SUPPORTSELFDIAG
RESULTSDATA
MONITORCAN DIAG
SUPPORT
MNTRACTIVE
TESTECU
PA R T
NUMBER
BCM BCM
Power door lock system DOOR LOCK
Rear window defogger REAR DEFOGGER
Warning chime BUZZER
Room lamp timer INT LAMP
Headlamp HEAD LAMP
Wiper WIPER
Turn signal lamp
Hazard lampFLASHER
Intelligent Key system INTELLIGENT KEY
Combination switch COMB SW
IVIS IMMU
Room lamp battery saver BATTERY SAVER
Trunk lid TRUNK
Vehicle security system THEFT ALM
Retained power control RETAINED PWR
Oil pressure switch SIGNAL BUFFER
Panic system PANIC ALARM
Page 943 of 5621

BL-4Revision: 2006 January2006 M35/M45 Terminals and Reference Value for BCM ..............213
CONSULT-II Function (BCM) ................................214
CONSULT-II INSPECTION PROCEDURE ........214
DATA MONITOR ................................................215
ACTIVE TEST ...................................................215
Trouble Diagnosis .................................................216
TRUNK DOSE NOT OPEN WITH TRUNK LID
OPENER SWITCH / WITH INTELLIGENT KEY .216
VEHICLE SECURITY (THEFT WARNING) SYSTEM .220
Component Parts and Harness Connector Location .220
System Description ...............................................222
DESCRIPTION ..................................................222
POWER SUPPLY AND GROUND CIRCUIT .....223
INITIAL CONDITION TO ACTIVATE THE SYS-
TEM ...................................................................223
VEHICLE SECURITY SYSTEM ALARM OPER-
ATION ................................................................224
VEHICLE SECURITY SYSTEM DEACTIVATION .224
PANIC ALARM OPERATION .............................224
CAN Communication System Description ............224
CAN Communication Unit .....................................224
Schematic .............................................................225
Wiring Diagram —VEHSEC— ..............................226
Terminals and Reference Value of BCM ...............232
Terminals and Reference Value of IPDM E/R .......232
CONSULT-II Function (BCM) ................................233
CONSULT-II APPLICATION ITEM .....................234
Trouble Diagnosis Work Flow ...............................235
Preliminary Check ................................................235
Trouble Diagnosis Symptom Chart .......................237
Diagnostic Procedure 1 ........................................238
DOOR SWITCH CHECK ...................................238
HOOD SWITCH CHECK ...................................241
TRUNK ROOM LAMP SWITCH CHECK ..........243
Diagnostic Procedure 2 ........................................245
SECURITY INDICATOR LAMP CHECK ............245
Diagnostic Procedure 3 ........................................246
FRONT DOOR KEY CYLINDER SWITCH
CHECK ..............................................................246
Diagnostic Procedure 4 ........................................246
VEHICLE SECURITY HORN ALARM CHECK . 246
Diagnostic Procedure 5 ........................................247
VEHICLE SECURITY HEADLAMP ALARM
CHECK ..............................................................247
Diagnostic Procedure 6 ........................................247
DOOR LOCK AND UNLOCK SWITCH CHECK .247
Diagnostic Procedure 7 ........................................247
VEHCLE SECURITY HAZARD LAMP ALARM
CHECK ..............................................................247
IVIS (INFINITI VEHICLE IMMOBILIZER SYSTEM-
NATS) ......................................................................248
Component Parts and Harness Connector Location .248
System Description ...............................................250
DESCRIPTION ..................................................250
PRECAUTIONS FOR KEY REGISTRATION ....250
SECURITY INDICATOR ....................................250
Operation Description ...........................................251
SYSTEM DIAGRAM ..........................................251
OPERATION WHEN INSERTING TO KEY SLOT .251OPERATION WHEN INTELLIGENT KEY IS
CARRIED ...........................................................251
PUSH-BUTTON IGNITION SWITCH OPERA-
TION PROCEDURE ..........................................251
ECM Re-Communicating Function .......................252
Schematic .............................................................254
Wiring Diagram — NATS — ..................................256
Terminals and Reference Value for Intelligent Key
Unit ........................................................................264
Terminals and Reference Value for Steering Lock
Unit ........................................................................266
Terminals and Reference Value for BCM ..............266
Terminals and Reference Value for IPDM E/R ......267
Terminals and Reference Value for PDU ..............267
CONSULT-II ..........................................................268
CONSULT-II INSPECTION PROCEDURE ........268
CONSULT-II DIAGNOSTIC TEST MODE FUNC-
TION ..................................................................270
HOW TO READ SELF-DIAGNOSTIC RESULTS .270
“NATS V5.0” SELF-DIAGNOSTIC RESULTS
ITEM CHART .....................................................271
“NATS BCM OR S/ENT” SELF-DIAGNOSTIC
RESULTS ITEM CHART ....................................271
“NATS I-KEY” SELF-DIAGNOSTIC RESULTS
ITEM CHART .....................................................272
Work Flow .............................................................272
Trouble Diagnoses Flow Chart for IVIS (NATS) ....275
Symptom Chart for Security Indicator ...................277
CONDITIONS OF VEHICLE (OPERATING CON-
DITIONS) ...........................................................277
Check Security Indicator Harness .........................277
DTC P1612 CHAIN of ECM-IMMU .......................278
DTC P1611 ID DISCORD, IMM-ECM ...................280
Removal and Installation of Key Slot ....................280
REMOVAL ..........................................................280
INSTALLATION ..................................................280
INTEGRATED HOMELINK TRANSMITTER ...........281
Wiring Diagram —TRNSCV— ..............................281
Trouble Diagnoses ................................................282
DIAGNOSTIC PROCEDURE .............................282
BODY REPAIR ........................................................284
Body Exterior Paint Color ......................................284
Body Component Parts .........................................285
UNDERBODY COMPONENT PARTS ...............285
BODY COMPONENT PARTS ............................287
Corrosion Protection ..........................................
...289
DESCRIPTION ..................................................289
UNDERCOATING ..............................................290
Body Sealing .........................................................291
DESCRIPTION ..................................................291
Body Construction .................................................294
BODY CONSTRUCTION ...................................294
Body Alignment .....................................................295
BODY CENTER MARKS ...................................295
PANEL PARTS MATCHING MARKS .................296
DESCRIPTION ..................................................297
ENGINE COMPARTMENT ................................298
UNDERBODY ....................................................300
PASSENGER COMPARTMENT ........................302
Page 955 of 5621
BL-16
HOOD
Revision: 2006 January2006 M35/M45
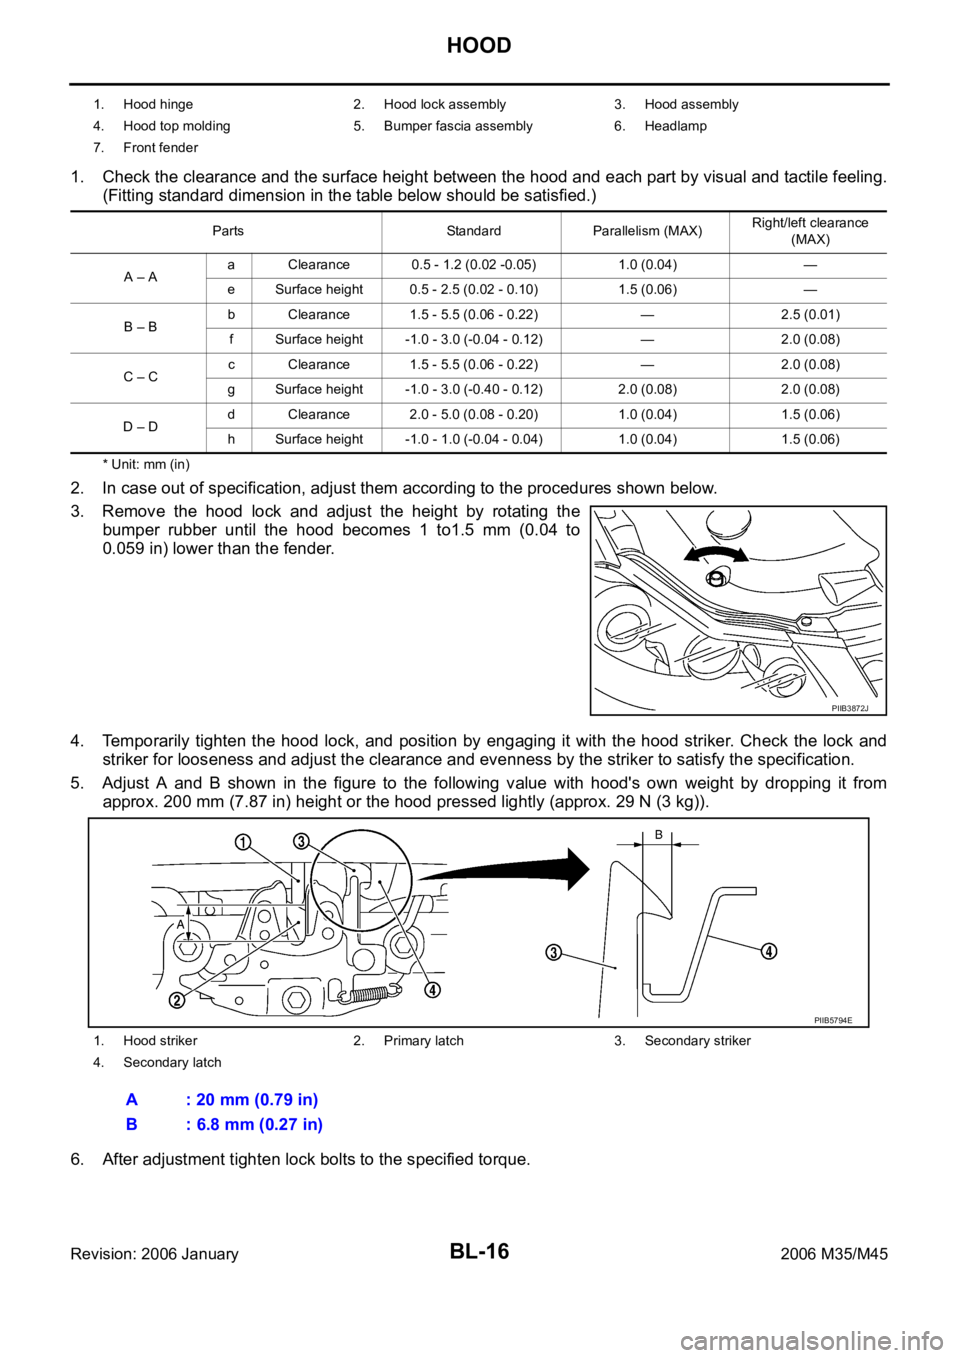
1. Check the clearance and the surface height between the hood and each part by visual and tactile feeling.
(Fitting standard dimension in the table below should be satisfied.)
* Unit: mm (in)
2. In case out of specification, adjust them according to the procedures shown below.
3. Remove the hood lock and adjust the height by rotating the
bumper rubber until the hood becomes 1 to1.5 mm (0.04 to
0.059 in) lower than the fender.
4. Temporarily tighten the hood lock, and position by engaging it with the hood striker. Check the lock and
striker for looseness and adjust the clearance and evenness by the striker to satisfy the specification.
5. Adjust A and B shown in the figure to the following value with hood's own weight by dropping it from
approx. 200 mm (7.87 in) height or the hood pressed lightly (approx. 29 N (3 kg)).
6. After adjustment tighten lock bolts to the specified torque.
1. Hood hinge 2. Hood lock assembly 3. Hood assembly
4. Hood top molding 5. Bumper fascia assembly 6. Headlamp
7. Front fender
Parts Standard Parallelism (MAX)Right/left clearance
(MAX)
A – Aa Clearance 0.5 - 1.2 (0.02 -0.05) 1.0 (0.04) —
e Surface height 0.5 - 2.5 (0.02 - 0.10) 1.5 (0.06) —
B – Bb Clearance 1.5 - 5.5 (0.06 - 0.22) — 2.5 (0.01)
f Surface height -1.0 - 3.0 (-0.04 - 0.12) — 2.0 (0.08)
C – Cc Clearance 1.5 - 5.5 (0.06 - 0.22) — 2.0 (0.08)
g Surface height -1.0 - 3.0 (-0.40 - 0.12) 2.0 (0.08) 2.0 (0.08)
D – Dd Clearance 2.0 - 5.0 (0.08 - 0.20) 1.0 (0.04) 1.5 (0.06)
h Surface height -1.0 - 1.0 (-0.04 - 0.04) 1.0 (0.04) 1.5 (0.06)
PIIB3872J
1. Hood striker 2. Primary latch 3. Secondary striker
4. Secondary latch
A : 20 mm (0.79 in)
B : 6.8 mm (0.27 in)
PIIB5794E
Page 960 of 5621
RADIATOR CORE SUPPORT
BL-21
C
D
E
F
G
H
J
K
L
MA
B
BL
Revision: 2006 January2006 M35/M45
RADIATOR CORE SUPPORTPFP:62500
Removal and InstallationNIS001WN
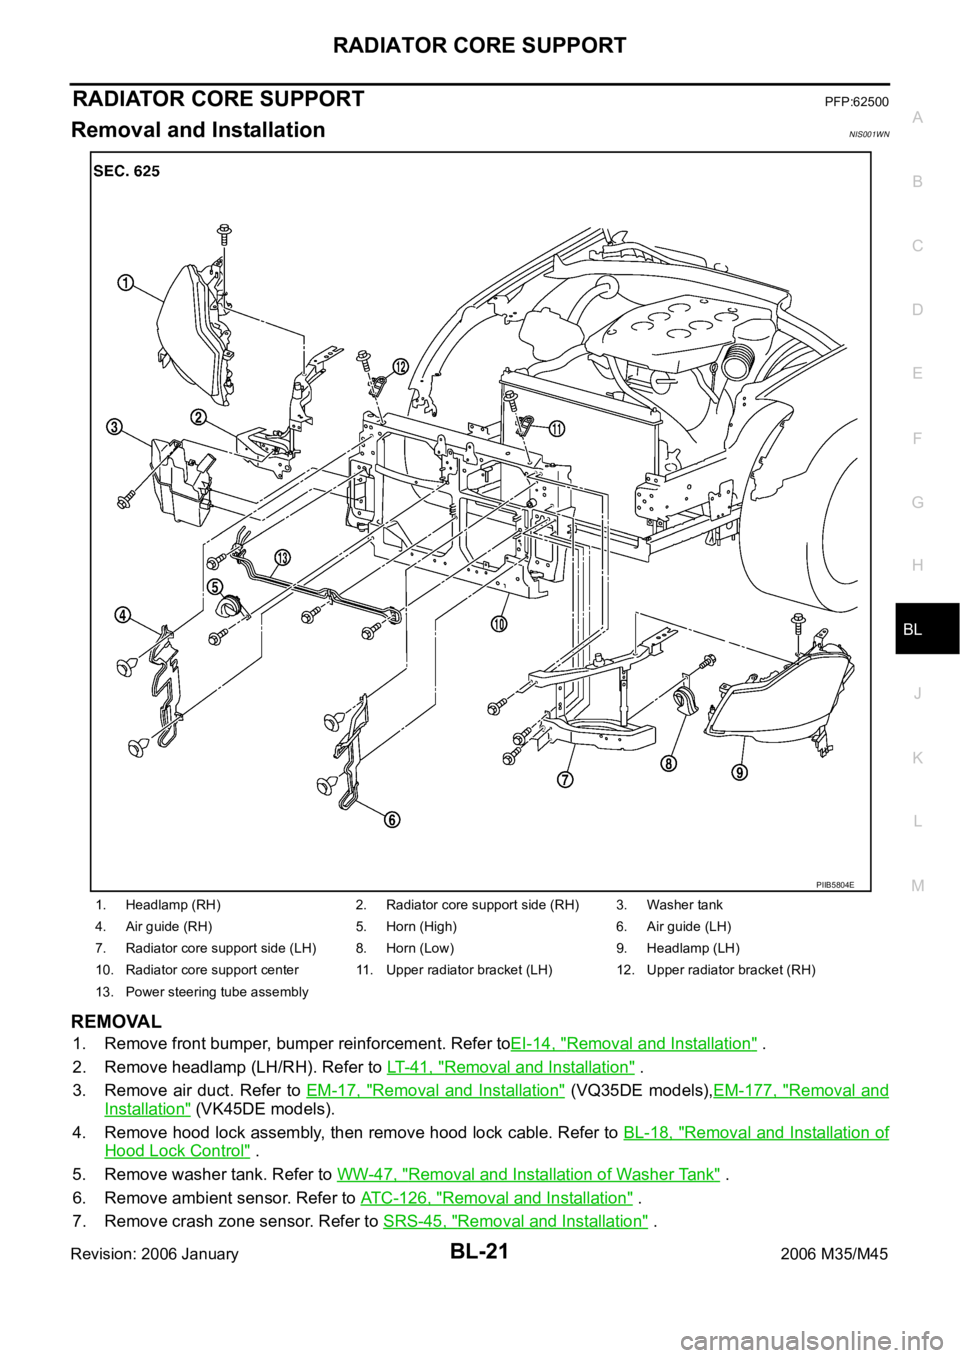
REMOVAL
1. Remove front bumper, bumper reinforcement. Refer toEI-14, "Removal and Installation" .
2. Remove headlamp (LH/RH). Refer to LT- 4 1 , "
Removal and Installation" .
3. Remove air duct. Refer to EM-17, "
Removal and Installation" (VQ35DE models),EM-177, "Removal and
Installation" (VK45DE models).
4. Remove hood lock assembly, then remove hood lock cable. Refer to BL-18, "
Removal and Installation of
Hood Lock Control" .
5. Remove washer tank. Refer to WW-47, "
Removal and Installation of Washer Tank" .
6. Remove ambient sensor. Refer to ATC-126, "
Removal and Installation" .
7. Remove crash zone sensor. Refer to SRS-45, "
Removal and Installation" .
1. Headlamp (RH) 2. Radiator core support side (RH) 3. Washer tank
4. Air guide (RH) 5. Horn (High) 6. Air guide (LH)
7. Radiator core support side (LH) 8. Horn (Low) 9. Headlamp (LH)
10. Radiator core support center 11. Upper radiator bracket (LH) 12. Upper radiator bracket (RH)
13. Power steering tube assembly
PIIB5804E
Page 962 of 5621
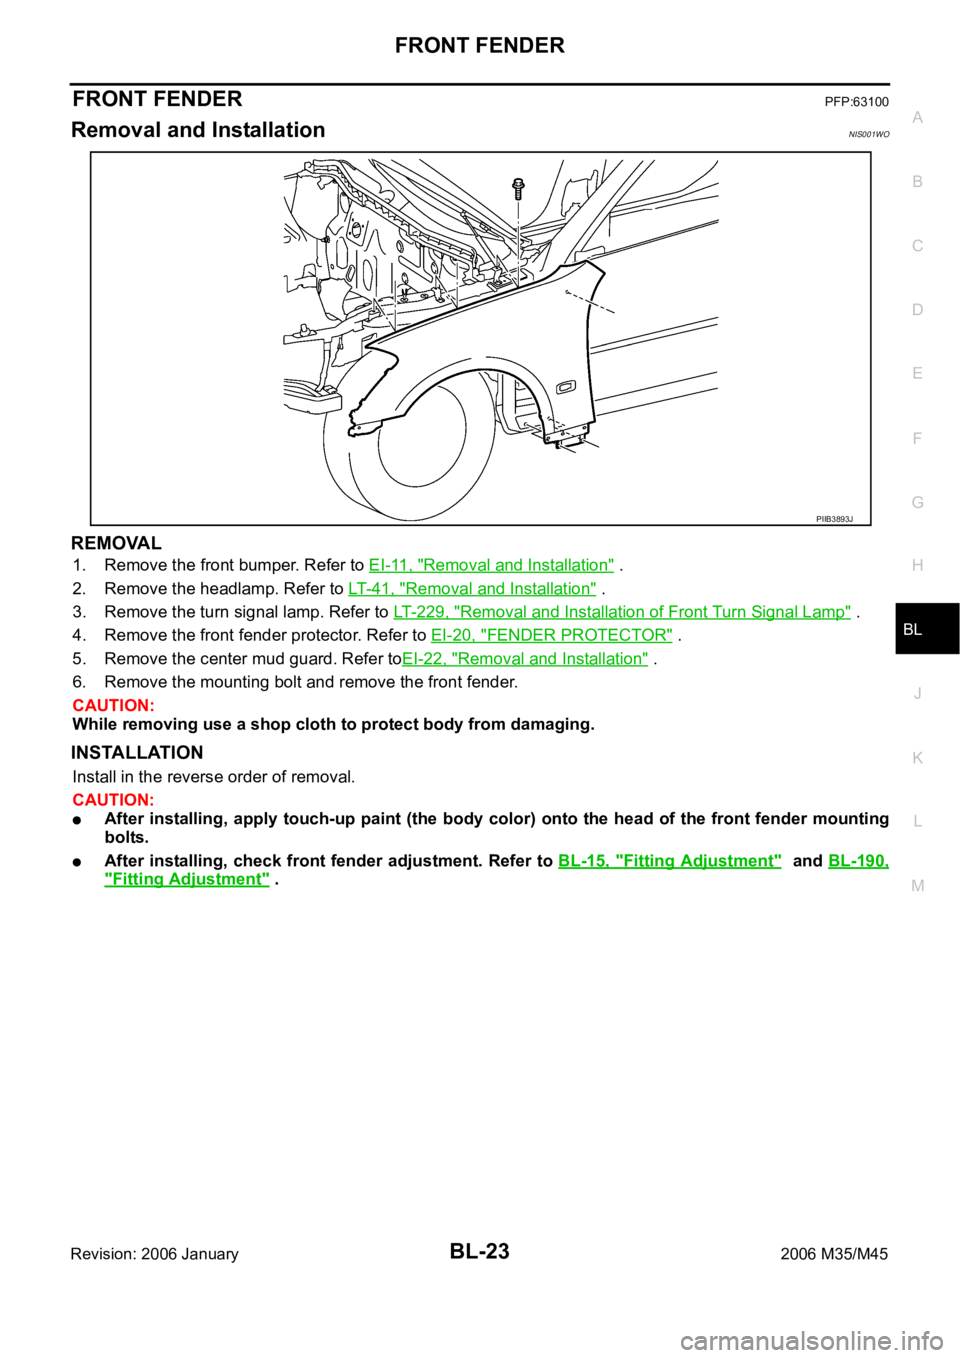
FRONT FENDER
BL-23
C
D
E
F
G
H
J
K
L
MA
B
BL
Revision: 2006 January2006 M35/M45
FRONT FENDERPFP:63100
Removal and InstallationNIS001WO
REMOVAL
1. Remove the front bumper. Refer to EI-11, "Removal and Installation" .
2. Remove the headlamp. Refer to LT-41, "
Removal and Installation" .
3. Remove the turn signal lamp. Refer to LT-229, "
Removal and Installation of Front Turn Signal Lamp" .
4. Remove the front fender protector. Refer to EI-20, "
FENDER PROTECTOR" .
5. Remove the center mud guard. Refer toEI-22, "
Removal and Installation" .
6. Remove the mounting bolt and remove the front fender.
CAUTION:
While removing use a shop cloth to protect body from damaging.
INSTALLATION
Install in the reverse order of removal.
CAUTION:
After installing, apply touch-up paint (the body color) onto the head of the front fender mounting
bolts.
After installing, check front fender adjustment. Refer to BL-15, "Fitting Adjustment" and BL-190,
"Fitting Adjustment" .
PIIB3893J
Page 992 of 5621
INTELLIGENT KEY SYSTEM
BL-53
C
D
E
F
G
H
J
K
L
MA
B
BL
Revision: 2006 January2006 M35/M45
Hazard and Horn Reminder Function
When doors are locked or unlocked by Intelligent Key, Intelligent Key unit sends hazard and horn request sig-
nal to BCM via CAN communication line.
BCM flashes hazard warning lamps as a reminder and sends horn chirp signal to IPDM E/R. IPDM E/R
sounds horn as a reminder.
The hazard and horn reminder has a horn chirp mode (C mode) and a non-horn chirp mode (S mode).
Operating function of hazard and horn reminder
Hazard and horn reminder does not operate if any door switch is ON (any door is OPEN).
How to change hazard and horn reminder mode
With CONSULT-II
Hazard and horn reminder can be changed using “HORN WITH KEYLESS LOCK” and “HAZARD ANSWER
BACK” mode in “WORK SUPPORT”.Refer to BL-83, "
WORK SUPPORT" .
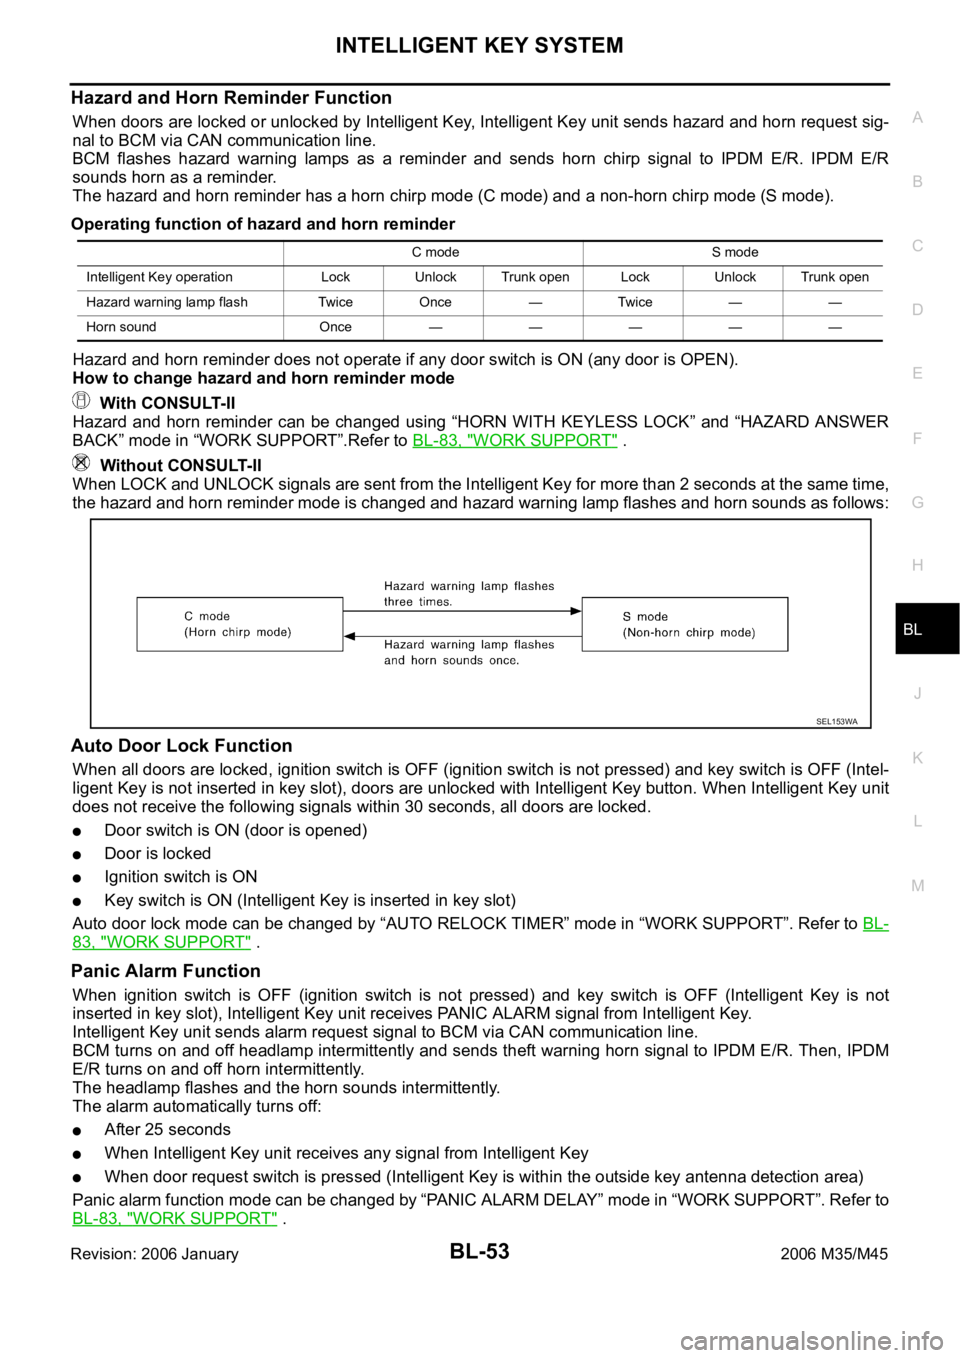
Without CONSULT-II
When LOCK and UNLOCK signals are sent from the Intelligent Key for more than 2 seconds at the same time,
the hazard and horn reminder mode is changed and hazard warning lamp flashes and horn sounds as follows:
Auto Door Lock Function
When all doors are locked, ignition switch is OFF (ignition switch is not pressed) and key switch is OFF (Intel-
ligent Key is not inserted in key slot), doors are unlocked with Intelligent Key button. When Intelligent Key unit
does not receive the following signals within 30 seconds, all doors are locked.
Door switch is ON (door is opened)
Door is locked
Ignition switch is ON
Key switch is ON (Intelligent Key is inserted in key slot)
Auto door lock mode can be changed by “AUTO RELOCK TIMER” mode in “WORK SUPPORT”. Refer to BL-
83, "WORK SUPPORT" .
Panic Alarm Function
When ignition switch is OFF (ignition switch is not pressed) and key switch is OFF (Intelligent Key is not
inserted in key slot), Intelligent Key unit receives PANIC ALARM signal from Intelligent Key.
Intelligent Key unit sends alarm request signal to BCM via CAN communication line.
BCM turns on and off headlamp intermittently and sends theft warning horn signal to IPDM E/R. Then, IPDM
E/R turns on and off horn intermittently.
The headlamp flashes and the horn sounds intermittently.
The alarm automatically turns off:
After 25 seconds
When Intelligent Key unit receives any signal from Intelligent Key
When door request switch is pressed (Intelligent Key is within the outside key antenna detection area)
Panic alarm function mode can be changed by “PANIC ALARM DELAY” mode in “WORK SUPPORT”. Refer to
BL-83, "
WORK SUPPORT" .
C mode S mode
Intelligent Key operation Lock Unlock Trunk open Lock Unlock Trunk open
Hazard warning lamp flash Twice Once — Twice — —
Horn sound Once—————
SEL153WA