INFINITI Q50 HYBRID 2014 Infiniti Intouch
Manufacturer: INFINITI, Model Year: 2014, Model line: Q50 HYBRID, Model: INFINITI Q50 HYBRID 2014Pages: 274, PDF Size: 1.43 MB
Page 101 of 274

6. Infiniti InTouch Apps
6-8
MOBILE APPS
Mobile Apps are a limited selection of
popular smartphone-based apps that have
been customized for in-vehicle use. Mobile
Apps can be accessed by connecting your
compatible smartphone to the vehicle.
GETTING USER ID AND PASSWORD
When you activate the Infiniti InTouch Apps
service for the first time, you should
acquire the user ID and password in
advance, the acquisition of a user ID and
a setup of a password which logs in to
exclusive applications are required.
INFO:
.
It is also possible to acquire an ID and a
password directly from an INFINITI portal
site.
.The vehicle information is required for
entering the user information.
NOTE:
Other applications may not operate as a result
of installing Infiniti InTouch App. (It is impos-
sible to perform verification tests that combine
the system with all possible applications available for a smartphone.)
For details of Mobile Apps, please refer to
http://www.InfinitiUSA.com/InfinitiIn-
Touch/Support/(for United States) or
http://www.Infiniti.ca/InfinitiIntouch (for
Canada)
Notes on linking Smartphone App to
vehicle
NOTE:
.
The service cannot be used with the Mobile
Apps if the application usage setting of
Infiniti InTouch App is not ON.
.Some applications may not run unless they
are installed on a smartphone.
.Based on the user ID information that was
registered with the current application, the
contents are displayed in the in-vehicle
display.
.When using each application, it is assumed
that the user has already agreed to the user
policy of each application in advance.
Accuracy of information that is obtained
using an application is not guaranteed.
.Even when Mobile Apps are updated,
regular apps used in a smartphone may
not always be synchronized.
USING SMARTPHONE APPLICATIONS
1. Connect a smartphone to the vehicle.
2. Push
Page 102 of 274

MEMO
6. Infiniti InTouch Apps
6-9
Page 103 of 274

6. Infiniti InTouch Apps
6-10 MEMO
Page 104 of 274

7 Monitor system
RearView Monitor (if so equipped) ....................... 7-2RearView Monitor operation precautions ......... 7-2
How to read displayed lines ............................ 7-3
How to park with predictive course lines ......... 7-4
ReaView Monitor settings ................................ 7-4
Operating tips ................................................. 7-5
Around View
®Monitor (AVM) (if so equipped) ..... 7-6
Around View Monitor operation precautions .... 7-6
Around View Monitor Main operation .............. 7-7
How to view Around View Monitor screen ........ 7-7
How to see each view...................................... 7-8 Camera aiding sonar function ...................... 7-12
Moving Object Detection (MOD) ................... 7-13
Around View Monitor settings ...................... 7-16
Operating tips.............................................. 7-18
Difference between predictive and
actual distances ................................................ 7-19 Backing up on a steep uphill ....................... 7-19
Backing up on a steep downhill................... 7-19
Backing up near a projecting object............. 7-19
Backing up behind a projecting object ......... 7-20
Page 105 of 274

7. Monitor system
7-2
REARVIEW MONITOR (if so equipped)
When the shift lever is shifted into the R
(Reverse) position, the upper touch screen
display (upper display) shows the view to
the rear of the vehicle.
The system is designed as an aid to the
driver in situations such as slot parking or
parallel parking.
REARVIEW MONITOR OPERATION
PRECAUTIONS
The distance between the vehicle and the
objects viewed on the monitor may be
different from the actual distances.
“Difference between predictive and
actual distances” (page 7-19)
WARNING!
Failure to follow the warnings and instruc-
tions for proper use of the RearView Monitor
could result in serious injury or death.
. The RearView Monitor is a convenience
but it is not a substitute for proper
backing. Always turn and look out the
windows, and check mirrors to be sure
that it is safe to move before operating
the vehicle. Always back up slowly. .
The system is designed as an aid to the
driver in detecting large stationary ob-
jects directly behind the vehicle, to help
avoid damaging the vehicle.
. The system cannot completely eliminate
blind spots and may not detect every
object. It does not warn of moving
objects.
. Underneath the bumper and the corner
areas of the bumper cannot be viewed on
the RearView Monitor because of its
monitoring range limitation. The system
will not detect small objects below the
bumper, and may not detect objects
close to the bumper or on the ground.
. Objects viewed in the RearView Monitor
differ from actual distance because a
wide-angle lens is used.
. Objects in the RearView Monitor will
appear visually opposite, similar to than
when viewed in the rear view and outside
mirrors
. Make sure that the trunk is securely
closed when backing up.
. Do not put anything on the RearView
camera. The RearView camera is installed
above the license plate. .
When washing the vehicle with high-
pressure water, be sure not to spray it
around the camera. Otherwise, water
may enter the camera unit causing water
condensation on the lens, a malfunction,
fire or an electric shock.
. Do not strike the camera. It is a precision
instrument. Otherwise, it may malfunc-
tion or cause damage resulting in a fire
or an electric shock.
CAUTION!
Do not scratch the camera lens when
cleaning dirt or snow from the front of the
camera.
Page 106 of 274

HOW TO READ DISPLAYED LINES
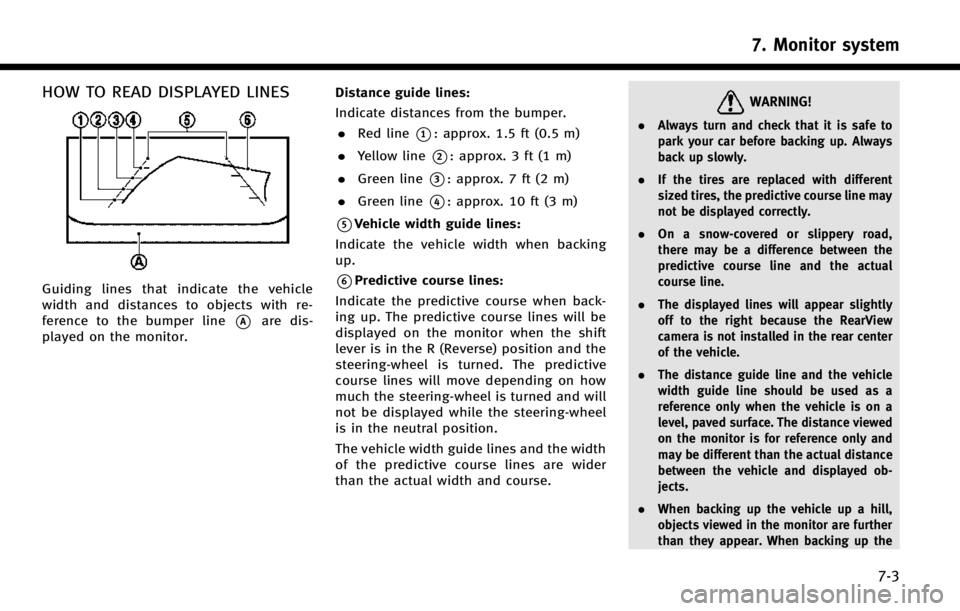
Guiding lines that indicate the vehicle
width and distances to objects with re-
ference to the bumper line
*Aare dis-
played on the monitor. Distance guide lines:
Indicate distances from the bumper.
. Red line
*1: approx. 1.5 ft (0.5 m)
. Yellow line
*2: approx. 3 ft (1 m)
. Green line
*3: approx. 7 ft (2 m)
. Green line
*4: approx. 10 ft (3 m)
*5Vehicle width guide lines:
Indicate the vehicle width when backing
up.
*6Predictive course lines:
Indicate the predictive course when back-
ing up. The predictive course lines will be
displayed on the monitor when the shift
lever is in the R (Reverse) position and the
steering-wheel is turned. The predictive
course lines will move depending on how
much the steering-wheel is turned and will
not be displayed while the steering-wheel
is in the neutral position.
The vehicle width guide lines and the width
of the predictive course lines are wider
than the actual width and course.
WARNING!
. Always turn and check that it is safe to
park your car before backing up. Always
back up slowly.
. If the tires are replaced with different
sized tires, the predictive course line may
not be displayed correctly.
. On a snow-covered or slippery road,
there may be a difference between the
predictive course line and the actual
course line.
. The displayed lines will appear slightly
off to the right because the RearView
camera is not installed in the rear center
of the vehicle.
. The distance guide line and the vehicle
width guide line should be used as a
reference only when the vehicle is on a
level, paved surface. The distance viewed
on the monitor is for reference only and
may be different than the actual distance
between the vehicle and displayed ob-
jects.
. When backing up the vehicle up a hill,
objects viewed in the monitor are further
than they appear. When backing up the
7. Monitor system
7-3
Page 107 of 274

7. Monitor system
7-4
vehicle down a hill, objects viewed in the
monitor are closer than they appear. Use
the inside mirror or glance over your
shoulder to properly judge distances to
other objects.
HOW TO PARK WITH PREDICTIVE
COURSE LINES
1. Visually check that the parking space issafe before parking your vehicle. 2. The rear view of the vehicle
*Ais
displayed as illustrated when the shift
lever is shifted to the R (Reverse)
position.
3. Slowly back up the vehicle adjusting the steering-wheel so that the predic-
tive course lines
*Benter the parking
space
*C.
4. When the back of the vehicle enters the parking space
*C, maneuver the steer-
ing-wheel to make the vehicle width
guide lines
*Dparallel to the parking
space
*C. 5. When the vehicle is parked in the space
completely, move the shift lever to the
P (Park) position and apply the parking
brake.
REAVIEW MONITOR SETTINGS
The RearView Monitor settings can be
changed with the following procedure.
1. Push
Page 108 of 274
![INFINITI Q50 HYBRID 2014 Infiniti Intouch Setting ItemsAction
[Camera Menu] [Predictive Course Lines] When this item is turned on, the predictive
course line is displayed on the rear view
screen.
[Display Settings]
(Available only when camera INFINITI Q50 HYBRID 2014 Infiniti Intouch Setting ItemsAction
[Camera Menu] [Predictive Course Lines] When this item is turned on, the predictive
course line is displayed on the rear view
screen.
[Display Settings]
(Available only when camera](/img/42/34966/w960_34966-107.png)
Setting ItemsAction
[Camera Menu] [Predictive Course Lines] When this item is turned on, the predictive
course line is displayed on the rear view
screen.
[Display Settings]
(Available only when camera
screen is displayed on the
upper display.) [Brightness]
Adjust display settings by touching [+]/[-].
[Contrast]
[Tint]
[Color]
[Black Level]
[Default Settings] Return all settings to default.
OPERATING TIPS
. When the shift lever is shifted to the R
(Reverse) position, the upper screen
automatically changes to the RearView
Monitor mode.
. The following conditions may occur, but
it does not indicate a malfunction.
—
When the view is switched, the images
on the screen may be displayed with
some delay.
—When the temperature is extremely highor low, the screen may not clearly
display objects.
—When strong light directly comes on tothe camera, objects may not be dis- played clearly.
—Vertical lines may be seen in objects on
the screen due to strong reflected light
from the bumper.
—The screen may flicker under fluorescent
light.
—The colors of objects on the RearViewMonitor may differ somewhat from the
actual color of objects.
—Objects on the monitor may not be clearin a dark environment.
. If dirt, rain or snow accumulates on the
camera, the RearView Monitor may not
display object clearly. Clean the camera
if this happens. .
Do not use alcohol, benzine or thinner
to clean the camera. This will cause
discoloration. To clean the camera,
wipe with a cloth dampened with
diluted mild cleaning agent and then
wipe with a dry cloth.
. Do not damage the camera as the
monitor screen may be adversely af-
fected.
. Do not use wax on the camera window.
Wipe off any wax with a clean cloth
dampened with mild detergent diluted
with water.
7. Monitor system
7-5
Page 109 of 274

7. Monitor system
7-6
AROUND VIEW®MONITOR (AVM) (if so
equipped)
When you push the
INFINITI Controller or shift the shift lever
into the R (Reverse) position while the
ignition switch is in the ON position, the
Around View Monitor operates with the
sonar system. The upper touch screen
display (upper display) shows the view to
the Around View Monitor. The Around View
Monitor shows various views of the posi-
tion of the vehicle.
Available views:
. Bird-Eye View
The surrounding view of the vehicle.
. Front-Side View
The view around and ahead of the front
passenger’s side wheel.
. Front View
An approximately 150-degree view of
the front of the vehicle.
. Front-Wide View
An approximately 180-degree view of
the front of the vehicle. .
Rear View
An approximately 150-degree view of
the rear of the vehicle.
. Rear-Wide View
An approximately 180-degree view of
the rear of the vehicle.
AROUND VIEW MONITOR OPERA-
TION PRECAUTIONS
The system is designed as an aid to the
driver in situations such as slot parking or
parallel parking.
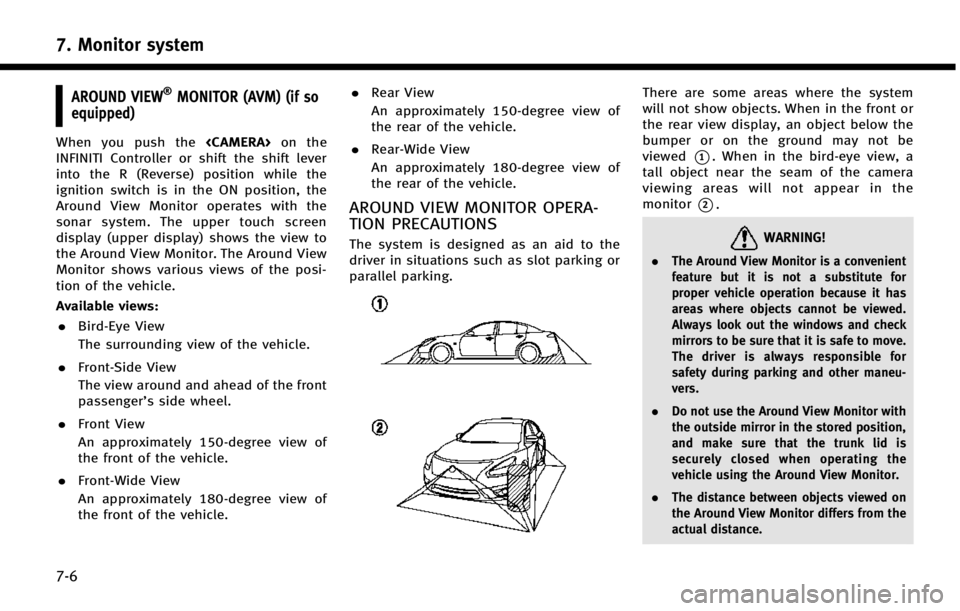
There are some areas where the system
will not show objects. When in the front or
the rear view display, an object below the
bumper or on the ground may not be
viewed
*1. When in the bird-eye view, a
tall object near the seam of the camera
viewing areas will not appear in the
monitor
*2.
WARNING!
. The Around View Monitor is a convenient
feature but it is not a substitute for
proper vehicle operation because it has
areas where objects cannot be viewed.
Always look out the windows and check
mirrors to be sure that it is safe to move.
The driver is always responsible for
safety during parking and other maneu-
vers.
. Do not use the Around View Monitor with
the outside mirror in the stored position,
and make sure that the trunk lid is
securely closed when operating the
vehicle using the Around View Monitor.
. The distance between objects viewed on
the Around View Monitor differs from the
actual distance.
Page 110 of 274

.The cameras are installed above the front
grille, the outside mirrors and above the
rear license plate. Do not put anything on
the cameras.
. When washing the vehicle with high-
pressure water, be sure not to spray it
around the cameras. Otherwise, water
may enter the camera unit causing water
condensation on the lens, a malfunction,
fire or an electric shock.
. Do not strike the cameras. They are
precision instruments. Doing so could
cause a malfunction or cause damage
resulting in a fire or an electric shock.
CAUTION!
Do not scratch the lens when cleaning dirt or
snow from the front of the camera.
AROUND VIEW MONITOR MAIN OP-
ERATION
Starting the system
To start the system, push
change the shift lever position into “R”
while the ignition switch is in the ON
position.
Switching views
Views on the AVM screen can be switched
by pushing
View] or by changing the shift lever
position.
Push
When
screen is displayed, Around View Monitor
operates and the front view and bird-eye
view are displayed. Push
switch the display to the front view and
front-side view screen or front-wide view
screen. Changing shift lever position:
When the shift lever is in the
“R”position,
the rear or rear-wide view is displayed.
When the shift lever is not in the “R”
position, the front or front-wide view is
displayed.
HOW TO VIEW AROUND VIEW
MONITOR SCREEN
Around view screen
7. Monitor system
7-7