ESP INFINITI Q50-HYBRID 2014 Owner's Manual
[x] Cancel search | Manufacturer: INFINITI, Model Year: 2014, Model line: Q50-HYBRID, Model: INFINITI Q50-HYBRID 2014Pages: 402, PDF Size: 2.83 MB
Page 144 of 402
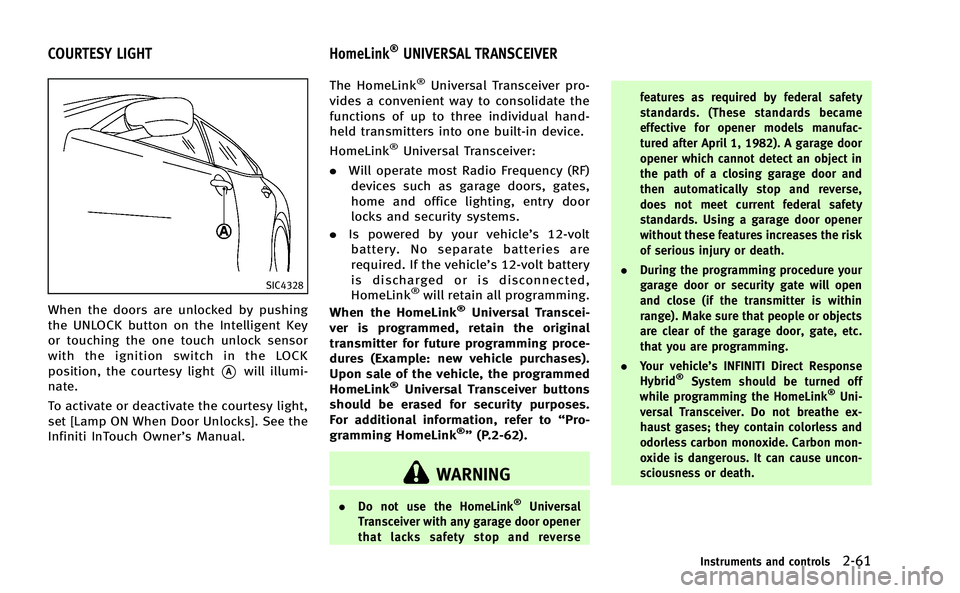
SIC4328
When the doors are unlocked by pushing
the UNLOCK button on the Intelligent Key
or touching the one touch unlock sensor
with the ignition switch in the LOCK
position, the courtesy light
*Awill illumi-
nate.
To activate or deactivate the courtesy light,
set [Lamp ON When Door Unlocks]. See the
Infiniti InTouch Owner’s Manual. The HomeLink
®Universal Transceiver pro-
vides a convenient way to consolidate the
functions of up to three individual hand-
held transmitters into one built-in device.
HomeLink
®Universal Transceiver:
. Will operate most Radio Frequency (RF)
devices such as garage doors, gates,
home and office lighting, entry door
locks and security systems.
. Is powered by your vehicle’s 12-volt
battery. No separate batteries are
required. If the vehicle’s 12-volt battery
is discharged or is disconnected,
HomeLink
®will retain all programming.
When the HomeLink®Universal Transcei-
ver is programmed, retain the original
transmitter for future programming proce-
dures (Example: new vehicle purchases).
Upon sale of the vehicle, the programmed
HomeLink
®Universal Transceiver buttons
should be erased for security purposes.
For additional information, refer to “Pro-
gramming HomeLink
®” (P.2-62).
WARNING
. Do not use the HomeLink®Universal
Transceiver with any garage door opener
that lacks safety stop and reverse features as required by federal safety
standards. (These standards became
effective for opener models manufac-
tured after April 1, 1982). A garage door
opener which cannot detect an object in
the path of a closing garage door and
then automatically stop and reverse,
does not meet current federal safety
standards. Using a garage door opener
without these features increases the risk
of serious injury or death.
. During the programming procedure your
garage door or security gate will open
and close (if the transmitter is within
range). Make sure that people or objects
are clear of the garage door, gate, etc.
that you are programming.
. Your vehicle’s INFINITI Direct Response
Hybrid
®System should be turned off
while programming the HomeLink®Uni-
versal Transceiver. Do not breathe ex-
haust gases; they contain colorless and
odorless carbon monoxide. Carbon mon-
oxide is dangerous. It can cause uncon-
sciousness or death.
Instruments and controls2-61
COURTESY LIGHT HomeLink®UNIVERSAL TRANSCEIVER
Page 148 of 402
2. The indicator light will begin to flashafter 20 seconds. Without releasing the
HomeLink
®button, proceed with “Pro-
gramming HomeLink®” - Step 1.
For questions or comments, contact
HomeLink
®at: www.homelink.com or 1-
800-355-3515.
The HomeLink
®Universal Transceiver but-
ton has now been reprogrammed. The new
device can be activated by pushing the
HomeLink
®button that was just pro-
grammed. This procedure will not affect
any other programmed HomeLink
®but-
tons.
IF YOUR VEHICLE IS STOLEN
If your vehicle is stolen, you should change
the codes of any non-rolling code device
that has been programmed into
HomeLink
®. Consult the Owner’s Manual
of each device or call the manufacturer or
retailer of those devices for additional
information.
When your vehicle is recovered, you will
need to reprogram the HomeLink
®Uni-
versal Transceiver with your new transmit-
ter information. FCC Notice:
For USA:
This device complies with Part 15 of the
FCC Rules. Operation is subject to the
following two conditions: (1) This device
may not cause harmful interference, and
(2) this device must accept any interfer-
ence received, including interference that
may cause undesired operation.
NOTE:
Changes or modifications not expressly
approved by the party responsible for
compliance could void the user’s authority
to operate the equipment.
For Canada:
This device complies with RSS-210 of
Industry Canada. Operation is subject to
the following two conditions: (1) this
device may not cause interference, and
(2) this device must accept any interfer-
ence, including interference that may
cause undesired operation of the device.
Instruments and controls2-65
Page 155 of 402
3-6Pre-driving checks and adjustments
3. Within 20 seconds of performing Step2, push and hold the power door lock
switch to the
position (UNLOCK) for
more than 5 seconds.
4. When activated, the hazard indicator will flash twice. When deactivated, the
hazard indicator will flash once.
5. The ignition switch must be placed in the OFF and ON position again between
each setting change.
When the automatic door unlock system is
deactivated, the doors do not unlock when
the ignition switch is placed in the OFF
position. To unlock the door manually, use
the inside lock knob or the power door lock
switch (driver’s or front passenger’s side).
The automatic door unlock function can be
changed on the lower display. (See the
Infiniti InTouch Owner’s Manual.)
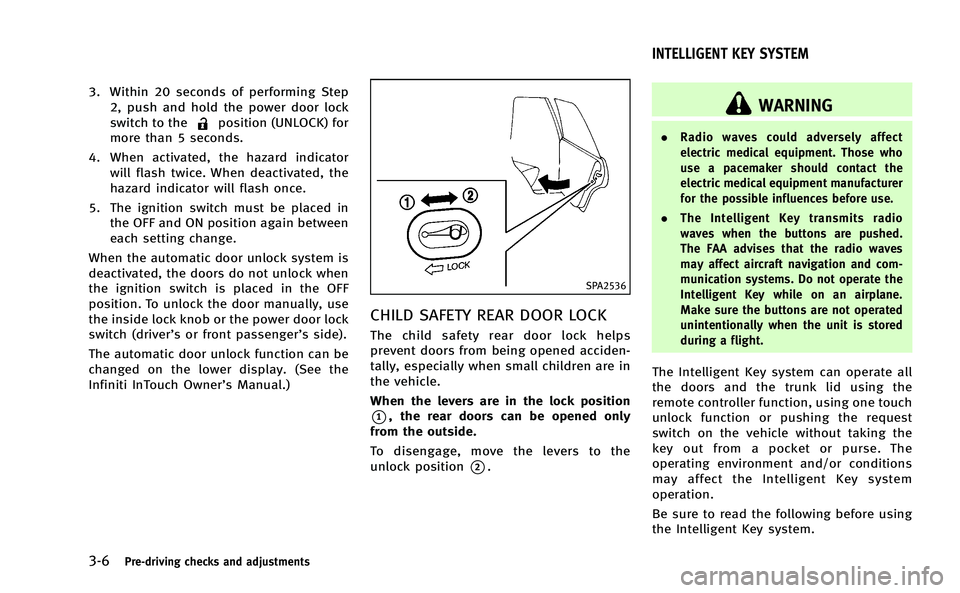
SPA2536
CHILD SAFETY REAR DOOR LOCK
The child safety rear door lock helps
prevent doors from being opened acciden-
tally, especially when small children are in
the vehicle.
When the levers are in the lock position
*1, the rear doors can be opened only
from the outside.
To disengage, move the levers to the
unlock position
*2.
WARNING
. Radio waves could adversely affect
electric medical equipment. Those who
use a pacemaker should contact the
electric medical equipment manufacturer
for the possible influences before use.
. The Intelligent Key transmits radio
waves when the buttons are pushed.
The FAA advises that the radio waves
may affect aircraft navigation and com-
munication systems. Do not operate the
Intelligent Key while on an airplane.
Make sure the buttons are not operated
unintentionally when the unit is stored
during a flight.
The Intelligent Key system can operate all
the doors and the trunk lid using the
remote controller function, using one touch
unlock function or pushing the request
switch on the vehicle without taking the
key out from a pocket or purse. The
operating environment and/or conditions
may affect the Intelligent Key system
operation.
Be sure to read the following before using
the Intelligent Key system.
INTELLIGENT KEY SYSTEM
Page 159 of 402
3-10Pre-driving checks and adjustments
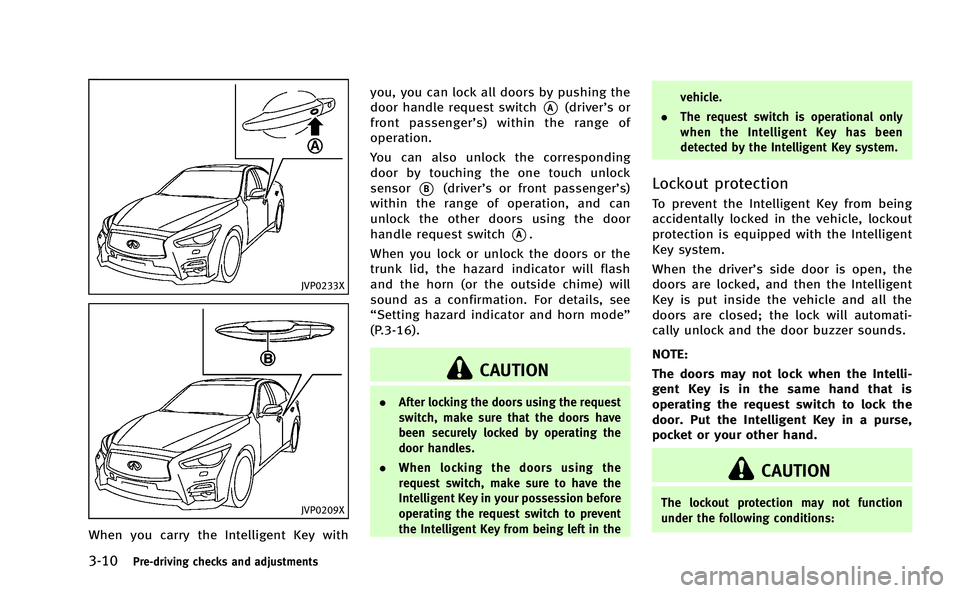
JVP0233X
JVP0209X
When you carry the Intelligent Key withyou, you can lock all doors by pushing the
door handle request switch
*A(driver’sor
front passenger’ s) within the range of
operation.
You can also unlock the corresponding
door by touching the one touch unlock
sensor
*B(driver’s or front passenger’s)
within the range of operation, and can
unlock the other doors using the door
handle request switch
*A.
When you lock or unlock the doors or the
trunk lid, the hazard indicator will flash
and the horn (or the outside chime) will
sound as a confirmation. For details, see
“Setting hazard indicator and horn mode”
(P.3-16).
CAUTION
. After locking the doors using the request
switch, make sure that the doors have
been securely locked by operating the
door handles.
. When locking the doors using the
request switch, make sure to have the
Intelligent Key in your possession before
operating the request switch to prevent
the Intelligent Key from being left in the vehicle.
. The request switch is operational only
when the Intelligent Key has been
detected by the Intelligent Key system.
Lockout protection
To prevent the Intelligent Key from being
accidentally locked in the vehicle, lockout
protection is equipped with the Intelligent
Key system.
When the driver’s side door is open, the
doors are locked, and then the Intelligent
Key is put inside the vehicle and all the
doors are closed; the lock will automati-
cally unlock and the door buzzer sounds.
NOTE:
The doors may not lock when the Intelli-
gent Key is in the same hand that is
operating the request switch to lock the
door. Put the Intelligent Key in a purse,
pocket or your other hand.
CAUTION
The lockout protection may not function
under the following conditions:
Page 160 of 402
.When the Intelligent Key is placed on top
of the instrument panel.
. When the Intelligent Key is placed inside
the glove box or a storage bin.
. When the Intelligent Key is placed inside
the door pockets.
. When the Intelligent Key is placed inside
or near metallic materials.
Locking doors and fuel-filler door
1. Push the ignition switch to the OFF
position and make sure you carry the
Intelligent Key with you.*1
2. Close all the doors.*2
3. Push the door handle request switch (driver’s or front passenger’s)
*Awhile
carrying the Intelligent Key with you.*3
4. All the doors and fuel-filler door will lock.
5. The hazard indicator flashes twice and the outside chime sounds twice.
*1: Doors will lock with the Intelligent Key while the ignition switch is in the ACC
or ON position.
*2: Doors will not lock with the Intelligent Key while any door is open. *3: Doors will not lock by pushing the
door handle request switch with the
Intelligent Key inside the vehicle.
However, when an Intelligent Key is
inside the vehicle, doors can be
locked with another registered Intelli-
gent Key.
Unlocking doors and fuel-filler door
1. Hold the outside door handle (driver’sor front passenger’s) while carrying the
Intelligent Key with you.
2. The hazard indicator flashes once and the outside chime sounds once. The
corresponding door will unlock.
3. Push the door handle request switch within 1 minute.
4. The hazard indicator flashes once and the outside chime sounds once again.
All the doors and the fuel-filler door will
unlock.
All doors and the fuel-filler door will be
locked automatically unless one of the
following operations is performed within 1
minute after pushing the request switch or
touch unlock operation while the doors are
locked.
. Opening any door .
Pushing the ignition switch
During this 1-minute time period, if the
UNLOCK
button on the Intelligent Key
is pushed, all doors will be locked auto-
matically after another 1 minute.
Pre-driving checks and adjustments3-11
Page 171 of 402
3-22Pre-driving checks and adjustments
.Push the power door lock switch to the
UNLOCK position.
To lock, close the fuel-filler door securely
and lock all doors by operating the door
handle request switch, the LOCK button on
the Intelligent Key, the mechanical key or
the power door lock switch.
FUEL-FILLER CAP
WARNING
. Gasoline is extremely flammable and
highly explosive under certain condi-
tions. You could be burned or seriously
injured if it is misused or mishandled.
Always stop the INFINITI Direct Response
Hybrid
®System and do not smoke or
allow open flames or sparks near the
vehicle when refueling.
. Do not attempt to top off the fuel tank
after the fuel pump nozzle shuts off
automatically. Continued refueling may
cause fuel overflow, resulting in fuel
spray and possibly a fire.
. Use only an original equipment type
fuel-filler cap as a replacement. It has a
built-in safety valve needed for proper
operation of the fuel system and emis- sion control system. An incorrect cap can
result in a serious malfunction and
possible injury. It could also cause the
Malfunction Indicator Light (MIL) to
come on.
. Never pour fuel into the throttle body to
attempt to start your vehicle.
. Do not fill a portable fuel container in
the vehicle or trailer. Static electricity
can cause an explosion of flammable
liquid, vapor or gas in any vehicle or
trailer. To reduce the risk of serious
injury or death when filling portable fuel
containers:
—Always place the container on the
ground when filling.
—Do not use electronic devices whenfilling.
—Keep the pump nozzle in contactwith the container while you are
filling it.
—Use only approved portable fuel
containers for flammable liquid.
CAUTION
. If fuel is spilled on the vehicle body,
flush it away with water to avoid paint
damage.
. Failure to tighten the fuel-filler cap
properly may cause the
Malfunction
Indicator Light (MIL) to illuminate. If the
light illuminates because the fuel-
filler cap is loose or missing, tighten or
install the cap and continue to drive the
vehicle. The
light should turn off
after a few driving trips. If thelight
does not turn off after a few driving trips,
have the vehicle inspected by an INFINITI
retailer.
. The Loose Fuel Cap warning will appear
if the fuel-filler cap is not properly
tightened. It may take a few driving
trips for the warning to be displayed.
Failure to tighten the fuel-filler cap
properly after the Loose Fuel Cap warn-
ing appears may cause the
Mal-
function Indicator Light (MIL) to
illuminate.
. For additional information, see “Mal-
function Indicator Light (MIL)” (P.2-19).
Page 186 of 402
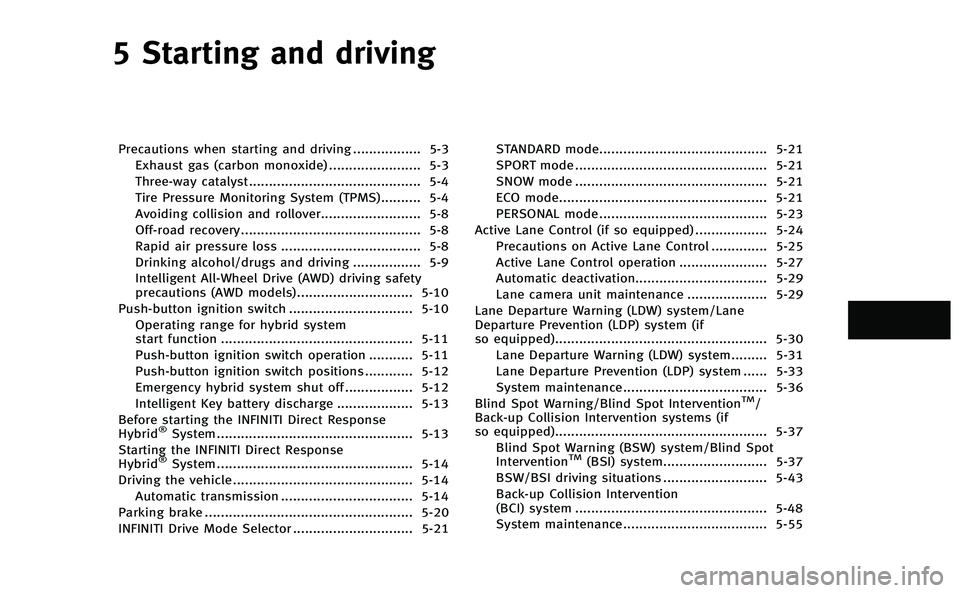
5 Starting and driving
Precautions when starting and driving................. 5-3
Exhaust gas (carbon monoxide) ....................... 5-3
Three-way catalyst........................................... 5-4
Tire Pressure Monitoring System (TPMS).......... 5-4
Avoiding collision and rollover......................... 5-8
Off-road recovery............................................. 5-8
Rapid air pressure loss ................................... 5-8
Drinking alcohol/drugs and driving ................. 5-9
Intelligent All-Wheel Drive (AWD) driving safety
precautions (AWD models)............................. 5-10
Push-button ignition switch ............................... 5-10 Operating range for hybrid system
start function ................................................ 5-11
Push-button ignition switch operation ........... 5-11
Push-button ignition switch positions ............ 5-12
Emergency hybrid system shut off ................. 5-12
Intelligent Key battery discharge ................... 5-13
Before starting the INFINITI Direct Response
Hybrid
®System ................................................. 5-13
Starting the INFINITI Direct Response
Hybrid
®System ................................................. 5-14
Driving the vehicle ............................................. 5-14 Automatic transmission ................................. 5-14
Parking brake .................................................... 5-20
INFINITI Drive Mode Selector .............................. 5-21 STANDARD mode.......................................... 5-21
SPORT mode ................................................ 5-21
SNOW mode ................................................ 5-21
ECO mode.................................................... 5-21
PERSONAL mode .......................................... 5-23
Active Lane Control (if so equipped) .................. 5-24
Precautions on Active Lane Control .............. 5-25
Active Lane Control operation ...................... 5-27
Automatic deactivation................................. 5-29
Lane camera unit maintenance .................... 5-29
Lane Departure Warning (LDW) system/Lane
Departure Prevention (LDP) system (if
so equipped)..................................................... 5-30 Lane Departure Warning (LDW) system......... 5-31
Lane Departure Prevention (LDP) system ...... 5-33
System maintenance.................................... 5-36
Blind Spot Warning/Blind Spot Intervention
TM/
Back-up Collision Intervention systems (if
so equipped)..................................................... 5-37
Blind Spot Warning (BSW) system/Blind Spot
Intervention
TM(BSI) system.......................... 5-37
BSW/BSI driving situations .......................... 5-43
Back-up Collision Intervention
(BCI) system ................................................ 5-48
System maintenance.................................... 5-55
Page 188 of 402
WARNING
.Do not leave children or adults who
would normally require the support of
others alone in your vehicle. Pets should
not be left alone either. They could
accidentally injure themselves or others
through inadvertent operation of the
vehicle. Also, on hot, sunny days,
temperatures in a closed vehicle could
quickly become high enough to cause
severe or possibly fatal injuries to
people or animals.
. Closely supervise children when they are
around cars to prevent them from play-
ing and becoming locked in the trunk
where they could be seriously injured.
Keep the car locked, with the rear
seatback and trunk lid securely latched
when not in use, and prevent children’s
access to car keys.
EXHAUST GAS (carbon monoxide)
WARNING
.Do not breathe exhaust gases; they
contain colorless and odorless carbon
monoxide. Carbon monoxide is danger-
ous. It can cause unconsciousness or
death.
. If you suspect that exhaust fumes are
entering the vehicle, drive with all
windows fully open, and have the
vehicle inspected immediately.
. Do not run the engine in closed spaces
such as a garage.
. Do not park the vehicle with the INFINITI
Direct Response Hybrid
®System run-
ning for any extended length of time.
. Keep the trunk lid closed while driving,
otherwise exhaust gases could be drawn
into the passenger compartment. If you
must drive with the trunk lid open,
follow these precautions:
1) Open all the windows.
2) Set the air recirculation mode to off and the fan control to high to
circulate the air. .
If electrical wiring or other cable con-
nections must pass to a trailer through
the seal on the trunk lid or the body,
follow the manufacturer’s recommenda-
tion to prevent carbon monoxide entry
into the vehicle.
. The exhaust system and body should be
inspected by a qualified mechanic when-
ever:
—The vehicle is raised for service.
—You suspect that exhaust fumes are
entering into the passenger compart-
ment.
—You notice a change in the sound of
the exhaust system.
—You have had an accident involvingdamage to the exhaust system,
underbody, or rear of the vehicle.
Starting and driving5-3
PRECAUTIONS WHEN STARTING AND
DRIVING
Page 190 of 402
light will continue to illuminate until the
system is reset by an INFINITI retailer. Your
vehicle can be driven for a limited time on
a flat tire. See“Run-flat tires” (P.8-36).
Please note that the TPMS is not a
substitute for proper tire maintenance,
and it is the driver’ s responsibility to
maintain correct tire pressure, even if
under-inflation has not reached the level
to trigger illumination of the TPMS low tire
pressure telltale.
Your vehicle has also been equipped with a
TPMS malfunction indicator to indicate
when the system is not operating properly.
The TPMS malfunction indicator is com-
bined with the low tire pressure telltale.
When the system detects a malfunction,
the telltale will flash for approximately one
minute and then remain continuously
illuminated. This sequence will continue
upon subsequent vehicle start-ups as long
as the malfunction exists. When the mal-
function indicator is illuminated, the sys-
tem may not be able to detect or signal low
tire pressure as intended. TPMS malfunc-
tions may occur for a variety of reasons,
including the installation of replacement or
alternate tires or wheels on the vehicle that
prevent the TPMS from functioning prop- erly. Always check the TPMS malfunction
telltale after replacing one or more tires or
wheels on your vehicle to ensure that the
replacement or alternate tires and wheels
allow the TPMS to continue to function
properly.
Additional information
.
The TPMS will activate only when the
vehicle is driven at speeds above 16
MPH (25 km/h). Also, this system may
not detect a sudden drop in tire
pressure (for example a flat tire while
driving).
. The low tire pressure warning light does
not automatically turn off when the tire
pressure is adjusted. After the tire is
inflated to the recommended pressure,
the vehicle must be driven at speeds
above 16 MPH (25 km/h) to activate the
TPMS and turn off the low tire pressure
warning light. Use a tire pressure gauge
to check the tire pressure.
. The “Tire Pressure Low - Add Air”
warning appears in the vehicle informa-
tion display when the low tire pressure
warning light is illuminated and low tire
pressure is detected. The “Tire Pressure
Low - Add Air” warning turns off when
the low tire pressure warning light turns off.
The
“Tire Pressure Low - Add Air”
warning does not appear if the low tire
pressure warning light illuminates to
indicate a TPMS malfunction.
. The “Flat Tire - Visit dealer” warning
appears in the vehicle information dis-
play when the low tire pressure warn-
ing light is illuminated and one or more
flat tires are detected.
. Tire pressure rises and falls depending
on the heat caused by the vehicle’s
operation and the outside temperature.
Low outside temperature can lower the
temperature of the air inside the tire
which can cause a lower tire inflation
pressure. This may cause the low tire
pressure warning light to illuminate. If
the warning light illuminates in low
ambient temperature, check the tire
pressure for all four tires.
. You can also check the pressure of all
tires in the vehicle information display.
(See “Vehicle information display” (P.2-
21).)
For additional information, see “Low tire
pressure warning light” (P.2-15) and“Tire
Pressure Monitoring System (TPMS)” (P.6-
3).
Starting and driving5-5
Page 192 of 402
vehicle.
. If a computer (or similar equipment) or
a DC/AC converter is being used in or
near the vehicle.
FCC Notice:
For USA:
This device complies with Part 15 of the
FCC Rules. Operation is subject to the
following two conditions:
1. This device may not cause harmful
interference, and
2. This device must accept any interfer-
ence received, including interference
that may cause undesired operation.
NOTE:
Changes or modification not expressly
approved by the party responsible for
compliance could void the user’ s
authority to operate the equipment.
For Canada:
This device complies with RSS-210 of
Industry Canada. Operation is subject to
the following two conditions:
1. This device may not cause interference,
and
2. This device must accept any interfer-
ence, include interference that may cause undesired operation of the de-
vice.
TPMS with Tire Inflation Indicator
When adding air to an under-inflated tire,
the TPMS with Tire Inflation Indicator
provides visual and audible signals out-
side the vehicle to help you inflate the tires
to the recommended COLD tire pressure.
Vehicle set-up:
1. Park the vehicle in a safe and level
place.
2. Apply the parking brake and place the shift lever in the P (Park) position.
3. Place the ignition switch in the ON position. Do not start the hybrid
system.
Operation:
1. Add air to the tire.
2. After a few seconds, the hazard indica- tors will start flashing.
3. When the designated pressure is reached, the horn beeps once and the
hazard indicators stop flashing.
4. Perform the above steps for each tire.
. If the tire is over-inflated more than
approximately 4 psi (30 kPa), the horn beeps and the hazard indicators flash 3
times. To correct the pressure, push the
core of the valve stem on the tire briefly
to release pressure. When the pressure
reaches the designated pressure, the
horn beeps once.
. If the hazard indicator does not flash
within approximately 15 seconds after
starting to inflate the tire, it indicates
that the Tire Inflation Indicator is not
operating.
. The TPMS will not activate the Tire
Inflation Indicator under the following
conditions:
— If there is interference from an
external device or transmitter
— The air pressure from the inflation
device such as those using a power
socket is not sufficient to inflate the
tire
— If an electrical equipment is being
used in or near the vehicle
— There is a malfunction in the TPMS
system
— There is a malfunction in the horn or
hazard indicators
. If the Tire Inflation Indicator does not
operate due to TPMS interference,
move the vehicle about 3 ft (1 m)
Starting and driving5-7