INFINITI QX4 2001 Factory Service Manual
Manufacturer: INFINITI, Model Year: 2001, Model line: QX4, Model: INFINITI QX4 2001Pages: 2395, PDF Size: 43.2 MB
Page 571 of 2395

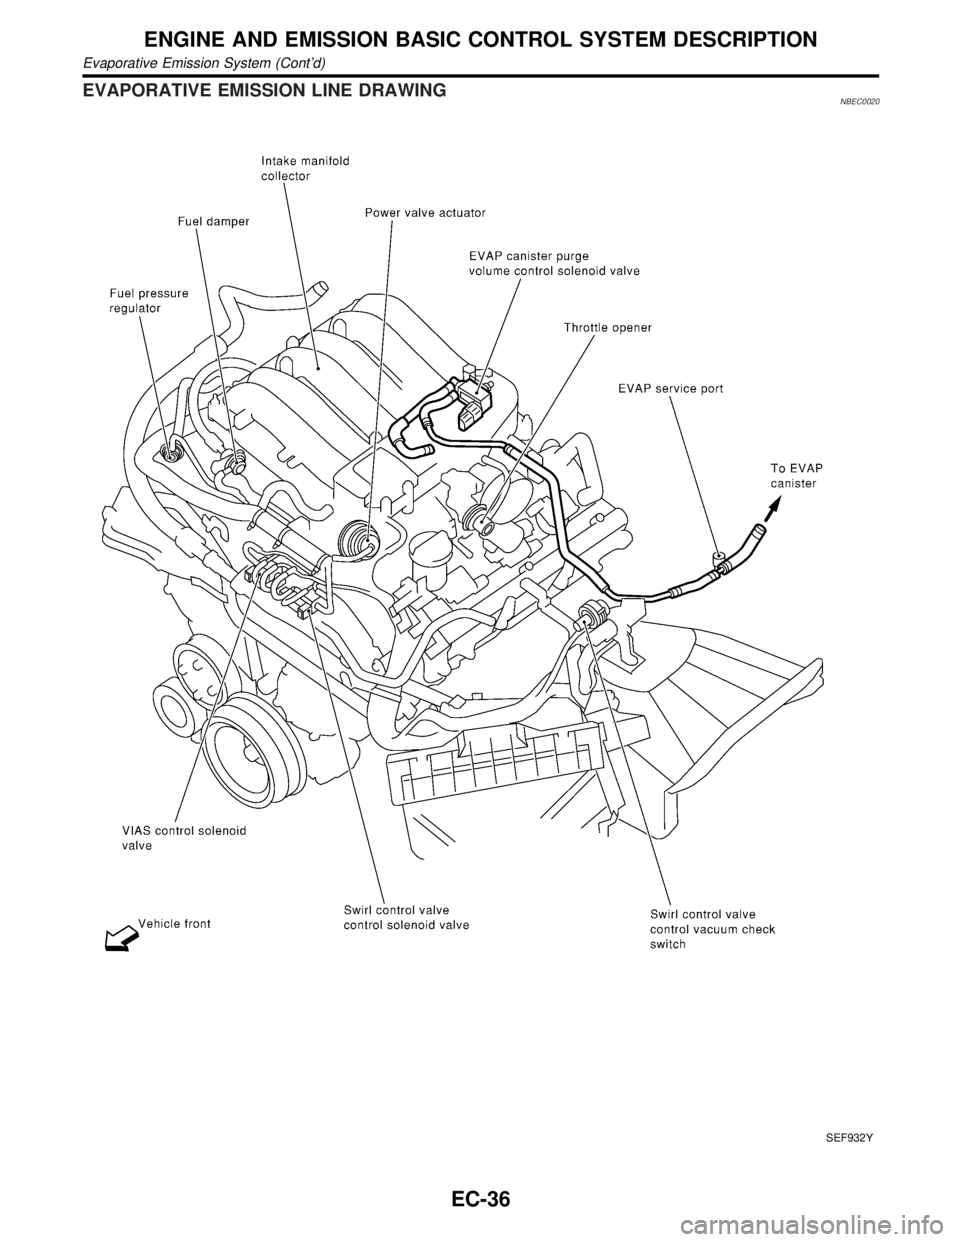
EVAPORATIVE EMISSION LINE DRAWINGNBEC0020
SEF932Y
ENGINE AND EMISSION BASIC CONTROL SYSTEM DESCRIPTION
Evaporative Emission System (Cont'd)
EC-36
Page 572 of 2395

SEF870T
GI
MA
EM
LC
FE
AT
TF
PD
AX
SU
BR
ST
RS
BT
HA
SC
EL
IDX
ENGINE AND EMISSION BASIC CONTROL SYSTEM DESCRIPTION
Evaporative Emission System (Cont'd)
EC-37
Page 573 of 2395

SEF372Q
SEF559A
Positive Crankcase Ventilation
DESCRIPTIONNBEC0021This system returns blow-by gas to the intake manifold.
The positive crankcase ventilation (PCV) valve is provided to con-
duct crankcase blow-by gas to the intake manifold.
During partial throttle operation of the engine, the intake manifold
sucks the blow-by gas through the PCV valve.
Normally, the capacity of the valve is sufficient to handle any
blow-by and a small amount of ventilating air.
The ventilating air is then drawn from the air inlet tubes into the
crankcase. In this process the air passes through the hose con-
necting air inlet tubes to rocker cover.
Under full-throttle condition, the manifold vacuum is insufficient to
draw the blow-by flow through the valve. The flow goes through the
hose connection in the reverse direction.
On vehicles with an excessively high blow-by, the valve does not
meet the requirement. This is because some of the flow will go
through the hose connection to the air inlet tubes under all
conditions.
SEC137A
INSPECTIONNBEC0022PCV (Positive Crankcase Ventilation) ValveNBEC0022S01With engine running at idle, remove PCV valve ventilation hose
from PCV valve; if the valve is working properly, a hissing noise will
be heard as air passes through it and a strong vacuum should be
felt immediately when a finger is placed over valve inlet.
ET277
PCV Valve Ventilation HoseNBEC0022S021. Check hoses and hose connections for leaks.
2. Disconnect all hoses and clean with compressed air. If any
hose cannot be freed of obstructions, replace.
ENGINE AND EMISSION BASIC CONTROL SYSTEM DESCRIPTION
Positive Crankcase Ventilation
EC-38
Page 574 of 2395

SEF941Y
SEF214Y
Fuel Pressure ReleaseNBEC0023Before disconnecting fuel line, release fuel pressure from fuel
line to eliminate danger.
WITH CONSULT-IINBEC0023S011. Turn ignition switch ªONº.
2. Perform ªFUEL PRESSURE RELEASEº in ªWORK SUP-
PORTº mode with CONSULT-II.
3. Start engine.
4. After engine stalls, crank it two or three times to release all fuel
pressure.
5. Turn ignition switch ªOFFº.
SEF933Y
WITHOUT CONSULT-IINBEC0023S021. Remove fuel pump fuse located in fuse box.
2. Start engine.
3. After engine stalls, crank it two or three times to release all fuel
pressure.
4. Turn ignition switch ªOFFº.
5. Reinstall fuel pump fuse after servicing fuel system.
SEF327Z
Fuel Pressure CheckNBEC0024IWhen reconnecting fuel line, always use new clamps.
IMake sure that clamp screw does not contact adjacent
parts.
IUse a torque driver to tighten clamps.
IUse Pressure Gauge to check fuel pressure.
IDo not perform fuel pressure check with system operat-
ing. Fuel pressure gauge may indicate false readings.
1. Release fuel pressure to zero.
2. Disconnect fuel tube joint between fuel damper and injector
tube and set fuel pressure check adapter (J44321).
GI
MA
EM
LC
FE
AT
TF
PD
AX
SU
BR
ST
RS
BT
HA
SC
EL
IDX
BASIC SERVICE PROCEDURE
Fuel Pressure Release
EC-39
Page 575 of 2395

SEF328Z
3. Install pressure gauge to the fuel pressure check adapter as
shown in the figure.
4. Start engine and check for fuel leakage.
5. Read the indication of fuel pressure gauge.
At idling:
With vacuum hose connected
Approximately 235 kPa (2.4 kg/cm
2, 34 psi)
With vacuum hose disconnected
Approximately 294 kPa (3.0 kg/cm
2, 43 psi)
If results are unsatisfactory, perform Fuel Pressure Regulator
Check.
SEF329Z
Fuel Pressure Regulator CheckNBEC00251. Stop engine and disconnect fuel pressure regulator vacuum
hose from vacuum gallery.
2. Plug vacuum gallery with a blind cap.
3. Connect variable vacuum source to fuel pressure regulator.
SEF718BA
4. Start engine and read indication of fuel pressure gauge as
vacuum is changed.
Fuel pressure should decrease as vacuum increases. If results
are unsatisfactory, replace fuel pressure regulator.
BASIC SERVICE PROCEDURE
Fuel Pressure Check (Cont'd)
EC-40
Page 576 of 2395

SEF937Y
SEF703X
Injector
REMOVAL AND INSTALLATIONNBEC00261. Release fuel pressure to zero.
2. Remove intake manifold collector. Refer to EM-20, ªTIMING
CHAINº.
3. Remove fuel tube assemblies in numerical sequence as
shown in the figure at left.
4. Expand and remove clips securing fuel injectors.
5. Extract fuel injectors straight from fuel tubes.
IBe careful not to damage injector nozzles during removal.
IDo not bump or drop fuel injectors.
6. Carefully install O-rings, including the one used with the pres-
sure regulator.
ILubricate O-rings with a smear of engine oil.
IBe careful not to damage O-rings with service tools, fin-
ger nails or clips. Do not expand or twist O-rings.
IDiscard old clips; replace with new ones.
7. Position clips in grooves on fuel injectors.
IMake sure that protrusions of fuel injectors are aligned
with cutouts of clips after installation.
SEF938Y
8. Align protrusions of fuel tubes with those of fuel injectors.
Insert fuel injectors straight into fuel tubes.
9. After properly inserting fuel injectors, check to make sure that
fuel tube protrusions are engaged with those of fuel injectors,
and that flanges of fuel tubes are engaged with clips.
GI
MA
EM
LC
FE
AT
TF
PD
AX
SU
BR
ST
RS
BT
HA
SC
EL
IDX
BASIC SERVICE PROCEDURE
Injector
EC-41
Page 577 of 2395

SEF939Y
10. Tighten fuel tube assembly mounting nuts in numerical
sequence (indicated in the figure at left) and in two stages.
: Tightening torque N´m (kg-m, ft-lb)
1st stage:
9.3 - 10.8 (1.0 - 1.1, 6.9 - 7.9)
2nd stage:
20.6 - 26.5 (2.1 - 2.7, 16 - 19)
11. Install all parts removed in reverse order of removal.
CAUTION:
After properly connecting fuel tube assembly to injector and
fuel hose, check connection for fuel leakage.
SEF058Y
How to Check Idle Speed and Ignition TimingNBEC0607IDLE SPEEDNBEC0607S01IUsing CONSULT-II
Check idle speed in ªDATA MONITORº mode with CONSULT-II.
SEF940Y
IGNITION TIMINGNBEC0607S02Any of following two methods may be used.
IMethod A
a) Attach timing light to loop wire as shown.
b) Check ignition timing.
SEF942Y
IMethod B
a) Remove No. 1 ignition coil.
BASIC SERVICE PROCEDURE
Injector (Cont'd)
EC-42
Page 578 of 2395

SEF943Y
SEF572X
b) Connect No. 1 ignition coil and No. 1 spark plug with suitable
high-tension wire as shown, and attach timing light clamp to
this wire.
c) Check ignition timing.
SEF311Q
Idle Speed/Ignition Timing/Idle Mixture Ratio
Adjustment
NBEC0028PREPARATIONNBEC0028S011) Make sure that the following parts are in good order.
IBattery
IIgnition system
IEngine oil and coolant levels
IFuses
IECM harness connector
IVacuum hoses
GI
MA
EM
LC
FE
AT
TF
PD
AX
SU
BR
ST
RS
BT
HA
SC
EL
IDX
BASIC SERVICE PROCEDURE
How to Check Idle Speed and Ignition Timing (Cont'd)
EC-43
Page 579 of 2395

IAir intake system
(Oil filler cap, oil level gauge, etc.)
IFuel pressure
IEngine compression
IThrottle valve
IEvaporative emission system
2) On air conditioner equipped models, checks should be carried out while the air conditioner is ªOFFº.
3) On automatic transmission equipped models, when checking idle rpm, ignition timing and mixture ratio,
checks should be carried out while shift lever is in ªNº position.
4) When measuring ªCOº percentage, insert probe more than 40 cm (15.7 in) into tail pipe.
5) Turn off headlamps, heater blower, rear defogger.
6) Keep front wheels pointed straight ahead.
7) Make the check after the cooling fan has stopped.
BASIC SERVICE PROCEDURE
Idle Speed/Ignition Timing/Idle Mixture Ratio Adjustment (Cont'd)
EC-44
Page 580 of 2395

Overall Inspection SequenceNBEC0028S0101
SEC141C
GI
MA
EM
LC
FE
AT
TF
PD
AX
SU
BR
ST
RS
BT
HA
SC
EL
IDX
BASIC SERVICE PROCEDURE
Idle Speed/Ignition Timing/Idle Mixture Ratio Adjustment (Cont'd)
EC-45