ignition INFINITI QX50 2019 Navigation Manual
[x] Cancel search | Manufacturer: INFINITI, Model Year: 2019, Model line: QX50, Model: INFINITI QX50 2019Pages: 288, PDF Size: 1.42 MB
Page 89 of 288
Models without navigation system:
Push
>on
the steering-wheel to display the phone screen again.
HANDS-FREE TEXT MESSAGING
ASSISTANT
WARNING
Use the text messaging feature after
parking your vehicle in a safe location. If
you have to use the feature while driving,
exercise extreme caution at all times so
full attention may be given to vehicle
operation.
CAUTION
This feature is disabled if the connected
device does not support the Message
Access Profile (MAP). See the phone’s
Owner’s Manual for details and instruc-
tions.
Laws in some jurisdictions may restrict the
use of “Text-to-Speech.” Check local regula-
tions before using this feature.
The system allows for the sending and
receiving of text messages through the vehicle interface.
Depending on the device that is connected
to the vehicle, some of the items/functions
may not be displayed or used.
Receiving a message
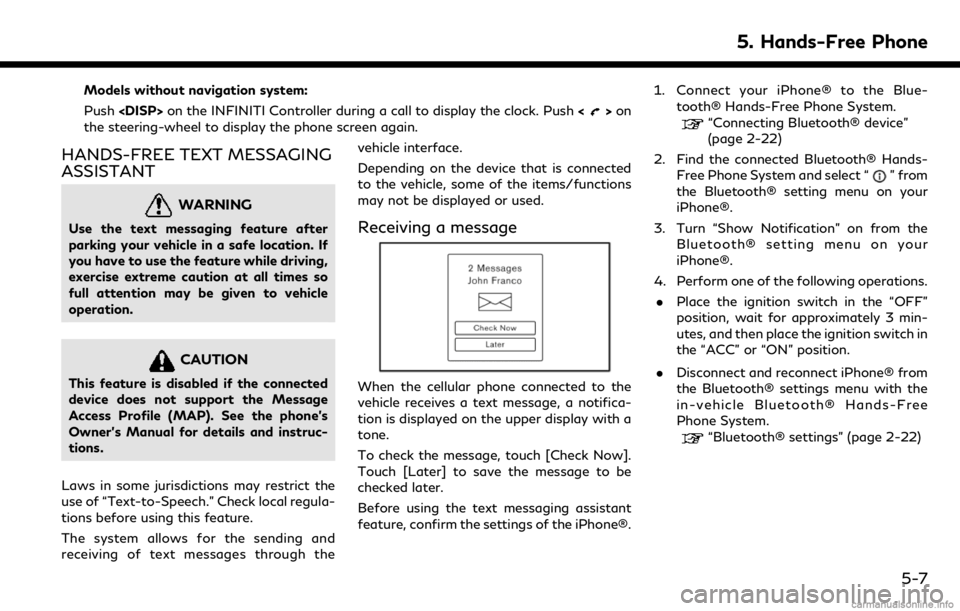
When the cellular phone connected to the
vehicle receives a text message, a notifica-
tion is displayed on the upper display with a
tone.
To check the message, touch [Check Now].
Touch [Later] to save the message to be
checked later.
Before using the text messaging assistant
feature, confirm the settings of the iPhone®.1. Connect your iPhone® to the Blue-
tooth® Hands-Free Phone System.
“Connecting Bluetooth® device”
(page 2-22)
2. Find the connected Bluetooth® Hands- Free Phone System and select “
” from
the Bluetooth® setting menu on your
iPhone®.
3. Turn “Show Notification” on from the Bluetooth® setting menu on your
iPhone®.
4. Perform one of the following operations. . Place the ignition switch in the “OFF”
position, wait for approximately 3 min-
utes, and then place the ignition switch in
the “ACC” or “ON” position.
. Disconnect and reconnect iPhone® from
the Bluetooth® settings menu with the
in-vehicle Bluetooth® Hands-Free
Phone System.
“Bluetooth® settings” (page 2-22)
5. Hands-Free Phone
5-7
Page 98 of 288
6. INFINITI InTouchTMApps
INFINITI INTOUCHTMAPPS
OVERVIEW
Laws in some jurisdictions may restrict the
use of some applications and features.
Check local regulations for any require-
ments.
CAUTION
. While driving, some operations are
limited in order to prevent distracting
the driver. While driving, avoid keep-
ing a close watch on the display.
. Some application services may be
subject to change or termination
without prior notice.
USING APPLICATIONS
NOTE:
To use APP functions on the models with-
out navigation system, calendar setting is
necessary for checking SSL expiration date.
“Clock settings” (page 2-21)
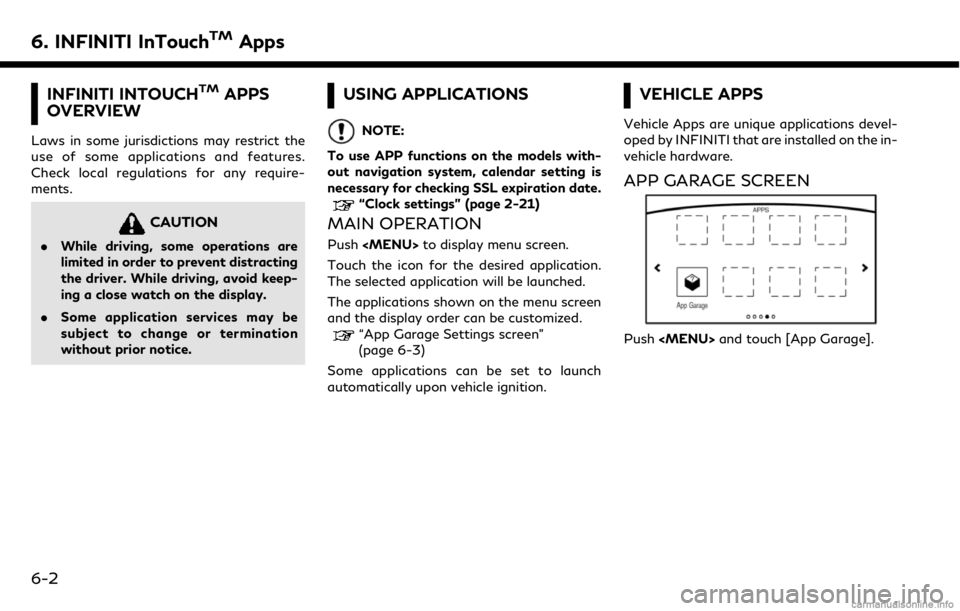
MAIN OPERATION
Push
Page 99 of 288
![INFINITI QX50 2019 Navigation Manual Available settings. [App Garage Settings]
Touch to view Apps information, man-
age Apps, customize shortcuts on the
menu screen and set notifications.
. Available application list
Displays the install INFINITI QX50 2019 Navigation Manual Available settings. [App Garage Settings]
Touch to view Apps information, man-
age Apps, customize shortcuts on the
menu screen and set notifications.
. Available application list
Displays the install](/img/42/34995/w960_34995-98.png)
Available settings. [App Garage Settings]
Touch to view Apps information, man-
age Apps, customize shortcuts on the
menu screen and set notifications.
. Available application list
Displays the installed Vehicle Apps.
When a listed application is selected, the
application will start.
App Garage Settings screen
You can use various application settings.
1. Push
2. Touch [App Garage Settings].
Available items may vary depending on the
models and the specifications.
Menu Item Action
[All Apps] Show all applications. Select an application from the list to
modify additional application-specific settings.
[Running Apps] Applications listDisplay all running applications. To display application
information or stop an application, select the desired
application from the list.
[Stop All] Stop all running applications.
[Menu Icon Lo-
cation Setting] Applications
listShow or hide the application icon on the menu screen.
[Delete All] Delete all application icons on menu screen.
[Auto Start Setting] Enable this setting to automatically launch the application
upon vehicle ignition.
[System Information] Display system information.
[Install Apps via USB] Install an application via USB from the INFINITI portal site.
[Network Notification] This function is not applied.
[Installation Notification] If [Installation Notification] is on, a pop-up message is
displayed when a new application is installed.
[Factory Data Reset] Discard the stored application data.
NOTE:
. Depending on the type of application,
some applications may not be displayed
in the [Running Apps] field even if they
are running.
. After resetting the data by using [Fac-
tory Data Reset], the system will re- spond slowly because of the high work
load of the system. Place the ignition
switch in the “OFF” position and wait 5
minutes. Then place the ignition switch
in the “ON” position again.
. Vehicle Apps may not work for 30
seconds after placing the ignition switch
6. INFINITI InTouchTMApps
6-3
Page 104 of 288
7. Monitor system
REARVIEW MONITOR (if so
equipped)
WARNING
Failure to follow the warnings and in-
structions for proper use of the RearView
Monitor system could result in serious
injury or death.. The RearView Monitor is a conveni-
ence but it is not a substitute for
proper backing. Always turn and look
out the windows, and check mirrors to
be sure that it is safe to move before
operating the vehicle. Always back up
slowly.
. The system is designed as an aid to
the driver in showing large stationary
objects directly behind the vehicle, to
help avoid damaging the vehicle.
. The distance guide line and the vehicle
width line should be used as a refer-
ence only when the vehicle is on a level
paved surface. The distance viewed
on the monitor is for reference only
and may be different than the actual
distance between the vehicle and displayed objects.
CAUTION
Do not scratch the camera lens when
cleaning dirt or snow from the front of
camera.
When the shift lever is shifted into the R
(Reverse) position, the upper touch screen
display (upper display) shows the view to the
rear of the vehicle.
The radio can still be heard while the Rear-
View Monitor is active.
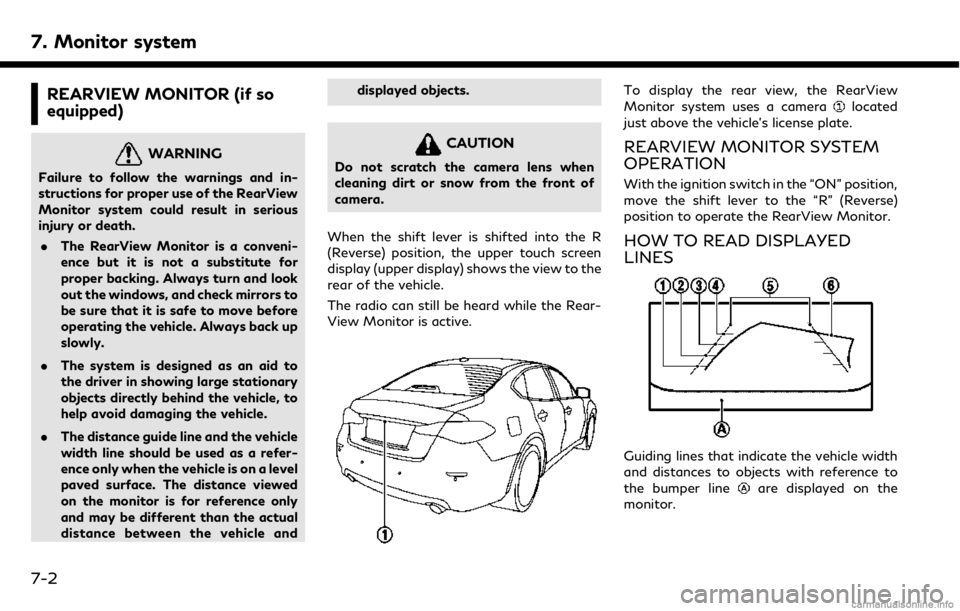
To display the rear view, the RearView
Monitor system uses a cameralocated
just above the vehicle’s license plate.
REARVIEW MONITOR SYSTEM
OPERATION
With the ignition switch in the “ON” position,
move the shift lever to the “R” (Reverse)
position to operate the RearView Monitor.
HOW TO READ DISPLAYED
LINES
Guiding lines that indicate the vehicle width
and distances to objects with reference to
the bumper line
are displayed on the
monitor.
7-2
Page 111 of 288
the front of the vehicle.
. Front-Wide View
An approximately 180-degree view of
the front of the vehicle.
. Rear View
An approximately 150-degree view of
the rear of the vehicle.
. Rear-Wide View (if so equipped)
An approximately 180-degree view of
the rear of the vehicle.
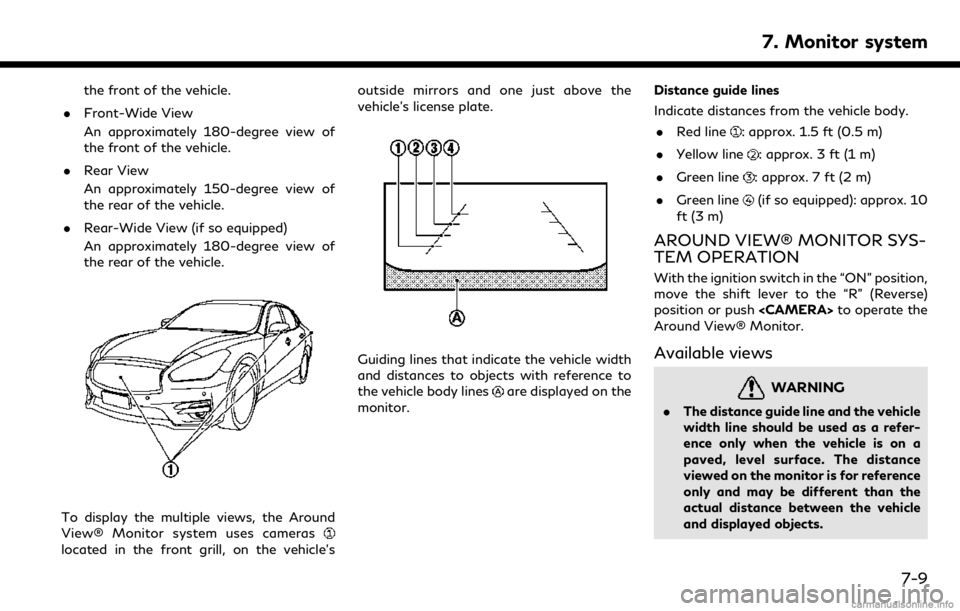
To display the multiple views, the Around
View® Monitor system uses cameras
located in the front grill, on the vehicle’s outside mirrors and one just above the
vehicle’s license plate.
Guiding lines that indicate the vehicle width
and distances to objects with reference to
the vehicle body lines
are displayed on the
monitor. Distance guide lines
Indicate distances from the vehicle body.
. Red line
: approx. 1.5 ft (0.5 m)
. Yellow line
: approx. 3 ft (1 m)
. Green line
: approx. 7 ft (2 m)
. Green line
(if so equipped): approx. 10
ft (3 m)
AROUND VIEW® MONITOR SYS-
TEM OPERATION
With the ignition switch in the “ON” position,
move the shift lever to the “R” (Reverse)
position or push
Around View® Monitor.
Available views
WARNING
. The distance guide line and the vehicle
width line should be used as a refer-
ence only when the vehicle is on a
paved, level surface. The distance
viewed on the monitor is for reference
only and may be different than the
actual distance between the vehicle
and displayed objects.
7. Monitor system
7-9
Page 114 of 288
7. Monitor system
the first time after the ignition switch is
placed in the “ON” position.
The driver can check the approximate direc-
tion and angle of the tire on the display by
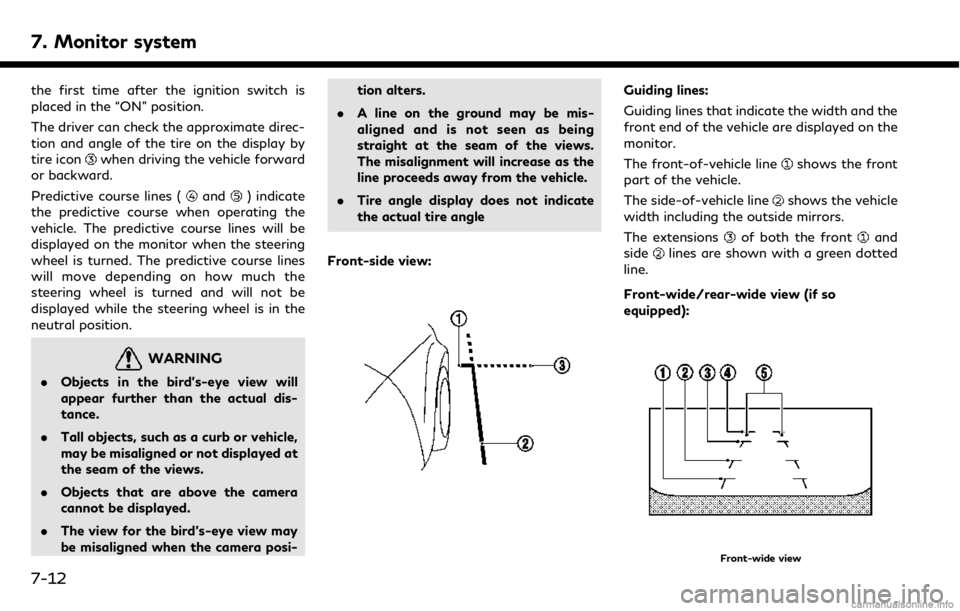
tire icon
when driving the vehicle forward
or backward.
Predictive course lines (
and) indicate
the predictive course when operating the
vehicle. The predictive course lines will be
displayed on the monitor when the steering
wheel is turned. The predictive course lines
will move depending on how much the
steering wheel is turned and will not be
displayed while the steering wheel is in the
neutral position.
WARNING
. Objects in the bird’s-eye view will
appear further than the actual dis-
tance.
. Tall objects, such as a curb or vehicle,
may be misaligned or not displayed at
the seam of the views.
. Objects that are above the camera
cannot be displayed.
. The view for the bird’s-eye view may
be misaligned when the camera posi- tion alters.
. A line on the ground may be mis-
aligned and is not seen as being
straight at the seam of the views.
The misalignment will increase as the
line proceeds away from the vehicle.
. Tire angle display does not indicate
the actual tire angle
Front-side view:
Guiding lines:
Guiding lines that indicate the width and the
front end of the vehicle are displayed on the
monitor.
The front-of-vehicle line
shows the front
part of the vehicle.
The side-of-vehicle line
shows the vehicle
width including the outside mirrors.
The extensions
of both the frontand
sidelines are shown with a green dotted
line.
Front-wide/rear-wide view (if so
equipped):
Front-wide view
7-12
Page 118 of 288
![INFINITI QX50 2019 Navigation Manual 7. Monitor system
is displayed for the first time after the
ignition switch is positioned in the “ON”
position.
. [Predictive Course Lines]:
When this item is turned on, the pre-
dictive course li INFINITI QX50 2019 Navigation Manual 7. Monitor system
is displayed for the first time after the
ignition switch is positioned in the “ON”
position.
. [Predictive Course Lines]:
When this item is turned on, the pre-
dictive course li](/img/42/34995/w960_34995-117.png)
7. Monitor system
is displayed for the first time after the
ignition switch is positioned in the “ON”
position.
. [Predictive Course Lines]:
When this item is turned on, the pre-
dictive course line is displayed in the
front, rear and bird’s-eye view screen.
. [Automatic Display with Sonar]:
The automatic sonar display can be
turned on/off.
“Camera aiding sonar function
(models with Around View® Moni-
tor)” (page 7-19)
AROUND VIEW® MONITOR SYS-
TEM LIMITATIONS
WARNING
Listed below are the system limitations
for Around View® Monitor. Failure to
operate the vehicle in accordance with
these system limitations could result in
serious injury or death.
. Do not use the Around View® Moni-
tor with the outside mirrors in the
stored position, and make sure that
the trunk is securely closed when
operating the vehicle using the Around View® Monitor.
. The apparent distance between ob-
jects viewed on the Around View®
Monitor differs from the actual dis-
tance.
. The cameras are installed on the front
grille, the outside mirrors and above
the rear license plate. Do not put
anything on the vehicle that covers
the cameras.
. When washing the vehicle with high
pressure water, be sure not to spray it
around the cameras. Otherwise,
water may enter the camera unit
causing water condensation on the
lens, a malfunction, fire or an electric
shock.
. Do not strike the cameras. They are
precision instruments. Doing so could
cause a malfunction or cause damage
resulting in a fire or an electric shock.
The following are operating limitations and
do not represent a system malfunction: . The screen displayed on the Around
View® Monitor will automatically return
to the previous screen 3 minutes after
has been pushed while the
shift lever is in a position other than the
“R” (Reverse) position.
. There may be a delay when switching
between views.
. When the temperature is extremely high
or low, the screen may not display
objects clearly.
. When strong light is directly shines on
the camera, objects may not be displayed
clearly.
. The screen may flicker under fluorescent
light.
. The colors of objects on the Around
View® Monitor may differ somewhat
from the actual color of objects.
. Objects on the monitor may not be clear
and the color of the object may differ in a
dark environment.
. There may be differences in sharpness
between each camera view of the bird’s-
eye view.
. When activating the Around View®
Monitor, the icons and the messages
may not be displayed for a while.
7-16
Page 123 of 288
Moving Object Detection (MOD) system will
also be turned off at the same time.
“Moving Object Detection (MOD)”
(page 7-23)
When the Sonar·MOD key is touched again,
the indicator light will illuminate and the
sonar will turn back on.
In the cases below, the sonar will be turned
back on automatically: . When the shift lever is in the “R”
(Reverse) position.
. When
screen other than the camera view is
shown on the display.
. When the vehicle speed decreases below
approximately 5 MPH (8 km/h).
. When the ignition switch is placed in the
“OFF” position and turned back to the
“ON” position again.
When the Sonar·MOD key is touched, the
MOD function will also be turned off.
When sonar system is completely turned off
from the setting menu, “
” will disappear
from the the Sonar·MOD key. The key will
disappear from the screen when both of the
systems are completely turned off from the
setting menu. To prevent the sonar system from activating
altogether, change the status in the camera
settings menu.
“Around View® Monitor settings”
(page 7-15)
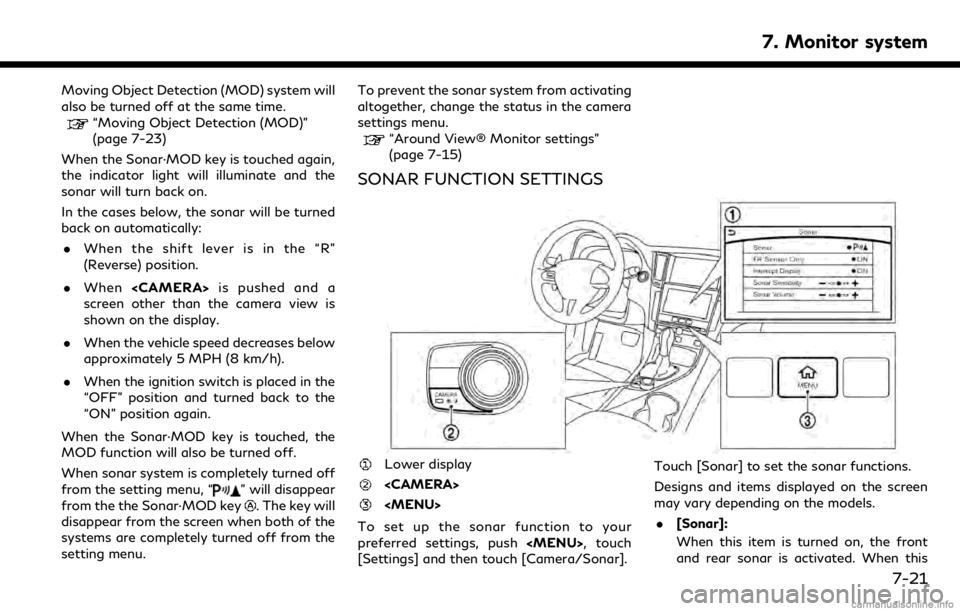
SONAR FUNCTION SETTINGS
Lower display
To set up the sonar function to your
preferred settings, push
[Settings] and then touch [Camera/Sonar]. Touch [Sonar] to set the sonar functions.
Designs and items displayed on the screen
may vary depending on the models.
. [Sonar]:
When this item is turned on, the front
and rear sonar is activated. When this
7. Monitor system
7-21
Page 158 of 288
8. Information and settings
FULLY CUSTOMIZABLE DIGI-
TAL ENVIRONMENT
The system will automatically recognize the
user upon turning on the vehicle, after
Setting up the user information. There will
be a personalized welcome guidance and a
prompt to log-in.
This feature allows 3 drivers to use their own
registration, drive mode, driving position, air
conditioner and audio settings, and mem-
orizes these custom settings.
Log-in user can be changed from welcome
guidance screen or User List screen.
NOTE:
. Vehicle Apps settings and configura-
tions are not linked to specific Intelli-
gent Keys.
. A maximum of four Intelligent Keys can
be registered to store settings for three
profiled users and one guest. One user
setting information can be stored per
key.
. When the ignition switch is pushed to
the “OFF” position, the user settings at
that point will be memorized by the
Intelligent Key that is used.
USER REGISTRATION
The driving position, navigation, and air
conditioner, etc., settings can be memorize
for each user. The settings can be restored
when deactivating the system.
Up to three users can be registered.
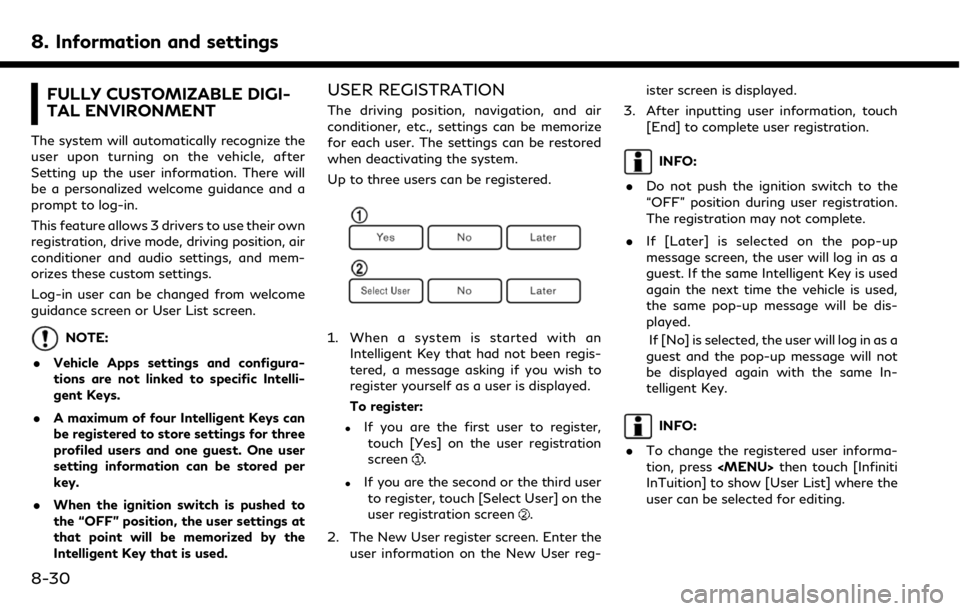
1. When a system is started with an
Intelligent Key that had not been regis-
tered, a message asking if you wish to
register yourself as a user is displayed.
To register:
.If you are the first user to register,touch [Yes] on the user registration
screen
.
.If you are the second or the third userto register, touch [Select User] on the
user registration screen
.
2. The New User register screen. Enter the user information on the New User reg- ister screen is displayed.
3. After inputting user information, touch [End] to complete user registration.
INFO:
. Do not push the ignition switch to the
“OFF” position during user registration.
The registration may not complete.
. If [Later] is selected on the pop-up
message screen, the user will log in as a
guest. If the same Intelligent Key is used
again the next time the vehicle is used,
the same pop-up message will be dis-
played.
If [No] is selected, the user will log in as a
guest and the pop-up message will not
be displayed again with the same In-
telligent Key.
INFO:
. To change the registered user informa-
tion, press
InTuition] to show [User List] where the
user can be selected for editing.
8-30
Page 160 of 288
8. Information and settings
INFO:
. The number of characters for the user
name is limited.
. When a current user is deleted, the user
is changed to a guest user.
. When the ignition switch is pushed to the
“OFF” position, the current user settings
will be stored by the Intelligent Key that
is used.
Change the user picture
When you connect USB device with image
data, you can download image and setting
picture.
1. Display User Edit screen and touch
[Change Icon].
2. Connect USB device and touch [
].
3. Touch preferred picture file name.
4. Touch [Select] to setting user picture.
When display picture-preview screen, touch
[Update Only] to only update picture list
from USB device.
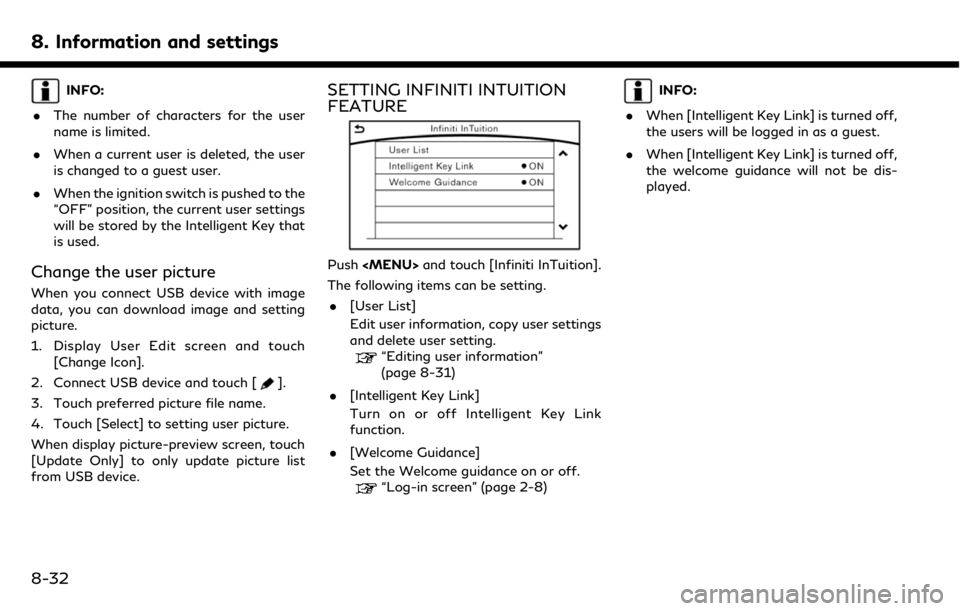
SETTING INFINITI INTUITION
FEATURE
Push
The following items can be setting. . [User List]
Edit user information, copy user settings
and delete user setting.
“Editing user information”
(page 8-31)
. [Intelligent Key Link]
Turn on or off Intelligent Key Link
function.
. [Welcome Guidance]
Set the Welcome guidance on or off.
“Log-in screen” (page 2-8)
INFO:
. When [Intelligent Key Link] is turned off,
the users will be logged in as a guest.
. When [Intelligent Key Link] is turned off,
the welcome guidance will not be dis-
played.
8-32