transmission INFINITI QX56 2007 Factory Owners Manual
[x] Cancel search | Manufacturer: INFINITI, Model Year: 2007, Model line: QX56, Model: INFINITI QX56 2007Pages: 3061, PDF Size: 64.56 MB
Page 361 of 3061
ASSEMBLY
AT-291
< SERVICE INFORMATION >
D
E
F
G
H
I
J
K
L
MA
B
AT
N
O
P
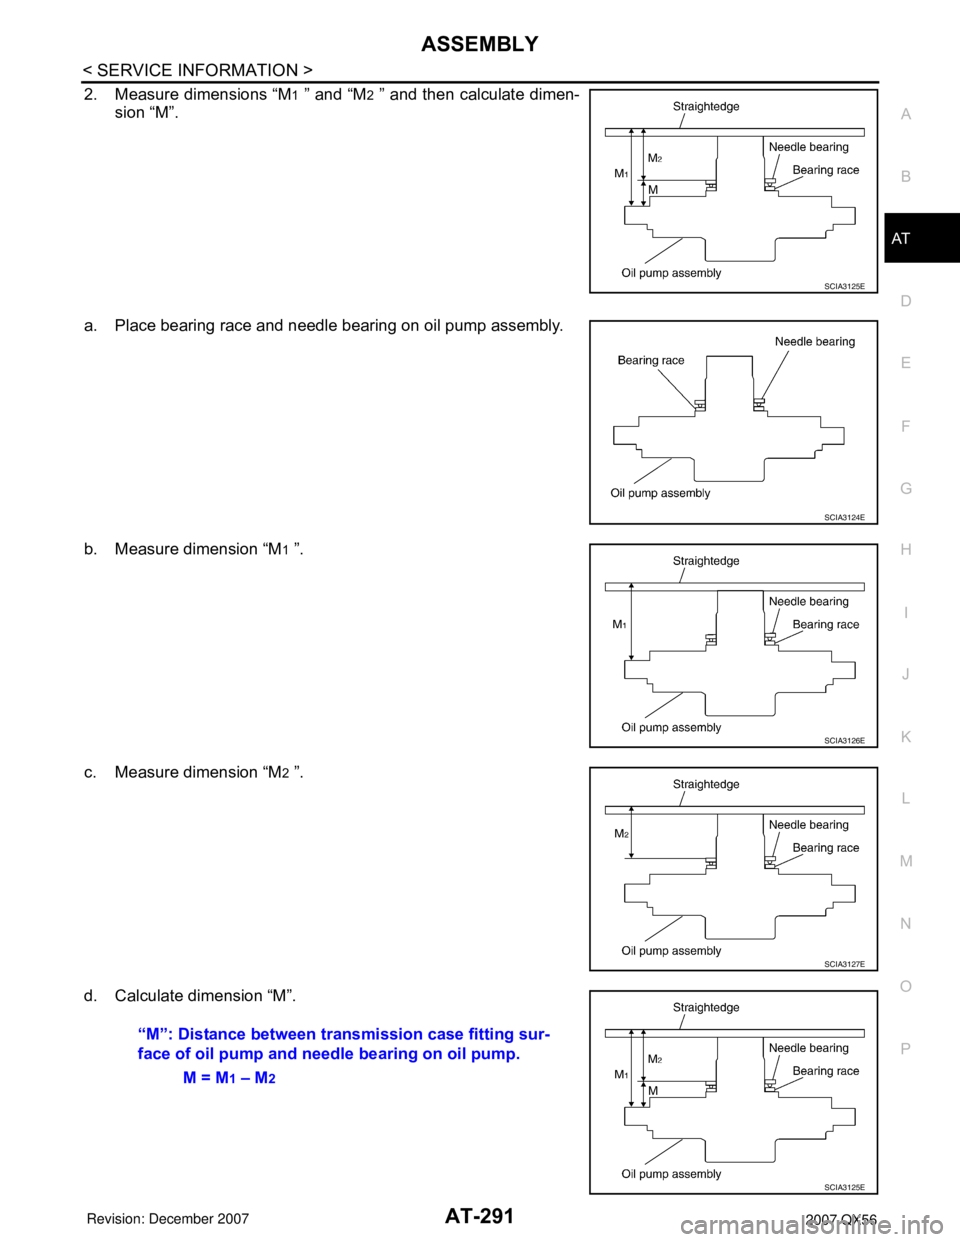
2. Measure dimensions “M1 ” and “M2 ” and then calculate dimen-
sion “M”.
a. Place bearing race and needle bearing on oil pump assembly.
b. Measure dimension “M
1 ”.
c. Measure dimension “M
2 ”.
d. Calculate dimension “M”.
SCIA3125E
SCIA3124E
SCIA3126E
SCIA3127E
“M”: Distance between transmission case fitting sur-
face of oil pump and needle bearing on oil pump.
M = M
1 – M2
SCIA3125E
Page 362 of 3061
AT-292
< SERVICE INFORMATION >
ASSEMBLY
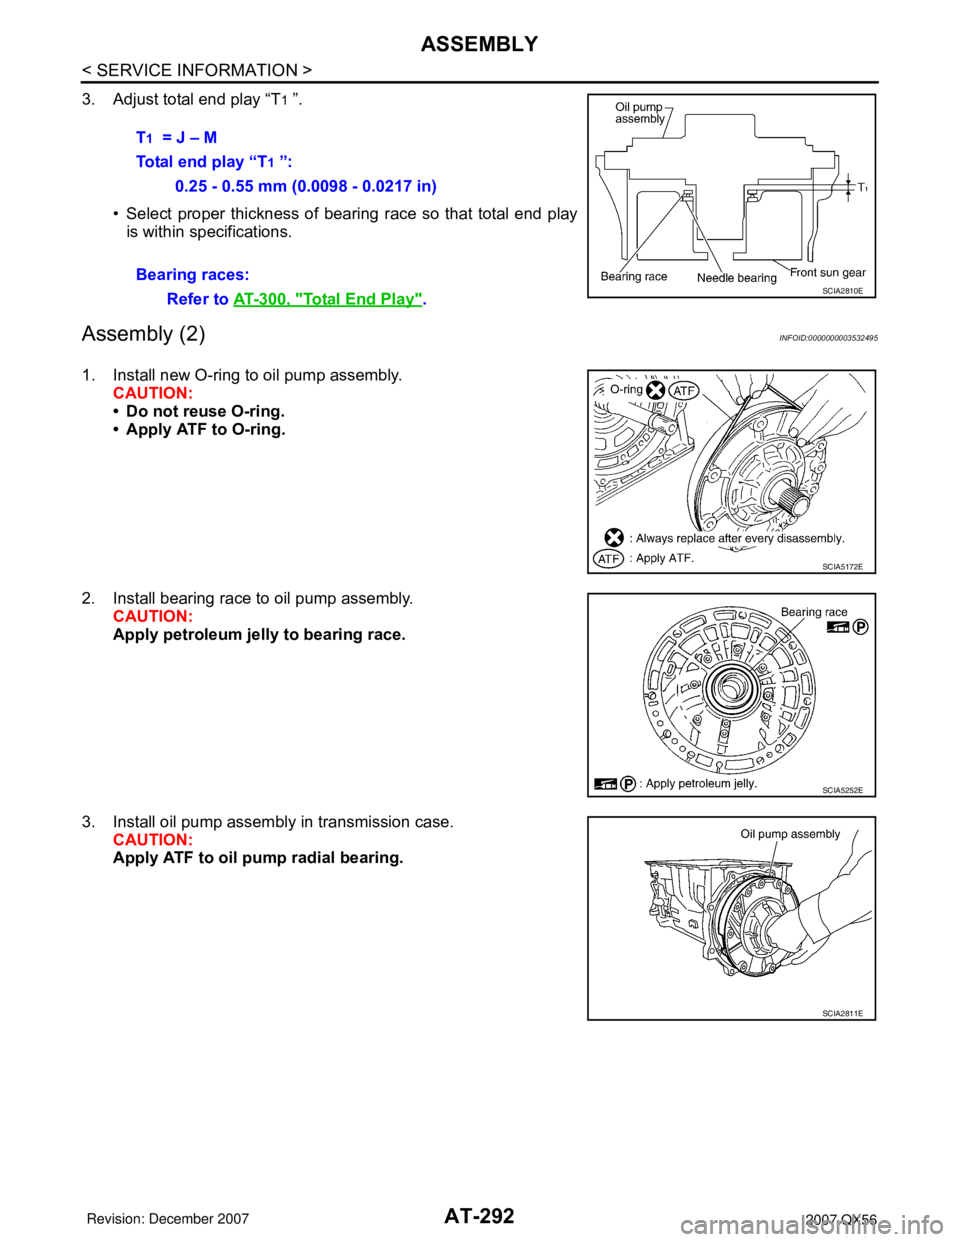
3. Adjust total end play “T1 ”.
• Select proper thickness of bearing race so that total end play
is within specifications.
Assembly (2)INFOID:0000000003532495
1. Install new O-ring to oil pump assembly.
CAUTION:
• Do not reuse O-ring.
• Apply ATF to O-ring.
2. Install bearing race to oil pump assembly.
CAUTION:
Apply petroleum jelly to bearing race.
3. Install oil pump assembly in transmission case.
CAUTION:
Apply ATF to oil pump radial bearing.T
1 = J – M
Total end play “T
1 ”:
0.25 - 0.55 mm (0.0098 - 0.0217 in)
Bearing races:
Refer to AT-300, "
Total End Play".SCIA2810E
SCIA5172E
SCIA5252E
SCIA2811E
Page 363 of 3061
ASSEMBLY
AT-293
< SERVICE INFORMATION >
D
E
F
G
H
I
J
K
L
MA
B
AT
N
O
P
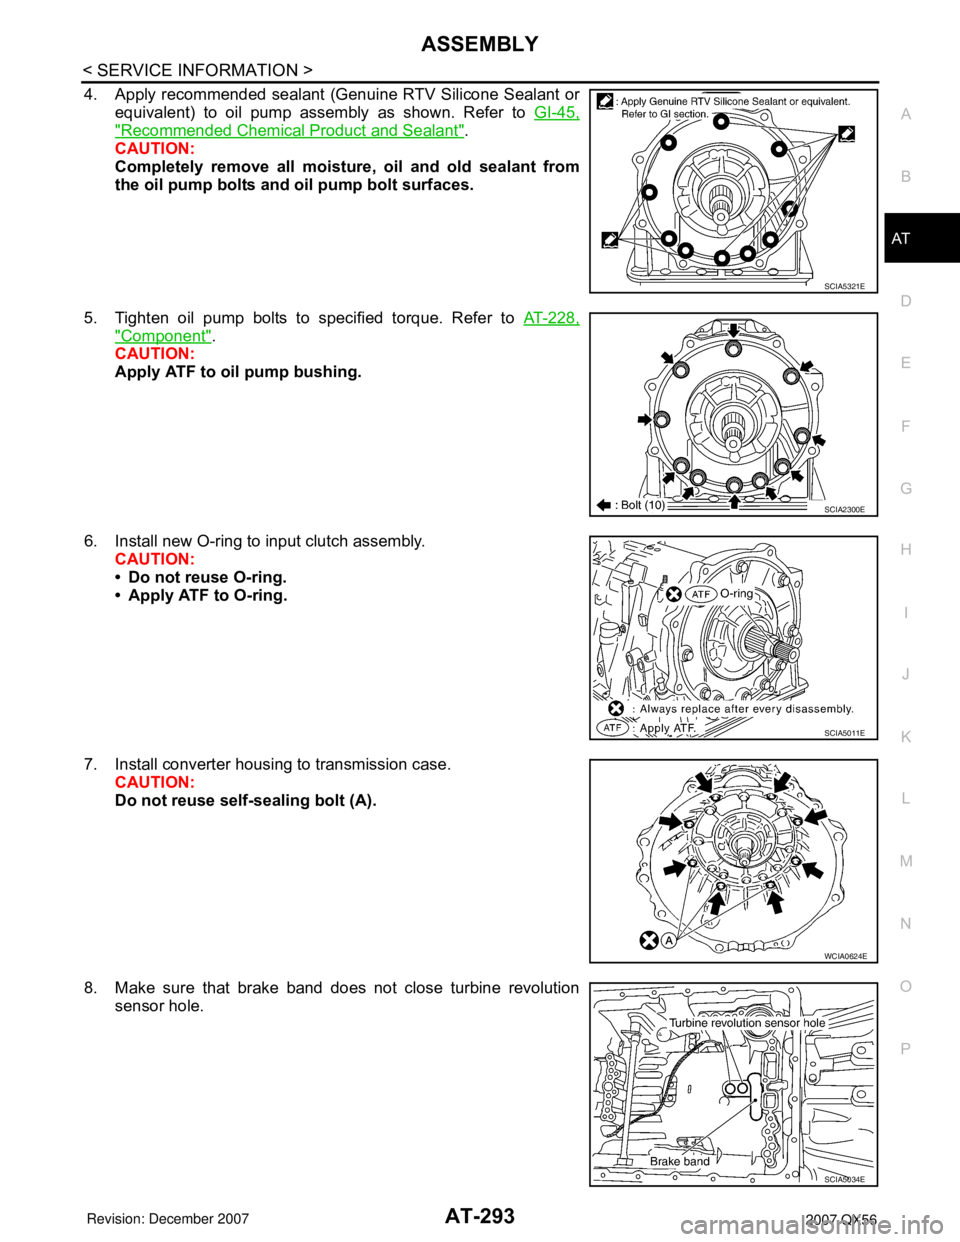
4. Apply recommended sealant (Genuine RTV Silicone Sealant or
equivalent) to oil pump assembly as shown. Refer to GI-45,
"Recommended Chemical Product and Sealant".
CAUTION:
Completely remove all moisture, oil and old sealant from
the oil pump bolts and oil pump bolt surfaces.
5. Tighten oil pump bolts to specified torque. Refer to AT-228,
"Component".
CAUTION:
Apply ATF to oil pump bushing.
6. Install new O-ring to input clutch assembly.
CAUTION:
• Do not reuse O-ring.
• Apply ATF to O-ring.
7. Install converter housing to transmission case.
CAUTION:
Do not reuse self-sealing bolt (A).
8. Make sure that brake band does not close turbine revolution
sensor hole.
SCIA5321E
SCIA2300E
SCIA5011E
WCIA0624E
SCIA5034E
Page 365 of 3061
ASSEMBLY
AT-295
< SERVICE INFORMATION >
D
E
F
G
H
I
J
K
L
MA
B
AT
N
O
P
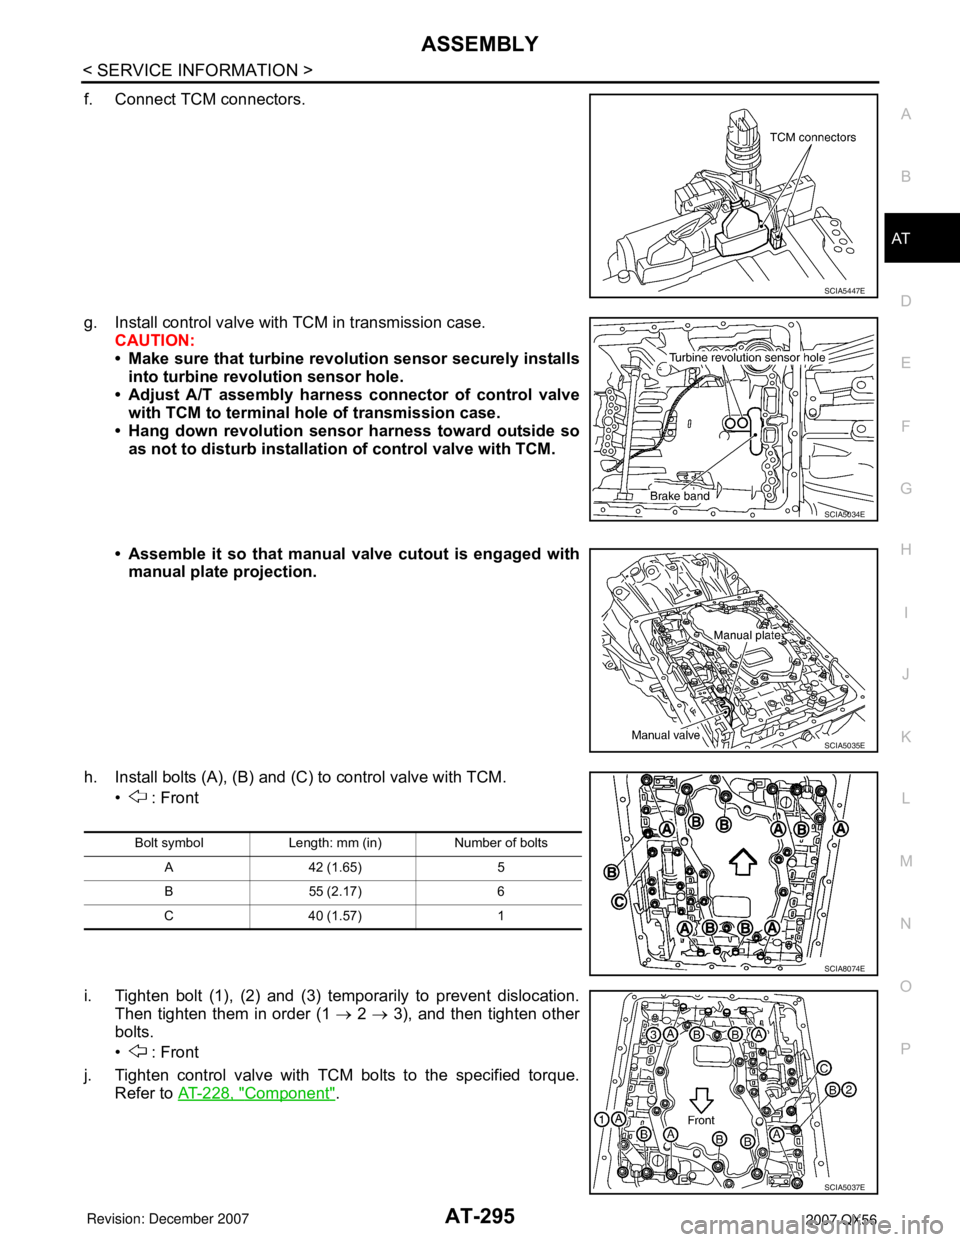
f. Connect TCM connectors.
g. Install control valve with TCM in transmission case.
CAUTION:
• Make sure that turbine revolution sensor securely installs
into turbine revolution sensor hole.
• Adjust A/T assembly harness connector of control valve
with TCM to terminal hole of transmission case.
• Hang down revolution sensor harness toward outside so
as not to disturb installation of control valve with TCM.
• Assemble it so that manual valve cutout is engaged with
manual plate projection.
h. Install bolts (A), (B) and (C) to control valve with TCM.
• : Front
i. Tighten bolt (1), (2) and (3) temporarily to prevent dislocation.
Then tighten them in order (1 → 2 → 3), and then tighten other
bolts.
• : Front
j. Tighten control valve with TCM bolts to the specified torque.
Refer to AT-228, "
Component".
SCIA5447E
SCIA5034E
SCIA5035E
Bolt symbol Length: mm (in) Number of bolts
A 42 (1.65) 5
B 55 (2.17) 6
C 40 (1.57) 1
SCIA8074E
SCIA5037E
Page 367 of 3061
ASSEMBLY
AT-297
< SERVICE INFORMATION >
D
E
F
G
H
I
J
K
L
MA
B
AT
N
O
P
17. Install the oil pan and new oil pan gasket. Refer to AT-209, "Oil Pan".
CAUTION:
• Do not reuse the oil pan gasket.
• Completely remove all moisture, oil and old gasket from the oil pan gasket mating surfaces and
holes.
• Always replace the oil pan bolts as they are self-sealing.
• Be sure the oil pan drain plug hole is located to the rear of the transmission assembly.
• Partially install the oil pan bolts in a criss-cross pattern to prevent dislocation of the gasket.
• Be careful not to pinch harnesses.
18. Install drain plug in oil pan with new gasket.
CAUTION:
Do not reuse the drain plug gasket.
19. Install torque converter.
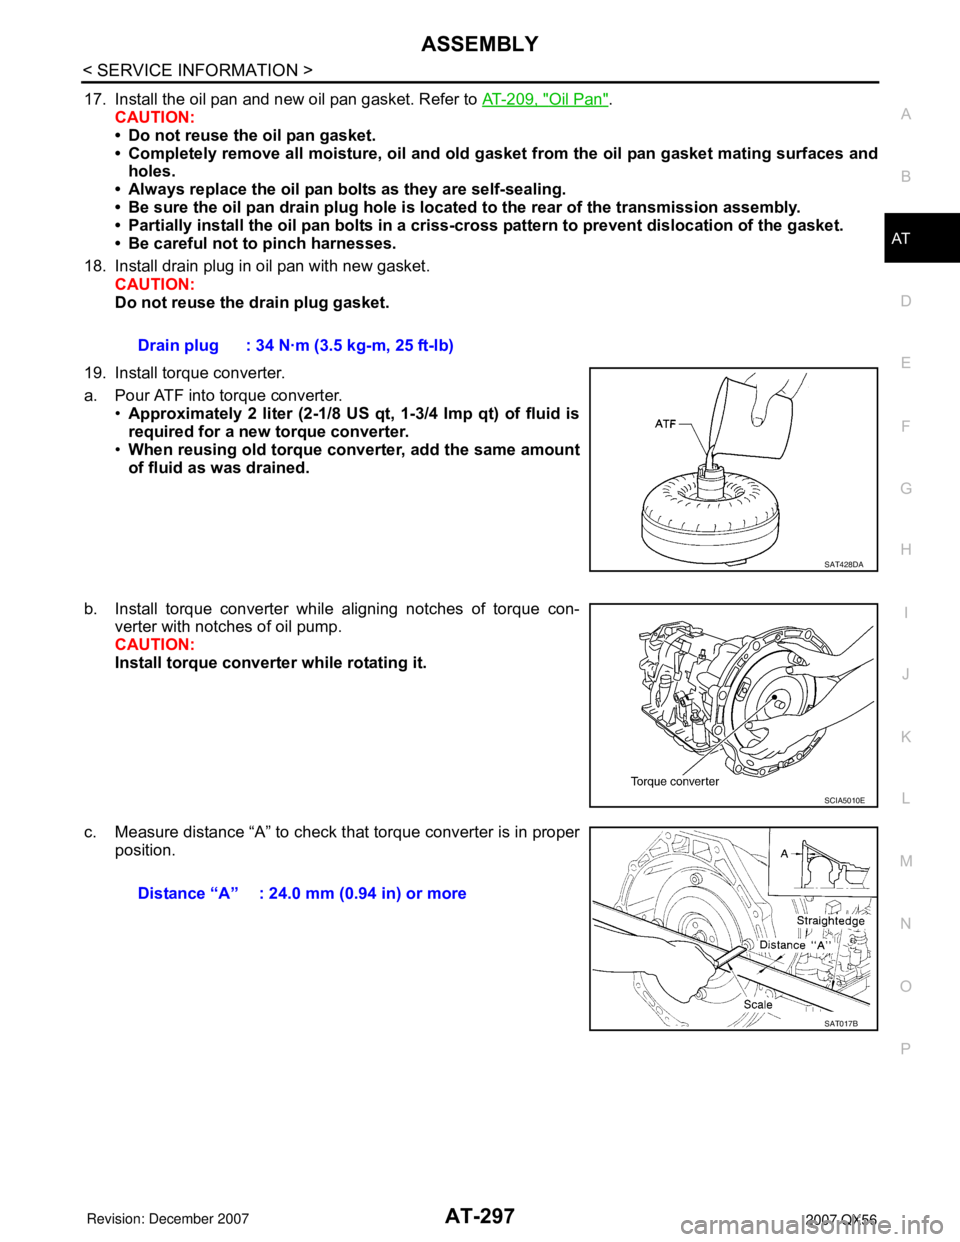
a. Pour ATF into torque converter.
•Approximately 2 liter (2-1/8 US qt, 1-3/4 Imp qt) of fluid is
required for a new torque converter.
•When reusing old torque converter, add the same amount
of fluid as was drained.
b. Install torque converter while aligning notches of torque con-
verter with notches of oil pump.
CAUTION:
Install torque converter while rotating it.
c. Measure distance “A” to check that torque converter is in proper
position.Drain plug : 34 N·m (3.5 kg-m, 25 ft-lb)
SAT428DA
SCIA5010E
Distance “A” : 24.0 mm (0.94 in) or more
SAT017B
Page 368 of 3061
AT-298
< SERVICE INFORMATION >
SERVICE DATA AND SPECIFICATIONS (SDS)
SERVICE DATA AND SPECIFICATIONS (SDS)
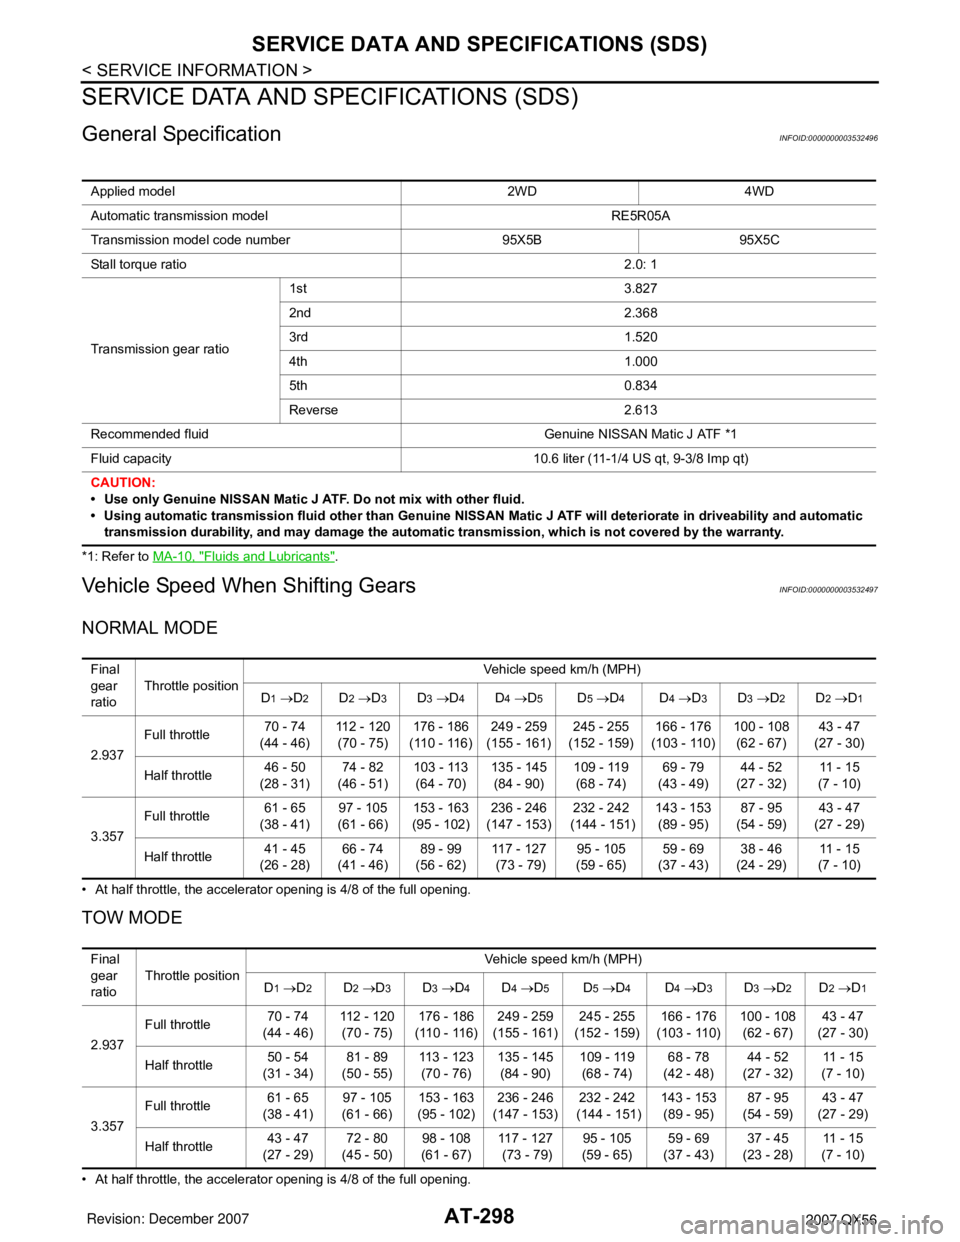
General SpecificationINFOID:0000000003532496
*1: Refer to MA-10, "Fluids and Lubricants".
Vehicle Speed When Shifting GearsINFOID:0000000003532497
NORMAL MODE
• At half throttle, the accelerator opening is 4/8 of the full opening.
TOW MODE
• At half throttle, the accelerator opening is 4/8 of the full opening.Applied model 2WD 4WD
Automatic transmission model RE5R05A
Transmission model code number 95X5B 95X5C
Stall torque ratio2.0: 1
Transmission gear ratio1st 3.827
2nd 2.368
3rd 1.520
4th 1.000
5th 0.834
Reverse 2.613
Recommended fluid Genuine NISSAN Matic J ATF *1
Fluid capacity 10.6 liter (11-1/4 US qt, 9-3/8 Imp qt)
CAUTION:
• Use only Genuine NISSAN Matic J ATF. Do not mix with other fluid.
• Using automatic transmission fluid other than Genuine NISSAN Matic J ATF will deteriorate in driveability and automatic
transmission durability, and may damage the automatic transmission, which is not covered by the warranty.
Final
gear
ratioThrottle positionVehicle speed km/h (MPH)
D
1 →D2D2 →D3D3 →D4D4 →D5D5 →D4D4 →D3D3 →D2D2 →D1
2.937Full throttle 70 - 74
(44 - 46)112 - 120
(70 - 75)176 - 186
(110 - 116)249 - 259
(155 - 161)245 - 255
(152 - 159)166 - 176
(103 - 110)100 - 108
(62 - 67)43 - 47
(27 - 30)
Half throttle 46 - 50
(28 - 31)74 - 82
(46 - 51)103 - 113
(64 - 70)135 - 145
(84 - 90)109 - 119
(68 - 74)69 - 79
(43 - 49)44 - 52
(27 - 32)11 - 1 5
(7 - 10)
3.357Full throttle 61 - 65
(38 - 41)97 - 105
(61 - 66)153 - 163
(95 - 102)236 - 246
(147 - 153)232 - 242
(144 - 151)143 - 153
(89 - 95)87 - 95
(54 - 59)43 - 47
(27 - 29)
Half throttle 41 - 45
(26 - 28)66 - 74
(41 - 46)89 - 99
(56 - 62)117 - 127
(73 - 79)95 - 105
(59 - 65)59 - 69
(37 - 43)38 - 46
(24 - 29)11 - 1 5
(7 - 10)
Final
gear
ratioThrottle positionVehicle speed km/h (MPH)
D
1 →D2D2 →D3D3 →D4D4 →D5D5 →D4D4 →D3D3 →D2D2 →D1
2.937Full throttle 70 - 74
(44 - 46)112 - 120
(70 - 75)176 - 186
(110 - 116)249 - 259
(155 - 161)245 - 255
(152 - 159)166 - 176
(103 - 110)100 - 108
(62 - 67)43 - 47
(27 - 30)
Half throttle 50 - 54
(31 - 34)81 - 89
(50 - 55)113 - 123
(70 - 76)135 - 145
(84 - 90)109 - 119
(68 - 74)68 - 78
(42 - 48)44 - 52
(27 - 32)11 - 1 5
(7 - 10)
3.357Full throttle 61 - 65
(38 - 41)97 - 105
(61 - 66)153 - 163
(95 - 102)236 - 246
(147 - 153)232 - 242
(144 - 151)143 - 153
(89 - 95)87 - 95
(54 - 59)43 - 47
(27 - 29)
Half throttle 43 - 47
(27 - 29)72 - 80
(45 - 50)98 - 108
(61 - 67)117 - 127
(73 - 79)95 - 105
(59 - 65)59 - 69
(37 - 43)37 - 45
(23 - 28)11 - 1 5
(7 - 10)
Page 647 of 3061

NAVIGATION SYSTEM
AV-107
< SERVICE INFORMATION >
C
D
E
F
G
H
I
J
L
MA
B
AV
N
O
P
The Error History displays the time and place of the most recent occurrence of that error. However, take note
of the following points.
• Correct time of the error occurrence may not be displayed when the GPS antenna substrate within the NAVI
control unit has malfunctioned.
• Place of the error occurrence is represented by the position of the current-location mark at the time when the
error occurred. If the current-location mark has deviated from the correct position, then the place of the error
occurrence may be located correctly.
• The maximum number of occurrences which can be stored is 50. For the 51st and later occurrences, the dis-
played number remains 50.
When a reproducible malfunction occurred but its cause cannot be identified because several errors are
present, record the item, number and place (longitude/latitude) of error occurrence (or delete the Error His-
tory), then turn the ignition switch from OFF to ON to reproduce the malfunction. Check the Error History to
find the items which show an increased number of occurrences, and diagnose the item.
Error itemPossible causes
Example of symptom
Action/symptom
Gyro sensor
disconnectedCommunications malfunction between NAVI control unit and inter-
nal gyro.
• Navigation location detection performance has
deteriorated.
(Angular velocity cannot be detected.) • Perform self-diagnosis.
• When the NAVI control unit is judged normal by self-diagnosis,
the symptom may be intermittent, caused by strong radio interfer-
ence.
GPS discon-
nectedCommunication error between NAVI control unit and internal GPS
substrate.• Navigation location detection performance has
deteriorated.
(Location correction using GPS is not per-
formed.)
• GPS receiving status remains gray. • Perform self-diagnosis.
• When the NAVI control unit is judged normal by self-diagnosis,
the symptom may be intermittent, caused by strong radio interfer-
ence.
GPS trans-
mission ca-
ble
malfunctionMalfunctioning transmission wires to NAVI control unit and internal
GPS substrate.
• During self-diagnosis, GPS diagnosis is not
performed. • Perform self-diagnosis.
• When the NAVI control unit is judged normal by self-diagnosis,
the symptom may be intermittent, caused by strong radio interfer-
ence.
GPS input
line connec-
tion errorMalfunctioning receiving wires to NAVI control unit and internal
GPS substrate.• Navigation location detection performance has
deteriorated.
(Location correction using GPS is not per-
formed.)
• GPS receiving status remains gray. • Perform self-diagnosis.
• When the NAVI control unit is judged normal by self-diagnosis,
the symptom may be intermittent, caused by strong radio interfer-
ence.
GPS TCX0
over
GPS TCX0
underOscillating frequency of the GPS substrate frequency synchronizing
oscillation circuit exceeded (or below) the specification
• Navigation location detection performance has
deteriorated.
(Location correction using GPS is not per-
formed.)
• GPS receiving status remains gray. • Perform self-diagnosis.
• When the NAVI control unit is judged normal by self-diagnosis,
the symptom may be intermittent, caused by strong radio interfer-
ence, or the control unit may have been subjected to excessively
high or low temperatures.
GPS ROM
malfunction
GPS RAM
malfunctionContents of ROM (or RAM) in GPS substrate are malfunctioning. • Location detection accuracy of the navigation
system will deteriorate, depending on the error
area in the memory, because GPS cannot
make correct positioning.
(Location correction using GPS is not per-
formed.) • Perform self-diagnosis.
• When the NAVI control unit is judged normal by self-diagnosis,
the symptom may be intermittent, caused by strong radio interfer-
ence.
Page 1017 of 3061
![INFINITI QX56 2007 Factory Owners Manual
DI-6
< SERVICE INFORMATION >
COMBINATION METERS
POWER SUPPLY AND GROUND CIRCUIT
Power is supplied at all times
• through 10A fuse [No.19, located in the fuse block (J/B)]
• to combination meter t INFINITI QX56 2007 Factory Owners Manual
DI-6
< SERVICE INFORMATION >
COMBINATION METERS
POWER SUPPLY AND GROUND CIRCUIT
Power is supplied at all times
• through 10A fuse [No.19, located in the fuse block (J/B)]
• to combination meter t](/img/42/57029/w960_57029-1016.png)
DI-6
< SERVICE INFORMATION >
COMBINATION METERS
POWER SUPPLY AND GROUND CIRCUIT
Power is supplied at all times
• through 10A fuse [No.19, located in the fuse block (J/B)]
• to combination meter terminal 8.
With the ignition switch in the ON or START position, power is supplied
• through 10A fuse [No.14, located in the fuse block (J/B)]
• to combination meter terminal 24.
Ground is supplied
• to combination meter terminal 17
• through body grounds M57, M61 and M79.
WATER TEMPERATURE GAUGE
The water temperature gauge indicates the engine coolant temperature.
ECM provides an engine coolant temperature signal to combination meter via CAN communication lines.
ENGINE OIL PRESSURE GAUGE
The engine oil pressure gauge indicates whether the engine oil pressure is low or normal.
The oil pressure gauge is controlled by the IPDM E/R (intelligent power distribution module engine room). Low
oil pressure causes oil pressure switch terminal 1 to provide ground to IPDM E/R terminal 42. The IPDM E/R
then signals the combination meter (unified meter control unit) via CAN communication lines and a low oil
pressure indication is displayed by the oil pressure gauge.
A/T OIL TEMPERATURE GAUGE
The A/T oil temperature gauge indicates the A/T fluid temperature.
TCM (transmission control module) provides an A/T flui d temperature signal to combination meter via CAN
communication lines.
VOLTAGE GAUGE
The voltage gauge indicates the battery/charging system voltage.
The voltage gauge is regulated by the unified meter control unit.
TA C H O M E T E R
The tachometer indicates engine speed in revolutions per minute (rpm).
ECM provides an engine speed signal to combination meter via CAN communication lines.
FUEL GAUGE
The fuel gauge indicates the approximate fuel level in the fuel tank.
The fuel gauge is regulated by the unified meter control unit and a variable resistor signal supplied
• to combination meter terminal 15.
• through fuel level sensor unit and fuel pump terminal 2
• through fuel level sensor unit and fuel pump terminal 5
• from combination meter terminal 16
SPEEDOMETER
ABS actuator and electric unit (contro l unit) provides a vehicle speed signal to the combination meter via CAN
communication lines.
ODO/TRIP METER
The vehicle speed signal and the memory signals from the meter memory circuit are processed by the combi-
nation meter and the mileage is displayed.
How to Change the Display
Refer to Owner's Manual for odo/tr ip meter operating instructions.
CAN COMMUNICATION SYSTEM DESCRIPTION
Refer to LAN-4.
Page 1058 of 3061

REAR SONAR SYSTEM
DI-47
< SERVICE INFORMATION >
C
D
E
F
G
H
I
J
L
MA
B
DI
N
O
P
Ground is supplied
• to sonar control unit terminal 6
• through body grounds B7 and B19.
With the ignition switch in the ON or START position, and the transmission gear selector lever in the R posi-
tion, power is supplied
• to sonar control unit terminal 5
• from back-up lamp relay terminal 5.
With power and ground supplied, transmission gear selector lever in R position, and the rear sonar system
OFF switch ON, the rear sonar system will detect obstacles within 1.8 m (5.9 ft.) of the rear sonar sensors. The
vehicle operator is notified of obstacles by varied rate of tone from the sonar buzzer depending on distance of
obstacle being sensed.
REAR SONAR SYSTEM OFF SWITCH
With power and ground supplied to the sonar control unit, transmission gear selector lever in R position, the
sonar system can be disabled and the sonar buzzer silenced by momentarily pressing the rear sonar system
OFF switch. The rear sonar system OFF indicator lamp will be illuminated in the rear sonar system OFF
switch.
To disable the rear sonar system, ground is supplied
• to sonar control unit terminal 13
• through rear sonar system OFF switch terminal 1
• through rear sonar system OFF switch terminal 2
• from body grounds M57, M61, and M79.
To light the rear sonar system OFF indicator, power is supplied
• from sonar control unit terminal 4
• to the rear sonar system OFF switch terminal 5.
Ground is supplied
• to the rear sonar system OFF switch terminal 6
• from body grounds M57, M61, and M79.
The rear sonar system and buzzer will be disabled and the rear sonar system OFF indicator will be illuminated
until the ignition switch is turned OFF. When the ignition switch is turned ON, the rear sonar system will be
enabled. Depressing the rear sonar system OFF switch momentarily will enable the rear sonar system also.
Enabling the rear sonar system will cause the rear sonar system OFF indicator to go out.
SONAR BUZZER
With power supplied to the sonar control unit and the transmission gear selector lever in R position, a station-
ary object that is at least 7.0 cm (2.8 in.) wide and 1.0 m (39.0 in.) tall and that is closer than 1.8 meters (5.9 ft.)
will be detected by the rear sonar sensors, causing the sonar buzzer to sound a tone. As the vehicle moves
closer to the object, the rate of the tone will increase. When the object is less than 25.0 cm (10 in.) from the
rear bumper, the tone will sound continuously.
Power is supplied
• from sonar control unit terminal 7
• to sonar buzzer terminal +.
Ground is supplied
• to sonar buzzer terminal -
• from sonar control unit terminal 3.
REAR SONAR SENSOR
With power and ground supplied to the rear sonar sensors, the sonar sensors transmit a 38.4 kHz ultrasonic
signal. This signal is reflected back to the sensor by objects large enough and close enough to be detected.
The rear sonar sensors measure the time from the transmitted signal to the time the signal is reflected back
and sends this information to the sonar control unit.
Power is supplied
• from sonar control unit terminal 16
• to each rear sonar sensor terminal 1.
Ground is supplied
• to each rear sonar sensor terminal 3
• from sonar control unit terminal 15.
Signal is supplied
• from each rear sonar sensor terminal 2
• to sonar control unit terminals 9, 10, 11 and 12.
Page 1061 of 3061

DI-50
< SERVICE INFORMATION >
REAR SONAR SYSTEM
Sonar Control Unit Harness Connector Terminal Layout
INFOID:0000000003533527
Terminal and Reference Value for Sonar Control UnitINFOID:0000000003533528
WKIA5222E
Te r m i n a l
(color)ItemCondition
Reference value (V)
(Approx.) Ignition
switchOperation
3 (R) Sonar buzzer return ON — 0 - 12 (variable)
4 (BR/Y)Rear sonar system
OFF indicator outputONRear sonar system OFF
switch ON 0
OFF Battery voltage
5 (G/W) Reverse signal ONTransmission gear se-
lector leverR position Battery voltage
Transmission gear se-
lector leverNot R position 0
6 (B)Sonar control unit
ground —— 0
7 (L) Sonar buzzer drive
signalON — Battery voltage
8 (G/R)Sonar control unit
powerON — Battery voltage
9 (GR)Rear sonar sensor
signal - RH outerON• Rear sonar system OFF switch ON
• Transmission gear selector lever in R po-
sition
• No obstaclesBattery voltage
10 (P)Rear sonar sensor
signal - LH outerON• Rear sonar system OFF switch ON
• Transmission gear selector lever in R po-
sition
• No obstaclesBattery voltage
11 ( O )Rear sonar sensor
signal - LH innerON• Rear sonar system OFF switch ON
• Transmission gear selector lever in R po-
sition
• No obstaclesBattery voltage
12 (LG)Rear sonar sensor
signal - RH innerON• Rear sonar system OFF switch ON
• Transmission gear selector lever in R po-
sition
• No obstaclesBattery voltage
13 (LG)Rear sonar system
OFF switch signalONRear sonar system OFF
switchON 0
OFF Battery voltage
15 (Y)Rear sonar sensor
groundON — 0
16 (LG/B)Rear sonar sensor
powerON Ignition switch ON Battery voltage