mirror INFINITI QX56 2007 Factory Service Manual
[x] Cancel search | Manufacturer: INFINITI, Model Year: 2007, Model line: QX56, Model: INFINITI QX56 2007Pages: 3061, PDF Size: 64.56 MB
Page 1 of 3061
-1
QUICK REFERENCE INDEX
AGENERAL INFORMATIONGIGeneral Information
BENGINEEMEngine Mechanical
LUEngine Lubrication System
COEngine Cooling System
ECEngine Control System
FLFuel System
EXExhaust System
ACCAccelerator Control System
CTRANSMISSION/
TRANSAXLEATAutomatic Transmission
DDRIVELINE/AXLETFTransfer
PRPropeller Shaft
FFDFront Final Drive
RFDRear Final Drive
FAXFront Axle
RAXRear Axle
ESUSPENSIONFSUFront Suspension
RSURear Suspension
WTRoad Wheels & Tires
FBRAKESBRBrake System
PBParking Brake System
BRCBrake Control System
GSTEERINGPSPower Steering System
HRESTRAINTSSBSeat Belts
SRSSupplemental Restraint System (SRS)
IBODYBLBody, Lock & Security System
GWGlasses, Window System & Mirrors
RFRoof
EIExterior & Interior
IPInstrument Panel
SESeat
APAdjustable Pedal
JAIR CONDITIONERATCAutomatic Air Conditioner
KELECTRICALSCStarting & Charging System
LTLighting System
DIDriver Information System
WWWiper, Washer & Horn
BCSBody Control System
LANLAN System
AVAudio Visual, Navigation & Telephone System
ACSAuto Cruise Control System
PGPower Supply, Ground & Circuit Elements
LMAINTENANCEMAMaintenance
Edition: August 2006
Revision: December 2007
Publication No. SM7E-1J60U1
B
D
© 2007 NISSAN NORTH AMERICA, INC.
All rights reserved. No part of this Service Manual may be reproduced or stored in a retrieval system, or transmitted in any
form, or by any means, electronic, mechanical, photo-copying, recording or otherwise, without the prior written permission
of Nissan North America, Inc.
A
C
E
F
G
H
I
J
K
L
M
Page 395 of 3061
AIR CONDITIONER CONTROLATC-25
< SERVICE INFORMATION >
C
DE
F
G H
I
K L
M A
B
AT C
N
O P
TEMPERATURE CONTROL DIAL (TEMPE RATURE CONTROL) (DRIVER SIDE)
Increases or decreases the set temperature.
TEMPERATURE CONTROL DIAL (TEMPERATURE CONTROL) (PASSENGER SIDE)
Increases or decreases the set temperature.
TEMPERATURE CONTROL DIAL (TEMPERA TURE AND MODE CONTROL) (REAR)
Increases or decreases the set temperature. The mode al so changes from foot at full hot setting, to foot/vent
mid-range (warm) setting, and then to panel on full cold setting.
RECIRCULATION ( ) SWITCH
• When REC switch is ON, REC switch indicator turns ON, and air inlet is set to REC.
• When REC switch is turned OFF, or when compressor is turned from ON to OFF, REC switch is automati-
cally turned OFF. REC mode can be re-entered by pressing REC switch again.
• REC switch is not operated when DEF switch is tu rned ON, at the D/F position or in floor position.
DEFROSTER ( ) SWITCH
Positions the air outlet doors to the defrost position. Al so positions the intake doors to the outside air position.
REAR WINDOW DEFOGGER SWITCH
When switch is ON, rear window and door mirrors are defogged.
OFF SWITCH
The compressor and blower are OFF, the intake doors are set to the outside air position, and the air outlet
doors are set to the foot (75% foot and 25% defrost) position.
A/C SWITCH
The compressor is ON or OFF.
(Pressing the A/C switch when the AUTO switch is ON will turn off the A/C switch and compressor.)
MODE SWITCH (FRONT)
Controls the air discharge outlets.
FRONT BLOWER CONTROL DIAL
Manually control the blower speed. Seven speeds are av ailable for manual control (as shown on the display
screen).
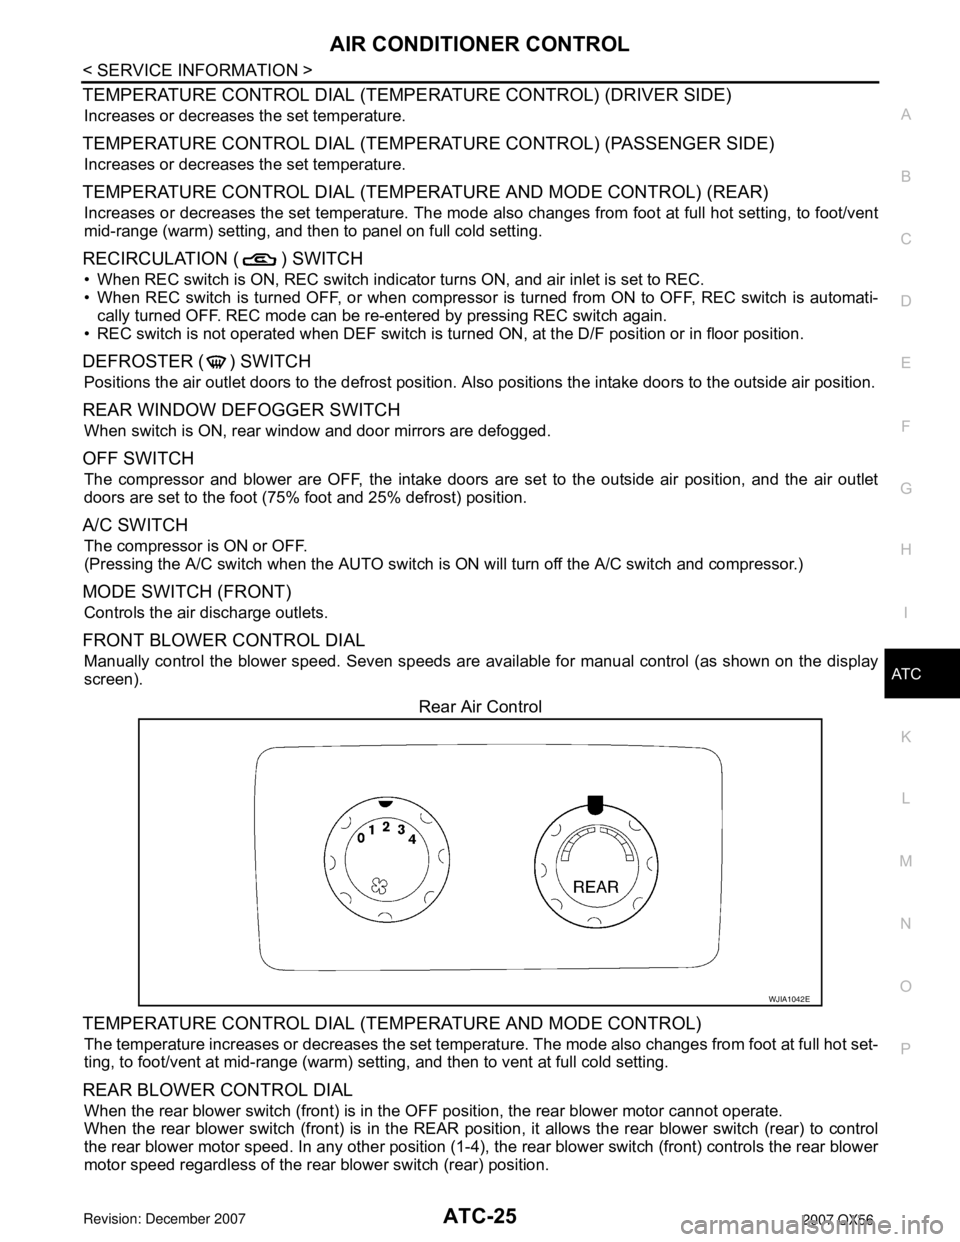
Rear Air Control
TEMPERATURE CONTROL DIAL (TEM PERATURE AND MODE CONTROL)
The temperature increases or decreases the set temperat ure. The mode also changes from foot at full hot set-
ting, to foot/vent at mid-range (warm) setti ng, and then to vent at full cold setting.
REAR BLOWER CONTROL DIAL
When the rear blower switch (front) is in the OFF position, the rear blower motor cannot operate.
When the rear blower switch (front) is in the REAR positi on, it allows the rear blower switch (rear) to control
the rear blower motor speed. In any other position (1-4), the rear blower switch (front) controls the rear blower
motor speed regardless of the rear blower switch (rear) position.
WJIA1042E
Page 536 of 3061
ATC-166
< SERVICE INFORMATION >
REFRIGERANT LINES
INSTALLATION
Installation is in the reverse order of removal.
CAUTION:
• Replace the O-rings on the A/C refrigerant pipes with new ones, then apply compressor oil to them
when installing them.
• After charging refrigerant, check for leaks.
Checking of Refrigerant LeaksINFOID:0000000003533307
PRELIMINARY CHECK
Perform a visual inspection of all refrigeration parts, fittings, hoses and components for signs of A/C oil leak-
age, damage, and corrosion. Any A/C oil leakage may indi cate an area of refrigerant leakage. Allow extra
inspection time in these areas when using either an el ectronic refrigerant leak detector (J-41995) or fluores-
cent dye leak detector (J-42220).
If any dye is observed using a fluorescent dye leak detector (J-42220), confirm the leak using a electronic
refrigerant leak detector (J-41995). It is possible that the dye is from a prior leak that was repaired and not
properly cleaned.
When searching for leaks, do not stop when one leak is found but continue to check for additional leaks at all
system components and connections.
When searching for refrigerant leaks using an electronic refrigerant leak detector (J-41995), move the probe
along the suspected leak area at 25 - 50 mm (1 - 2 in) per second and no further than 6 mm (1/4 in) from the
component.
CAUTION:
Moving the electronic refrigerant l eak detector probe slower and clo ser to the suspected leak area will
improve the chances of finding a leak.
Checking System for L eaks Using the Fluoresc ent Dye Leak DetectorINFOID:0000000003533308
1. Check the A/C system for leaks using the fluorescent dye leak detector and safety goggles (J-42220) in a
low sunlight area (area without windows preferable). Il luminate all components, fittings and lines. The dye
will appear as a bright green/yellow area at the point of leakage. Fluorescent dye observed at the evapo-
rator drain opening indicates an evaporator core asse mbly leak (tubes, core or expansion valve).
2. If the suspected area is difficult to see, use an adjustable mirror or wipe the area with a clean shop rag or
cloth, then inspect the shop rag or cloth with the fl uorescent dye leak detector (J-42220) for dye residue.
3. After the leak is repaired, remove any residual dye using refrigerant dye cleaner (J-43872) to prevent
future misdiagnosis.
4. Perform a system performance check and then verify t he leak repair using a electronic refrigerant leak
detector (J-41995).
NOTE:
• Other gases in the work area or substances on the A/C components, for example, anti-freeze, wind-
shield washer fluid, solvents and oils, may falsely tri gger the leak detector. Make sure the surfaces to be
checked are clean.
• Clean with a dry cloth or blow off with shop air.
• Do not allow the sensor tip of the electronic refri gerant leak detector (J-41995) to contact with any sub-
stance. This can also cause false readings and may damage the detector.
Dye InjectionINFOID:0000000003533309
NOTE:
This procedure is only necessary when recharging the system or when the compressor has seized and must
be replaced.
1. Check the A/C system static (at rest) pressure . Pressure must be at least 345 kPa (3.52 kg/cm
2 , 50 psi).
2. Pour one bottle 7.4 cc (1/4 ounce) of the HFC-134a (R -134a) fluorescent leak detection dye (J-41447) into
the HFC-134a (R-134a) dye injector (J-41459).
CAUTION: Expansion valve bolts : 4 N·m (0.41 kg-m, 35 in-lb)
A/C refrigerant pipe to exp
ansion valve bolt : Refer to ATC-152, "
Component".
Page 847 of 3061
BL-136
< SERVICE INFORMATION >
BODY REPAIR
BODY REPAIR
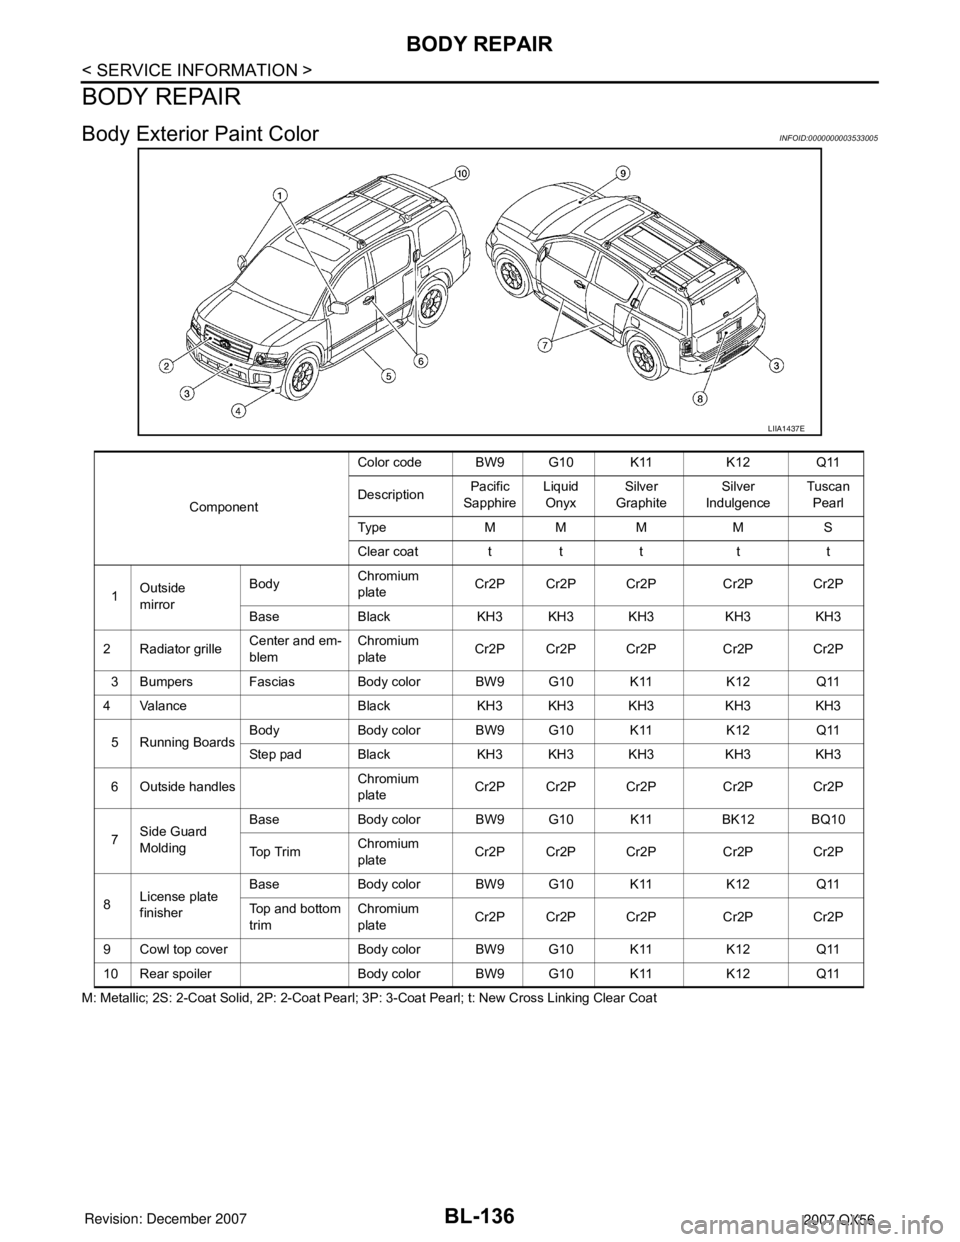
Body Exterior Paint ColorINFOID:0000000003533005
M: Metallic; 2S: 2-Coat Solid, 2P: 2-Coat Pearl; 3P: 3-Coat Pearl; t: New Cross Linking Clear Coat
LIIA1437E
ComponentColor code BW9 G10 K11 K12 Q11
DescriptionPacific
Sapphire Liquid
OnyxSilver
GraphiteSilver
IndulgenceTuscan
Pearl
Typ e M M M M S
Clear coat t t t t t
1Outside
mirrorBodyChromium
plateCr2P Cr2P Cr2P Cr2P Cr2P
Base Black KH3 KH3 KH3 KH3 KH3
2 Radiator grilleCenter and em-
blemChromium
plateCr2P Cr2P Cr2P Cr2P Cr2P
3 Bumpers Fascias Body color BW9 G10 K11 K12 Q11
4 Valance Black KH3 KH3 KH3 KH3 KH3
5 Running BoardsBody Body color BW9 G10 K11 K12 Q11
Step pad Black KH3 KH3 KH3 KH3 KH3
6 Outside handlesChromium
plateCr2P Cr2P Cr2P Cr2P Cr2P
7Side Guard
MoldingBase Body color BW9 G10 K11 BK12 BQ10
To p T r i mChromium
plateCr2P Cr2P Cr2P Cr2P Cr2P
8License plate
finisherBase Body color BW9 G10 K11 K12 Q11
Top and bottom
trimChromium
plateCr2P Cr2P Cr2P Cr2P Cr2P
9 Cowl top cover Body color BW9 G10 K11 K12 Q11
10 Rear spoiler Body color BW9 G10 K11 K12 Q11
Page 1035 of 3061
DI-24
< SERVICE INFORMATION >
COMPASS AND THERMOMETER
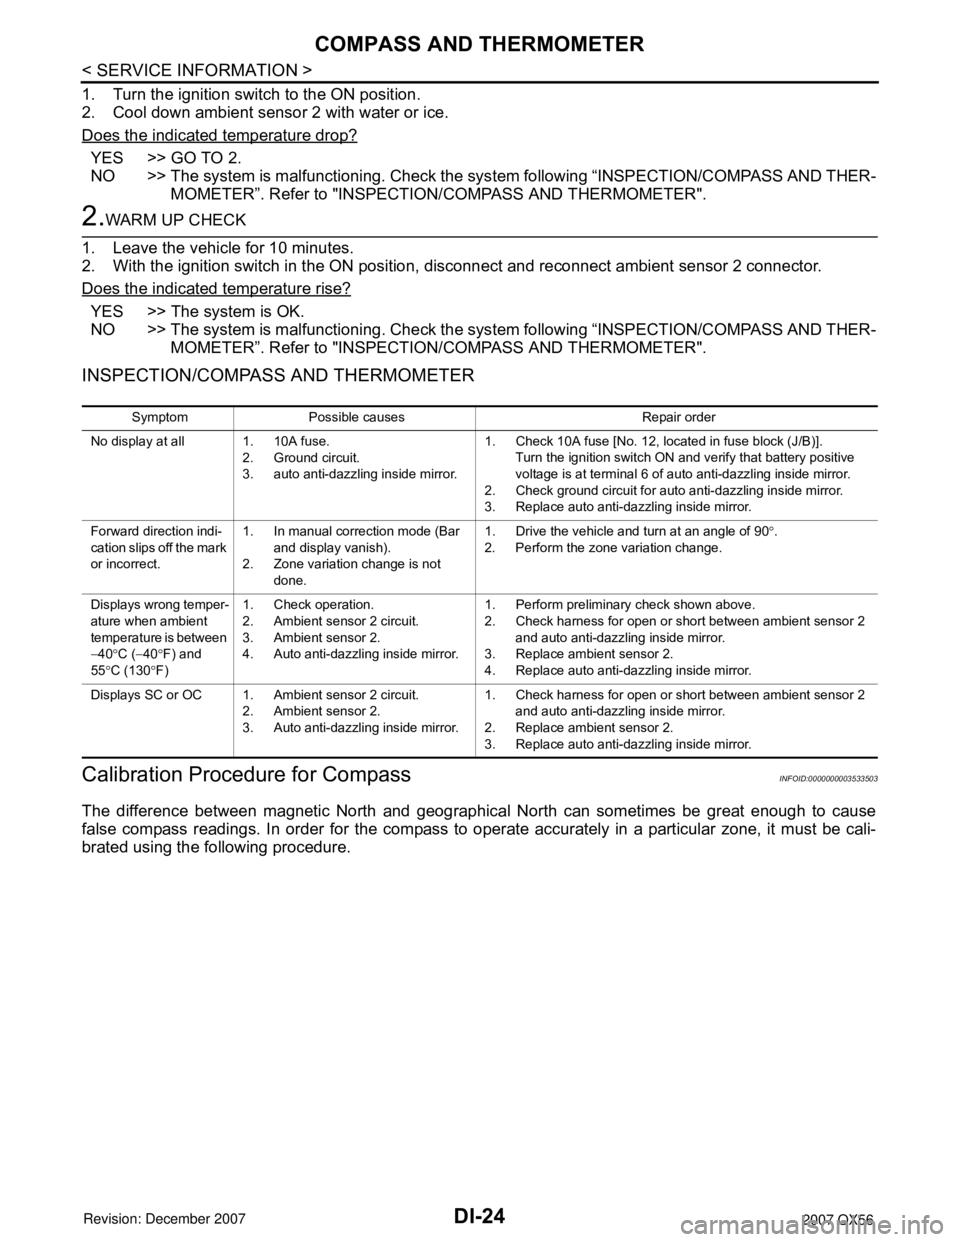
1. Turn the ignition switch to the ON position.
2. Cool down ambient sensor 2 with water or ice.
Does the indicated temperature drop?
YES >> GO TO 2.
NO >> The system is malfunctioning. Check the system following “INSPECTION/COMPASS AND THER-
MOMETER”. Refer to "INSPECTION/COMPASS AND THERMOMETER".
2.WARM UP CHECK
1. Leave the vehicle for 10 minutes.
2. With the ignition switch in the ON position, disconnect and reconnect ambient sensor 2 connector.
Does the indicated temperature rise?
YES >> The system is OK.
NO >> The system is malfunctioning. Check the system following “INSPECTION/COMPASS AND THER-
MOMETER”. Refer to "INSPECTION/COMPASS AND THERMOMETER".
INSPECTION/COMPASS AND THERMOMETER
Calibration Procedure for CompassINFOID:0000000003533503
The difference between magnetic North and geographical North can sometimes be great enough to cause
false compass readings. In order for the compass to operate accurately in a particular zone, it must be cali-
brated using the following procedure.
Symptom Possible causes Repair order
No display at all 1. 10A fuse.
2. Ground circuit.
3. auto anti-dazzling inside mirror.1. Check 10A fuse [No. 12, located in fuse block (J/B)].
Turn the ignition switch ON and verify that battery positive
voltage is at terminal 6 of auto anti-dazzling inside mirror.
2. Check ground circuit for auto anti-dazzling inside mirror.
3. Replace auto anti-dazzling inside mirror.
Forward direction indi-
cation slips off the mark
or incorrect.1. In manual correction mode (Bar
and display vanish).
2. Zone variation change is not
done.1. Drive the vehicle and turn at an angle of 90°.
2. Perform the zone variation change.
Displays wrong temper-
ature when ambient
temperature is between
−40°C (−40°F) and
55°C (130°F)1. Check operation.
2. Ambient sensor 2 circuit.
3. Ambient sensor 2.
4. Auto anti-dazzling inside mirror.1. Perform preliminary check shown above.
2. Check harness for open or short between ambient sensor 2
and auto anti-dazzling inside mirror.
3. Replace ambient sensor 2.
4. Replace auto anti-dazzling inside mirror.
Displays SC or OC 1. Ambient sensor 2 circuit.
2. Ambient sensor 2.
3. Auto anti-dazzling inside mirror.1. Check harness for open or short between ambient sensor 2
and auto anti-dazzling inside mirror.
2. Replace ambient sensor 2.
3. Replace auto anti-dazzling inside mirror.
Page 1756 of 3061
DOOR OUTSIDE MOLDING
EI-27
< SERVICE INFORMATION >
C
D
E
F
G
H
J
K
L
MA
B
EI
N
O
P
DOOR OUTSIDE MOLDING
Removal and InstallationINFOID:0000000003533133
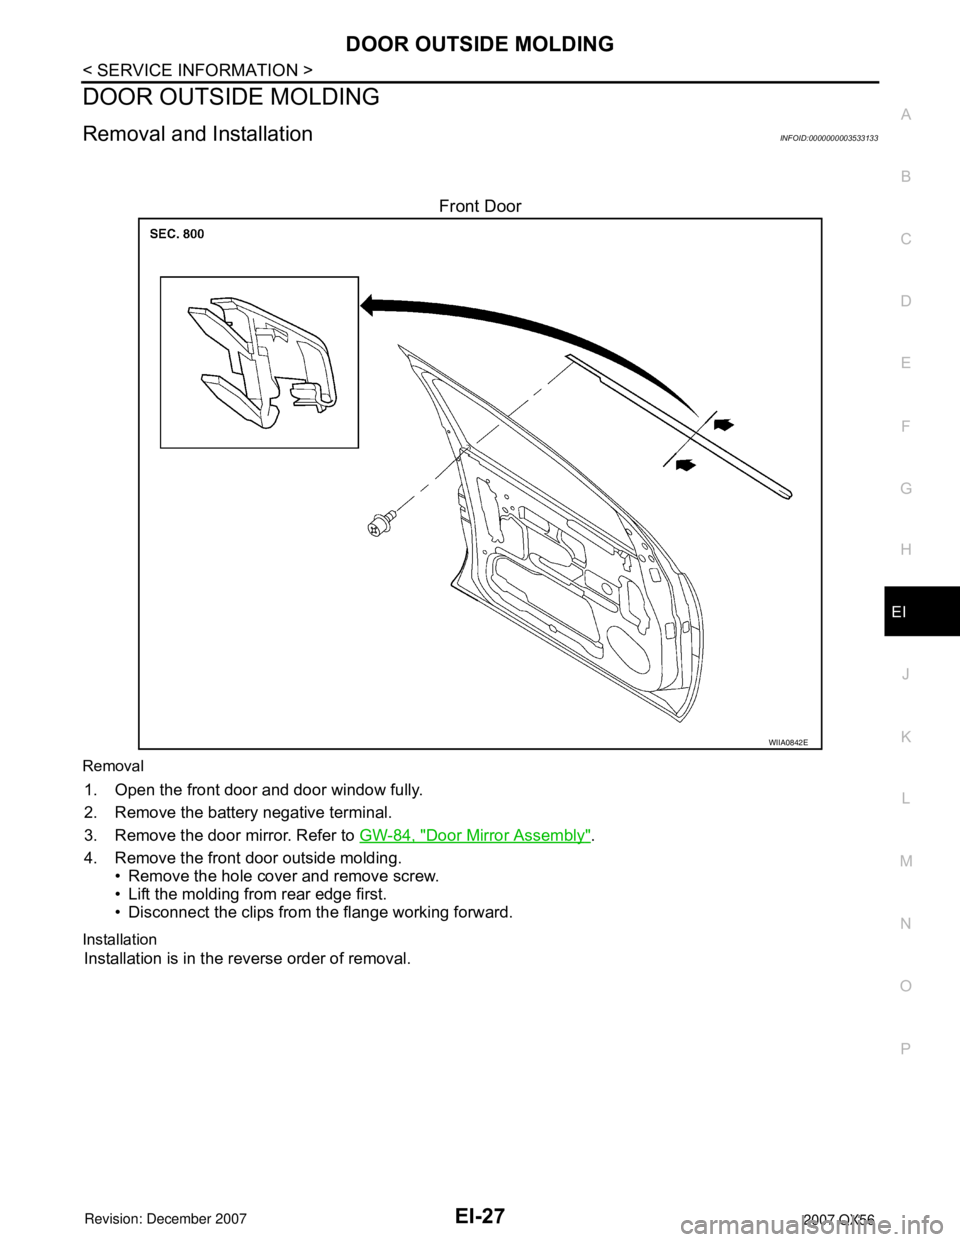
Front Door
Removal
1. Open the front door and door window fully.
2. Remove the battery negative terminal.
3. Remove the door mirror. Refer to GW-84, "
Door Mirror Assembly".
4. Remove the front door outside molding.
• Remove the hole cover and remove screw.
• Lift the molding from rear edge first.
• Disconnect the clips from the flange working forward.
Installation
Installation is in the reverse order of removal.
WIIA0842E
Page 1789 of 3061
INTAKE MANIFOLDEM-19
< SERVICE INFORMATION >
C
DE
F
G H
I
J
K L
M A
EM
NP
O
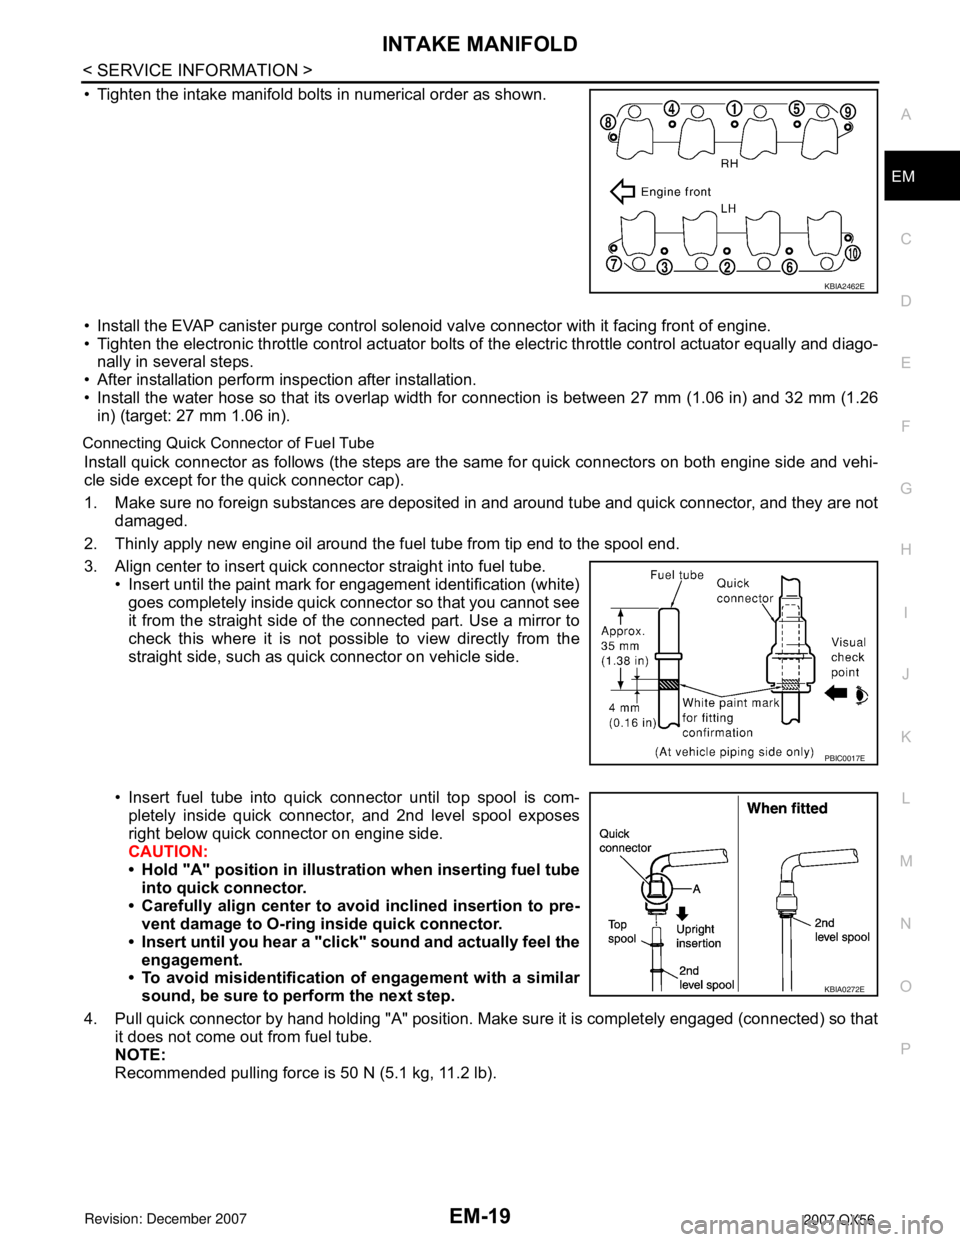
• Tighten the intake manifold bolts in numerical order as shown.
• Install the EVAP canister purge control solenoi
d valve connector with it facing front of engine.
• Tighten the electronic throttle control actuator bolts of the electric throttle control actuator equally and diago-
nally in several steps.
• After installation perform inspection after installation.
• Install the water hose so that its overlap width for connection is between 27 mm (1.06 in) and 32 mm (1.26
in) (target: 27 mm 1.06 in).
Connecting Quick Connector of Fuel Tube
Install quick connector as follows (the steps are the same for quick connectors on both engine side and vehi-
cle side except for the quick connector cap).
1. Make sure no foreign substances are deposited in and around tube and quick connector, and they are not
damaged.
2. Thinly apply new engine oil around the fuel tube from tip end to the spool end.
3. Align center to insert quick connector straight into fuel tube. • Insert until the paint mark for engagement identification (white)
goes completely inside quick connector so that you cannot see
it from the straight side of the connected part. Use a mirror to
check this where it is not possible to view directly from the
straight side, such as quick connector on vehicle side.
• Insert fuel tube into quick connector until top spool is com- pletely inside quick connector, and 2nd level spool exposes
right below quick connector on engine side.
CAUTION:
• Hold "A" position in illustration when inserting fuel tubeinto quick connector.
• Carefully align center to avoid inclined insertion to pre-
vent damage to O-ring inside quick connector.
• Insert until you hear a "click" sound and actually feel the engagement.
• To avoid misidentification of engagement with a similar
sound, be sure to perform the next step.
4. Pull quick connector by hand holding "A" position. Make sure it is completely engaged (connected) so that it does not come out from fuel tube.
NOTE:
Recommended pulling force is 50 N (5.1 kg, 11.2 lb).
KBIA2462E
PBIC0017E
KBIA0272E
Page 1804 of 3061
EM-34
< SERVICE INFORMATION >
FUEL INJECTOR AND FUEL TUBE
6. Installation of the remaining components is in the reverse order of removal.
INSPECTION AFTER INSTALLATION
After installing the fuel tubes, make sure there are no fuel leaks at the connections using the following steps.
1. Apply fuel pressure to the fuel lines by turning ignition switch ON (with engine stopped). Then check for fuel leaks at the connections.
NOTE:
Use mirrors for checking on hidden points.
2. Start the engine and rev it up and check for fuel leaks at the connections. CAUTION:
Do not touch the engine immediately after stopping, as engine becomes extremely hot.
Page 2011 of 3061
RECOMMENDED CHEMICAL PRODUCTS AND SEALANTS
GI-45
< SERVICE INFORMATION >
C
D
E
F
G
H
I
J
K
L
MB
GI
N
O
PRECOMMENDED CHEMICAL PRODUCTS AND SEALANTS
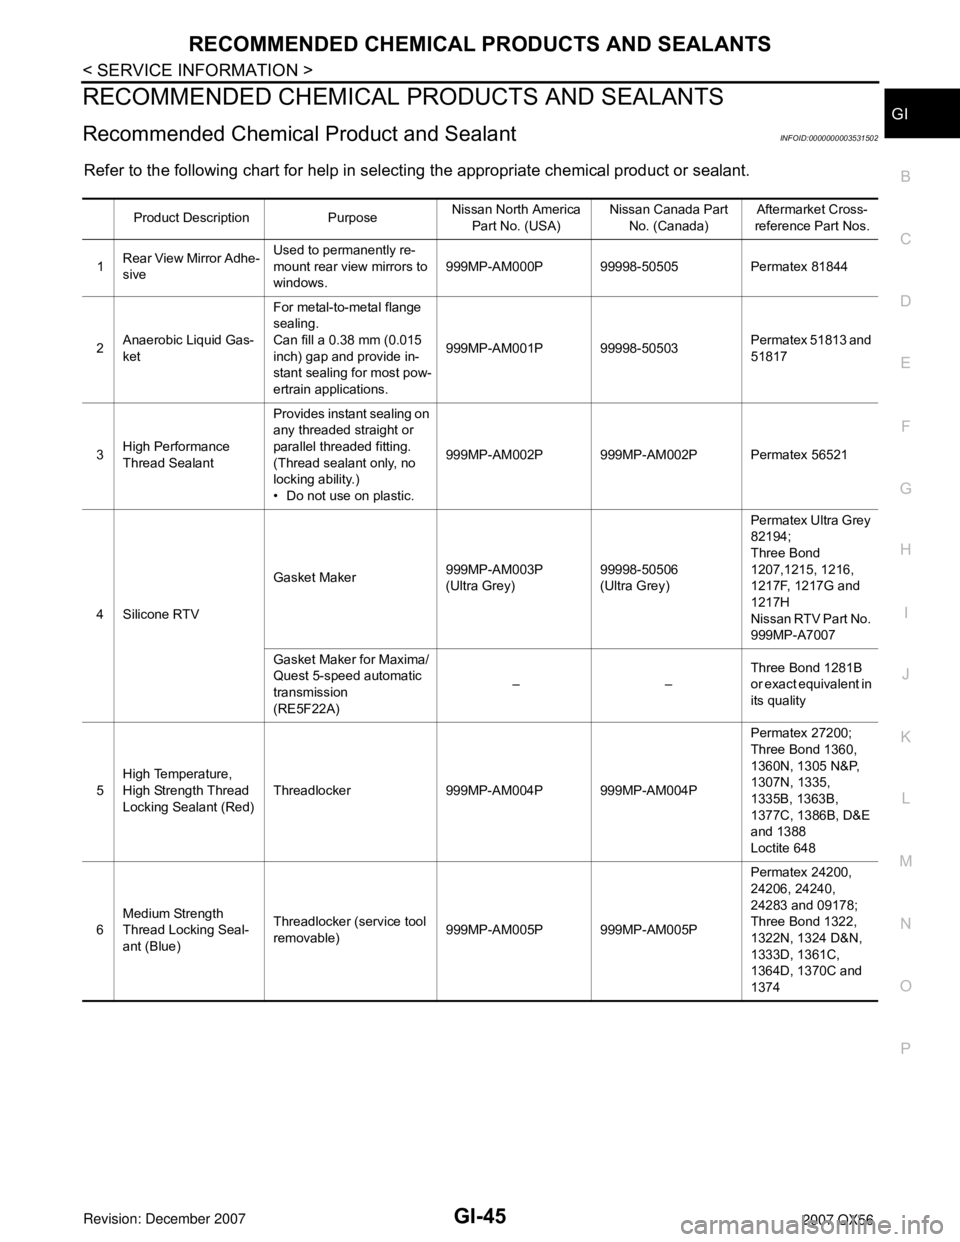
Recommended Chemical Product and SealantINFOID:0000000003531502
Refer to the following chart for help in selecting the appropriate chemical product or sealant.
Product Description PurposeNissan North America
Part No. (USA)Nissan Canada Part
No. (Canada)Aftermarket Cross-
reference Part Nos.
1Rear View Mirror Adhe-
siveUsed to permanently re-
mount rear view mirrors to
windows.999MP-AM000P 99998-50505 Permatex 81844
2Anaerobic Liquid Gas-
ketFor metal-to-metal flange
sealing.
Can fill a 0.38 mm (0.015
inch) gap and provide in-
stant sealing for most pow-
ertrain applications.999MP-AM001P 99998-50503Permatex 51813 and
51817
3High Performance
Thread SealantProvides instant sealing on
any threaded straight or
parallel threaded fitting.
(Thread sealant only, no
locking ability.)
• Do not use on plastic.999MP-AM002P 999MP-AM002P Permatex 56521
4 Silicone RTVGasket Maker999MP-AM003P
(Ultra Grey)99998-50506
(Ultra Grey)Permatex Ultra Grey
82194;
Three Bond
1207,1215, 1216,
1217F, 1217G and
1217H
Nissan RTV Part No.
999MP-A7007
Gasket Maker for Maxima/
Quest 5-speed automatic
transmission
(RE5F22A)––Three Bond 1281B
or exact equivalent in
its quality
5High Temperature,
High Strength Thread
Locking Sealant (Red)Threadlocker 999MP-AM004P 999MP-AM004PPermatex 27200;
Three Bond 1360,
1360N, 1305 N&P,
1307N, 1335,
1335B, 1363B,
1377C, 1386B, D&E
and 1388
Loctite 648
6Medium Strength
Thread Locking Seal-
ant (Blue)Threadlocker (service tool
removable)999MP-AM005P 999MP-AM005PPermatex 24200,
24206, 24240,
24283 and 09178;
Three Bond 1322,
1322N, 1324 D&N,
1333D, 1361C,
1364D, 1370C and
1374
Page 2020 of 3061
GW-1
BODY
C
D
E
F
G
H
J
K
L
M
SECTION GW
A
B
GW
N
O
P
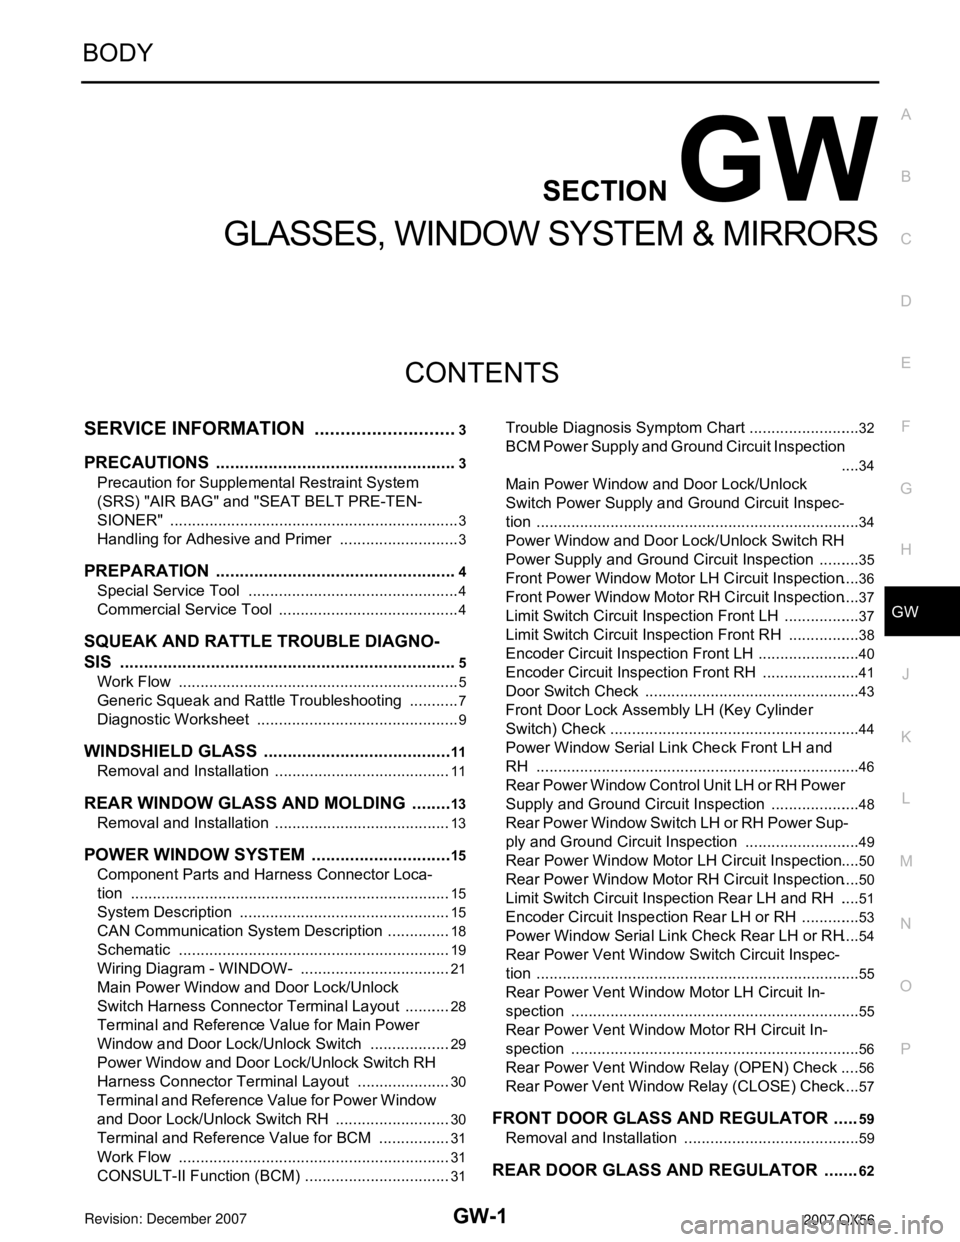
CONTENTS
GLASSES, WINDOW SYSTEM & MIRRORS
SERVICE INFORMATION ............................3
PRECAUTIONS ...................................................3
Precaution for Supplemental Restraint System
(SRS) "AIR BAG" and "SEAT BELT PRE-TEN-
SIONER" ...................................................................
3
Handling for Adhesive and Primer ............................3
PREPARATION ...................................................4
Special Service Tool .................................................4
Commercial Service Tool ..........................................4
SQUEAK AND RATTLE TROUBLE DIAGNO-
SIS .......................................................................
5
Work Flow .................................................................5
Generic Squeak and Rattle Troubleshooting ............7
Diagnostic Worksheet ...............................................9
WINDSHIELD GLASS ........................................11
Removal and Installation .........................................11
REAR WINDOW GLASS AND MOLDING .........13
Removal and Installation .........................................13
POWER WINDOW SYSTEM ..............................15
Component Parts and Harness Connector Loca-
tion ..........................................................................
15
System Description .................................................15
CAN Communication System Description ...............18
Schematic ...............................................................19
Wiring Diagram - WINDOW- ...................................21
Main Power Window and Door Lock/Unlock
Switch Harness Connector Terminal Layout ...........
28
Terminal and Reference Value for Main Power
Window and Door Lock/Unlock Switch ...................
29
Power Window and Door Lock/Unlock Switch RH
Harness Connector Terminal Layout ......................
30
Terminal and Reference Value for Power Window
and Door Lock/Unlock Switch RH ...........................
30
Terminal and Reference Value for BCM .................31
Work Flow ...............................................................31
CONSULT-II Function (BCM) ..................................31
Trouble Diagnosis Symptom Chart ..........................32
BCM Power Supply and Ground Circuit Inspection
....
34
Main Power Window and Door Lock/Unlock
Switch Power Supply and Ground Circuit Inspec-
tion ...........................................................................
34
Power Window and Door Lock/Unlock Switch RH
Power Supply and Ground Circuit Inspection ..........
35
Front Power Window Motor LH Circuit Inspection ....36
Front Power Window Motor RH Circuit Inspection ....37
Limit Switch Circuit Inspection Front LH ..................37
Limit Switch Circuit Inspection Front RH .................38
Encoder Circuit Inspection Front LH ........................40
Encoder Circuit Inspection Front RH .......................41
Door Switch Check ..................................................43
Front Door Lock Assembly LH (Key Cylinder
Switch) Check ..........................................................
44
Power Window Serial Link Check Front LH and
RH ...........................................................................
46
Rear Power Window Control Unit LH or RH Power
Supply and Ground Circuit Inspection .....................
48
Rear Power Window Switch LH or RH Power Sup-
ply and Ground Circuit Inspection ...........................
49
Rear Power Window Motor LH Circuit Inspection ....50
Rear Power Window Motor RH Circuit Inspection ....50
Limit Switch Circuit Inspection Rear LH and RH .....51
Encoder Circuit Inspection Rear LH or RH ..............53
Power Window Serial Link Check Rear LH or RH ....54
Rear Power Vent Window Switch Circuit Inspec-
tion ...........................................................................
55
Rear Power Vent Window Motor LH Circuit In-
spection ...................................................................
55
Rear Power Vent Window Motor RH Circuit In-
spection ...................................................................
56
Rear Power Vent Window Relay (OPEN) Check ....56
Rear Power Vent Window Relay (CLOSE) Check ....57
FRONT DOOR GLASS AND REGULATOR .....59
Removal and Installation .........................................59
REAR DOOR GLASS AND REGULATOR .......62