battery INFINITI QX56 2008 Factory Service Manual
[x] Cancel search | Manufacturer: INFINITI, Model Year: 2008, Model line: QX56, Model: INFINITI QX56 2008Pages: 4083, PDF Size: 81.73 MB
Page 583 of 4083
![INFINITI QX56 2008 Factory Service Manual BRC-116
< REMOVAL AND INSTALLATION >[VDC/TCS/ABS]
ACTUATOR AND ELECTRIC UNIT (ASSEMBLY)
ACTUATOR AND ELECTRIC UNIT (ASSEMBLY)
Removal and InstallationINFOID:0000000001604550
REMOVAL
1. Disconnect the INFINITI QX56 2008 Factory Service Manual BRC-116
< REMOVAL AND INSTALLATION >[VDC/TCS/ABS]
ACTUATOR AND ELECTRIC UNIT (ASSEMBLY)
ACTUATOR AND ELECTRIC UNIT (ASSEMBLY)
Removal and InstallationINFOID:0000000001604550
REMOVAL
1. Disconnect the](/img/42/57030/w960_57030-582.png)
BRC-116
< REMOVAL AND INSTALLATION >[VDC/TCS/ABS]
ACTUATOR AND ELECTRIC UNIT (ASSEMBLY)
ACTUATOR AND ELECTRIC UNIT (ASSEMBLY)
Removal and InstallationINFOID:0000000001604550
REMOVAL
1. Disconnect the negative battery terminal.
2. Remove the air duct and resonator assembly and air cleaner case. Refer to
EM-25, "
Removal and Instal-
lation".
3. Drain the brake fluid. Refer to BR-17, "
Drain and Refill" .
4. Disconnect the actuator harness from the ABS actuator and electric unit (control unit).
5. Disconnect the brake tubes. CAUTION:
• To remove the brake tubes, use a flare nut wrench to prevent the flare nuts and brake tubes from
being damaged.
• Be careful not to splash brake fluid on painted areas.
6. Remove the three bolts and remove the ABS actuator and electric unit (control unit).
INSTALLATION
Installation is in the reverse order of removal.
CAUTION:
To install, use a flare nut wr ench (commercial service tool).
1. To rear left caliper
13 N·m (1.3 kg-m, 10 ft-lb) 2. To rear right caliper
13 N·m (1.3 kg-m, 10 ft-lb) 3. To front left caliper
13 N·m (1.3 kg-m, 10 ft-lb)
4. To front right caliper 13 N·m (1.3 kg-m, 10 ft-lb) 5. From the master cylinder secondary side
18.2 N·m (1.9 kg-m, 13 ft-lb) 6. From the master cylinder primary side
18.2 N·m (1.9 kg-m, 13 ft-lb)
7. ABS actuator and electric unit (control unit) 8. Actuator harness connector
WFIA0375E
Revision: March 2010
2008 QX56
Page 590 of 4083
BRM-4
< SERVICE INFORMATION >
BODY REPAIR
Body Component Parts
INFOID:0000000001609798
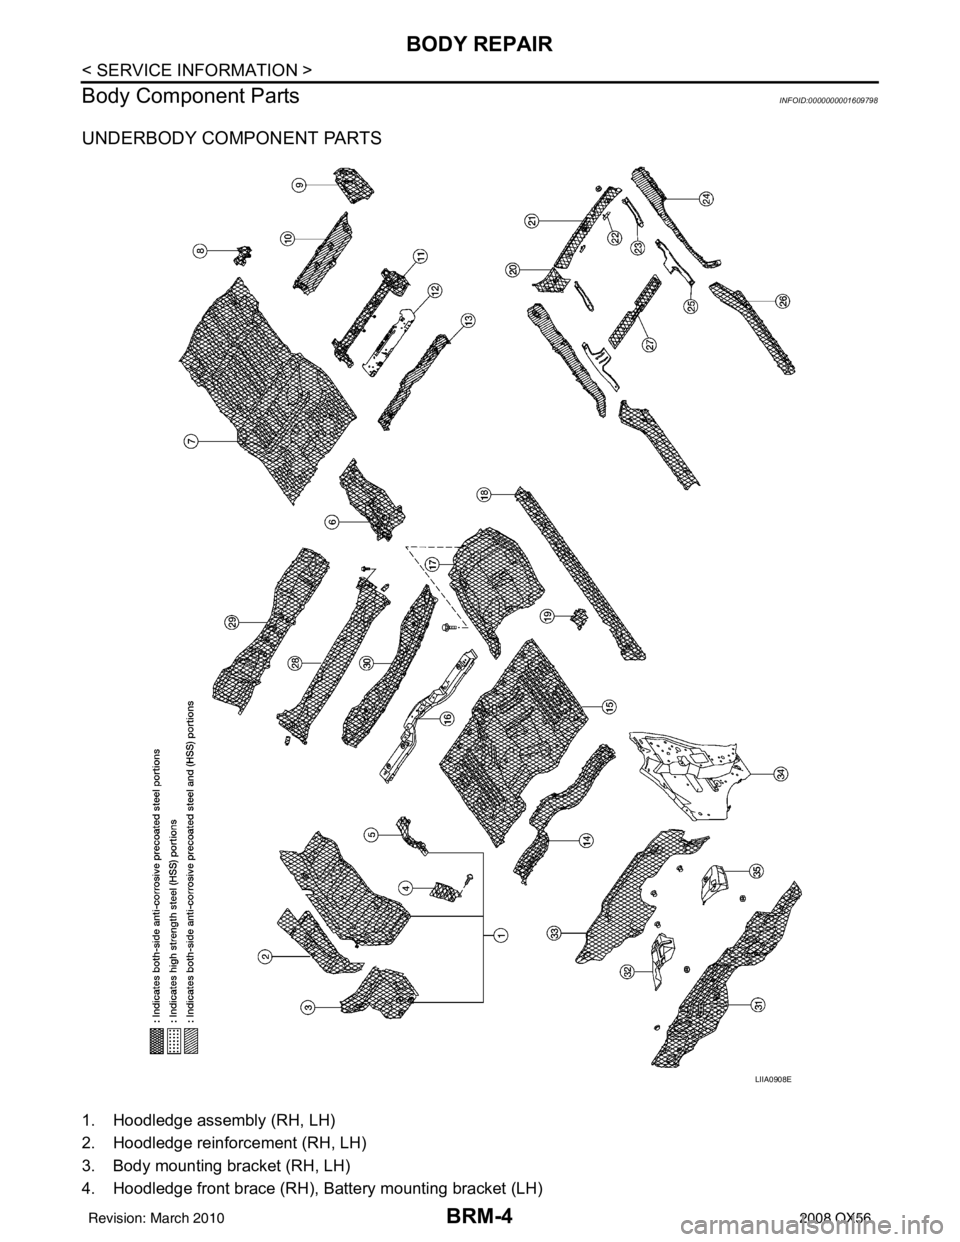
UNDERBODY COMPONENT PARTS
1. Hoodledge assembly (RH, LH)
2. Hoodledge reinforcement (RH, LH)
3. Body mounting bracket (RH, LH)
4. Hoodledge front brace (RH), Battery mounting bracket (LH)
LIIA0908E
Revision: March 2010 2008 QX56
Page 618 of 4083

BRM-32
< SERVICE INFORMATION >
BODY REPAIR
1. When repairing and painting a portion of the body adjacent to plastic parts, consider their characteristics
(influence of heat and solvent) and remove them if neces sary or take suitable measures to protect them.
2. Plastic parts should be repaired and painted using methods suiting the materials
, characteristics.
Abbre- viation Material name Heat resisting
temperature °C ( °F) Resistance to gasoline and
solvents Other cautions
PE Polyethylene 60 (140)Gasoline and most solvents are
harmless if applied for a very
short time (wipe up quickly). Flammable
PVC Polyvinyl Chloride 80 (176) Same as above. Poison gas is emitted
when burned.
EPM/
EPDM Ethylene Propylene (Diene) rub-
ber
80 (176) Same as above.
Flammable
TPO/
TPR Thermoplastic Olefine/
Thermoplastic Rubber
80 (176) Same as above.
Flammable
PP Polypropylene 90 (194) Same as above. Flammable, avoid bat-
tery acid.
UP Polyester thermoset 90 (194) Same as above. Flammable
PS Polystyrene 80 (176) Avoid solvents. Flammable
ABS Acrylonitrile Butadiene Styrene
resin
80 (176) Avoid gasoline and solvents.
AES Acrylonitrile Ethylene Styrene 80 (176) Same as above.
PMMA Polymethyl Methacrylate 85 (185) Same as above.
AAS Acrylonitrile Acrylic Styrene 85 (185) Same as above.
AS Acrylonitrile Styrene 85 (185) Same as above.
EVA Polyvinyl Ethyl Acetate 90 (194) Same as above.
ASA Acrylonitrile Styrene Acrylate 100 (222) Same as above. Flammable
PPO/
PPE Polyphenylene Oxide/
Polyphenylene Ether
110 (230) Same as above.
PC Polycarbonate 120 (248) Same as above.
PAR Polyacrylate 180 (356) Same as above.
L-
LDPE Lenear Low Density PE
45 (100)Gasoline and most solvents are
harmless. Flammable
PUR Polyurethane 90 (194) Same as above.
TPU Thermoplastic Urethane 110 (230) Same as above.
PPC Polypropylene Composite 115 (239) Same as above. Flammable
POM Polyacetal 120 (248) Same as above. Avoid battery acid.
PBT+P
C Polybutylene Terephtha-
late+Polycarbonate
120 (248) Same as above.
Flammable
PA Polyamide (Nylon) 140 (284) Same as above. Avoid immersing in wa-
ter.
PBT Polybutylene Terephthalate 140 (284) Same as above.
FRP Fiber Reinforced Plastics 170 (338) Same as above. Avoid battery acid.
PET Polyethylene Terephthalate 180 (356) Same as above.
PEI Polyetherimide 200 (392) Same as above.
Revision: March 2010 2008 QX56
Page 665 of 4083
CCS
DTC 31 POWER SUPPLY CIR1, DTC 34 POWER SUPPLY CIR2
CCS-25
< COMPONENT DIAGNOSIS >
C
D E
F
G H
I
J
K L
M B
N P A
DTC 31 POWER SUPPLY CIR1, DTC 34 POWER SUPPLY CIR2
DTC 31 POWER SUPPLY CIR1, DTC 34 POWER SUPPLY CIR2INFOID:0000000001744705
1.CHECK ICC UNIT CONNECTOR
1. Turn ignition switch OFF.
2. Disconnect ICC unit connectors and connect them secu rely again. Erase DTC, then perform self-diagno-
sis of ICC system again.
Does the DTC reset?
YES >> GO TO 2
NO >> • Poor connector connection. • Check connector. Check connector housing for disconnected, loose, bent, and collapsed termi-nals. If any malfunction is detected, repair as as necessary. Erase DTC and perform ICC system
running test. Refer to CCS-8, "
ACTION TEST : ICC System Running Test".
2.CHECK POWER SUPPLY CIRCUIT FOR ICC UNIT
1. Turn ignition switch ON.
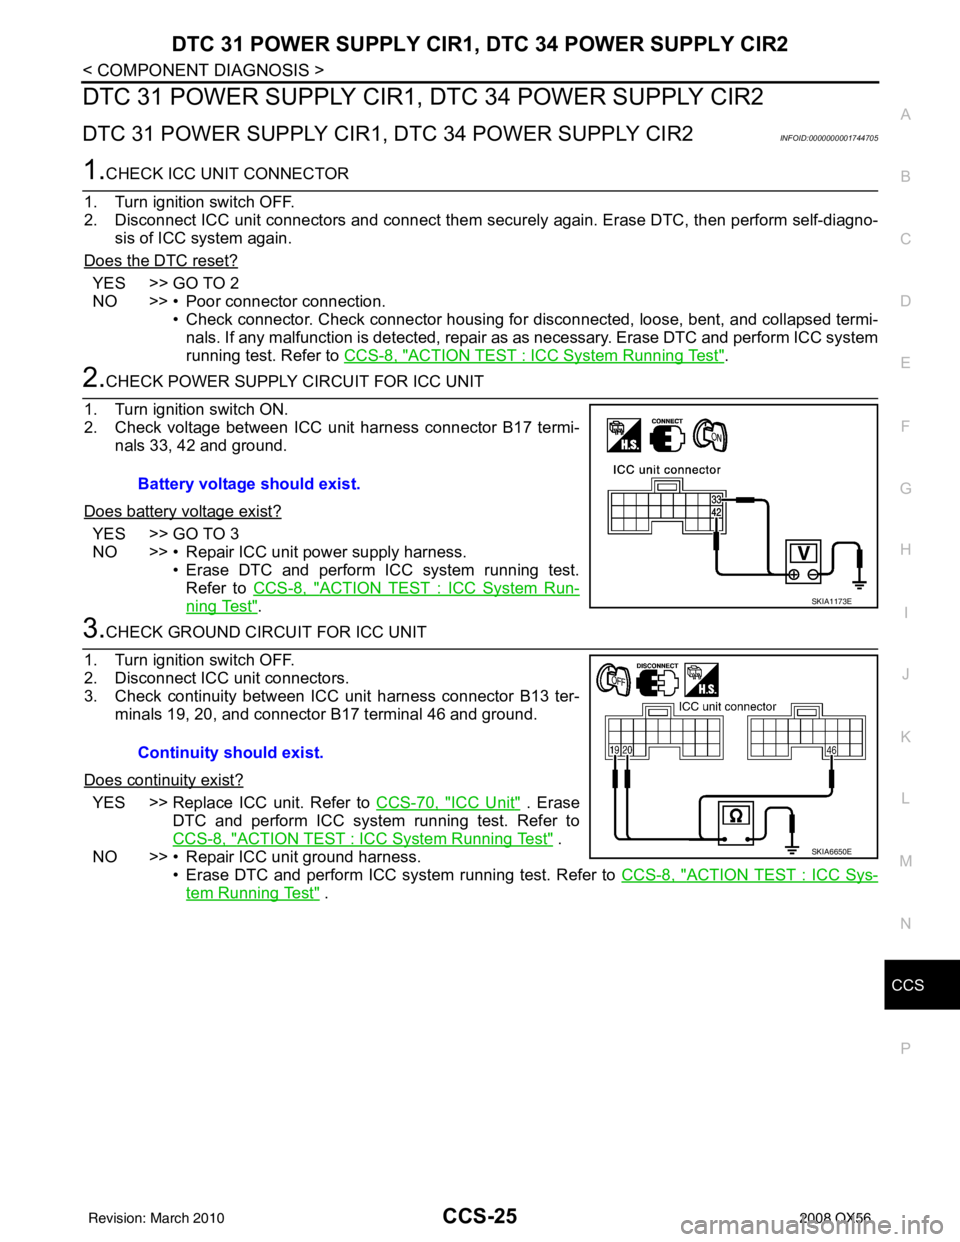
2. Check voltage between ICC unit harness connector B17 termi- nals 33, 42 and ground.
Does battery voltage exist?
YES >> GO TO 3
NO >> • Repair ICC unit power supply harness. • Erase DTC and perform ICC system running test.
Refer to CCS-8, "
ACTION TEST : ICC System Run-
ning Test".
3.CHECK GROUND CIRCUIT FOR ICC UNIT
1. Turn ignition switch OFF.
2. Disconnect ICC unit connectors.
3. Check continuity between ICC unit harness connector B13 ter- minals 19, 20, and connector B17 terminal 46 and ground.
Does continuity exist?
YES >> Replace ICC unit. Refer to CCS-70, "ICC Unit" . Erase
DTC and perform ICC system running test. Refer to
CCS-8, "
ACTION TEST : ICC System Running Test" .
NO >> • Repair ICC unit ground harness.
• Erase DTC and perform ICC system running test. Refer to CCS-8, "
ACTION TEST : ICC Sys-
tem Running Test" .
Battery voltage should exist.
SKIA1173E
Continuity should exist.
SKIA6650E
Revision: March 2010
2008 QX56
Page 673 of 4083
CCS
DTC 90 STOP LAMP RLY FIXCCS-33
< COMPONENT DIAGNOSIS >
C
DE
F
G H
I
J
K L
M B
N P A
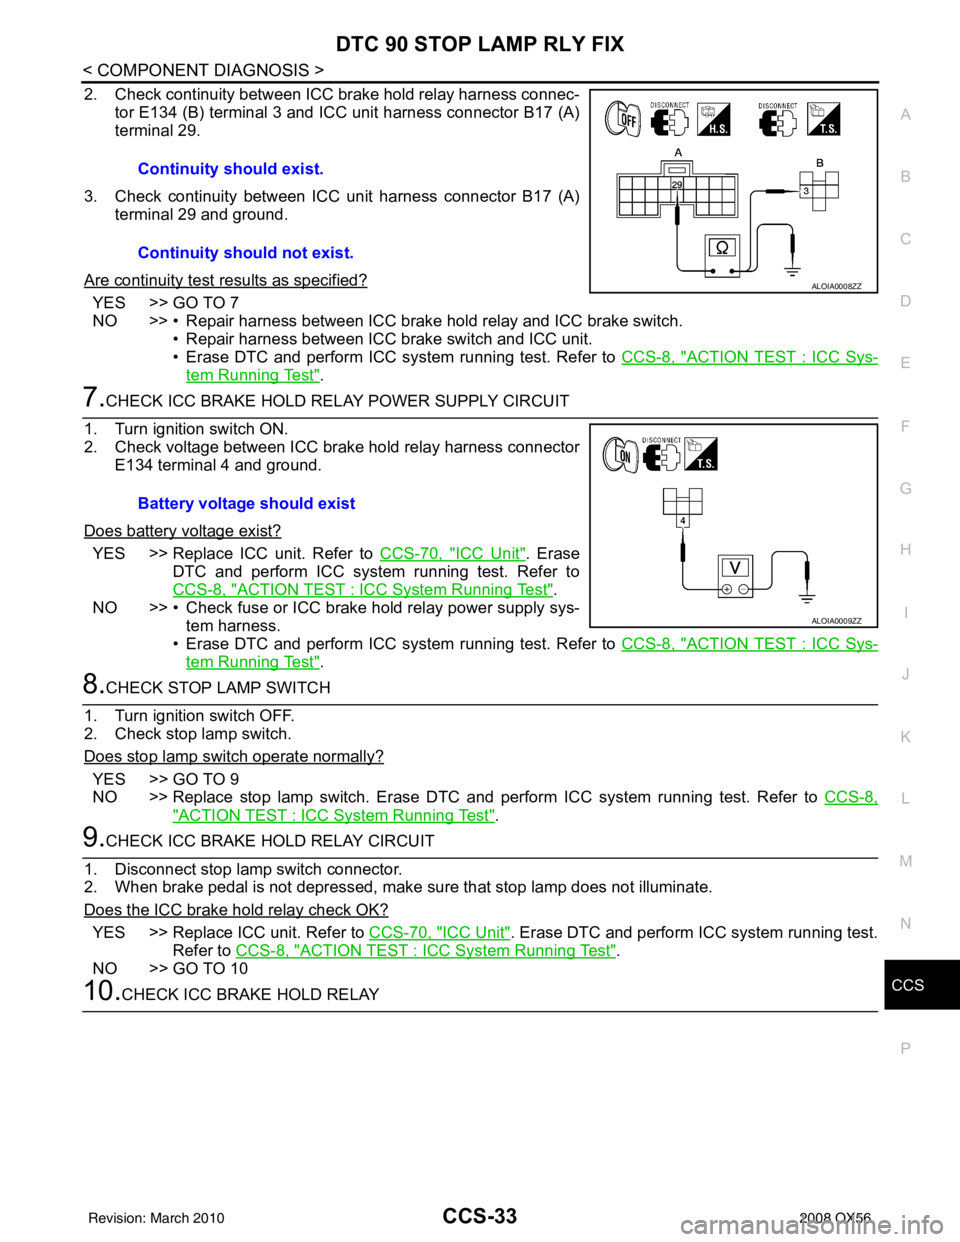
2. Check continuity between ICC brake hold relay harness connec- tor E134 (B) terminal 3 and IC C unit harness connector B17 (A)
terminal 29.
3. Check continuity between ICC unit harness connector B17 (A) terminal 29 and ground.
Are continuity test results as specified?
YES >> GO TO 7
NO >> • Repair harness between ICC brake hold relay and ICC brake switch. • Repair harness between ICC brake switch and ICC unit.
• Erase DTC and perform ICC system running test. Refer to CCS-8, "
ACTION TEST : ICC Sys-
tem Running Test".
7.CHECK ICC BRAKE HOLD RELAY POWER SUPPLY CIRCUIT
1. Turn ignition switch ON.
2. Check voltage between ICC brake hold relay harness connector E134 terminal 4 and ground.
Does battery voltage exist?
YES >> Replace ICC unit. Refer to CCS-70, "ICC Unit". Erase
DTC and perform ICC system running test. Refer to
CCS-8, "
ACTION TEST : ICC System Running Test".
NO >> • Check fuse or ICC brake hold relay power supply sys- tem harness.
• Erase DTC and perform ICC system running test. Refer to CCS-8, "
ACTION TEST : ICC Sys-
tem Running Test".
8.CHECK STOP LAMP SWITCH
1. Turn ignition switch OFF.
2. Check stop lamp switch.
Does stop lamp switch operate normally?
YES >> GO TO 9
NO >> Replace stop lamp switch. Erase DTC and perform ICC system running test. Refer to CCS-8,
"ACTION TEST : ICC System Running Test".
9.CHECK ICC BRAKE HOLD RELAY CIRCUIT
1. Disconnect stop lamp switch connector.
2. When brake pedal is not depressed, make sure that stop lamp does not illuminate.
Does the ICC brake hold relay check OK?
YES >> Replace ICC unit. Refer to CCS-70, "ICC Unit". Erase DTC and perform ICC system running test.
Refer to CCS-8, "
ACTION TEST : ICC System Running Test".
NO >> GO TO 10
10.CHECK ICC BRAKE HOLD RELAY Continuity should exist.
Continuity should not exist.
ALOIA0008ZZ
Battery voltage should exist
ALOIA0009ZZ
Revision: March 2010
2008 QX56
Page 675 of 4083
CCS
DTC 90 STOP LAMP RLY FIXCCS-35
< COMPONENT DIAGNOSIS >
C
DE
F
G H
I
J
K L
M B
N P A
1. Connect connectors of ICC unit and stop lamp switch.
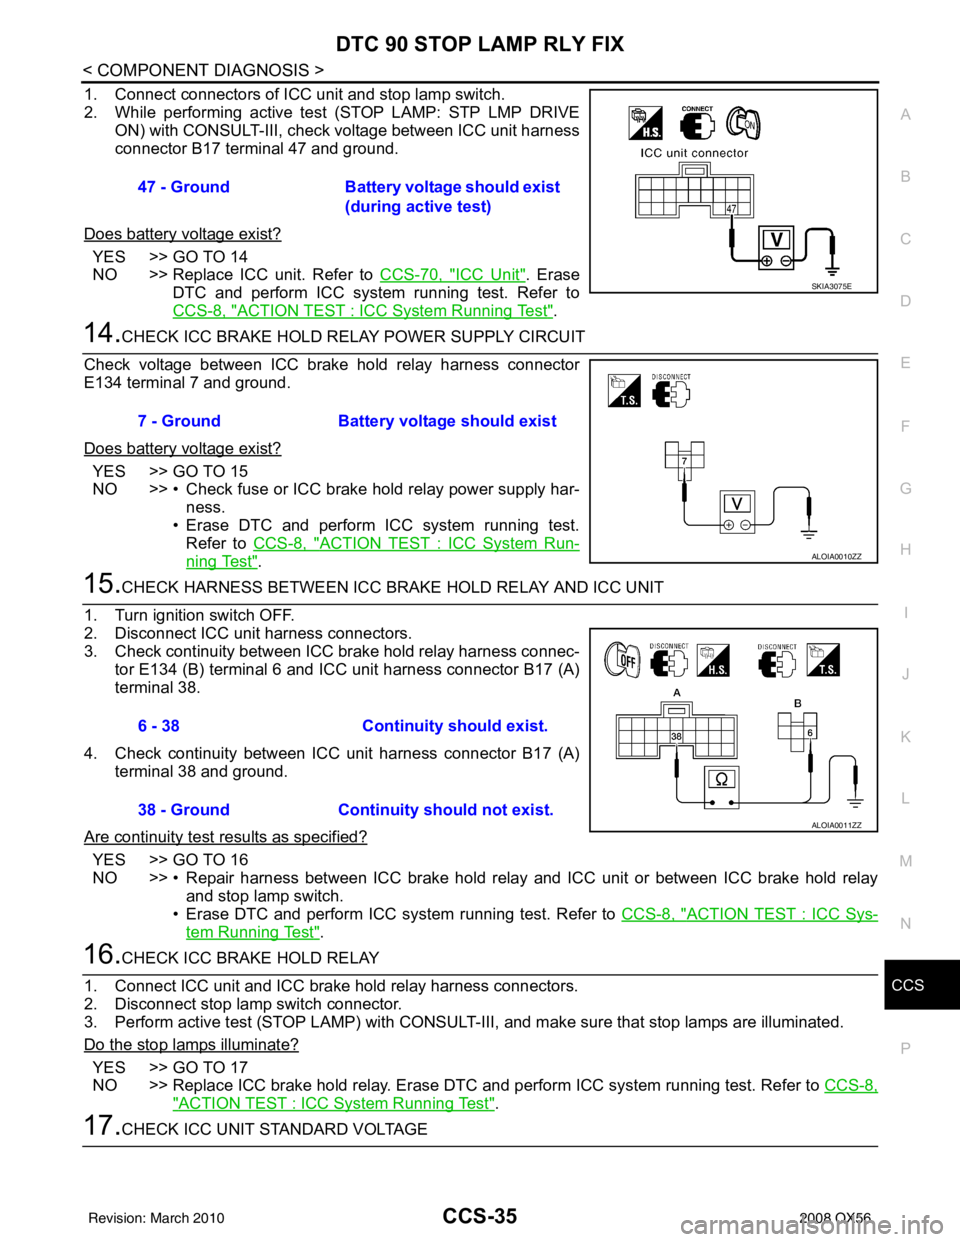
2. While performing active test (STOP LAMP: STP LMP DRIVE ON) with CONSULT-III, check voltage between ICC unit harness
connector B17 terminal 47 and ground.
Does battery voltage exist?
YES >> GO TO 14
NO >> Replace ICC unit. Refer to CCS-70, "
ICC Unit". Erase
DTC and perform ICC system running test. Refer to
CCS-8, "
ACTION TEST : ICC System Running Test".
14.CHECK ICC BRAKE HOLD RELAY POWER SUPPLY CIRCUIT
Check voltage between ICC brake hold relay harness connector
E134 terminal 7 and ground.
Does battery voltage exist?
YES >> GO TO 15
NO >> • Check fuse or ICC brake hold relay power supply har- ness.
• Erase DTC and perform ICC system running test. Refer to CCS-8, "
ACTION TEST : ICC System Run-
ning Test".
15.CHECK HARNESS BETWEEN ICC BRAKE HOLD RELAY AND ICC UNIT
1. Turn ignition switch OFF.
2. Disconnect ICC unit harness connectors.
3. Check continuity between ICC brake hold relay harness connec- tor E134 (B) terminal 6 and IC C unit harness connector B17 (A)
terminal 38.
4. Check continuity between ICC unit harness connector B17 (A) terminal 38 and ground.
Are continuity test results as specified?
YES >> GO TO 16
NO >> • Repair harness between ICC brake hold relay and ICC unit or between ICC brake hold relay and stop lamp switch.
• Erase DTC and perform ICC system running test. Refer to CCS-8, "
ACTION TEST : ICC Sys-
tem Running Test".
16.CHECK ICC BRAKE HOLD RELAY
1. Connect ICC unit and ICC brake hold relay harness connectors.
2. Disconnect stop lamp switch connector.
3. Perform active test (STOP LAMP) with CONSULT-III, and make sure that stop lamps are illuminated.
Do the stop lamps illuminate?
YES >> GO TO 17
NO >> Replace ICC brake hold relay. Erase DTC and perform ICC system running test. Refer to CCS-8,
"ACTION TEST : ICC System Running Test".
17.CHECK ICC UNIT STANDARD VOLTAGE
47 - Ground
Battery voltage should exist
(during active test)
SKIA3075E
7 - Ground Battery voltage should exist
ALOIA0010ZZ
6 - 38 Continuity should exist.
38 - Ground Continuity should not exist.
ALOIA0011ZZ
Revision: March 2010 2008 QX56
Page 686 of 4083
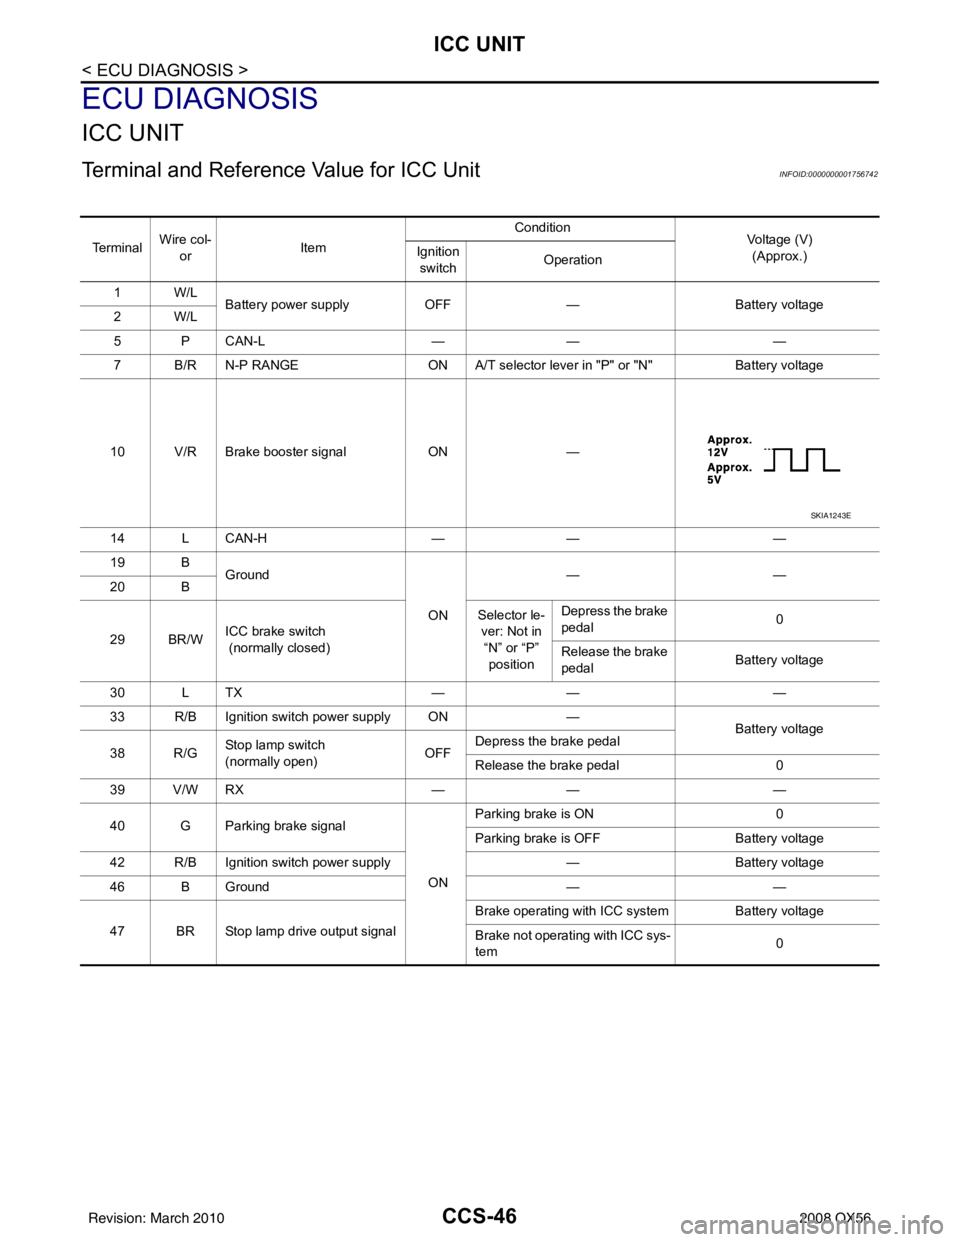
CCS-46
< ECU DIAGNOSIS >
ICC UNIT
ECU DIAGNOSIS
ICC UNIT
Terminal and Reference Value for ICC UnitINFOID:0000000001756742
Te r m i n a lWire col-
or Item Condition
Voltage (V)
(Approx.)
Ignition
switch Operation
1W/L Battery power supply OFF— Battery voltage
2W/L
5 P CAN-L —— —
7 B/R N-P RANGE ON A/T selector lever in "P" or "N"Battery voltage
10 V/R Brake booster signal ON—
14 L CAN-H —— —
19 B Ground
ON——
20 B
29 BR/W ICC brake switch
(normally closed) Selector le-
ver: Not in “N” or “P” position Depress the brake
pedal
0
Release the brake
pedal Battery voltage
30 L TX —— —
33 R/B Ignition switch power supply ON —
Battery voltage
38 R/G St op la mp sw i tc h
(normally open) OFFDepress the brake pedal
Release the brake pedal
0
39 V/W RX —— —
40 G Parking brake signal
ONParking brake is ON
0
Parking brake is OFF Battery voltage
42 R/B Ignition switch power supply —Battery voltage
46 B Ground ——
47 BR Stop lamp drive output signal Brake operating with ICC system
Battery voltage
Brake not operating with ICC sys-
tem 0
SKIA1243E
Revision: March 2010
2008 QX56
Page 708 of 4083
CCS-68
< PRECAUTION >
PRECAUTIONS
PRECAUTION
PRECAUTIONS
Precaution for Supplemental Restraint System (SRS) "AIR BAG" and "SEAT BELT
PRE-TENSIONER"
INFOID:0000000006218458
The Supplemental Restraint System such as “A IR BAG” and “SEAT BELT PRE-TENSIONER”, used along
with a front seat belt, helps to reduce the risk or severity of injury to the driver and front passenger for certain
types of collision. This system includes seat belt switch inputs and dual stage front air bag modules. The SRS
system uses the seat belt switches to determine the front air bag deployment, and may only deploy one front
air bag, depending on the severity of a collision and w hether the front occupants are belted or unbelted.
Information necessary to service the system safely is included in the SR and SB section of this Service Man-
ual.
WARNING:
• To avoid rendering the SRS inopera tive, which could increase the risk of personal injury or death in
the event of a collision which would result in air bag inflation, all maintenance must be performed by
an authorized NISSAN/INFINITI dealer.
• Improper maintenance, including in correct removal and installation of the SRS, can lead to personal
injury caused by unintent ional activation of the system. For re moval of Spiral Cable and Air Bag
Module, see the SR section.
• Do not use electrical test equipmen t on any circuit related to the SRS unless instructed to in this
Service Manual. SRS wiring harn esses can be identified by yellow and/or orange harnesses or har-
ness connectors.
PRECAUTIONS WHEN USING POWER TOOLS (AIR OR ELECTRIC) AND HAMMERS
WARNING:
• When working near the Airbag Diagnosis Sensor Unit or other Airbag System sensors with the Igni-
tion ON or engine running, DO NOT use air or electri c power tools or strike near the sensor(s) with a
hammer. Heavy vibration could activate the sensor( s) and deploy the air bag(s), possibly causing
serious injury.
• When using air or electric power tools or hammers , always switch the Ignition OFF, disconnect the
battery, and wait at least 3 minu tes before performing any service.
ICC System ServiceINFOID:0000000001731915
• Do not look straight into the laser beam discharger when adjusting laser beam aiming.
• Turn the MAIN switch OFF in conditions similar to dr iving, such as free rollers or a chassis dynamometer.
• Do not use the ICC sensor integrated unit removing from vehicle. Never disassemble and remodel.
• Erase DTC when replacing parts of ICC system, then c heck the operation of ICC system after adjusting laser
beam aiming if necessary.
Revision: March 2010 2008 QX56
Page 713 of 4083

CHG
CHG-1
ELECTRICAL & POWER CONTROL
C
DE
F
G H
I
J
K L
B
SECTION CHG
A
O P
N
CONTENTS
CHARGING SYSTEM
PRECAUTION .......
........................................2
PRECAUTIONS .............................................. .....2
Precaution for Supplemental Restraint System
(SRS) "AIR BAG" and "SEAT BELT PRE-TEN-
SIONER" ............................................................. ......
2
Precaution Necessary for Steering Wheel Rota-
tion After Battery Disconnect ............................... ......
2
Precaution for Power Generation Variable Voltage
Control System ..........................................................
3
PREPARATION ............................................4
PREPARATION .............................................. .....4
Special Service Tool ........................................... ......4
Commercial Service Tool ..........................................4
BASIC INSPECTION ....................................5
DIAGNOSIS AND REPAIR WORKFLOW ..... .....5
Work Flow ........................................................... ......5
FUNCTION DIAGNOSIS ...............................8
CHARGING SYSTEM ..................................... .....8
System Diagram .................................................. ......8
System Description ...................................................8
Component Description ............................................8
POWER GENERATION VOLTAGE VARI-
ABLE CONTROL SYSTEM .................................
9
System Diagram .................................................. ......9
System Description ...................................................9
Component Description .............................................9
COMPONENT DIAGNOSIS .........................10
CHARGING SYSTEM PRELIMINARY IN-
SPECTION ....... .................................................
10
Inspection Procedure ........................................... ....10
POWER GENERATION VOLTAGE VARI-
ABLE CONTROL SYSTEM OPERATION IN-
SPECTION ........................................................
11
Inspection Procedure ........................................... ....11
B TERMINAL CIRCUIT .....................................13
Description ...............................................................13
Diagnosis Procedure ...............................................13
L TERMINAL CIRCUIT .....................................14
Description ...............................................................14
Diagnosis Procedure ...............................................14
S TERMINAL CIRCUIT .....................................15
Description ...............................................................15
Diagnosis Procedure ...............................................15
CHARGING SYSTEM .......................................16
Wiring Diagram ........................................................16
SYMPTOM DIAGNOSIS ..............................21
CHARGING SYSTEM .......................................21
Symptom Table ................................................... ....21
ON-VEHICLE REPAIR .................................22
GENERATOR ....................................................22
Removal and Installation ..................................... ....22
SERVICE DATA AND SPECIFICATIONS
(SDS) ............... .......................................... ...
23
GENERATOR ....................................................23
Generator ............................................................ ....23
Revision: March 2010 2008 QX56
Page 714 of 4083
CHG-2
< PRECAUTION >
PRECAUTIONS
PRECAUTION
PRECAUTIONS
Precaution for Supplemental Restraint System (SRS) "AIR BAG" and "SEAT BELT
PRE-TENSIONER"
INFOID:0000000004857596
The Supplemental Restraint System such as “A IR BAG” and “SEAT BELT PRE-TENSIONER”, used along
with a front seat belt, helps to reduce the risk or severity of injury to the driver and front passenger for certain
types of collision. This system includes seat belt switch inputs and dual stage front air bag modules. The SRS
system uses the seat belt switches to determine the front air bag deployment, and may only deploy one front
air bag, depending on the severity of a collision and w hether the front occupants are belted or unbelted.
Information necessary to service the system safely is included in the SR and SB section of this Service Man-
ual.
WARNING:
• To avoid rendering the SRS inopera tive, which could increase the risk of personal injury or death in
the event of a collision which would result in air bag inflation, all maintenance must be performed by
an authorized NISSAN/INFINITI dealer.
• Improper maintenance, including in correct removal and installation of the SRS, can lead to personal
injury caused by unintent ional activation of the system. For re moval of Spiral Cable and Air Bag
Module, see the SR section.
• Do not use electrical test equipmen t on any circuit related to the SRS unless instructed to in this
Service Manual. SRS wiring harn esses can be identified by yellow and/or orange harnesses or har-
ness connectors.
PRECAUTIONS WHEN USING POWER TOOLS (AIR OR ELECTRIC) AND HAMMERS
WARNING:
• When working near the Airbag Diagnosis Sensor Unit or other Airbag System sensors with the Igni-
tion ON or engine running, DO NOT use air or electri c power tools or strike near the sensor(s) with a
hammer. Heavy vibration could activate the sensor( s) and deploy the air bag(s), possibly causing
serious injury.
• When using air or electric power tools or hammers , always switch the Ignition OFF, disconnect the
battery, and wait at least 3 minu tes before performing any service.
Precaution Necessary for Steering W heel Rotation After Battery Disconnect
INFOID:0000000004857595
NOTE:
• This Procedure is applied only to models with Intelligent Key system and NATS (NISSAN ANTI-THEFT SYS-
TEM).
• Remove and install all control units after disconnecting both battery cables with the ignition knob in the
″LOCK ″ position.
• Always use CONSULT-III to perform self-diagnosis as a part of each function inspection after finishing work.
If DTC is detected, perform trouble diagnosis according to self-diagnostic results.
For models equipped with the Intelligent Key system and NATS, an electrically controlled steering lock mech-
anism is adopted on the key cylinder.
For this reason, if the battery is disconnected or if the battery is discharged, the steering wheel will lock and
steering wheel rotation will become impossible.
If steering wheel rotation is required when battery pow er is interrupted, follow the procedure below before
starting the repair operation.
OPERATION PROCEDURE
1. Connect both battery cables. NOTE:
Supply power using jumper cables if battery is discharged.
2. Use the Intelligent Key or mechanical key to turn the ignition switch to the ″ACC ″ position. At this time, the
steering lock will be released.
3. Disconnect both battery cables. The steering lock will remain released and the steering wheel can be rotated.
4. Perform the necessary repair operation.
Revision: March 2010 2008 QX56