cooling INFINITI QX56 2009 Factory Service Manual
[x] Cancel search | Manufacturer: INFINITI, Model Year: 2009, Model line: QX56, Model: INFINITI QX56 2009Pages: 4171, PDF Size: 84.65 MB
Page 1 of 4171

A
B
C
D
E
F
G
H
I
J
K
L
M
N
P
O
QUICK REFERENCE INDEX
AGENERAL INFORMATIONGIGeneral Information
BENGINEEMEngine Mechanical
LUEngine Lubrication System
COEngine Cooling System
ECEngine Control System
FLFuel System
EXExhaust System
STRStarting System
ACCAccelerator Control System
CHYBRIDHBCHybrid Control System
HBBHybrid Battery System
HBRHybrid Brake System
DTRANSMISSION & DRIVE-
LINETMTransaxle & Transmission
DLNDriveline
FAXFront Axle
RAXRear Axle
ESUSPENSIONFSUFront Suspension
RSURear Suspension
SCSSuspension Control System
WTRoad Wheels & Tires
FBRAKESBRBrake System
PBParking Brake System
BRCBrake Control System
GSTEERINGSTSteering System
STCSteering Control System
HRESTRAINTSSBSeat Belt
SBCSeat Belt Control System
SRSRS Airbag
SRCSRS Airbag Control System
IVENTILATION, HEATER &
AIR CONDITIONERVTLVentilation System
HAHeater & Air Conditioning System
HACHeater & Air Conditioning Control System
JBODY INTERIORINTInterior
IPInstrument Panel
SESeat
ADPAutomatic Drive Postioner
APAdjustable Pedal
KBODY EXTERIOR,
DOORS, ROOF & VEHICLE
SECURITYDLKDoor & Lock
SECSecurity Control System
GWGlass & Window System
PWCPower Window Control System
RFRoof
EXTExterior
BRMBody Repair Manual
LDRIVER CONTROLSMIRMirrors
EXLExterior Lighting System
INLInterior Lighting System
WWWiper & Washer
DEFDefogger
HRNHorn
MELECTRICAL & POWER
CONTROLPWOPower Outlet
BCSBody Control System
LANLAN System
PCSPower Control System
CHGCharging System
PGPower Supply, Ground & Circuit Elements
NDRIVER INFORMATION &
MULTIMEDIAMWIMeter, Warning Lamp & Indicator
WCSWarning Chime System
SNSonar System
AVAudio, Visual & Navigation System
OCRUISE CONTROLCCSCruise Control System
PMAINTENANCEMAMaintenance
All rights reserved. No part
of this Service Manual may
be reproduced or stored in a
retrieval system, or transmit-
ted in any form, or by any
means, electronic, mechani-
cal, photo-copying, record-
ing or otherwise, without the
prior written permission of
Nissan North America, Inc.
Edition: June 2008
Revision: December 2009
Publication No. SM9
E-1J60U1
Page 8 of 4171

2009
QUICK REFERNCE CHART: QX56
Front Disc Brake
INFOID:0000000005987155
Unit: mm (in)
Rear Disc BrakeINFOID:0000000005987156
Unit: mm (in)
Fluids and LubricantsINFOID:0000000005987154
Brake model AD41VA
Brake pad Standard thickness (new) 12.0 (0.476)
Repair limit thickness 1.0 (0.039)
Disc rotor Standard thickness (new) 30 (1.181)
Repair limit thickness 28.5 (1.122)
Maximum uneven wear (measured at 8 positions) 0.015 (0.0006)
Runout limit (with it attached to the vehicle) 0.03 (0.001)
Brake model
AD14VE
Brake pad Standard thickness (new) 12.0 (0.472)
Repair limit thickness 1.0 (0.039)
Disc rotor Standard thickness (new) 14.0 (0.551)
Repair limit thickness 12.5 (0.492)
Maximum uneven wear (measured at 8 positions) 0.015 (0.0006)
Runout limit (with it attached to the vehicle) 0.05 (0.002)
Description
Capacity (Approximate)
Metric US measure Imp measure
Fuel 105.8 28 gal 23 1/4 gal
Engine oil
Drain and refill With oil filter change
6.5 6 7/8 qt 5 3/4 qt
Without oil filter change 6.2 6 1/2 qt 5 1/2 qt
Dry engine (engine overhaul) 7.6 8 qt 6 3/4 qt
Cooling system With reservoir
at MAX level
14.4
15 1/4 qt 12 5/8 qt
Automatic transmission fluid (ATF) 10.6 11 1/4 qt 9 3/8 qt
Rear differential gear oil 1.75 3 3/4 pt 3 1/8 pt
Transfer fluid 3.0 3 1/8 qt 2 5/8 qt
Front differential gear oil 1.6 3 3/8 pt 2 7/8 pt
Power steering fluid (PSF) 1.0 1 1/8 qt 7/8 qt
Brake fluid — — —
Brake grease — — —
Multi-purpose grease — — —
Windshield washer fluid 4.5 4 3/4 qt 4 qt
Air conditioning system refrigerant 1.08 ± 0.05 kg 2.38 ± 0.11 lb 2.38 ± 0.11 lb
Air conditioning system oil 290 m9.8 fl oz 10.2 fl oz
Page 696 of 4171

CCS
DTC109 LASER HIGH TEMPCCS-45
< COMPONENT DIAGNOSIS >
C
DE
F
G H
I
J
K L
M B
N P A
DTC109 LASER HIGH TEMP
DTC 109 LASER HIGH TEMPINFOID:0000000003776955
1.CHECK SYMPTOM
Inspect engine cooling system.
Did the engine overheat?
YES >> • Repair cooling system. • Erase DTC and perform ICC system running test. Refer to CCS-8, "
ACTION TEST : ICC Sys-
tem Running Test". Then perform self-diagnosis of ICC system again.
NO >> • Replace ICC sensor and adjust laser beam aiming. Refer to CCS-71, "
ICC Sensor".
• Erase DTC, then perform ICC system running test. Refer to CCS-8, "
ACTION TEST : ICC Sys-
tem Running Test". Then perform self-diagnosis of ICC system again.
Revision: December 20092009 QX56
Page 745 of 4171

CO-1
ENGINE
C
DE
F
G H
I
J
K L
M
SECTION CO
A
CO
N
O P
CONTENTS
ENGINE COOLING SYSTEM
PRECAUTION ....... ........................................2
PRECAUTIONS .............................................. .....2
Precaution for Supplemental Restraint System
(SRS) "AIR BAG" and "SEAT BELT PRE-TEN-
SIONER" ............................................................. ......
2
Precaution Necessary for Steering Wheel Rota-
tion After Battery Disconnect ............................... ......
2
Precaution for Liquid Gasket .....................................3
PREPARATION ............................................4
PREPARATION .............................................. .....4
Special Service Tool ........................................... ......4
Commercial Service Tool ..........................................5
FUNCTION DIAGNOSIS ...............................6
COOLING SYSTEM ....................................... .....6
Cooling Circuit ..................................................... ......6
Schematic .................................................................7
OVERHEATING CAUSE ANALYSIS ..................8
Troubleshooting Chart ...............................................8
ON-VEHICLE MAINTENA NCE ....................10
ENGINE COOLANT ....................................... ....10
Inspection ............................................................ ....10
Changing Engine Coolant .......................................11
RADIATOR ........................................................14
Checking Radiator ............................................... ....14
ON-VEHICLE REPAIR .................................15
RADIATOR ....... .................................................15
Exploded View ..................................................... ....15
Removal and Installation .........................................15
ENGINE COOLING FAN ...................................18
Exploded View .........................................................18
Removal and Installation (Crankshaft Driven
Type) .......................................................................
18
Removal and Installation (Motor Driven Type) ........19
WATER PUMP ..................................................20
Exploded View .........................................................20
Removal and Installation .........................................20
THERMOSTAT AND WATER PIPING ..............22
Exploded View .........................................................22
Removal and Installation .........................................22
SERVICE DATA AND SPECIFICATIONS
(SDS) ............... .......................................... ...
24
SERVICE DATA AND SPECIFICATIONS
(SDS) .................................................................
24
Standard and Limit .............................................. ....24
Revision: December 20092009 QX56
Page 748 of 4171

CO-4
< PREPARATION >
PREPARATION
PREPARATION
PREPARATION
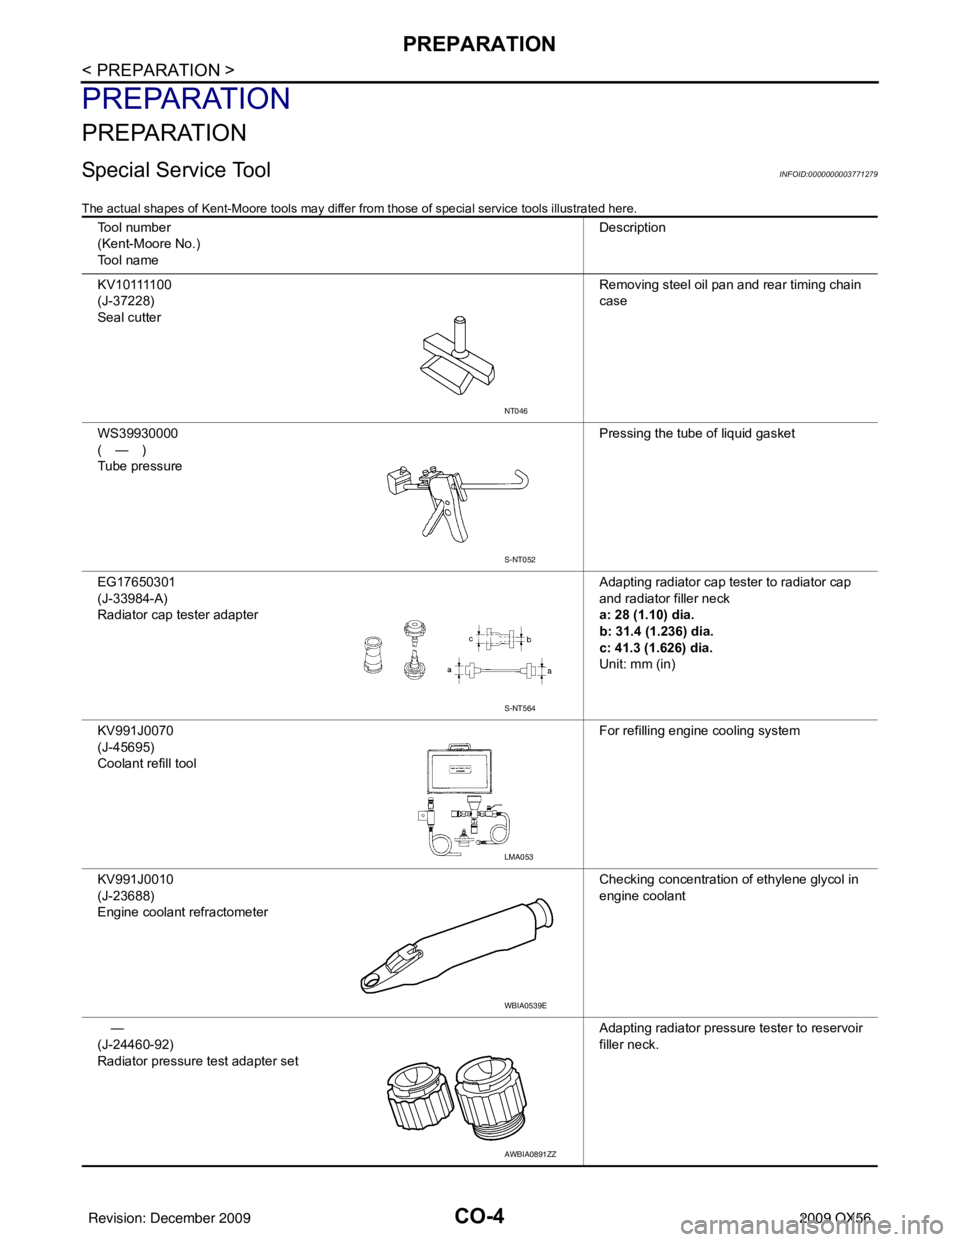
Special Service ToolINFOID:0000000003771279
The actual shapes of Kent-Moore tools may differ from those of special service tools illustrated here.
Tool number
(Kent-Moore No.)
Tool name Description
K V 1 0 1111 0 0
(J-37228)
Seal cutter Removing steel oil pan and rear timing chain
case
WS39930000
(—)
Tube pressure Pressing the tube of liquid gasket
EG17650301
(J-33984-A)
Radiator cap tester adapter Adapting radiator cap tester to radiator cap
and radiator filler neck
a: 28 (1.10) dia.
b: 31.4 (1.236) dia.
c: 41.3 (1.626) dia.
Unit: mm (in)
KV991J0070
(J-45695)
Coolant refill tool For refilling engine cooling system
KV991J0010
(J-23688)
Engine coolant refractometer Checking concentration of ethylene glycol in
engine coolant
—
(J-24460-92)
Radiator pressure test adapter set Adapting radiator pressure tester to reservoir
filler neck.
NT046
S-NT052
S-NT564
LMA053
WBIA0539E
AWBIA0891ZZ
Revision: December 20092009 QX56
Page 750 of 4171

CO-6
< FUNCTION DIAGNOSIS >
COOLING SYSTEM
FUNCTION DIAGNOSIS
COOLING SYSTEM
Cooling CircuitINFOID:0000000003771281
WBIA0439E
Revision: December 20092009 QX56
Page 751 of 4171

COOLING SYSTEMCO-7
< FUNCTION DIAGNOSIS >
C
DE
F
G H
I
J
K L
M A
CO
NP
O
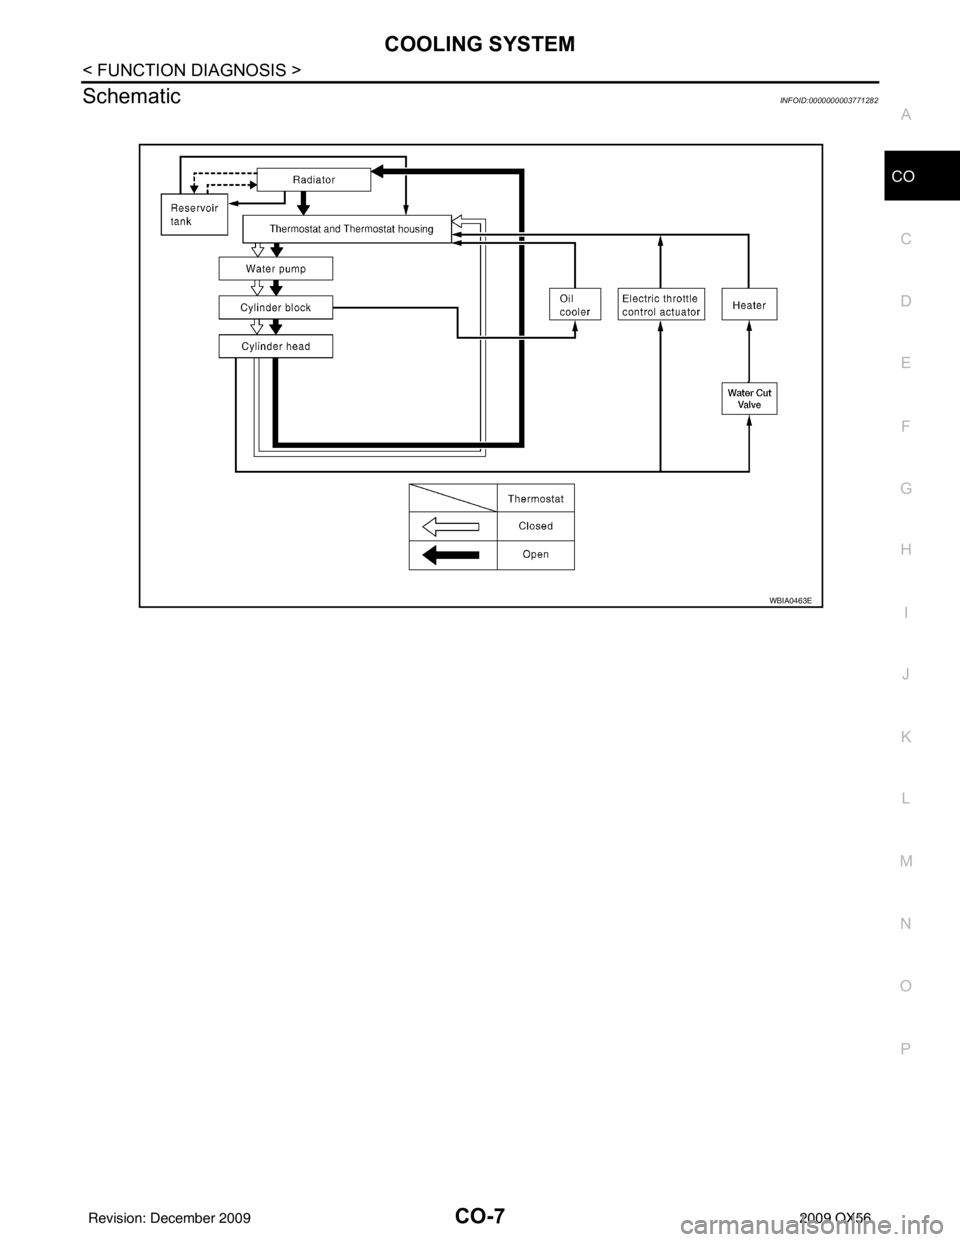
SchematicINFOID:0000000003771282
WBIA0463E
Revision: December 20092009 QX56
Page 752 of 4171

CO-8
< FUNCTION DIAGNOSIS >
OVERHEATING CAUSE ANALYSIS
OVERHEATING CAUSE ANALYSIS
Troubleshooting ChartINFOID:0000000003771283
SymptomCheck items
Cooling sys-
tem parts
malfunction Poor heat transfer
Water pump malfunction Worn or loose drive belt
—
Thermostat stuck closed Coolant circulation
Damaged fins
Dust contamination or pa-
per clogging
Physical damage
Clogged radiator cooling
tube Excess foreign material
(rust, dirt, sand, etc.)
Water cut valve malfunction Excess foreign material
(rust, dirt, sand, etc.), phys-
ical damage
Reduced air flow Cooling fan does not oper-
ate
Fan assembly —
High resistance to fan rota-
tion
Damaged fan blades
Damaged radiator shroud —Radiator shroud —
Improper engine coolant
mixture ratio —
Engine coolant viscosity —
Poor engine coolant quality —Engine coolant density —
Insufficient engine coolant Engine coolant leaksCooling hose
Loose clamp
Cracked hose
Water pump Poor sealing
Radiator cap Loose
Poor sealing
Radiator O-ring for da
mage, deterio-
ration or improper fitting
Cracked radiator tank
Cracked radiator core
Reservoir tank Cracked reservoir tank
Overflowing reservoir tank Exhaust gas leaks into cool-
ing system Cylinder head deterioration
Cylinder head gasket deteri-
oration
Revision: December 20092009 QX56
Page 754 of 4171

CO-10
< ON-VEHICLE MAINTENANCE >
ENGINE COOLANT
ON-VEHICLE MAINTENANCE
ENGINE COOLANT
InspectionINFOID:0000000003771284
LEVEL CHECK
• Check if the engine coolant reservoir tank level is within MIN toMAX level when engine is cool.
• Adjust engine coolant level as necessary.
CHECKING COOLING SYSTEM FOR LEAKS
WARNING:
Never remove the radiator or reservoir cap when th e engine is hot. Serious burns could occur from
high-pressure engine coolant escaping from the radiator or reservoir.
• To check for leakage, apply pressure to the cooling system at the
reservoir filler neck using suitable tool and Tool.
CAUTION:
Higher pressure than specified may cause radiator damage.
NOTE:
In case that engine coolant decreases, replenish cooling system
with engine coolant.
• If any concerns are found, repair or replace damaged parts.
CHECKING RESERVOIR CAP
• Check reservoir cap relief pressure using suitable tool and Tool.
NOTE:
Apply engine coolant to the cap seal.
• Replace the reservoir cap if there is any damage in the negative- pressure valve, or if the open-valve pressure is outside of the limit.
CHECKING RADIATOR CAP
SMA412B
Tool number : EG17650301 (J-33984-A)
Leakage test pressure : 137 kPa (1.4 kg/cm, 20 psi)
WBIA0612E
Tool number : EG17650301 (J-33984-A)
Standard : 95 - 125 kPa (0.97 - 1.28 kg/cm
2, 14 - 18 psi)
WBIA0611E
Revision: December 20092009 QX56
Page 755 of 4171

ENGINE COOLANTCO-11
< ON-VEHICLE MAINTENANCE >
C
DE
F
G H
I
J
K L
M A
CO
NP
O
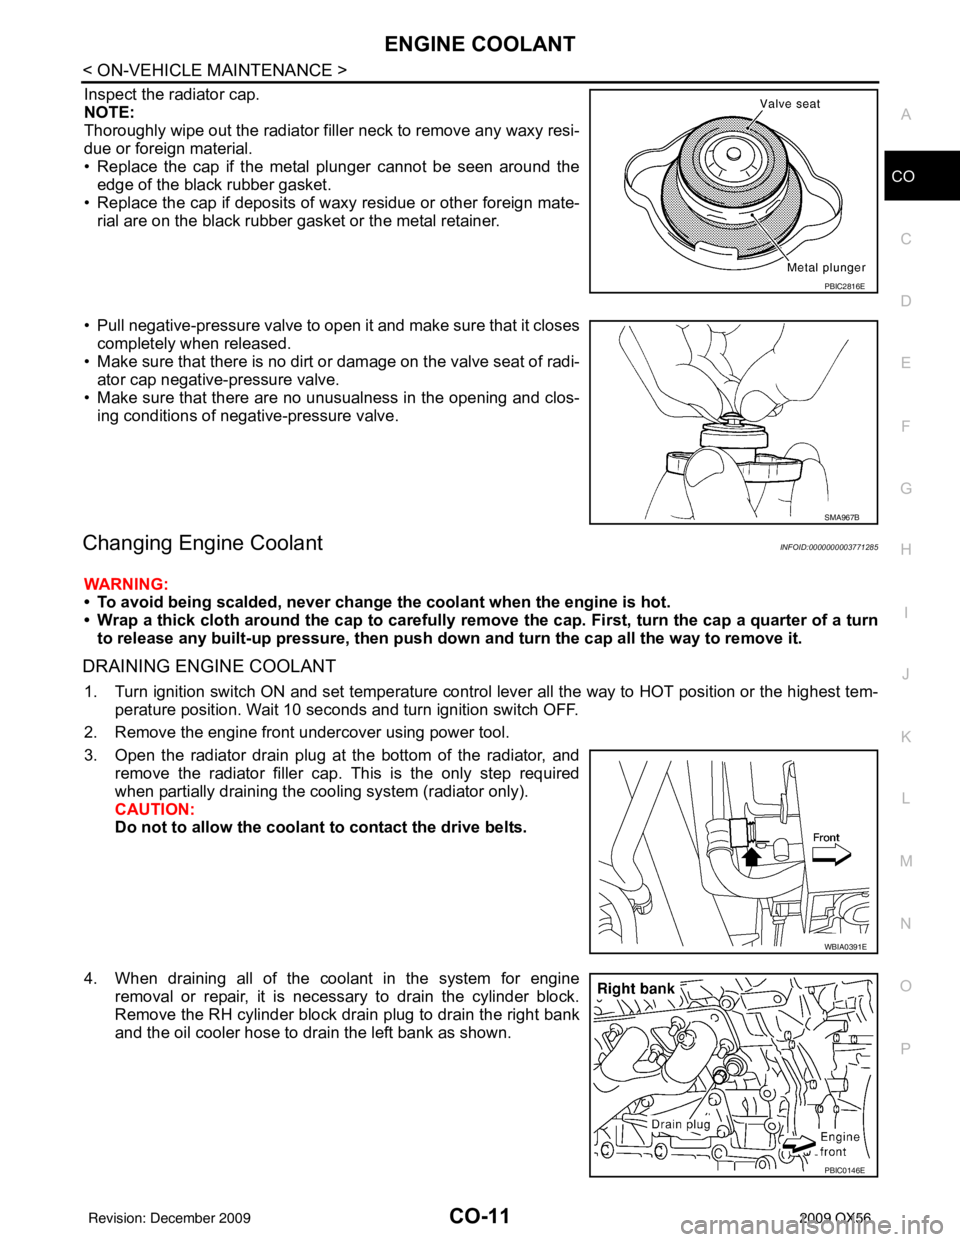
Inspect the radiator cap.
NOTE:
Thoroughly wipe out the radiator filler
neck to remove any waxy resi-
due or foreign material.
• Replace the cap if the metal plunger cannot be seen around the edge of the black rubber gasket.
• Replace the cap if deposits of waxy residue or other foreign mate- rial are on the black rubber gasket or the metal retainer.
• Pull negative-pressure valve to open it and make sure that it closes completely when released.
• Make sure that there is no dirt or damage on the valve seat of radi-
ator cap negative-pressure valve.
• Make sure that there are no unusualness in the opening and clos- ing conditions of negative-pressure valve.
Changing Engine CoolantINFOID:0000000003771285
WARNING:
• To avoid being scalded, never change the coolant when the engine is hot.
• Wrap a thick cloth around the cap to carefully remo ve the cap. First, turn the cap a quarter of a turn
to release any built-up pressure, then push down and turn the cap all the way to remove it.
DRAINING ENGINE COOLANT
1. Turn ignition switch ON and set temperature control lever all the way to HOT position or the highest tem-
perature position. Wait 10 seconds and turn ignition switch OFF.
2. Remove the engine front undercover using power tool.
3. Open the radiator drain plug at the bottom of the radiator, and remove the radiator filler cap. This is the only step required
when partially draining the cooling system (radiator only).
CAUTION:
Do not to allow the coolant to contact the drive belts.
4. When draining all of the coolant in the system for engine removal or repair, it is necessary to drain the cylinder block.
Remove the RH cylinder block drain plug to drain the right bank
and the oil cooler hose to drain the left bank as shown.
PBIC2816E
SMA967B
WBIA0391E
PBIC0146E
Revision: December 20092009 QX56