tire pressure INFINITI QX56 2011 Factory Workshop Manual
[x] Cancel search | Manufacturer: INFINITI, Model Year: 2011, Model line: QX56, Model: INFINITI QX56 2011Pages: 5598, PDF Size: 94.53 MB
Page 4261 of 5598

RSU-6
< PERIODIC MAINTENANCE >
WHEEL ALIGNMENT
WHEEL ALIGNMENT
InspectionINFOID:0000000006225661
DESCRIPTION
Measure wheel alignment under unladen conditions.
NOTE:
“Unladen conditions” means that fuel, engine coolant, and lubricant are full. Spare tire, jack, hand tools and
mats are in designated positions.
PRELIMINARY CHECK
Check the following:
Tires for improper air pressure and wear
Road wheels for runout. Refer to WT-64, "
Inspection".
Wheel bearing axial end play. Refer to RAX-5, "
Inspection".
Ball joint axial end play of suspension arm and front lower link. Refer to RSU-20, "
Ball Joint".
Shock absorber operation
Each mounting point of axle and suspension for looseness and deformation
Each of front lower link, rear lower link, rear suspension member, suspension arm and shock absorber for
cracks, deformation, and other damage
Vehicle height (posture)
GENERAL INFORMATION AND RECOMMENDATIONS
A four-wheel thrust alignment should be performed.
- This type of alignment is recomm ended for any NISSAN/INFINITI vehicle.
- The four-wheel “thrust” process helps ensure that t he vehicle is properly aligned and the steering wheel is
centered.
- The alignment rack itself should be capable of accepting any NISSAN/INFINITI vehicle.
- The rack should be checked to ensure that it is level.
Make sure the machine is properly calibrated.
- Your alignment equipment should be regularly calib rated in order to give correct information.
- Check with the manufacturer of your specific equi pment for their recommended Service/Calibration Sched-
ule.
ALIGNMENT PROCESS
IMPORTANT:
Use only the alignment specifications listed in this Service Manual.
When displaying the alignment settings, many alignment machines use “indicators”: (Green/red, plus or
minus, Go/No Go). Never use these indicators.
- The alignment specifications programmed into your machine that operate these indicators may not be cor-
rect.
- This may result in an ERROR.
Some newer alignment machines are equipped with an optional “Rolling Compensation” method to “com- pensate” the sensors (alignment targets or head units). Never use this “Rolling Compensation” method.
- Use the “Jacking Compensation Method”. After installi ng the alignment targets or head units, raise the vehi-
cle and rotate the wheels 1/2 turn both ways.
- See Instructions in the alignment machine you're using for more information on this.
AdjustmentINFOID:0000000006225662
CAMBER
Revision: 2010 May2011 QX56
Page 4273 of 5598

RSU-18
< UNIT REMOVAL AND INSTALLATION >
REAR SUSPENSION MEMBER
UNIT REMOVAL AND INSTALLATION
REAR SUSPENSION MEMBER
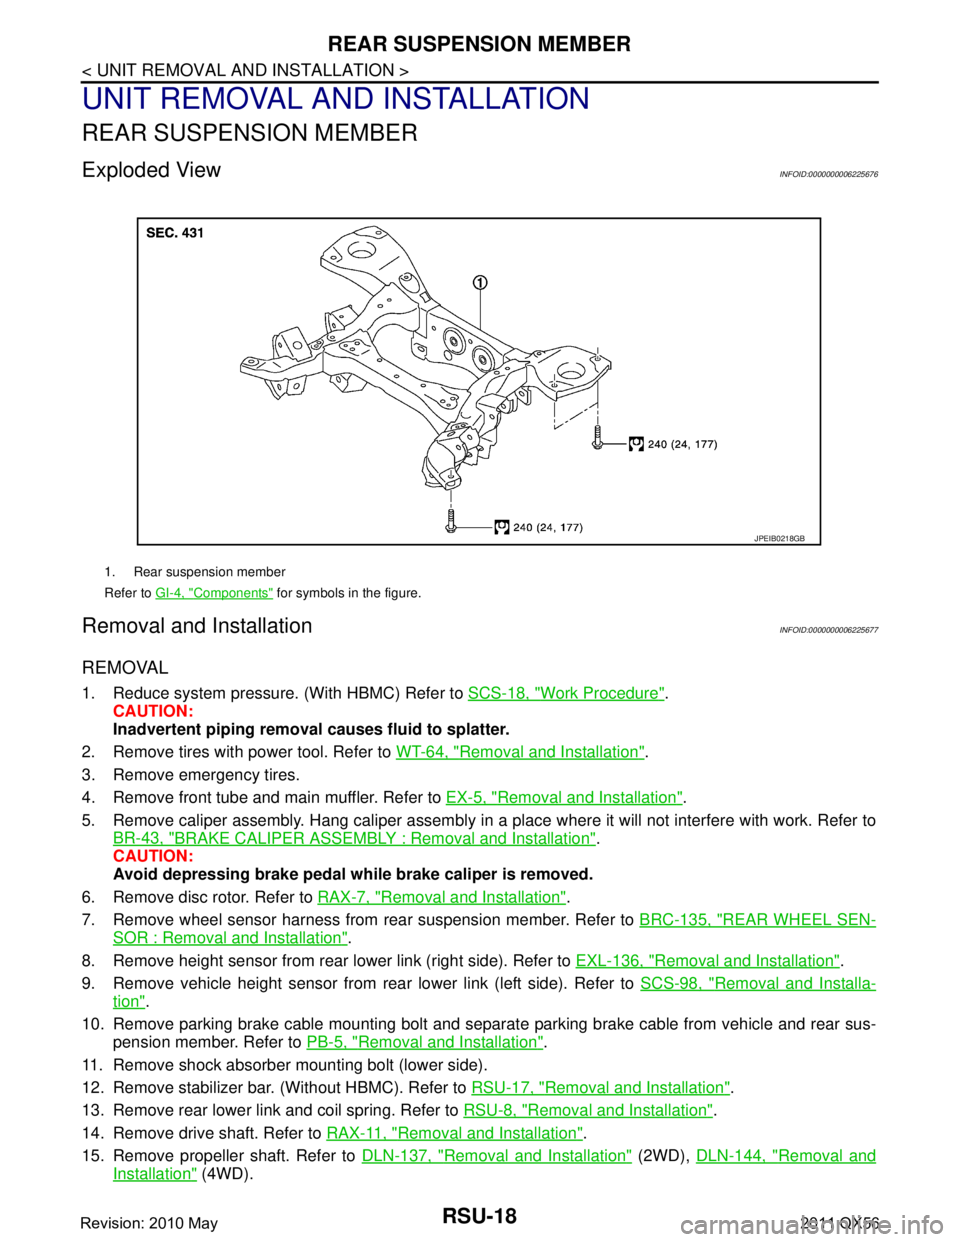
Exploded ViewINFOID:0000000006225676
Removal and InstallationINFOID:0000000006225677
REMOVAL
1. Reduce system pressure. (With HBMC) Refer to SCS-18, "Work Procedure".
CAUTION:
Inadvertent piping removal causes fluid to splatter.
2. Remove tires with power tool. Refer to WT-64, "
Removal and Installation".
3. Remove emergency tires.
4. Remove front tube and main muffler. Refer to EX-5, "
Removal and Installation".
5. Remove caliper assembly. Hang caliper assembly in a place where it will not interfere with work. Refer to BR-43, "
BRAKE CALIPER ASSEMBLY : Removal and Installation".
CAUTION:
Avoid depressing brake pedal wh ile brake caliper is removed.
6. Remove disc rotor. Refer to RAX-7, "
Removal and Installation".
7. Remove wheel sensor harness from rear suspension member. Refer to BRC-135, "
REAR WHEEL SEN-
SOR : Removal and Installation".
8. Remove height sensor from rear lower link (right side). Refer to EXL-136, "
Removal and Installation".
9. Remove vehicle height sensor from rear lower link (left side). Refer to SCS-98, "
Removal and Installa-
tion".
10. Remove parking brake cable mounting bolt and separa te parking brake cable from vehicle and rear sus-
pension member. Refer to PB-5, "
Removal and Installation".
11. Remove shock absorber mounting bolt (lower side).
12. Remove stabilizer bar. (Without HBMC). Refer to RSU-17, "
Removal and Installation".
13. Remove rear lower link and coil spring. Refer to RSU-8, "
Removal and Installation".
14. Remove drive shaft. Refer to RAX-11, "
Removal and Installation".
15. Remove propeller shaft. Refer to DLN-137, "
Removal and Installation" (2WD), DLN-144, "Removal and
Installation" (4WD).
1. Rear suspension member
Refer to GI-4, "
Components" for symbols in the figure.
JPEIB0218GB
Revision: 2010 May2011 QX56
Page 4367 of 5598
![INFINITI QX56 2011 Factory Workshop Manual
DESCRIPTIONSCS-7
< SYSTEM DESCRIPTION > [HBMC]
C
D
F
G H
I
J
K L
M A
B
SCS
N
O P
SYSTEM DESCRIPTION
DESCRIPTION
DescriptionINFOID:0000000006255998
Hydraulic body-motion control s ystem is adopted, INFINITI QX56 2011 Factory Workshop Manual
DESCRIPTIONSCS-7
< SYSTEM DESCRIPTION > [HBMC]
C
D
F
G H
I
J
K L
M A
B
SCS
N
O P
SYSTEM DESCRIPTION
DESCRIPTION
DescriptionINFOID:0000000006255998
Hydraulic body-motion control s ystem is adopted,](/img/42/57033/w960_57033-4366.png)
DESCRIPTIONSCS-7
< SYSTEM DESCRIPTION > [HBMC]
C
D
F
G H
I
J
K L
M A
B
SCS
N
O P
SYSTEM DESCRIPTION
DESCRIPTION
DescriptionINFOID:0000000006255998
Hydraulic body-motion control s ystem is adopted, which makes shock absorber stroke appropriately by
hydraulic pressure according to driving scenes.
The adoption of this system allows the reduction in a ro ll angle (i.e. vehicle body tilt angle at cornering) to
improve steering stability and ride quality during travel on level roads. Furthermore, the use of this system
improves the running performance on rough roads by shock absorption and quality tire adhesion through
maximized stroke.
Revision: 2010 May2011 QX56
Page 4369 of 5598
![INFINITI QX56 2011 Factory Workshop Manual
STRUCTURE AND OPERATIONSCS-9
< SYSTEM DESCRIPTION > [HBMC]
C
D
F
G H
I
J
K L
M A
B
SCS
N
O P
STRUCTURE AND OPERATION
Hydraulic Body-Moti on Control SystemINFOID:0000000006256001
Shock AbsorberINFOID: INFINITI QX56 2011 Factory Workshop Manual
STRUCTURE AND OPERATIONSCS-9
< SYSTEM DESCRIPTION > [HBMC]
C
D
F
G H
I
J
K L
M A
B
SCS
N
O P
STRUCTURE AND OPERATION
Hydraulic Body-Moti on Control SystemINFOID:0000000006256001
Shock AbsorberINFOID:](/img/42/57033/w960_57033-4368.png)
STRUCTURE AND OPERATIONSCS-9
< SYSTEM DESCRIPTION > [HBMC]
C
D
F
G H
I
J
K L
M A
B
SCS
N
O P
STRUCTURE AND OPERATION
Hydraulic Body-Moti on Control SystemINFOID:0000000006256001
Shock AbsorberINFOID:0000000006256002
The use of accumulator-generated pressure responsive to driving conditions or pressure generated by oil flow
to the upper/lower chamber improves the steering stabili ty at curving, in addition to the running performance
and a ride quality during off-road travel.
FRONT SIDE
Oil enters from oil inlet outlet hole (A) and flows into lower chamber (3) via outside oil path of cylinder inside.
Oil enters from oil inlet outlet hole (B) and flows into upper chamber (1). With the pressure difference between
oil flowed into the upper chamber and lower chamber, the piston (2) moves up and down and conveys a force
generated through this motion to the tires.
1. Middle tube assembly RH 2. Accumulator assembly RH 3. Front tube assembly A
4. Front tube assembly B 5. Accumulator assembly LH 6. PPMU pipe A
7. PPMU assembly 8. Middle tube assembly LH 9. PPMU pipe B
10. Rear tube assembly A 11. Rear tube assembly B
:Vehicle front
JSEIA0228ZZ
Revision: 2010 May2011 QX56
Page 4370 of 5598
![INFINITI QX56 2011 Factory Workshop Manual
SCS-10
< SYSTEM DESCRIPTION >[HBMC]
STRUCTURE AND OPERATION
REAR SIDE
Oil enters from oil inlet outlet hole (A) and flows into upper
chamber (1). Oil enters from oil inlet outlet hole (B)
and flows INFINITI QX56 2011 Factory Workshop Manual
SCS-10
< SYSTEM DESCRIPTION >[HBMC]
STRUCTURE AND OPERATION
REAR SIDE
Oil enters from oil inlet outlet hole (A) and flows into upper
chamber (1). Oil enters from oil inlet outlet hole (B)
and flows](/img/42/57033/w960_57033-4369.png)
SCS-10
< SYSTEM DESCRIPTION >[HBMC]
STRUCTURE AND OPERATION
REAR SIDE
Oil enters from oil inlet outlet hole (A) and flows into upper
chamber (1). Oil enters from oil inlet outlet hole (B)
and flows into lower chamber (3) via outside oil path of cylinder inside. With the pressure difference between
oil flowed into the upper chamber and lower chamber, the piston (2) moves up and down and conveys a force
generated through this motion to the tires.
PPMUINFOID:0000000006256003
PPMU stands for Passive Pressure Maintenance Unit.
System pressure increases according to increase of oil volume due to oil temperature increase. Sudden rise in system pressure can be controlled by feeding the increased oil into the PPMU.
Oil flows into oil chamber via PPMU pipe A and PPM U pipe B by influence of pressure change, pushes gas
spring of nitrogen gas, and pools.
1. Upper chamber 2. Piston 3. Lower chamber
A. Oil inlet outlet hole B. Oil inlet outlet hole
: Vehicle upper
JSEIA0173ZZ
1. Upper chamber 2. Piston 3. Lower chamber
A. Oil inlet outlet hole B. Oil inlet outlet hole
:Vehicle upper
JSEIA0245ZZ
Revision: 2010 May2011 QX56
Page 4380 of 5598
![INFINITI QX56 2011 Factory Workshop Manual
SCS-20
< BASIC INSPECTION >[HBMC]
CHECK INTERNAL LEAKAGE
CHECK INTERNAL LEAKAGE
Work ProcedureINFOID:0000000006256012
CAUTION:
Clean surrounding areas of
oil injection jack using steam before sta INFINITI QX56 2011 Factory Workshop Manual
SCS-20
< BASIC INSPECTION >[HBMC]
CHECK INTERNAL LEAKAGE
CHECK INTERNAL LEAKAGE
Work ProcedureINFOID:0000000006256012
CAUTION:
Clean surrounding areas of
oil injection jack using steam before sta](/img/42/57033/w960_57033-4379.png)
SCS-20
< BASIC INSPECTION >[HBMC]
CHECK INTERNAL LEAKAGE
CHECK INTERNAL LEAKAGE
Work ProcedureINFOID:0000000006256012
CAUTION:
Clean surrounding areas of
oil injection jack using steam before starting operation, since there may
be mud on it.
Clean oil pressure gauge (special service tool: KV40108000) jack with steam before use.
1. Remove protector of PPMU.
2. Remove cap of oil injection jack.
3. Install an oil pressure gauge (SST: KV40108000) (A) to oil injec- tion jack.
CAUTION:
Jack must be securely inserted until a click sound can beheard.
Pressure reducing valve (B) of the oil pressure gauge
must be closed.
4. Loosen needle valves A, C, and E of PPMU by approximately 2 rotations. CAUTION:
Never loosen the needle valve more than required.
5. Lift up the vehicle. CAUTION:
Check that tires never contact the ground.
6. Tighten needle valves C and E of PPMU.
7. Loosen lock nut of needle valve D of PPMU and then tighten needle valve D.
8. Lift down the vehicle. CAUTION:
Check that the lift is fully lowered.
9. Write down a value of the oil pressure gauge after 5 minutes.
10. Tighten needle valve A of PPMU.
11. Loosen lock nut of needle valve B of PPMU and then tighten needle valve B.
12. Loosen needle valve C of PPMU by approximately 2 rotations. CAUTION:
Never loosen the needle valve more than required.
13. Read a value of oil pressure gauge.
14. Compare difference of reading with pressure reading in step 9.
15. Tighten needle valves A, C, and E of PPMU to the specified torque.
16. Loosen needle valves B and D of PPMU by approximatel y 2 rotations and then tighten lock nut to the
specified torque.
CAUTION:
Never loosen the needle valve more than required.
JSEIA0186ZZ
Pressure difference
0.1 MPa or more : Normal
0.1 MPa or less : Malfunction
: 8.3 N·m (0.85 kg-m, 73 in-lb)
JSEIA0187ZZ
Revision: 2010 May2011 QX56
Page 4382 of 5598
![INFINITI QX56 2011 Factory Workshop Manual
SCS-22
< BASIC INSPECTION >[HBMC]
CHECK FOR MALFUNCTION
CHECK FOR MALFUNCTION
Work ProcedureINFOID:0000000006256013
CAUTION:
Clean surrounding areas of
oil injection jack using steam before start INFINITI QX56 2011 Factory Workshop Manual
SCS-22
< BASIC INSPECTION >[HBMC]
CHECK FOR MALFUNCTION
CHECK FOR MALFUNCTION
Work ProcedureINFOID:0000000006256013
CAUTION:
Clean surrounding areas of
oil injection jack using steam before start](/img/42/57033/w960_57033-4381.png)
SCS-22
< BASIC INSPECTION >[HBMC]
CHECK FOR MALFUNCTION
CHECK FOR MALFUNCTION
Work ProcedureINFOID:0000000006256013
CAUTION:
Clean surrounding areas of
oil injection jack using steam before starting operation, since there may
be mud on it.
Clean oil pressure gauge (special service tool: KV40108000) jack with steam before use.
1. Remove protector of PPMU.
2. Remove cap of oil injection jack.
3. Install an oil pressure gauge (SST: KV40108000) (A) to oil injec- tion jack.
CAUTION:
Jack must be securely inserted until a click sound can beheard.
Pressure reducing valve (B) of the oil pressure gauge
must be closed.
4. Loosen needle valves A, C, and E of PPMU by approximately 2 rotations.
CAUTION:
Never loosen the needle valve more than required.
5. Lift up the vehicle. CAUTION:
Check that tires never contact the ground.
6. Tighten needle valves A and C of PPMU.
7. Loosen lock nuts of needle valves B and D of PPMU and then tighten needle valves B and D.
8. Write down a value of the oil pressure gauge.
9. Lift down the vehicle. CAUTION:
Check that the lift is fully lowered.
10. Read a value of oil pressure gauge.
11. Compare difference of reading with pressure reading in step 8.
12. Tighten needle valves A, C, and E of PPMU to the specified torque.
13. Loosen needle valves B and D of PPMU by approximatel y 2 rotations and then tighten lock nut to the
specified torque.
CAUTION:
Never loosen the needle valve more than required.
JSEIA0186ZZ
Pressure change
Pressure increases : PPMU malfunction
Pressure does not change : Shock absorber malfunction
Tightening torque : 8.3 N· m (0.85 kg-m, 73 in-lb)
Tightening torque : 20 N·m (2.0 kg-m, 15 ft-lb)
JSEIA0187ZZ
Revision: 2010 May2011 QX56
Page 4387 of 5598
![INFINITI QX56 2011 Factory Workshop Manual
CHECK ORIFICE FOR CLOGGINGSCS-27
< BASIC INSPECTION > [HBMC]
C
D
F
G H
I
J
K L
M A
B
SCS
N
O P
CHECK ORIFICE FOR CLOGGING
Work ProcedureINFOID:0000000006256015
CAUTION:
Clean surrounding areas of o INFINITI QX56 2011 Factory Workshop Manual
CHECK ORIFICE FOR CLOGGINGSCS-27
< BASIC INSPECTION > [HBMC]
C
D
F
G H
I
J
K L
M A
B
SCS
N
O P
CHECK ORIFICE FOR CLOGGING
Work ProcedureINFOID:0000000006256015
CAUTION:
Clean surrounding areas of o](/img/42/57033/w960_57033-4386.png)
CHECK ORIFICE FOR CLOGGINGSCS-27
< BASIC INSPECTION > [HBMC]
C
D
F
G H
I
J
K L
M A
B
SCS
N
O P
CHECK ORIFICE FOR CLOGGING
Work ProcedureINFOID:0000000006256015
CAUTION:
Clean surrounding areas of oil inj ection jack using steam before starting operation, since there may
be mud on it.
Clean oil pressure gauge (special service tool: KV40108000) jack with steam before use.
1. Remove protector of PPMU.
2. Remove cap of oil injection jack.
3. Install an oil pressure gauge (SST: KV40108000) (A) to oil injec- tion jack.
CAUTION:
Jack must be securely inserted until a click sound can beheard.
Pressure reducing valve (B) of the oil pressure gauge
must be closed.
4. Loosen needle valves A, C, and E of PPMU by approximately 2 rotations.
CAUTION:
Never loosen the needle valve more than required.
5. Lift up the vehicle. CAUTION:
Check that tires never contact the ground.
6. Tighten needle valves A, C, and E of PPMU.
7. Lift down the vehicle. CAUTION:
Check that the lift is fully lowered.
8. Loosen pressure reducing valve (A) of oil pressure gauge and then lower pressure.
CAUTION:
Be careful since oil drains sw iftly from oil drain hole (B).
9. Check that reading of oil pressure gauge is 0 MPa. Close pres- sure reducing valve.
10. Loosen needle valve E of PPMU by approximately 2 rotations. CAUTION:
Never loosen the needle valve more than required.
11. Write down a value of the oil pressure gauge.
12. Tighten needle valve E of PPMU.
13. Loosen pressure reducing valve of oil pressure gauge and then lower pressure. CAUTION:
Be careful since oil drains swiftly from oil drain hole.
14. Check that reading of oil pressure gauge is 0 MPa. Close pressure reducing valve.
15. Loosen needle valve A of PPMU by approximately 2 rotations. CAUTION:
Never loosen the needle valve more than required.
16. Read a value of the oil pressure gauge after 5 minutes.
17. Compare difference of reading with pressure reading in step 11.
JSEIA0186ZZ
JSEIA0187ZZ
JSEIA0188ZZ
Revision: 2010 May2011 QX56
Page 4768 of 5598

COLLISION DIAGNOSISSR-5
< BASIC INSPECTION >
C
DE
F
G
I
J
K L
M A
B
SR
N
O P
BASIC INSPECTION
COLLISION DIAGNOSIS
FOR FRONTAL COLLISION
FOR FRONTAL COLLISION : When SR S is activated in a collisionINFOID:0000000006113080
CAUTION:
Due to varying models and option levels, not all parts listed in the chart below apply to all vehicles.
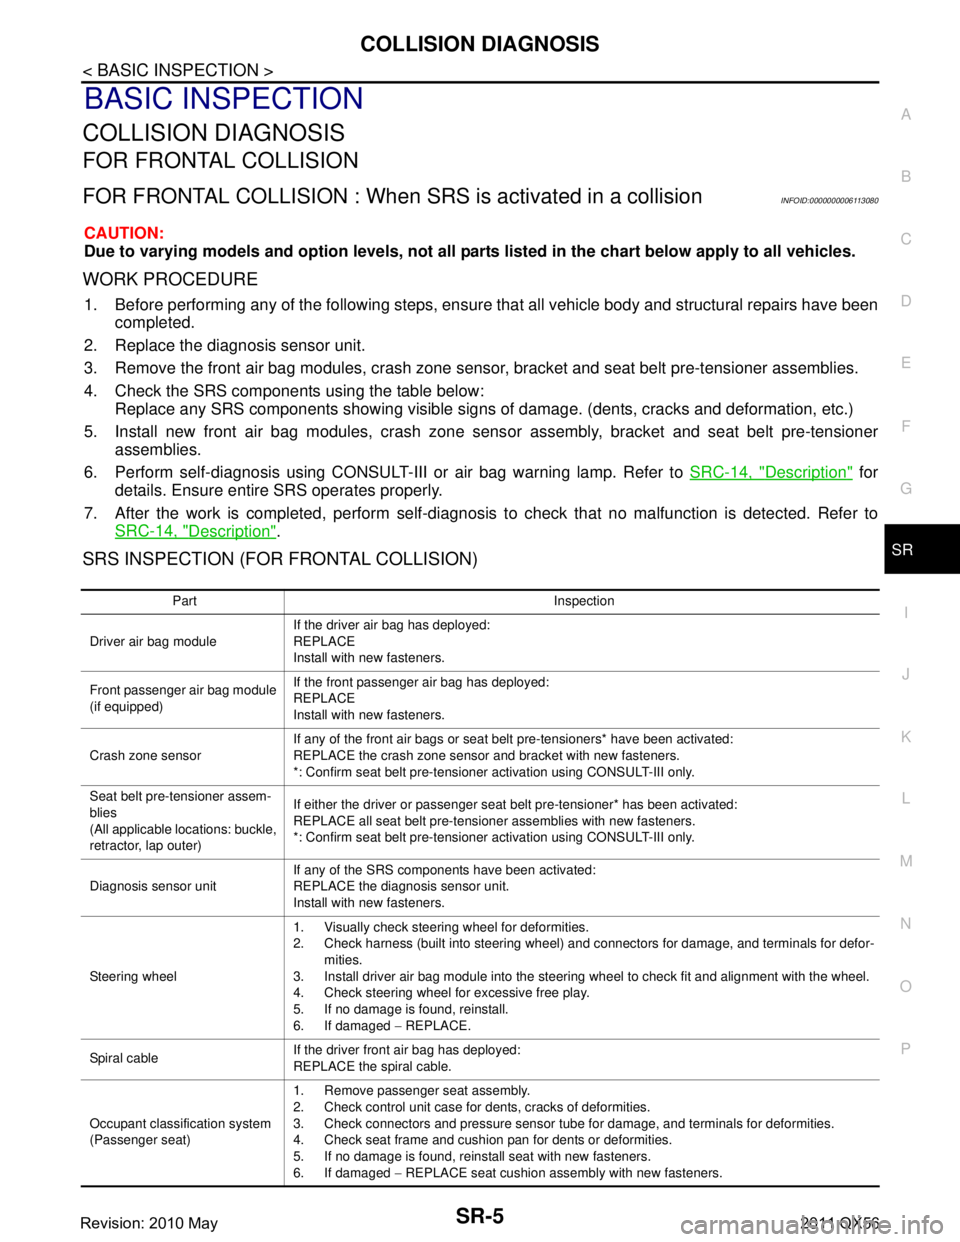
WORK PROCEDURE
1. Before performing any of the following steps, ensur e that all vehicle body and structural repairs have been
completed.
2. Replace the diagnosis sensor unit.
3. Remove the front air bag modules, crash zone sensor , bracket and seat belt pre-tensioner assemblies.
4. Check the SRS components using the table below: Replace any SRS components showing visible signs of damage. (dents, cracks and deformation, etc.)
5. Install new front air bag modules, crash zone sens or assembly, bracket and seat belt pre-tensioner
assemblies.
6. Perform self-diagnosis using CONSULT-III or air bag warning lamp. Refer to SRC-14, "
Description" for
details. Ensure entire SRS operates properly.
7. After the work is completed, perform self-diagnosis to check that no malfunction is detected. Refer to
SRC-14, "
Description".
SRS INSPECTION (FOR FRONTAL COLLISION)
Part Inspection
Driver air bag module If the driver air bag has deployed:
REPLACE
Install with new fasteners.
Front passenger air bag module
(if equipped) If the front passenger air bag has deployed:
REPLACE
Install with new fasteners.
Crash zone sensor If any of the front air bags or seat belt pre-tensioners* have been activated:
REPLACE the crash zone sensor and bracket with new fasteners.
*: Confirm seat belt pre-tensioner activation using CONSULT-III only.
Seat belt pre-tensioner assem-
blies
(All applicable locations: buckle,
retractor, lap outer) If either the driver or passenger seat belt pre-tensioner* has been activated:
REPLACE all seat belt pre-tensioner assemblies with new fasteners.
*: Confirm seat belt pre-tensioner activation using CONSULT-III only.
Diagnosis sensor unit If any of the SRS components have been activated:
REPLACE the diagnosis sensor unit.
Install with new fasteners.
Steering wheel 1. Visually check steering wheel for deformities.
2. Check harness (built into steering wheel) and connectors for damage, and terminals for defor-
mities.
3. Install driver air bag module into the steering wheel to check fit and alignment with the wheel.
4. Check steering wheel for excessive free play.
5. If no damage is found, reinstall.
6. If damaged − REPLACE.
Spiral cable If the driver front air bag has deployed:
REPLACE the spiral cable.
Occupant classification system
(Passenger seat) 1. Remove passenger seat assembly.
2. Check control unit case for dents, cracks of deformities.
3. Check connectors and pressure sensor tube for damage, and terminals for deformities.
4. Check seat frame and cushion pan for dents or deformities.
5. If no damage is found, reinstall seat with new fasteners.
6. If damaged
− REPLACE seat cushion assembly with new fasteners.
Revision: 2010 May2011 QX56
Page 4770 of 5598

COLLISION DIAGNOSISSR-7
< BASIC INSPECTION >
C
DE
F
G
I
J
K L
M A
B
SR
N
O P
FOR SIDE AND ROLLOVER COLLISION
FOR SIDE AND ROLLOVER CO LLISION : When SRS is activated in a collision
INFOID:0000000006113082
CAUTION:
Due to varying models and option levels, not all parts listed in the chart below apply to all vehicles.
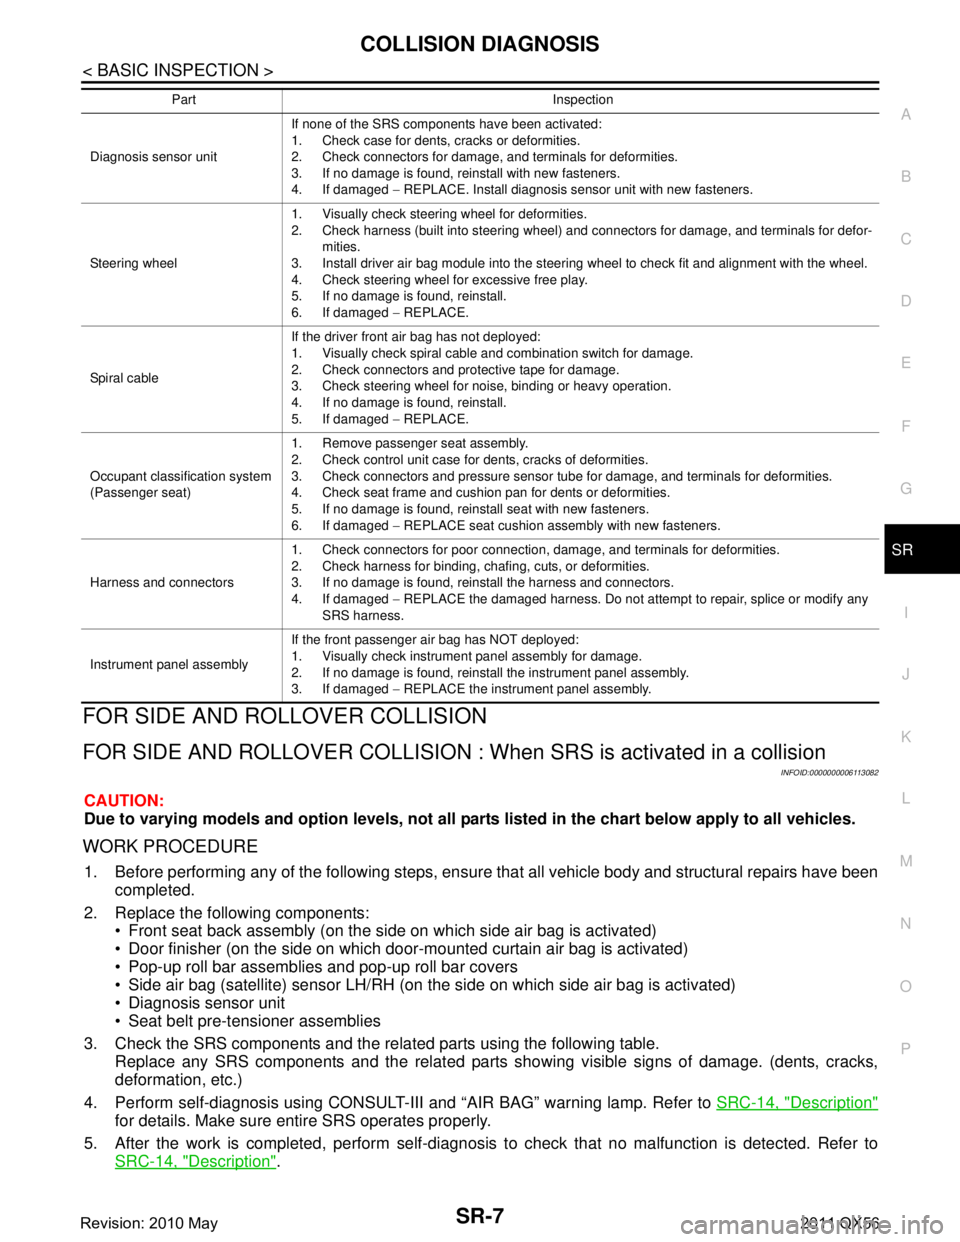
WORK PROCEDURE
1. Before performing any of the following steps, ensur e that all vehicle body and structural repairs have been
completed.
2. Replace the following components: Front seat back assembly (on the side on which side air bag is activated)
Door finisher (on the side on which door-mounted curtain air bag is activated)
Pop-up roll bar assemblies and pop-up roll bar covers
Side air bag (satellite) sensor LH/RH (on the side on which side air bag is activated)
Diagnosis sensor unit
Seat belt pre-tensioner assemblies
3. Check the SRS components and the related parts using the following table. Replace any SRS components and the related parts s howing visible signs of damage. (dents, cracks,
deformation, etc.)
4. Perform self-diagnosis using CONSULT-III and “AIR BAG” warning lamp. Refer to SRC-14, "
Description"
for details. Make sure entire SRS operates properly.
5. After the work is completed, perform self-diagnosis to check that no malfunction is detected. Refer to
SRC-14, "
Description".
Diagnosis sensor unit If none of the SRS components have been activated:
1. Check case for dents, cracks or deformities.
2. Check connectors for damage, and terminals for deformities.
3. If no damage is found, reinstall with new fasteners.
4. If damaged
− REPLACE. Install diagnosis sensor unit with new fasteners.
Steering wheel 1. Visually check steering wheel for deformities.
2. Check harness (built into steering wheel) and connectors for damage, and terminals for defor-
mities.
3. Install driver air bag module into the steering wheel to check fit and alignment with the wheel.
4. Check steering wheel for excessive free play.
5. If no damage is found, reinstall.
6. If damaged − REPLACE.
Spiral cable If the driver front air bag has not deployed:
1. Visually check spiral cable and combination switch for damage.
2. Check connectors and protective tape for damage.
3. Check steering wheel for noise, binding or heavy operation.
4. If no damage is found, reinstall.
5. If damaged
− REPLACE.
Occupant classification system
(Passenger seat) 1. Remove passenger seat assembly.
2. Check control unit case for dents, cracks of deformities.
3. Check connectors and pressure sensor tube for damage, and terminals for deformities.
4. Check seat frame and cushion pan for dents or deformities.
5. If no damage is found, reinstall seat with new fasteners.
6. If damaged
− REPLACE seat cushion assembly with new fasteners.
Harness and connectors 1. Check connectors for poor connection, damage, and terminals for deformities.
2. Check harness for binding, chafing, cuts, or deformities.
3. If no damage is found, reinstall the harness and connectors.
4. If damaged
− REPLACE the damaged harness. Do not attempt to repair, splice or modify any
SRS harness.
Instrument panel assembly If the front passenger air bag has NOT deployed:
1. Visually check instrument panel assembly for damage.
2. If no damage is found, reinstall the instrument panel assembly.
3. If damaged
− REPLACE the instrument panel assembly.
Part Inspection
Revision: 2010 May2011 QX56