height INFINITI QX56 2011 Factory Workshop Manual
[x] Cancel search | Manufacturer: INFINITI, Model Year: 2011, Model line: QX56, Model: INFINITI QX56 2011Pages: 5598, PDF Size: 94.53 MB
Page 2278 of 5598
![INFINITI QX56 2011 Factory Workshop Manual
EC-254
< DTC/CIRCUIT DIAGNOSIS >[VK56VD]
P0138, P0158 HO2S2
11 .CHECK HEATED OXYGEN SENSOR 2
Refer to EC-254, "
Component Inspection (HO2 sensor 2)".
Is the inspection result normal?
YES >> GO TO 13 INFINITI QX56 2011 Factory Workshop Manual
EC-254
< DTC/CIRCUIT DIAGNOSIS >[VK56VD]
P0138, P0158 HO2S2
11 .CHECK HEATED OXYGEN SENSOR 2
Refer to EC-254, "
Component Inspection (HO2 sensor 2)".
Is the inspection result normal?
YES >> GO TO 13](/img/42/57033/w960_57033-2277.png)
EC-254
< DTC/CIRCUIT DIAGNOSIS >[VK56VD]
P0138, P0158 HO2S2
11 .CHECK HEATED OXYGEN SENSOR 2
Refer to EC-254, "
Component Inspection (HO2 sensor 2)".
Is the inspection result normal?
YES >> GO TO 13.
NO >> GO TO 12.
12.REPLACE HEATED OXYGEN SENSOR 2
Replace malfunctioning heated oxygen sensor 2. Refer to EM-40, "
Exploded View".
CAUTION:
Discard any heated oxygen sensor which has been dropped from a height of more than 0.5 m (19.7
in) onto a hard surface such as a concrete floor; use a new one.
Before installing new oxygen sensor, clean exh aust system threads using Oxygen Sensor Thread
Cleaner [commercial service tool (J-43897-18 or J-43897-12)] and approved anti-seize lubricant
(commercial service tool).
>> INSPECTION END
13.CHECK INTERMITTENT INCIDENT
Refer to GI-40, "
Intermittent Incident".
>> INSPECTION END
Component Inspection (HO2 sensor 2)INFOID:0000000006217820
1.INSPECTION START
Will CONSULT-III be used?
Will CONSULT-III be used?
YES >> GO TO 2.
NO >> GO TO 3.
2.CHECK HEATED OXYGEN SENSOR 2
WITH CONSULT-III
1. Start engine and warm it up to the normal operating temperature.
2. Start engine and keep the engine speed between 3,500 and 4,000 rpm for at least 1 minute under no load.
3. Let engine idle for 1 minute.
4. Select “FUEL INJECTION” in “ACT IVE TEST” mode, and select “HO2S2 (B1)/(B2)” as the monitor item
with CONSULT-III.
5. Check “HO2S2 (B1)/(B2)” at idle speed when adjusting “FUEL INJECTION” to ±25%.
“HO2S2 (B1)/(B2)” should be above 0.74 V at least once when the “FUEL INJECTION” is +25%.
“HO2S2 (B1)/(B2)” should be below 0.18 V at least once when the “FUEL INJECTION” is −25%.
Is the inspection result normal?
YES >> INSPECTION END
NO >> GO TO 6.
3.CHECK HEATED OXYGEN SENSOR 2-I
WITHOUT CONSULT-III
1. Start engine and warm it up to the normal operating temperature.
JMBIA1573GB
Revision: 2010 May2011 QX56
Page 2279 of 5598
![INFINITI QX56 2011 Factory Workshop Manual
P0138, P0158 HO2S2EC-255
< DTC/CIRCUIT DIAGNOSIS > [VK56VD]
C
D
E
F
G H
I
J
K L
M A
EC
NP
O
2. Turn ignition switch OFF and wait at least 10 seconds.
3. Start engine and keep the engine speed between INFINITI QX56 2011 Factory Workshop Manual
P0138, P0158 HO2S2EC-255
< DTC/CIRCUIT DIAGNOSIS > [VK56VD]
C
D
E
F
G H
I
J
K L
M A
EC
NP
O
2. Turn ignition switch OFF and wait at least 10 seconds.
3. Start engine and keep the engine speed between](/img/42/57033/w960_57033-2278.png)
P0138, P0158 HO2S2EC-255
< DTC/CIRCUIT DIAGNOSIS > [VK56VD]
C
D
E
F
G H
I
J
K L
M A
EC
NP
O
2. Turn ignition switch OFF and wait at least 10 seconds.
3. Start engine and keep the engine speed between 3,500 and
4,000 rpm for at least 1 minute under no load.
4. Let engine idle for 1 minute.
5. Check the voltage between ECM harness connector terminals under the following conditions.
Is the inspection result normal?
YES >> INSPECTION END
NO >> GO TO 4.
4.CHECK HEATED OXYGEN SENSOR 2-II
Check the voltage between ECM harness connector terminals under the following conditions.
Is the inspection result normal?
YES >> INSPECTION END
NO >> GO TO 5.
5.CHECK HEATED OXYGEN SENSOR 2-III
Check the voltage between ECM harness connector terminals under the following conditions.
Is the inspection result normal?
YES >> INSPECTION END
NO >> GO TO 6.
6.REPLACE HEATED OXYGEN SENSOR 2
Replace malfunctioning heated oxygen sensor 2. Refer to EM-40, "
Exploded View".
CAUTION:
Discard any heated oxygen sensor which has been dr opped from a height of more than 0.5 m (19.7
in) onto a hard surface such as a concrete floor; use a new one.
ECM
Condition Voltage
Connector +–
Te r m i n a l Te r m i n a l
F110 96
[HO2S2
(bank 1)] 100Revving up to 4,000 rpm under no load at
least 10 times The voltage should be above 0.74 V at
least once during this procedure.
The voltage should be below 0.18 V at
least once during this procedure.
87
[HO2S2
(bank 2)]
ECM
Condition Voltage
Connector +–
Te r m i n a l Te r m i n a l
F110 96
[HO2S2
(bank 1)] 100 Keeping engine at idle for 10 minutes The voltage should be above 0.74 V at
least once during this procedure.
The voltage should be below 0.18 V at
least once during this procedure.
87
[HO2S2
(bank 2)]
ECM
Condition Voltage
Connector +–
Te r m i n a l Te r m i n a l
F110 96
[HO2S2
(bank 1)] 100Coasting from 80 km/h (50 MPH) with se-
lector lever in the D position The voltage should be above 0.74 V at
least once during this procedure.
The voltage should be below 0.18 V at
least once during this procedure.
87
[HO2S2
(bank 2)]
Revision: 2010 May2011 QX56
Page 2284 of 5598
![INFINITI QX56 2011 Factory Workshop Manual
EC-260
< DTC/CIRCUIT DIAGNOSIS >[VK56VD]
P0139, P0159 HO2S2
3. Also check harness for short to power.
Is the inspection result normal?
YES >> GO TO 4.
NO >> Repair open circuit, short to ground or sh INFINITI QX56 2011 Factory Workshop Manual
EC-260
< DTC/CIRCUIT DIAGNOSIS >[VK56VD]
P0139, P0159 HO2S2
3. Also check harness for short to power.
Is the inspection result normal?
YES >> GO TO 4.
NO >> Repair open circuit, short to ground or sh](/img/42/57033/w960_57033-2283.png)
EC-260
< DTC/CIRCUIT DIAGNOSIS >[VK56VD]
P0139, P0159 HO2S2
3. Also check harness for short to power.
Is the inspection result normal?
YES >> GO TO 4.
NO >> Repair open circuit, short to ground or short to power in harness or connectors.
4.CHECK HEATED OXYGEN SENSOR 2
Refer to EC-260, "
Component Inspection (HO2 sensor 2)".
Is the inspection result normal?
YES >> GO TO 6.
NO >> GO TO 5.
5.REPLACE HEATED OXYGEN SENSOR 2
Replace malfunctioning heated oxygen sensor 2. Refer to EM-40, "
Exploded View".
CAUTION:
Discard any heated oxygen sensor which has been dropped from a height of more than 0.5 m (19.7
in) onto a hard surface such as a concrete floor; use a new one.
Before installing new oxygen sensor, clean exh aust system threads using Oxygen Sensor Thread
Cleaner [commercial service tool (J-43897-18 or J-43897-12)] and approved anti-seize lubricant
(commercial service tool).
>> INSPECTION END
6.CHECK INTERMITTENT INCIDENT
Refer to GI-40, "
Intermittent Incident".
>> INSPECTION END
Component Inspection (HO2 sensor 2)INFOID:0000000006217824
1.INSPECTION START
Will CONSULT-III be used?
Will CONSULT-III be used?
YES >> GO TO 2.
NO >> GO TO 3.
2.CHECK HEATED OXYGEN SENSOR 2
WITH CONSULT-III
1. Start engine and warm it up to the normal operating temperature.
2. Start engine and keep the engine speed between 3,500 and 4,000 rpm for at least 1 minute under no load.
3. Let engine idle for 1 minute.
4. Select “FUEL INJECTION” in “ACT IVE TEST” mode, and select “HO2S2 (B1)/(B2)” as the monitor item
with CONSULT-III.
5. Check “HO2S2 (B1)/(B2)” at idle speed when adjusting “FUEL INJECTION” to ±25%.
“HO2S2 (B1)/(B2)” should be above 0.74 V at least once when the “FUEL INJECTION” is +25%.
“HO2S2 (B1)/(B2)” should be below 0.18 V at least once when the “FUEL INJECTION” is −25%.
Is the inspection result normal?
YES >> INSPECTION END
JMBIA1573GB
Revision: 2010 May2011 QX56
Page 2286 of 5598
![INFINITI QX56 2011 Factory Workshop Manual
EC-262
< DTC/CIRCUIT DIAGNOSIS >[VK56VD]
P0139, P0159 HO2S2
6.REPLACE HEATED OXYGEN SENSOR 2
Replace malfunctioning heated oxygen sensor 2. Refer to EM-40, "
Exploded View".
CAUTION:
Discard any h INFINITI QX56 2011 Factory Workshop Manual
EC-262
< DTC/CIRCUIT DIAGNOSIS >[VK56VD]
P0139, P0159 HO2S2
6.REPLACE HEATED OXYGEN SENSOR 2
Replace malfunctioning heated oxygen sensor 2. Refer to EM-40, "
Exploded View".
CAUTION:
Discard any h](/img/42/57033/w960_57033-2285.png)
EC-262
< DTC/CIRCUIT DIAGNOSIS >[VK56VD]
P0139, P0159 HO2S2
6.REPLACE HEATED OXYGEN SENSOR 2
Replace malfunctioning heated oxygen sensor 2. Refer to EM-40, "
Exploded View".
CAUTION:
Discard any heated oxygen sensor which has been dropped from a height of more than 0.5 m (19.7
in) onto a hard surface such as a concrete floor; use a new one.
Before installing new oxygen sensor, clean exh aust system threads using Oxygen Sensor Thread
Cleaner [commercial service tool (J-43897-18 or J-43897-12)] and approved anti-seize lubricant
(commercial service tool).
>> INSPECTION END
Revision: 2010 May2011 QX56
Page 2513 of 5598
![INFINITI QX56 2011 Factory Workshop Manual
P2A00, P2A03 A/F SENSOR 1EC-489
< DTC/CIRCUIT DIAGNOSIS > [VK56VD]
C
D
E
F
G H
I
J
K L
M A
EC
NP
O
4. Also check harness for short to power.
Is the inspection result normal?
YES >> GO TO 8.
NO >> Rep INFINITI QX56 2011 Factory Workshop Manual
P2A00, P2A03 A/F SENSOR 1EC-489
< DTC/CIRCUIT DIAGNOSIS > [VK56VD]
C
D
E
F
G H
I
J
K L
M A
EC
NP
O
4. Also check harness for short to power.
Is the inspection result normal?
YES >> GO TO 8.
NO >> Rep](/img/42/57033/w960_57033-2512.png)
P2A00, P2A03 A/F SENSOR 1EC-489
< DTC/CIRCUIT DIAGNOSIS > [VK56VD]
C
D
E
F
G H
I
J
K L
M A
EC
NP
O
4. Also check harness for short to power.
Is the inspection result normal?
YES >> GO TO 8.
NO >> Repair open circuit, short to ground or short to power in harness or connectors.
8.CHECK A/F SENSOR 1 HEATER
Refer to EC-182, "
Component Inspection (A/F Sensor 1 Heater)".
Is the inspection result normal?
YES >> GO TO 9.
NO >> GO TO 10.
9.CHECK INTERMITTENT INCIDENT
Perform GI-40, "
Intermittent Incident".
Is the inspection result normal?
YES >> GO TO 10.
NO >> Repair or replace malfunctioning part.
10.REPLACE AIR FUEL RATIO (A/F) SENSOR 1
Replace air fuel ratio (A/F) sensor 1. Refer to EX-5, "
Exploded View".
CAUTION:
Discard any A/F sensor which has been dropped from a height of more than 0.5 m (19.7 in) onto a
hard surface such as a concrete floor; use a new one.
Before installing new A/F senso r, clean exhaust system threads using Oxygen Sensor Thread
Cleaner [commercial service tool (J-43897-18 or J-43897-12)] and approved anti-seize lubricant
(commercial service tool).
Will CONSULT-III be used?
YES >> GO TO 11.
NO >> GO TO 12.
11 .CONFIRM A/F ADJUSTMENT DATA
WITH CONSULT-III
1. Turn ignition switch ON.
2. Select “A/F ADJ-B1” and “A/F ADJ-B2” in “DATA MONITOR” mode with CONSULT-III.
3. Check that “0.000” is di splayed on CONSULT-III screen.
Is
“0.000” displayed?
YES >> INSPECTION END
NO >> GO TO 12.
12.CLEAR THE MIXTURE RATIO SELF-LEARNING VALUE
Clear the mixture ratio self-learning value. Refer to EC-152, "
Work Procedure".
Will CONSULT-III be used?
YES >> GO TO 13.
NO >> INSPECTION END
13.CONFIRM A/F ADJUSTMENT DATA
WITH CONSULT-III
1. Turn ignition switch ON.
2. Select “A/F ADJ-B1” and “A/F ADJ-B2” in “DATA MONITOR” mode with CONSULT-III.
3. Check that “0.000” is di splayed on CONSULT-III screen.
>> INSPECTION END
DTC A/F sensor 1 ECM
Continuity
Bank Connector Terminal Connector Terminal
P2A00 1 F67 6 F11094
Existed
P2A03 2 F68 6 74
Revision: 2010 May2011 QX56
Page 2641 of 5598

CAMSHAFTEM-79
< REMOVAL AND INSTALLATION >
C
DE
F
G H
I
J
K L
M A
EM
NP
O
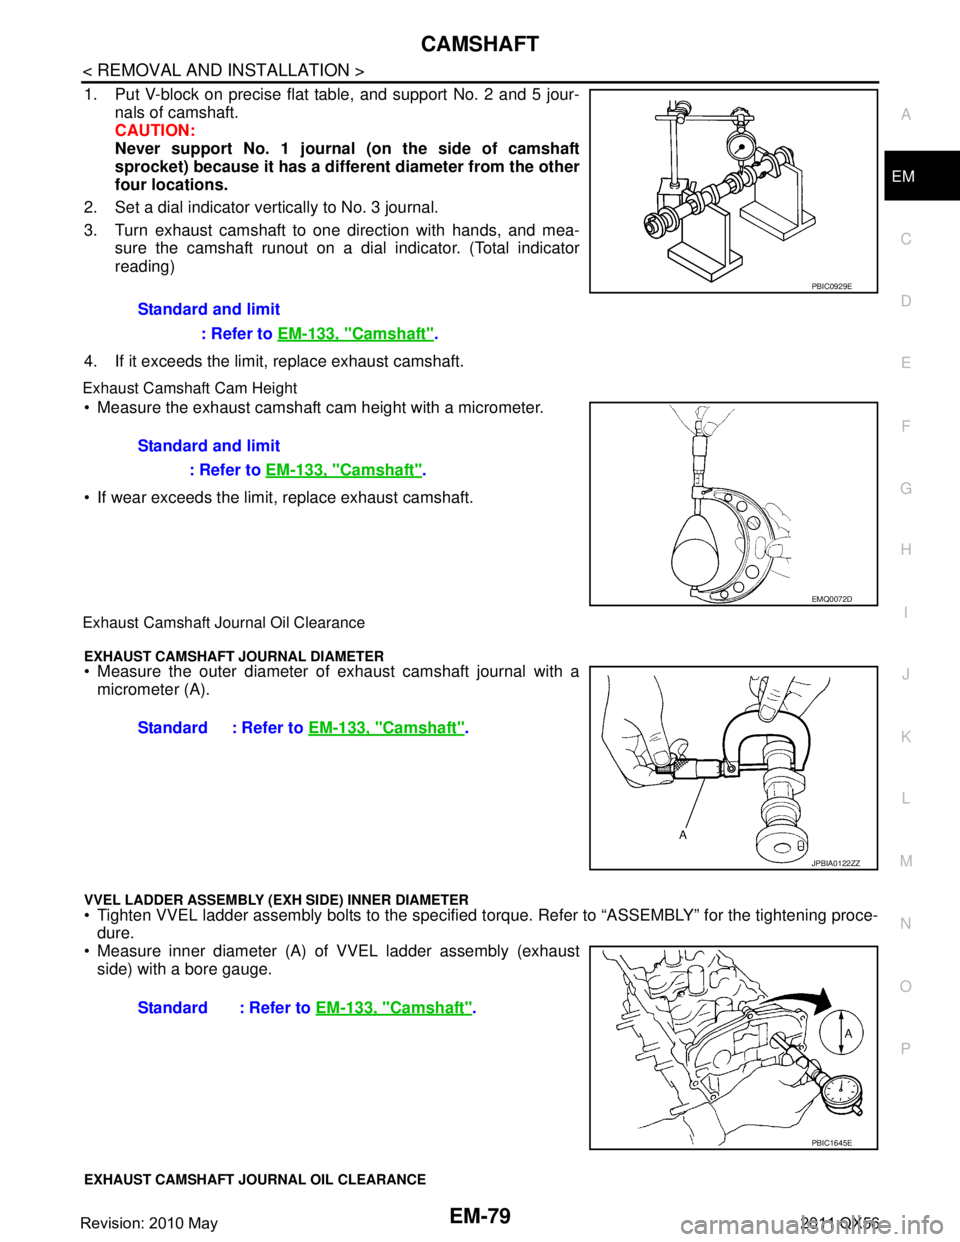
1. Put V-block on precise flat table, and support No. 2 and 5 jour-
nals of camshaft.
CAUTION:
Never support No. 1 journal (on the side of camshaft
sprocket) because it has a different diameter from the other
four locations.
2. Set a dial indicator vertically to No. 3 journal.
3. Turn exhaust camshaft to one direction with hands, and mea- sure the camshaft runout on a dial indicator. (Total indicator
reading)
4. If it exceeds the limit, replace exhaust camshaft.
Exhaust Camshaft Cam Height
Measure the exhaust camshaft cam height with a micrometer.
If wear exceeds the limit, replace exhaust camshaft.
Exhaust Camshaft Journal Oil Clearance
EXHAUST CAMSHAFT JOURNAL DIAMETER
Measure the outer diameter of exhaust camshaft journal with a micrometer (A).
VVEL LADDER ASSEMBLY (EXH SIDE) INNER DIAMETER Tighten VVEL ladder assembly bolts to the specifi ed torque. Refer to “ASSEMBLY” for the tightening proce-
dure.
Measure inner diameter (A) of VVEL ladder assembly (exhaust side) with a bore gauge.
EXHAUST CAMSHAFT JOURNAL OIL CLEARANCE
Standard and limit
: Refer to EM-133, "
Camshaft".
PBIC0929E
Standard and limit
: Refer to EM-133, "
Camshaft".
EMQ0072D
Standard : Refer to EM-133, "Camshaft".
JPBIA0122ZZ
Standard : Refer to EM-133, "Camshaft".
PBIC1645E
Revision: 2010 May2011 QX56
Page 2643 of 5598

CAMSHAFTEM-81
< REMOVAL AND INSTALLATION >
C
DE
F
G H
I
J
K L
M A
EM
NP
O
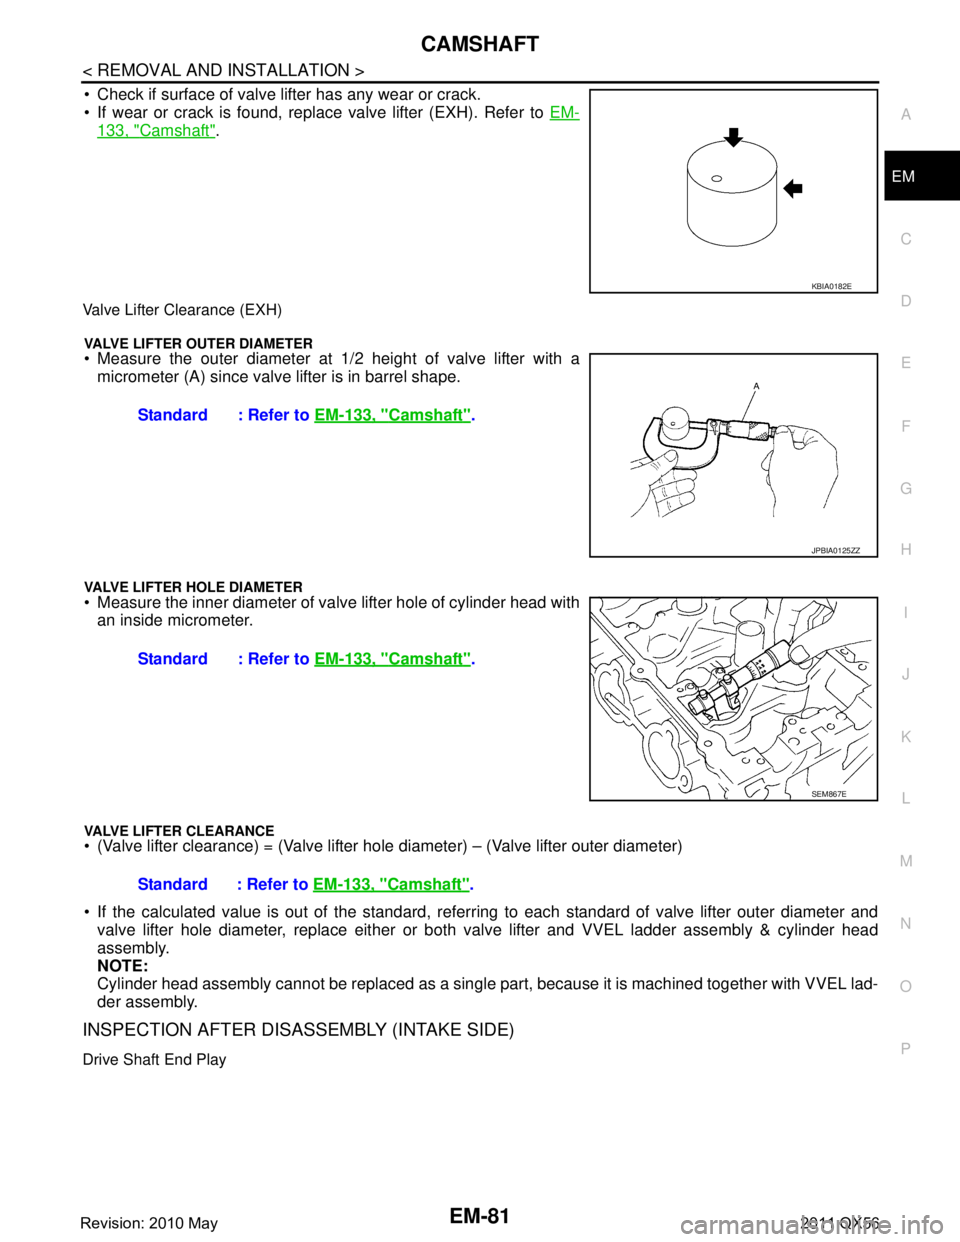
Check if surface of valve lifter has any wear or crack.
If wear or crack is found, replace valve lifter (EXH). Refer to
EM-
133, "Camshaft".
Valve Lifter Clearance (EXH)
VALVE LIFTER OUTER DIAMETER Measure the outer diameter at 1/2 height of valve lifter with a
micrometer (A) since valve lifter is in barrel shape.
VALVE LIFTER HOLE DIAMETER Measure the inner diameter of va lve lifter hole of cylinder head with
an inside micrometer.
VALVE LIFTER CLEARANCE (Valve lifter clearance) = (Valve lifter hole diameter) – (Valve lifter outer diameter)
If the calculated value is out of the standard, referr ing to each standard of valve lifter outer diameter and
valve lifter hole diameter, replace either or both valve lifter and VVEL ladder assembly & cylinder head
assembly.
NOTE:
Cylinder head assembly cannot be replaced as a single pa rt, because it is machined together with VVEL lad-
der assembly.
INSPECTION AFTER DISASSEMBLY (INTAKE SIDE)
Drive Shaft End Play
KBIA0182E
Standard : Refer to EM-133, "Camshaft".
JPBIA0125ZZ
Standard : Refer to EM-133, "Camshaft".
SEM867E
Standard : Refer to EM-133, "Camshaft".
Revision: 2010 May2011 QX56
Page 2645 of 5598

CAMSHAFTEM-83
< REMOVAL AND INSTALLATION >
C
DE
F
G H
I
J
K L
M A
EM
NP
O
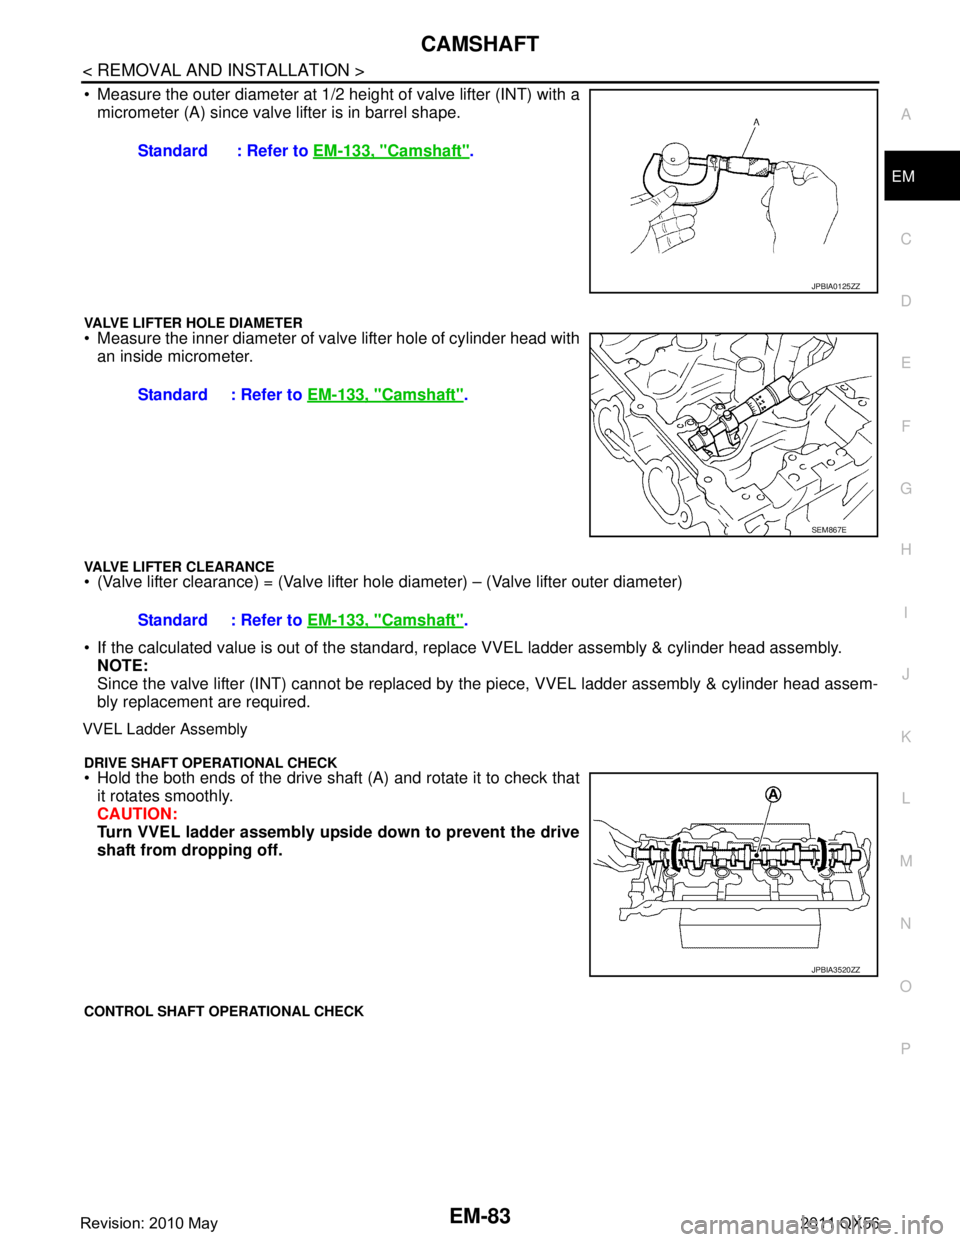
Measure the outer diameter at 1/2
height of valve lifter (INT) with a
micrometer (A) since valve lifter is in barrel shape.
VALVE LIFTER HOLE DIAMETER Measure the inner diameter of va lve lifter hole of cylinder head with
an inside micrometer.
VALVE LIFTER CLEARANCE (Valve lifter clearance) = (Valve lifter hole diameter) – (Valve lifter outer diameter)
If the calculated value is out of the standard, r eplace VVEL ladder assembly & cylinder head assembly.
NOTE:
Since the valve lifter (INT) cannot be replaced by t he piece, VVEL ladder assembly & cylinder head assem-
bly replacement are required.
VVEL Ladder Assembly
DRIVE SHAFT OPERATIONAL CHECK Hold the both ends of the drive shaft (A) and rotate it to check that it rotates smoothly.
CAUTION:
Turn VVEL ladder assembly upside down to prevent the drive
shaft from dropping off.
CONTROL SHAFT OPERATIONAL CHECK
Standard : Refer to EM-133, "Camshaft".
JPBIA0125ZZ
Standard : Refer to EM-133, "Camshaft".
SEM867E
Standard : Refer to EM-133, "Camshaft".
JPBIA3520ZZ
Revision: 2010 May2011 QX56
Page 2654 of 5598
![INFINITI QX56 2011 Factory Workshop Manual
EM-92
< REMOVAL AND INSTALLATION >
CYLINDER HEAD
a. Apply new engine oil on new valve oil seal joint and seal lip.
b. Using the valve oil seal drift [SST: KV10115600 (J-38958)] (A),press fit valve se INFINITI QX56 2011 Factory Workshop Manual
EM-92
< REMOVAL AND INSTALLATION >
CYLINDER HEAD
a. Apply new engine oil on new valve oil seal joint and seal lip.
b. Using the valve oil seal drift [SST: KV10115600 (J-38958)] (A),press fit valve se](/img/42/57033/w960_57033-2653.png)
EM-92
< REMOVAL AND INSTALLATION >
CYLINDER HEAD
a. Apply new engine oil on new valve oil seal joint and seal lip.
b. Using the valve oil seal drift [SST: KV10115600 (J-38958)] (A),press fit valve seal to height (b) shown in figure.
4. Install valve. NOTE:
Larger diameter valves are for intake side.
5. Install valve spring (with valve spring seat). Install narrow pitch (B) end [paint mark (C)] to cylinder headside (valve spring seat side).
6. Install valve spring retainer.
7. Install valve collet. Compress valve spring with the valve spring compressor [SST:
KV10116200 (J26336-A)] (A), the attachment [SST:
KV10115900 (J26336-20)] (C) and the adapter [SST:
KV10109220 ( — )] (B). Install valve collet with a magnet
hand.
CAUTION:
When working, take care not to damage valve lifter holes.
Tap valve stem edge lightly with plastic hammer after installa- tion to check its installed condition.
InspectionINFOID:0000000006289573
INSPECTION AFTER DISASSEMBLY
Cylinder Head Bolt s Outer Diameter
Cylinder head bolts are tightened by plastic zone tightening
method. Whenever the size difference between (B) and (A)
exceeds the limit, replace them with new one.
If reduction of outer diameter appears in a position other than (A),
use it as (A) point. Height (b)
Intake, Exhaust : 14.3 - 14.9 mm (0.563 - 0.587 in)
JPBIA1367ZZ
A : Wide pitch
: Cylinder head side
Paint mark color
Intake : Light green
Exhaust : Light blue
JPBIA0179ZZ
JPBIA1365ZZ
Limit [(B) - (A)] : 0.18 mm (0.0071 in)
c : 55 mm (2.17 in)
d : 12 mm (0.47 in)
JPBIA2144ZZ
Revision: 2010 May2011 QX56
Page 2656 of 5598

EM-94
< REMOVAL AND INSTALLATION >
CYLINDER HEAD
Check if the contact area band is continuous all around the circum-ference.
- If not, grind to adjust valve fitting and check again. If the contacting surface still has “NG” conditions even after the re-check, replace
valve seat (EXH). Refer to EM-86, "
Exploded View". (Exhaust
side)
- If not, replace VVEL ladder assembly & cylinder head assembly. Refer to EM-86, "
Exploded View". (Intake side)
NOTE:
Since the valve seat (INT) cannot be replaced by t he piece, VVEL ladder assembly & cylinder head assem-
bly replacement are required.
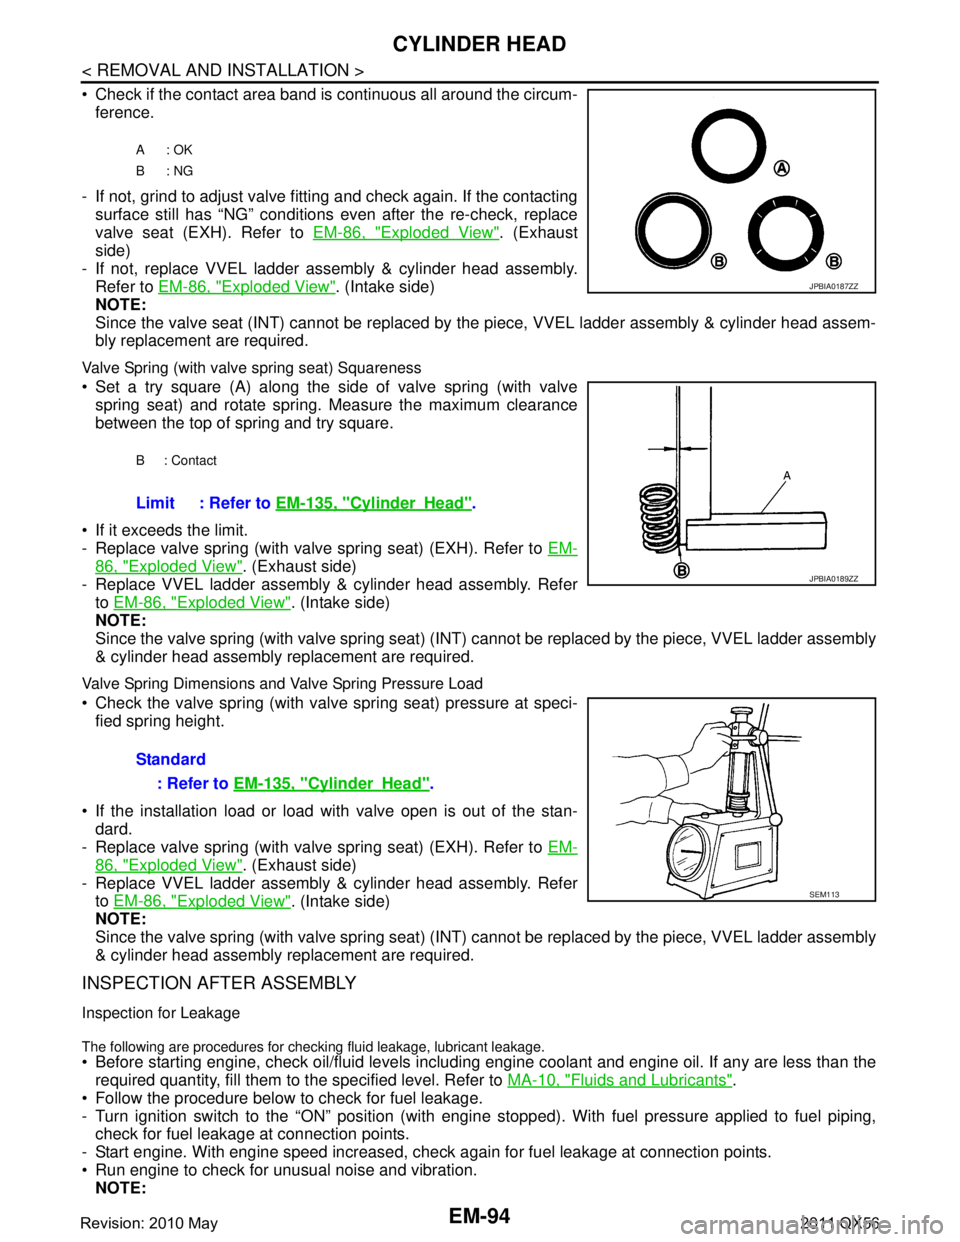
Valve Spring (with valve spring seat) Squareness
Set a try square (A) along the side of valve spring (with valve
spring seat) and rotate spring. Measure the maximum clearance
between the top of spring and try square.
If it exceeds the limit.
- Replace valve spring (with valve spring seat) (EXH). Refer to EM-
86, "Exploded View". (Exhaust side)
- Replace VVEL ladder assembly & cylinder head assembly. Refer
to EM-86, "
Exploded View". (Intake side)
NOTE:
Since the valve spring (with valve spring seat) (INT) c annot be replaced by the piece, VVEL ladder assembly
& cylinder head assembly replacement are required.
Valve Spring Dimensions and Valve Spring Pressure Load
Check the valve spring (with valve spring seat) pressure at speci- fied spring height.
If the installation load or load with valve open is out of the stan- dard.
- Replace valve spring (with valve spring seat) (EXH). Refer to EM-
86, "Exploded View". (Exhaust side)
- Replace VVEL ladder assembly & cylinder head assembly. Refer to EM-86, "
Exploded View". (Intake side)
NOTE:
Since the valve spring (with valve spring seat) (INT) c annot be replaced by the piece, VVEL ladder assembly
& cylinder head assembly replacement are required.
INSPECTION AFTER ASSEMBLY
Inspection for Leakage
The following are procedures for checking fluid leakage, lubricant leakage.
Before starting engine, check oil/fluid levels includi ng engine coolant and engine oil. If any are less than the
required quantity, fill them to the specified level. Refer to MA-10, "
Fluids and Lubricants".
Follow the procedure below to check for fuel leakage.
- Turn ignition switch to the “ON” position (with engi ne stopped). With fuel pressure applied to fuel piping,
check for fuel leakage at connection points.
- Start engine. With engine speed increased, che ck again for fuel leakage at connection points.
Run engine to check for unusual noise and vibration. NOTE:
A: OK
B: NG
JPBIA0187ZZ
B : Contact
Limit : Refer to EM-135, "CylinderHead".
JPBIA0189ZZ
Standard
: Refer to EM-135, "
CylinderHead".
SEM113
Revision: 2010 May2011 QX56