warning INFINITI QX60 2023 Owners Manual
[x] Cancel search | Manufacturer: INFINITI, Model Year: 2023, Model line: QX60, Model: INFINITI QX60 2023Pages: 636, PDF Size: 7.28 MB
Page 253 of 636

3. Press and hold the power liftgate closeswitch
OBlocated on the liftgate for more
than 3 seconds or until two beeps are
heard.
The liftgate will open to the selected position
setting. To change the position of the liftgate,
repeat steps 1-3 for setting the position of
the liftgate.
OPENING THE FUEL-FILLER
DOOR
To open the fuel-filler door, push the right
side of the fuel-filler door to release.
WARNING
• Gasoline is extremely flammable and
highly explosive under certain condi-
tions. You could be burned or seriously
injured if it is misused or mishandled. Al-
ways stop the engine and do not smoke
or allow open flames or sparks near the
vehicle when refueling. •
Do not attempt to top off the fuel tank
after the fuel pump nozzle shuts off au-
tomatically. Continued refueling may
cause fuel overflow, resulting in fuel
spray and possibly a fire.
• Never pour fuel into the throttle body to
attempt to start your vehicle.
• Do not fill a portable fuel container in the
vehicle or trailer. Static electricity can
cause an explosion of flammable liquid,
vapor or gas in any vehicle or trailer. To
reduce the risk of serious injury or death
when filling portable fuel containers:
– Always place the container on the
ground when filling.
– Do not use electronic devices when
filling.
– Keep the pump nozzle in contact with
the container while you are filling it.
– Use only approved portable fuel con-
tainers for flammable liquid.
LPD2725
FUEL-FILLER DOOR
Pre-driving checks and adjustments3-27
Page 255 of 636

Never move the nozzle during the refueling.
Pull out the nozzle approximately 5 seconds
after the fuel pump nozzle shuts off auto-
matically (initial shut-off).
Close the fuel-filler door after refueling.
If you need to refuel from a portable fuel
container, use the funnel supplied with your
vehicle. (see “When refueling from a portable
fuel container” (P. 3-30).
CAUTION
• Do not attempt to open the flaps on the
fuel-filler opening using any tool other
than the fuel pump nozzle.
• This fuel-filler opening is only conform-
able to normal fuel pump nozzles at gas
stations. Using a nozzle with a small di-
ameter may damage the opening and the
fuel system.
• If fuel is spilled on the vehicle body, flush
it away with water to avoid paint
damage.
WARNING
• Gasoline is extremely flammable and
highly explosive under certain condi-
tions. You could be burned or seriously
injured if it is misused or mishandled. Al-
ways stop the engine and do not smoke
or allow open flames or sparks near the
vehicle when refueling.
• Do not attempt to top off the fuel tank
after the fuel pump nozzle shuts off au-
tomatically. Continued refueling may
cause fuel overflow, resulting in fuel
spray and possibly a fire.
• Never pour fuel into the throttle body to
attempt to start your vehicle.
• Do not fill a portable fuel container in the
vehicle or trailer. Static electricity can
cause an explosion of flammable liquid,
vapor or gas in any vehicle or trailer. To
reduce the risk of serious injury or death
when filling portable fuel containers:
– Always place the container on the
ground when filling.
– Do not use electronic devices when
filling. –
Keep the pump nozzle in contact with
the container while you are filling it.
– Use only approved portable fuel con-
tainers for flammable liquid.
Pre-driving checks and adjustments3-29
Page 256 of 636

WHEN REFUELING FROM A
PORTABLE FUEL CONTAINER
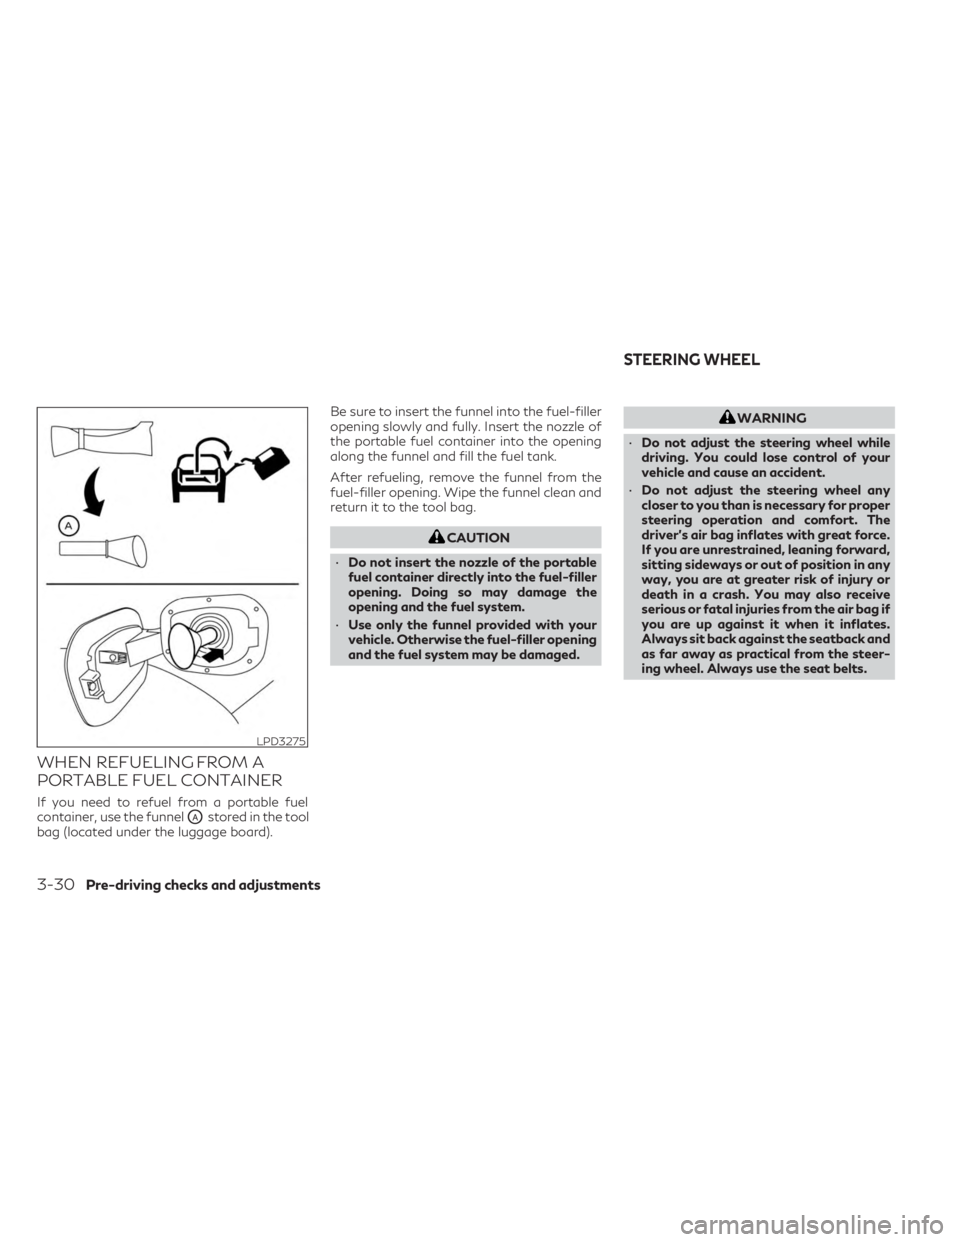
If you need to refuel from a portable fuel
container, use the funnel
OAstored in the tool
bag (located under the luggage board). Be sure to insert the funnel into the fuel-filler
opening slowly and fully. Insert the nozzle of
the portable fuel container into the opening
along the funnel and fill the fuel tank.
After refueling, remove the funnel from the
fuel-filler opening. Wipe the funnel clean and
return it to the tool bag.
CAUTION
• Do not insert the nozzle of the portable
fuel container directly into the fuel-filler
opening. Doing so may damage the
opening and the fuel system.
• Use only the funnel provided with your
vehicle. Otherwise the fuel-filler opening
and the fuel system may be damaged.
WARNING
• Do not adjust the steering wheel while
driving. You could lose control of your
vehicle and cause an accident.
• Do not adjust the steering wheel any
closer to you than is necessary for proper
steering operation and comfort. The
driver's air bag inflates with great force.
If you are unrestrained, leaning forward,
sitting sideways or out of position in any
way, you are at greater risk of injury or
death in a crash. You may also receive
serious or fatal injuries from the air bag if
you are up against it when it inflates.
Always sit back against the seatback and
as far away as practical from the steer-
ing wheel. Always use the seat belts.
LPD3275
STEERING WHEEL
3-30Pre-driving checks and adjustments
Page 260 of 636

Type A (if so equipped)
For additional information on HomeLink® Uni-
versal Transceiver operation, see “HomeLink®
Universal Transceiver” (P. 2-116).
NOTE:
Do not hand any objects over the sensorsO1
or apply glass cleaner to the sensors. Doing
so will reduce the sensitivity of the sensors,
resulting improper operation.
Type B (if so equipped)
NOTE:
Do not hand any objects over the sensorsO1
or apply glass cleaner to the sensors. Doing
so will reduce the sensitivity of the sensors,
resulting improper operation.
SMART REAR VIEW MIRROR
(if so equipped)
WARNING
Failure to follow the warnings and instruc-
tions for proper use of the Smart Rear View
Mirror could result in serious injury or
death.
• The Smart Rear View Mirror is a conve-
nience feature but it is not a substitute
for proper vehicle operation. The system
has areas where objects cannot be
viewed. Check the blind spot of the
Smart Rear View Mirror before vehicle
operation. The driver is always respon-
sible for safe driving.
• Do not disassemble or modify the Smart
Rear View Mirror, the camera unit or
wirings. If you do, it may result in acci-
dents or fire. In case you notice smoke or
smell coming from the Smart Rear View
Mirror, stop using the system immedi-
ately. It is recommended that you see an
INFINITI retailer for servicing.
• Do not operate the Smart Rear View
Mirror while driving. Doing so can be a
distraction and it could lose control of
your vehicle and cause an accident or se-
rious injury.
LPD3328LPD3329
3-34Pre-driving checks and adjustments
Page 267 of 636

OUTSIDE MIRRORS
The outside mirror remote control will oper-
ate only when the ignition switch is in the
ACC or ON position.
Push the switch
O1orO2to select the left or
right mirror. Adjust each mirror to the desired
position using the large switch
O3. Push the
switch
O1orO2and make sure that the cor-
responding light is off, to prevent accidentally
moving the mirror.
WARNING
• Objects viewed in the outside mirror on
the passenger side are closer than they
appear. Be careful when moving to the
right. Using only this mirror could cause
an accident. Use the inside mirror or
glance over your shoulder to properly
judge distances to other objects.
• Do not adjust the mirrors while driving.
You could lose control of your vehicle and
cause an accident.
Power folding outside mirrors
CAUTION
• Do not touch the mirrors while they are
moving. Your hand may be pinched, and
the mirror may malfunction.
• Do not drive with the mirrors stored. You
will be unable to see behind the vehicle.
Push the switch
O1to close the mirrors. Push
the switch again to open the mirrors.
LPD3277LPD3186
Pre-driving checks and adjustments3-41
Page 273 of 636

1.button
2. CAMERA buttonWARNING
• Failure to follow the warnings and in-
structions for proper use of the Rear-
View Monitor system could result in se-
rious injury or death. •
RearView Monitor is a convenience fea-
ture and is not a substitute for proper
backing. Always turn and look out the
windows and check mirrors to be sure
that it is safe to move before operating
the vehicle. Always back up slowly.
LHA5526
REARVIEW MONITOR (if so
equipped)
Monitor, climate, audio, phone and voice recognition systems4-3
Page 276 of 636

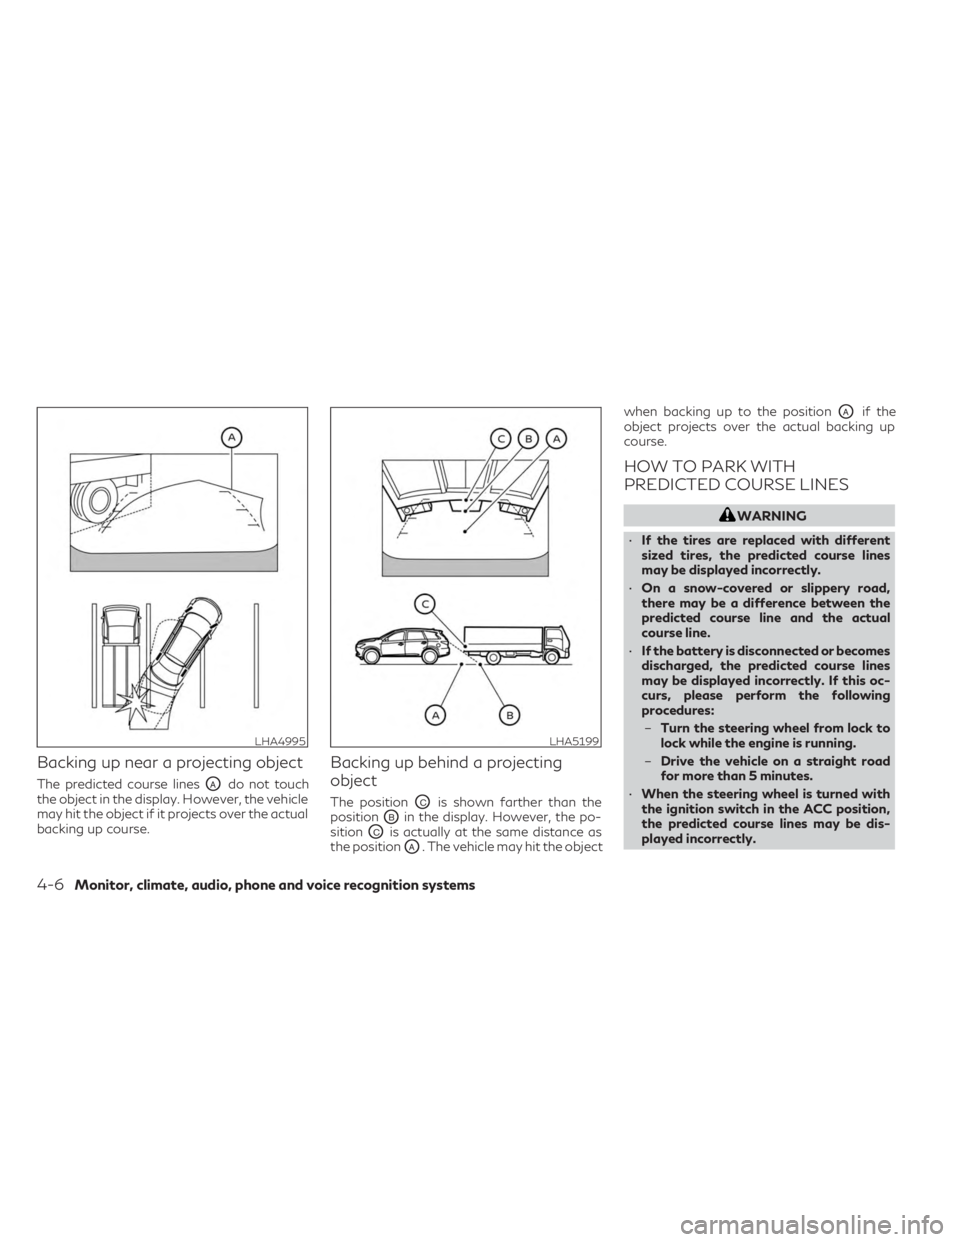
Backing up near a projecting object
The predicted course linesOAdo not touch
the object in the display. However, the vehicle
may hit the object if it projects over the actual
backing up course.
Backing up behind a projecting
object
The positionOCis shown farther than the
position
OBin the display. However, the po-
sition
OCis actually at the same distance as
the position
OA. The vehicle may hit the object when backing up to the position
OAif the
object projects over the actual backing up
course.
HOW TO PARK WITH
PREDICTED COURSE LINES
WARNING
• If the tires are replaced with different
sized tires, the predicted course lines
may be displayed incorrectly.
• On a snow-covered or slippery road,
there may be a difference between the
predicted course line and the actual
course line.
• If the battery is disconnected or becomes
discharged, the predicted course lines
may be displayed incorrectly. If this oc-
curs, please perform the following
procedures:
– Turn the steering wheel from lock to
lock while the engine is running.
– Drive the vehicle on a straight road
for more than 5 minutes.
• When the steering wheel is turned with
the ignition switch in the ACC position,
the predicted course lines may be dis-
played incorrectly.
LHA4995LHA5199
4-6Monitor, climate, audio, phone and voice recognition systems
Page 278 of 636

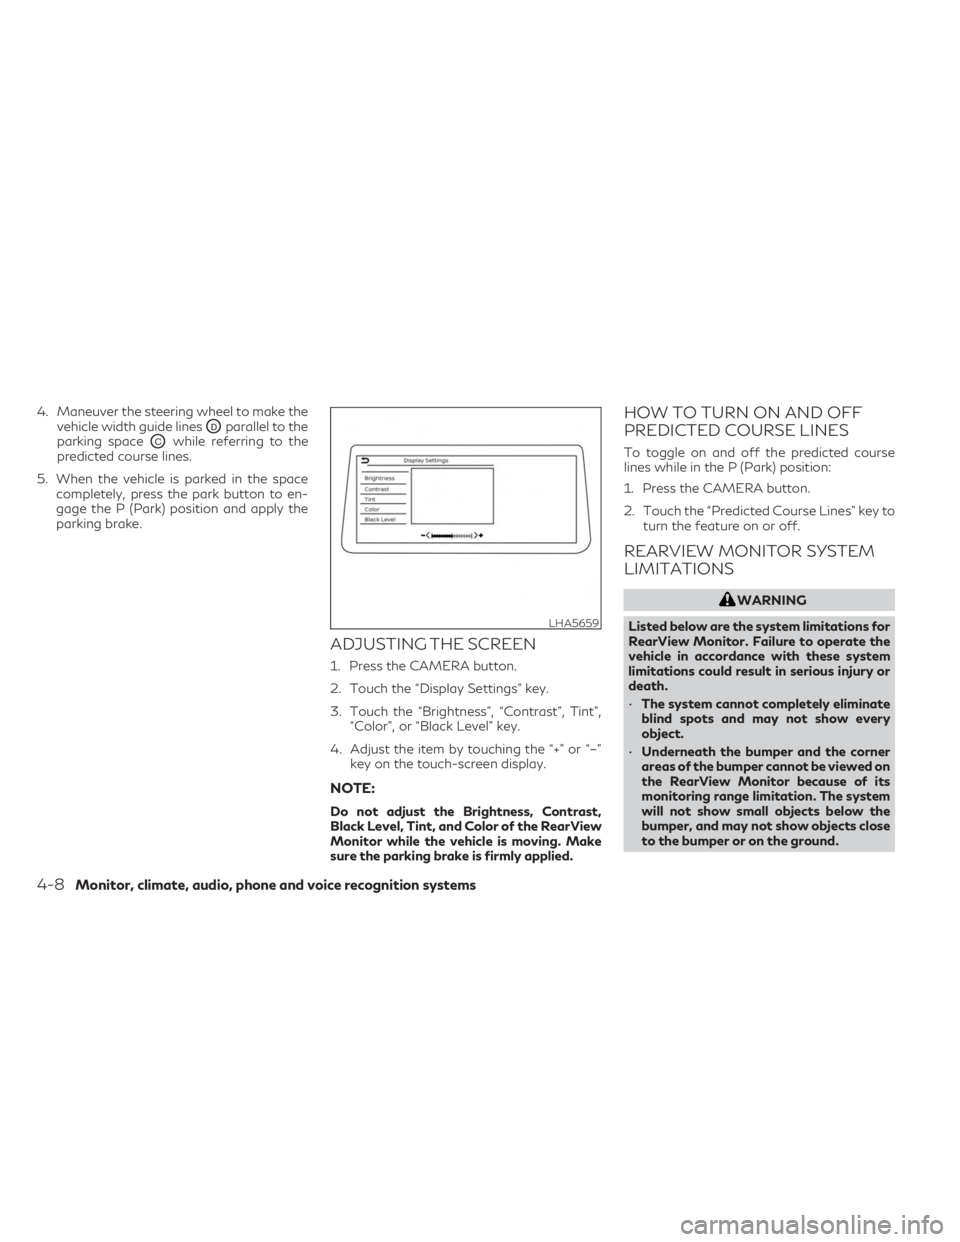
4. Maneuver the steering wheel to make thevehicle width guide lines
ODparallel to the
parking space
OCwhile referring to the
predicted course lines.
5. When the vehicle is parked in the space completely, press the park button to en-
gage the P (Park) position and apply the
parking brake.
ADJUSTING THE SCREEN
1. Press the CAMERA button.
2. Touch the “Display Settings” key.
3. Touch the “Brightness”, “Contrast”, Tint”, “Color”, or “Black Level” key.
4. Adjust the item by touching the “+” or “–” key on the touch-screen display.
NOTE:
Do not adjust the Brightness, Contrast,
Black Level, Tint, and Color of the RearView
Monitor while the vehicle is moving. Make
sure the parking brake is firmly applied.
HOW TO TURN ON AND OFF
PREDICTED COURSE LINES
To toggle on and off the predicted course
lines while in the P (Park) position:
1. Press the CAMERA button.
2. Touch the “Predicted Course Lines” key toturn the feature on or off.
REARVIEW MONITOR SYSTEM
LIMITATIONS
WARNING
Listed below are the system limitations for
RearView Monitor. Failure to operate the
vehicle in accordance with these system
limitations could result in serious injury or
death.
• The system cannot completely eliminate
blind spots and may not show every
object.
• Underneath the bumper and the corner
areas of the bumper cannot be viewed on
the RearView Monitor because of its
monitoring range limitation. The system
will not show small objects below the
bumper, and may not show objects close
to the bumper or on the ground.
LHA5659
4-8Monitor, climate, audio, phone and voice recognition systems
Page 281 of 636

WARNING
• Failure to follow the warnings and in-
structions for the proper use of the
Around View® Monitor system could re-
sult in serious injury or death.
• The Around View® Monitor is a conve-
nience feature and is not a substitute for
proper vehicle operation because it has
areas where objects cannot be viewed.
The four corners of the vehicle in particu-
lar, are areas where objects do not al-
ways appear in the bird’s-eye, front, or
rear views. Always check your surround-
ings to be sure that it is safe to move
before operating the vehicle. Always op-
erate the vehicle slowly.
• The driver is always responsible for
safety during parking and other
maneuvers.
CAUTION
Do not scratch the camera lens when clean-
ing dirt or snow from the front of the
camera. The Around View® Monitor system is de-
signed as an aid to the driver in situations
such as slot parking or parallel parking.
The monitor displays various views of the
position of the vehicle in a split screen format.
Not all views are available at all times.
Available views:
• Front View
An approximately 150–degree view of the
front of the vehicle.
• Rear View An approximately 150–degree view of the
rear of the vehicle.
• Bird's-Eye View The surrounding views of the vehicle from
above.
• Front-Side View The view around and ahead of the front
passenger's side wheel.
• Front-Wide View An approximately 180–degree view of the
front the vehicle.
• Rear-Wide View An approximately 180–degree view of the
rear of the vehicle. To display the multiple views, the Around
View® Monitor system uses cameras located
in the front grille, on the vehicle’s outside
mirrors and one located in back door finisher
O1.
AROUND VIEW® MONITOR
SYSTEM OPERATION
With the ignition switch in the ON position,
move the shift lever to the R (Reverse) posi-
tion or press the CAMERA button to operate
the Around View® Monitor. When activating
the Around View® Monitor, the guide lines,
the icons and the messages may not be dis-
played immediately.
LHA5508
Monitor, climate, audio, phone and voice recognition systems4-11
Page 282 of 636

When the camera is first activated with the
bird’s-eye view in the display, a red icon will
flash on the screen. This indicates that the
sonar system is activated. For additional in-
formation on the front and rear sonar system,
see “Front and rear sonar system” (P. 5-172).
The screen displayed on the Around View®
Monitor will automatically return to the pre-
vious screen 3 minutes after the CAMERA or
button has been pressed with the shift
lever in a position other than the R (reverse)
position
Available views
WARNING
• The distance guide lines and the vehicle
width lines should be used as a reference
only when the vehicle is on a paved, level
surface. The apparent distance viewed
on the monitor may be different than the
actual distance between the vehicle and
displayed objects.
• Use the displayed lines and the bird’s-
eye view as a reference. The lines and the
bird’s-eye view are greatly affected by
the number of occupants, cargo, fuel
level, vehicle position, road condition
and road grade. •
If the tires are replaced with different
sized tires, the predicted course lines and
the bird's-eye view may be displayed
incorrectly.
• When driving the vehicle up a hill, objects
viewed in the monitor are further than
they appear. When driving the vehicle
down a hill, objects viewed in the monitor
are closer than they appear.
• Objects in the rear view will appear visu-
ally opposite compared to when viewed
in the monitor and outside mirrors.
• Use the mirrors or actually look to prop-
erly judge distances to other objects.
• On a snow-covered or slippery road,
there may be a difference between the
predicted course lines and the actual
course line.
• The vehicle width and predicted course
lines are wider than the actual width and
course.
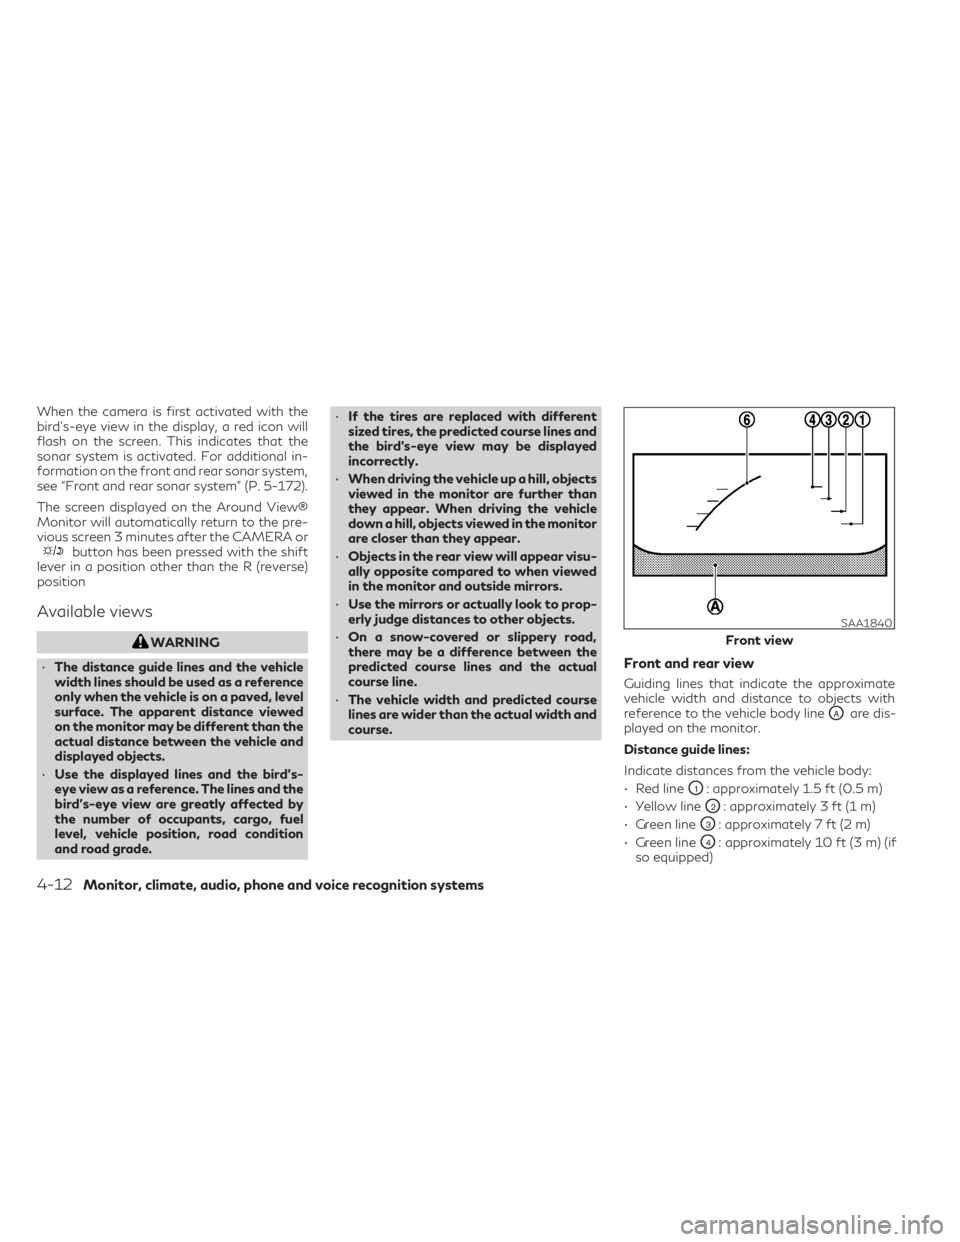
Front and rear view
Guiding lines that indicate the approximate
vehicle width and distance to objects with
reference to the vehicle body line
OAare dis-
played on the monitor.
Distance guide lines:
Indicate distances from the vehicle body:
• Red line
O1: approximately 1.5 ft (0.5 m)
• Yellow line
O2: approximately 3 ft (1 m)
• Green line
O3: approximately 7 ft (2 m)
• Green line
O4: approximately 10 ft (3 m) (if
so equipped)
SAA1840
Front view
4-12Monitor, climate, audio, phone and voice recognition systems