INFINITI QX60 HYBRID 2016 Quick Reference Guide
Manufacturer: INFINITI, Model Year: 2016, Model line: QX60 HYBRID, Model: INFINITI QX60 HYBRID 2016Pages: 40, PDF Size: 2.83 MB
Page 31 of 40
29
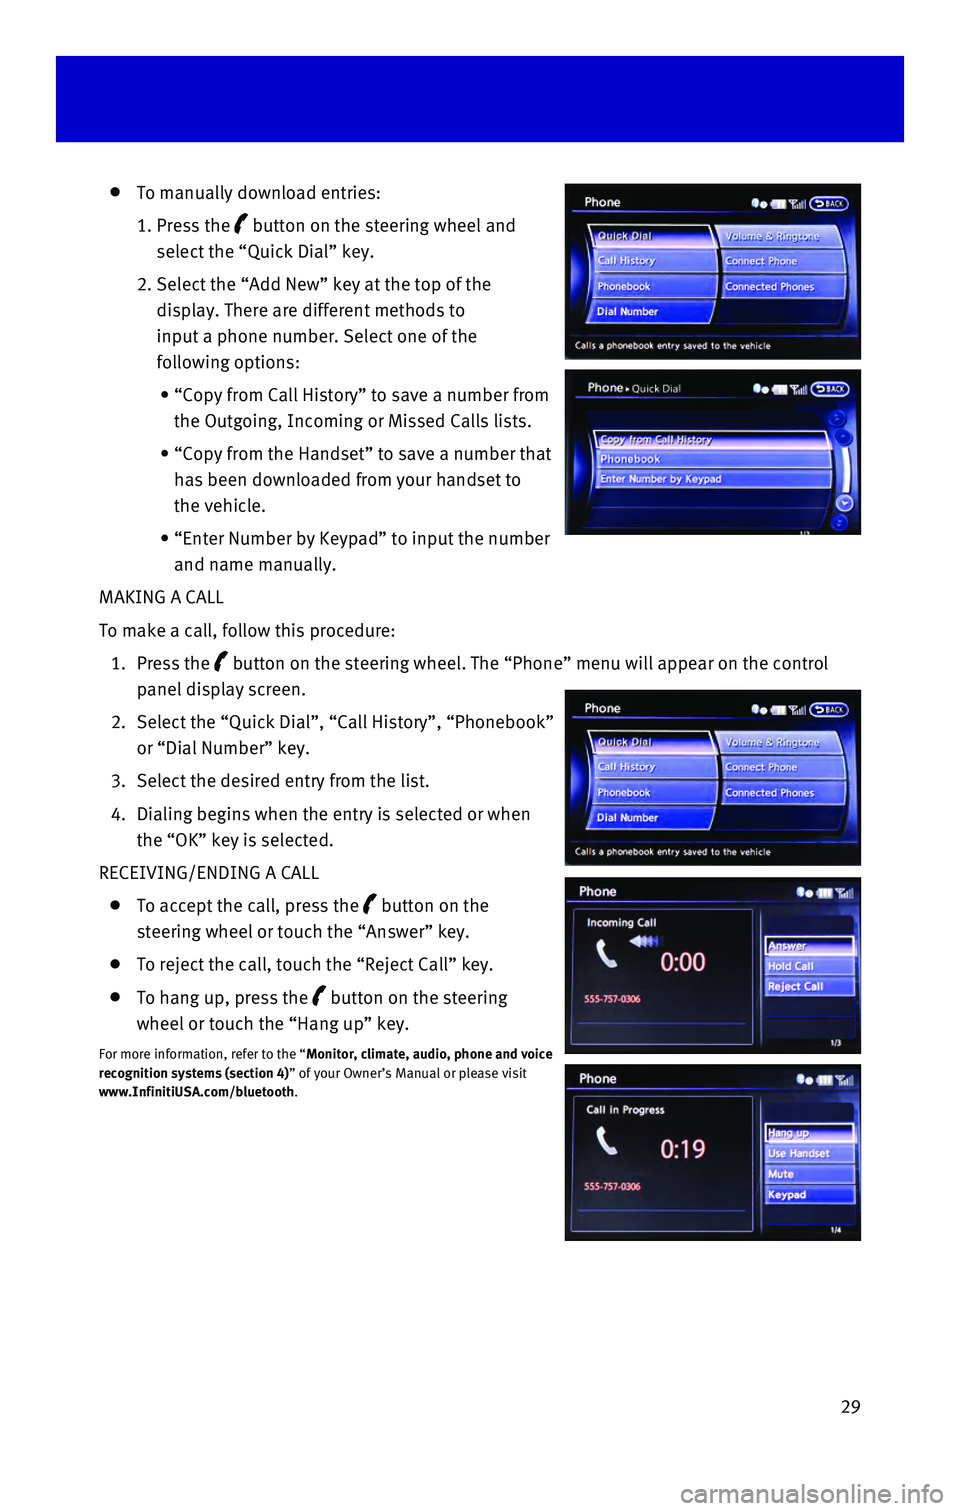
To manually download entries:
1. Press the button on the steering wheel and
select the “Quick Dial” key.
2. Select the “Add New” key at the top of the
display. There are different methods to
input a phone number. Select one of the
following options:
• “Copy from Call History” to save a number from
the Outgoing, Incoming or Missed Calls lists.
• “Copy from the Handset” to save a number that
has been downloaded from your handset to
the vehicle.
• “Enter Number by Keypad” to input the number
and name manually.
MAKING A CALL
To make a call, follow this procedure:
1. Press the button on the steering wheel. The “Phone” menu will appear on the\
control
panel display screen.
2. Select the “Quick Dial”, “Call History”, “Phonebook”
or “Dial Number” key.
3. Select the desired entry from the list.
4. Dialing begins when the entry is selected or when
the “OK” key is selected.
RECEIVING/ENDING A CALL
To accept the call, press the button on the
steering wheel or touch the “Answer” key.
To reject the call, touch the “Reject Call” key.
To hang up, press the button on the steering
wheel or touch the “Hang up” key.
For more information, refer to the “Monitor, climate, audio, phone and voice
recognition systems (section 4)” of your Owner’s Manual or please visit
www.InfinitiUSA.com/bluetooth.
Page 32 of 40
30
Bluetooth® Streaming Audio with Navigation (if so equipped)
If you have a compatible Bluetooth® device with streaming audio (A2DP and AVRCP
profiles), you can set up the wireless connection between your Bluetoot\
h® device and your
vehicle’s audio system. This connection allows you to listen to audio\
from the Bluetooth®
device using your vehicle’s speakers.
A cellular telephone should not be used while driving so full attention \
may be given to
vehicle operation.*
To use your connected Bluetooth® device to
stream audio, it will need to be connected as an
audio device. The following procedure will initially
connect a Bluetooth
® device as an audio player and
allow you to switch between devices.
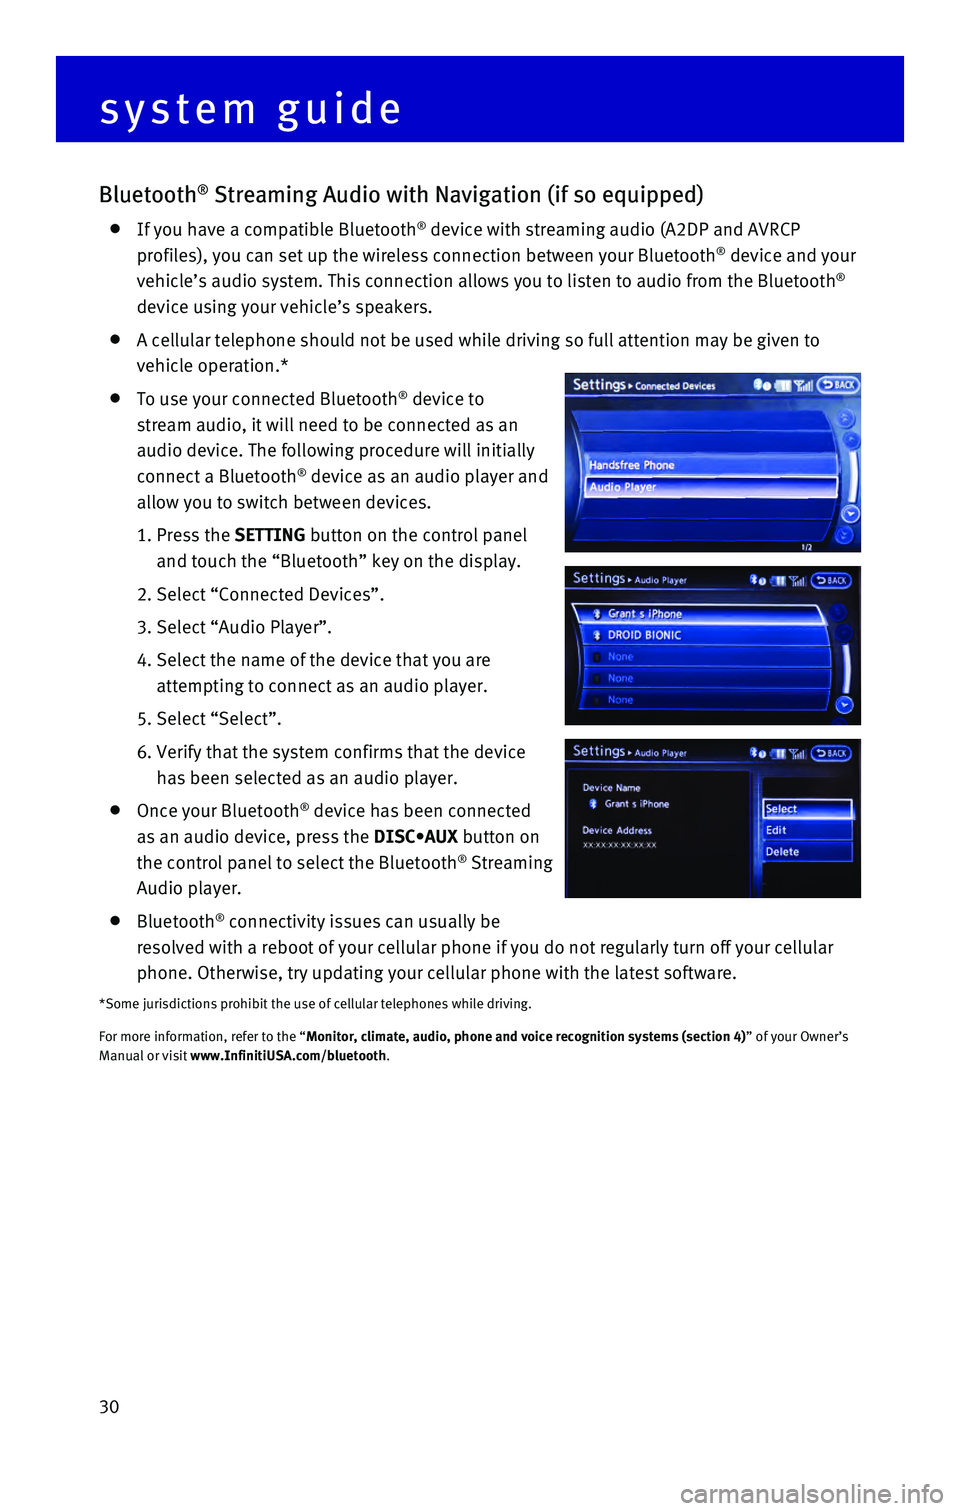
1. Press the SETTING button on the control panel
and touch the “Bluetooth” key on the display.
2. Select “Connected Devices”.
3. Select “Audio Player”.
4. Select the name of the device that you are
attempting to connect as an audio player.
5. Select “Select”.
6. Verify that the system confirms that the device
has been selected as an audio player.
Once your Bluetooth® device has been connected
as an audio device, press the DISC•AUX button on
the control panel to select the Bluetooth
® Streaming
Audio player.
Bluetooth® connectivity issues can usually be
resolved with a reboot of your cellular phone if you do not regularly tu\
rn off your cellular
phone. Otherwise, try updating your cellular phone with the latest softw\
are.
*Some jurisdictions prohibit the use of cellular telephones while drivin\
g.
For more information, refer to the “Monitor, climate, audio, phone and voice recognition systems (section 4\
) ” of your Owner’s
Manual or visit www.InfinitiUSA.com/bluetooth.
system guide
Page 33 of 40
31
Navigation System (if so equipped)
Your Navigation System can calculate a route from your current location \
to a preferred
destination. The real-time map display and turn-by-turn voice guidance w\
ill lead you along
the route.
The Navigation System will continually update your vehicle’s position\
. If you have deviated
from the original route, it will recalculate the route from your current\
location.
SYSTEM OPERATION
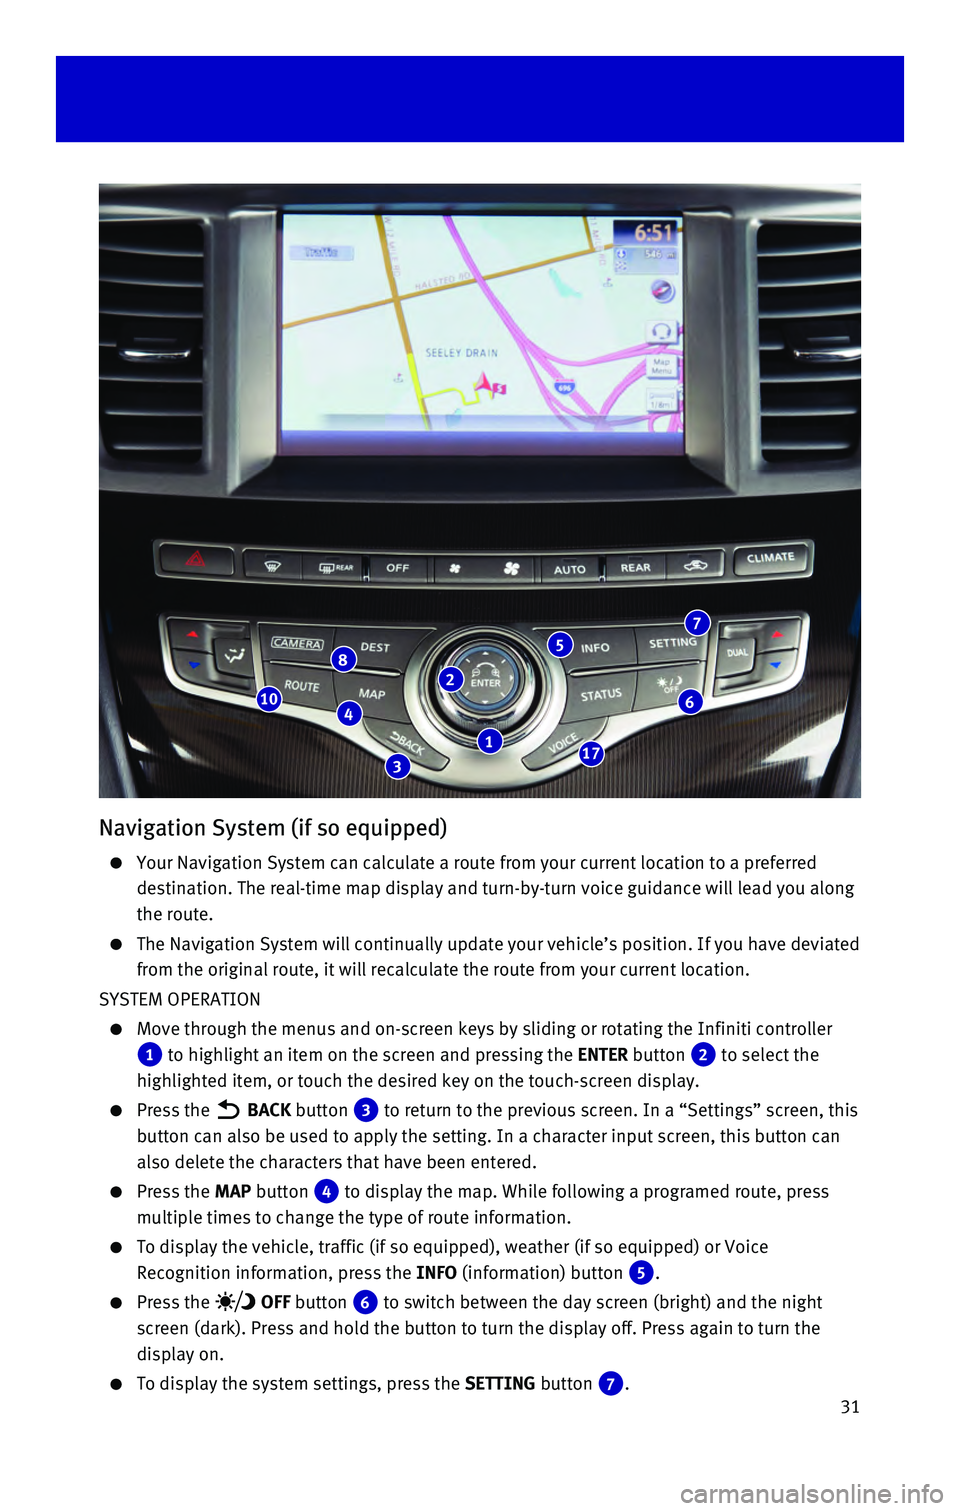
Move through the menus and on-screen keys by sliding or rotating the Inf\
initi controller
1 to highlight an item on the screen and pressing the ENTER button 2 to select the
highlighted item, or touch the desired key on the touch-screen display.
Press the BACK button 3 to return to the previous screen. In a “Settings” screen, this
button can also be used to apply the setting. In a character input scree\
n, this button can
also delete the characters that have been entered.
Press the MAP button 4 to display the map. While following a programed route, press
multiple times to change the type of route information.
To display the vehicle, traffic (if so equipped), weather (if so equi\
pped) or Voice
Recognition information, press the INFO (information) button
5.
Press the OFF button 6 to switch between the day screen (bright) and the night
screen (dark). Press and hold the button to turn the display off. Pres\
s again to turn the
display on.
To display the system settings, press the SETTING button 7.
2
3
46
8
17
10
7
1
5
Page 34 of 40

32 SETTING A ROUTE
To set a route, first ensure that the correct region is
selected on the touch-screen.
1. Press the DEST (destination)
button
8 on the
control panel.
2. Select the “Change Region” key 9.
3. Select the preferred region.
Once this is complete, select your destination:
1. Press the DEST (destination) button 8 on the
control panel.
2. Select the preferred destination setting method.
3. Enter the address number, street name, and city
as prompted by the screen.
CANCELING A ROUTE
1. Press the ROUTE button 10 on the control panel.
2. Select the “Cancel Route” key 11.
ZOOMING IN AND OUT
On the map screen, turn the Infiniti controller 1 right or left to zoom in or out.
MOVING AROUND THE MAP
To scroll the map, slide the Infiniti controller 1 in the direction you want to scroll.
CHANGING THE MAP VIEW
It is possible to switch between two different map views: 2D and bird’\
s-eye view (3D).
To switch to the preferred map view:
1. With the map displayed, press the ENTER
button
2 on the control panel.
2. Select the “Change View” key 12 to change the
view to 2D or bird’s-eye view (3D).
3. Select the “Map Settings” key 13 to change
the orientation of the map.
VOICE GUIDANCE
To activate voice guidance:
1. Press the ROUTE button 10 on the
control panel.
2. Select the “Guidance Settings” key 14.
3. To ensure that voice guidance is activated, select
the “Guidance Voice” key
15.
The indicator illuminates if voice guidance
is activated.
To adjust the guidance volume, select the
“Guidance Volume” key
16.
To hear the current guidance during a programed
route, press the VOICE button
17.
For more information, refer to your Navigation System Owner’s Manual.\
system guide
11
14
12
13
15
16
9
Page 35 of 40
33
HomeLink® Universal Transceiver
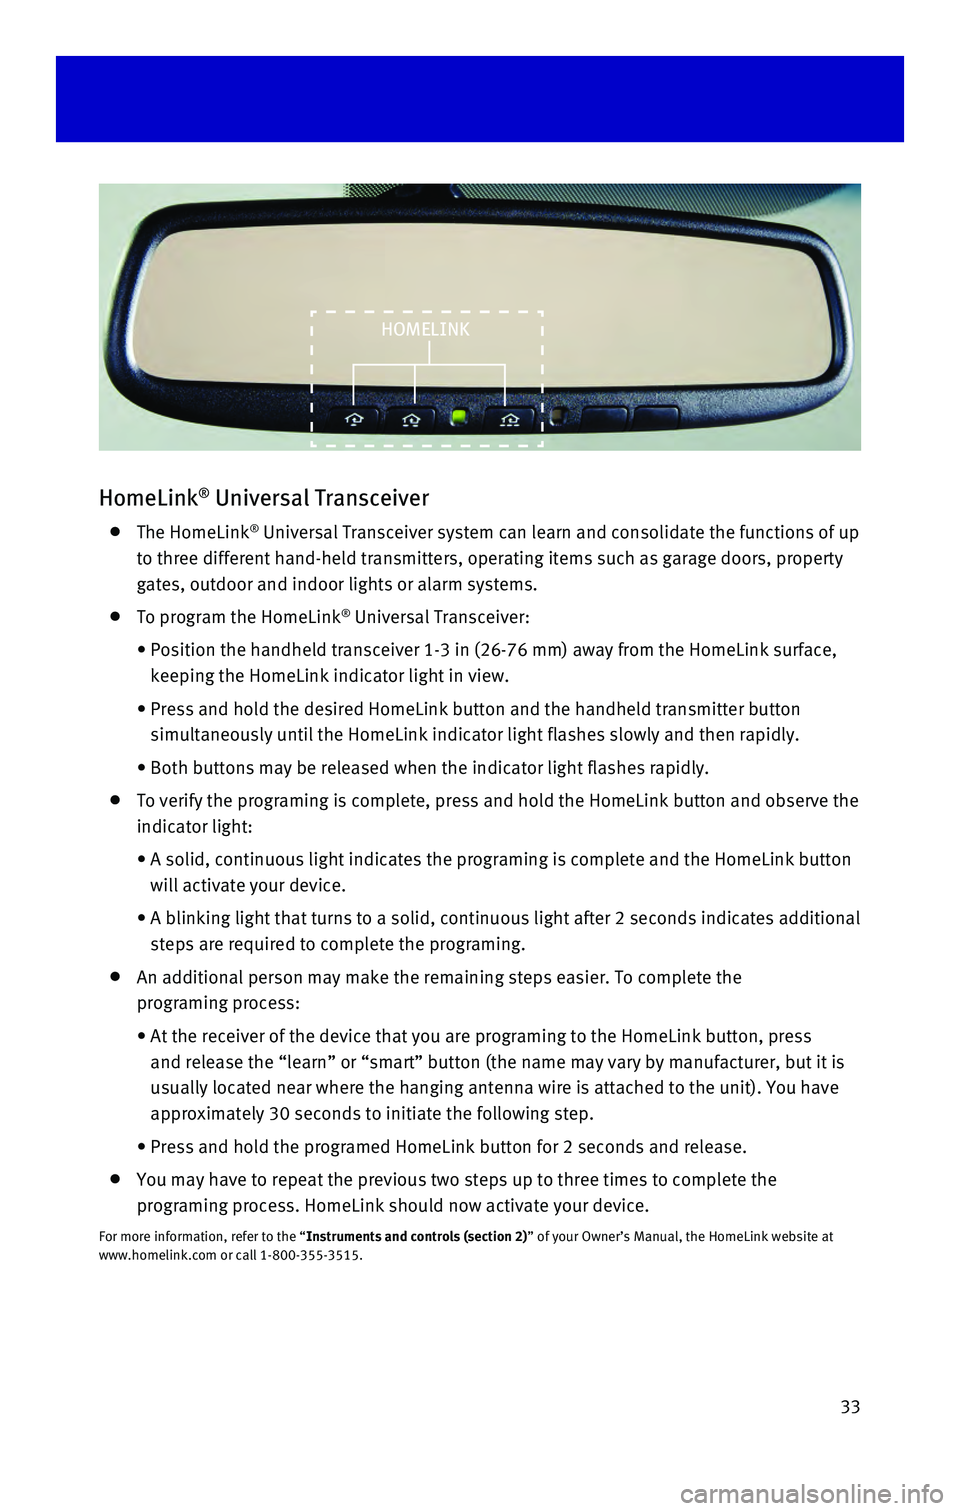
The HomeLink® Universal Transceiver system can learn and consolidate the functions of\
up
to three different hand-held transmitters, operating items such as garag\
e doors, property
gates, outdoor and indoor lights or alarm systems.
To program the HomeLink® Universal Transceiver:
• Position the handheld transceiver 1-3 in (26-76 mm) away from the Home\
Link surface,
keeping the HomeLink indicator light in view.
• Press and hold the desired HomeLink button and the handheld transmitter \
button
simultaneously until the HomeLink indicator light flashes slowly and the\
n rapidly.
• Both buttons may be released when the indicator light flashes rapidly.
To verify the programing is complete, press and hold the HomeLink button\
and observe the
indicator light:
• A solid, continuous light indicates the programing is complete and the H\
omeLink button
will activate your device.
• A blinking light that turns to a solid, continuous light after 2 seconds\
indicates additional
steps are required to complete the programing.
An additional person may make the remaining steps easier. To complete th\
e
programing process:
• At the receiver of the device that you are programing to the HomeLink bu\
tton, press
and release the “learn” or “smart” button (the name may var\
y by manufacturer, but it is
usually located near where the hanging antenna wire is attached to the u\
nit). You have
approximately 30 seconds to initiate the following step.
• Press and hold the programed HomeLink button for 2 seconds and release.
You may have to repeat the previous two steps up to three times to compl\
ete the
programing process. HomeLink should now activate your device.
For more information, refer to the “Instruments and controls (section 2)” of your Owner’s Manual, the HomeLink website at
www.homelink.com or call 1-800-355-3515.
HOMELINK
Page 36 of 40

memo
Page 37 of 40

memo
Page 38 of 40

memo
Page 39 of 40

memo
Page 40 of 40
This Quick Reference Guide is intended to provide an overview of some of\
the unique features of your new vehicle.
Please see your Owner’s Manual for important safety information and s\
ystem operation limitations. Features and
equipment in your vehicle may vary depending on model, trim level, optio\
ns selected, order, date of production,
region or availability. Therefore, you may find information about featur\
es or equipment that are not included or
installed on your vehicle.
All information, specifications and illustrations in this Quick Referenc\
e Guide are those in effect at the time
of printing. INFINITI reserves the right to change specifications, perfo\
rmance, design or component suppliers
without notice and without obligation. From time to time, INFINITI may u\
pdate or revise this Quick Reference
Guide to provide owners with the most accurate information currently ava\
ilable. Please carefully read and retain,
with this Quick Reference Guide, all revision updates sent to you by INF\
INITI to ensure you have access to
accurate and up-to-date information regarding your vehicle. Current vers\
ions of vehicle Quick Reference
Guides, Owner’s Manuals and any updates can also be found in the Owne\
r section of the INFINITI website at
https://owners.infinitiusa.com/iowners/navigation/manualsAndGuides. If you have questions concerning any
information in your Owner’s Manual, contact INFINITI Client Support (\
see contact information listed above).
Below is a list of helpful resources that can be used to learn more abou\
t the vehicle’s systems
and feature operations.
• Vehicle Owner’s Manual • Infiniti Client Support 1-800-662-6200
Support is always available if your Infiniti retailer
cannot assist you or you would like to provide
Infiniti directly with comments or questions.
• Infiniti Roadside Assistance 1-800-662-6200 (option 1)
As part of the Infiniti Total Ownership
Experience
®, Roadside Assistance is
available to you, 24 hours a day 365 days a
year, for emergency roadside assistance.
• Infiniti Elite® Extended Protection Program 1-800-662-6200
Infiniti Elite® Assurance Products provide
you with quality long-term protection
and enhanced peace of mind.
• Infiniti Financial Services Client Support 1-800-627-4437
For client support with your Infiniti
Financial Services loan or lease.
• Infiniti Financial Services www.infinitifinance.com
Use the IFS Online Account Manager to check
your account status, schedule recurring
payments and access important forms.
• Owner Portal 1-855-444-7244
www.owners.InfinitiUSA.com/iowners
Your Infiniti Owner Portal account contains
your personal preferences, vehicle information
and links to key vehicle features and services.
• Infiniti Connection™ 1-800-334-7858
www.InfinitiUSA.com/intouch/connection
The suite of digital alerts and remote services is
your direct link to personal security,
convenience and confidence.
• SiriusXM Radio 1-877-447-0011
For support with your SiriusXM subscription.
• Infiniti USA.com www.InfinitiUSA.com/bluetooth
Reference this site for a list of compatible
cellular phones and instructions on how to
pair your cellular phone to your vehicle.
• Infiniti Electronic Quick Reference Guide (use Quick Response (QR) code or URL below)
Helpful Resources
Printing: December 2015 (04) /
QR16EA HL
50U0 / Printed in USA
To view detailed instructional videos, go to
www.infinitiownersinfo.mobi/2016/qx60
or snap this barcode with an appropriate
barcode reader.