INFINITI QX80 2020 Infiniti Connection
Manufacturer: INFINITI, Model Year: 2020, Model line: QX80, Model: INFINITI QX80 2020Pages: 276, PDF Size: 1.16 MB
Page 91 of 276

VideoAudio Codec Extension
Without Picture (Audio
only) AAC
“.m4a”, “.aac”
AAC+ “.m4a”, “.aac”
Linear PCM “.wav”, “.aiff”
Dolby Digital “.m4a”, “.ac3”
MP3 “.mp3”, “.m4a”
Ogg Vorbis “.ogg”
WMA “.wma”
3. Audio system
3-43
Page 92 of 276

3. Audio system
Apple support
When an iPhone®, iPad®, or iPod® is
connected, the Mobile Entertainment Sys-
tem will play music with the iPod® technol-
ogy and initiate quick charging (up to 2.1 A).
The following Apple products are supported:. iPhone® 5s (iOS 7.0.4)
. iPhone® 5c (iOS 7.1)
. iPhone® 5 (iOS 6.1.4)
. iPhone® 4S (iOS 5.1.1)
. iPhone® 4 (iOS 7.1)
. iPhone® 3GS (iOS 6.1.6)
. iPhone® 3G (iOS 4.2.1)
. iPad® (4th generation) (iOS 7.0.4)
. iPad® (3rd generation) (iOS 6.0)
. iPad® (2nd generation) (iOS 6.0)
. iPad® (1st generation) (iOS 5.1.1)
. iPad Air® (iOS 7.0.4)
. iPad mini
TM(2nd generation) (iOS 7.0.4)
. iPad mini
TM(1st generation) (iOS 7.0.4)
. iPod touch® (5th generation) (iOS 6.1.3) .
iPod touch® (4th generation) (iOS 6.1.3)
. iPod touch® (3rd generation) (iOS 5.1.1)
. iPod touch® (2nd generation) (iOS 4.2.1)
. iPod touch® (1st generation) (iOS 3.1.3)
. iPod nano® (7th generation) (Firmware
version 1.0.2)
. iPod nano® (6th generation) (Firmware
version 1.2)
. iPod nano® (5th generation) (Firmware
version 1.0.2)
. iPod nano® (4th generation) (Firmware
version 1.0.3)
. iPod nano® (3rd generation) (Firmware
version 1.1.2)
. iPod nano® (2nd generation) (Firmware
version 1.1.3)
. iPod nano® (1st generation) (Firmware
version 1.3.1)
. iPod classic® (160 GB) (End 2009)
(Firmware version 2.0.4)
. iPod classic® (120 GB) (Firmware ver-
sion 2.0.1)
. iPod classic® (Firmware version 1.1.2)
“Made for iPod®,” “Made for iPhone®,” and
“Made for iPad®” mean that an electronic
accessory has been designed to connect
specifically to iPod®, iPhone®, or iPad®,
respectively, and has been certified by the
developer to meet Apple performance stan-
dards. Apple is not responsible for the
operation of this device or its compliance
with safety and regulatory standards. Please
note that the use of this accessory with
iPod®, iPhone®, or iPad® may affect wire-
less performance.
iPad®, iPhone®, iPod®, iPod classic®, iPod
nano®, iPod touch®, and Retina are trade-
marks of Apple Inc., registered in the U.S.
and other countries. iPad Air® and iPad
mini
TMare trademarks of Apple Inc.
Licenses
Dolby:
Manufactured under license from Dolby
Laboratories. Dolby and the double-D sym-
bol are trademarks of Dolby Laboratories.
3-44
Page 93 of 276

DivX:
This DivX Certified® device can play DivX®
Home Theater video files up to 576p
(including .avi, .divx).
Download free software at www.divx.com
to create, play and stream digital video.
DivX®, DivX Certified® and
associated logos are trade-
marks of DivX, LLC and are
used under license.
Covered by one or more of
the following U.S. patents:
8,731,369; 9,369,687; and
RE45,052.
7,295,673; 7,460,668;
8,656,183; 9,184,920
RMVB:
Portions of this software are included under
license from RealNetworks, Inc. Copyright
1995-2011, RealNetworks, Inc. All rights
reserved.
HDMI:
The terms HDMI and HDMI High-Definition
Multimedia Interface, and the HDMI Logo
are trademarks or registered trademarks of
HDMI Licensing, LLC in the United States
and other countries.MPEG4–AVC (H.264):
THIS PRODUCT IS LICENSED UNDER THE
AVC PATENT PORTFOLIO LICENSE FOR
THE PERSONAL AND NON-COMMER-
CIAL USE OF A CONSUMER TO (i) EN-
CODE VIDEO IN COMPLIANCE WITH THE
AVC STANDARD (“AVC VIDEO”) AND/OR
(ii) DECODE AVC VIDEO THAT WAS EN-
CODED BY A CONSUMER ENGAGED IN A
PERSONAL AND NON-COMMERCIAL
ACTIVITY AND/OR WAS OBTAINED
FROM A VIDEO PROVIDER LICENSED
TO PROVIDE AVC VIDEO. NO LICENSE
IS GRANTED OR SHALL BE IMPLIED FOR
ANY OTHER USE. ADDITIONAL INFOR-
MATION MAY BE OBTAINED FROM
MPEG LA, L.L.C. SEE HTTP://WWW.
MPEGLA.COM
VC-1:
THIS PRODUCT IS LICENSED UNDER THE
VC-1 PATENT PORTFOLIO LICENSE FOR
THE PERSONAL AND NON-COMMER-
CIAL USE OF A CONSUMER TO (i) EN-
CODE VIDEO IN COMPLIANCE WITH THE
VC-1 STANDARD (“VC-1 VIDEO”) AND/
OR (ii) DECODE VC-1 VIDEO THAT WAS
ENCODED BY A CONSUMER ENGAGED
IN A PERSONAL AND NON-COMMER- CIAL ACTIVITY AND/OR WAS OBTAINED
FROM A VIDEO PROVIDER LICENSED TO
PROVIDE VC-1 VIDEO. NO LICENSE IS
GRANTED OR SHALL BE IMPLIED FOR
ANY OTHER USE. ADDITIONAL INFOR-
MATION MAY BE OBTAINED FROM
MPEG LA, L.L.C. SEE HTTP://WWW.
MPEGLA.COM
MPEG-4 Visual:
USE OF THIS PRODUCT IN ANY MANNER
THAT COMPLIES WITH THE MPEG-4
VISUAL STANDARD IS PROHIBITED, EX-
CEPT FOR USE BY A CONSUMER ENGA-
GING IN PERSONAL AND NON-
COMMERCIAL ACTIVITIES.
WMA/WMV:
This product includes technology owned by
Microsoft Corporation and under a license
from Microsoft Licensing, GP. Use or dis-
tribution of such technology outside of this
product is prohibited without a license from
Microsoft Corporation and/or Microsoft
Licensing, GP as applicable.
MP3:
MPEG Layer-3 audio coding technology
licensed from Fraunhofer IIS and Thomson.
3. Audio system
3-45
Page 94 of 276

3. Audio system
Sorenson Spark Video decoder:
This product contains an officially licensed
Sorenson Spark optimized video decoder
licensed from Sorenson Media, Inc.
Natune surround sound:
Natune surround sound is a
general term for the family
of the latest acoustic signal
processing technology pro-
duced by DiMAGIC Co., Ltd.
REMOTE CONTROLLER AND
HEADPHONES
Remote controller
A remote controller is provided with the
Mobile Entertainment System.
The remote controller is for the rear display
operation and cannot be used to control
portable devices.
The following buttons/switches are on the
remote controller. The availability of the
operations may differ depending on the
played source and data.
<>:
Push to activate or deactivate the rear
displays individually.
Push to display the HOME screen.
“Operations on rear displays” (page 3-51)
<>
, <>, <>, <> (Select
buttons):
Push the select buttons to select the
items displayed on the rear screens.
3-46
Page 95 of 276
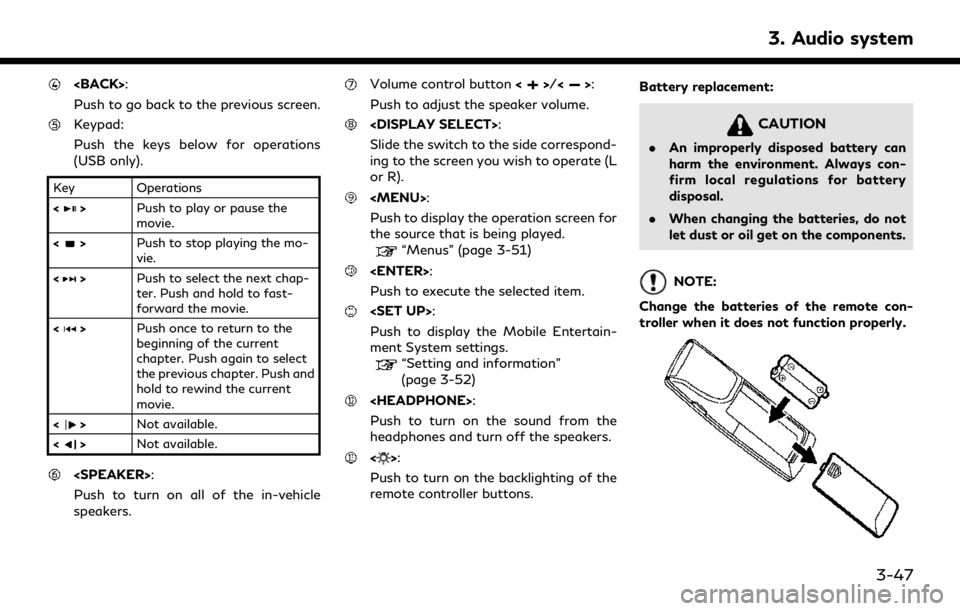
Push to go back to the previous screen.
Keypad:
Push the keys below for operations
(USB only).
Key Operations
<
>Push to play or pause the
movie.
<
> Push to stop playing the mo-
vie.
<
> Push to select the next chap-
ter. Push and hold to fast-
forward the movie.
<
> Push once to return to the
beginning of the current
chapter. Push again to select
the previous chapter. Push and
hold to rewind the current
movie.
<
> Not available.
<
> Not available.
Push to turn on all of the in-vehicle
speakers.
Volume control button <>/<>:
Push to adjust the speaker volume.
Slide the switch to the side correspond-
ing to the screen you wish to operate (L
or R).
Page 96 of 276
3. Audio system
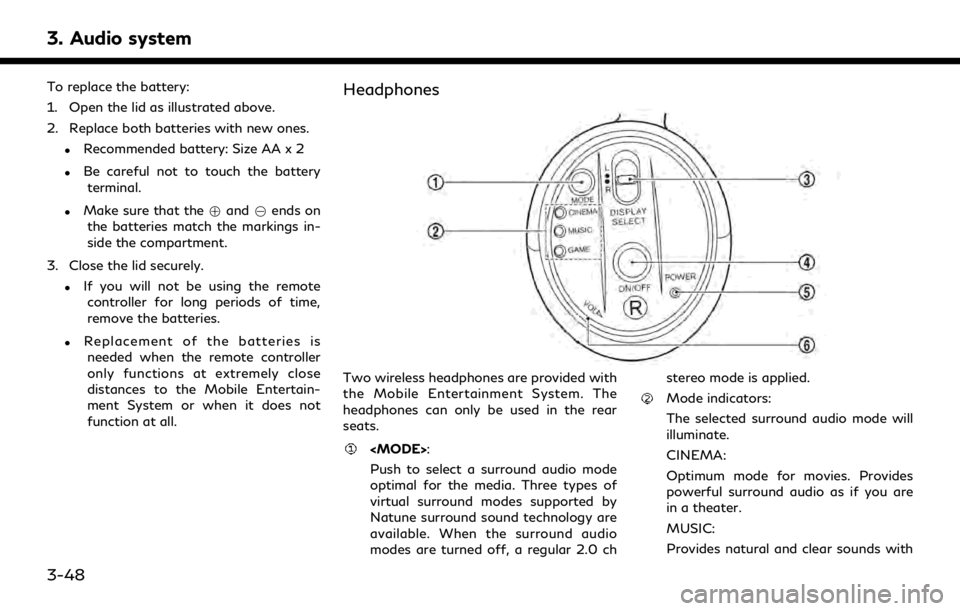
To replace the battery:
1. Open the lid as illustrated above.
2. Replace both batteries with new ones.
.Recommended battery: Size AA x 2
.Be careful not to touch the batteryterminal.
.Make sure that the +and 7ends on
the batteries match the markings in-
side the compartment.
3. Close the lid securely.
.If you will not be using the remote controller for long periods of time,
remove the batteries.
.Replacement of the batteries is
needed when the remote controller
only functions at extremely close
distances to the Mobile Entertain-
ment System or when it does not
function at all.
Headphones
Two wireless headphones are provided with
the Mobile Entertainment System. The
headphones can only be used in the rear
seats.
Push to select a surround audio mode
optimal for the media. Three types of
virtual surround modes supported by
Natune surround sound technology are
available. When the surround audio
modes are turned off, a regular 2.0 ch stereo mode is applied.
Mode indicators:
The selected surround audio mode will
illuminate.
CINEMA:
Optimum mode for movies. Provides
powerful surround audio as if you are
in a theater.
MUSIC:
Provides natural and clear sounds with
3-48
Page 97 of 276
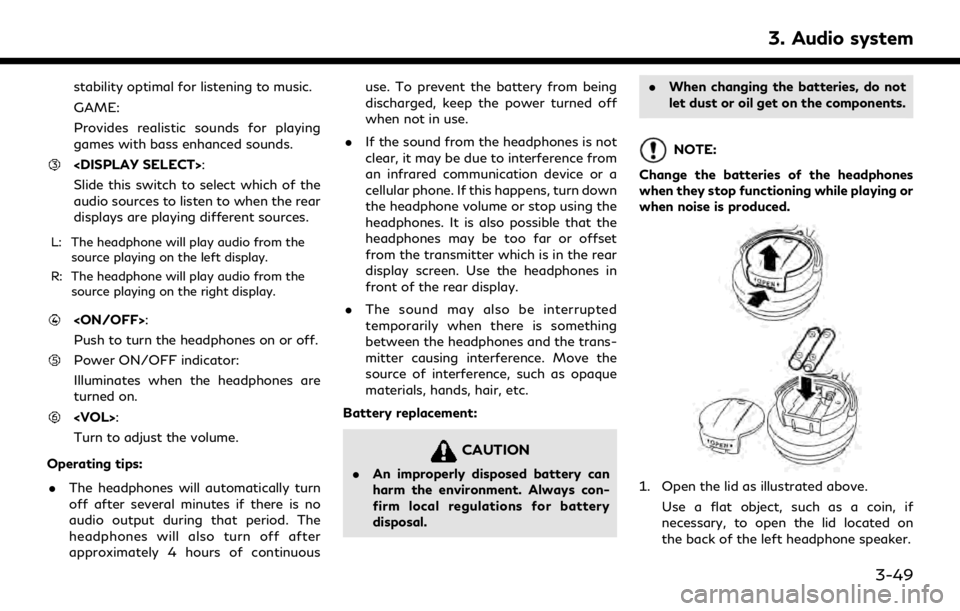
stability optimal for listening to music.
GAME:
Provides realistic sounds for playing
games with bass enhanced sounds.
Slide this switch to select which of the
audio sources to listen to when the rear
displays are playing different sources.
L: The headphone will play audio from thesource playing on the left display.
R: The headphone will play audio from the source playing on the right display.
Push to turn the headphones on or off.
Power ON/OFF indicator:
Illuminates when the headphones are
turned on.
Turn to adjust the volume.
Operating tips:
. The headphones will automatically turn
off after several minutes if there is no
audio output during that period. The
headphones will also turn off after
approximately 4 hours of continuous use. To prevent the battery from being
discharged, keep the power turned off
when not in use.
. If the sound from the headphones is not
clear, it may be due to interference from
an infrared communication device or a
cellular phone. If this happens, turn down
the headphone volume or stop using the
headphones. It is also possible that the
headphones may be too far or offset
from the transmitter which is in the rear
display screen. Use the headphones in
front of the rear display.
. The sound may also be interrupted
temporarily when there is something
between the headphones and the trans-
mitter causing interference. Move the
source of interference, such as opaque
materials, hands, hair, etc.
Battery replacement:
CAUTION
. An improperly disposed battery can
harm the environment. Always con-
firm local regulations for battery
disposal. .
When changing the batteries, do not
let dust or oil get on the components.
NOTE:
Change the batteries of the headphones
when they stop functioning while playing or
when noise is produced.
1. Open the lid as illustrated above. Use a flat object, such as a coin, if
necessary, to open the lid located on
the back of the left headphone speaker.
3. Audio system
3-49
Page 98 of 276
3. Audio system
2. Replace both batteries with new ones.
.Recommended battery: Size AAA x 2
.Be careful not to touch the batteryterminal.
.Make sure that the +and 7ends on
the batteries match the markings in-
side the compartment.
3. Close the lid securely.
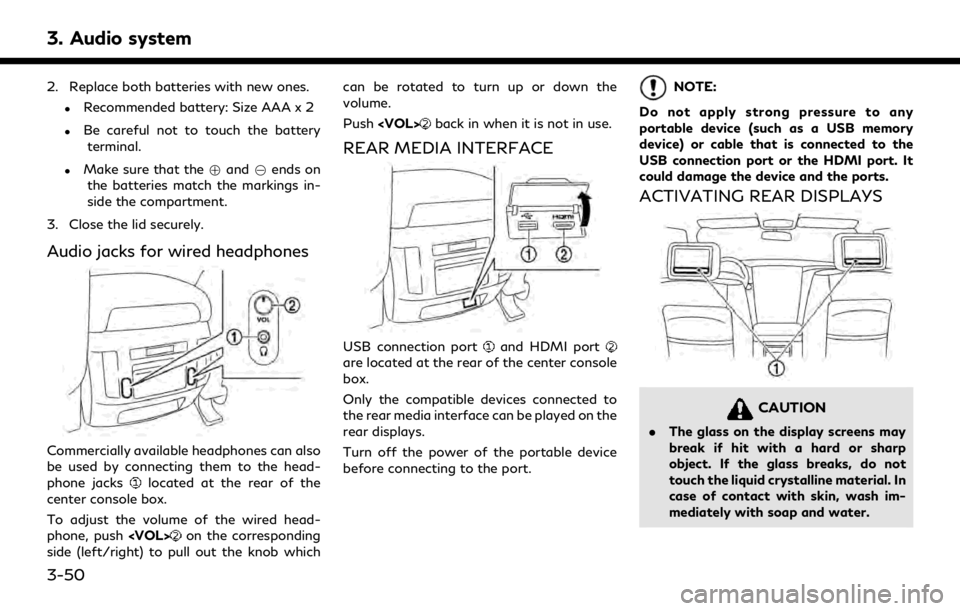
Audio jacks for wired headphones
Commercially available headphones can also
be used by connecting them to the head-
phone jacks
located at the rear of the
center console box.
To adjust the volume of the wired head-
phone, push
on the corresponding
side (left/right) to pull out the knob which can be rotated to turn up or down the
volume.
Push
back in when it is not in use.
REAR MEDIA INTERFACE
USB connection portand HDMI portare located at the rear of the center console
box.
Only the compatible devices connected to
the rear media interface can be played on the
rear displays.
Turn off the power of the portable device
before connecting to the port.
NOTE:
Do not apply strong pressure to any
portable device (such as a USB memory
device) or cable that is connected to the
USB connection port or the HDMI port. It
could damage the device and the ports.
ACTIVATING REAR DISPLAYS
CAUTION
. The glass on the display screens may
break if hit with a hard or sharp
object. If the glass breaks, do not
touch the liquid crystalline material. In
case of contact with skin, wash im-
mediately with soap and water.
3-50
Page 99 of 276
.Applying pressure to the display
screens may damage it.
“Care and maintenance”
(page 3-56)
The rear displays are located on the back of
the front head restraints.
Use the remote controller to operate the
rear display screens.
“Remote controller” (page 3-46)
Select the left or right rear display using
controller and push <
>to activate the
corresponding rear display. When the
display is turned on, a green indicator on
the lower corner of the display will
illuminate.
The lower part of the rear displays
functions as a signal receiver/transmitter
for the remote controller and wireless head-
phones, and should not be blocked or
covered.
Turning the rear displays on/off can also be
done on the front display.
“Controlling the rear system on the
front display” (page 3-53)
NOTE:
. The rear displays may turn off auto-
matically when the temperature is high
to protect the display screens from
being damaged.
. The movement of the images displayed
on the rear displays could slow down
when the temperature is below 32°F
(0°C) but this is not a malfunction. The
movement will return to normal when
the temperature rises between 32°F
(0°C) and 122°F (50°C).
. The following conditions may occur but
these are characteristics of the crystal
display and are not malfunctions:
— Black spots, bright spots and after-
images appear on this display.
— The screen appears faint or dimmed
depending on the angle viewed.OPERATIONS ON REAR DIS-
PLAYS
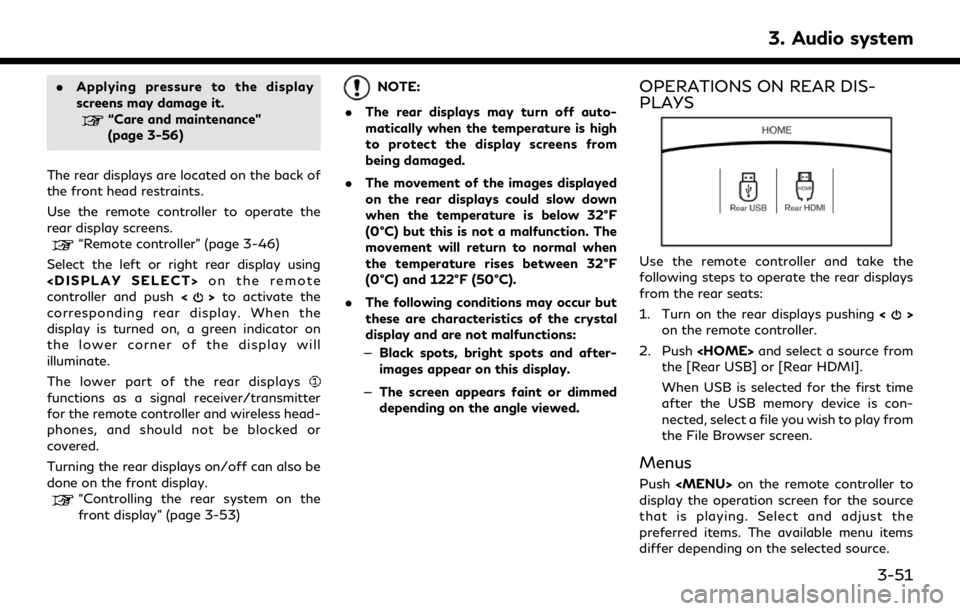
Use the remote controller and take the
following steps to operate the rear displays
from the rear seats:
1. Turn on the rear displays pushing <
>
on the remote controller.
2. Push
the [Rear USB] or [Rear HDMI].
When USB is selected for the first time
after the USB memory device is con-
nected, select a file you wish to play from
the File Browser screen.
Menus
Push
Page 100 of 276
![INFINITI QX80 2020 Infiniti Connection 3. Audio system
Available menu items:. [Speaker Output]
When this item is turned on, the audio of
the source playing on the corresponding
rear display will be output to the vehicle
speakers.
. [File B INFINITI QX80 2020 Infiniti Connection 3. Audio system
Available menu items:. [Speaker Output]
When this item is turned on, the audio of
the source playing on the corresponding
rear display will be output to the vehicle
speakers.
. [File B](/img/42/35001/w960_35001-99.png)
3. Audio system
Available menu items:. [Speaker Output]
When this item is turned on, the audio of
the source playing on the corresponding
rear display will be output to the vehicle
speakers.
. [File Browser] (USB only)
The data contained in the USB can be
browsed. The tracks are automatically
categorized by playlists, songs, artists,
composers, genres, etc.
. [Play Mode] (USB only)
Select a preferred play mode from
[Normal]/[Repeat]/[Shuffle].
. [Aspect Ratio]
Aspect can be selected from normal,
wide, cinema and full.
. [Audio] (USB (DivX®) only)
Select a preferred settings for the audio
output.
. [Subtitle] (USB (DivX®) only)
Choose the preferred subtitle language
setting.SETTING AND INFORMATION
Various settings for the Mobile Entertain-
ment System, such as aspect ratio, language,
etc., can be changed on the rear displays.
Push
select the preferred item to change the rear
display settings and to view the system
information.
Available items:
. [System Settings]
. [Display Settings]
. [Information]
System settings
To change the settings of the Mobile
Entertainment System, push
the remote controller and select [System
Settings].
Select the preferred item and adjust the
setting using the remote controller.
Available items:
. [Aspect Ratio]
Select the image size from normal, wide,
cinema and full.
. [Language]
The language of the rear menu screens can be set independently from the front
display. The rear display language set-
tings will be applied to both the rear left
and rear right displays. Select [Manual]
and then select a preferred language
from the list. To apply the same language
that is applied to the front display, select
[Auto].
. [Operation Guide]
When this item is turned on, an explana-
tion for the menu highlighted on the
screen will appear at the bottom of the
screen.
. [DivX(R) VOD]
DivX® VOD license information can be
viewed.
Display settings
To change the rear display settings, push
select [Display Settings].
Select the preferred item and adjust the
setting using the remote controller.
3-52