battery ISUZU KB P190 2007 Workshop Service Manual
[x] Cancel search | Manufacturer: ISUZU, Model Year: 2007, Model line: KB P190, Model: ISUZU KB P190 2007Pages: 6020, PDF Size: 70.23 MB
Page 614 of 6020
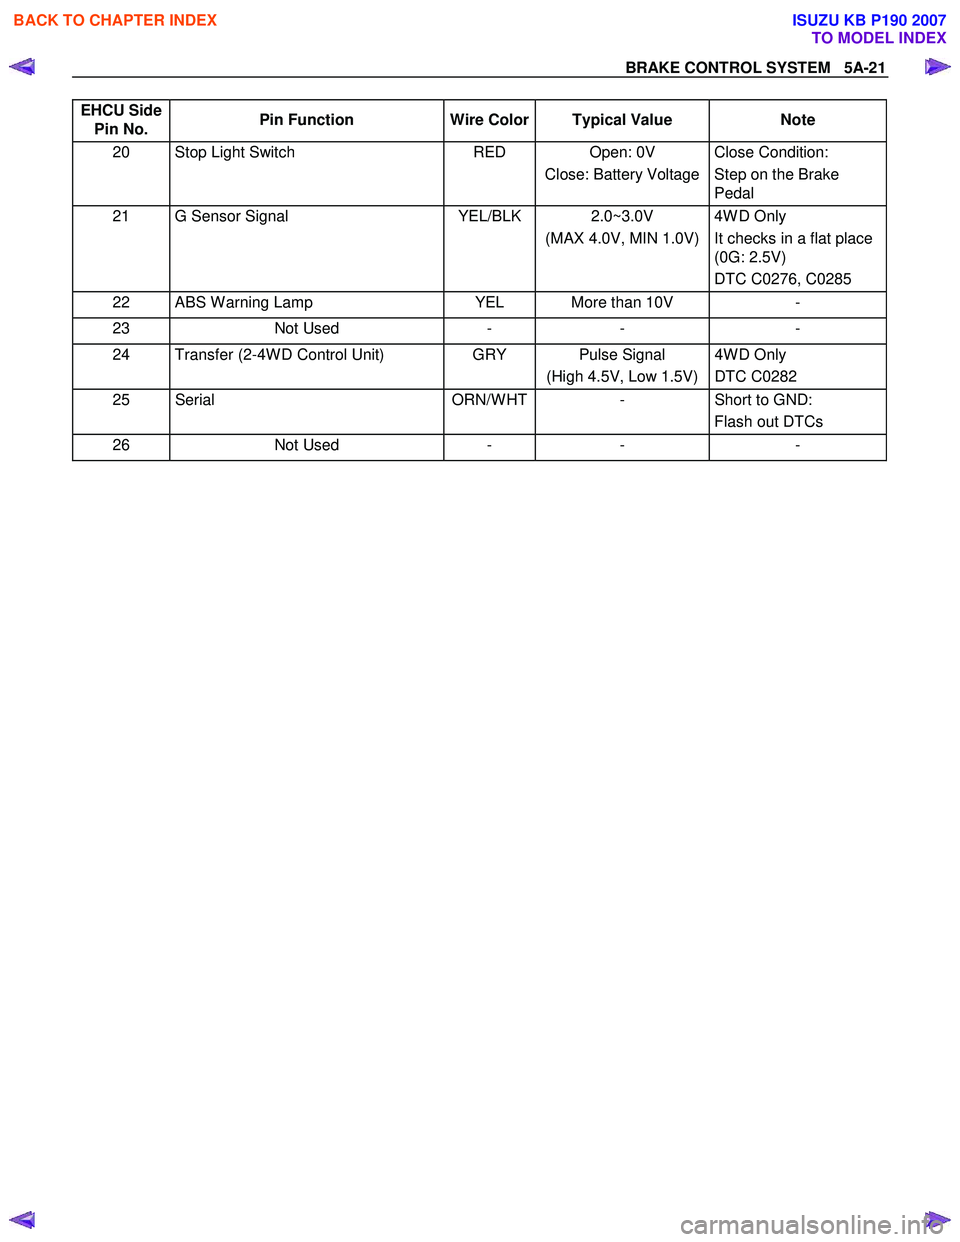
BRAKE CONTROL SYSTEM 5A-21
EHCU Side
Pin No. Pin Function
Wire Color Typical Value Note
20 Stop Light Switch RED Open: 0V
Close: Battery Voltage Close Condition:
Step on the Brake
Pedal
21 G Sensor Signal YEL/BLK 2.0~3.0V
(MAX 4.0V, MIN 1.0V) 4W D Only
It checks in a flat place
(0G: 2.5V)
DTC C0276, C0285
22 ABS W arning Lamp YEL More than 10V -
23 Not Used - - -
24 Transfer (2-4W D Control Unit) GRY Pulse Signal
(High 4.5V, Low 1.5V) 4W D Only
DTC C0282
25 Serial ORN/W HT- Short to GND:
Flash out DTCs
26 Not Used - - -
BACK TO CHAPTER INDEX
TO MODEL INDEX
ISUZU KB P190 2007
Page 617 of 6020
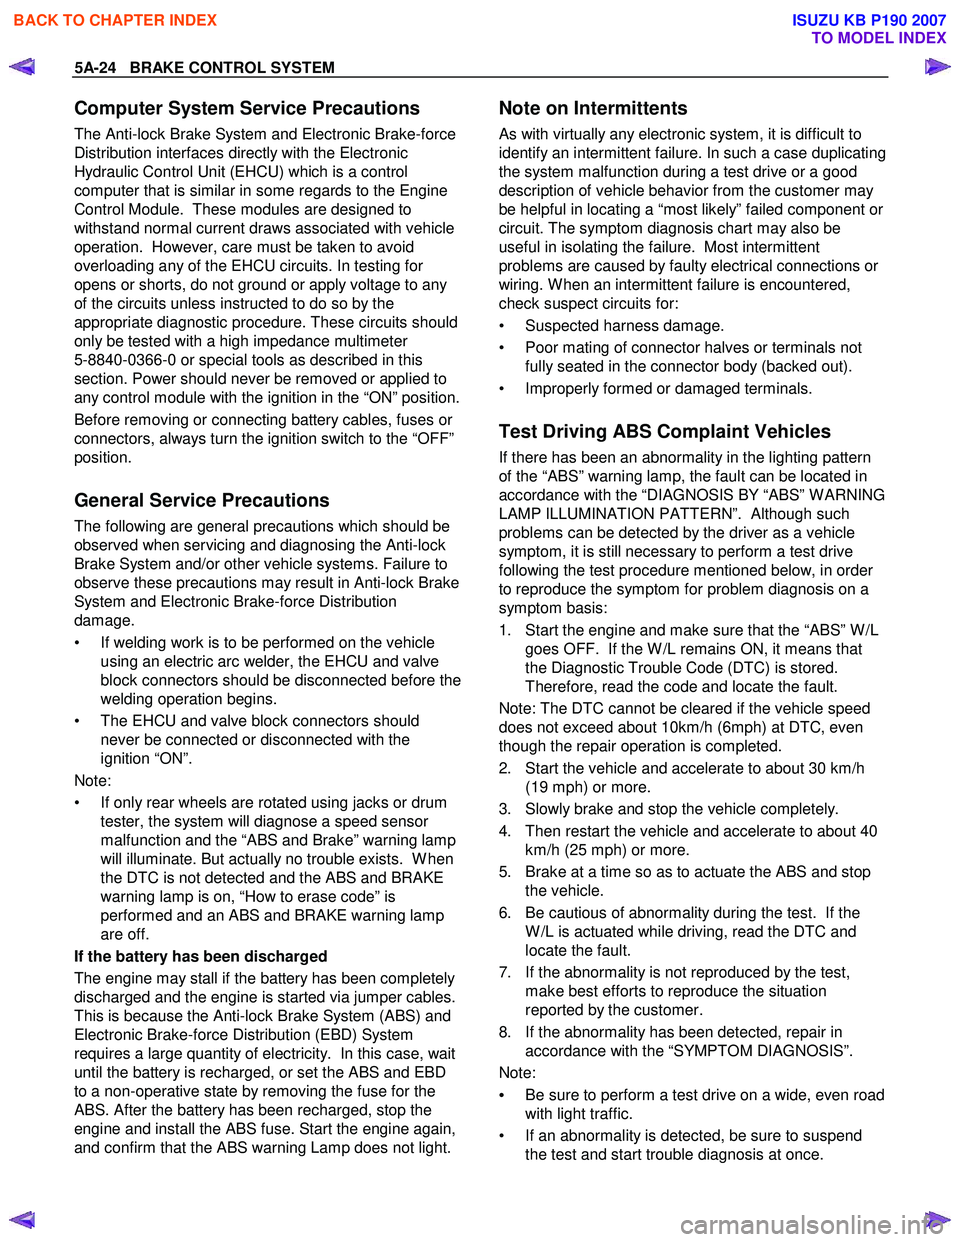
5A-24 BRAKE CONTROL SYSTEM
Computer System Service Precautions
The Anti-lock Brake System and Electronic Brake-force
Distribution interfaces directly with the Electronic
Hydraulic Control Unit (EHCU) which is a control
computer that is similar in some regards to the Engine
Control Module. These modules are designed to
withstand normal current draws associated with vehicle
operation. However, care must be taken to avoid
overloading any of the EHCU circuits. In testing for
opens or shorts, do not ground or apply voltage to any
of the circuits unless instructed to do so by the
appropriate diagnostic procedure. These circuits should
only be tested with a high impedance multimeter
5-8840-0366-0 or special tools as described in this
section. Power should never be removed or applied to
any control module with the ignition in the “ON” position.
Before removing or connecting battery cables, fuses or
connectors, always turn the ignition switch to the “OFF”
position.
General Service Precautions
The following are general precautions which should be
observed when servicing and diagnosing the Anti-lock
Brake System and/or other vehicle systems. Failure to
observe these precautions may result in Anti-lock Brake
System and Electronic Brake-force Distribution
damage.
• If welding work is to be performed on the vehicle using an electric arc welder, the EHCU and valve
block connectors should be disconnected before the
welding operation begins.
• The EHCU and valve block connectors should never be connected or disconnected with the
ignition “ON”.
Note:
• If only rear wheels are rotated using jacks or drum tester, the system will diagnose a speed sensor
malfunction and the “ABS and Brake” warning lamp
will illuminate. But actually no trouble exists. W hen
the DTC is not detected and the ABS and BRAKE
warning lamp is on, “How to erase code” is
performed and an ABS and BRAKE warning lamp
are off.
If the battery has been discharged
The engine may stall if the battery has been completely
discharged and the engine is started via jumper cables.
This is because the Anti-lock Brake System (ABS) and
Electronic Brake-force Distribution (EBD) System
requires a large quantity of electricity. In this case, wait
until the battery is recharged, or set the ABS and EBD
to a non-operative state by removing the fuse for the
ABS. After the battery has been recharged, stop the
engine and install the ABS fuse. Start the engine again,
and confirm that the ABS warning Lamp does not light.
Note on Intermittents
As with virtually any electronic system, it is difficult to
identify an intermittent failure. In such a case duplicating
the system malfunction during a test drive or a good
description of vehicle behavior from the customer may
be helpful in locating a “most likely” failed component or
circuit. The symptom diagnosis chart may also be
useful in isolating the failure. Most intermittent
problems are caused by faulty electrical connections or
wiring. W hen an intermittent failure is encountered,
check suspect circuits for:
• Suspected harness damage.
• Poor mating of connector halves or terminals not fully seated in the connector body (backed out).
• Improperly formed or damaged terminals.
Test Driving ABS Complaint Vehicles
If there has been an abnormality in the lighting pattern
of the “ABS” warning lamp, the fault can be located in
accordance with the “DIAGNOSIS BY “ABS” W ARNING
LAMP ILLUMINATION PATTERN”. Although such
problems can be detected by the driver as a vehicle
symptom, it is still necessary to perform a test drive
following the test procedure mentioned below, in order
to reproduce the symptom for problem diagnosis on a
symptom basis:
1. Start the engine and make sure that the “ABS” W /L
goes OFF. If the W /L remains ON, it means that
the Diagnostic Trouble Code (DTC) is stored.
Therefore, read the code and locate the fault.
Note: The DTC cannot be cleared if the vehicle speed
does not exceed about 10km/h (6mph) at DTC, even
though the repair operation is completed.
2. Start the vehicle and accelerate to about 30 km/h (19 mph) or more.
3. Slowly brake and stop the vehicle completely.
4. Then restart the vehicle and accelerate to about 40 km/h (25 mph) or more.
5. Brake at a time so as to actuate the ABS and stop the vehicle.
6. Be cautious of abnormality during the test. If the W /L is actuated while driving, read the DTC and
locate the fault.
7. If the abnormality is not reproduced by the test, make best efforts to reproduce the situation
reported by the customer.
8. If the abnormality has been detected, repair in accordance with the “SYMPTOM DIAGNOSIS”.
Note:
• Be sure to perform a test drive on a wide, even road
with light traffic.
• If an abnormality is detected, be sure to suspend the test and start trouble diagnosis at once.
BACK TO CHAPTER INDEX
TO MODEL INDEX
ISUZU KB P190 2007
Page 625 of 6020
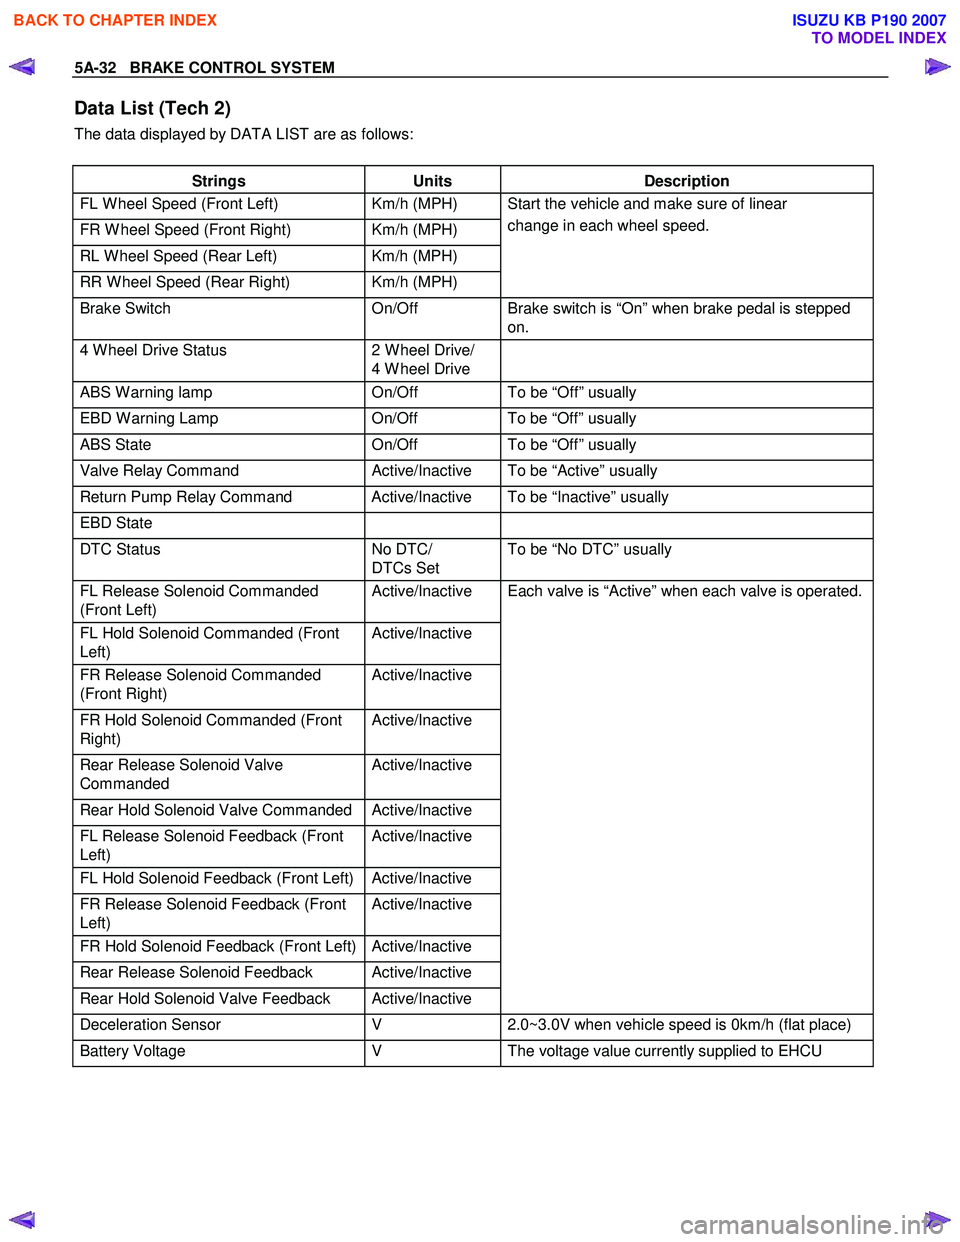
5A-32 BRAKE CONTROL SYSTEM
Data List (Tech 2)
The data displayed by DATA LIST are as follows:
Strings Units Description
FL W heel Speed (Front Left) Km/h (MPH)
FR W heel Speed (Front Right) Km/h (MPH)
RL W heel Speed (Rear Left) Km/h (MPH)
RR W heel Speed (Rear Right) Km/h (MPH) Start the vehicle and make sure of linear
change in each wheel speed.
Brake Switch On/Off Brake switch is “On” when brake pedal is stepped
on.
4 W heel Drive Status 2 W heel Drive/
4 W heel Drive
ABS W arning lamp
On/Off To be “Off” usually
EBD W arning Lamp On/Off To be “Off” usually
ABS State On/Off To be “Off” usually
Valve Relay Command Active/Inactive To be “Active” usually
Return Pump Relay Command Active/Inactive To be “Inactive” usually
EBD State
DTC Status No DTC/
DTCs Set To be “No DTC” usually
FL Release Solenoid Commanded
(Front Left) Active/Inactive
FL Hold Solenoid Commanded (Front
Left) Active/Inactive
FR Release Solenoid Commanded
(Front Right) Active/Inactive
FR Hold Solenoid Commanded (Front
Right) Active/Inactive
Rear Release Solenoid Valve
Commanded Active/Inactive
Rear Hold Solenoid Valve Commanded Active/Inactive
FL Release Solenoid Feedback (Front
Left) Active/Inactive
FL Hold Solenoid Feedback (Front Left) Active/Inactive
FR Release Solenoid Feedback (Front
Left) Active/Inactive
FR Hold Solenoid Feedback (Front Left) Active/Inactive
Rear Release Solenoid Feedback Active/Inactive
Rear Hold Solenoid Valve Feedback Active/Inactive Each valve is “Active” when each valve is operated.
Deceleration Sensor
V 2.0~3.0V when vehicle speed is 0km/h (flat place)
Battery Voltage V The voltage value currently supplied to EHCU
BACK TO CHAPTER INDEX
TO MODEL INDEX
ISUZU KB P190 2007
Page 627 of 6020

5A-34 BRAKE CONTROL SYSTEM
Warning Lamp System Control Main Items DTC
(Flash Code) Description
ABS Brake
(EBD) ABS EBD
× × Battery, W iring or EHCU
(less than 8V) C0277 (77) System Voltage Low
× × Battery or W iring
(less than 10V)
C0278 (78) System Voltage High
× × Battery or W iring EHCU
C0282
(82) 4 W heel Drive State Input Signal
Failure × × W iring
C0285
(85) Control Module Vehicle Options
Incorrect × × Vehicle (Sensor or EHCU)
*A : W hen three or more failures are detected, the EBD warning lamp is "ON" and control is canceled.
*B : The ABS lamp is “OFF” when the ABS lamp is “ON” after a repair, until the vehicle’s speed becomes
more than 10km/h (6mph) in the following ignition
cycle and failure is not detected.
BACK TO CHAPTER INDEX
TO MODEL INDEX
ISUZU KB P190 2007
Page 637 of 6020

5A-44 BRAKE CONTROL SYSTEM
Brake Pedal Feed Is Abnormal
Step Action Value(s) Yes No
1 Is the stop light actuated when the brake pedal is
depressed? - Go to Step 2 Go to Step 3
2 1. Turn the ignition switch off.
2. Disconnect EHCU connector. Is the check voltage for EHCU connector terminals
when brake pedal is depressed than battery voltage? - Go to Step 4 Harness NG
between stop light SW and EHCU.
Go to Step 6
3 Is stop light fuse normal?
- Go to Step 5 Replace stop
light fuse.
Go to Step 6
4 Is the check continuity between EHCU connector to body grounded?
- Go to Step 6 Repair body
grounded harness.
Go to Step 6
5 Is stop light switch operation normal?
- Repair stop
light harness.
Go to Step 6 Replace stop
light switch.
Go to Step 6
6 Reconnect all components, ensure all components are properly mounted.
Is this step finished? - Repeat the
“Basic
diagnostic
flow chart” Go to Step 6
BACK TO CHAPTER INDEX
TO MODEL INDEX
ISUZU KB P190 2007
Page 671 of 6020

5A-78 BRAKE CONTROL SYSTEM
DTC C0276 (Flash Code 76) G Sensor Malfunction
RTW 75AMF001501
Step Action Value(s) Yes No
1 W ere the steps of the “Basic Diagnostic Flow Chart”
performed?
- Go to Step 2 Go to Basic
Diagnostic
Flow Chart
2 1. Check for a poor connection at the G sensor harness connector.
2. If a problem is found, repair as necessary. W as a problem found? - Verify repair Go to Step 3
3 1. Ignition “OFF”, disconnect the G sensor and EHCU.
2. Ignition “ON”, engine “OFF”.
3. Check the supply voltage to G sensor. W as the value normal? Battery
Voltage Go to Step 5 Go to Step 4
4 Repair or replace the power supply circuit.
Is the action complete? - Verify repair -
5 1. Check the circuit between EHCU and G sensor.
(Check circuit for an open, short to ground, or short
to voltage.)
2. If a problem is found, repair as necessary. W as a problem found? - Verify repair Go to Step 6
BACK TO CHAPTER INDEX
TO MODEL INDEX
ISUZU KB P190 2007
Page 673 of 6020

5A-80 BRAKE CONTROL SYSTEM
DTC C0277 (Flash Code 77) System Voltage Low
DTC C0278 (Flash Code 78) System Voltage High
RTW 75ALF000301
Step Action Value(s) Yes No
1 W ere the steps of the “Basic Diagnostic Flow Chart”
performed?
- Go to Step 2 Go to Basic
Diagnostic
Flow Chart
2 1. Check for a poor connection at EHCU
2. If a problem is found, repair as necessary. W as a problem found? - Verify repair Go to Step 3
3 1. Ignition “OFF”, disconnect EHCU.
2. Ignition “ON”, engine “OFF”.
3. Check the supply voltage to EHCU. Is the value normal? Battery
Voltage Go to Step 5 Go to Step 4
4 Repair or replace the power supply circuit.
Is the action complete? - Verify repair -
BACK TO CHAPTER INDEX
TO MODEL INDEX
ISUZU KB P190 2007
Page 676 of 6020

BRAKE CONTROL SYSTEM 5A-83
Step Action
Value(s) Yes No
5 1. Ignition "OFF".
2. Connect 2-4W D control unit.
3. Disconnect EHCU.
4. Ignition "ON," engine "OFF."
5. Install the high impedance digital multimeter.
6. Check the transfer (2-4W D control unit) signal value. (Battery voltage is more than 10V.)
W as the value normal? Transfer 2W D
Mode: 8.3Hz (± 15%)
Transfer 4W D Mode: 4.2Hz (± 15%) Go to Step 7 Go to Step 6
6 Replace 2-4W D control unit.
Is the action complete?
- Go to Step 7 -
7 1. Ignition “ON”, engine “OFF”. 2. Select “Display DTCs” with the Tech 2. Note: Perform the various tests (actuator test, test
run, brake test, etc.) then observe the DTC with a
Tech 2.
Are any DTCs stored? - Go to Step 8 Verify repair
8 Replace EHCU.
Note: Check the EHCU type for specification, when
the EHCU is replaced.
(Specification ; 2W D model or 4W D model)
Is the action complete? - Verify repair -
BACK TO CHAPTER INDEX
TO MODEL INDEX
ISUZU KB P190 2007
Page 786 of 6020
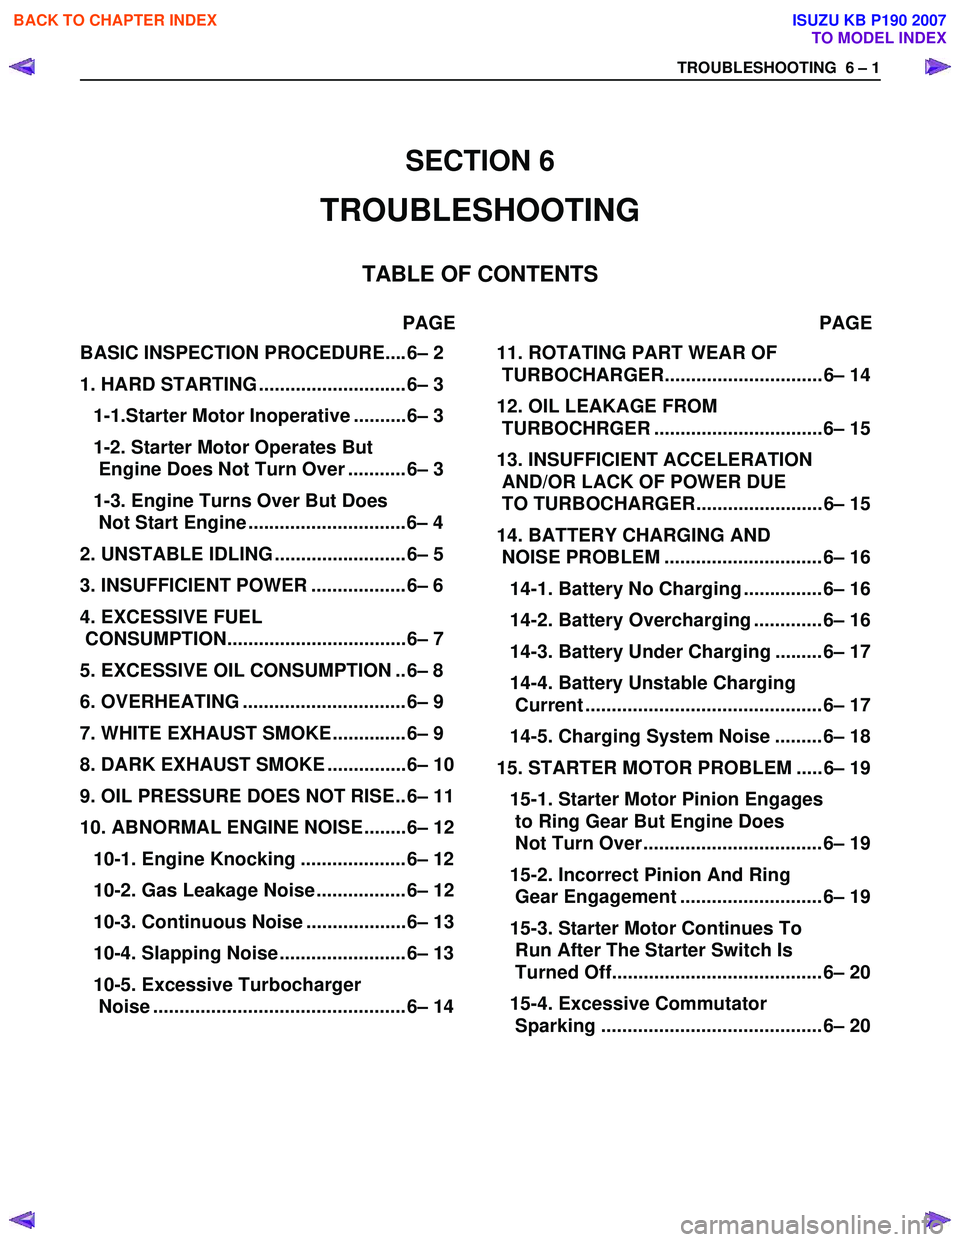
TROUBLESHOOTING 6 – 1
BASIC INSPECTION PROCEDURE....6– 2
1. HARD STARTING ............................6– 3
1-1.Starter Motor Inoperative ..........6– 3
1-2. Starter Motor Operates But
Engine Does Not Turn Over ...........6– 3
1-3. Engine Turns Over But Does
Not Start Engine ..............................6– 4
2. UNSTABLE IDLING .........................6– 5
3. INSUFFICIENT POWER ..................6– 6
4. EXCESSIVE FUEL
CONSUMPTION..................................6– 7
5. EXCESSIVE OIL CONSUMPTION ..6– 8
6. OVERHEATING ...............................6– 9
7. WHITE EXHAUST SMOKE..............6– 9
8. DARK EXHAUST SMOKE ...............6– 10
9. OIL PRESSURE DOES NOT RISE..6– 11
10. ABNORMAL ENGINE NOISE ........6– 12
10-1. Engine Knocking ....................6– 12
10-2. Gas Leakage Noise .................6– 12
10-3. Continuous Noise ...................6– 13
10-4. Slapping Noise ........................6– 13
10-5. Excessive Turbocharger
Noise ................................................6– 14
11. ROTATING PART WEAR OF
TURBOCHARGER.............................. 6– 14
12. OIL LEAKAGE FROM
TURBOCHRGER ................................ 6– 15
13. INSUFFICIENT ACCELERATION
AND/OR LACK OF POWER DUE
TO TURBOCHARGER........................ 6– 15
14. BATTERY CHARGING AND
NOISE PROBLEM .............................. 6– 16
14-1. Battery No Charging ............... 6– 16
14-2. Battery Overcharging ............. 6– 16
14-3. Battery Under Charging ......... 6– 17
14-4. Battery Unstable Charging
Current ............................................. 6– 17
14-5. Charging System Noise ......... 6– 18
15. STARTER MOTOR PROBLEM ..... 6– 19
15-1. Starter Motor Pinion Engages
to Ring Gear But Engine Does
Not Turn Over .................................. 6– 19
15-2. Incorrect Pinion And Ring
Gear Engagement ........................... 6– 19
15-3. Starter Motor Continues To
Run After The Starter Switch Is
Turned Off........................................ 6– 20
15-4. Excessive Commutator
Sparking .......................................... 6– 20
SECTION 6
TROUBLESHOOTING
TABLE OF CONTENTS
PAGE PAGE
BACK TO CHAPTER INDEX
TO MODEL INDEX
ISUZU KB P190 2007
Page 787 of 6020
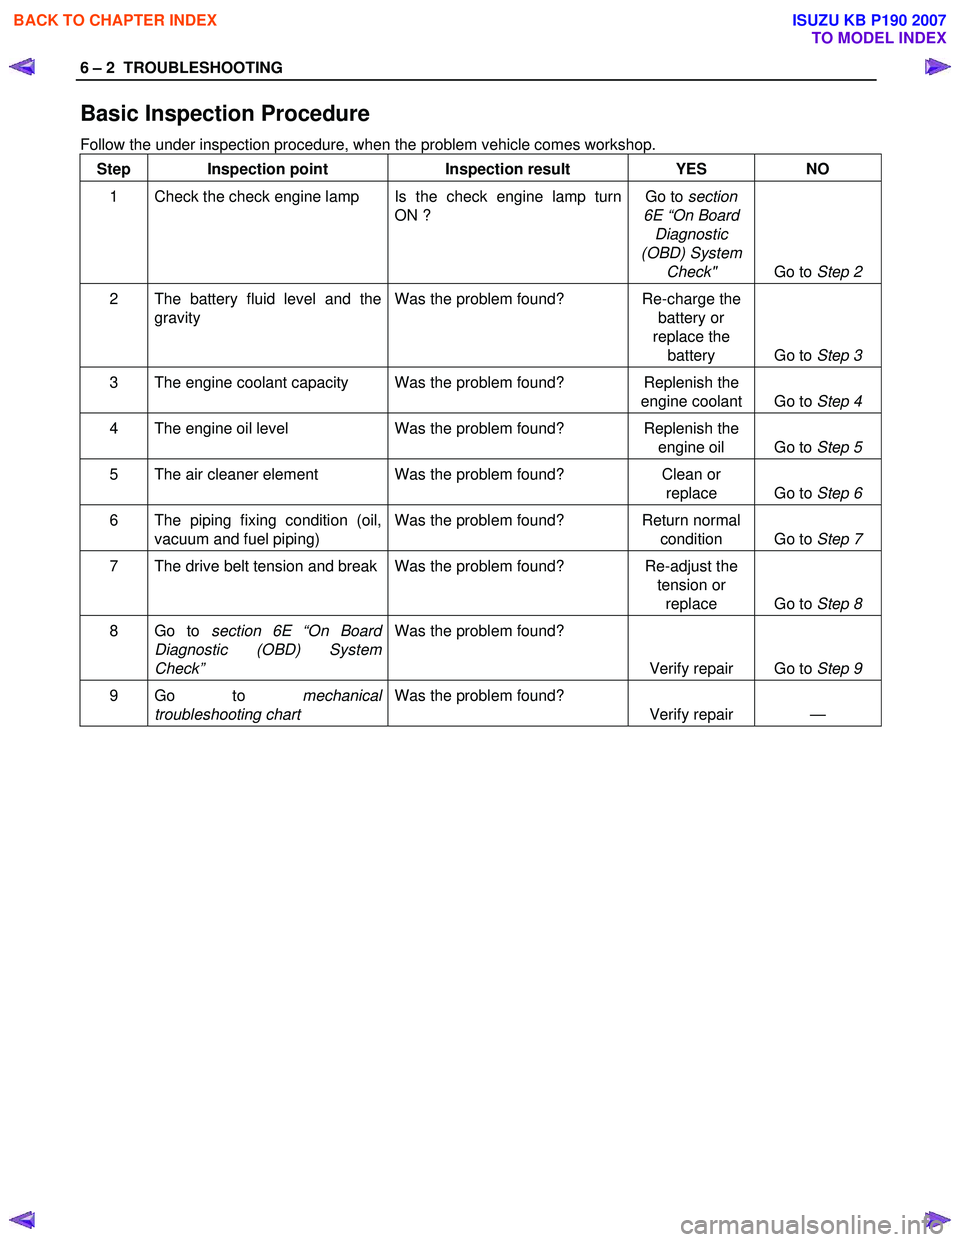
6 – 2 TROUBLESHOOTING
Basic Inspection Procedure
Follow the under inspection procedure, when the problem vehicle comes workshop. Step Inspection point Inspection result YES NO
1 Check the check engine lamp Is the check engine lamp turn ON ? Go to
section
6E “On Board Diagnostic
(OBD) System Check" Go to Step 2
2 The battery fluid level and the
gravity Was the problem found? Re-charge the
battery or
replace the battery Go to Step 3
3 The engine coolant capacity Was the problem found? Replenish the
engine coolant Go to Step 4
4 The engine oil level Was the problem found? Replenish the
engine oil Go to Step 5
5 The air cleaner element Was the problem found? Clean or
replace Go to Step 6
6 The piping fixing condition (oil,
vacuum and fuel piping) Was the problem found? Return normal
condition Go to Step 7
7 The drive belt tension and break Was the problem found? Re-adjust the
tension or replace Go to Step 8
8 Go to section 6E “On Board
Diagnostic (OBD) System
Check” Was the problem found?
Verify repair Go to Step 9
9 Go to mechanical
troubleshooting chart Was the problem found?
Verify repair —
BACK TO CHAPTER INDEX
TO MODEL INDEX
ISUZU KB P190 2007