oil pressure ISUZU KB P190 2007 Workshop Repair Manual
[x] Cancel search | Manufacturer: ISUZU, Model Year: 2007, Model line: KB P190, Model: ISUZU KB P190 2007Pages: 6020, PDF Size: 70.23 MB
Page 22 of 6020
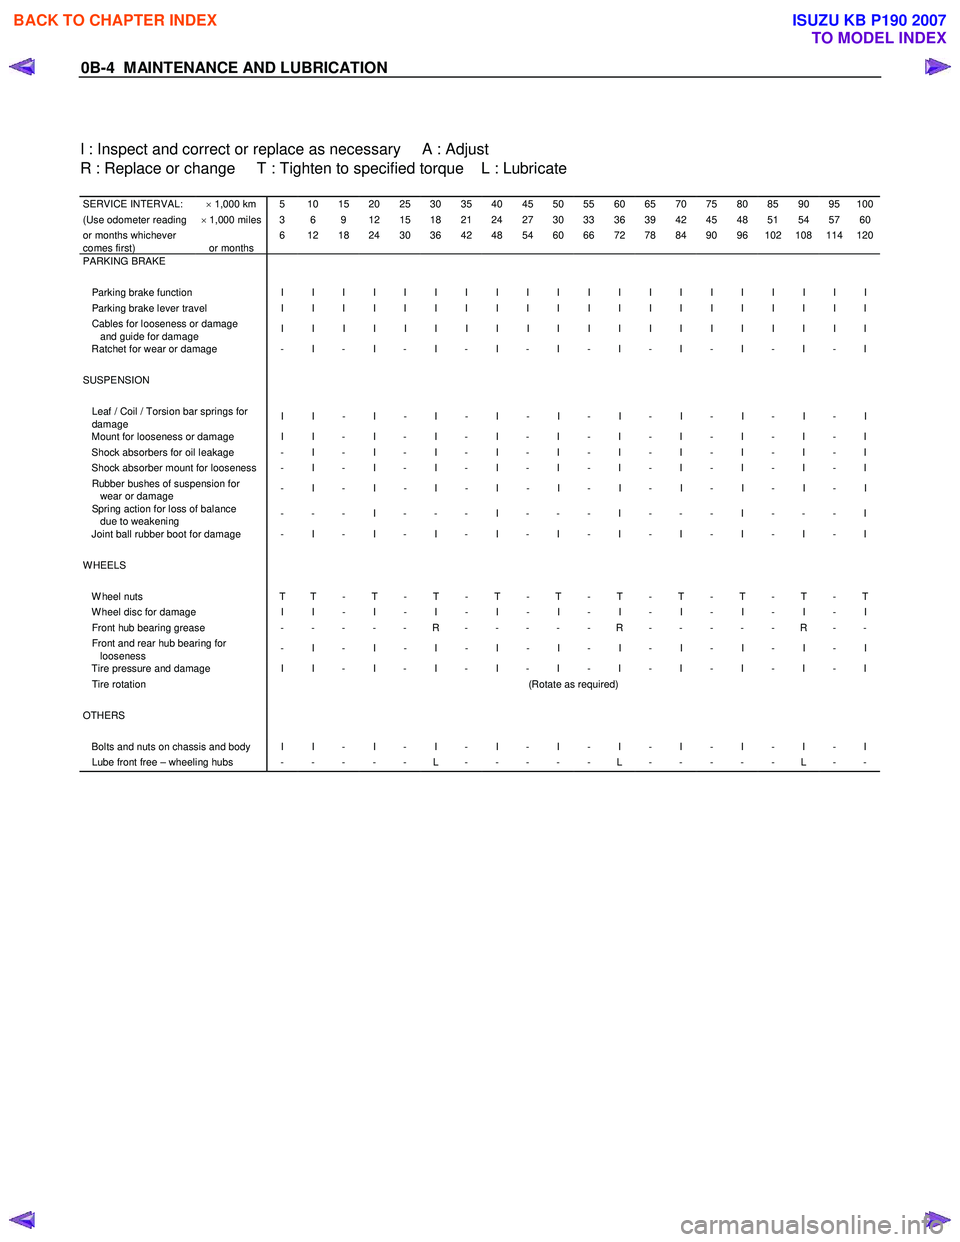
0B-4 MAINTENANCE AND LUBRICATION
I : Inspect and correct or replace as necessary A : Adjust
R : Replace or change T : Tighten to specified torque L : Lubricate
SERVICE INTERVAL: × 1,000 km 5 10 15 20 25 30 35 40 45 50 55 60 65 70 75 80 85 90 95 100(Use odometer reading × 1,000 miles 3 6 9 12 15 18 21 24 27 30 33 36 39 42 45 48 51 54 57 60or months whichever
comes first)
or months 6 12 18 24 30 36 42 48 54 60 66 72 78 84 90 96 102 108 114 120
PARKING BRAKE
Parking brake function I I I I I I I I I I I I I I I I I I I I Parking brake lever travel I I I I I I I I I I I I I I I I I I I I Cables for looseness or damage
and guide for damage I I I I I I I I I I I I I I I I I I I I
Ratchet for wear or damage - I - I - I - I - I - I - I - I - I - I
SUSPENSION Leaf / Coil / Torsion bar springs for
damage I I - I - I - I - I - I - I - I - I - I
Mount for looseness or damage I I - I - I - I - I - I - I - I - I - I Shock absorbers for oil leakage - I - I - I - I - I - I - I - I - I - I Shock absorber mount for looseness - I - I - I - I - I - I - I - I - I - I Rubber bushes of suspension for
wear or damage - I - I - I - I - I - I - I - I - I - I
Spring action for loss of balance
due to weakening - - - I - - - I - - - I - - - I - - - I
Joint ball rubber boot for damage - I - I - I - I - I - I - I - I - I - I
WHEELS W heel nuts T T - T - T - T - T - T - T - T - T - T W heel disc for damage I I - I - I - I - I - I - I - I - I - I Front hub bearing grease - - - - - R - - - - - R - - - - - R - - Front and rear hub bearing for
looseness - I - I - I - I - I - I - I - I - I - I
Tire pressure and damage I I - I - I - I - I - I - I - I - I - I Tire rotation
(Rotate as required) OTHERS Bolts and nuts on chassis and body I I - I - I - I - I - I - I - I - I - I Lube front free – wheeling hubs - - - - - L - - - - - L - - - - - L - -
BACK TO CHAPTER INDEX
TO MODEL INDEX
ISUZU KB P190 2007
Page 24 of 6020
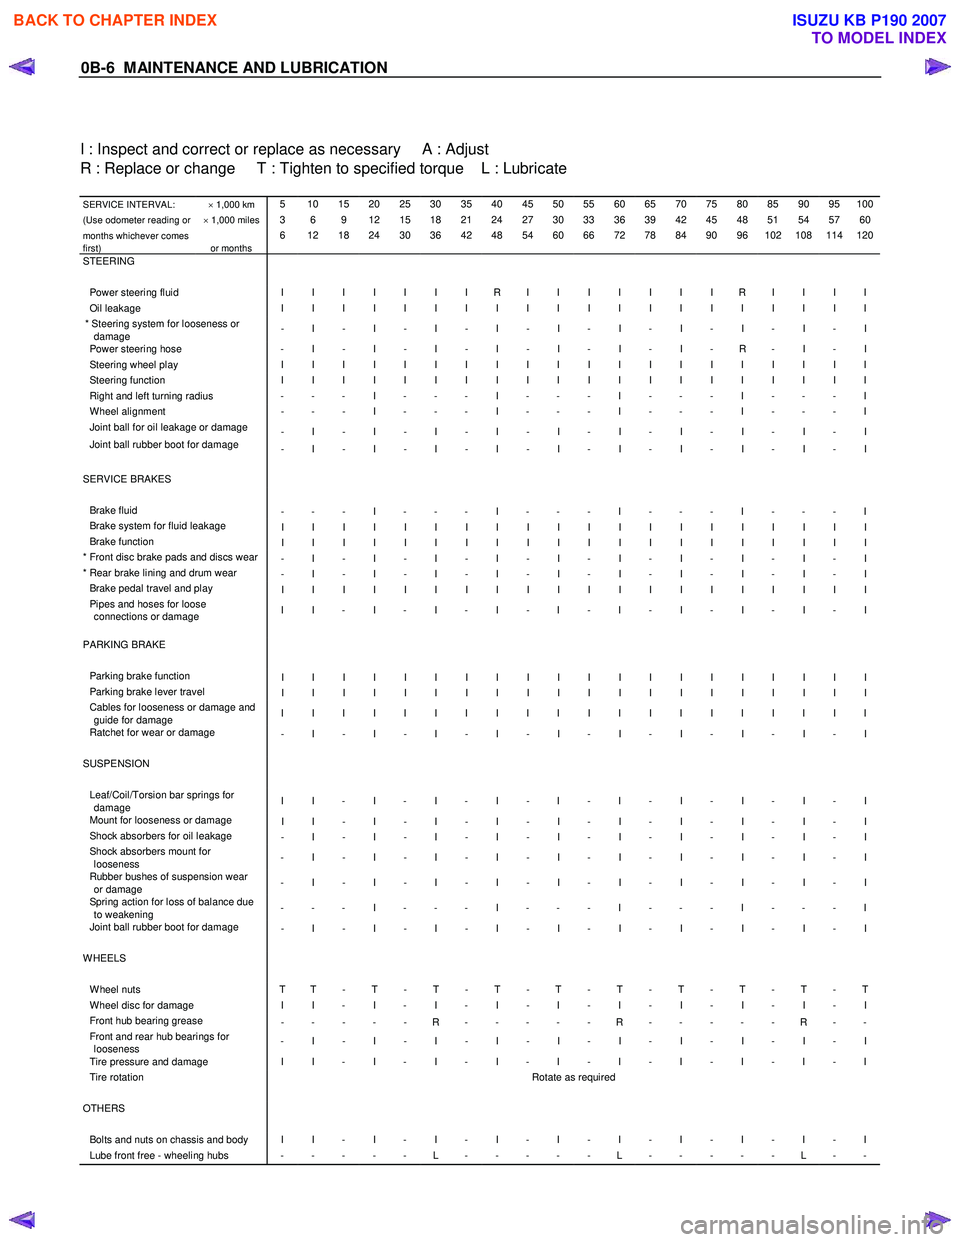
0B-6 MAINTENANCE AND LUBRICATION
I : Inspect and correct or replace as necessary A : Adjust
R : Replace or change T : Tighten to specified torque L : Lubricate
SERVICE INTERVAL: × 1,000 km 5 10 15 20 25 30 35 40 45 50 55 60 65 70 75 80 85 90 95 100
(Use odometer reading or × 1,000 miles 3 6 9 12 15 18 21 24 27 30 33 36 39 42 45 48 51 54 57 60
months whichever comes
first)
or months 6 12 18 24 30 36 42 48 54 60 66 72 78 84 90 96 102 108 114 120
STEERING Power steering fluid I I I I I I I R I I I I I I I R I I I I Oil leakage I I I I I I I I I I I I I I I I I I I I * Steering system for looseness or
damage - I - I - I - I - I - I - I - I - I - I
Power steering hose
- I - I - I - I - I - I - I - R - I - I Steering wheel play I I I I I I I I I I I I I I I I I I I I Steering function I I I I I I I I I I I I I I I I I I I I Right and left turning radius - - - I - - - I - - - I - - - I - - - I W heel alignment - - - I - - - I - - - I - - - I - - - I Joint ball for oil leakage or damage
- I - I - I - I - I - I - I - I - I - I
Joint ball rubber boot for damage - I - I - I - I - I - I - I - I - I - I
SERVICE BRAKES Brake fluid - - - I - - - I - - - I - - - I - - - I Brake system for fluid leakage I I I I I I I I I I I I I I I I I I I I Brake function I I I I I I I I I I I I I I I I I I I I * Front disc brake pads and discs wear - I - I - I - I - I - I - I - I - I - I * Rear brake lining and drum wear - I - I - I - I - I - I - I - I - I - I Brake pedal travel and play I I I I I I I I I I I I I I I I I I I I Pipes and hoses for loose
connections or damage I I - I - I - I - I - I - I - I - I - I
PARKING BRAKE Parking brake function I I I I I I I I I I I I I I I I I I I I Parking brake lever travel I I I I I I I I I I I I I I I I I I I I Cables for looseness or damage and
guide for damage I I I I I I I I I I I I I I I I I I I I
Ratchet for wear or damage
- I - I - I - I - I - I - I - I - I - I SUSPENSION Leaf/Coil/Torsion bar springs for
damage I I - I - I - I - I - I - I - I - I - I
Mount for looseness or damage
I I - I - I - I - I - I - I - I - I - I Shock absorbers for oil leakage - I - I - I - I - I - I - I - I - I - I Shock absorbers mount for
looseness - I - I - I - I - I - I - I - I - I - I
Rubber bushes of suspension wear
or damage - I - I - I - I - I - I - I - I - I - I
Spring action for loss of balance due
to weakening - - - I - - - I - - - I - - - I - - - I
Joint ball rubber boot for damage
- I - I - I - I - I - I - I - I - I - I WHEELS W heel nuts T T - T - T - T - T - T - T - T - T - T W heel disc for damage I I - I - I - I - I - I - I - I - I - I Front hub bearing grease
- - - - - R - - - - - R - - - - - R - - Front and rear hub bearings for
looseness - I - I - I - I - I - I - I - I - I - I
Tire pressure and damage I I - I - I - I - I - I - I - I - I - I Tire rotation
Rotate as required OTHERS Bolts and nuts on chassis and body I I - I - I - I - I - I - I - I - I - I Lube front free - wheeling hubs - - - - - L - - - - - L - - - - - L - -
BACK TO CHAPTER INDEX
TO MODEL INDEX
ISUZU KB P190 2007
Page 26 of 6020
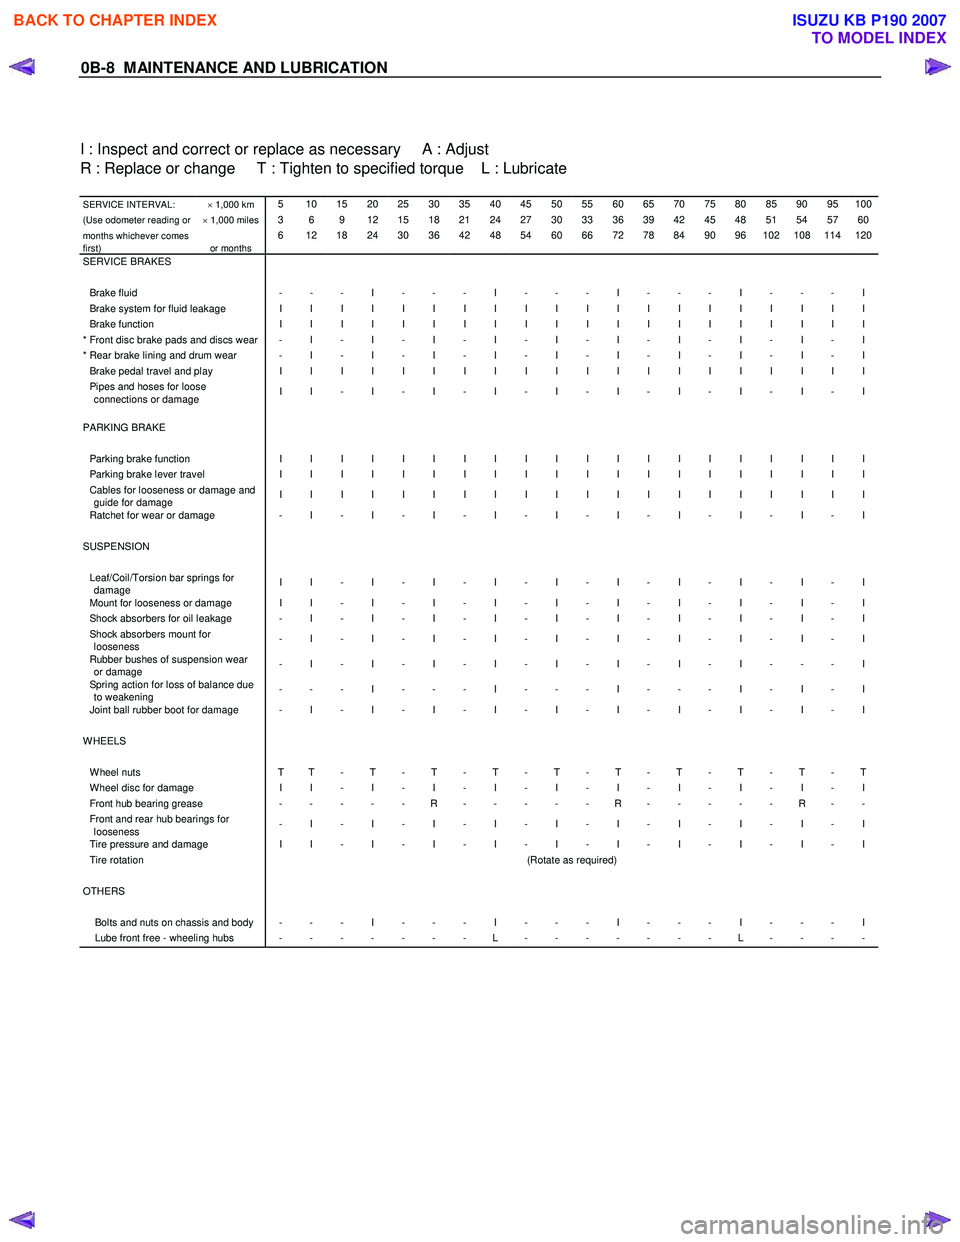
0B-8 MAINTENANCE AND LUBRICATION
I : Inspect and correct or replace as necessary A : Adjust
R : Replace or change T : Tighten to specified torque L : Lubricate
SERVICE INTERVAL: × 1,000 km 5 10 15 20 25 30 35 40 45 50 55 60 65 70 75 80 85 90 95 100
(Use odometer reading or × 1,000 miles 3 6 9 12 15 18 21 24 27 30 33 36 39 42 45 48 51 54 57 60
months whichever comes
first)
or months 6 12 18 24 30 36 42 48 54 60 66 72 78 84 90 96 102 108 114 120
SERVICE BRAKES Brake fluid - - - I - - - I - - - I - - - I - - - I Brake system for fluid leakage I I I I I I I I I I I I I I I I I I I I Brake function I I I I I I I I I I I I I I I I I I I I * Front disc brake pads and discs wear - I - I - I - I - I - I - I - I - I - I * Rear brake lining and drum wear - I - I - I - I - I - I - I - I - I - I Brake pedal travel and play I I I I I I I I I I I I I I I I I I I I Pipes and hoses for loose
connections or damage I I - I - I - I - I - I - I - I - I - I
PARKING BRAKE Parking brake function I I I I I I I I I I I I I I I I I I I I Parking brake lever travel I I I I I I I I I I I I I I I I I I I I Cables for looseness or damage and
guide for damage I I I I I I I I I I I I I I I I I I I I
Ratchet for wear or damage - I - I - I - I - I - I - I - I - I - I
SUSPENSION Leaf/Coil/Torsion bar springs for
damage I I - I - I - I - I - I - I - I - I - I
Mount for looseness or damage I I - I - I - I - I - I - I - I - I - I Shock absorbers for oil leakage - I - I - I - I - I - I - I - I - I - I Shock absorbers mount for
looseness - I - I - I - I - I - I - I - I - I - I
Rubber bushes of suspension wear
or damage - I - I - I - I - I - I - I - I - - - I
Spring action for loss of balance due
to weakening - - - I - - - I - - - I - - - I - I - I
Joint ball rubber boot for damage - I - I - I - I - I - I - I - I - I - I
WHEELS W heel nuts T T - T - T - T - T - T - T - T - T - T W heel disc for damage I I - I - I - I - I - I - I - I - I - I Front hub bearing grease - - - - - R - - - - - R - - - - - R - - Front and rear hub bearings for
looseness - I - I - I - I - I - I - I - I - I - I
Tire pressure and damage I I - I - I - I - I - I - I - I - I - I Tire rotation
(Rotate as required) OTHERS Bolts and nuts on chassis and body - - - I - - - I - - - I - - - I - - - I Lube front free - wheeling hubs - - - - - - - L - - - - - - - L - - - -
BACK TO CHAPTER INDEX
TO MODEL INDEX
ISUZU KB P190 2007
Page 55 of 6020
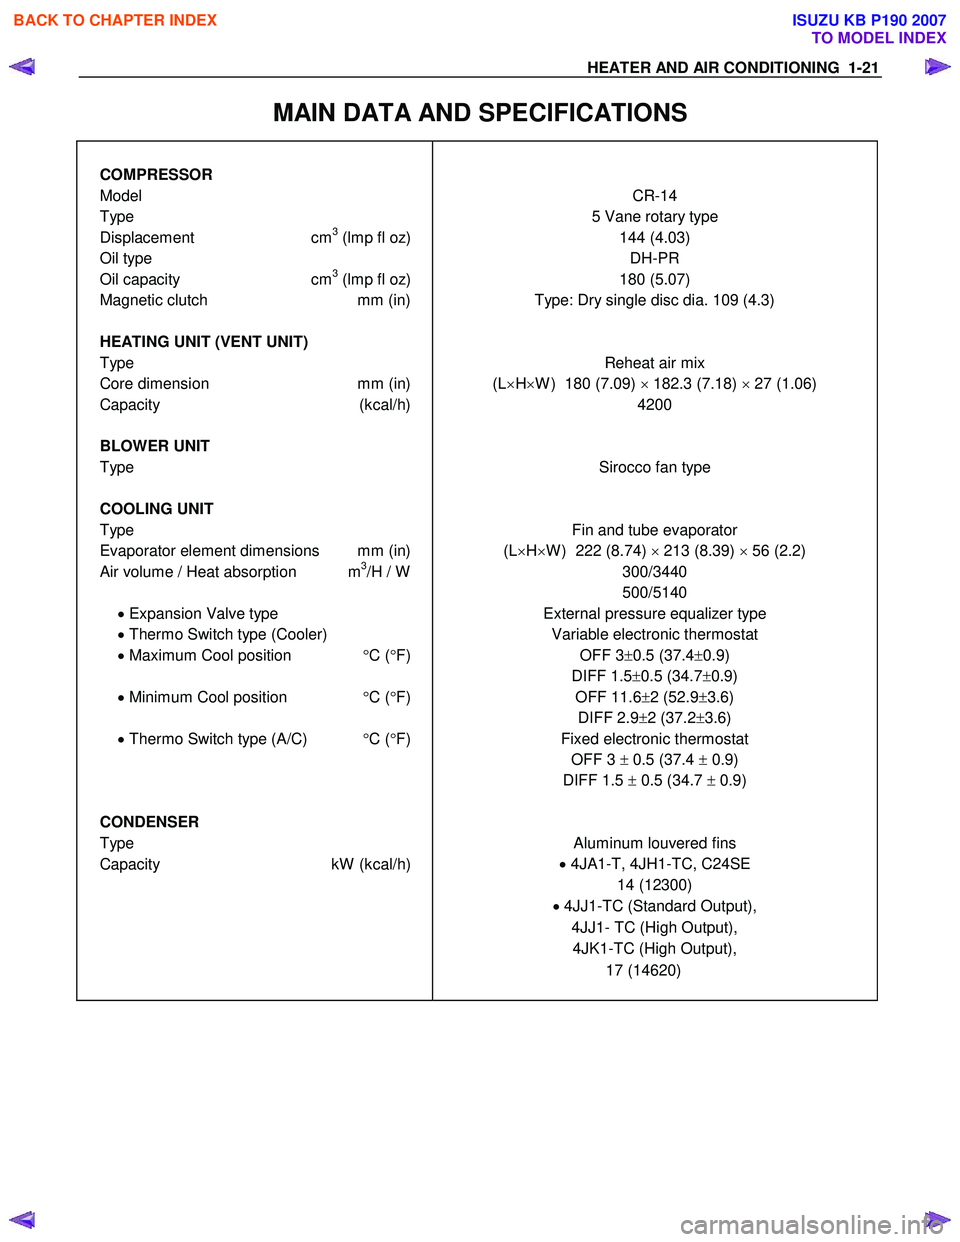
HEATER AND AIR CONDITIONING 1-21
MAIN DATA AND SPECIFICATIONS
COMPRESSOR
Model CR-14
Type 5 Vane rotary type
Displacement cm3 (lmp fl oz) 144 (4.03)
Oil type DH-PR
Oil capacity cm3 (lmp fl oz) 180 (5.07)
Magnetic clutch mm (in) Type: Dry single disc dia. 109 (4.3)
HEATING UNIT (VENT UNIT)
Type Reheat air mix
Core dimension mm (in) (L×H ×W ) 180 (7.09) × 182.3 (7.18) × 27 (1.06)
Capacity (kcal/h) 4200
BLOWER UNIT
Type Sirocco fan type
COOLING UNIT
Type Fin and tube evaporator
Evaporator element dimensions mm (in) (L×H ×W ) 222 (8.74) × 213 (8.39) × 56 (2.2)
Air volume / Heat absorption m3/H / W
300/3440
500/5140
• Expansion Valve type External pressure equalizer type
• Thermo Switch type (Cooler) Variable electronic thermostat
• Maximum Cool position °C ( °F) OFF 3± 0.5 (37.4 ±0.9)
DIFF 1.5 ±0.5 (34.7 ±0.9)
• Minimum Cool position °C ( °F)
OFF 11.6
±2 (52.9 ±3.6)
DIFF 2.9 ±2 (37.2 ±3.6)
• Thermo Switch type (A/C) °C ( °F) Fixed electronic thermostat
OFF 3 ± 0.5 (37.4 ± 0.9)
DIFF 1.5 ± 0.5 (34.7 ± 0.9)
CONDENSER
Type Aluminum louvered fins
Capacity kW (kcal/h) •
4JA1-T, 4JH1-TC, C24SE
14 (12300)
• 4JJ1-TC (Standard Output),
4JJ1- TC (High Output), 4JK1-TC (High Output),
17 (14620)
BACK TO CHAPTER INDEX
TO MODEL INDEX
ISUZU KB P190 2007
Page 265 of 6020
3B-4 POWER-ASSISTED STEERING SYSTEM
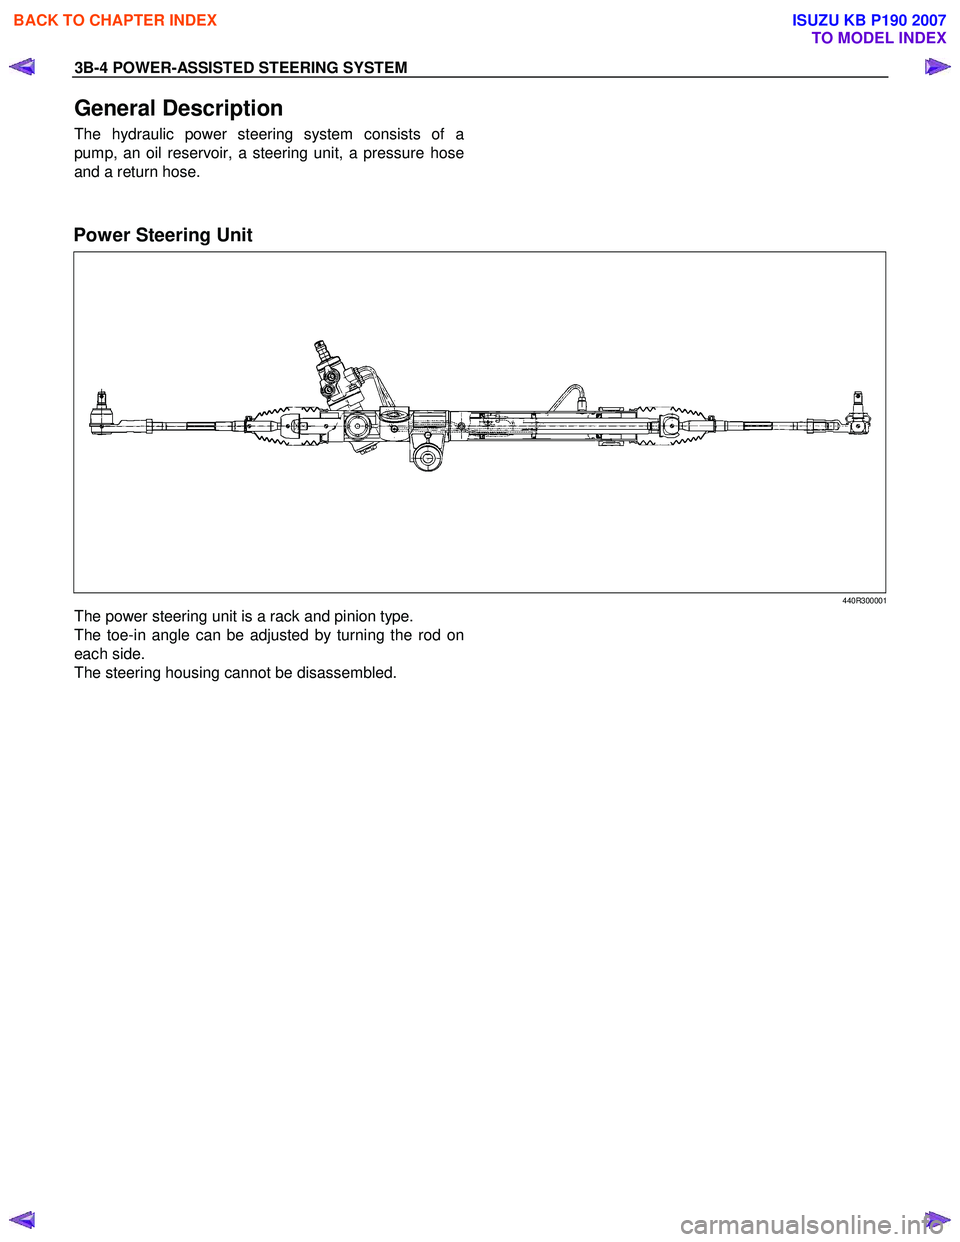
General Description
The hydraulic power steering system consists of a
pump, an oil reservoir, a steering unit, a pressure hose
and a return hose.
Power Steering Unit
440R300001
The power steering unit is a rack and pinion type.
The toe-in angle can be adjusted by turning the rod on
each side.
The steering housing cannot be disassembled.
BACK TO CHAPTER INDEX
TO MODEL INDEX
ISUZU KB P190 2007
Page 266 of 6020
POWER-ASSISTED STEERING SYSTEM 3B-5
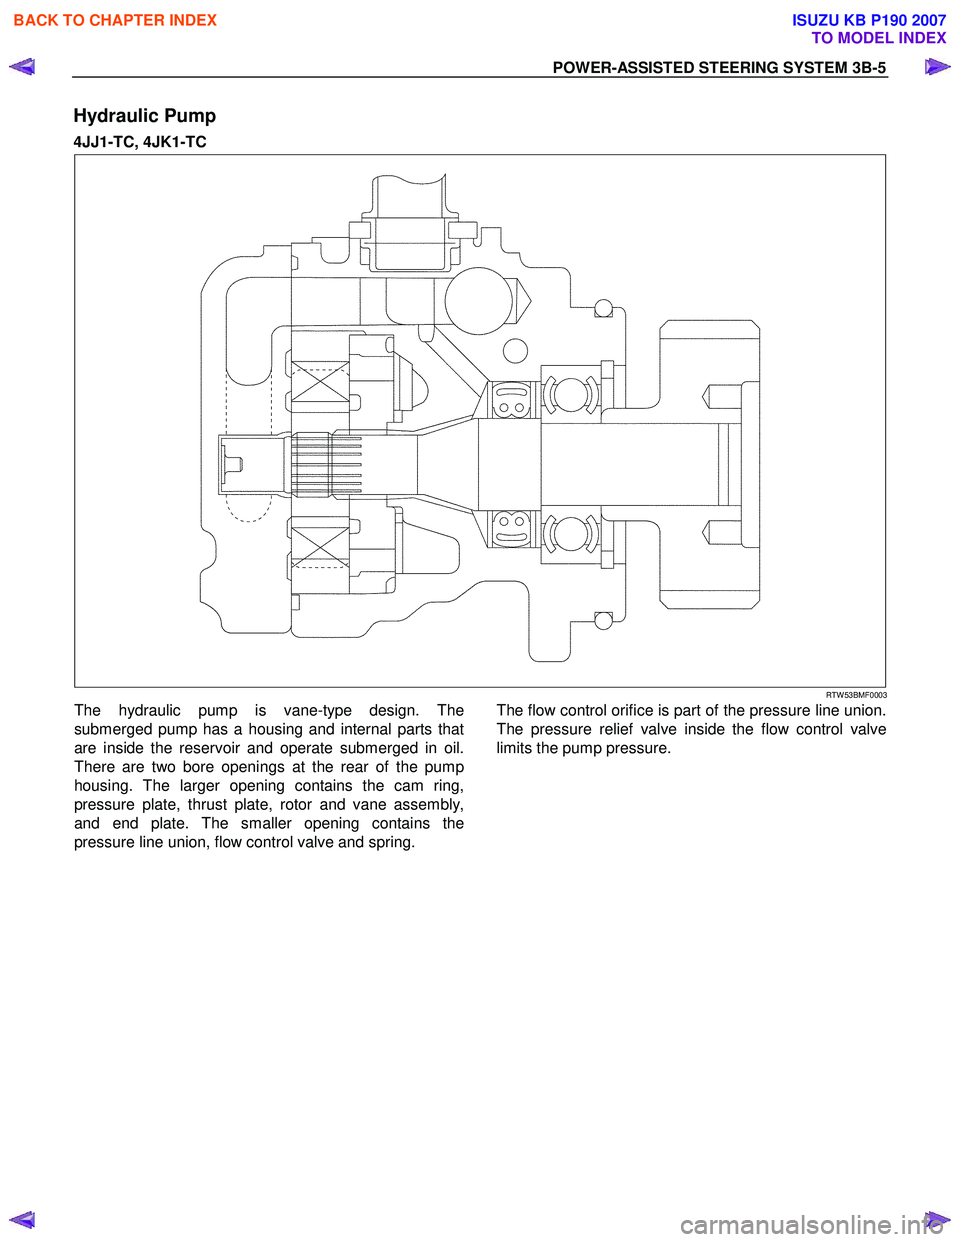
Hydraulic Pump
4JJ1-TC, 4JK1-TC
RTW 53BMF0003
The hydraulic pump is vane-type design. The
submerged pump has a housing and internal parts that
are inside the reservoir and operate submerged in oil.
There are two bore openings at the rear of the pump
housing. The larger opening contains the cam ring,
pressure plate, thrust plate, rotor and vane assembly,
and end plate. The smaller opening contains the
pressure line union, flow control valve and spring.
The flow control orifice is part of the pressure line union.
The pressure relief valve inside the flow control valve
limits the pump pressure.
BACK TO CHAPTER INDEX
TO MODEL INDEX
ISUZU KB P190 2007
Page 268 of 6020
POWER-ASSISTED STEERING SYSTEM 3B-7
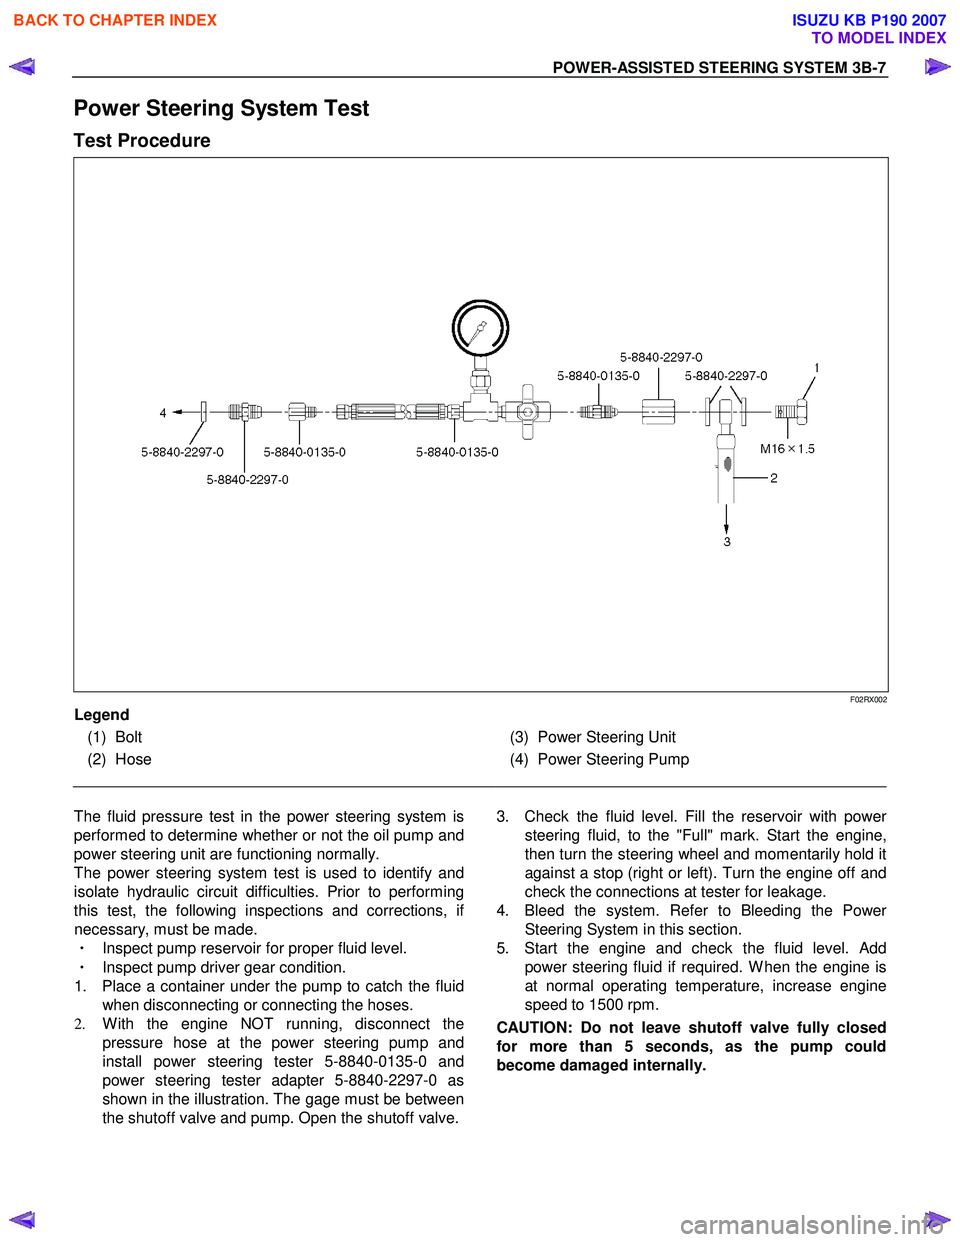
Power Steering System Test
Test Procedure
F02RX002
Legend
(1) Bolt
(2) Hose
(3) Power Steering Unit
(4) Power Steering Pump
The fluid pressure test in the power steering system is
performed to determine whether or not the oil pump and
power steering unit are functioning normally.
The power steering system test is used to identify and
isolate hydraulic circuit difficulties. Prior to performing
this test, the following inspections and corrections, i
f
necessary, must be made.
・ Inspect pump reservoir for proper fluid level.
・ Inspect pump driver gear condition.
1. Place a container under the pump to catch the fluid when disconnecting or connecting the hoses.
2. W ith the engine NOT running, disconnect the
pressure hose at the power steering pump and
install power steering tester 5-8840-0135-0 and
power steering tester adapter 5-8840-2297-0 as
shown in the illustration. The gage must be between
the shutoff valve and pump. Open the shutoff valve.
3. Check the fluid level. Fill the reservoir with powe
r
steering fluid, to the "Full" mark. Start the engine,
then turn the steering wheel and momentarily hold it
against a stop (right or left). Turn the engine off and
check the connections at tester for leakage.
4. Bleed the system. Refer to Bleeding the Powe
r
Steering System in this section.
5. Start the engine and check the fluid level. Add power steering fluid if required. W hen the engine is
at normal operating temperature, increase engine
speed to 1500 rpm.
CAUTION: Do not leave shutoff valve fully closed
for more than 5 seconds, as the pump could
become damaged internally.
BACK TO CHAPTER INDEX
TO MODEL INDEX
ISUZU KB P190 2007
Page 269 of 6020
3B-8 POWER-ASSISTED STEERING SYSTEM
6. Fully close the shutoff valve. Record the highest
pressures.
・ If the pressure recorded is within 9800-10300 kPa
(100-105 kg/cm
2/1422-1493psi), the pump is
functioning within its specifications.
・ If the pressure recorded is higher than 10300 kPa
(105 kg/cm
2/1493psi), the valve in the pump is
defective.
・ If the pressure recorded is lower than 9800 kPa
(100 kg/cm
2/1422psi), the valve or the rotating
assembly in the pump is defective.
7. If the pump pressures are within specifications, leave the valve open and turn (or have someone
else turn) the steering wheel fully in both directions.
Record the highest pressures and compare with the
maximum pump pressure recorded in step 6. If this
pressure cannot be built up at either side of the
power steering unit, the power steering unit is
leaking internally and must be replaced.
8. Shut the engine off, remove the testing gauge.
9. Reconnect the pressure hose, check the fluid level and make the needed repairs.
10. If the problem still exists, the steering and front suspension must be thoroughly examined.
Maintenance
The hydraulic system should be kept clean, the fluid
level in the reservoir should be checked at regula
r
intervals and fluid added when required. Refer to
Recommended Fluids and Lubricants in General
Information section for the type of fluid to be used and
the intervals for filling.
If the system contains some dirt, flush it as described in
this section. If it is exceptionally dirty, the pump must be
completely disassembled before further usage. (The
steering unit cannot be disassembled.)
All tubes, hoses, and fittings should be inspected for
leakage at regular intervals. Fittings must be tight. Make
sure the clips, clamps and supporting tubes and hoses
are in place and properly secured.
Power steering hoses and lines must not be twisted,
kinked or tightly bent. Air in the system will cause
spongy action and noisy operation. W hen a hose is
disconnected or when fluid is lost, for any reason, the
system must be bled after refilling. Refer to Bleeding the
Power Steering System in this section.
・ Inspect gear for looseness or damage.
・ Inspect hoses to insure they are not touching an
y
other parts of the vehicle.
・ Inspect fluid level and fill to the proper level.
Fluid Level
1. Run the engine until the power steering fluid
reaches normal operating temperature, about 55 °
C (130 °F), then shut the engine off.
2. Check the level of fluid in the reservoir.
3. If the fluid level is low, add power steering fluid as
specified in General Information to the proper level
and install the receiver cap.
4. W hen checking the fluid level after the steering system has been serviced, air must be bled from
the system. Refer to Bleeding the Power Steering
System in this section.
Bleeding the Power Steering System
W hen a power steering pump or unit has been installed,
or an oil line has been disconnected, the air that has
entered the system must be bled out before the vehicle
is operated. If air is allowed to remain in the powe
r
steering fluid system, noisy and unsatisfactory operation
of the system may result.
Bleeding Procedure
W hen bleeding the system, and any time fluid is added
to the power steering system, be sure to use only powe
r
steering fluid as specified in General Information.
1. Fill the pump fluid reservoir to the proper level and let the fluid settle for at least two minutes.
2. Start the engine and let it run for a few seconds. Do not turn the steering wheel. Then turn the engine
off.
3. Add fluid if necessary.
4. Repeat the above procedure until the fluid level remains constant after running the engine.
5. Raise and support the front end of the vehicle so that the wheels are off the ground.
6. Start the engine. Slowly turn the steering wheel right and left, lightly contacting the wheel stops.
7. Add power steering fluid if necessary.
8. Lower the vehicle, set the steering wheel at the straight forward position after turning it to its full
steer positions 2 or 3 times, and stop the engine.
9. Check the fluid level and refill as required.
10. If the fluid is extremely foamy, allow the vehicle to settle for a few minutes, then repeat the above
procedure.
Flushing the Power Steering System
1. Raise and support the front end of the vehicle off
the ground until the wheels are free to turn.
2. Remove the fluid return line at the pump inlet connector and plug the connector port on the pump.
Direct the line toward a large container to catch the
draining fluid.
3. W hile running the engine at idle, fill the reservoi
r
with new power steering fluid. Turn the steering
wheel in both directions. Do not contact or hold the
steering wheel to the wheel stops. This will cause
the pump to go to pressure relief mode, which ma
y
cause a sudden fluid overflow at the reservoir.
BACK TO CHAPTER INDEX
TO MODEL INDEX
ISUZU KB P190 2007
Page 381 of 6020
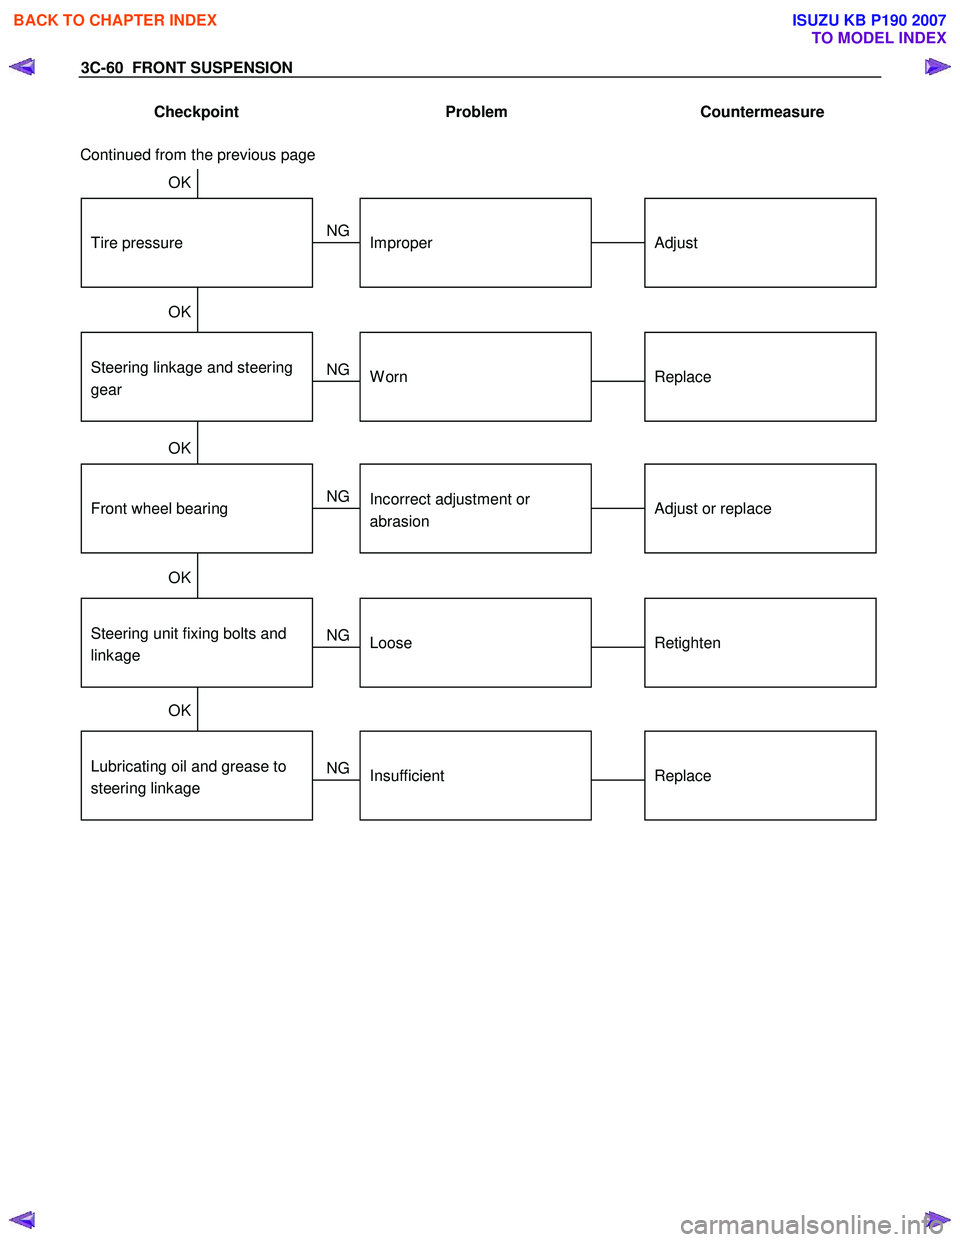
3C-60 FRONT SUSPENSION
Checkpoint Problem Countermeasure
Steering linkage and steering
gearReplaceWorn
AdjustImproper
OK
NG
NG
OKTire pressure
Continued from the previous page
Steering unit fixing bolts and
linkageRetightenLoose
Adjust or replaceIncorrect adjustment or
abrasion
OK
NG
NG
OKFront wheel bearing
Lubricating oil and grease to
steering linkageReplaceInsufficient
NG
OK
BACK TO CHAPTER INDEX
TO MODEL INDEX
ISUZU KB P190 2007
Page 472 of 6020
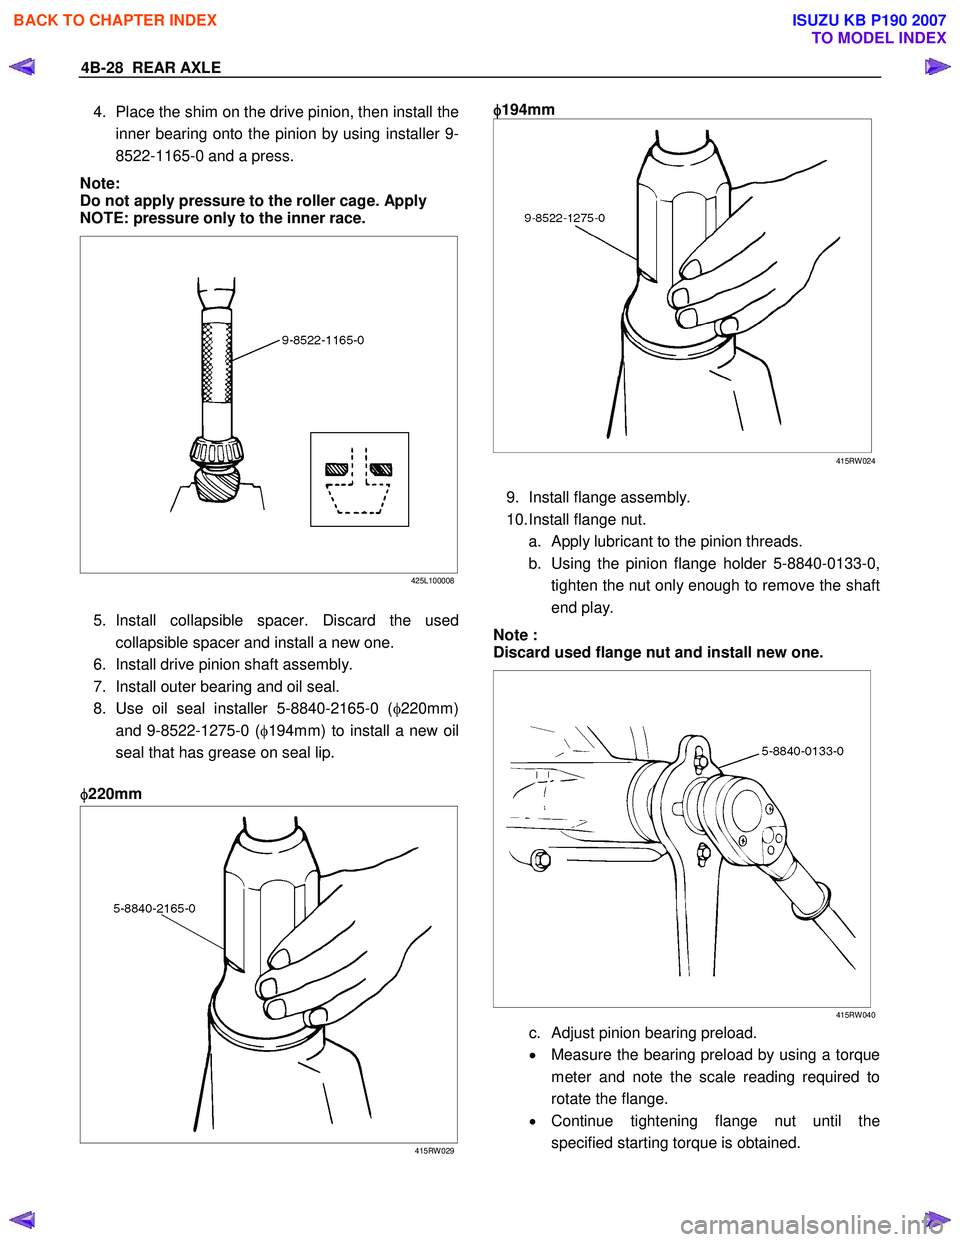
4B-28 REAR AXLE
4. Place the shim on the drive pinion, then install the
inner bearing onto the pinion by using installer 9-
8522-1165-0 and a press.
Note:
Do not apply pressure to the roller cage. Apply
NOTE: pressure only to the inner race.
425L100008
5. Install collapsible spacer. Discard the used collapsible spacer and install a new one.
6. Install drive pinion shaft assembly.
7. Install outer bearing and oil seal.
8. Use oil seal installer 5-8840-2165-0 ( φ220mm)
and 9-8522-1275-0 ( φ194mm) to install a new oil
seal that has grease on seal lip.
φ
φφ
φ
220mm
415RW 029
φ
φφ
φ
194mm
415RW 024
9. Install flange assembly.
10. Install flange nut. a. Apply lubricant to the pinion threads.
b. Using the pinion flange holder 5-8840-0133-0, tighten the nut only enough to remove the shaft
end play.
Note :
Discard used flange nut and install new one.
415RW 040
c. Adjust pinion bearing preload.
• Measure the bearing preload by using a torque
meter and note the scale reading required to
rotate the flange.
• Continue tightening flange nut until the
specified starting torque is obtained.
BACK TO CHAPTER INDEX
TO MODEL INDEX
ISUZU KB P190 2007