ISUZU TFS SERIES 1997 Repair Manual
TFS SERIES 1997
ISUZU
ISUZU
https://www.carmanualsonline.info/img/61/57182/w960_57182-0.png
ISUZU TFS SERIES 1997 Repair Manual
Page 360 of 1600
5-32 BRAKES
Installation Steps
1. Clip ; Pad
2. Pad Assembly with Shim
After attaching the pad assembly with the shim to the support
bracket, position the wear indicator to the lower side of the pad.
3. Caliper Assembly
Lower the caliper into its original position.
Do not damage the flexible hose by twisting or pulling it.
4. Lock Bolt
Attach the lock bolt to the caliper.
Torque N
m(kgfm/lbft)
27 - 37 (2.8 - 3.8 / 20 - 27)
Page 362 of 1600
5-34 BRAKES
Important Operations
5. Dust Seal Ring
Using a small screwdriver, remove the dust boot.
7. Piston (with Ring Seal)
Insert a block of wood into the caliper and force out the piston
by blowing compressed air into the caliper at the flexible hose
attachment.
This procedure must be done prior tor removal of dust seal.
CAUTION:
Do not place your fingers in front of the piston in an
attempt to catch or protect it when applying compressed
air.
Page 363 of 1600
BRAKES 5-35
INSPECTION AND REPAIR
Make necessary correction or parts replacement if wear damage or any other abnormal conditions are found
through inspection.
Rotor
Caliper body
Cylinder bore
Piston
Support bracket
Lock bolt
Guide pin
Visual Check
Inspect the following parts for wear, bending, distortion,
cracking, corrosion, or other abnormal conditions.
Rotor
Thickness (t) mm(in)
Standard Minimum
thickness after
refinishingReplacement
thickness
(Discard)
22.0(0.866) 20.97(0.826) 20.6(0.811)
Run out
Limit mm(in)
0.13 (0.005)
Before inspection, adjust the wheel bearing correctly.
Using a dial gauge, measure the run out at the center of disc
pad contact surface.
Parallelism (Total circumferential thickness variation)
Limit mm(in)
0.15 (0.0006)
Contact surface must be within 0.015 mm at the circumference
of 203 mm dia. Circle.
Page 382 of 1600
5-54 BRAKES
Important Operation - Removal
3. Brake Line
When handling, be careful not to spill brake fluid over the
painted surfaces, as damage to the paint finish will result.
Important Operation - Installation
8. Master Cylinder Assembly
Check the distance from the flange face of the vacuum servo
to the end of the push rod before installation of the master
cylinder.
Projection (A) mm(in)
18.0 - 18.2 (0.709 - 0.717)
If the measured distance deviates from the specified range,
make an adjustment with the lock nut
1 at the end of the push
rod.
Torque N
m(kgfm/lbft)
15 - 25 (1.5 - 2.5 / 11 - 18)
7. Vacuum Servo to Dash Panel and Pedal Mounting
Bracket
Torque N
m(kgfm/lbft)
22 - 31 (2.2 - 3.2 / 16 - 23)
Apply sealer to the dashboard fitting face.
3. Brake Line
Torque N
m(kgfm/lbft)
9 - 15 (0.9 - 1.5 / 6.5 - 11)
Page 392 of 1600
5-64 BRAKES
PARKING BRAKE (FLOOR MOUNT TYPE)
REMOVAL AND INSTALLATION
PARKING BRAKE LEVER AND FRONT CABLE ASSEMBLY
Removal Steps
1. Lock nut
2. Adjust nut
3. Equalizer
4. Center console
5. Bolt
6. Switch connector
7. Parking brake lever
8. Parking brake front cable
Installation Steps
8. Parking brake front cable
7. Parking brake lever
6. Switch connector
5. Bolt
4. Center console
3. Equalizer
2. Adjust nut
1. Lock nut
Important Operation - Installation
8. Parking Brake Front Cable
Apply grease (BESCO L-2 or equivalent) to the front cable
before installation.
After installation, be sure to adjust the parking brake.
Refer to "SERVICING" of this section.
Page 393 of 1600
BRAKES 5-65
REAR CABLE ASSEMBLY
Removal Steps
1. Lock nut
2. Adjusting nut
3. Bolt
4. Retainer
5. Clip and bolt ; crossmember
6. Clip and bolt ; side member
7. Clip and bolt ; side member
8. Clip and bolt ; spring eye
9. Clip and bolt ; leaf spring
10. Hand brake rear cable
Installation Steps
10. Hand brake rear cable
9. Clip and bolt ; leaf spring
8. Clip and bolt ; spring eye
7. Clip and bolt ; side member
6. Clip and bolt ; side member
5. Clip and bolt ; crossmember
4. Retainer
3. Bolt
2. Adjusting nut
1. Lock nut
Page 394 of 1600

5-66 BRAKES
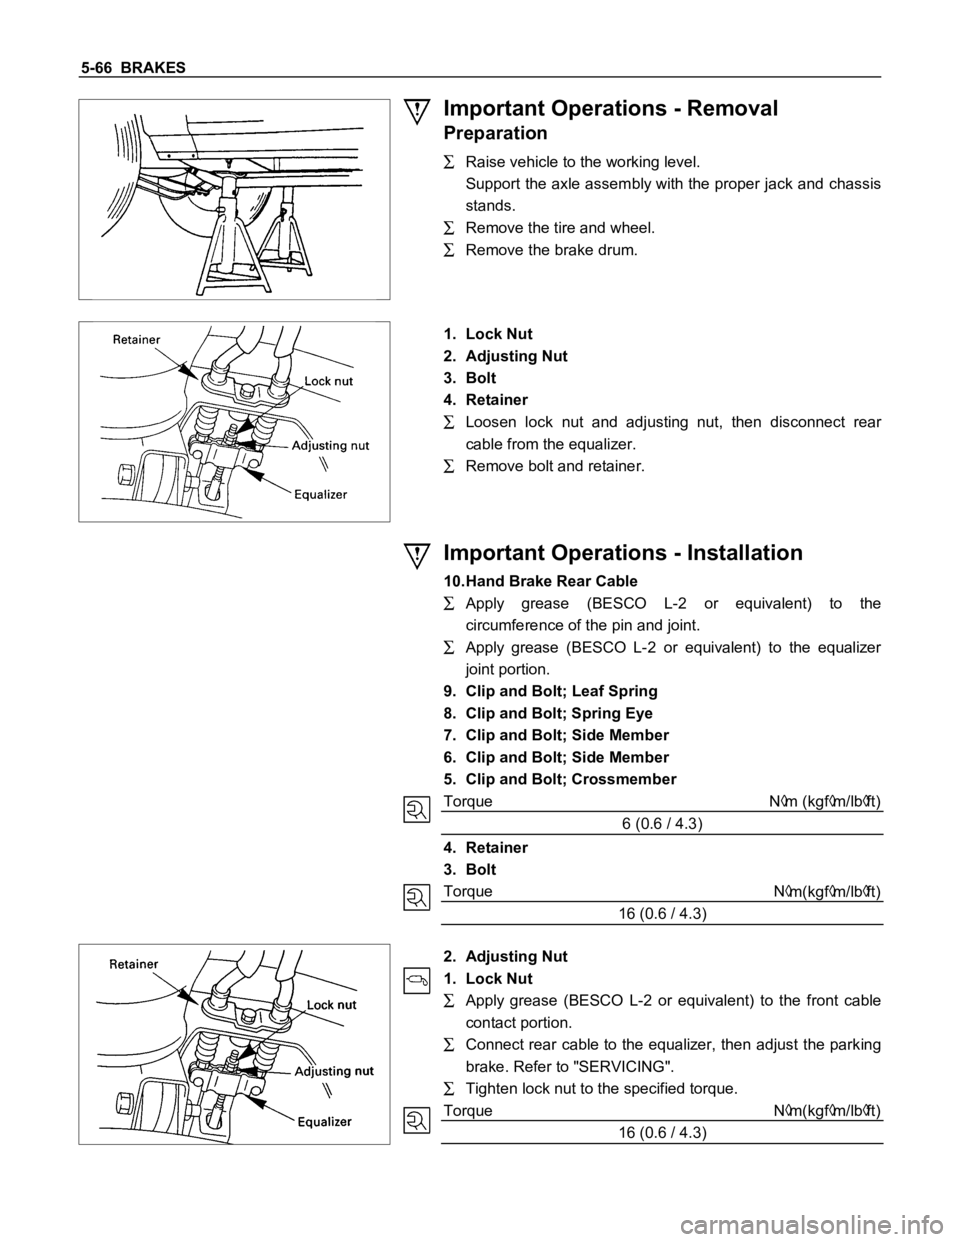
Important Operations - Removal
Preparation
Raise vehicle to the working level.
Support the axle assembly with the proper jack and chassis
stands.
Remove the tire and wheel.
Remove the brake drum.
1. Lock Nut
2. Adjusting Nut
3. Bolt
4. Retainer
Loosen lock nut and adjusting nut, then disconnect rear
cable from the equalizer.
Remove bolt and retainer.
Important Operations - Installation
10.Hand Brake Rear Cable
Apply grease (BESCO L-2 or equivalent) to the
circumference of the pin and joint.
Apply grease (BESCO L-2 or equivalent) to the equalizer
joint portion.
9. Clip and Bolt; Leaf Spring
8. Clip and Bolt; Spring Eye
7. Clip and Bolt; Side Member
6. Clip and Bolt; Side Member
5. Clip and Bolt; Crossmember
Torque N
m (kgfm/lbft)
6 (0.6 / 4.3)
4. Retainer
3. Bolt
Torque N
m(kgfm/lbft)
16 (0.6 / 4.3)
2. Adjusting Nut
1. Lock Nut
Apply grease (BESCO L-2 or equivalent) to the front cable
contact portion.
Connect rear cable to the equalizer, then adjust the parking
brake. Refer to "SERVICING".
Tighten lock nut to the specified torque.
Torque N
m(kgfm/lbft)
16 (0.6 / 4.3)
Page 456 of 1600
10-2 CAB
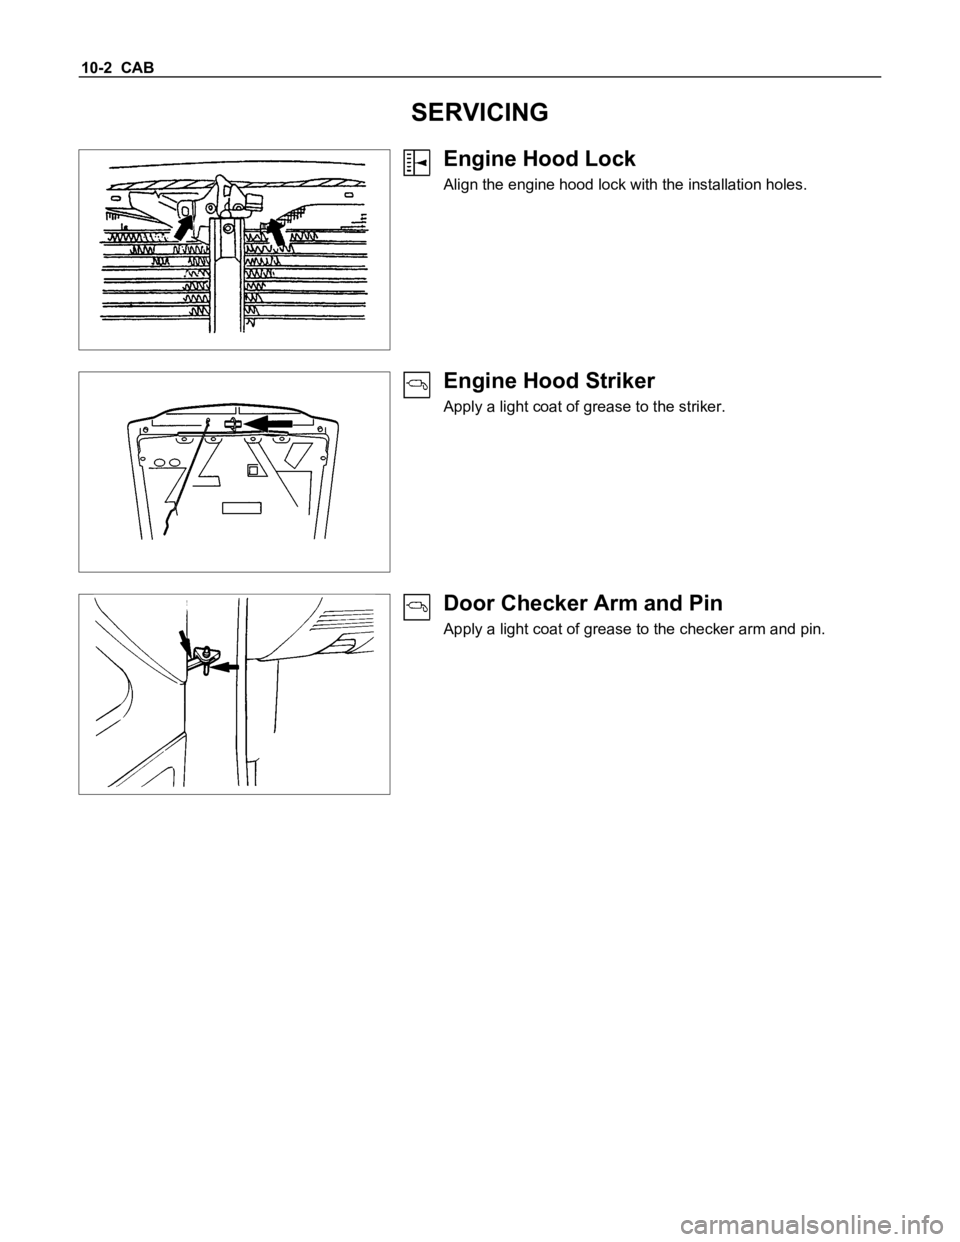
SERVICING
Engine Hood Lock
Align the engine hood lock with the installation holes.
Engine Hood Striker
Apply a light coat of grease to the striker.
Door Checker Arm and Pin
Apply a light coat of grease to the checker arm and pin.
Page 462 of 1600
10-8 CAB
SLIDING REAR WINDOW ASSEMBLY
DISASSEMBLY
Disassembly Steps
1. Weather strip
2. Packing ; rear window
3. Screw; binding
4. Frame ; rear window
5. Stopper
6. Rear window ; slide
7. Lock assembly with catchback window
8. Glass run
9. Glass ; rear window corner
10. Weather strip ; rear window corner
Page 464 of 1600
10-10 CAB
REASSEMBLY
Riassembly Steps
1. Weather strip ; rear window corner
2. Glass ; rear window corner
3. Glass run
4. Frame ; rear window
5. Screw; binding
6. Rear window ; slide
7. Stopper
8. Packing ; rear window
9. Lock assembly with catchback window
10. Weather strip


