Front axle ISUZU TFS SERIES 1997 Workshop Manual
[x] Cancel search | Manufacturer: ISUZU, Model Year: 1997, Model line: TFS SERIES, Model: ISUZU TFS SERIES 1997Pages: 1600, PDF Size: 40.98 MB
Page 39 of 1600
REAR AXLE 4B-43
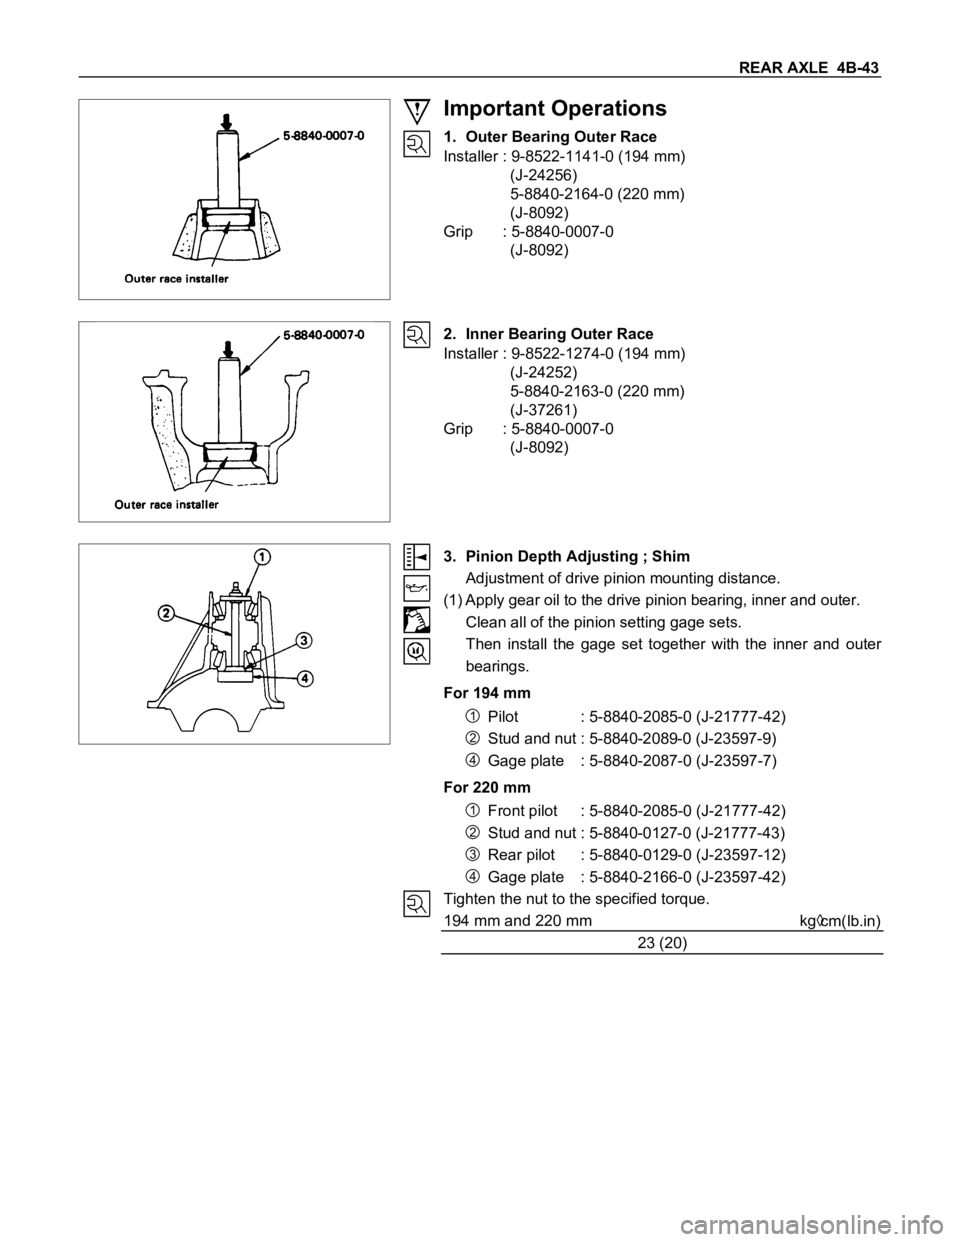
Important Operations
1. Outer Bearing Outer Race
Installer : 9-8522-1141-0 (194 mm)
(J-24256)
5-8840-2164-0 (220 mm)
(J-8092)
Grip : 5-8840-0007-0
(J-8092)
2. Inner Bearing Outer Race
Installer : 9-8522-1274-0 (194 mm)
(J-24252)
5-8840-2163-0 (220 mm)
(J-37261)
Grip : 5-8840-0007-0
(J-8092)
3. Pinion Depth Adjusting ; Shim
Adjustment of drive pinion mounting distance.
(1) Apply gear oil to the drive pinion bearing, inner and outer.
Clean all of the pinion setting gage sets.
Then install the gage set together with the inner and outer
bearings.
For 194 mm
1Pilot : 5-8840-2085-0 (J-21777-42)
2Stud and nut : 5-8840-2089-0 (J-23597-9)
4Gage plate : 5-8840-2087-0 (J-23597-7)
For 220 mm
1Front pilot : 5-8840-2085-0 (J-21777-42)
2Stud and nut : 5-8840-0127-0 (J-21777-43)
3Rear pilot : 5-8840-0129-0 (J-23597-12)
4Gage plate : 5-8840-2166-0 (J-23597-42)
Tighten the nut to the specified torque.
194 mm and 220 mm kg
cm(lb.in)
23 (20)
Page 64 of 1600

FRONT WHEEL DRIVE 4C1-1
SECTION 4C1
FRONT WHEEL DRIVE
TABLE OF CONTENTS
PAGE
Main Data and Specifications ...................................<0011001100110011001100110011001100110011001100110011001100110011001100110011001100110011001100110011001100110011001100110011001100110011001100110011001100110011001100110011001100110011001100110011001100
1100110011[ 4C1- 3
Special Parts Fixing Nuts and Bolts ............................................................................. 4C1- 4
Recommended Liquid Gasket ....................................................................................... 4C1- 7
Recommended Thread Locking Agents ....................................................................... 4C1- 7
Servicing<0011001100110011001100110011001100110011001100110011001100110011001100110011001100110011001100110011001100110011001100110011001100110011001100110011001100110011001100110011001100110011001100110011001100
11001100110011[<0011001100110011001100110011001100110011001100110011001100110011001100110011001100110011001100110011001100110011001100110011001100110011001100110011001100110011001100110011001100110011001100110011001100
11001100110011001100110011001100110011001100110011[..... 4C1- 8
General Description........................................................................................................ 4C1-9
Front Drive Axle Assembly............................................................................................ 4C1-12
Removal and Installation .......................................<0011001100110011001100110011001100110011001100110011001100110011001100110011001100110011001100110011001100110011001100110011001100110011001100110011001100110011001100110011001100110011001100110011001100
110011[ 4C1-12
Disassembly <0011001100110011001100110011001100110011001100110011001100110011001100110011001100110011001100110011001100110011001100110011001100110011001100110011001100110011001100110011001100110011001100110011001100
110011[<0011001100110011001100110011001100110011001100110011001100110011001100110011001100110011001100110011001100110011001100110011001100110011001100110011001100110011001100110011001100110011001100110011001100
1100110011001100110011001100110011[ 4C1-15
Inspection and Repair................................................................................................ 4C1-18
Reassembly <0011001100110011001100110011001100110011001100110011001100110011001100110011001100110011001100110011001100110011001100110011001100110011001100110011001100110011001100110011001100110011001100110011001100
1100110011[<0011001100110011001100110011001100110011001100110011001100110011001100110011001100110011001100110011001100110011001100110011001100110011001100110011001100110011001100110011001100110011001100110011001100
1100110011001100110011001100110011[ 4C1-19
Differential ....................................................................................................................... 4C1-22
Disassembly <0011001100110011001100110011001100110011001100110011001100110011001100110011001100110011001100110011001100110011001100110011001100110011001100110011001100110011001100110011001100110011001100110011001100
110011[<0011001100110011001100110011001100110011001100110011001100110011001100110011001100110011001100110011001100110011001100110011001100110011001100110011001100110011001100110011001100110011001100110011001100
1100110011001100110011001100110011[ 4C1-22
Major Components ............................................................................................... 4C1-22
Minor Components............................................................................................... 4C1-25
Inspection and Repair................................................................................................ 4C1-27
Reassembly <0011001100110011001100110011001100110011001100110011001100110011001100110011001100110011001100110011001100110011001100110011001100110011001100110011001100110011001100110011001100110011001100110011001100
1100110011[<0011001100110011001100110011001100110011001100110011001100110011001100110011001100110011001100110011001100110011001100110011001100110011001100110011001100110011001100110011001100110011001100110011001100
1100110011001100110011001100110011[ 4C1-29
Minor Components............................................................................................... 4C1-29
Major Components ............................................................................................... 4C1-31
Front Hub and Disc (4
2 Model) .................................................................................... 4C1-41
Disassembly <0011001100110011001100110011001100110011001100110011001100110011001100110011001100110011001100110011001100110011001100110011001100110011001100110011001100110011001100110011001100110011001100110011001100
110011[<0011001100110011001100110011001100110011001100110011001100110011001100110011001100110011001100110011001100110011001100110011001100110011001100110011001100110011001100110011001100110011001100110011001100
1100110011001100110011001100110011[ 4C1-41
Inspection and Repair................................................................................................ 4C1-44
Reassembly <0011001100110011001100110011001100110011001100110011001100110011001100110011001100110011001100110011001100110011001100110011001100110011001100110011001100110011001100110011001100110011001100110011001100
1100110011[<0011001100110011001100110011001100110011001100110011001100110011001100110011001100110011001100110011001100110011001100110011001100110011001100110011001100110011001100110011001100110011001100110011001100
1100110011001100110011001100110011[ 4C1-45
Front Hub and Disc (4
4 Model) .................................................................................... 4C1-48
Disassembly <0011001100110011001100110011001100110011001100110011001100110011001100110011001100110011001100110011001100110011001100110011001100110011001100110011001100110011001100110011001100110011001100110011001100
110011[<0011001100110011001100110011001100110011001100110011001100110011001100110011001100110011001100110011001100110011001100110011001100110011001100110011001100110011001100110011001100110011001100110011001100
1100110011001100110011001100110011[ 4C1-48
Inspection and Repair................................................................................................ 4C1-50
Reassembly <0011001100110011001100110011001100110011001100110011001100110011001100110011001100110011001100110011001100110011001100110011001100110011001100110011001100110011001100110011001100110011001100110011001100
1100110011[<0011001100110011001100110011001100110011001100110011001100110011001100110011001100110011001100110011001100110011001100110011001100110011001100110011001100110011001100110011001100110011001100110011001100
1100110011001100110011001100110011[ 4C1-51
Front Hub and Disc (Automatic Locking Hub) ............................................................. 4C1-54
INDEX
Page 66 of 1600
FRONT WHEEL DRIVE 4C1-3
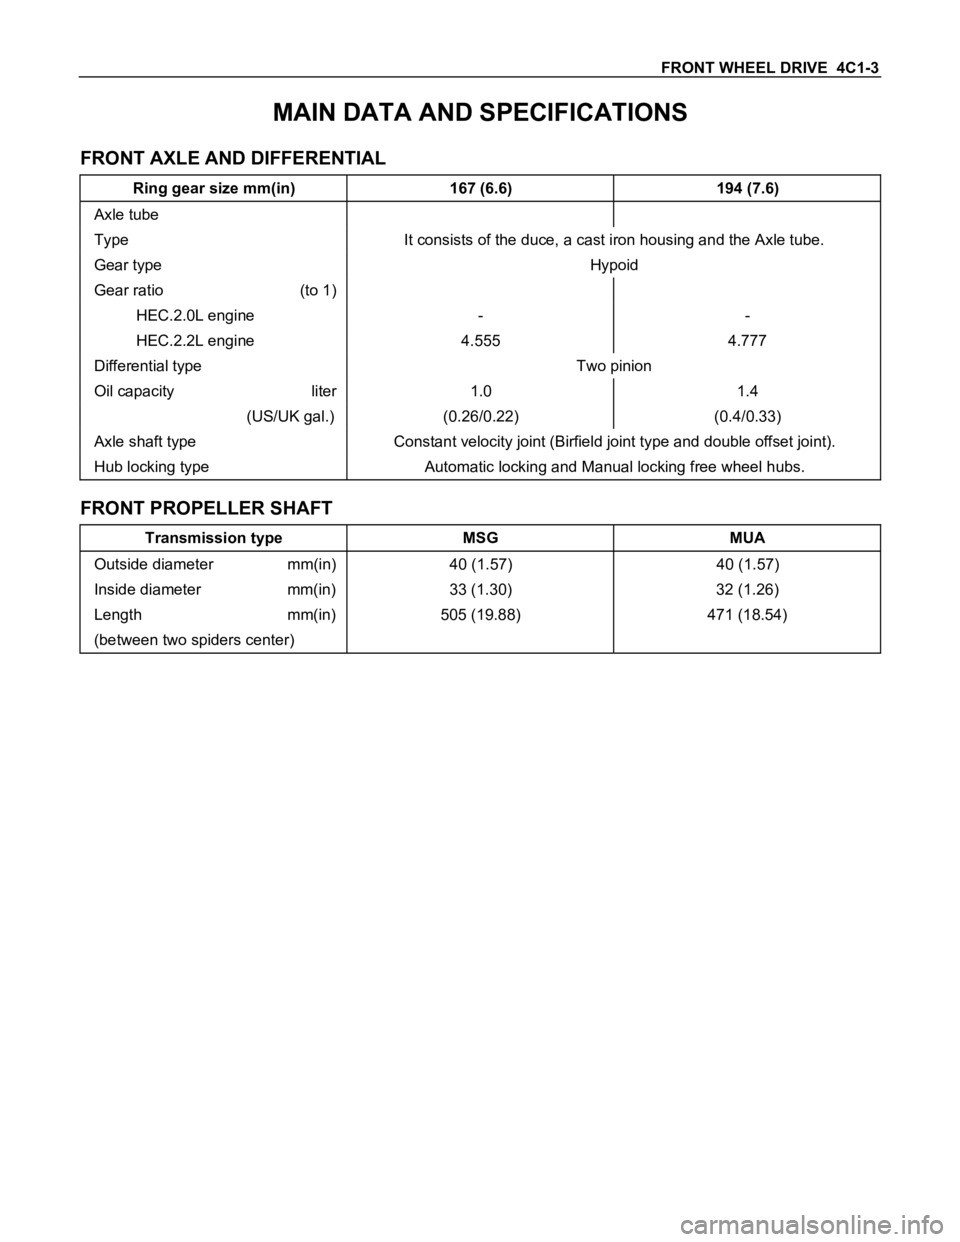
MAIN DATA AND SPECIFICATIONS
FRONT AXLE AND DIFFERENTIAL
Ring gear size mm(in) 167 (6.6) 194 (7.6)
Axle tube
Type It consists of the duce, a cast iron housing and the Axle tube.
Gear type Hypoid
Gear ratio (to 1)
HEC.2.0L engine - -
HEC.2.2L engine 4.555 4.777
Differential type Two pinion
Oil capacity liter 1.0 1.4
(US/UK gal.) (0.26/0.22) (0.4/0.33)
Axle shaft type Constant velocity joint (Birfield joint type and double offset joint).
Hub locking type Automatic locking and Manual locking free wheel hubs.
FRONT PROPELLER SHAFT
Transmission type MSG MUA
Outside diameter mm(in) 40 (1.57) 40 (1.57)
Inside diameter mm(in) 33 (1.30) 32 (1.26)
Length mm(in) 505 (19.88) 471 (18.54)
(between two spiders center)
Page 67 of 1600

4C1-4 FRONT WHEEL DRIVE
SPECIAL PARTS FIXING NUTS AND BOLTS
FRONT DRIVE AXLE AND PROPELLER SHAFT
Nm (kgfm/lbft)
152.114.7 (15.51.5/112.10.8)82.4
7.8 (8.40.8/60.85.8) 167mm 35.3
2.9 (3.60.3/26.02.2)
194mm 62.8
3.9 (6.40.4/46.32.9)194mm 62.8
3.9
(6.4
0. 2/46.32.9) 167mm 35.3
2.9
(3.6
0.3/26.00.2)
Page 70 of 1600
FRONT WHEEL DRIVE 4C1-7
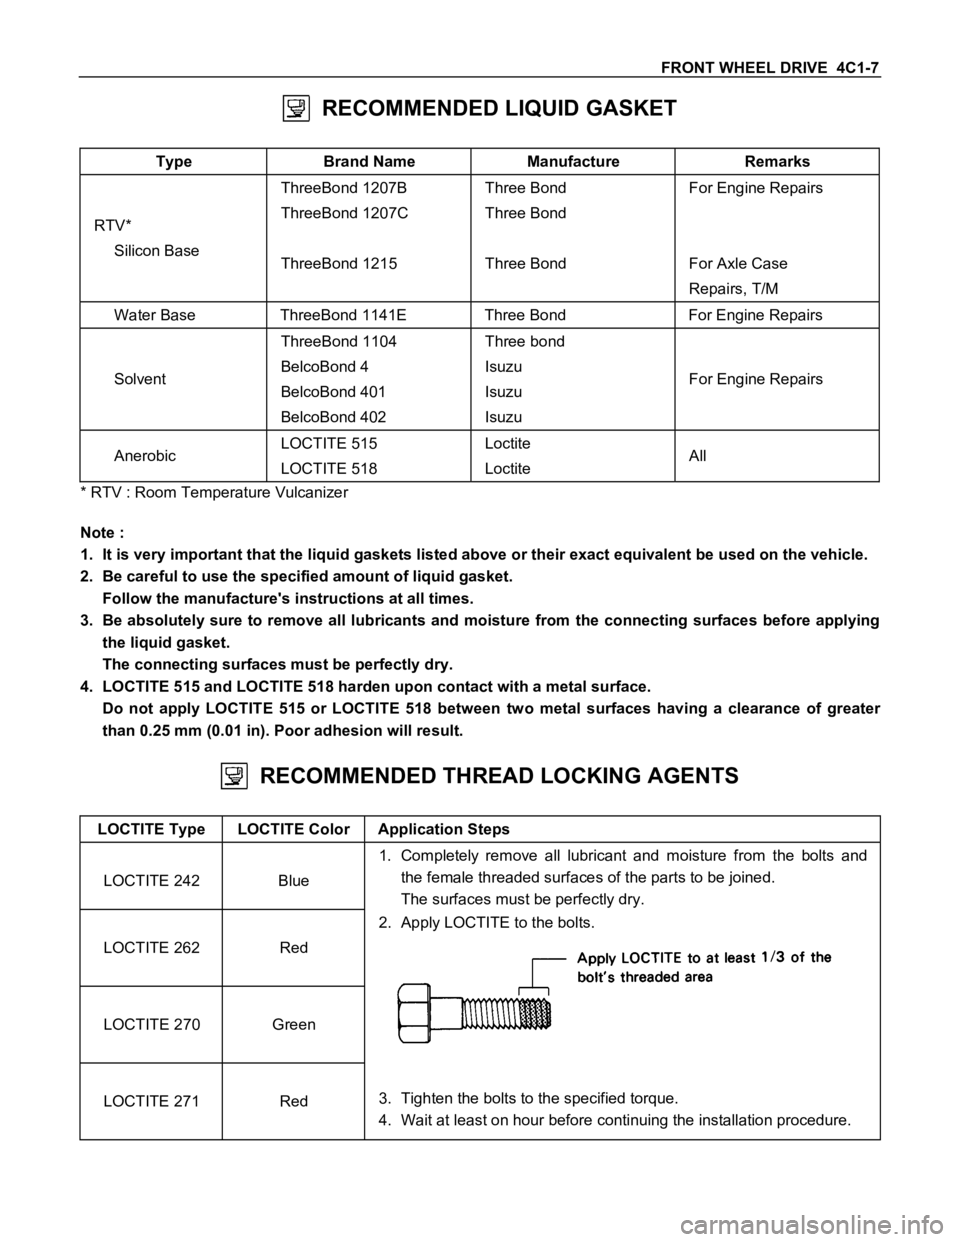
RECOMMENDED LIQUID GASKET
Type Brand Name Manufacture Remarks
RTV*
Silicon BaseThreeBond 1207B
ThreeBond 1207C
ThreeBond 1215Three Bond
Three Bond
Three BondFor Engine Repairs
For Axle Case
Repairs, T/M
Water Base ThreeBond 1141E Three Bond For Engine Repairs
SolventThreeBond 1104
BelcoBond 4
BelcoBond 401
BelcoBond 402Three bond
Isuzu
Isuzu
IsuzuFor Engine Repairs
AnerobicLOCTITE 515
LOCTITE 518Loctite
LoctiteAll
* RTV : Room Temperature Vulcanizer
Note :
1. It is very important that the liquid gaskets listed above or their exact equivalent be used on the vehicle.
2. Be careful to use the specified amount of liquid gasket.
Follow the manufacture's instructions at all times.
3. Be absolutely sure to remove all lubricants and moisture from the connecting surfaces before applying
the liquid gasket.
The connecting surfaces must be perfectly dry.
4. LOCTITE 515 and LOCTITE 518 harden upon contact with a metal surface.
Do not apply LOCTITE 515 or LOCTITE 518 between two metal surfaces having a clearance of greater
than 0.25 mm (0.01 in). Poor adhesion will result.
RECOMMENDED THREAD LOCKING AGENTS
LOCTITE Type LOCTITE Color Application Steps
LOCTITE 242 Blue1. Completely remove all lubricant and moisture from the bolts and
the female threaded surfaces of the parts to be joined.
The surfaces must be perfectly dry.
LOCTITE 262 Red2. Apply LOCTITE to the bolts.
LOCTITE 270 Green
LOCTITE 271 Red3. Tighten the bolts to the specified torque.
4. Wait at least on hour before continuing the installation procedure.
Page 72 of 1600

FRONT WHEEL DRIVE 4C1-9
GENERAL DESCRIPTION
FRONT DRIVE AXLE
FRONT HUB AND DISC (42 model)
Page 75 of 1600

4C1-12 FRONT WHEEL DRIVE
FRONT DRIVE AXLE ASSEMBLY
REMOVAL AND INSTALLATION
1. Refer to SECTION 3E “WHEEL AND TIRES” for road wheel Disassembly and Reassembly procedure.
2. Refer to SECTION 4 “BRAKES” for disc brake caliper removal and installation procedure.
3. Refer to SECTION 3B “STEERING” for Steering linkage removal and installation procedure.
4. Refer to SECTION 4C “FRONT WHEEL DRIVE” for automatic hub disassembly and reassembly procedure.
Removal Steps
1. Assembly of hub and disc, back plate,
knuckle, knuckle arm, and lower end.
2. Propeller shaft
3. Nut and bolt
4. Washer
5. Front drive axle assembly
6. Washer
Installation Steps
6. Washer
5. Front drive axle assembly
4. Washer
3. Nut and bolt
2. Propeller shaft
1. Assembly of hub and disc, back plate,
knuckle, knuckle arm, and lower end.
Page 76 of 1600

FRONT WHEEL DRIVE 4C1-13
Important Operations - Removal
1. Assembly of hub and disc, back plate, knuckle, knuckle
arm, and lower end.
Before removal, jack up the front of vehicle and support the
frame with jack stands.
2. Propeller Shaft
Apply the setting marks.
5. Front Drive Axle Assembly
(1) Put the lifting jack under the center part of the front.
(2) Remove four bolts fixing axle case mounting brackets to the
frame.
Note :
Be careful not to damage birfield joints or double off-set
joints when supporting axle shaft assembly.
(3) Lower the front axle assembly and roll it out toward the front
of the vehicle.
Take care not to damage the birfield joints or the double off-
set joints.
Page 77 of 1600
4C1-14 FRONT WHEEL DRIVE
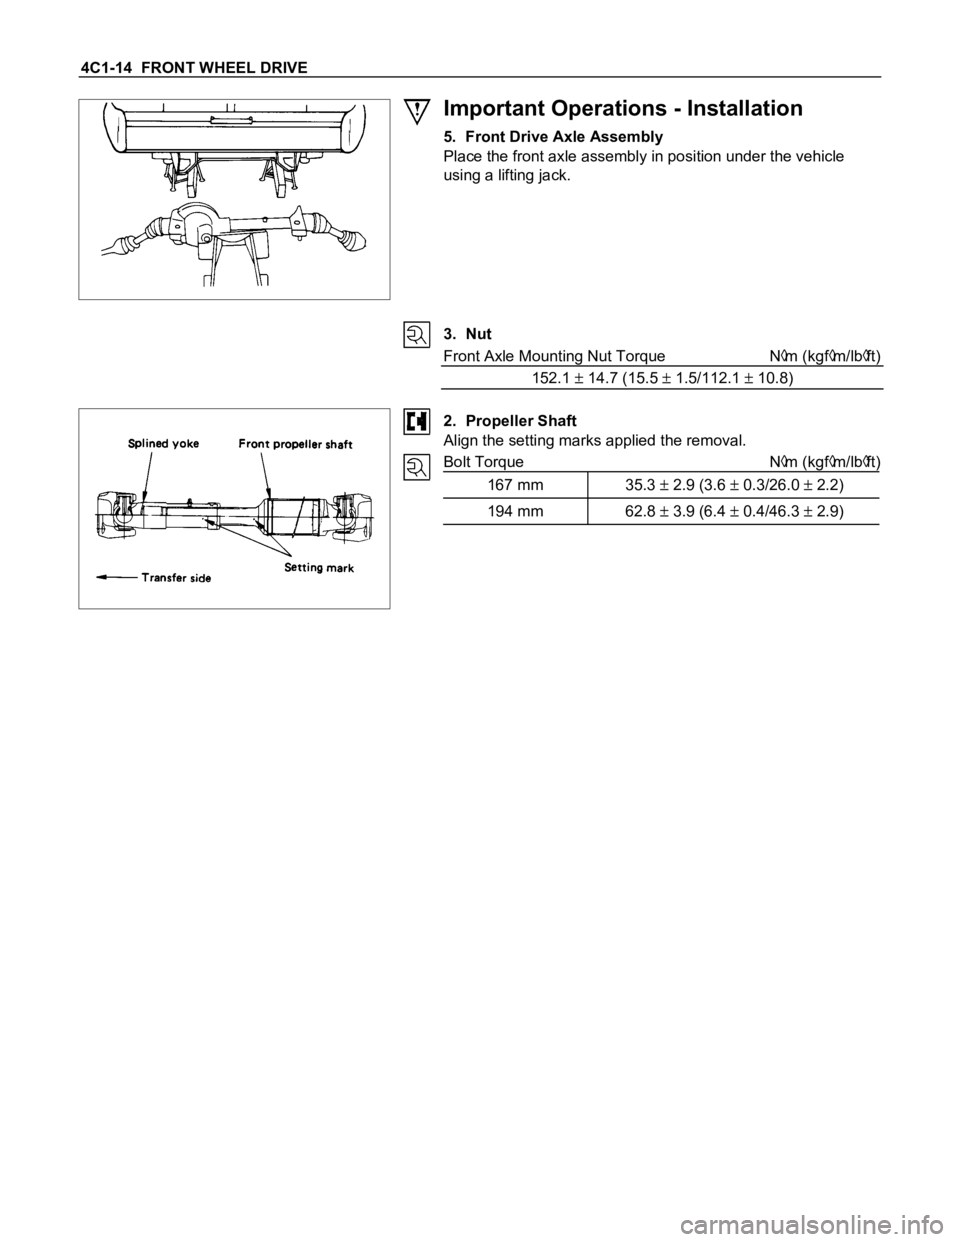
Important Operations - Installation
5. Front Drive Axle Assembly
Place the front axle assembly in position under the vehicle
using a lifting jack.
3. Nut
Front Axle Mounting Nut Torque N
m (kgfm/lbft)
152.1
14.7 (15.5 1.5/112.1 10.8)
2. Propeller Shaft
Align the setting marks applied the removal.
Bolt Torque N
m (kgfm/lbft)
167 mm 35.3
2.9 (3.6 0.3/26.0 2.2)
194 mm 62.8 3.9 (6.4 0.4/46.3 2.9)
Page 78 of 1600

FRONT WHEEL DRIVE 4C1-15
DISASSEMBLY
Disassembly Steps
1. Band
2. Bellows
3. Circlip
4. BJ shaft assembly
5. Ball
6. Snap ring
7. Ball retainer
8. Ball guide
9. Band
10. Bellows
11. Dust seal12. BJ shaft
13. Bolt
14. DOJ case assembly
15. Snap ring
16. Bearing
17. Snap ring
18. O-ring
19. Oil seal
20. Bracket
21. DOJ case
22. Axle case and differential