brake fluid ISUZU TFS SERIES 1997 Workshop Manual
[x] Cancel search | Manufacturer: ISUZU, Model Year: 1997, Model line: TFS SERIES, Model: ISUZU TFS SERIES 1997Pages: 1600, PDF Size: 40.98 MB
Page 343 of 1600

BRAKES 5-15
SERVICING
LOAD SENSING PROPORTIONING VALVE (LSPV)
Location of LSPV
Structure and Operation
The following is an explanation of the structure and operation
of the linkage type load sensing device.
This device controls the fluid pressure to the rear brakes in
accordance with changes in rear axle load (vertical
displacements of the rear axle springs).
Structure
This device consists of a load sensing spring (bending bar)
and a valve.
The valve is mounted through a bracket to the frame.
One end of the load sensing spring is fixed to the valve at
the frame and the other end to the rear axle housing
through a shackle.
Page 344 of 1600
5-16 BRAKES
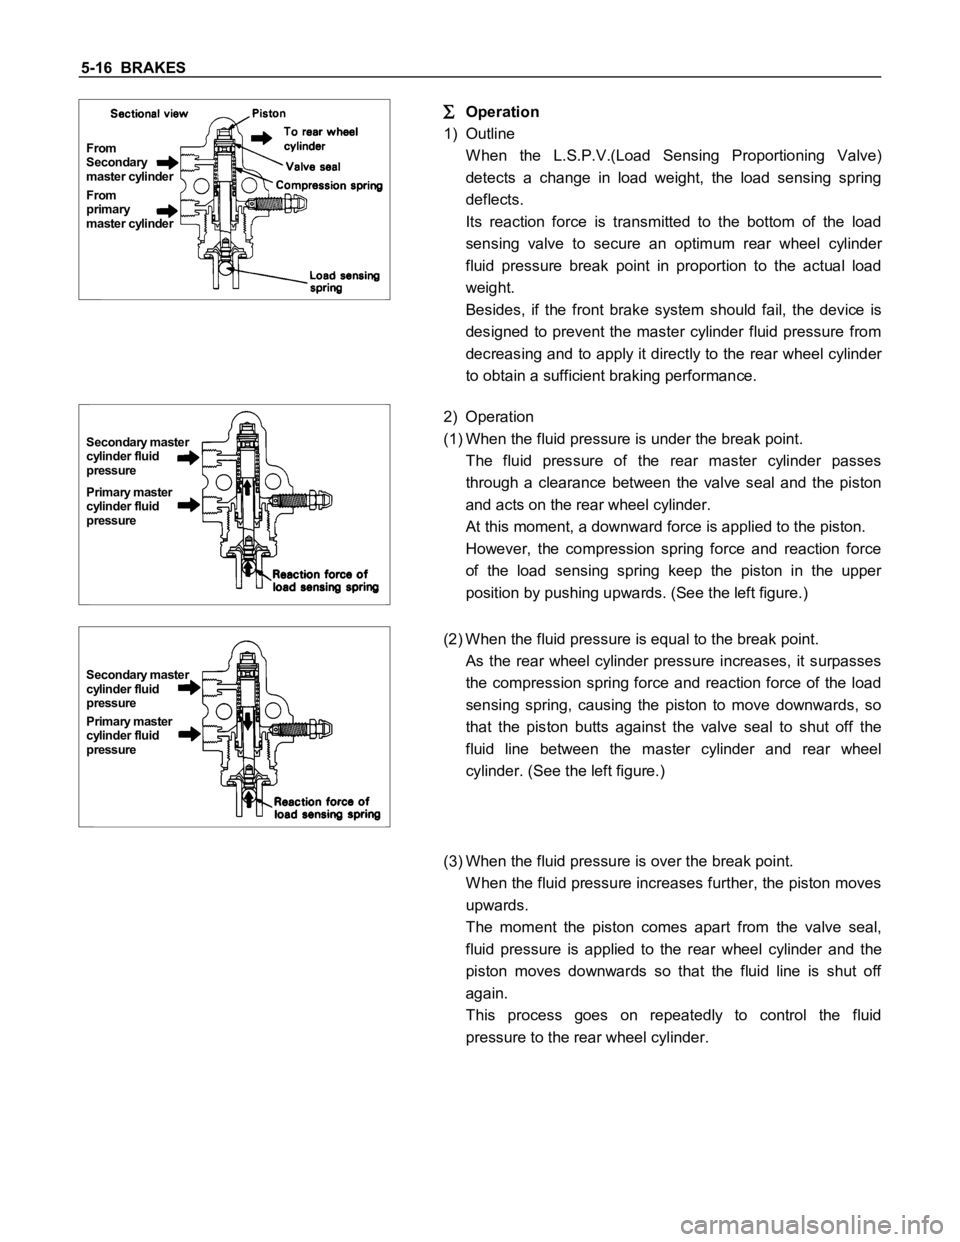
From
primary
master cylinder From
Secondary
master cylinder
Operation
1) Outline
W hen the L.S.P.V.(Load Sensing Proportioning Valve)
detects a change in load weight, the load sensing spring
deflects.
Its reaction force is transmitted to the bottom of the load
sensing valve to secure an optimum rear wheel cylinder
fluid pressure break point in proportion to the actual load
weight.
Besides, if the front brake system should fail, the device is
designed to prevent the master cylinder fluid pressure from
decreasing and to apply it directly to the rear wheel cylinder
to obtain a sufficient braking performance.
Primary master
cylinder fluid
pressure Secondary master
cylinder fluid
pressure
2) Operation
(1) When the fluid pressure is under the break point.
The fluid pressure of the rear master cylinder passes
through a clearance between the valve seal and the piston
and acts on the rear wheel cylinder.
At this moment, a downward force is applied to the piston.
However, the compression spring force and reaction force
of the load sensing spring keep the piston in the upper
position by pushing upwards. (See the left figure.)
Primary master
cylinder fluid
pressure Secondary master
cylinder fluid
pressure
(2) When the fluid pressure is equal to the break point.
As the rear wheel cylinder pressure increases, it surpasses
the compression spring force and reaction force of the load
sensing spring, causing the piston to move downwards, so
that the piston butts against the valve seal to shut off the
fluid line between the master cylinder and rear wheel
cylinder. (See the left figure.)
(3) When the fluid pressure is over the break point.
W hen the fluid pressure increases further, the piston moves
upwards.
The moment the piston comes apart from the valve seal,
fluid pressure is applied to the rear wheel cylinder and the
piston moves downwards so that the fluid line is shut off
again.
This process goes on repeatedly to control the fluid
pressure to the rear wheel cylinder.
Page 345 of 1600
BRAKES 5-17
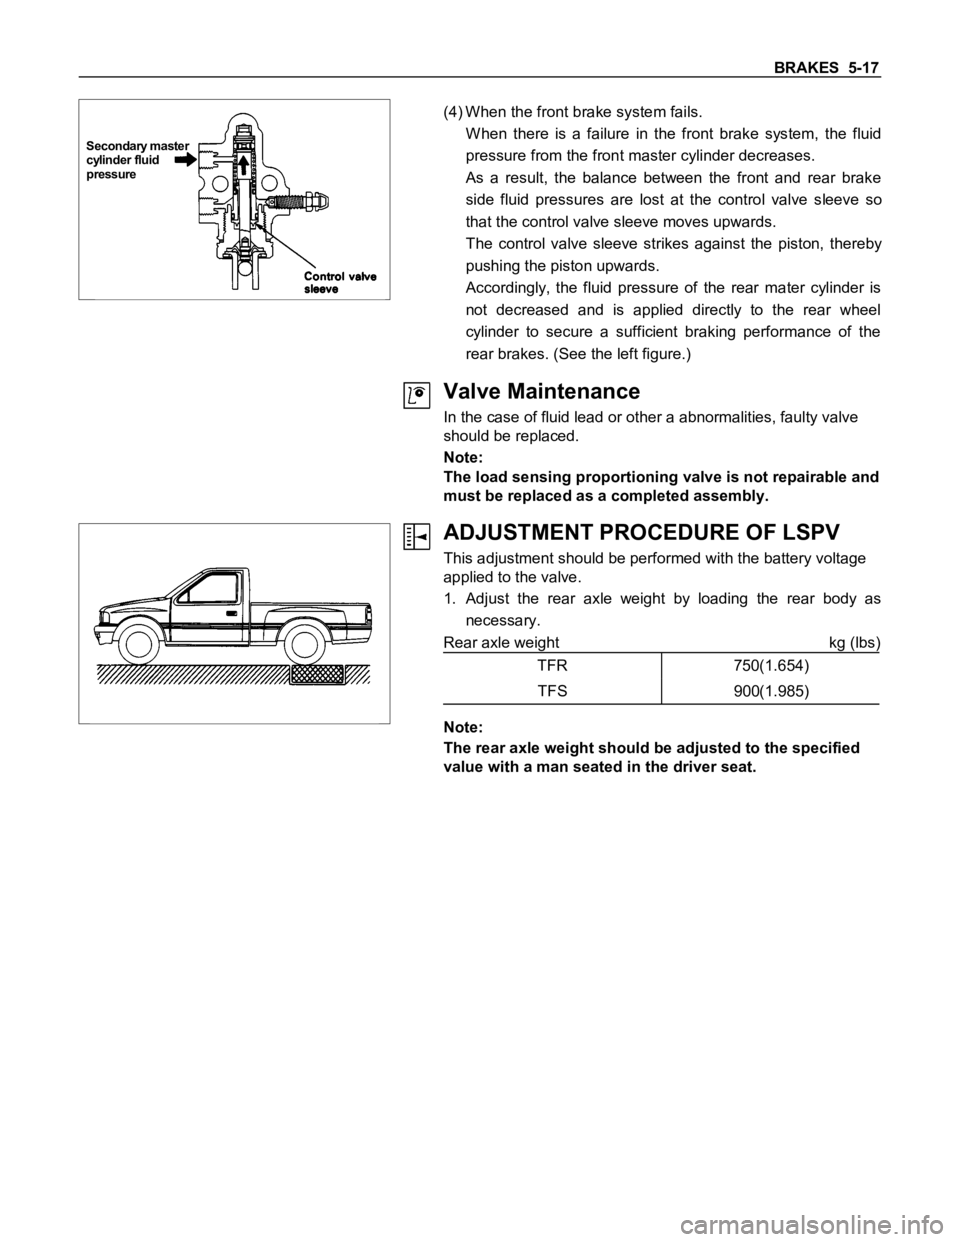
Secondary master
cylinder fluid
pressure
(4) When the front brake system fails.
W hen there is a failure in the front brake system, the fluid
pressure from the front master cylinder decreases.
As a result, the balance between the front and rear brake
side fluid pressures are lost at the control valve sleeve so
that the control valve sleeve moves upwards.
The control valve sleeve strikes against the piston, thereby
pushing the piston upwards.
Accordingly, the fluid pressure of the rear mater cylinder is
not decreased and is applied directly to the rear wheel
cylinder to secure a sufficient braking performance of the
rear brakes. (See the left figure.)
Valve Maintenance
In the case of fluid lead or other a abnormalities, faulty valve
should be replaced.
Note:
The load sensing proportioning valve is not repairable and
must be replaced as a completed assembly.
ADJUSTMENT PROCEDURE OF LSPV
This adjustment should be performed with the battery voltage
applied to the valve.
1. Adjust the rear axle weight by loading the rear body as
necessary.
Rear axle weight kg (lbs)
TFR 750(1.654)
TFS 900(1.985)
Note:
The rear axle weight should be adjusted to the specified
value with a man seated in the driver seat.
Page 347 of 1600
BRAKES 5-19
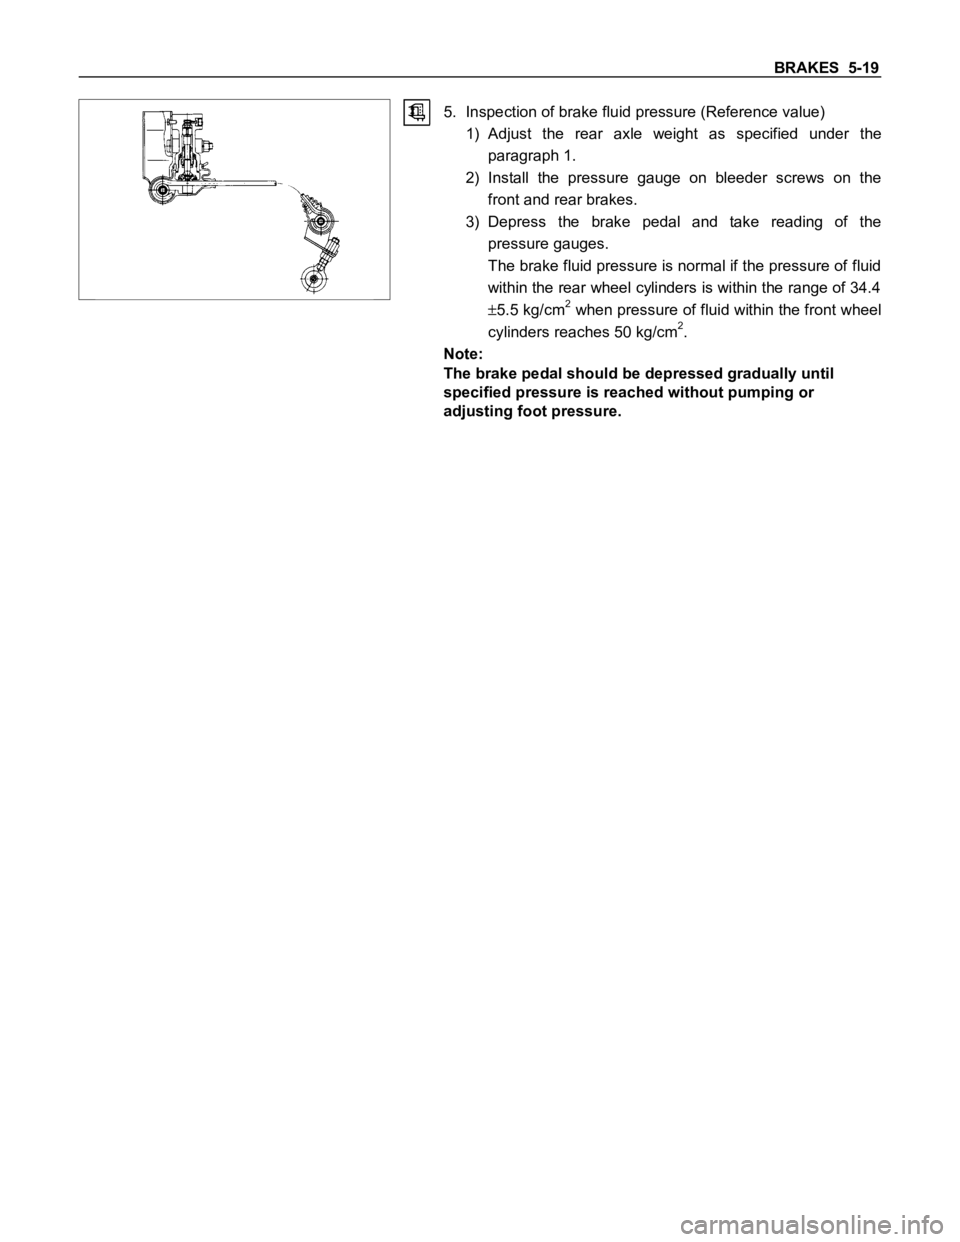
5. Inspection of brake fluid pressure (Reference value)
1) Adjust the rear axle weight as specified under the
paragraph 1.
2) Install the pressure gauge on bleeder screws on the
front and rear brakes.
3) Depress the brake pedal and take reading of the
pressure gauges.
The brake fluid pressure is normal if the pressure of fluid
within the rear wheel cylinders is within the range of 34.4
5.5 kg/cm2 when pressure of fluid within the front wheel
cylinders reaches 50 kg/cm2.
Note:
The brake pedal should be depressed gradually until
specified pressure is reached without pumping or
adjusting foot pressure.
Page 349 of 1600
BRAKES 5-21
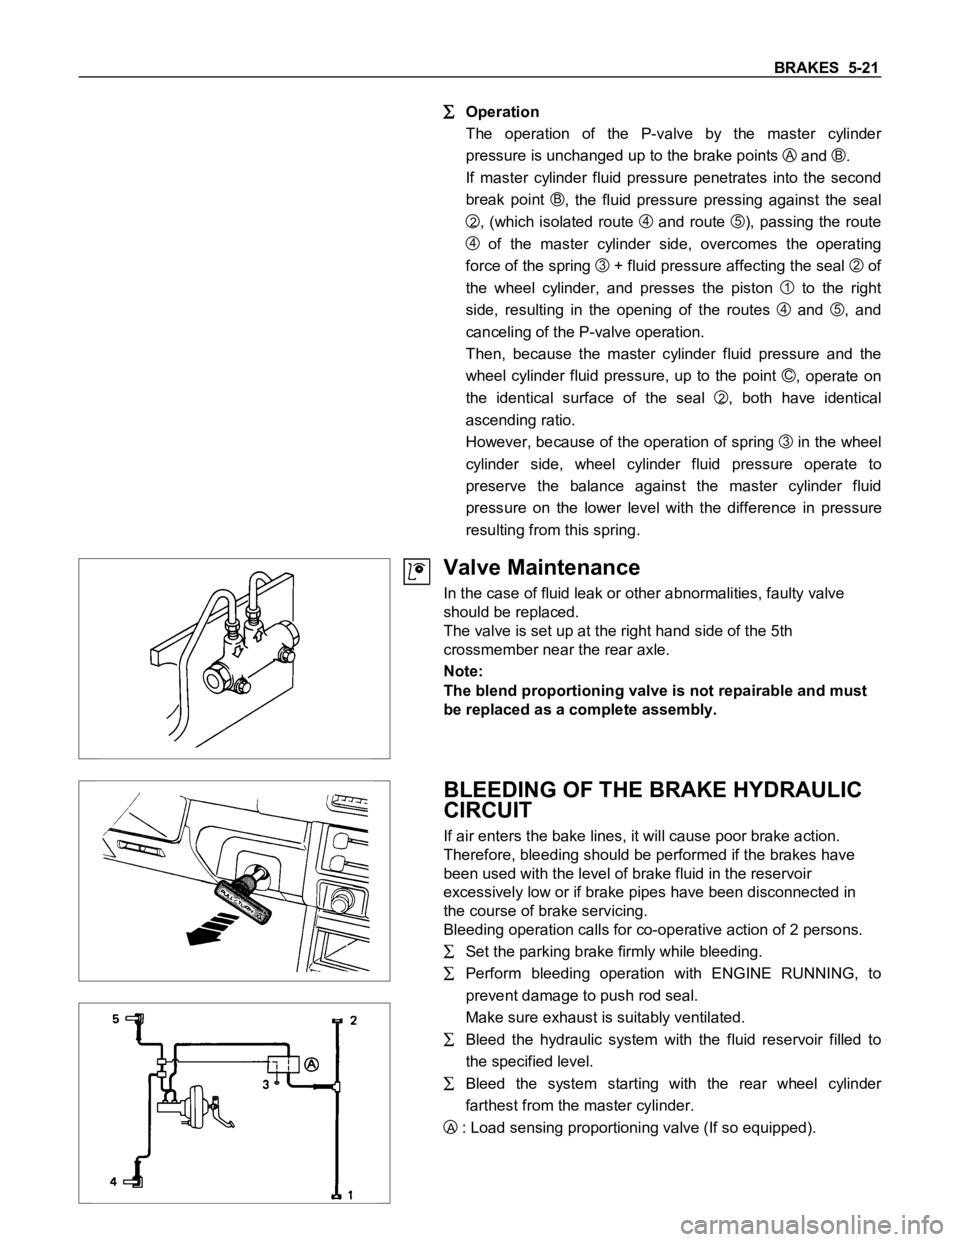
Operation
The operation of the P-valve by the master cylinder
pressure is unchanged up to the brake points
A and B.
If master cylinder fluid pressure penetrates into the second
break point
B, the fluid pressure pressing against the seal
2, (which isolated route 4 and route 5), passing the route
4 of the master cylinder side, overcomes the operating
force of the spring
3 + fluid pressure affecting the seal 2 of
the wheel cylinder, and presses the piston
1 to the right
side, resulting in the opening of the routes
4 and 5, and
canceling of the P-valve operation.
Then, because the master cylinder fluid pressure and the
wheel cylinder fluid pressure, up to the point
C, operate on
the identical surface of the seal
2, both have identical
ascending ratio.
However, because of the operation of spring
3 in the wheel
cylinder side, wheel cylinder fluid pressure operate to
preserve the balance against the master cylinder fluid
pressure on the lower level with the difference in pressure
resulting from this spring.
Valve Maintenance
In the case of fluid leak or other abnormalities, faulty valve
should be replaced.
The valve is set up at the right hand side of the 5th
crossmember near the rear axle.
Note:
The blend proportioning valve is not repairable and must
be replaced as a complete assembly.
BLEEDING OF THE BRAKE HYDRAULIC
CIRCUIT
If air enters the bake lines, it will cause poor brake action.
Therefore, bleeding should be performed if the brakes have
been used with the level of brake fluid in the reservoir
excessively low or if brake pipes have been disconnected in
the course of brake servicing.
Bleeding operation calls for co-operative action of 2 persons.
Set the parking brake firmly while bleeding.
Perform bleeding operation with ENGINE RUNNING, to
prevent damage to push rod seal.
Make sure exhaust is suitably ventilated.
Bleed the hydraulic system with the fluid reservoir filled to
the specified level.
Bleed the system starting with the rear wheel cylinder
farthest from the master cylinder.
A : Load sensing proportioning valve (If so equipped).
Page 350 of 1600
5-22 BRAKES
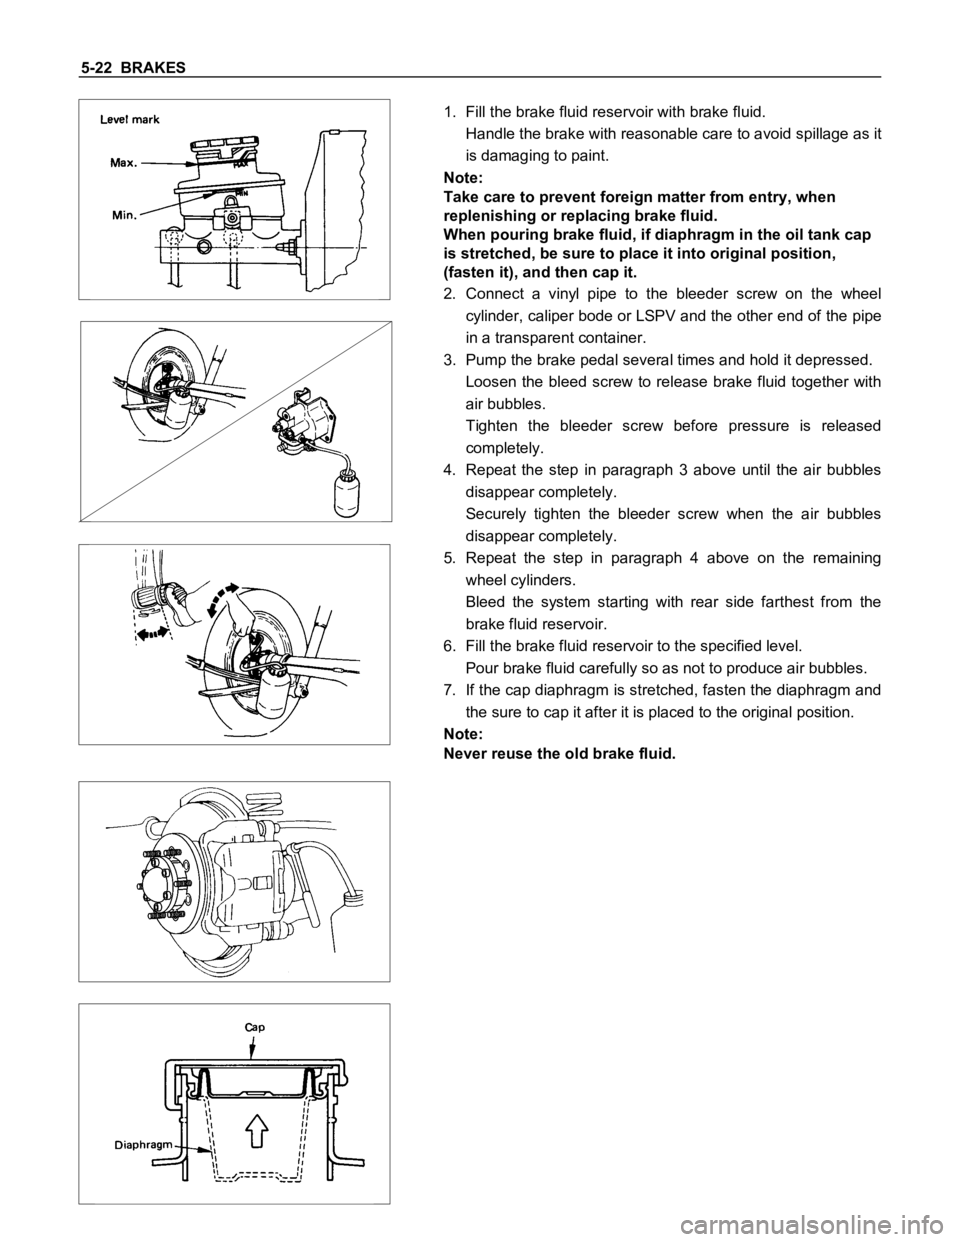
1. Fill the brake fluid reservoir with brake fluid.
Handle the brake with reasonable care to avoid spillage as it
is damaging to paint.
Note:
Take care to prevent foreign matter from entry, when
replenishing or replacing brake fluid.
When pouring brake fluid, if diaphragm in the oil tank cap
is stretched, be sure to place it into original position,
(fasten it), and then cap it.
2. Connect a vinyl pipe to the bleeder screw on the wheel
cylinder, caliper bode or LSPV and the other end of the pipe
in a transparent container.
3. Pump the brake pedal several times and hold it depressed.
Loosen the bleed screw to release brake fluid together with
air bubbles.
Tighten the bleeder screw before pressure is released
completely.
4. Repeat the step in paragraph 3 above until the air bubbles
disappear completely.
Securely tighten the bleeder screw when the air bubbles
disappear completely.
5. Repeat the step in paragraph 4 above on the remaining
wheel cylinders.
Bleed the system starting with rear side farthest from the
brake fluid reservoir.
6. Fill the brake fluid reservoir to the specified level.
Pour brake fluid carefully so as not to produce air bubbles.
7. If the cap diaphragm is stretched, fasten the diaphragm and
the sure to cap it after it is placed to the original position.
Note:
Never reuse the old brake fluid.
Page 369 of 1600

BRAKES 5-41
Free length
mm(in.)Set length
mm(in.)Set load
kg(lbs.)
Return spring :
upper
(adjust lever)124.9
(4.917)134.9
(5.311)70.7
(15.4
1.6)
Shoe return
spring : upper112.4
(4.425)121.5
(4.783)20.2
(4.4
0.4)
Shoe return
spring : lower167.2
(6.583)190.2
(7.488)28.02.8
(61.7
6.4)
Clean wheel Cylinder Parts
Always use clean brake fluid to clean wheel cylinder parts.
Note:
Do not use mineral-vase cleaning solvents such as
gasoline, kerosene, acetone, paint thinner, or carbon
tetrachloride.
Clearance Between the Wheel Cylinder
and the Piston
mm(in)
Standard Limit
0.02 - 0.1(0.001 - 0.004) 0.15(0.006)
Piston Cups
Inspect the piston cups for wear, distortion, fatigue, fatigue or
other abnormal conditions.
Measuring the Brake Drum
mm(in)
Standard Limit
Inside diameter 254(10.000) 255.5(10.059)
Run out 0.05(0.002) 0.15(0.006)
Inside diameter 295(11.614) 296.5(11.673)
Run out 0.05(0.02) 0.15(0.006)TFS
TFR
Page 374 of 1600

5-46 BRAKES
MASTER CYLINDER
REMOVAL AND INSTALLATION
BRAKE PEDAL ASSEMBLY
This illustration based on the LHD model.
Removal Steps
1. Brake line
2. Nut ; master cylinder to vacuum servo
3. Master cylinder assembly
Installation Steps
3. Master cylinder assembly
2. Nut ; master cylinder to vacuum servo
1. Brake line
Important Operation - Removal
1. Brake Line
Be very careful not to spill brake fluid on the painted surface.
Damage to the painted surface will result.
Important Operation - Installation
2. Nut ; Master Cylinder to Vacuum Servo
Torque N
m (kgfm/lbft)
1.0 - 1.6 (7 - 12 / 9.8 - 16)
1. Brake Line
Torque N
m (kgfm/lbft)
0.9 - 1.5 (6.5 - 11 / 8.8 - 15)
Page 375 of 1600

BRAKES 5-47
DISASSEMBLY
Disassembly Steps
1. Dust seal
2. Screw
3. Reservoir ; fluid, brake
4. Grommet
5. Ring ; snap
6. Bolt ; stopper7. Gasket
8. Piston assembly ; primary and spring
9. Piston assembly ; secondary and spring
10. Cover ; fluid reservoir
11. Seal
12. Cylinder assembly ; brake, master
Page 376 of 1600

5-48 BRAKES
Important Operations
When disassembling, inspecting or reassembling the master
cylinder assembly, take care not to bring the parts into contact
with mineral oil or dust. Wash the piston cups only with brake
fluid. Do not use gasoline or other mineral-base cleaning
solvents.
5. Ring ; Snap
Remove the snap ring from the cylinder body with pushing in
the primary and secondary pistons.
6. Bolt ; Stopper
Push in the primary and secondary pistons and remove the
stopper bolt completery from the cylinder body, then remove
the primary and secondary piston assemblies.
8. Piston Assembly ; Primary and Spring
9. Piston Assembly ; Secondary and Spring
Don’t remove the spring from the piston.