ECU ISUZU TROOPER 1995 Workshop Manual
[x] Cancel search | Manufacturer: ISUZU, Model Year: 1995, Model line: TROOPER, Model: ISUZU TROOPER 1995Pages: 1928
Page 1858 of 1928
1Q-100 BODY
&d. Arm ret set assembly
&e. Arm rest board
&f. Trim cover
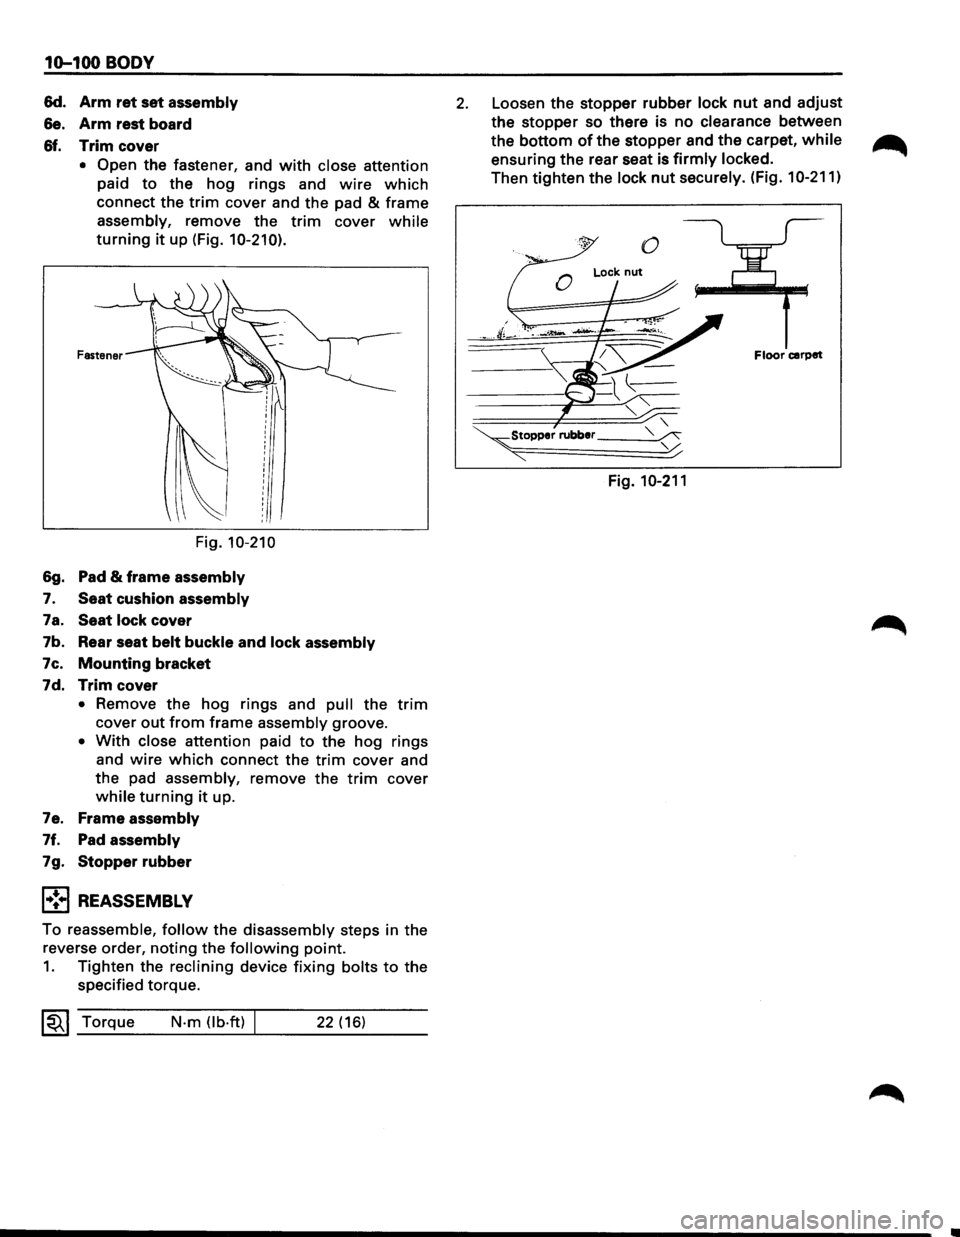
• Open the fastener, and with close attention
paid
to the hog rings and wire which
connect the trim cover and the pad & frame
assembly, remove the trim cover while
turning it up (Fig. 10-210).
Fastener
Fig. 10-210
&g. Pad & frame assembly
7. Seat cushion assembly
7a. Seat lock cover
7b. Rear seat
belt buckle and lock assembly
7c.
Mounting bracket
7d.
Trim cover
• Remove the hog rings and pull the trim
cover out from frame assembly groove.
• With close attention paid to the hog rings
and
wire which connect the trim cover and
the pad
assembly, remove the trim cover
while turning it up.
7e. Frame
assembly
7f. Pad assembly
7g. Stopperrubber
l•!•l REASSEMBLY
To reassemble, follow the disassembly steps in the
reverse order,
noting the following point.
1. Tighten the reclining device fixing bolts to the
specified torque.
~~~ Torque N-m (lb-ft) 22 (16)
2. Loosen the stopper rubber lock nut and adjust
the
stopper so there is no clearance between
the
bottom of the stopper and the carpet, while
ensuring the rear seat is firmly locked.
Then tighten the lock nut securely. (Fig. 10-211)
Floor carpet
~Stopper rubber __ _
"""' Fig. 10-211
Page 1861 of 1928
FRONT SEAT BELT
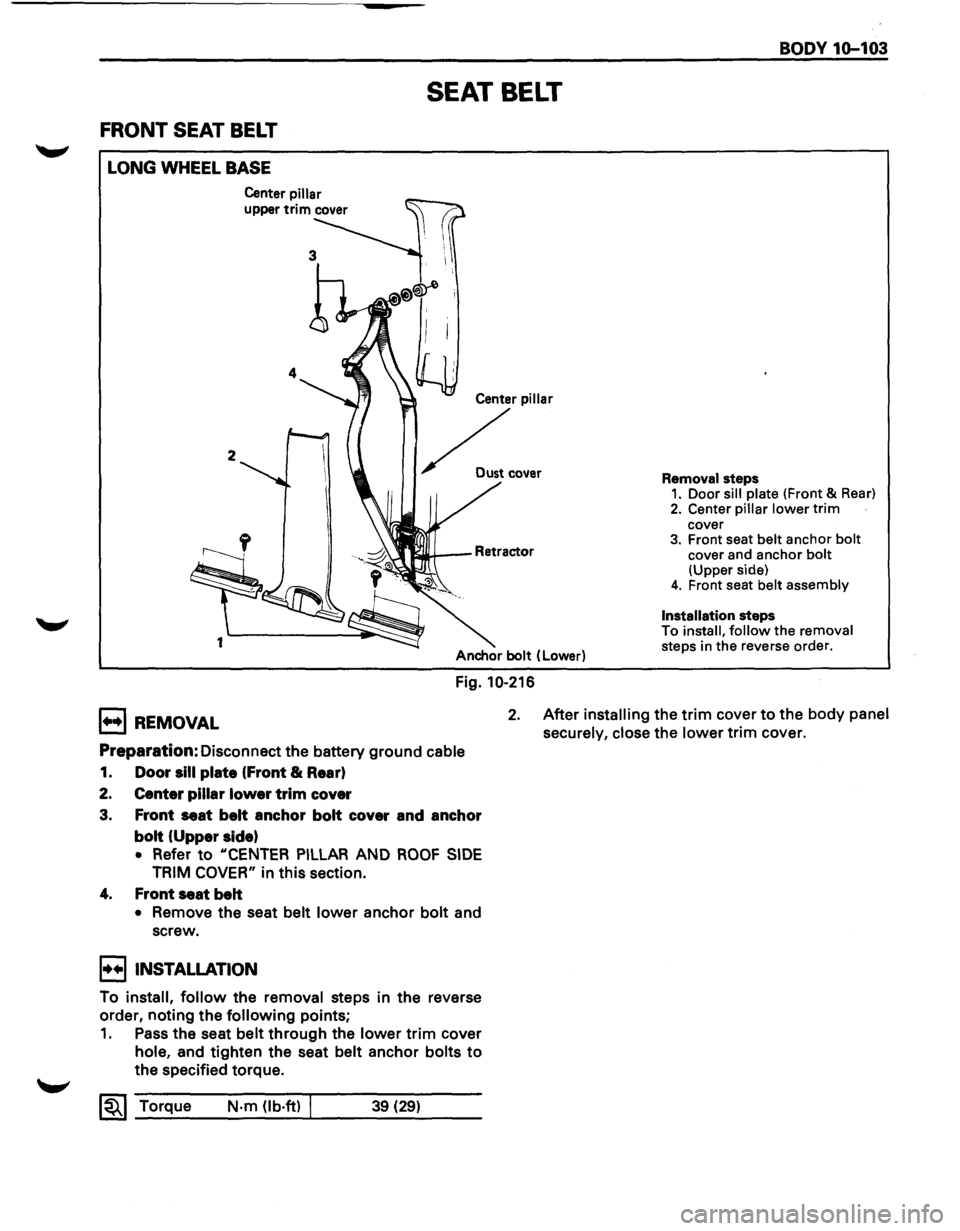
LONG WHEEL BASE
2
1
Center pillar
upper trim cover
SEAT BELT
Center pillar
~ .....
Anchor bolt (Lower)
Fig. 10-216
BODY 1Q-103
Removal steps 1. Door sill plate (Front & Rear)
2. Center pillar lower trim cover 3. Front seat belt anchor bolt cover and anchor bolt (Upper side) 4. Front seat belt assembly
Installation
steps
To install, follow the removal
steps in the reverse order.
B REMOVAL 2. After installing the trim cover to the body panel
securely, close
the lower trim cover.
Preparation: Disconnect the battery ground cable
1. Door sill plate (Front & Rear)
2. Center pillar lower trim cover
3. Front seat belt anchor bolt cover and anchor
bolt (Upper side)
• Refer to "CENTER PILLAR AND ROOF SIDE
TRIM COVER" in this section.
4. Front seat belt
• Remove the seat belt lower anchor bolt and
screw.
I••IINSTALLATION
To install, follow the removal steps in the reverse
order, noting the
following points;
1. Pass the seat belt through the lower trim cover
hole, and tighten the seat belt anchor bolts to
the specified torque.
~~~ Torque N·m (lb·ft) I 39 (29)
Page 1862 of 1928
----
10-104 BODY
SHORT
WHEEL BASE
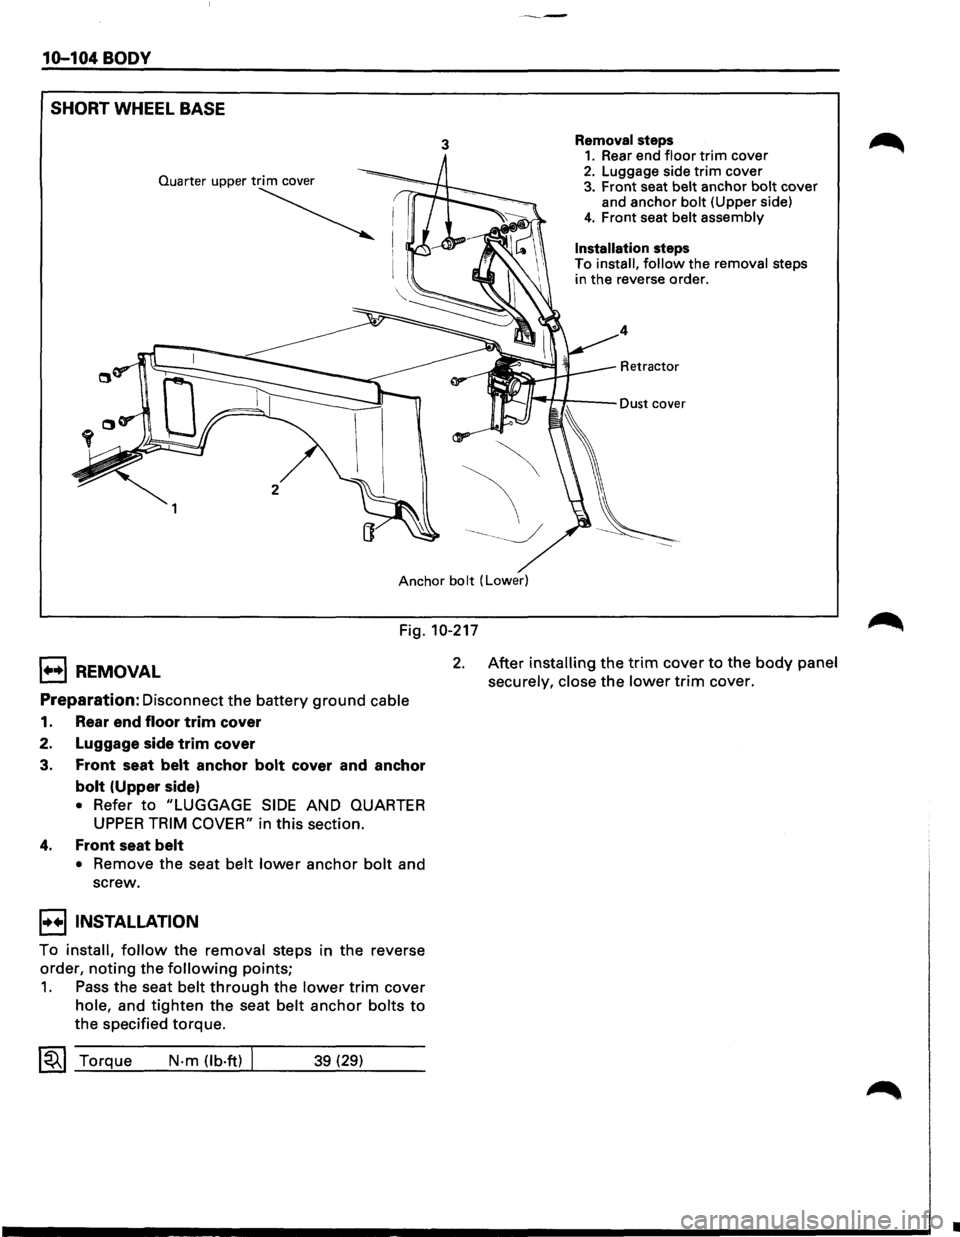
3 Removal steps 1. Rear end floor trim cover 2. Luggage side trim cover 3. Front seat belt anchor bolt cover
and anchor bolt (Upper side)
4. Front seat belt assembly
Installation steps
To install, follow the removal steps
in the reverse order.
4
Retractor
Anchor bolt (Lower)
Fig. 10-217
1++1 REMOVAL
Preparation: Disconnect the battery ground cable
1. Rear end floor trim cover
2. Luggage side
trim cover
3.
Front seat belt anchor bolt cover and anchor
bolt (Upper side)
• Refer to "LUGGAGE SIDE AND QUARTER
UPPER TRIM COVER" in this section.
4. Front seat belt
• Remove the seat belt lower anchor bolt and
screw.
I••IINSTALLATION
To install, follow the removal steps in the reverse
order,
noting the following points;
1. Pass the seat belt through the lower trim cover
hole, and tighten the seat belt anchor bolts to
the specified torque.
~~~ Torque N-m (lb·ft) 39 (29)
2. After installing the trim cover to the body panel
securely, close
the lower trim cover.
•
Page 1863 of 1928
FRONT SEAT BUCKLE ASSEMBLY
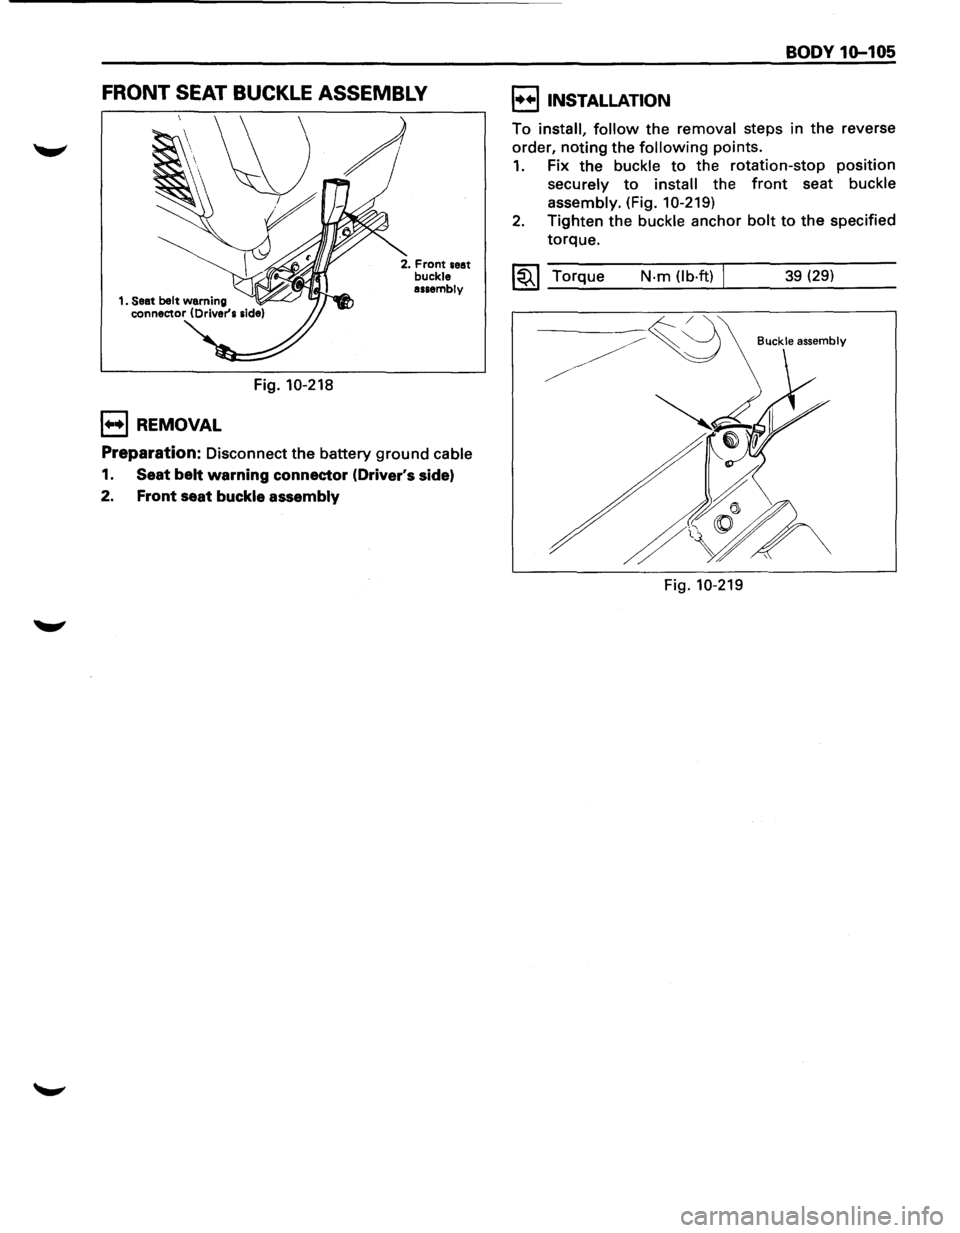
Fig. 10-218
1++1 REMOVAL
2. Front seat buckle assembly
Preparation: Disconnect the battery ground cable
1. Seat belt warning connector (Driver's side)
2. Front seat buckle assembly
BODY 1Q-105
I••IINSTALLATION
To install, follow the removal steps in the reverse
order, noting the following points.
1. Fix the buckle to the rotation-stop position
securely to install the front seat buckle
assembly.
(Fig. 10-219)
2. Tighten the buckle anchor bolt to the specified
torque.
~~~ Torque N·m (lb·ft) I 39 (29)
Buckle assembly
Fig. 10-219
Page 1883 of 1928
1••1 REMOVAL
Preparation: Battery ground cable
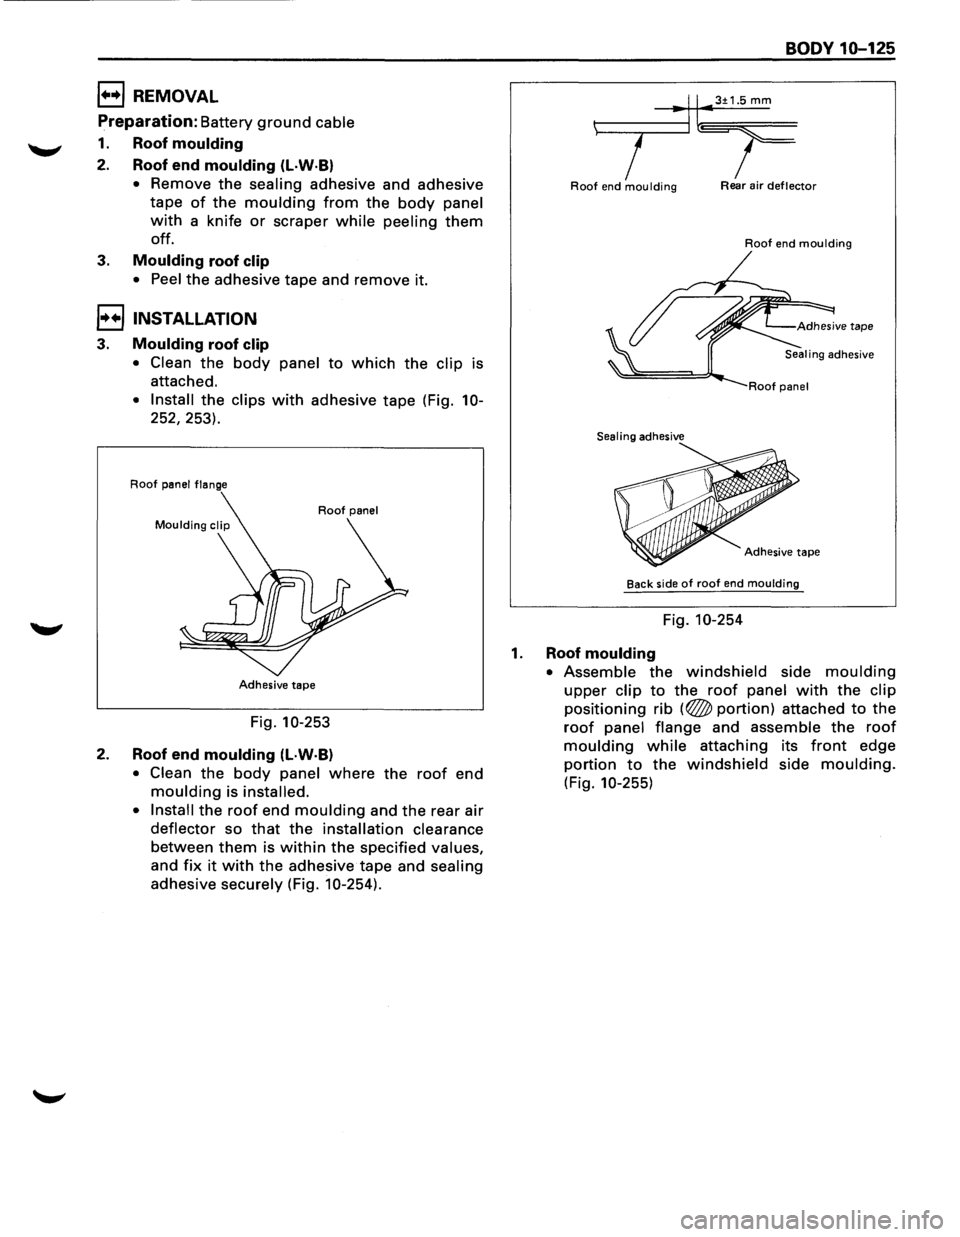
1. Roof moulding
2. Roof end moulding (L·W·B)
• Remove the sealing adhesive and adhesive
tape
of the moulding from the body panel
with a knife or scraper while peeling them
off.
3. Moulding roof clip
• Peel the adhesive tape and remove it.
I••! INSTALLATION
3. Moulding roof clip
• Clean the body panel to which the clip is
attached.
• Install the clips with adhesive tape (Fig. 10-
252, 253).
Roof panel flange
Roof panel
Adhesive tape
Fig. 10-253
2. Roof end moulding (l·W·B)
• Clean the body panel where the roof end
moulding is installed.
• Install
the roof end moulding and the rear air
deflector so that the installation clearance
between them is within the specified values,
and fix it with the adhesive tape and sealing
adhesive securely (Fig. 10-254).
BODY 10-125
t------.,.-lll•3±1.5 mm
7 I Roof end moulding Rear air deflector
Roof end moulding
Sealing adhesive
Adhesive
tape
Back side of roof end moulding
Fig. 10-254
1. Roof moulding
• Assemble the windshield side moulding
upper clip to the roof panel with the clip
positioning rib (~portion) attached to the
roof panel flange and assemble the roof
moulding while attaching its front edge
portion to the windshield side moulding.
(Fig. 10-255)
Page 1885 of 1928
BODY 10-127
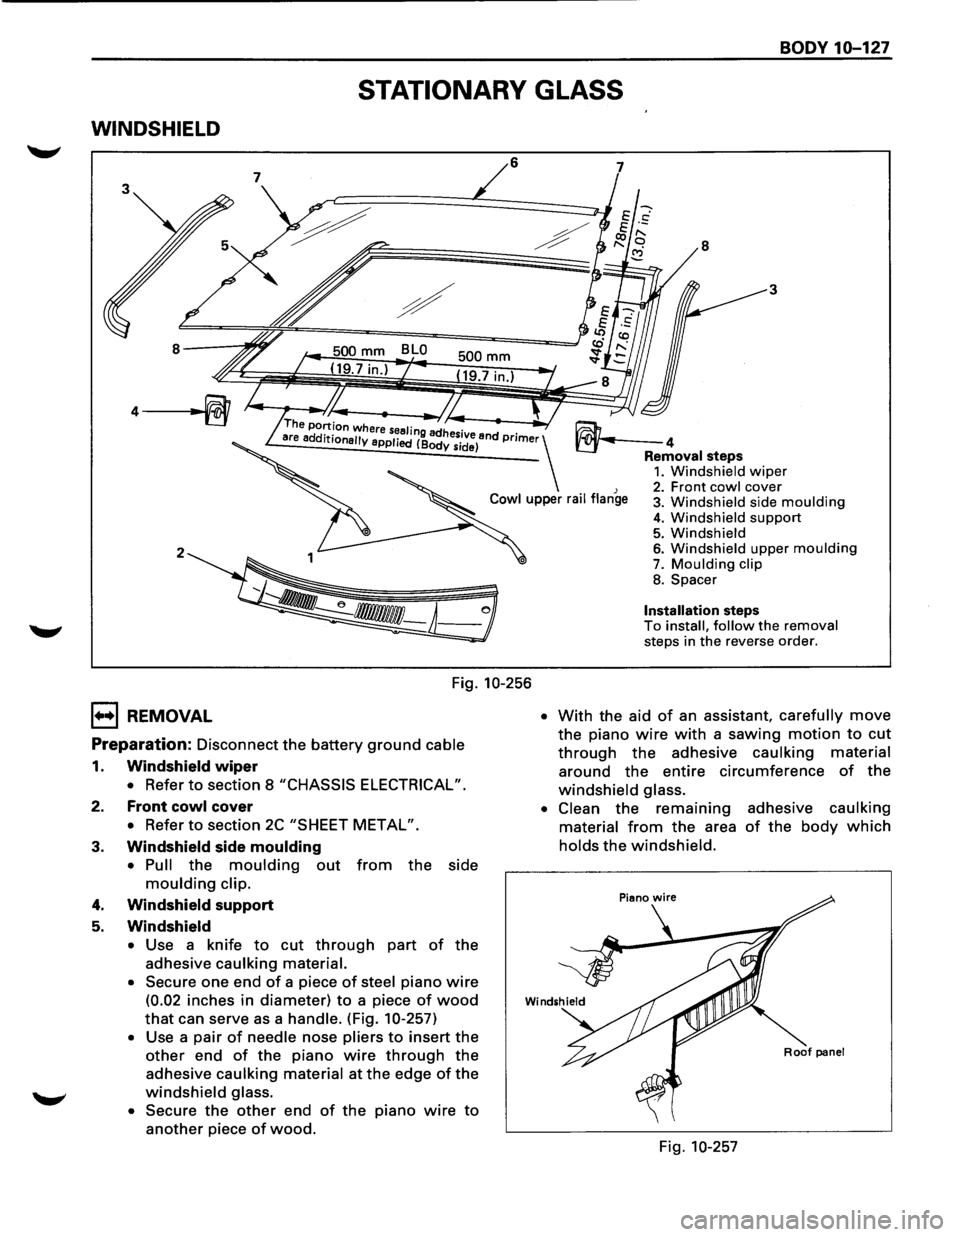
STATIONARY GLASS
WINDSHIELD
6
2
Fig. 10-256
1••1 REMOVAL
Preparation: Disconnect the battery ground cable
1. Windshield wiper
• Refer to section 8 "CHASSIS ELECTRICAL".
2. Front cowl cover
• Refer to section 2C "SHEET METAL".
3. Windshield side moulding
• Pull the moulding out from the side
moulding clip.
4. Windshield support
5. Windshield
• Use a knife to cut through part of the
adhesive caulking material.
•
Secure one end of a piece of steel piano wire
(0.02 inches in diameter) to a piece of wood
that can serve as a handle. (Fig. 10-257)
• Use a pair of needle nose pliers to insert the
other end of the piano wire through the
adhesive caulking material at the edge of the
windshield glass.
•
Secure the other end of the piano wire to
another piece of wood.
7
8
3
~4 Removal steps 1. Windshield wiper 2. Front cowl cover 3. Windshield side moulding
4. Windshield support 5. Windshield 6. Windshield upper moulding 7. Moulding clip
8. Spacer
Installation steps To install, follow the removal steps in the reverse order.
• With the aid of an assistant, carefully move
the piano wire with a sawing motion to cut
through the adhesive caulking material
around the entire circumference of the
windshield glass.
• Clean
the remaining adhesive caulking
material
from the area of the body which
holds the windshield.
Roof panel
Fig. 10-257