battery replacement ISUZU TROOPER 1995 User Guide
[x] Cancel search | Manufacturer: ISUZU, Model Year: 1995, Model line: TROOPER, Model: ISUZU TROOPER 1995Pages: 1928
Page 634 of 1928
68-6 ENGINE COOLING
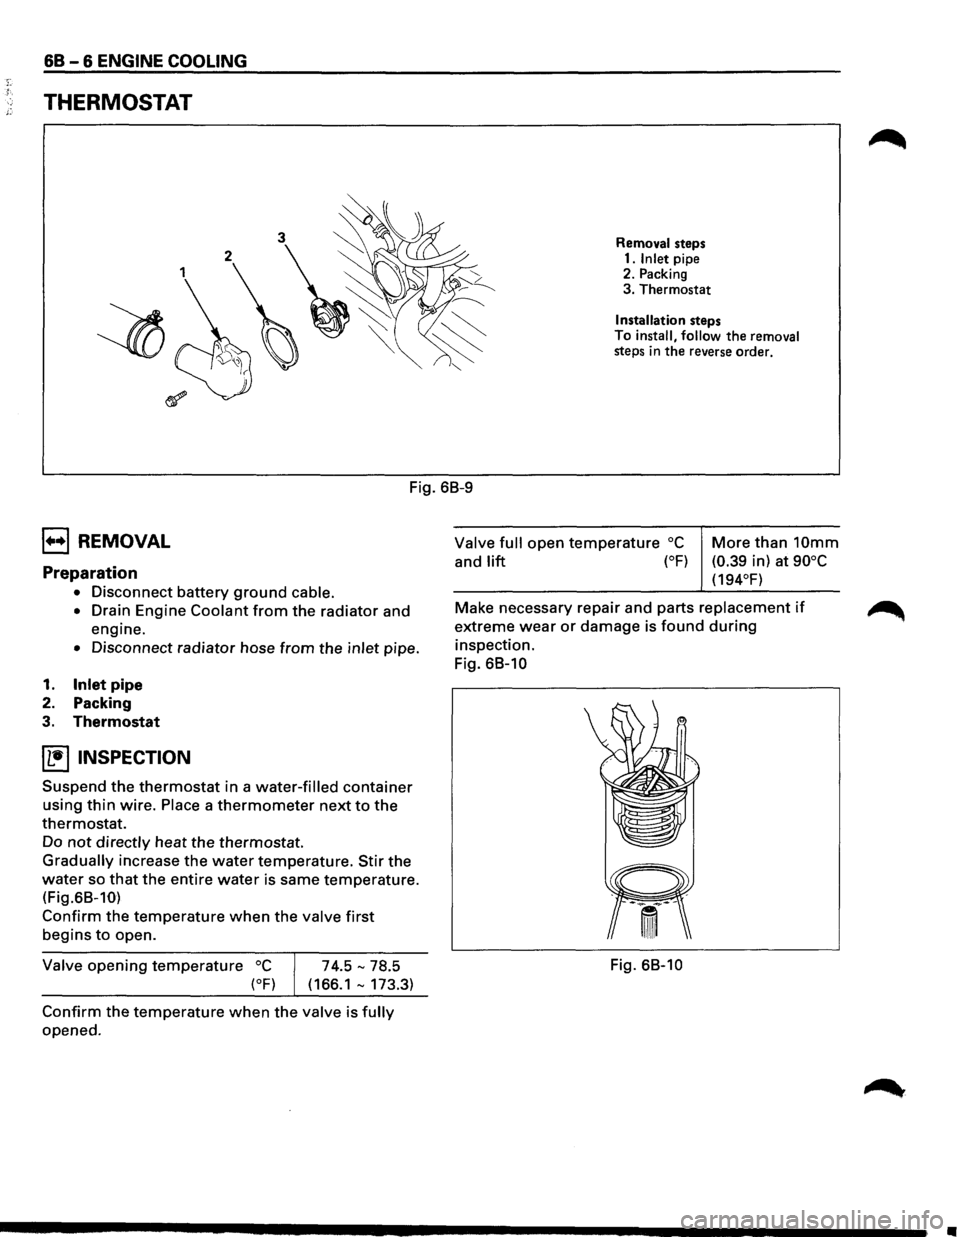
THERMOSTAT
Removal steps
1. Inlet pipe
2. Packing
3. Thermostat
Installation steps
To
install, follow the removal steps in the reverse order.
Fig. 68-9
B REMOVAL
Preparation
• Disconnect battery ground cable.
•
Drain Engine Coolant from the radiator and
engine.
• Disconnect radiator hose from the inlet pipe.
1. Inlet pipe
2. Packing
3.
Thermostat
~ INSPECTION
Suspend the thermostat in a water-filled container
using thin wire. Place a thermometer next to the
thermostat.
Do not directly heat the thermostat.
Gradually increase the water temperature. Stir the
water so that the entire water is same temperature.
(Fig.68-10)
Confirm the temperature when the valve first
begins to open.
Valve opening temperature oc
(oF)
74.5-78.5
( 166.1 -173.3)
Confirm the temperature when the valve is fully
opened.
Valve full open temperature oc
and lift (°F)
More than 10mm
(0.39 in) at 90°C
(194°F)
Make necessary repair and parts
replacement if
extreme wear or damage is found during
inspection.
Fig.
68-10
Fig. 68-10
•
Page 732 of 1928
6E2-36 DRIVEABILITV AND EMISSIONS
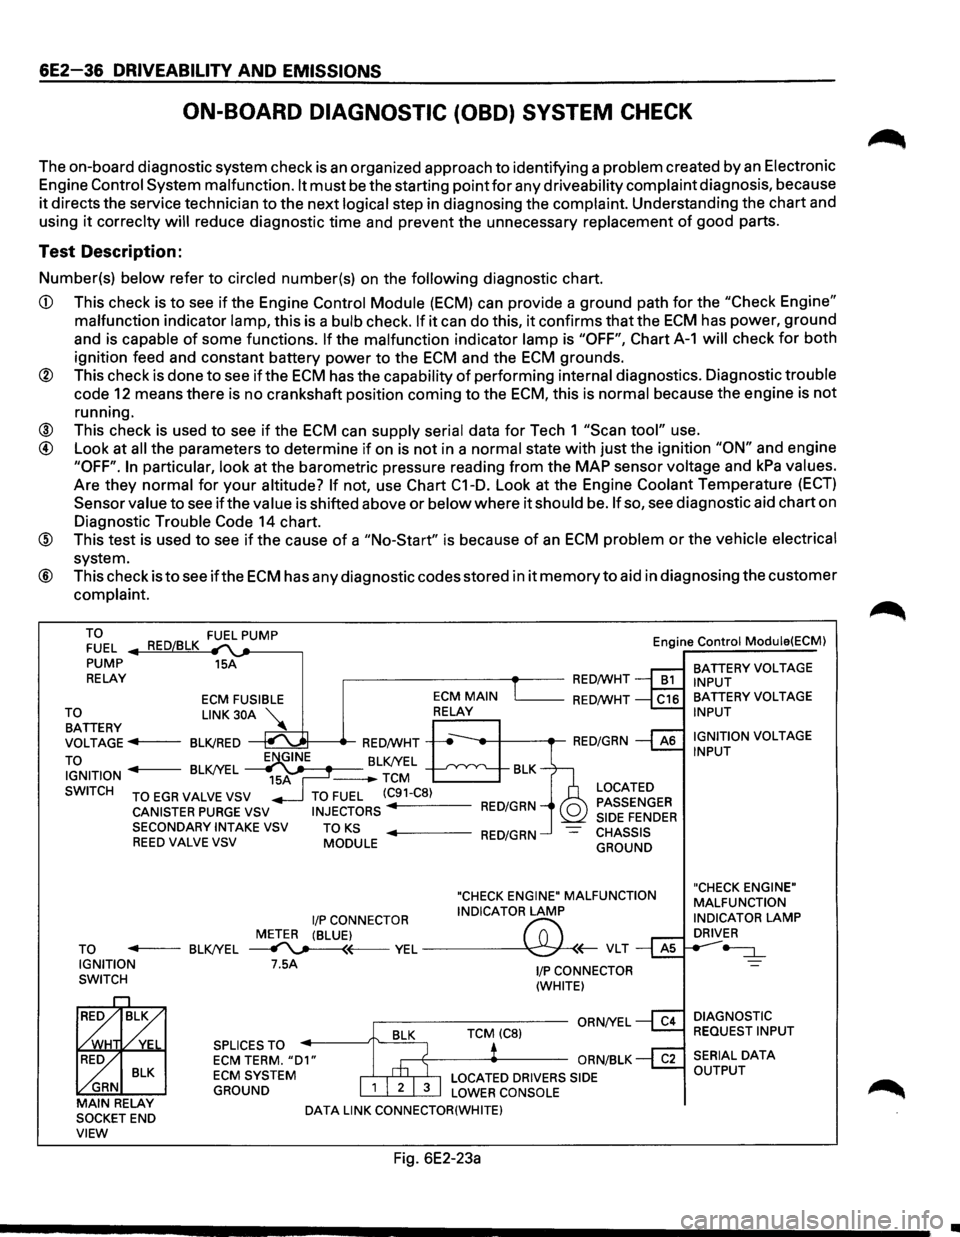
ON-BOARD DIAGNOSTIC (OBD) SYSTEM CHECK
The on-board diagnostic system check is an organized approach to identifying a problem created by an Electronic
Engine
Control System malfunction. It must be the starting point for any driveability complaint diagnosis, because
it directs the service technician to the next logical step in diagnosing the complaint. Understanding the chart and
using
it correclty will reduce diagnostic time and prevent the unnecessary replacement of good parts.
Test Description:
Number(s) below refer to circled number(s) on the following diagnostic chart.
CD This check is to see if the Engine Control Module (ECM) can provide a ground path for the "Check Engine"
malfunction indicator lamp, this is a bulb check. If it can do this, it confirms that the ECM has power, ground
and is capable
of some functions. If the malfunction indicator lamp is "OFF", Chart A-1 will check for both
ignition feed and constant battery power to the
ECM and the ECM grounds.
® This check is done to see if the ECM has the capability of performing internal diagnostics. Diagnostic trouble
code
12 means there is no crankshaft position coming to the ECM, this is normal because the engine is not
running.
® This check is used to see if the ECM can supply serial data for Tech 1 "Scan tool" use.
@ Look at all the parameters to determine if on is not in a normal state with just the ignition "ON" and engine
"OFF". In particular, look at the barometric pressure reading from the MAP sensor voltage and kPa values.
Are they normal for
your altitude? If not, use Chart C1-D. Look at the Engine Coolant Temperature (ECT)
Sensor value to see if the value is shifted above or below where it should be. If so, see diagnostic aid chart on
Diagnostic Trouble
Code 14 chart.
@ This test is used to see if the cause of a "No-Start" is because of an ECM problem or the vehicle electrical
system.
® This check is to see ifthe ECM has any diagnostic codes stored in it memory to aid in diagnosing the customer
complaint.
TO FUEL
PUMP
RELAY 15A
,------------+--RED/WHT Engine
Control Module(ECM)
BATTERY
VOLTAGE INPUT
ECM FUSIBLE L_ __ RED/WHT
~~TTERY LINK 30A ~
VOLTAGE ..,.,.f----BLK/RED
TO
~t-----tr-RED/WHT -----,t--+---.-RED/GRN
IGNITION BLK/YEL J-------BLK/YEL -TCM BLK
SWITCH
TO EGR VALVE VSV
CANISTER PURGE VSV SECONDARYINTAKEVSV REED VALVE VSV
TO FUEL (C91-C8)
INJECTORS RED/GRN
TO KS MODULE ..,._ ___ RED/GRN
LOCATED
PASSENGER
SIDE
FENDER CHASSIS
GROUND
"CHECK ENGINE" MALFUNCTION
I/P CONNECTOR INDICATOR LAMP
METER (BLUE)
f'7:' TO ..,._ __ BLK/YEL ~~VEL~(;-VLT IGNITION
SWITCH 7.5A
SPLICES TO
ECM TERM. "D1" ECM SYSTEM
GROUND
DATA LINK CONNECTOR(WHITE)
Fig. 6E2-23a
1/P CONNECTOR
(WHITE)
BATTERY VOLTAGE INPUT
IGNITION
VOLTAGE INPUT
"CHECK ENGINE"
MALFUNCTION
INDICATOR
LAMP DRIVER
-=:J._
DIAGNOSTIC
REQUEST INPUT
•
Page 799 of 1928
Park/Neutral Position (PNP) Switch (Auto Only)
The Park/Neutral position (PNP) switch indicates to the
Engine Control Module
(ECM) when the transmission
is in park, neutral
or drive. This information is used for
the exhaust gas recirculation, and the idle air control
valve operation.
NOTE:
• Vehicle
should not be driven with PNP switch
disconnected,
as idle quality will be affected and a
possible false diagnostic trouble code
(DTC) 24
(vehicle speed sensor).
DRIVEABILITY AND EMISSIONS 6E2-103
See DIAGNOSIS AND GENERAL SERVICE Section for
more information on the PNP switch. The PNP switch is
part
of the neutral/start and backup light switch
assembly mounted on the transmission.
See CHART C-
1 A for PNP switch check.
DIAGNOSIS
To read the DTC(s), use a "Scan tool" or ground the
diagnostic test terminal,
with the engine not running
and the ignition
"ON". The "Check Engine" malfunction
indicator lamp
will flash DTC 12 three times and then
flash each
DTC stored in memory three times. All
DTC(s) stored in memory will have been read when
DTC 12 is flashed again.
No new
DTC(s) can be stored when in the diagnostics
test mode (diagnostics lead grounded). This
eliminates confusion while the system is being
serviced.
To clear the
DTC(s) from memory:
• Ignition "OFF".
•
Disconnect main fuse located in the under hood
fuse/relay center near the battery.
Since the ECM can have a failure which may affect only
one circuit, following the diagnostic procedures in this
section
will determine which circuit has a problem and
where
it is.
If a diagnostic chart indicates thatthe ECM connections
or ECM is the cause of a problem, and the ECM is
replaced,
but does not correct the problem, one of the
following may be the reason.
• There is a problem with the ECM terminal
connections-The diagnostic chart will say ECM
connections or ECM. The terminals may have to
be removed from the connector in order to check
them properly.
• The ECM is not correct for the Vehicle-Ane
incorrect
ECM may cause a malfunction and may
set a DTC.
• The problem is intermittent -This means that
the problem is
not present at the time the system is
being checked.
In this case, refer to the
"Symptoms" portion of the manual and make a
careful physical inspection
of all portions of the
system involved.
• Shorted solenoid, relay coil, or harness
Solenoid and relays are turned "ON" and "OFF" by
the
ECM, using internal electronic switches called
"drivers".
Each driver is part of a group of four,
called "quad-drivers". Failure of one driver can
damage any other driver in the set. A
shorted solenoid, relay coil, or harness in a l-EFT
SHCI
computer will not damage the ECM, but will
cause the circuit and controlled component to be
inoperative. When the circuit fault is not present or
has been repaired, the "quad-driver" will again
operate in a normal manner due to its fault
protected design. If a fault has been repaired in a
circuit controlled by a "quad-driver", the original
ECM should be reinstalled and the circuit checked
for proper operation. ECM replacement will not be
necessary if the repaired circuit or component now
operates correctly.
J 34636 or BT-8405 testers or equivalent provide a fast,
accurate means
of checking for a shorted coil or a short
to battery positive voltage.
• The replacement ECM may be faulty-After the
ECM is replaced, the system should be re-checked
for proper operation. If the diagnostic chart again
indicates the
ECM is the problem, substitute a
known good
ECM. Although this is a rare
condition,
it could happen.
ENGINE CONTROL MODULE (ECM)
A faulty ECM will be determined in the diagnostic
charts.
ELECTRONICALL V ERASABLE
PROGRAMMABLE READ
ONL V MEMORY
A faulty electrically erasable programmable read only
memory, which is part of the ECM, will set a DTC 51.
ENGINE CONTROL MODULE (ECM)
INPUTS
All of the sensors and input switches can be diagnosed
by the use
of "Scan tool".
Following is a short description of how the sensors and
switches can be diagnosed by the use
"Scan tool". The
"Scan tool" can also be used to compare the values for
a normal running engine with the engine you're
diagnosing.
Page 801 of 1928
wcAUTION:
' • When replacing the production Engine Control
Module
(ECM) with a service ECM (controller),
it is important to transfer the broadcast
diagnostic
trouble code and production ECM
number to the service ECM label. Please do not
record on ECM cover. This will allow positive
identification
of ECM parts throughout the
service
life of the vehicle.
DRIVEABILITV AND EMISSIONS 6E2-1 05
\fCAUTION:
' • To prevent internal ECM damage, the ignition
must be
"OFF" when disconnecting or
reconnecting power
to ECM (for example;
battery cable, ECM pigtail, ECM fuse, jumper
cables etc.)
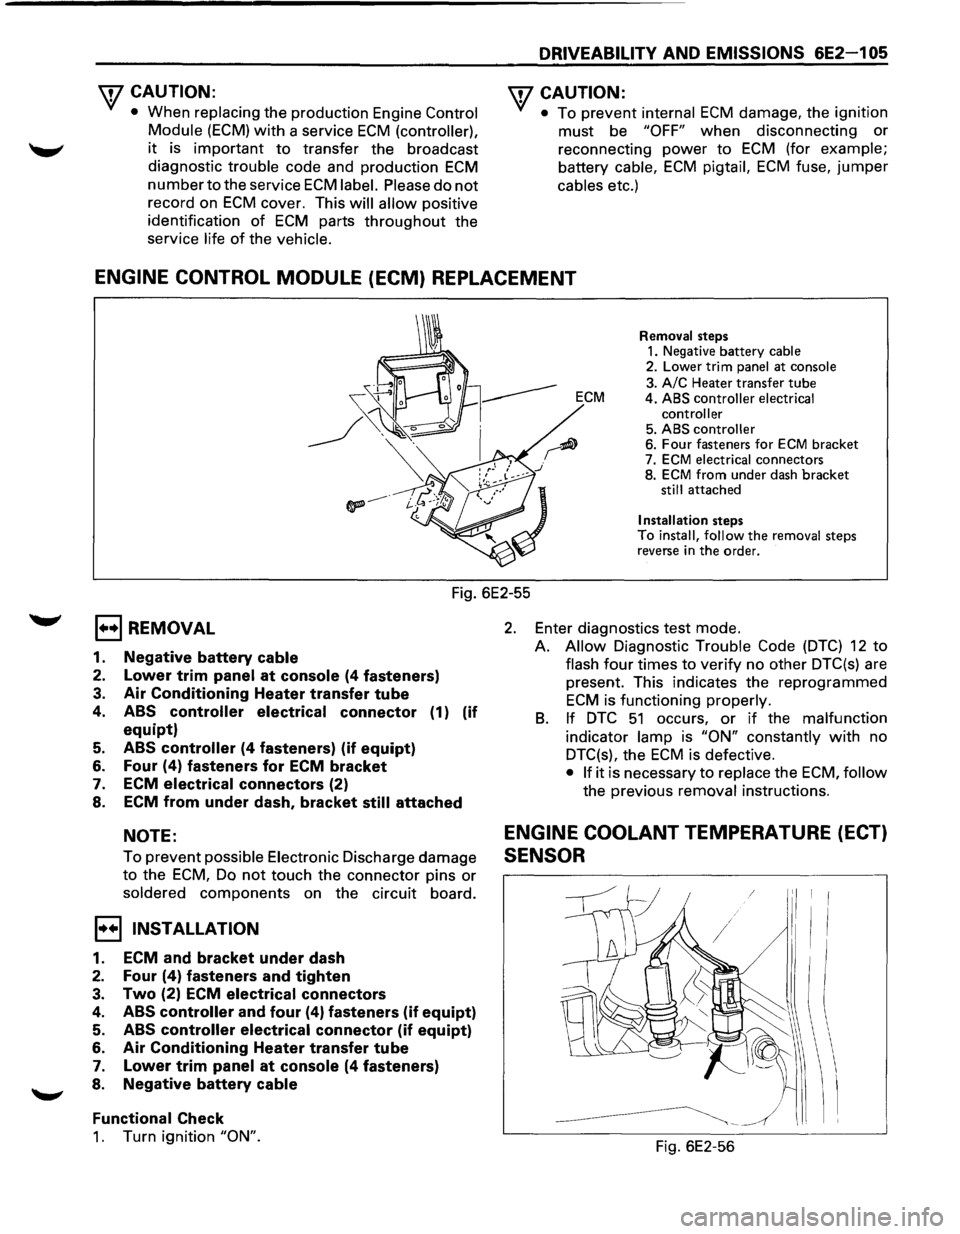
ENGINE CONTROL MODULE (ECM) REPLACEMENT
Removal steps 1. Negative battery cable 2. Lower trim panel at console
3. A/C Heater transfer tube ECM 4. ABS controller electrical
controller
5. ABS controller 6. Four fasteners for ECM bracket
7. ECM electrical connectors
8. ECM from under dash bracket still attached
Installation steps To install, follow the removal steps
reverse in the order.
Fig. 6E2-55
EJ REMOVAL
1. Negative battery cable
2. Lower trim panel at console (4 fasteners)
3. Air Conditioning Heater transfer tube
4. ABS controller electrical connector (1) (if
equipt)
5. ABS controller (4 fasteners) (if equipt)
6. Four (4) fasteners for ECM bracket
7. ECM
electrical connectors (2)
8. ECM from under dash, bracket
still attached
NOTE:
To prevent possible Electronic Discharge damage
to the ECM, Do not touch the connector pins or
soldered components on the circuit board.
I•+! INSTALLATION
1. ECM and bracket under dash
2. Four (4) fasteners and tighten
3. Two (2) ECM electrical connectors
4. ABS controller and four (4) fasteners (if equipt)
5. ABS controller electrical connector (if equipt)
6. Air Conditioning Heater transfer tube
7. Lower trim panel at console (4 fasteners)
8. Negative battery
cable
Functional
Check
1. Turn ignition "ON".
2. Enter diagnostics test mode.
A.
Allow Diagnostic Trouble Code (DTC) 12 to
flash four times to verify no other DTC(s) are
present. This indicates the reprogrammed
ECM is functioning properly.
B. If DTC 51 occurs, or if the malfunction
indicator lamp is "ON" constantly with no
DTC(s), the
ECM is defective.
• If it is necessary to replace the ECM, follow
the previous removal instructions.
ENGINE COOLANT TEMPERATURE (ECT)
SENSOR
Fig. 6E2-56
Page 803 of 1928
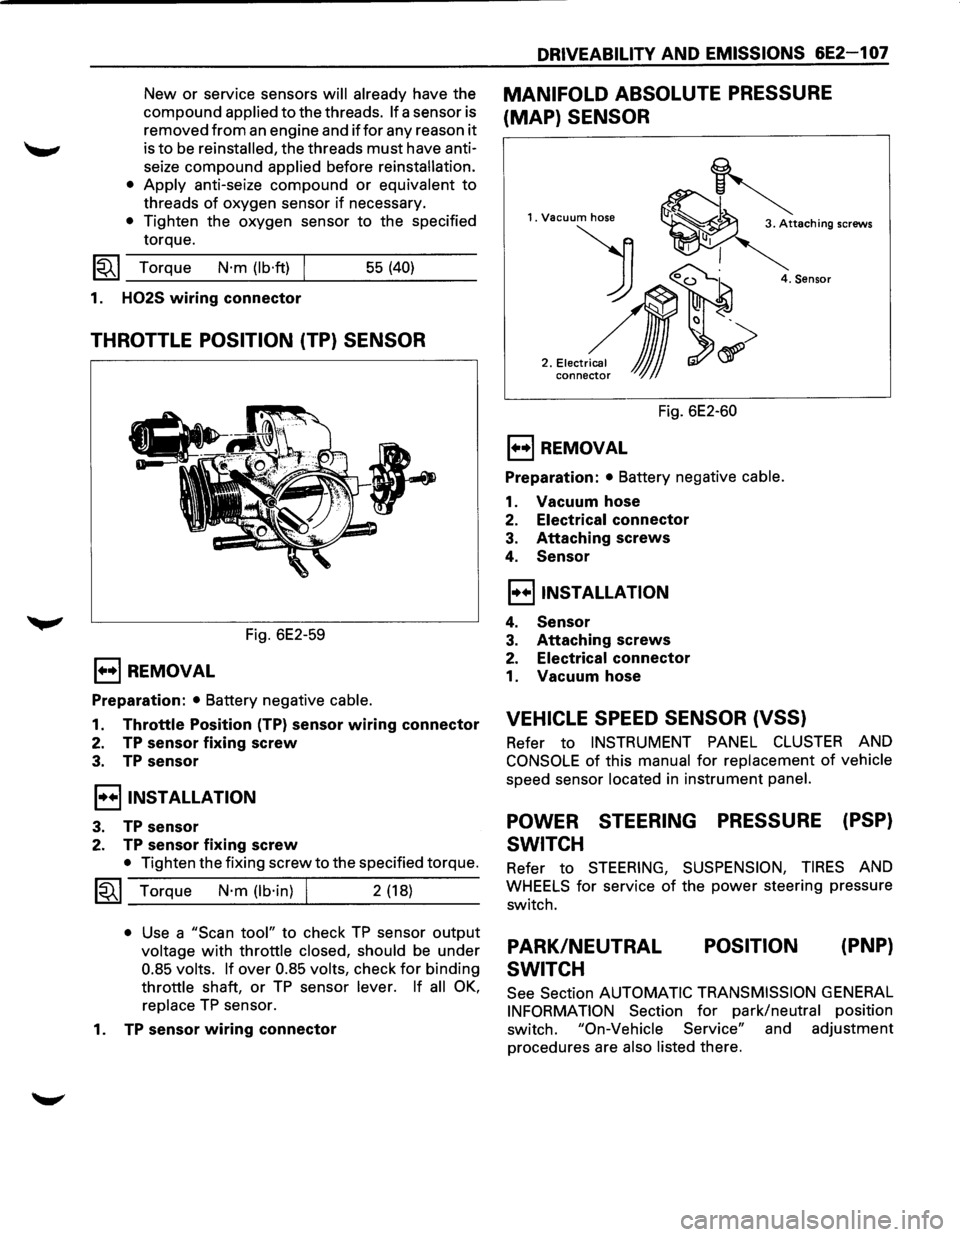
New or service sensors will already have the
compound
applied to the threads. If a sensor is
removed
from an engine and iffor any reason it
is to be reinstalled, the threads must have anti
seize compound
applied before reinstallation.
•
Apply anti-seize compound or equivalent to
threads of oxygen sensor if necessary.
• Tighten the oxygen sensor to the specified
torque.
1~1 Torque N·m (lb·ft) 55 (40)
1. H02S wiring connector
THROTTLE POSITION (TP) SENSOR
Fig. 6E2-59
E) REMOVAL
Preparation: • Battery negative cable.
1. Throttle Position (TP) sensor wiring connector
2. TP sensor fixing screw
3. TP sensor
I••IINSTALLATION
3. TP sensor
2. TP sensor fixing screw
• Tighten the fixing screw to the specified torque.
~~~ Torque N·m (lb·in) I 2 (18)
• Use a "Scan tool" to check TP sensor output
voltage with throttle closed, should be under
0.85 volts. If over 0.85 volts, check for binding
throttle shaft, or TP sensor lever. If all OK,
replace TP sensor.
1.
TP sensor wiring connector
DRIVEABILITY AND EMISSIONS 6E2-1 07
MANIFOLD ABSOLUTE PRESSURE
(MAP) SENSOR
1. Vacuum hose
) 0~
2 .• ,.~,,~,~
conne~ JJJ
4. Sensor
Fig. 6E2-60
E) REMOVAL
Preparation: • Battery negative cable.
1. Vacuum hose
2. Electrical connector
3. Attaching screws
4. Sensor
I••IINSTALLATION
4. Sensor
3. Attaching screws
2. Electrical connector
1. Vacuum hose
VEHICLE SPEED SENSOR (VSS)
Refer to INSTRUMENT PANEL CLUSTER AND
CONSOLE of this manual for replacement of vehicle
speed sensor located in instrument panel.
POWER STEERING PRESSURE (PSP)
SWITCH
Refer to STEERING, SUSPENSION, TIRES AND
WHEELS for service of the power steering pressure
switch.
PARK/NEUTRAL
SWITCH POSITION
(PNP}
See
Section AUTOMATIC TRANSMISSION GENERAL
INFORMATION Section for park/neutral position
switch.
"On-Vehicle Service" and adjustment
procedures are
also listed there.
Page 818 of 1928
6E2-122 DRIVEABILITV AND EMISSIONS
INDUCTION AIR CONTROL PLATE
SYSTEM
Refer to CHART C-2D to diagnose the Induction air
control plate system.
ON-VEHICLE SERVICE
FUEL PUMP RELAY
The fuel pump relay is mounted in the engine
compartment.
Other than checking for loose
connectors, the only service possible is replacement.
MUL TIPORT FUEL INJECTION
COMPONENTS
WCAUTION:
VI • To reduce the risk of fire and personal injury, it
is necessary to relieve the fuel system pressure
before servicing
fuel system components.
• After relieving system pressure, a small
amount of fuel may be released when servicing
fuel lines or connections. In order to reduce the
chance
of personal injury, cover fuel line
fittings with a shop towel before disconnecting,
to catch any
fuel that may leak out. Place the
towel in an approved container when
disconnect is completed.
Fuel Pressure Relief Procedure
1. Remove fuel cap.
2. Remove fuel pump relay from underhood relay
box.
3. Start engine and allow to stall.
4. Crank engine for additional 30 seconds.
5. Remove negative battery cable.
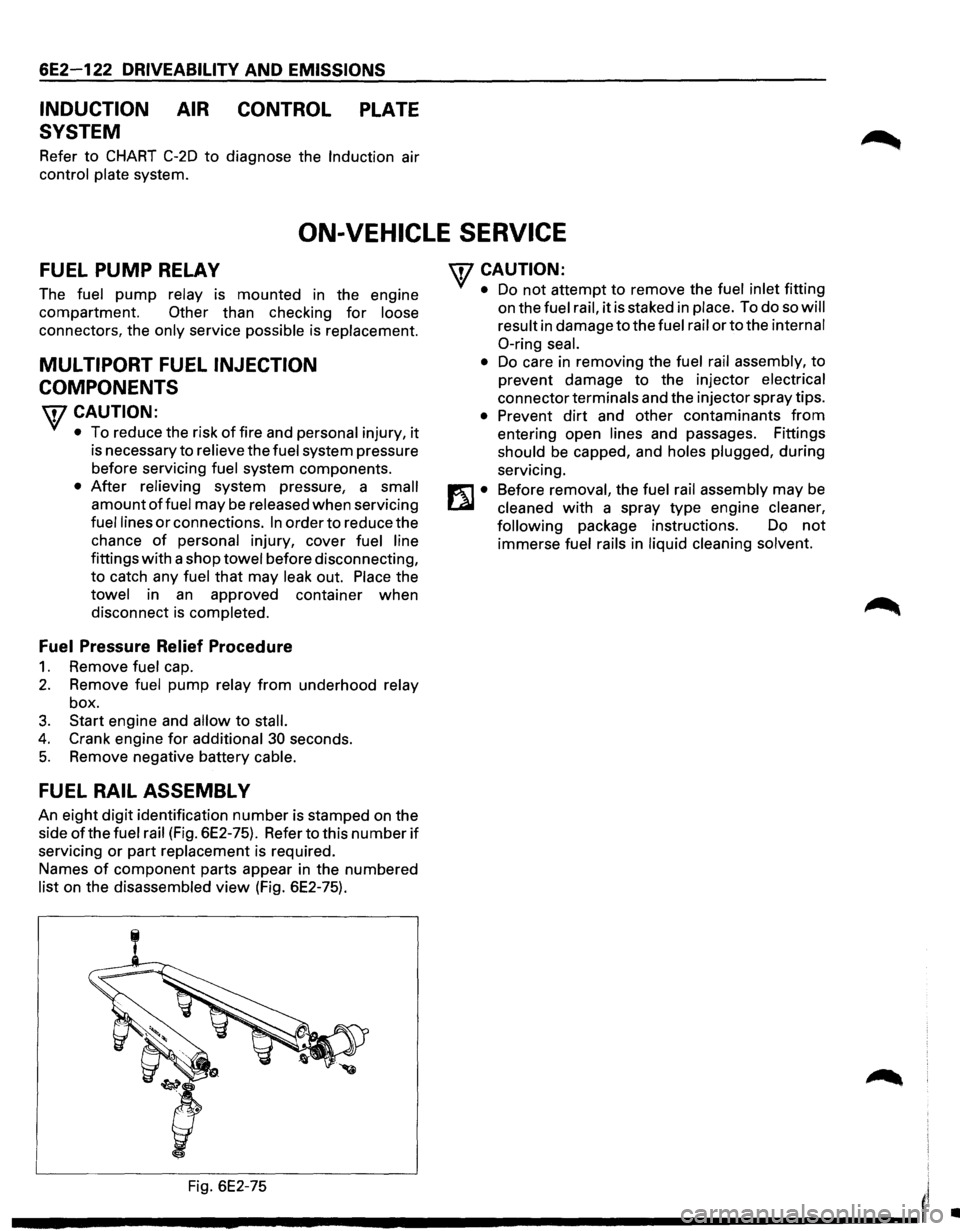
FUEL RAIL ASSEMBL V
An eight digit identification number is stamped on the
side
ofthe fuel rail (Fig. 6E2-75). Refer to this number if
servicing or part replacement is required.
Names
of component parts appear in the numbered
list on the disassembled view (Fig. 6E2-75).
'fCAUTION:
• Do not attempt to remove the fuel inlet fitting
on the
fuel rail, it is staked in place. To do so will
result
in damage to the fuel rail or to the internal
0-ring seal.
•
Do care in removing the fuel rail assembly, to
prevent damage to the injector
electrical
connector terminals and the injector spray tips.
• Prevent dirt and other contaminants from
entering open lines and passages. Fittings
should be capped, and holes plugged, during
servicing.
Before
removal, the fuel rail assembly may be
cleaned with a spray type engine cleaner,
following
package instructions. Do not
immerse fuel rails in liquid cleaning solvent.
Fig. 6E2-75
I'
---------------------'
•
Page 820 of 1928
6E2-124 DRIVEABILITV AND EMISSIONS
E) REMOVAL
Preparation: • Engine hood
• Battery negative cable
1.
Air cleaner assy
2.
Accelerator pedal cable
•
Disconnect from throttle body and cable
brackets.
3. Canister vacuum hose
• Disconnect from vacuum switch valve (VSV).
4. Vacuum booster hose
• Disconnect from Common chamber duct.
5. Connectors
• Disconnect idle air control valve, throttle
position sensor, manifold absolute pressure,
canister
VSV, exhaust gas recirculation (EGR)
VSV, intake air temperature and VSV.
6. High tension cable
• Remove from cylinder heads.
7. Electronic ignition (EI) module assy
• Disconnect 3 connector from El module.
• Remove 3 bolts from El bracket and El assy.
8.
Throttle body (TB)
• Remove 4 bolts from TB.
9. Vacuum hoses
• Disconnect canister VSV and EGR VSV vacuum
hose
from TB.
10. Fuel pressure control valve vacuum hose
• Disconnect from common chamber duct.
11.
PCV hose
• Disconnect from common chamber duct.
12.
Evaporate emission canister purge hose
• Disconnect from common chamber duct.
13.
EGR valve assy
• Remove 4 bolts from common chamber duct
and exhaust manifold.
14.
Common chamber duct
• Remove 4 bolts, 4 nuts and 3 duct bracket fixing
bolts.
• Remove ground cable fixing bolt from rear of
common chamber duct.
15.
Common chamber
• Remove 6 bolts and 2 nuts.
• Remove common chamber bracket fixing bolts
from rear of common chamber.
16. Fuel
hose
• Feed and return hose from fuel pipe and 2 fixing
bolts
from cylinder head. 17.
Fuel
rail assembly
• Remove fuel injector connector.
• Remove fuel rail fixing bolts.
• Remove fuel rail assy.
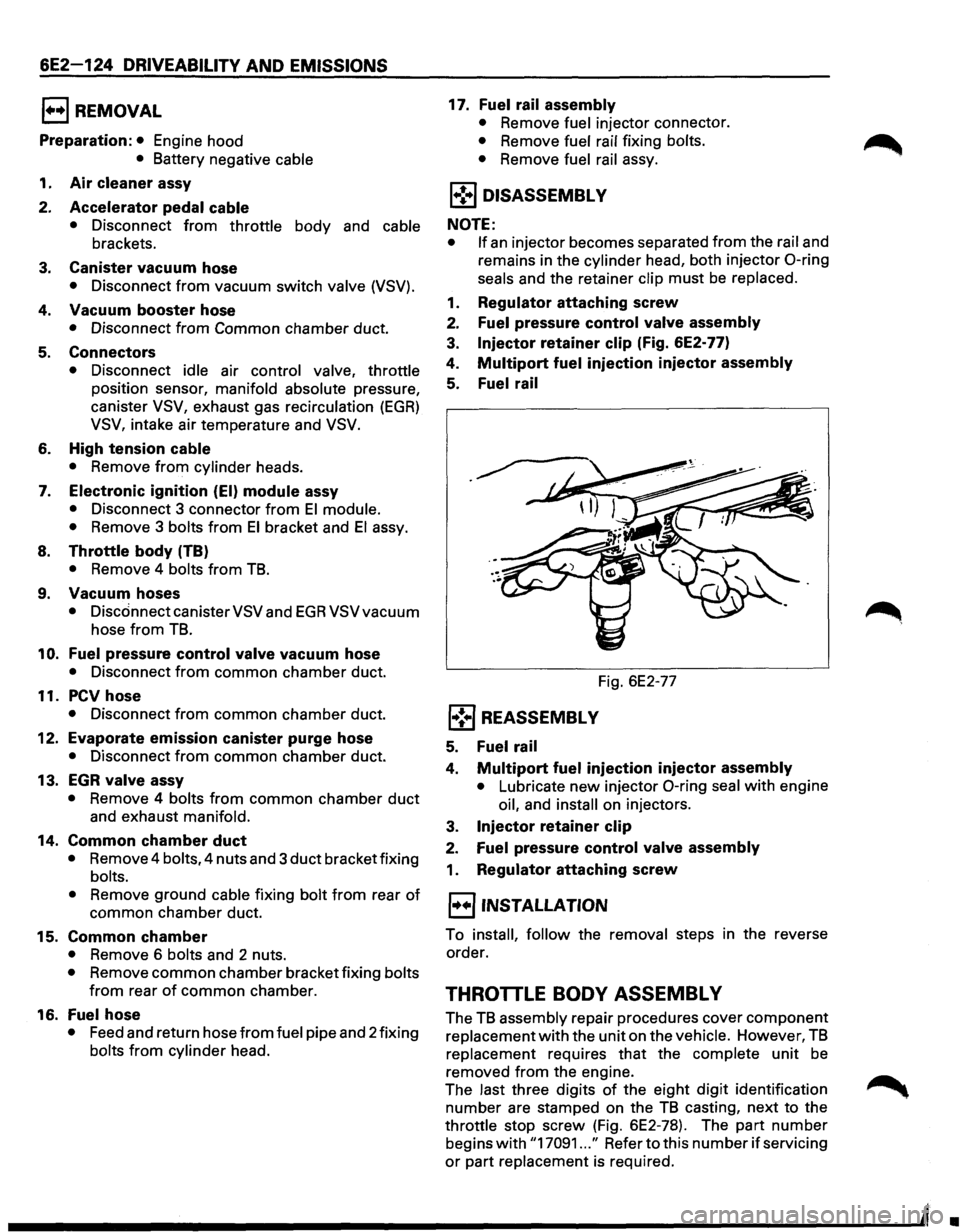
j .. !•l DISASSEMBL V
NOTE:
• If
an injector becomes separated from the rail and
remains in the cylinder head, both injector
0-ring
seals and the retainer clip must be replaced.
1.
Regulator attaching screw
2. Fuel pressure control valve assembly
3. Injector retainer clip (Fig. 6E2-77)
4.
Multipart fuel injection injector assembly
5. Fuel rail
Fig. 6E2-77
l•! .. j REASSEMBL V
5. Fuel rail
4. Multipart fuel injection injector assembly
• Lubricate new injector 0-ring seal with engine
oil, and
install on injectors.
3.
Injector retainer clip
2. Fuel pressure control valve assembly
1. Regulator attaching screw
l·u·jiNSTALLATION
To install, follow the removal steps in the reverse
order.
THROTTLE BODY ASSEMBL V
The TB assembly repair procedures cover component
replacement
with the unit on the vehicle. However, TB
replacement requires that the complete unit be
removed from the engine.
The last three digits
of the eight digit identification
number are stamped on the
TB casting, next to the
throttle stop screw (Fig. 6E2-78). The part number
begins
with "17091 ... " Refer to this number if servicing
or part replacement is required.
•
Page 942 of 1928
7A-70 AUTOMATIC TRANSMISSION (4L30-E)
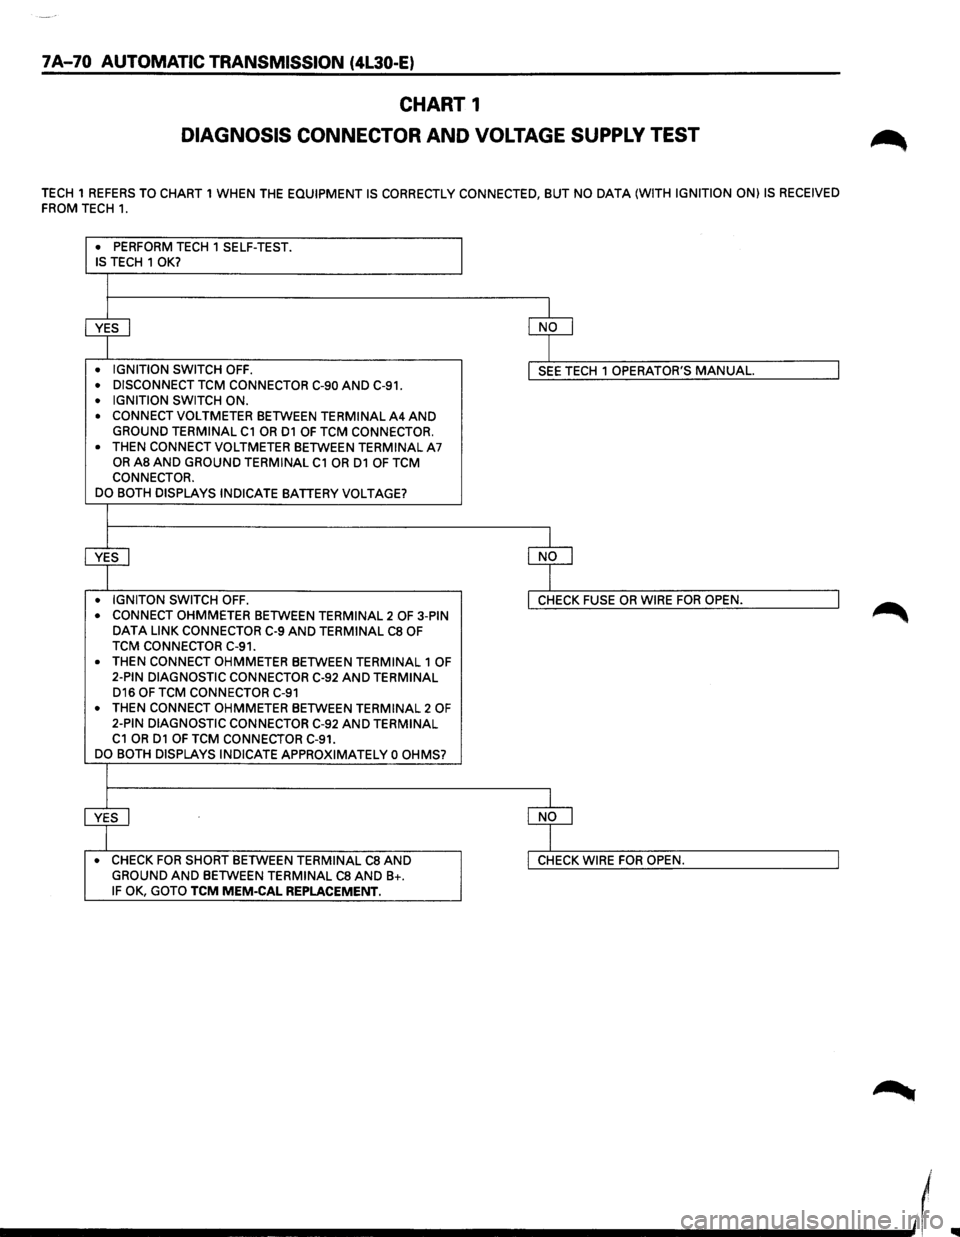
CHART 1
DIAGNOSIS CONNECTOR AND VOLTAGE SUPPLY TEST
TECH 1 REFERS TO CHART 1 WHEN THE EQUIPMENT IS CORRECTLY CONNECTED, BUT NO DATA (WITH IGNITION ON) IS RECEIVED
FROM TECH 1.
• PERFORM TECH 1 SELF-TEST . IS TECH 1 OK?
~ ~
• IGNITION SWITCH OFF . I SEE TECH 1 OPERATOR'S MANUAL. I • DISCONNECT TCM CONNECTOR C-90 AND C-91 .
• IGNITION SWITCH ON .
• CONNECT VOLTMETER BETWEEN TERMINAL A4 AND GROUND TERMINAL C1 OR D1 OF TCM CONNECTOR.
•
THEN CONNECT VOLTMETER BETWEEN TERMINAL A7 OR AS AND GROUND TERMINAL C1 OR D1 OF TCM
CONNECTOR.
DO BOTH DISPLAYS INDICATE
BATTERY VOLTAGE?
+ ~ • IGNITON SWITCH OFF. I CHECK FUSE OR WIRE FOR OPEN. I • CONNECT OHMMETER BETWEEN TERMINAL 2 OF 3-PIN DATA LINK CONNECTOR C-9 AND TERMINAL CS OF
TCM CONNECTOR C-91.
•
THEN CONNECT OHMMETER BETWEEN TERMINAL 1 OF
2-PIN DIAGNOSTIC CONNECTOR C-92 AND TERMINAL D16 OF TCM CONNECTOR C-91
• THEN CONNECT OHMMETER BETWEEN TERMINAL 2 OF 2-PIN DIAGNOSTIC CONNECTOR C-92 AND TERMINAL C1 OR D1 OF TCM CONNECTOR C-91.
DO BOTH DISPLAYS INDICATE APPROXIMATELY 0 OHMS?
~ ~ • CHECK FOR SHORT BETWEEN TERMINAL CS AND I CHECK WIRE FOR OPEN. I GROUND AND BETWEEN TERMINAL CS AND B+. IF OK, GOTO TCM MEM-CAL REPLACEMENT.
____________ _,,(
Page 981 of 1928
AUTOMATIC TRANSMISSION (4L30-E) 7A-109
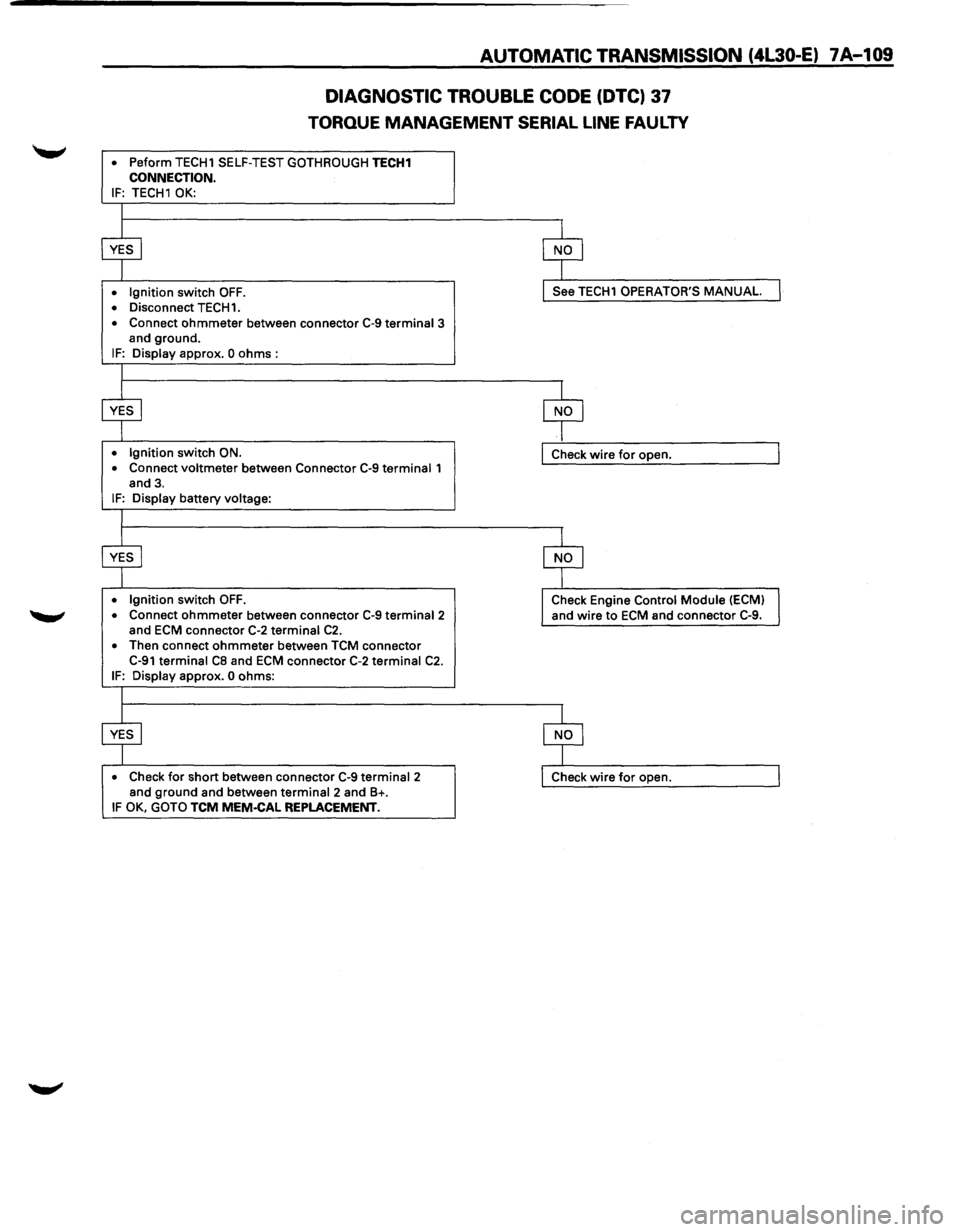
DIAGNOSTIC
TROUBLE CODE (DTC) 37
TORQUE MANAGEMENT SERIAL LINE FAULTY
• Peform TECH1 SELF-TEST GOTHROUGH TECH1 CONNECTION. IF: TECH1 OK:
• Ignition switch OFF. • Disconnect TECH1.
• Connect ohmmeter between connector C-9 terminal 3
and ground.
IF: Display approx. 0 ohms :
• Ignition switch ON.
• Connect voltmeter between Connector C-9 terminal 1
and 3.
IF: Display battery voltage:
• Ignition switch OFF. • Connect ohmmeter between connector C-9 terminal2 and ECM connector C-2 terminal C2. • Then connect ohmmeter between TCM connector C-91 terminal CB and ECM connector C-2 terminal C2. IF: Display approx. 0 ohms:
• Check for short between connector C-9 terminal 2
and ground and between terminal 2 and B+. IF OK, GOTO TCM MEM·CAL REPLACEMENT.
See TECH1 OPERATOR'S MANUAL
Check wire for open.
Check Engine Control
Module (ECM)
and wire
to ECM and connector C-9.
Page 1013 of 1928
AUTOMATIC TRANSMISSION (4L30-E) 7A-141
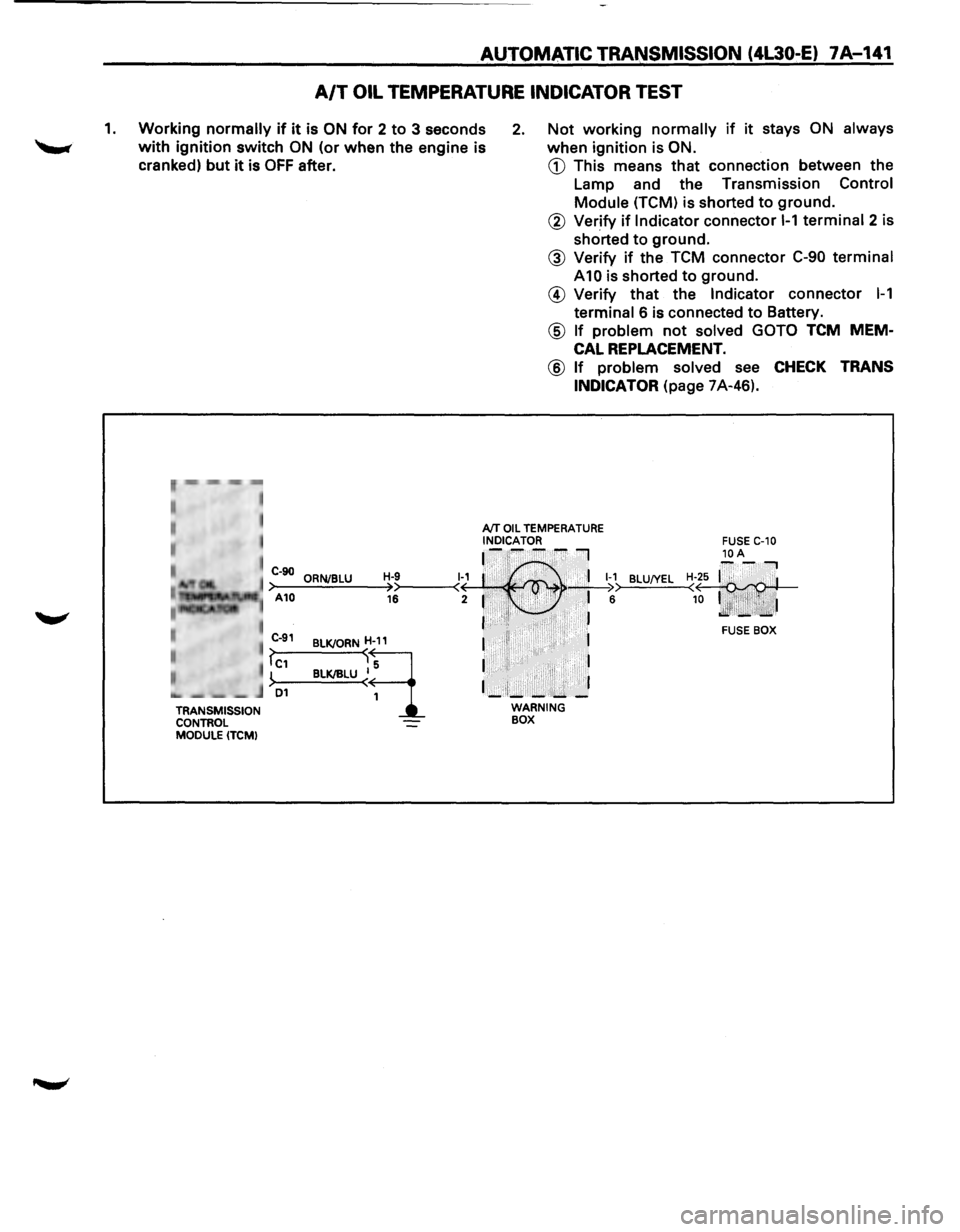
A/T OIL TEMPERATURE INDICATOR TEST
1. Working normally if it is ON for 2 to 3 seconds
with ignition switch ON (or when the engine is
cranked)
but it is OFF after.
2. Not working normally if it stays ON always
when ignition is ON.
CD This means that connection between the
Lamp and the Transmission
Control
Module (TCM) is shorted to ground.
r~,··mm -,-,~
• , I
I
TRANSMISSION
CONTROL
MODULE (TCM)
@ Verify if Indicator connector 1-1 terminal 2 is
shorted
to ground.
@ Verify if the TCM connector C-90 terminal
A10 is shorted to ground.
@ Verify that the Indicator connector 1-1
terminal 6 is connected to Battery.
@ If problem not solved GOTO TCM MEM
CAL REPLACEMENT.
@ If problem solved see CHECK TRANS
INDICATOR
(page 7A-46).
AfT OIL TEMPERATURE INDICATOR ~-~--~I
C-90 ORNJBLU H-9 1~1 :·' ,.· . 'I 1-1 >-A-10--=.:..;.;_;:,=-~>>----<( · , . ' >• • _;__I ;:. 16 2 1 . • .i· ,..:., • 6
I ·•'I• ·. . , . . J
BLU!YEL
BLKJORND
BLK/IILU ~~
I II 1
I I
1_:1;_-:....... _]
WARNING BOX
FUSE BOX