sensor ISUZU TROOPER 1995 Owner's Manual
[x] Cancel search | Manufacturer: ISUZU, Model Year: 1995, Model line: TROOPER, Model: ISUZU TROOPER 1995Pages: 1928
Page 248 of 1928
48-6 REAR AXLE
1••1 INSTALLATION
17. Differential assembly
• Refer to "DIFFERENTIAL ASSEMBLY" in this
section.
16.
Axle shaft assembly
• Tighten the bearing holder mounting nut to the
specified torque.
~~~ Torque N·m (lb·ft) 74 (54)
• Be sure not to damage the oil seal by the spline
of the shaft.
15. Brake
pipe
14. Antilock brake system (ABS) speed sensor and
harness
• Refer to Section 5A4 "4-WHEEL ANTI-LOCK
BRAKE SYSTEM (ABS)".
13. Brake disc
12. Brake
caliper
• Refer to Section 5A2 "DISC BRAKES".
11.
Axle housing assembly
10. Coil spring and insulator
9. Bolt and nut
• For the procedures in Items 9-5, refer to Section
3D "REAR SUSPENSION".
8. Bolt and nut
7. Nut
6. Nut
5. Nut
4. Brake tube flare nut
• Refer to Section 5A2 "DISC BRAKES".
3a. Rear Wheel Antilock (RWAL) speed sensor,
bracket and harness connector
• Tighten the speed sensor bolt to the specified
torque.
1~1 Torque N-m (lb·ft) j 24 (18)
3. ABS connector and bracket
2. Breather hose
1. Parking brake cable
• Refer to Section 5C "PARKING BRAKES".
Page 249 of 1928
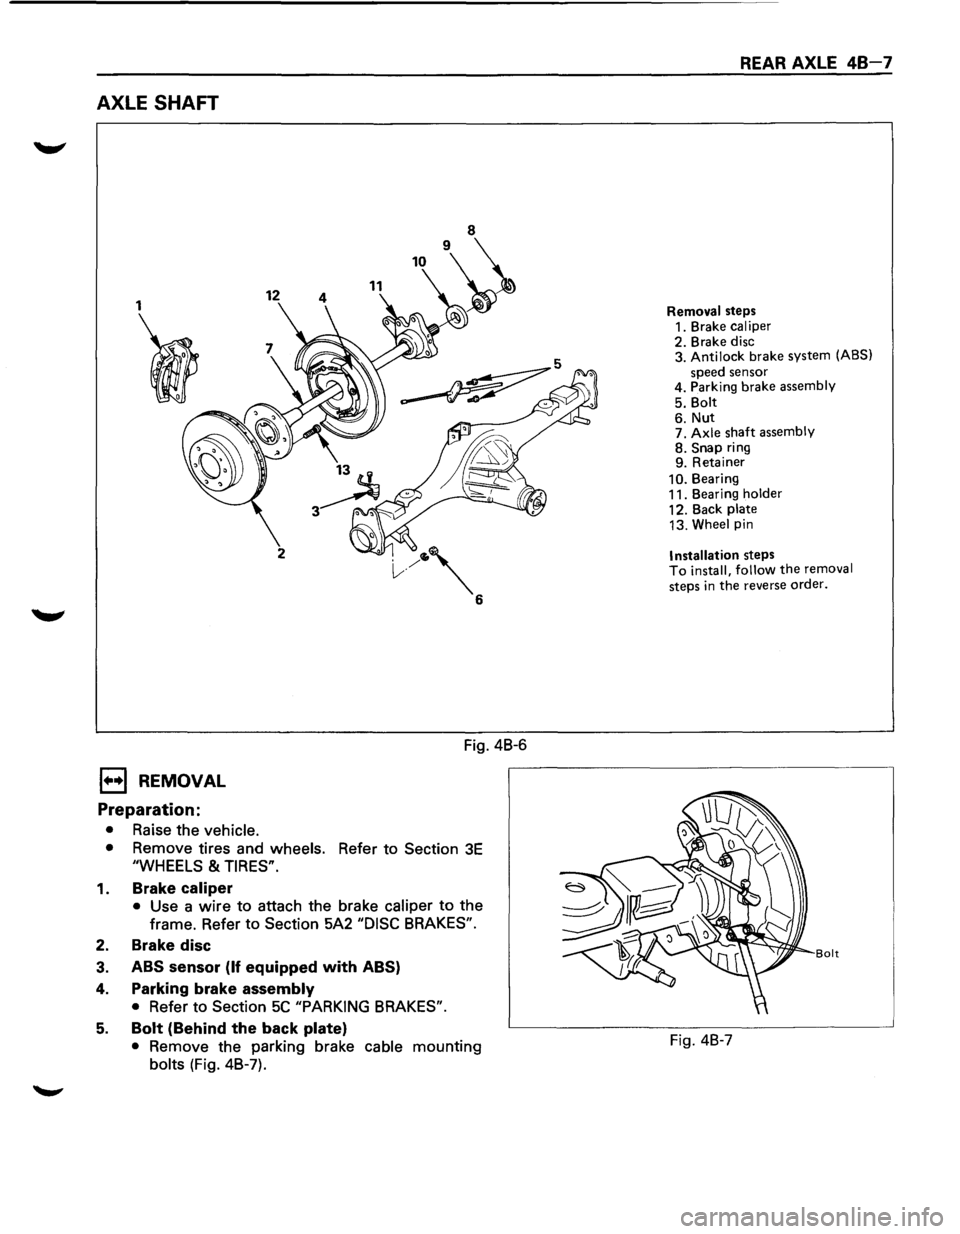
AXLE SHAFT
1
I
1••1 REMOVAL
Preparation:
• Raise the vehicle.
12 11
2
Fig. 4B-6
• Remove tires and wheels. Refer to Section 3E
"WHEELS & TIRES".
1. Brake caliper
• Use a wire to attach the brake caliper to the
frame. Refer to
Section 5A2 "DISC BRAKES".
2. Brake disc
3. ABS sensor (If equipped with ABS)
4. Parking brake assembly
• Refer to Section 5C "PARKING BRAKES".
5. Bolt (Behind the back plate)
• Remove the parking brake cable mounting
bolts (Fig. 4B-7).
REAR AXLE 48-7
Removal steps
1. Brake caliper
2. Brake disc
3. Antilock brake system (ABS)
speed sensor
4. Parking brake assembly
5. Bolt
6. Nut 7. Axle shaft assembly 8. Snap ring
9. Retainer
10. Bearing
11. Bearing holder
12. Back plate
13. Wheel pin
Installation steps To install, follow the removal
steps
in the reverse order.
Bolt
Fig. 4B-7
Page 251 of 1928
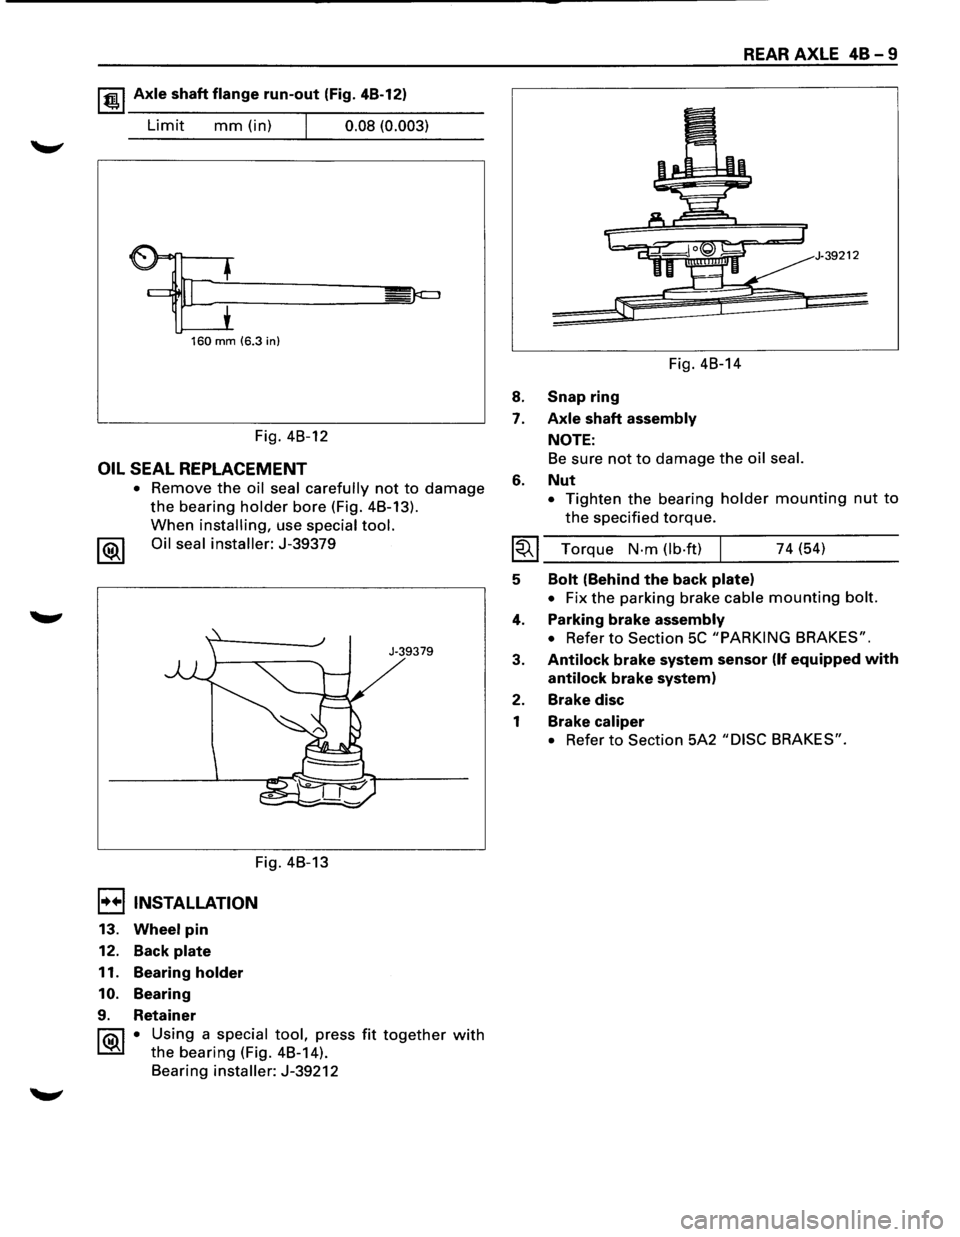
1 t!!.l Axle shaft flange run-out (Fig. 4B-12)
Limit mm (in) I 0.08 (0.003)
160 mm (6.3 in)
Fig. 4B-12
OIL SEAL REPLACEMENT
• Remove the oil seal carefully not to damage
the bearing holder bore (Fig. 4B-13).
When installing, use special tool.
1®1 Oil seal installer: J-39379
Fig. 4B-13
I••IINSTALLATION
13. Wheel pin
12. Back plate
11. Bearing holder
10. Bearing
9. Retainer
J-39379
1 ®I • Using a special tool, press fit together with
the bearing (Fig. 4B-14).
Bearing
installer: J-39212
8.
7.
6.
Fig. 4B-14
Snap ring
Axle shaft assembly
NOTE:
REAR AXLE 48-9
39212
Be sure not to damage the oil seal.
Nut
• Tighten the bearing holder mounting nut to
the specified torque.
I~I ___ T_o_rq_u_e __ N_·_m_(_lb_·f_t)~l _____ 7_4_(~5~4) ____ ___
5
4.
3.
2.
1
Bolt (Behind the back plate)
• Fix the parking brake cable mounting bolt.
Parking brake assembly
• Refer to Section 5C "PARKING BRAKES".
Antilock brake system sensor (If equipped with
antilock brake system)
Brake disc
Brake caliper
• Refer to Section 5A2 "DISC BRAKES".
Page 253 of 1928
E) INSTALLATION
5. Collapsible spacer
• Discard the used collapsible spacer and install
a new one.
4. Outer bearing
NOTE:
• Do not drive in, but just temporarily set in the
outer bearing
by hand, which should be
indirectly pressed in finally by tightening the
flange nut.
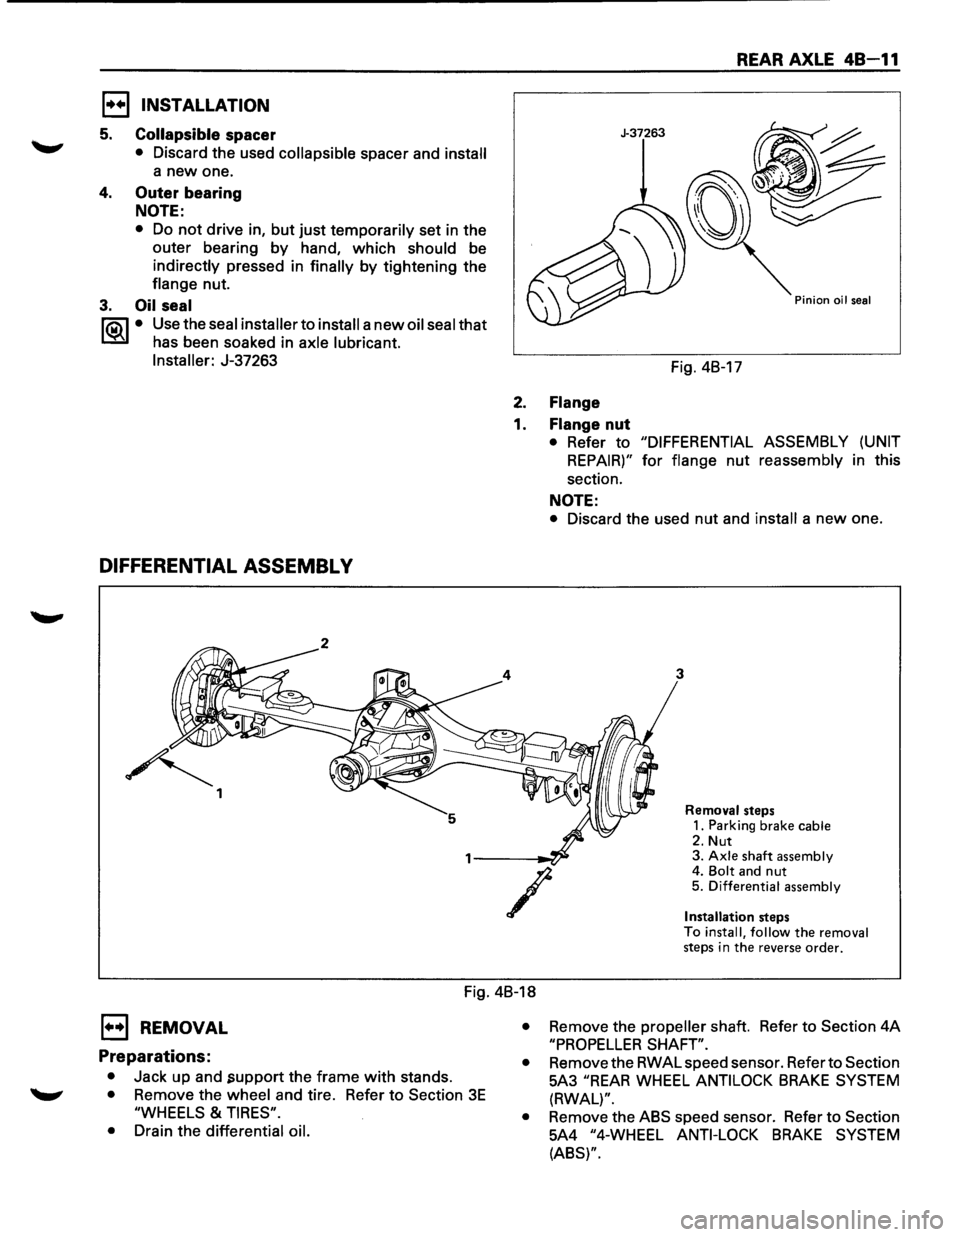
3. Oil seal
1"?.:\1 • Use the seal installer to install a new oil seal that
l.::::'i:il has been soaked in axle lubricant.
Installer:
J-37263
DIFFERENTIAL ASSEMBL V
~ 1
REAR AXLE 48-11
J-37263
Pinion oil seal
Fig. 4B-17
2. Flange
1. Flange nut
• Refer to "DIFFERENTIAL ASSEMBLY (UNIT
REPAIR)" for flange nut reassembly in this
section.
NOTE:
• Discard the used nut and install a new one.
3
/
Removal steps
1. Parking brake cable
2. Nut 3. Axle shaft assembly 4. Bolt and nut 5. Differential assembly
Installation
steps
To install, follow the removal steps in the reverse order.
Fig. 4B-18
E) REMOVAL
Preparations:
• Jack up and .support the frame with stands.
• Remove the wheel and tire. Refer to Section 3E
"WHEELS & TIRES".
•
Drain the differential oil. •
Remove
the propeller shaft. Refer to Section 4A
"PROPELLER SHAFT".
•
Remove the RWAL speed sensor. Refer to Section
5A3
"REAR WHEEL ANTILOCK BRAKE SYSTEM
(RWAL)".
•
Remove the ABS speed sensor. Refer to Section
5A4
"4-WHEEL ANTI-LOCK BRAKE SYSTEM
(ABS)".
Page 285 of 1928
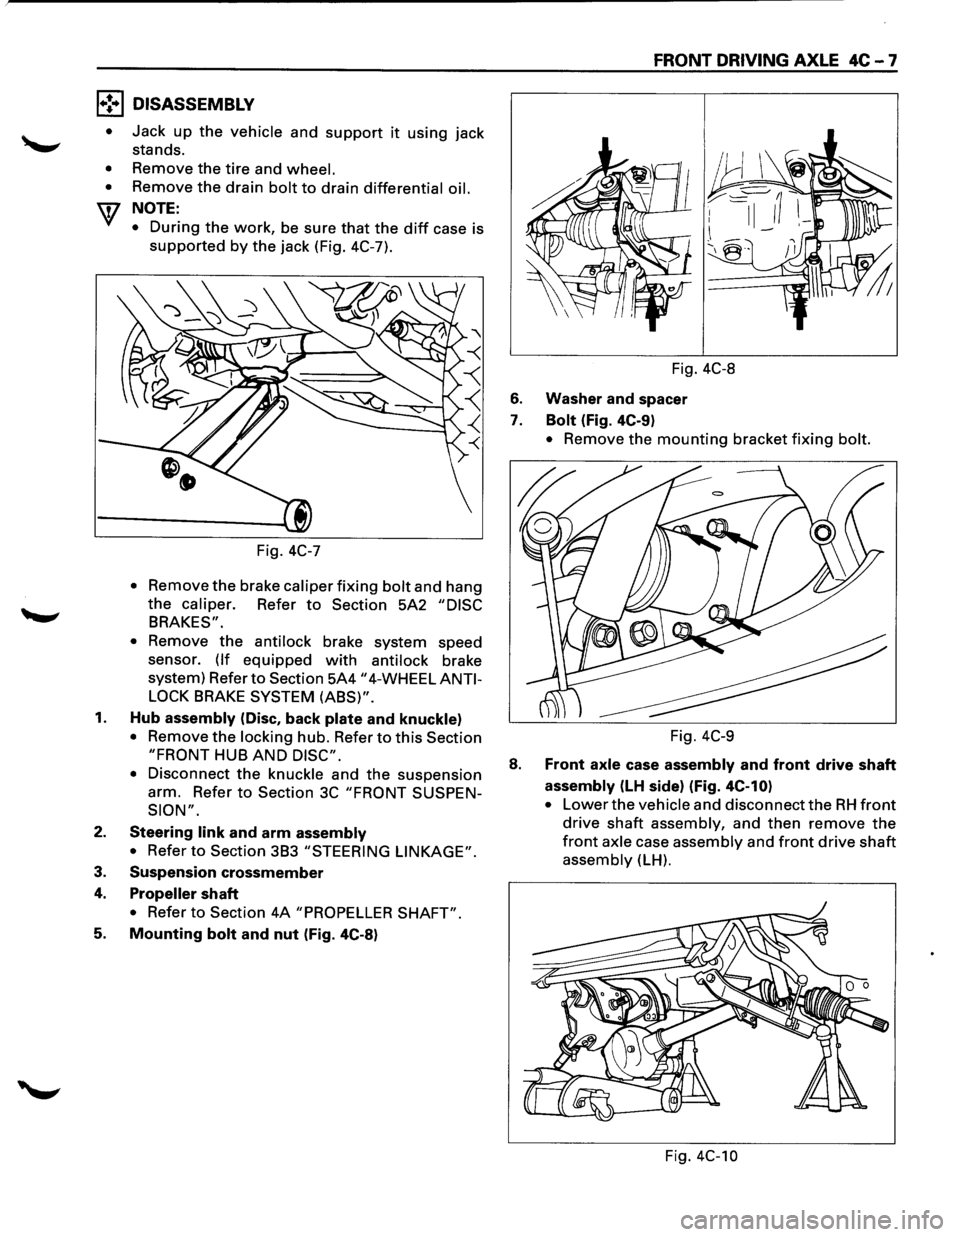
l•!•l DISASSEMBLY
•
•
•
Jack up the vehicle and support it using jack
stands.
Remove the
tire and wheel.
Remove the drain bolt to drain differential oil.
NOTE:
•
During the work, be sure that the diff case is
supported by the jack (Fig. 4C-7).
Fig.
4C-7
• Remov: the brake caliper fixing bolt and hang
the caliper. Refer to Section 5A2 "DISC
BRAKES".
•
Remove the antilock brake system speed
sensor.
(If equipped with antilock brake
system) Refer
to Section 5A4 "4-WHEEL ANTI
LOCK
BRAKE SYSTEM (ABS)".
1. Hub assembly (Disc, back plate and knuckle)
• Remove the locking hub. Refer to this Section
"FRONT HUB AND DISC".
•
Disconnect the knuckle and the suspension
arm. Refer
to Section 3C "FRONT SUSPEN
SION".
2. Steering link and arm assembly
• Refer to Section 3B3 "STEERING LINKAGE".
3. Suspension crossmember
4. Propeller shaft
• Refer to Section 4A "PROPELLER SHAFT".
5. Mounting bolt and nut (Fig. 4C-8)
FRONT DRIVING AXLE 4C-7
Fig. 4C-8
6. Washer and spacer
7. Bolt (Fig. 4C-9)
• Remove the mounting bracket fixing bolt.
Fig. 4C-9
8. Front axle case assembly and front drive shaft
assembly (LH side) (Fig. 4C-10)
• Lower the vehicle and disconnect the RH front
drive shaft assembly, and then remove the
front axle case assembly and front drive shaft
assembly (LH).
Fig. 4C-10
Page 306 of 1928
.
fi•28 FRONT DRIVINGk "
;: ~ ·~-¢,,
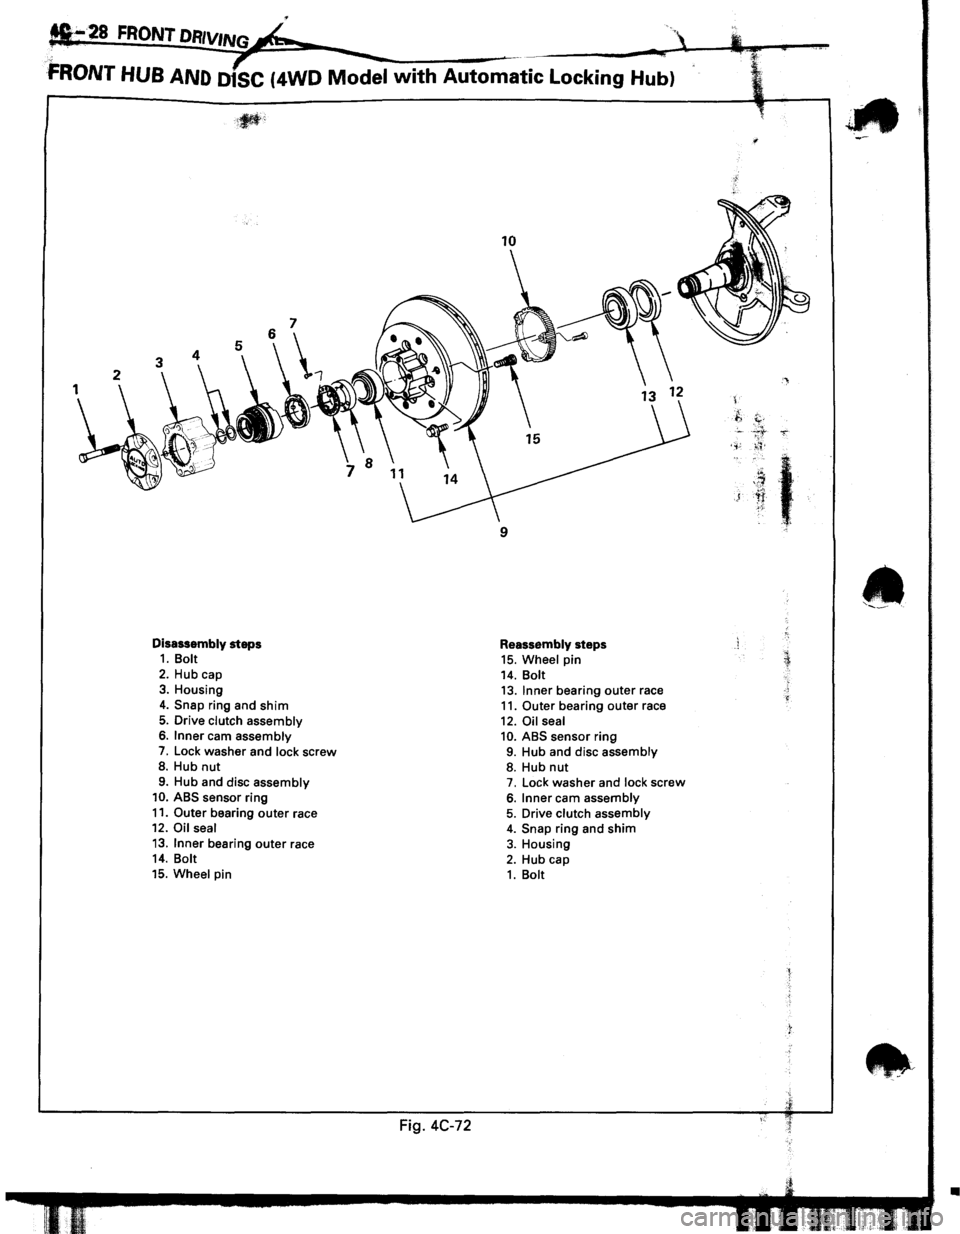
FRONT HUB AND D1SC (4WD Model with Automatic Locking Hub)
Disassembly steps 1. Bolt
2. Hub cap 3. Housing
4. Snap ring and shim
5. Drive clutch assembly 6. Inner cam assembly
7. Lock washer and lock screw 8. Hub nut
9. Hub and disc assembly 10. ABS sensor ring
11. Outer bearing outer race 12. Oil seal
13. Inner bearing outer race 14. Bolt
15. Wheel pin
Fig. 4C-72
10
9
Reassembly steps 15. Wheel pin 14. Bolt 13. Inner bearing outer race 11. Outer bearing outer race
12. Oil seal 10. ABS sensor ring 9. Hub and disc assembly 8. Hub nut 7. Lock washer and lock screw
6. Inner cam assembly 5. Drive clutch assembly 4. Snap ring and shim 3. Housing
2. Hub cap 1. Bolt
'
.f,
c. ' . .,;
)
t
~::
•
Page 307 of 1928
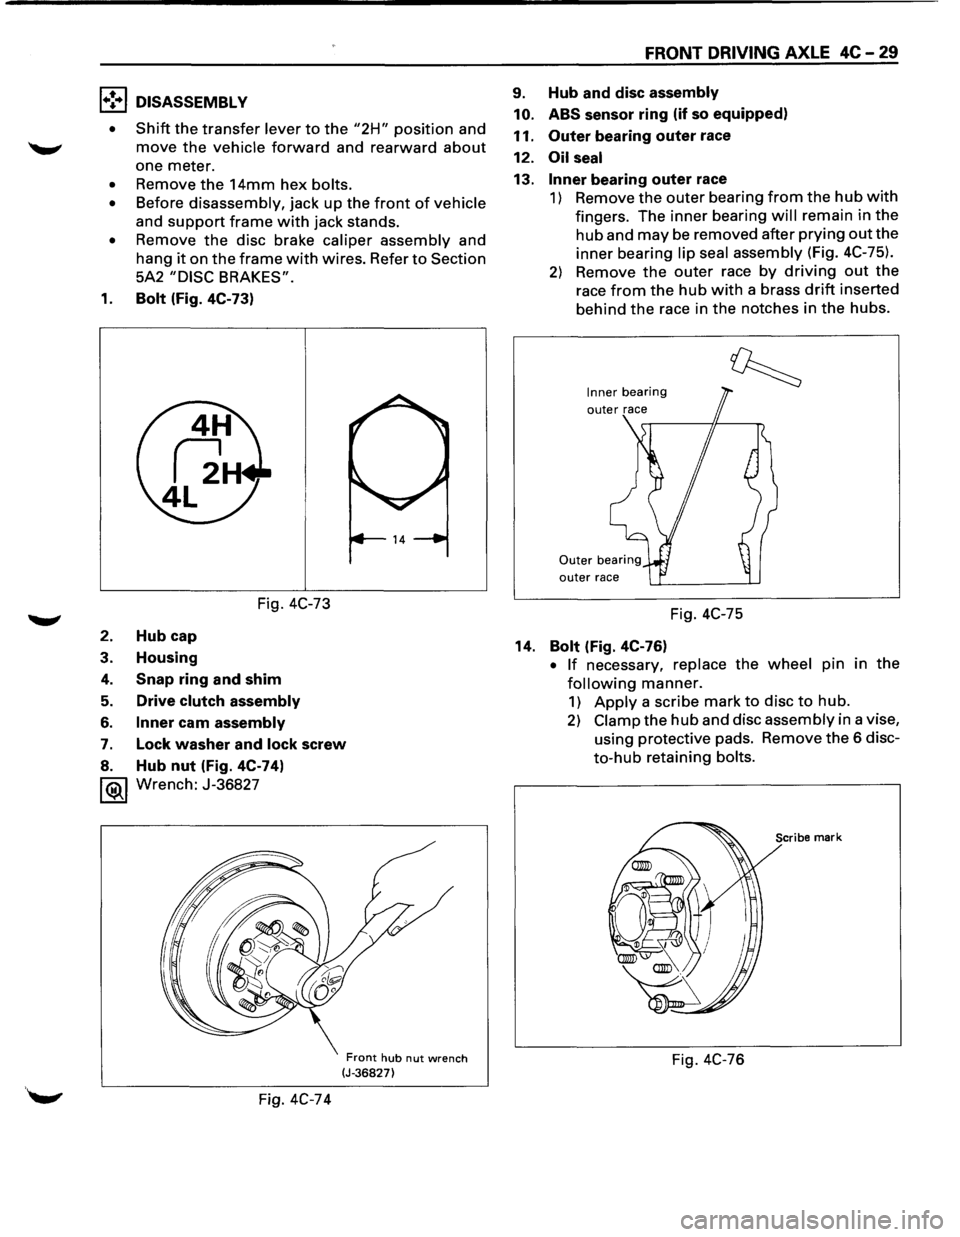
1•! .. 1 DISASSEMBLY
•
Shift the transfer lever to the "2H" position and
move the vehicle forward and rearward about
one meter.
• Remove the 14mm hex bolts.
• Before disassembly, jack up the front of vehicle
and
support frame with jack stands.
• Remove the disc brake caliper assembly and
hang
it on the frame with wires. Refer to Section
5A2
"DISC BRAKES".
1. Bolt (Fig. 4C-73)
Fig. 4C-73
2. Hub cap
3. Housing
4. Snap ring and shim
5. Drive clutch assembly
6. Inner cam assembly
7. Lock washer and lock screw
8. Hub nut (Fig. 4C-74)
1®.1 Wrench: J-36827
Fig. 4C-74
Front hub nut wrench (J-36827)
FRONT DRIVING AXLE 4C-29
9. Hub and disc assembly
10. ABS
sensor ring (if so equipped)
11.
Outer bearing outer race
12.
Oil seal
13. Inner bearing outer race
1) Remove the outer bearing from the hub with
fingers. The inner bearing will remain in the
hub and may be removed after prying out the
inner bearing lip seal assembly (Fig. 4C-75).
2) Remove the outer race by driving out the
race from the hub with a brass drift inserted
behind
the race in the notches in the hubs.
Inner bearing
outer race
Fig. 4C-75
14.
Bolt (Fig. 4C-76)
• If necessary, replace the wheel pin in the
following manner.
1) Apply a scribe mark to disc to hub.
2) Clamp the hub and disc assembly in a vise,
using protective pads. Remove
the 6 disc
to-hub retaining bolts.
Scribe mark
Fig. 4C-76
Page 308 of 1928
4C -30 FRONT DRIVING AXLE
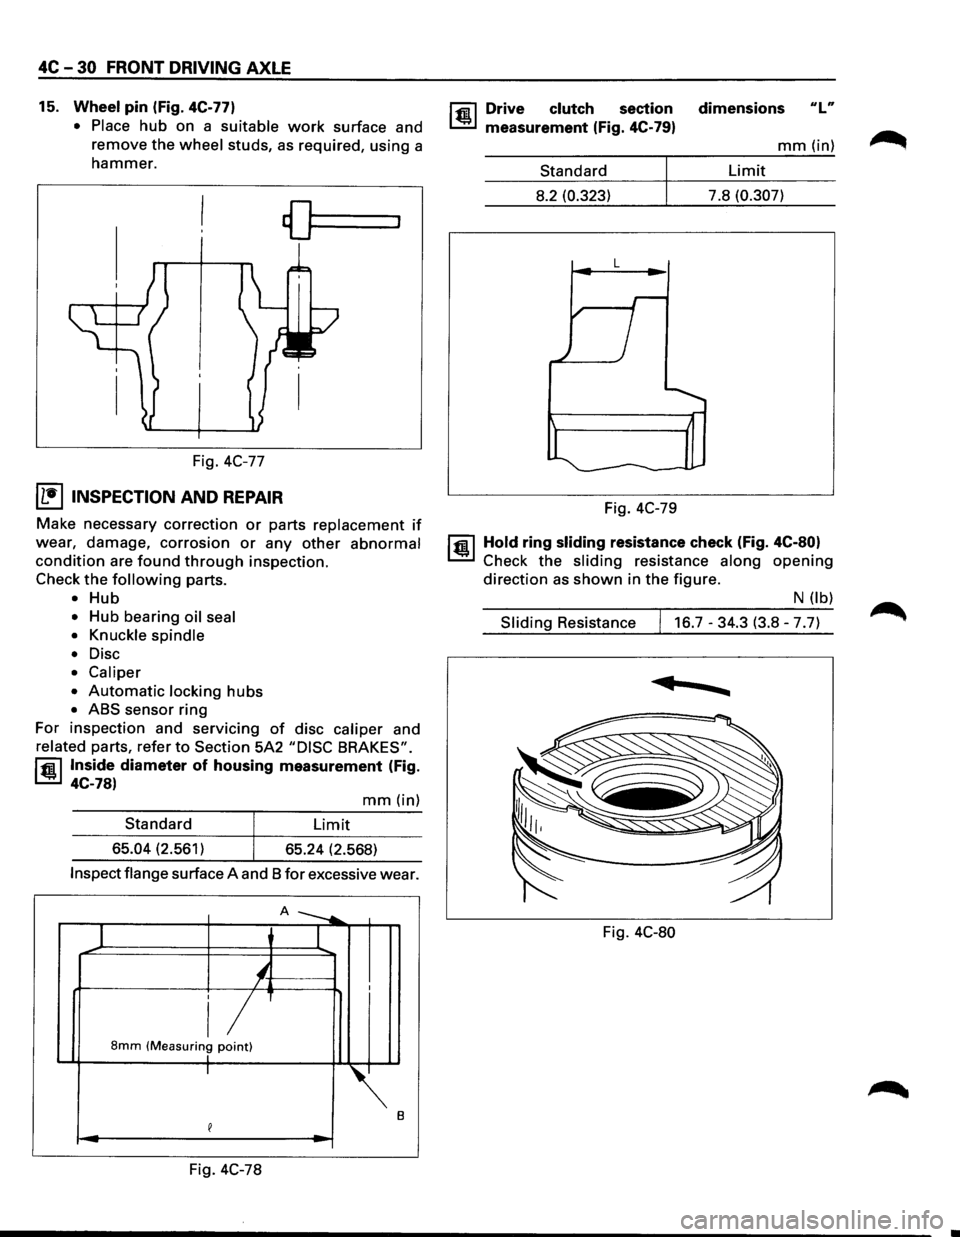
15. Wheel pin (Fig. 4C-77)
• Place
hub on a suitable work surface and
remove the
wheel studs, as required, using a
hammer.
Fig. 4C-77
I L•IINSPECTION AND REPAIR
Make necessary correction or parts replacement if
wear, damage, corrosion or any other abnormal
condition are found through inspection.
Check
the following parts.
• Hub
• Hub bearing oil seal
• Knuckle spindle
•
Disc
• Caliper
•
Automatic locking hubs
• ABS sensor ring
For inspection and servicing
of disc caliper and
related parts, refer to Section 5A2 "DISC BRAKES".
rfil Inside diameter of housing measurement (Fig.
~ 4C-78)
mm(in)
Standard Limit
65.04 (2.561)
65.24 (2.568)
Inspect flange surface A and 8 for excessive wear.
A ---....
1 I
'-/ I
i/ 8mm (Measuring point) I I
~.
e
Fig. 4C-78
rfil Drive clutch section
~ measurement (Fig. 4C-79)
Standard
8.2 (0.323)
L
Fig. 4C-79 dimensions
ulu
mm(in)
Limit
7.8
(0.307)
1@ 1 Hold ring sliding resistance check (Fig. 4C-80)
Check the sliding resistance along opening
direction as shown in the figure.
N (lb)
Sliding Resistance 16.7-34.3 (3.8-7.7)
......
Fig. 4C-80
Page 310 of 1928
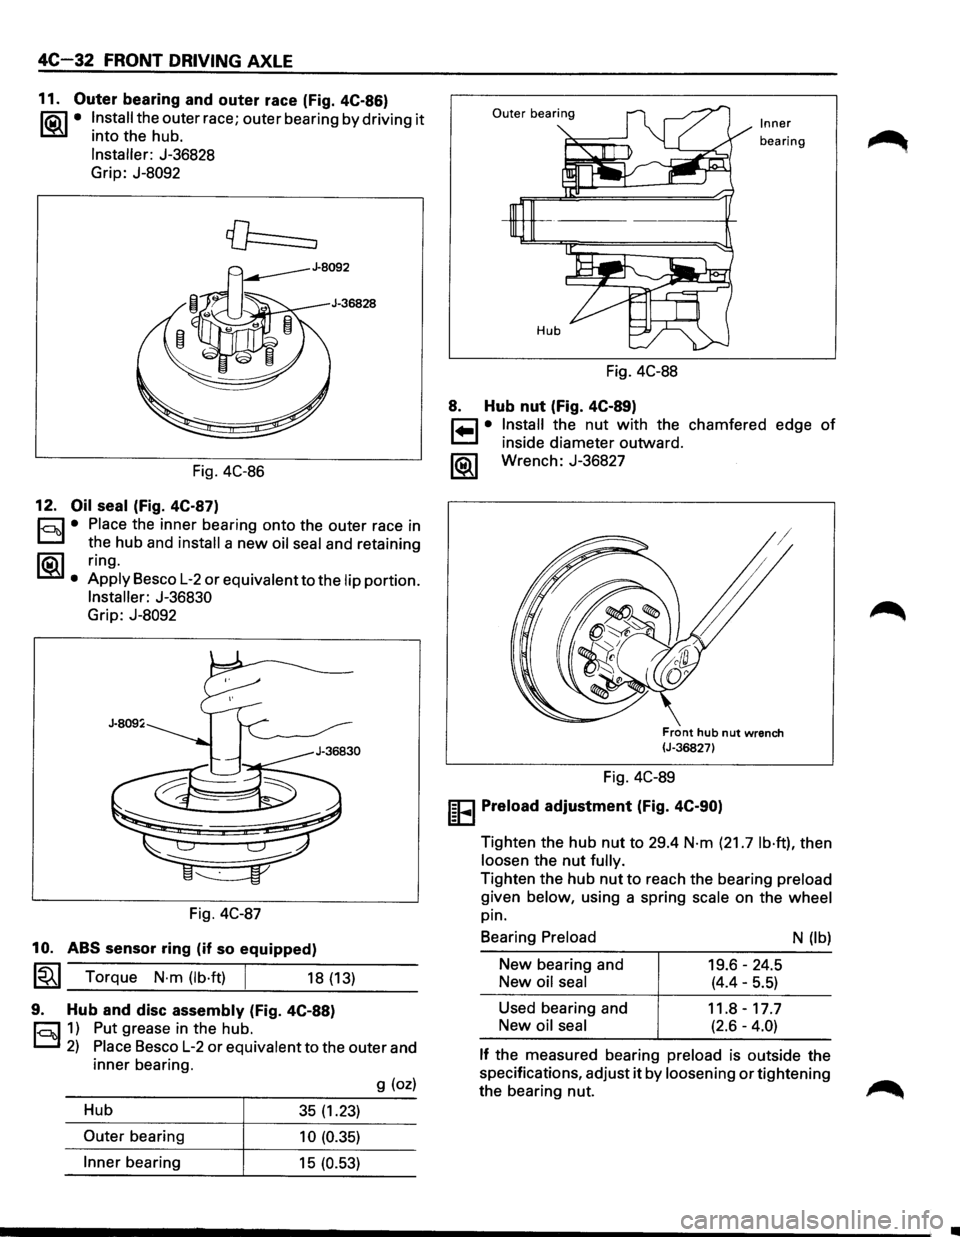
4C-32 FRONT DRIVING AXLE
11. Outer bearing and outer race (Fig. 4C-86)
li5\l • Install the outer race; outer bearing by driving it
L::!iil into the hub.
Installer: J-36828
Grip: J-8092
Fig. 4C-86
12. Oil seal (Fig. 4C-87)
r::::l • Place the inner bearing onto the outer race in
D the hub and install a new oil seal and retaining
~. ring.
Apply Besco L-2 or equivalent to the lip portion.
Installer: J-36830
Grip: J-8092
Fig. 4C-87
10. ABS sensor ring (if so equipped)
~~~ Torque N·m (lb·ft) [ 18 (13)
9. Hub and disc assembly (Fig. 4C-88)
r::::l 1) Put grease in the hub.
D 2) Place Besco L-2 or equivalent to the outer and
inner bearing.
g (oz)
Hub 35 (1.23)
Outer bearing 10 (0.35)
Inner bearing 15 (0.53)
Outer bearing Inner
bearing
Fig. 4C-88
8. Hub nut (Fig. 4C-89)
r=1 • Install the nut with the chamfered edge of
~ inside diameter outward.
1®..1 Wrench: J-36827
Front hub nut wrench (J-36827)
Fig. 4C-89
IEEI Preload adjustment (Fig. 4C-90)
Tighten the hub nut to 29.4 N·m (21.7 lb·ft), then
loosen the
nut fully.
Tighten the hub nut to reach the bearing preload
given below, using a spring scale on the wheel
pin.
Bearing
Preload
New bearing and
New oil seal
Used bearing and
New
oil seal
19.6-24.5
(4.4-5.5)
11.8-17.7
(2.6-4.0)
N (lb)
If the measured bearing preload is outside the
specifications, adjust
it by loosening or tightening
the bearing nut.
•
Page 337 of 1928
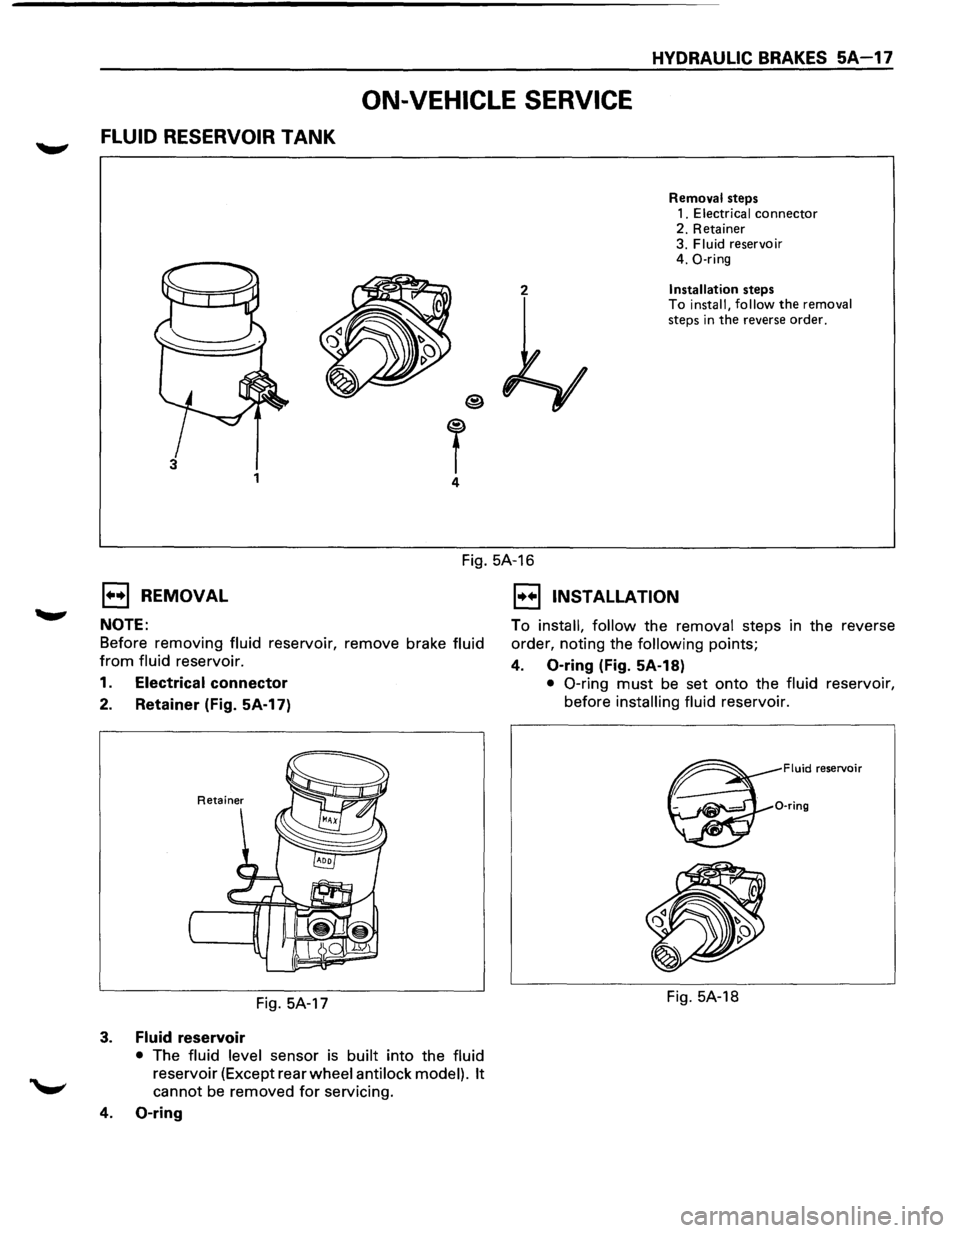
HYDRAULIC BRAKES 5A-17
ON-VEHICLE SERVICE
FLUID RESERVOIR TANK
2
T 4
3 1
Removal steps
1. Electrical connector 2. Retainer
3. Fluid reservoir
4. 0-ring
Installation steps
To install, follow the removal steps in the reverse order.
Fig. 5A-16
1••1 REMOVAL
NOTE:
Before removing fluid reservoir, remove brake fluid
from fluid reservoir.
1. Electrical connector
2. Retainer (Fig. 5A-17)
Fig. 5A-17
3. Fluid reservoir
• The fluid level sensor is built into the fluid
reservoir (Except rear wheel anti lock model). It
cannot be removed for servicing.
4. 0-ring
1••1 INSTALLATION
To install, follow the removal steps in the reverse
order, noting the
following points;
4. 0-ring (Fig. 5A-18)
• 0-ring must be set onto the fluid reservoir,
before
installing fluid reservoir.
Fluid reservoir
0-ring
Fig. 5A-18