ISUZU TROOPER 1995 Workshop Manual
Manufacturer: ISUZU, Model Year: 1995, Model line: TROOPER, Model: ISUZU TROOPER 1995Pages: 1928
Page 571 of 1928
l·u·IINSTALLATION
16. Common chamber
• Tighten bolts and nuts to the specified torque.
Bolts
1«1 Torque N·m (lb·ft) 24 (17)
Nuts
1«1 Torque N·m (lb·ft) 24 (17)
15. Throttle body
• Connect the water hose securely.
14. Common chamber duct
• Tighten bolts and nuts to the specified torque.
Bolts
~ Torque N·m (lb·ft) 24 (17)
Nuts
~ Torque N·m (lb·ft) 24 (17)
13. Exhaust Gas Recirculation Valve assembly
• Tighten bolts to the specified torque.
Exhaust Gas Recirculation Valve
Side
1«1 Torque N·m (lb·in) I 8 (69)
Exhaust Manifold Side
1«1 Torque N·m (lb·ft) 28 (21)
12. Evaporative Emission Canister Purge hose
11. Positive Crankcase Ventilation hose
10. Fuel Pressure Control Valve vacuum hose
8. Throttle body
• Tighten bolts to the specified torque.
1«1 Torque N·m (lb·ft) I 19 (14)
9. Vacuum hose
• Connect vacuum hoses on canister Vacuum
Switching Valve and Exhaust Gas Recirculation
Vacuum
Switching Valve to the throttle body.
7. Ignition Control Module assembly
• Tighten bolts to the specified torque and
connect connector.
1«1 Torque N·m (lb·ft)
6. High tension cables
5. Connectors
• Connect each connector.
4. Vacuum booster hose
3. Canister vacuum hose
19 (14)
ENGINE (V6 3.2L DOHC AND SOHC) 6A 1-13
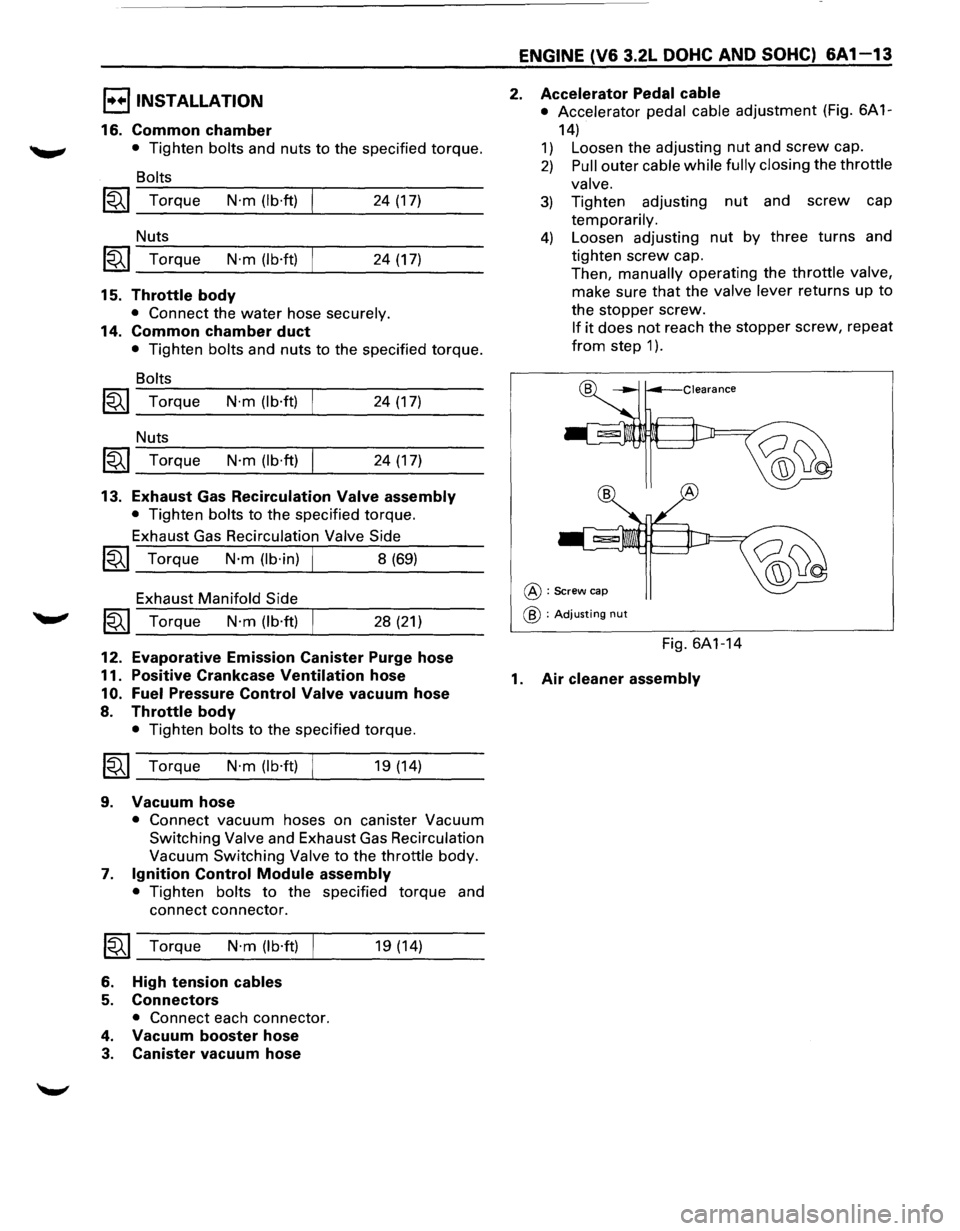
2. Accelerator Pedal cable
• Accelerator pedal cable adjustment (Fig. 6A 1-
14)
1) Loosen the adjusting nut and screw cap.
2) Pull outer cable while fully closing the throttle
valve.
3) Tighten adjusting nut and screw cap
temporarily.
4) Loosen adjusting nut by three turns and
tighten screw cap.
Then, manually operating the
throttle valve,
make sure that the valve lever returns up to
the stopper screw.
If it does not reach the stopper screw, repeat
from step 1 ).
@:Screw cap
@ : Adjusting nut
Fig. 6A1-14
1. Air cleaner assembly
Page 572 of 1928
6A1-14 ENGINE (V6 3.2L DOHC AND SOHC)
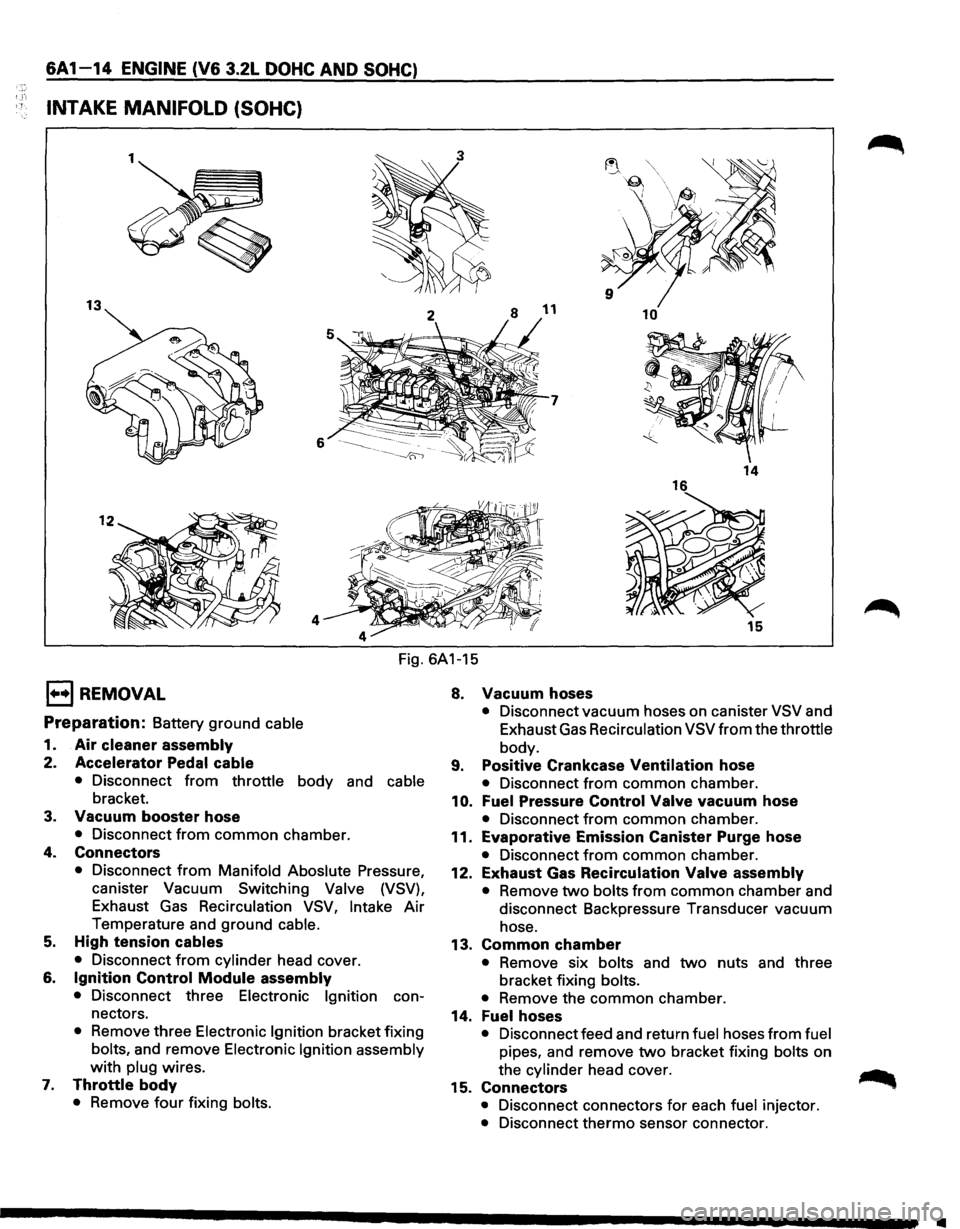
INTAKE MANIFOLD (SOHC}
13 10
7
6
14
4 15
Fig. 6A1-15
1••1 REMOVAL
Preparation: Battery ground cable
1. Air cleaner assembly
2. Accelerator Pedal cable
• Disconnect from throttle body and cable
bracket.
3. Vacuum booster hose
• Disconnect from common chamber.
4. Connectors
• Disconnect from Manifold Aboslute Pressure,
canister Vacuum Switching Valve (VSV),
Exhaust
Gas Recirculation VSV, Intake Air
Temperature and ground cable.
5. High tension cables
• Disconnect from cylinder head cover.
6. Ignition Control Module assembly
• Disconnect three Electronic Ignition con
nectors.
• Remove three Electronic Ignition bracket fixing
bolts, and remove Electronic Ignition assembly
with plug wires.
7. Throttle body
• Remove four fixing bolts.
8. Vacuum hoses
• Disconnect vacuum hoses on canister VSV and
Exhaust Gas Recirculation VSV
from the throttle
body.
9. Positive Crankcase Ventilation hose
• Disconnect from common chamber.
10. Fuel Pressure Control Valve vacuum hose
• Disconnect from common chamber.
11. Evaporative Emission Canister Purge hose
• Disconnect from common chamber.
12. Exhaust Gas Recirculation Valve assembly
• Remove two bolts from common chamber and
disconnect Backpressure Transducer vacuum
hose.
13. Common chamber
• Remove six bolts and two nuts and three
bracket fixing bolts.
• Remove the common chamber.
14. Fuel hoses
• Disconnect feed and return fuel hoses from fuel
pipes, and remove two bracket fixing bolts on
the cylinder head cover.
15. Connectors
• Disconnect connectors for each fuel injector.
• Disconnect thermo sensor connector.
•
Page 573 of 1928
16. Intake manifold
• Remove two fixing bolts and four nuts, then
remove the intake
manifold.
I••IINSTALLATION
16. Intake manifold
• Tighten bolts and nuts to the specified torque.
Bolts
~~~ Torque N·m (lb·ft) 24 (17)
Nuts
1~1 Torque N·m (lb·ft) 24 (17)
15. Connectors
• Connect each connector.
14. Fuel hoses
• Connect the hoses securely and install bolts on
the head cover.
13. Common chamber
• Tighten bolts and nuts to the specified torque.
Bolts
~~~ Torque N·m (lb·ft) 24 (17)
Nuts
~~~ Torque N·m (lb·ft) 24 (17)
12. Exhaust Gas Recirculation Valve assembly
• Tighten bolts to the specified torque.
~~~ Torque N·m (lb·in) I 9 (78)
11. Evaporative Emission Canister Purge hose
10. Fuel Pressure Control Valve vacuum hose
9. Positive Crankcase Ventilation hose
7. Throttle body
• Tighten bolts to the specified torque.
~~~ Torque N·m (lb·ft) I 22 (16)
8. Vacuum hose
• Connect vacuum hoses on canister Vacuum
Switching Valve and Exhaust Gas Recirculation
Vacuum
Switching Valve to the throttle body.
6. Ignition Control Module assembly
• Tighten bolts to the specified torque and
connect connector.
~~~ Torque N·m (lb·ft) 22 (16)
5. High tension cables
4. Connectors
• Connect each connector without fail.
3. Vacuum booster hose
ENGINE (V6 3.2L DOHC AND SOHC) 6A1-15
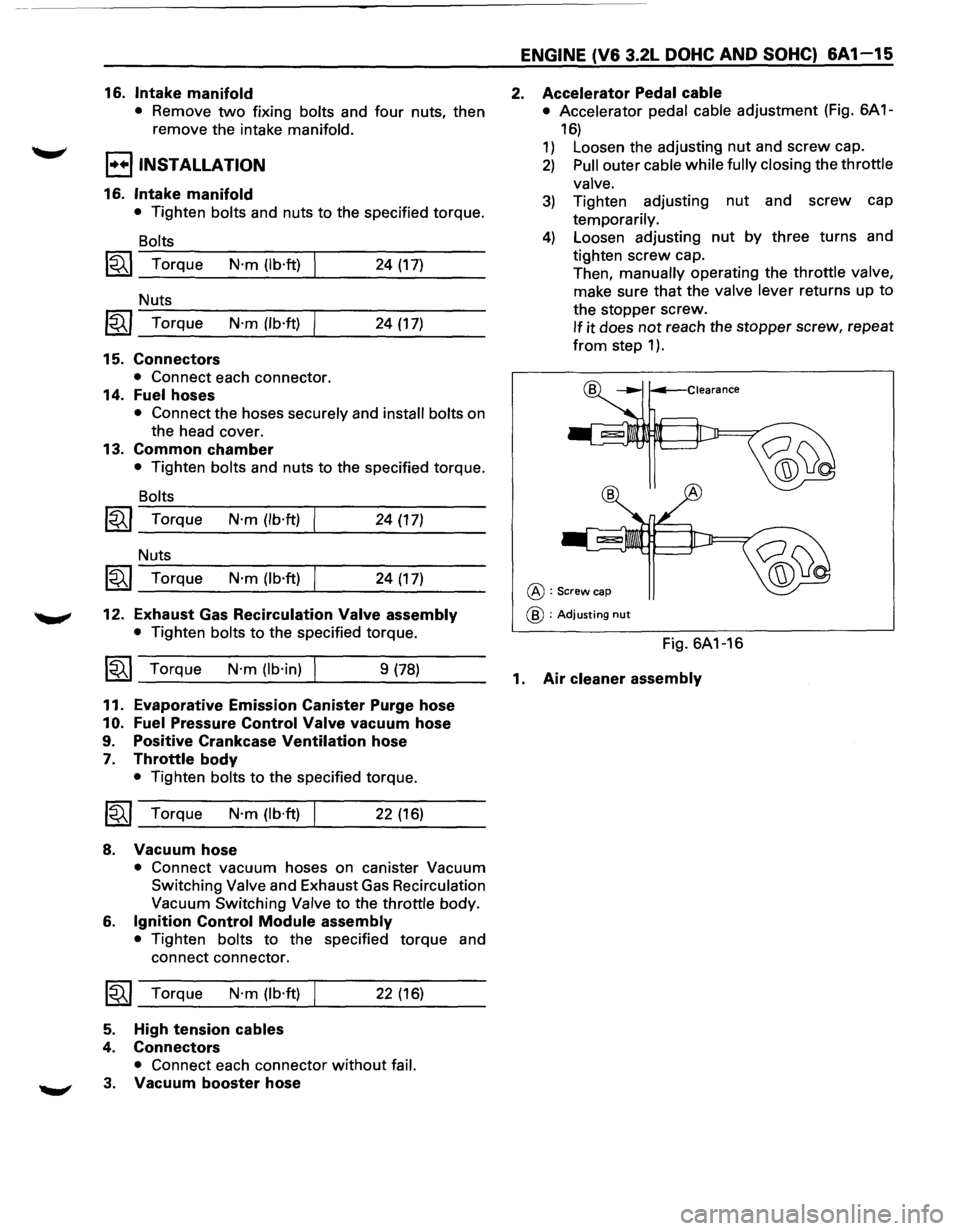
2. Accelerator Pedal cable
• Accelerator pedal cable adjustment (Fig. 6A 1-
16)
1) Loosen the adjusting nut and screw cap.
2) Pull outer cable while fully closing the throttle
valve.
3) Tighten adjusting nut and screw cap
temporarily.
4) Loosen adjusting nut by three turns and
tighten
screw cap.
Then,
manually operating the throttle valve,
make sure that the valve lever returns up to
the stopper screw.
If it does not reach the stopper screw, repeat
from step 1 ).
@:Screw cap
@ : Adjusting nut
Fig. 6A1-16
1. Air cleaner assembly
Page 574 of 1928
.,
6A1-16 ENGINE (V6 3.2L DOHC AND SOHC}
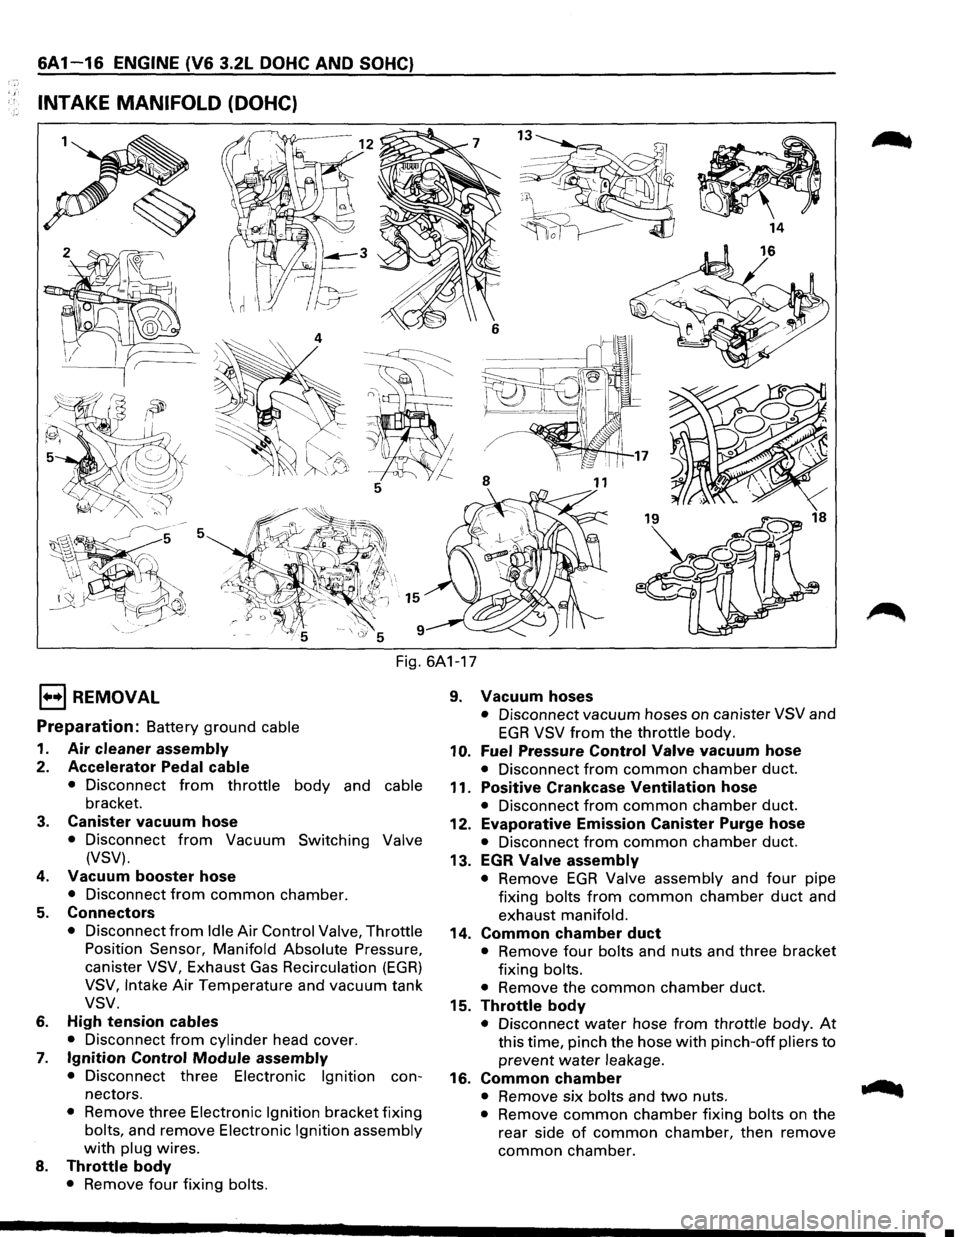
INTAKE MANIFOLD (DOHC)
Fig. 6A1-17
1••1 REMOVAL
Preparation: Battery ground cable
1. Air cleaner assembly
2. Accelerator Pedal cable
• Disconnect from throttle body and cable
bracket.
3. Canister vacuum hose
• Disconnect from Vacuum Switching Valve
(VSV).
4. Vacuum booster hose
• Disconnect from common chamber.
5. Connectors
• Disconnect from Idle Air Control Valve, Throttle
Position Sensor, Manifold Absolute Pressure,
canister
VSV, Exhaust Gas Recirculation (EGR)
VSV, Intake Air Temperature and vacuum tank
vsv.
6. High tension cables
• Disconnect from cylinder head cover.
7. Ignition Control Module assembly
• Disconnect three Electronic Ignition con
nectors.
• Remove three Electronic Ignition bracket fixing
bolts, and remove Electronic Ignition assembly
with plug wires.
8. Throttle body
• Remove four fixing bolts.
9. Vacuum hoses
• Disconnect vacuum hoses on canister VSV and
EGR VSV from the throttle body.
10. Fuel Pressure Control Valve vacuum hose
• Disconnect from common chamber duct.
11. Positive Crankcase Ventilation hose
• Disconnect from common chamber duct.
12. Evaporative Emission Canister Purge hose
• Disconnect from common chamber duct.
13. EGR Valve assembly
• Remove EGR Valve assembly and four pipe
fixing
bolts from common chamber duct and
exhaust
manifold.
14. Common chamber duct
• Remove four bolts and nuts and three bracket
fixing
bolts.
•
Remove the common chamber duct.
15. Throttle body
• Disconnect water hose from throttle body. At
this time, pinch the hose with pinch-off pliers to
prevent water leakage.
16. Common chamber
• Remove six bolts and two nuts.
• Remove common chamber fixing bolts on the
rear side
of common chamber, then remove
common chamber.
•
Page 575 of 1928
... t&:?
17. Fuel hoses
• Disconnect feed and return fuel hoses from fuel
pipes, and remove
two bracket fixing bolts on
the cylinder head cover.
18. Fuel injector connectors
• Disconnect from injectors.
19. Intake manifold
• Remove engine harness bracket on RH side.
• Remove two bolts and four nuts, and remove
intake manifold.
I••IINSTALLATION
19. Intake manifold
• Tighten bolts and nuts to the specified torque.
Bolts
~~~ Torque N·m (lb·ft) 24 (17)
Nuts
~~~ Torque N·m (lb·ft) 24 (17)
18. Fuel injector connectors
• Connect each connector.
17. Fuel hoses
• Connect the hoses securely and install the bolts
on the head cover.
16. Common chamber
• Tighten bolts and nuts to the specified torque.
Bolts
~ Torque N·m (lb·ft) 24 (17)
Nuts
~ Torque N·m (lb·ft) 24 (17)
15. Throttle body
• Connect surely the water hose.
14. Common chamber duct
• Tighten bolts and nuts to the specified torque.
Bolts
~ Torque N·m (lb·ft) 24 (17)
Nuts
~ Torque N·m (lb·ft) 24 (17)
13. Exhaust Gas Recirculation Valve assembly
• Tighten bolts to the specified torque.
Exhaust Gas Recirculation Valve
Side
~~~ Torque N·m (lb·in) I 8 (69)
Exhaust Manifold Side
~~~ Torque N·m (lb·ft) 28 (21)
12. Evaporative Emission Canister Purge hose
11. Positive Crankcase
Ventilation hose
10. Fuel Pressure Control Valve vacuum hose
ENGINE (V6 3.2L DOHC AND SOHC) 6A1-17
8. Throttle body
• Tighten bolts to the specified torque.
~~~ Torque N·m (lb·ft) I 19 (14)
9. Vacuum hose
• Connect vacuum hoses on canister Vacuum
Switching Valve and Exhaust Gas Recirculation
Vacuum Switching Valve
to the throttle body.
7. Ignition Control Module assembly
• Tighten bolts to the specified torque and
connect connector.
~~~ Torque N·m (lb·ft) 19 (14)
6. High tension cables
5. Connectors
• Connect each connector without fail.
4. Vacuum booster hose
3. Canister vacuum hose
2. Accelerator Pedal cable
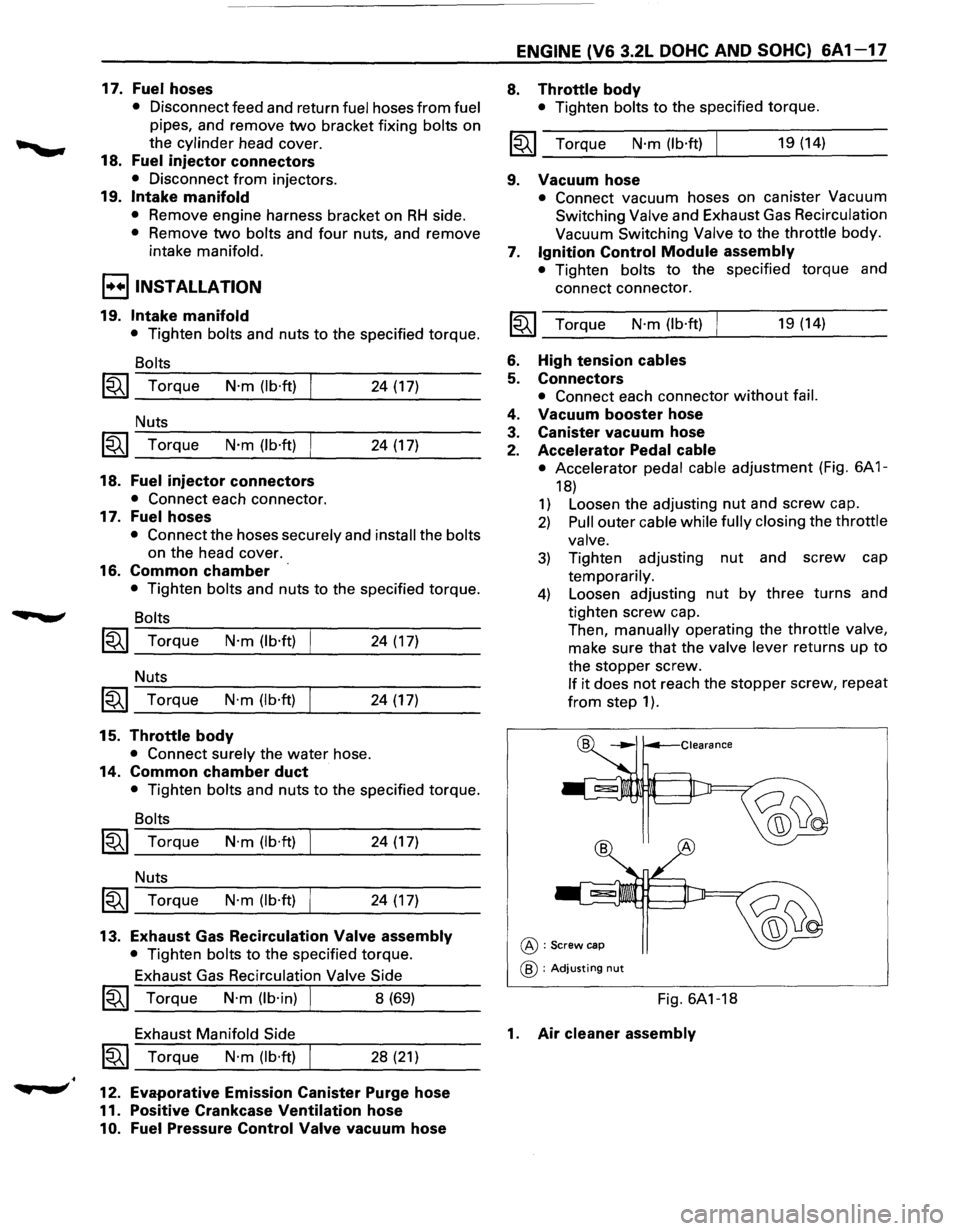
• Accelerator pedal cable adjustment (Fig. 6A 1-
18)
1) Loosen the adjusting nut and screw cap.
2) Pull outer cable while fully closing the throttle
valve.
3) Tighten adjusting nut and screw cap
temporarily.
4) Loosen adjusting nut by three turns and
tighten screw cap .
Then, manually operating the throttle valve,
make sure
that the valve lever returns up to
the stopper screw.
If it does not reach the stopper screw, repeat
from step 1 ).
@:Screw cap
@ : Adjusting nut
Fig. 6A1-18
1. Air cleaner assembly
Page 576 of 1928
6A 1-18 ENGINE (V6 3.2L DOHC AND SOHC)
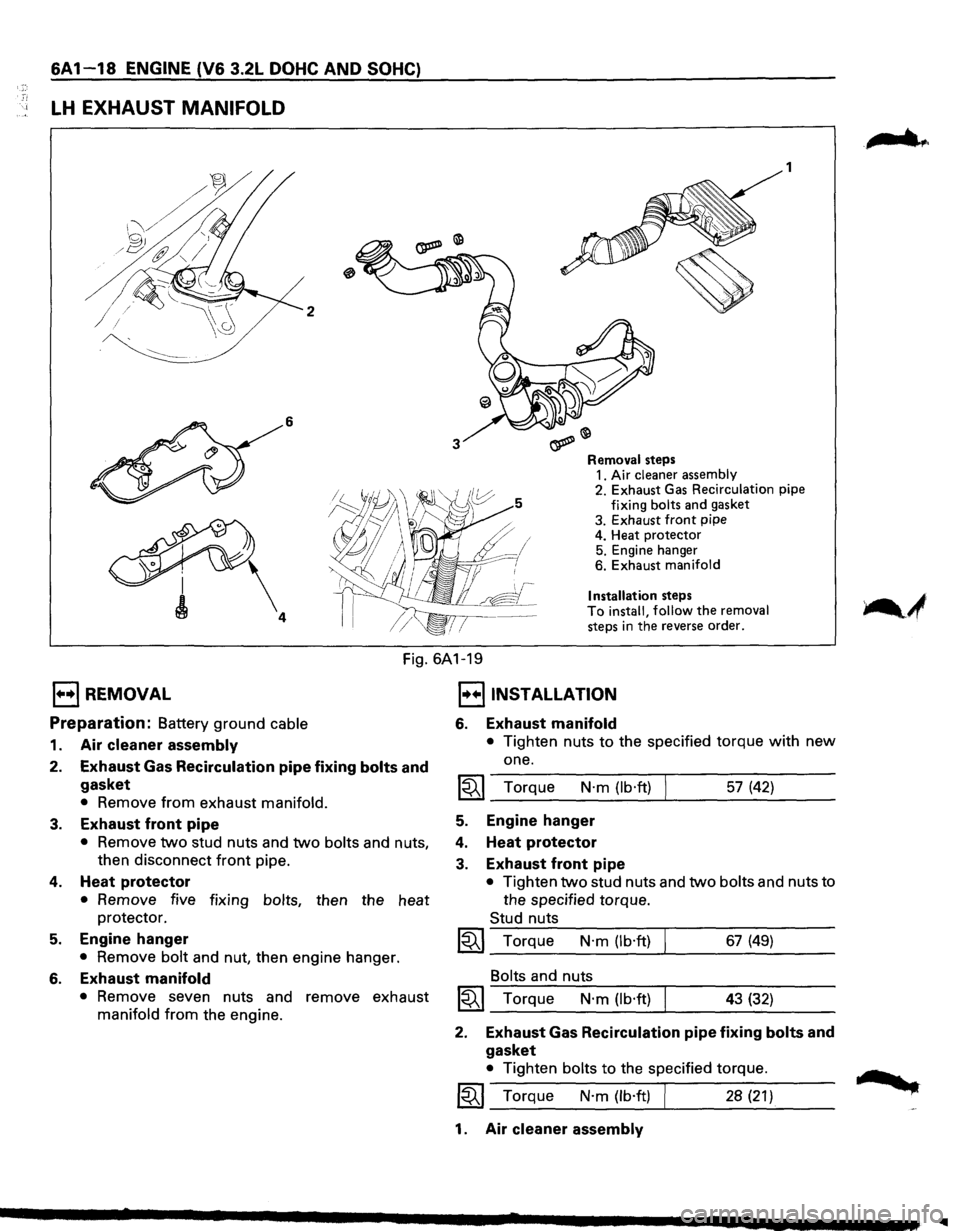
LH EXHAUST MANIFOLD
I
'
2
6 1
o?~
Removal steps 1.
Air cleaner assembly 2. Exhaust Gas Recirculation pipe
fixing bolts and gasket
3. Exhaust front pipe
4. Heat protector 5. Engine hanger
6. Exhaust manifold
Installation steps To install, follow the removal steps in the reverse order.
E) REMOVAL
Fig. 6A1-19
I••IINSTALLATION
Preparation: Battery ground cable
1. Air cleaner assembly
2. Exhaust Gas Recirculation pipe fixing bolts and
gasket
• Remove from exhaust manifold.
3. Exhaust front pipe
• Remove two stud nuts and two bolts and nuts,
then disconnect
front pipe.
4. Heat protector
• Remove five fixing bolts, then the heat
protector.
5. Engine hanger
• Remove bolt and nut, then engine hanger.
6. Exhaust manifold
• Remove seven nuts and remove exhaust
manifold from the engine.
6. Exhaust manifold
• Tighten nuts to the specified torque with new
one.
1~1 Torque N·m (lb·ft) 57 (42)
5. Engine hanger
4. Heat protector
3. Exhaust front pipe
• Tighten two stud nuts and two bolts and nuts to
the specified torque.
Stud nuts
~~~ Torque N·m (lb·ft) 67 (49)
Bolts and nuts
1~1 Torque N·m (lb·ft) 43 (32)
2. Exhaust Gas Recirculation pipe fixing bolts and
gasket
• Tighten bolts to the specified torque.
~~~ Torque N·m (lb·ft) 28 (21)
1. Air cleaner assembly
..
Page 577 of 1928
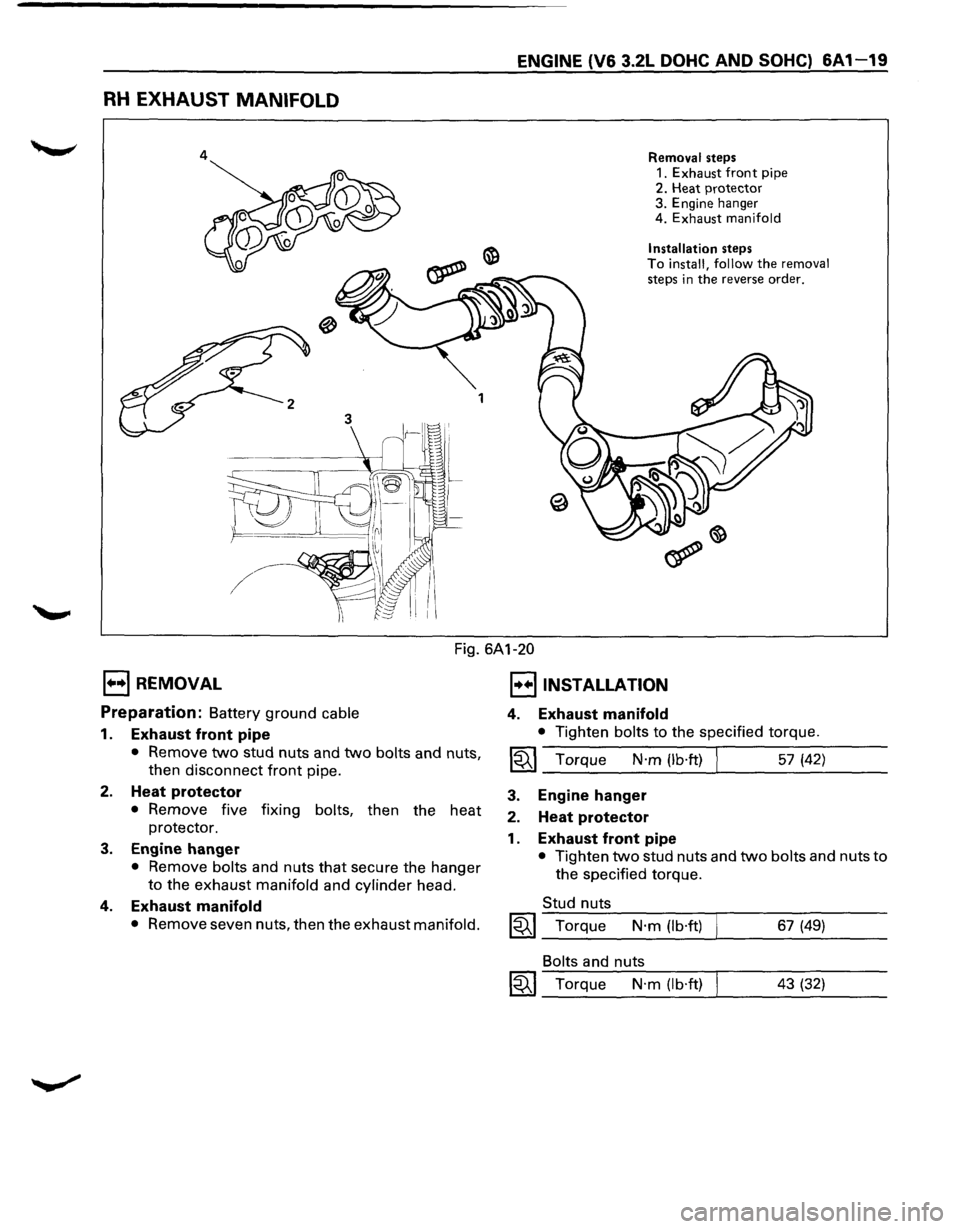
RH EXHAUST MANIFOLD
4
ENGINE (V6 3.2L DOHC AND SOHC) 6A1-19
Removal steps
1.
Exhaust front pipe 2. Heat protector 3. Engine hanger
4. Exhaust manifold
Installation
steps To install, follow the removal steps in the reverse order.
1••1 REMOVAL
Fig. 6A1-20
I••IINSTALLATION
Preparation: Battery ground cable
1. Exhaust front pipe
• Remove two stud nuts and two bolts and nuts,
then disconnect front pipe.
2. Heat protector
• Remove five fixing bolts, then the heat
protector.
3. Engine hanger
• Remove bolts and nuts that secure the hanger
to the exhaust manifold and cylinder head.
4. Exhaust manifold
• Remove seven nuts, then the exhaust manifold.
4. Exhaust manifold
• Tighten bolts to the specified torque.
I~I_T_or.:....q:....u_e __ N_·m__:_(l_b·_ft.:....) _!._ ___ 5_7_(4_2_) __ _
3.
2.
1.
Engine hanger
Heat protector
Exhaust front pipe
• Tighten two stud nuts and two bolts and nuts to
the specified torque.
Stud nuts
~~~ Torque N·m (lb·ft) 67 (49)
Bolts and nuts
~~~ Torque N·m (lb·ft) 43 (32)
Page 578 of 1928
·,'
6A1-20 ENGINE (V6 3.2L DOHC AND SOHC)
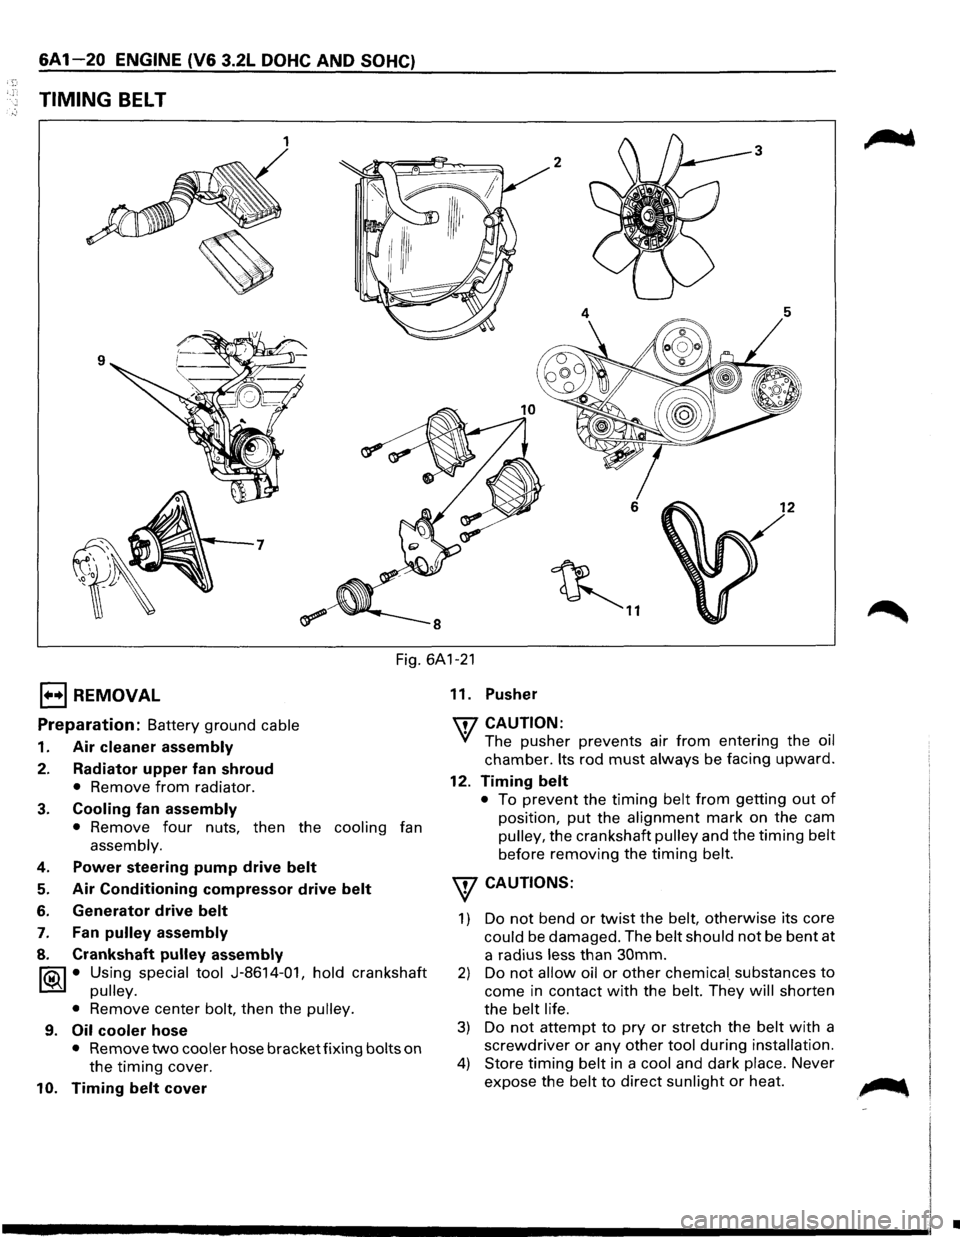
TIMING BELT
1 3
2
6 12
~ ..
Fig. 6A1-21
1••1 REMOVAL
Preparation: Battery ground cable
1. Air cleaner assembly
2. Radiator upper fan shroud
• Remove from radiator.
3. Cooling fan assembly
• Remove four nuts, then the cooling fan
assembly.
4. Power steering pump drive belt
5. Air Conditioning compressor drive belt
6. Generator drive belt
7. Fan pulley assembly
8. Crankshaft pulley assembly
~ • Using special tool J-8614-01, hold crankshaft
~ pulley.
•
Remove center bolt, then the pulley.
9. Oil cooler hose
• Remove two cooler hose bracket fixing bolts on
the timing cover.
10. Timing belt cover 11.
Pusher
'IT7 CAUTION:
'if The pusher prevents air from entering the oil
chamber. Its rod must always be facing upward.
12. Timing belt
• To prevent the timing belt from getting out of
position, put the alignment mark on the cam
pulley, the crankshaft pulley and the timing belt
before removing the timing belt.
w CAUTIONS:
1) Do not bend or twist the belt, otherwise its core
could be damaged. The belt should not be bent at
a radius
less than 30mm.
2) Do not allow oil or other chemica[ substances to
come in contact with the belt. They will shorten
the
belt life.
3) Do not attempt to pry or stretch the belt with a
screwdriver or any other tool during installation.
4) Store timing belt in a cool and dark place. Never
expose the
belt to direct sunlight or heat. ~
•
Page 579 of 1928
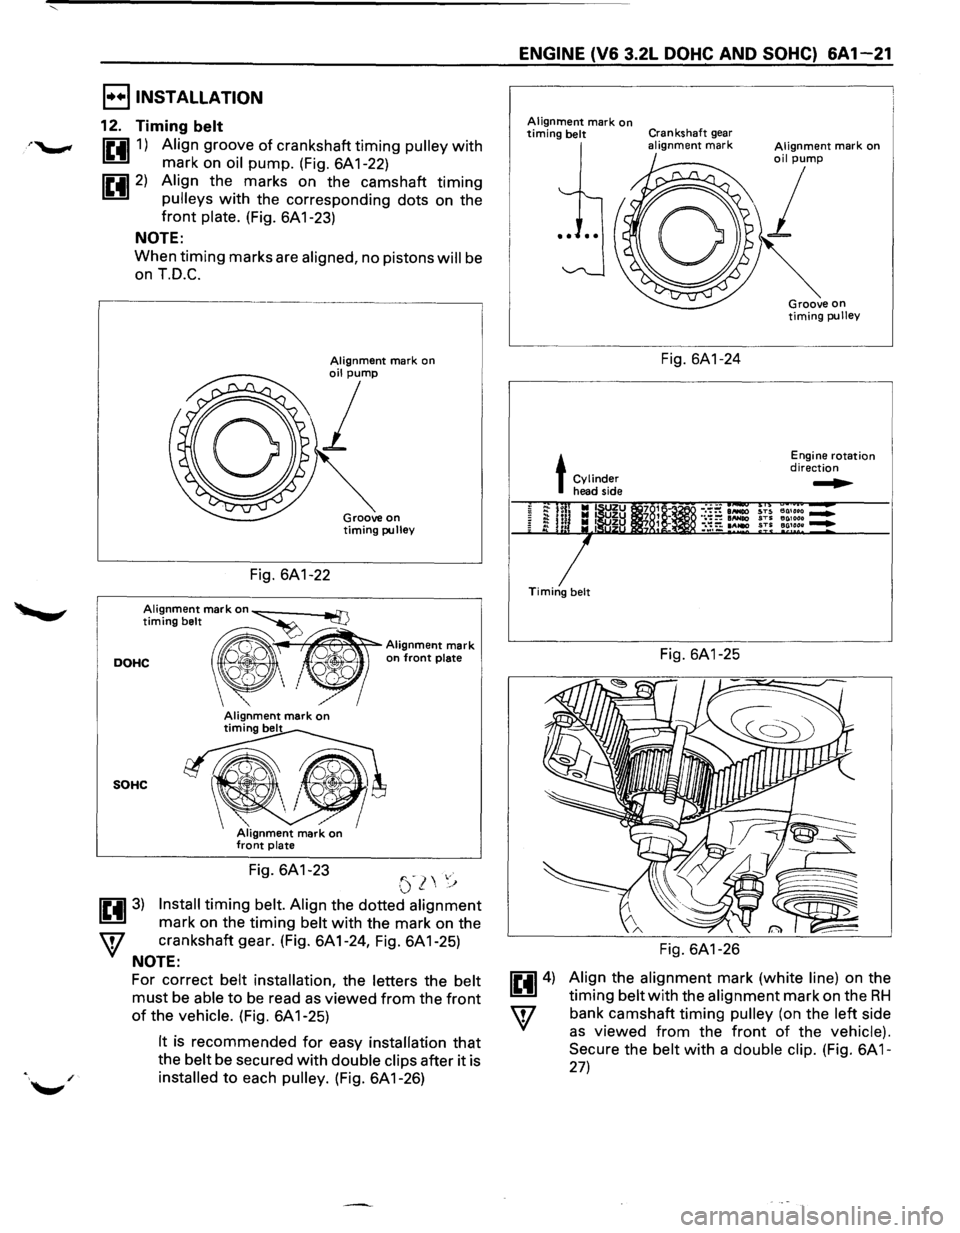
I••IINSTALLATION
12. Timing belt
1£4111) Align groove of crankshaft timing pulley with
mark on oil pump. (Fig. 6A 1-22)
1£4112) Align the marks on the camshaft timing
pulleys with the corresponding dots on the
front plate. (Fig. 6A 1-23)
NOTE:
When timing marks are aligned, no pistons will be
on T.D.C.
,-----------------------------,
Fig. 6A1-22
Groove on timing pulley
Alignment mark on~ ad]
timing belt ·~Alignment mark
DOHC ", ' on front plate Q',
SOHC
Fig. 6A1-23 '"-) ,.· (.)~\,'j
1£4113) Install timing belt. Align the dotted alignment
mark on the timing belt with the mark on the
W crankshaft gear. (Fig. 6A1-24, Fig. 6A1-25)
NOTE:
For correct belt installation, the letters the belt
must be able to be read as viewed from the front
of the vehicle. (Fig. 6A 1-25)
It is recommended for easy installation that
the belt be secured with double clips after it is
installed to each pulley. (Fig. 6A 1-26)
ENGINE (V6 3.2L DOHC AND SOHC) 6A1-21
Alignment mark on timing belt Crankshaft gear alignment mark
L~---
t Cylinder head side
Timing belt
Fig. 6A1-24
Fig. 6A1-25
Fig. 6A1-26
Engine rotation direction
~
Align the alignment mark (white line) on the
timing belt with the alignment mark on the RH
bank camshaft timing pulley (on the left side
as viewed from the front of the vehicle).
Secure
the belt with a double clip. (Fig. 6A 1-
27)
Page 580 of 1928
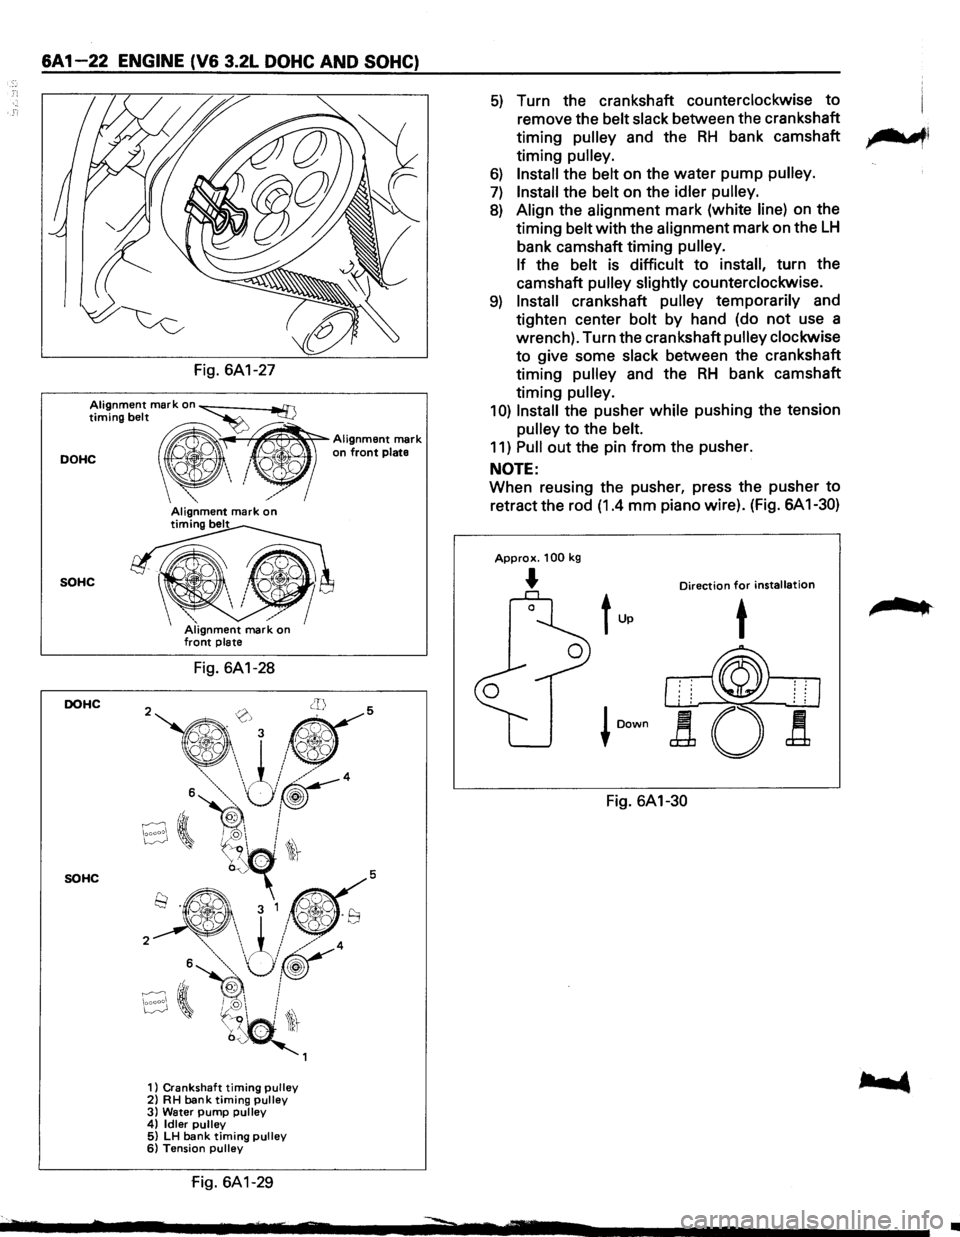
&A 1-22 ENGINE (V& 3.2L DOHC AND SOHC)
Fig. 6A1-27
Alignment mark on ~ timing belt ~
DOHC " ' on front plate
~~
Alignment mark
_","'
SOHC
DOHC
SOHC
/ Alignment mark on timing belt
Fig. 6A1-28
1) Crankshaft timing pulley 2) RH bank timing pulley 3) Water pump pulley 4) Idler pulley 5) LH bank timing pulley 6) Tension pulley
fig. 6A1-29
5) Turn the crankshaft counterclockwise to
remove the belt slack between the crankshaft
timing
pulley and the RH bank camshaft ,.......,,
timing pulley.
6) Install the belt on the water pump pulley.
7) Install the belt on the idler pulley.
8) Align the alignment mark (white line) on the
timing belt with the alignment mark on the
LH
bank camshaft timing pulley.
If
the belt is difficult to install, turn the
camshaft
pulley slightly counterclockwise.
9) Install crankshaft pulley temporarily and
tighten center bolt by hand (do
not use a
wrench). Turn the crankshaft
pulley clockwise
to give some slack between the crankshaft
timing
pulley and the RH bank camshaft
timing
pulley.
1 0) Install the pusher while pushing the tension
pulley to the belt.
11) Pull out the pin from the pusher.
NOTE:
When reusing the pusher, press the pusher to
retract the rod (1.4 mm piano wire). (Fig. 6A 1-30)
Approx. 100 kg
... Direction for installation
Fig. 6A1-30
,.. ..
•