warning light ISUZU TROOPER 1995 Repair Manual
[x] Cancel search | Manufacturer: ISUZU, Model Year: 1995, Model line: TROOPER, Model: ISUZU TROOPER 1995Pages: 1928
Page 1377 of 1928
::!! (Q 00 I ....., w ..,..
(
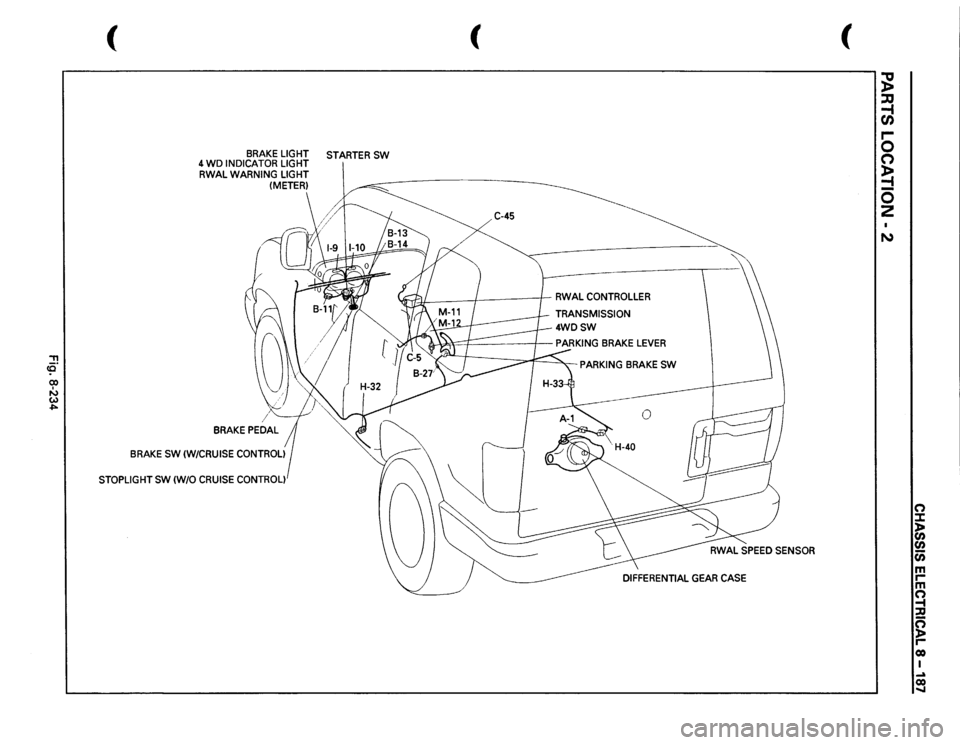
BRAKE
LIGHT
STARTER
SW
4 WD
INDICATOR
LIGHT
RWAL
WARNING
LIGHT (METER)
BRAKE
SW
(W/CRUISE
CONTROL)
STOPLIGHT
SW
(W/0
CRUISE
CONTROL)
(
C-45
JfJI:
/
I
RWAL
CONTROLLER
TRANSMISSION
4WDSW
PARKING
BRAKE
SW
(
;g ::JJ -1 en .... 0 0 ~ -0 2 N
n :I: l> en en c;; m rm n -t :a g reo I ~ co .....
Page 1382 of 1928
8-192 CHASSIS ELECTRICAL
TRANSMISSION CONTROL MODULE (TCM)
GENERAL DESCRIPTION
The circuit consists of the starter switch, TCM, mode switch, brake switch, speed sensor, kick down switch,
Power and
Winter switches, Throttle Position (TP) sensor, Engine Control Module (ECM), barometer sensor,
adapter case, main case,
warning light (CHECK TRANS, NT OIL TEMP) and indicator light (WINTER DRIVE,
POWER DRIVE).
The TCM, based on the predetermined shifting characteristics and lockup operating valve, provides the
optimum shifting control to the varying vehicle running condition. The following input signals are sent to the
TCM: select lever position from the mode switch, running mode from the POWER & WINTER switches,
throttle opening from the TP sensor, vehicle speed from the vehicle speed sensor and engine speed from the
ECM are sent to the TCM. After receiving these signals, the TCM determines the vehicle running condition,
and
it sends output signals to each solenoid to control shifting.
When the
TCC solenoid is engaged, the lockup mechanism operates.
The shift
solenoid 2.3 and 1.2/3.4 selects the shift gear position.
The force
motor controls the line pressure to improve shifting.
Also, when the TCM detects an abnormal signal from the transmission or sensor, it will cause the "CHECK
TRANS"
light on the warning box to flash in order to inform the driver of the malfunction.
Refer to section 7 A "AUTOMATIC TRANSMISSION" for details.
•
Page 1460 of 1928
8-270 CHASSIS ELECTRICAL
ANTI-THEFT SYSTEM
GENERAL DESCRIPTION .......
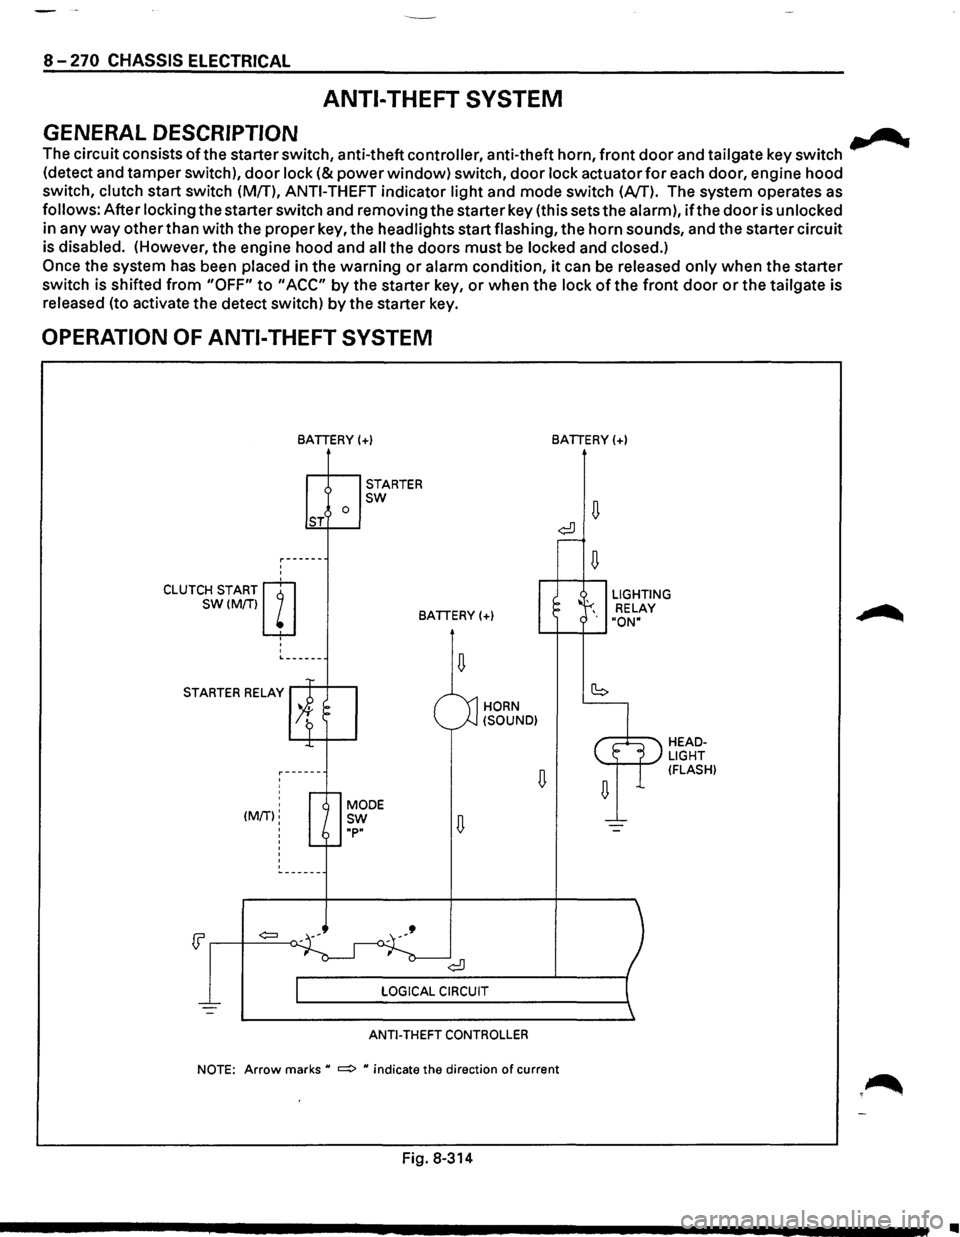
The circuit consists ofthe starter switch, anti-theft controller, anti-theft horn, front door and tailgate key switch
(detect and tamper switch),
door lock (&power window) switch, door lock actuator for each door, engine hood
switch, clutch start switch (MfT),
ANTI-THEFT indicator light and mode switch (AfT). The system operates as
follows: After locking the starter switch and removing the starter key (this sets the alarm),
ifthe door is unlocked
in any
way other than with the proper key, the headlights start flashing, the horn sounds, and the starter circuit
is disabled. (However,
the engine hood and all the doors must be locked and closed.)
Once the system has been placed in the warning or alarm condition, it can be released only when the starter
switch is shifted
from "OFF" to "ACC" by the starter key, or when the lock of the front door or the tailgate is
released (to activate the detect switch)
by the starter key.
OPERATION OF ANTI-THEFT SYSTEM
'
'
CLUTCH START m
SW(M/Tiw
' '
'
BATIERY(+)
0 ST
STARTER sw
BATIERY(+)
L------
STARTER RELAY
' ' (MIT):
'
'
'
HORN
(SOUND)
ANTI-THEFT CONTROLLER
BATIERY(+)
LIGHTING
RELAY
"ON"
HEADLIGHT (FLASH)
NOTE: Arrow marks u ~ u indicate the direction of current
Fig. 8-314
•
Page 1473 of 1928
DOOR LOCK ACTUATOR (fRT DOOR
LH & RH, RR DOOR -LH & RH, TAIL-
~ GATE)
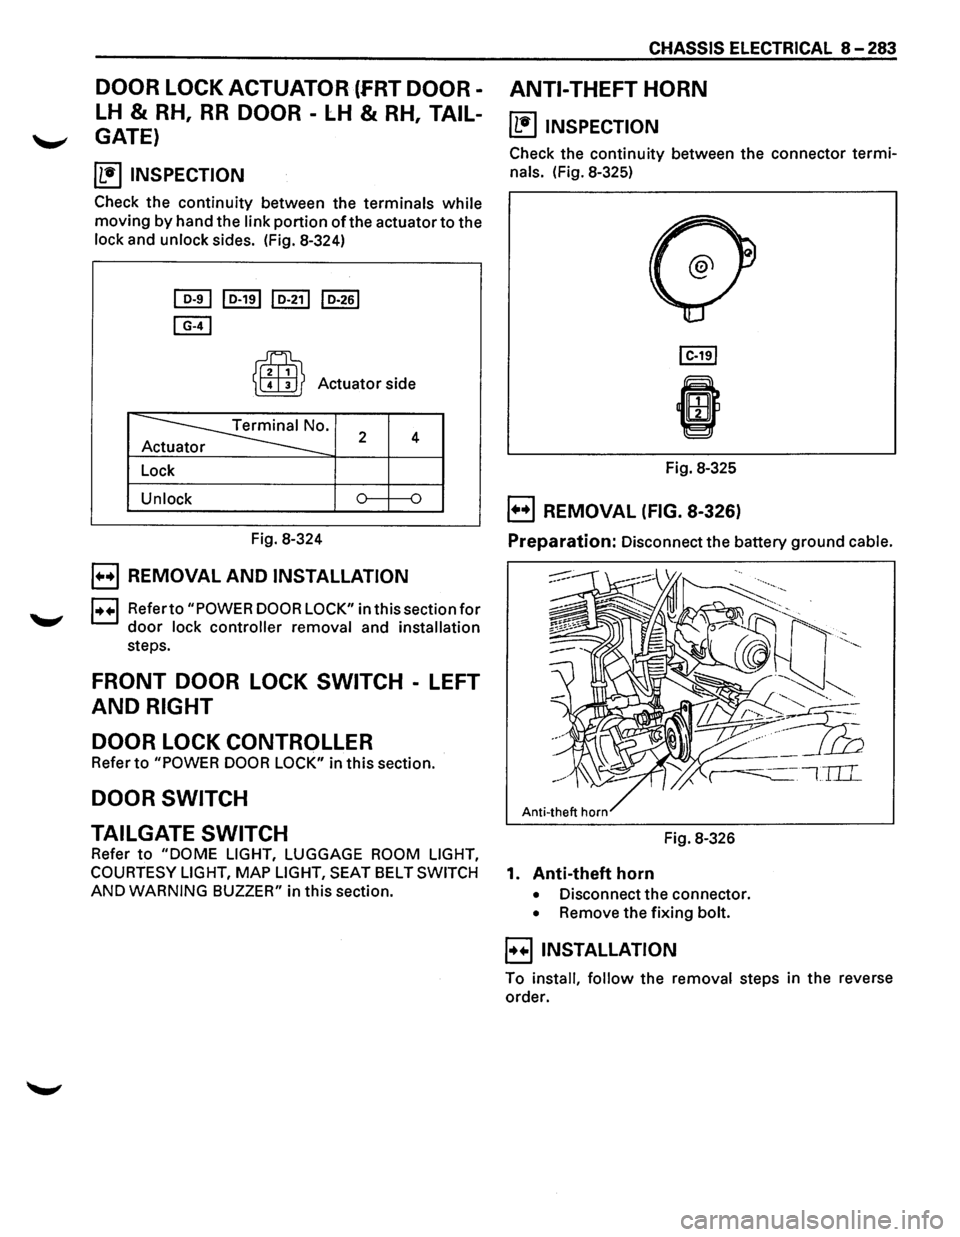
~ INSPECTION
Check the continuity between the terminals while
moving by hand the link portion of the actuator to the
lock and unlock sides. (Fig. 8-324)
[QI] I D-191 I D-211 I D-261
[E)
~
~ Actuator side
~· 2 4 r
Lock
Unlock
Fig. 8-324
B REMOVAL AND INSTALLATION
1++1 Referto "POWER DOOR LOCK" in this section for
door lock controller removal and installation
steps.
FRONT DOOR LOCK SWITCH -LEFT
AND RIGHT
DOOR LOCK CONTROLLER
Refer to "POWER DOOR LOCK" in this section.
DOOR SWITCH
CHASSIS ELECTRICAL 8-283
ANTI-THEFT HORN
~ INSPECTION
Check the continuity between the connector termi
nals. (Fig. 8-325)
Fig. 8-325
B REMOVAL (FIG. 8-326)
Preparation: Disconnect the battery ground cable.
TAILGATE SWITCH Fig. 8-326
Refer
to "DOME LIGHT, LUGGAGE ROOM LIGHT,
COURTESY LIGHT,
MAP LIGHT, SEAT BELT SWITCH 1. Anti-theft horn
AND WARNING BUZZER" in this section. • Disconnect the connector.
• Remove the fixing bolt.
B INSTALLATION
To install, follow the removal steps in the reverse
order.
Page 1478 of 1928
8-288 CHASSIS ELECTRICAL
METER AND WARNING/INDICATOR LIGHT
GENERAL DESCRIPTION
The circuit consists of the starter switch, meter assembly, vehicle speed sensor, clutch switch, transmission
switch, lighting switch,
turn signal switch, thermo unit, oil pressure unit, Engine Control Module, fuel tank unit,
4WD
SW, oil pressure switch, parking brake switch, brake fluid switch, seat belt switch and illumination
controller.
The meter ASM contains the speedometer, tachometer, voltmeter, engine coolant temperature gauge, oil
pressure gauge, fuel gauge and warning/indicator lights.
The meter warning/indicator lights and
their bulb sockets are a unit, they are installed from the back of the
speedometer assembly.
Page 1485 of 1928
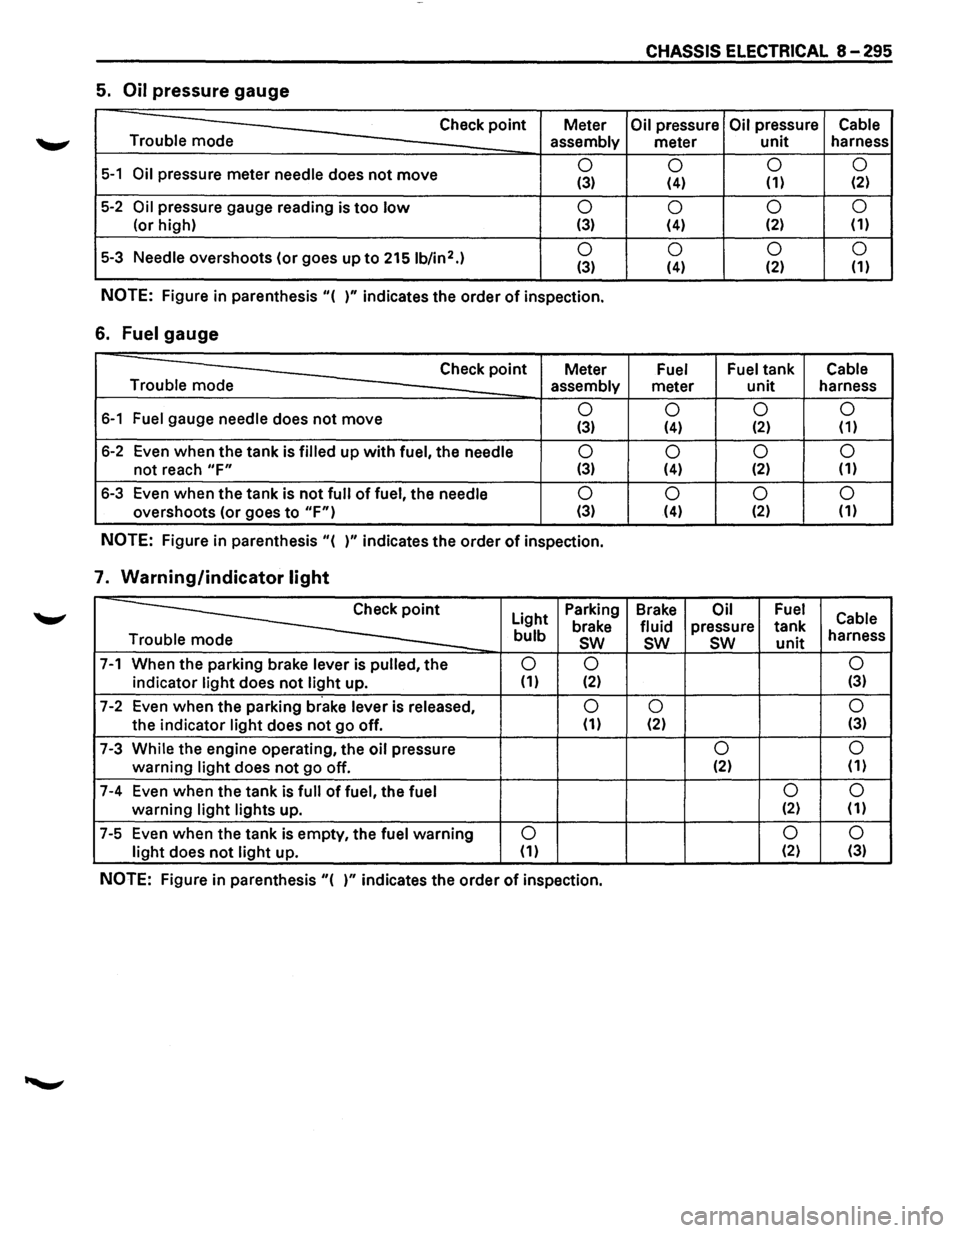
CHASSIS ELECTRICAL 8-295
5. Oil pressure gauge
Check point Meter Oil pressure Oil pressure Cable
Trouble mode
assembly meter unit harness
5-1 Oil pressure meter needle does not move 0
0 0
0 (3) (4) (1) (2)
5-2 Oil pressure
gauge reading is too low 0
0 0
0
(or
high) (3) (4) (2) (1)
5-3 Needle overshoots
(or goes up to 2151b/in2.) 0
0 0 0 (3) (4) (2)
(1)
NOTE: Figure
in parenthesis "( )" indicates the order of inspection.
6. Fuel gauge
Check point Meter Fuel Fuel tank Cable
Trouble mode assembly
meter unit harness
6-1 Fuel gauge needle does not move 0
0 0 0 (3) (4) (2) (1)
6-2 Even when the tank is filled up with fuel, the needle 0
0 0
0
not reach "F" (3) (4) (2)
(1)
6-3
Even when the tank is not full of fuel, the needle 0
0 0
0
overshoots (or goes to "F") (3) (4) (2) (1)
NOTE: Figure
in parenthesis "( )" indicates the order of inspection.
7. Warning/indicator light
~
Light Parking
Brake Oil Fuel Cable brake fluid pressure tank bulb sw sw sw unit harness
e
7-1 When the parking brake lever is pulled, the 0 0 0
indicator light does not light up. (1) (2) (3)
7-2 Even
when the parking brake lever is released, 0 0 0
the indicator light does not go off. (1) (2) (3)
7-3 While the engine operating,
the oil pressure 0 0
warning light does not go
off. (2)
(1)
7-4 Even
when the tank is full of fuel, the fuel 0 0
warning light lights
up. (2) (1)
7-5 Even
when the tank is empty, the fuel warning 0 0
0
light does not light up. (1) (2)
(3)
NOTE: Figure in parenthesis "( )" indicates the order of inspection.
Page 1501 of 1928
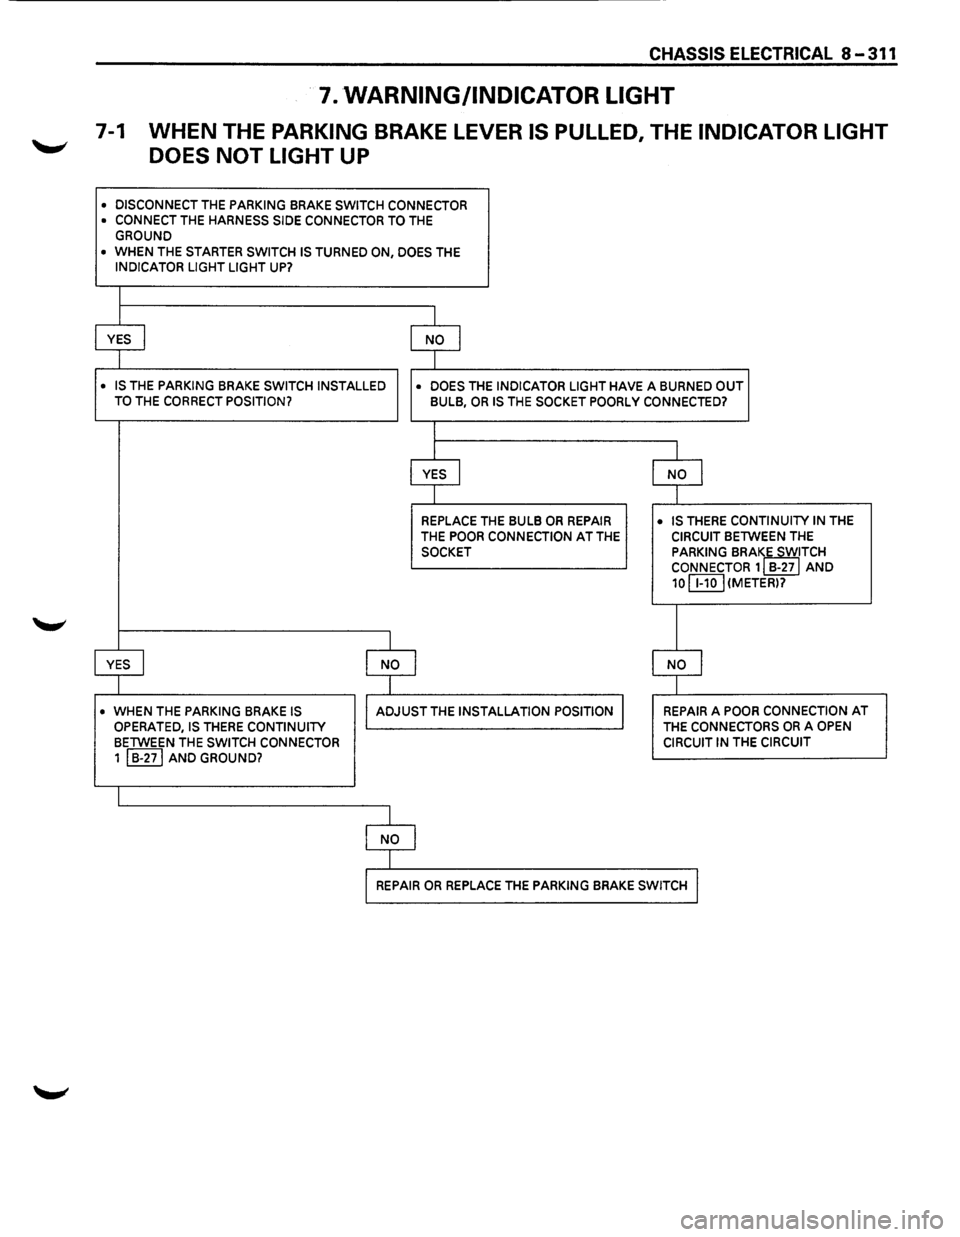
CHASSIS ELECTRICAL 8-311
7. WARNING/INDICATOR LIGHT
7-1 WHEN THE PARKING BRAKE LEVER IS PULLED, THE INDICATOR LIGHT
DOES
NOT LIGHT UP
• DISCONNECT THE PARKING BRAKE SWITCH CONNECTOR • CONNECT THE HARNESS SIDE CONNECTOR TO THE GROUND
• WHEN THE STARTER SWITCH IS TURNED ON, DOES THE INDICATOR LIGHT LIGHT UP?
I
YES I NO I
I
• IS THE PARKING BRAKE SWITCH INSTALLED
• DOES THE INDICATOR LIGHT HAVE A BURNED OUT TO THE CORRECT POSITION? BULB, OR IS THE SOCKET POORLY CONNECTED?
I
I
YES I NO j
I
REPLACE THE BULB OR REPAIR • IS THERE CONTINUITY IN THE
THE POOR CONNECTION AT THE CIRCUIT BETWEEN THE
SOCKET PARKING BRAIE SWITCH CONNECTOR 1 B-27 AND
10 C8.QJ (METER)?
I
YES I I NO I NO I
I
• WHEN THE PARKING BRAKE IS I ADJUST THE INSTALLATION POSITION I REPAIR A POOR CONNECTION AT
OPERATED, IS THERE CONTINUITY THE CONNECTORS OR A OPEN
BETWEEN THE SWITCH CONNECTOR CIRCUIT IN THE CIRCUIT
1 I B-271 AND GROUND?
I
I NO I
I
I REPAIR OR REPLACE THE PARKING BRAKE SWITCH I
Page 1503 of 1928
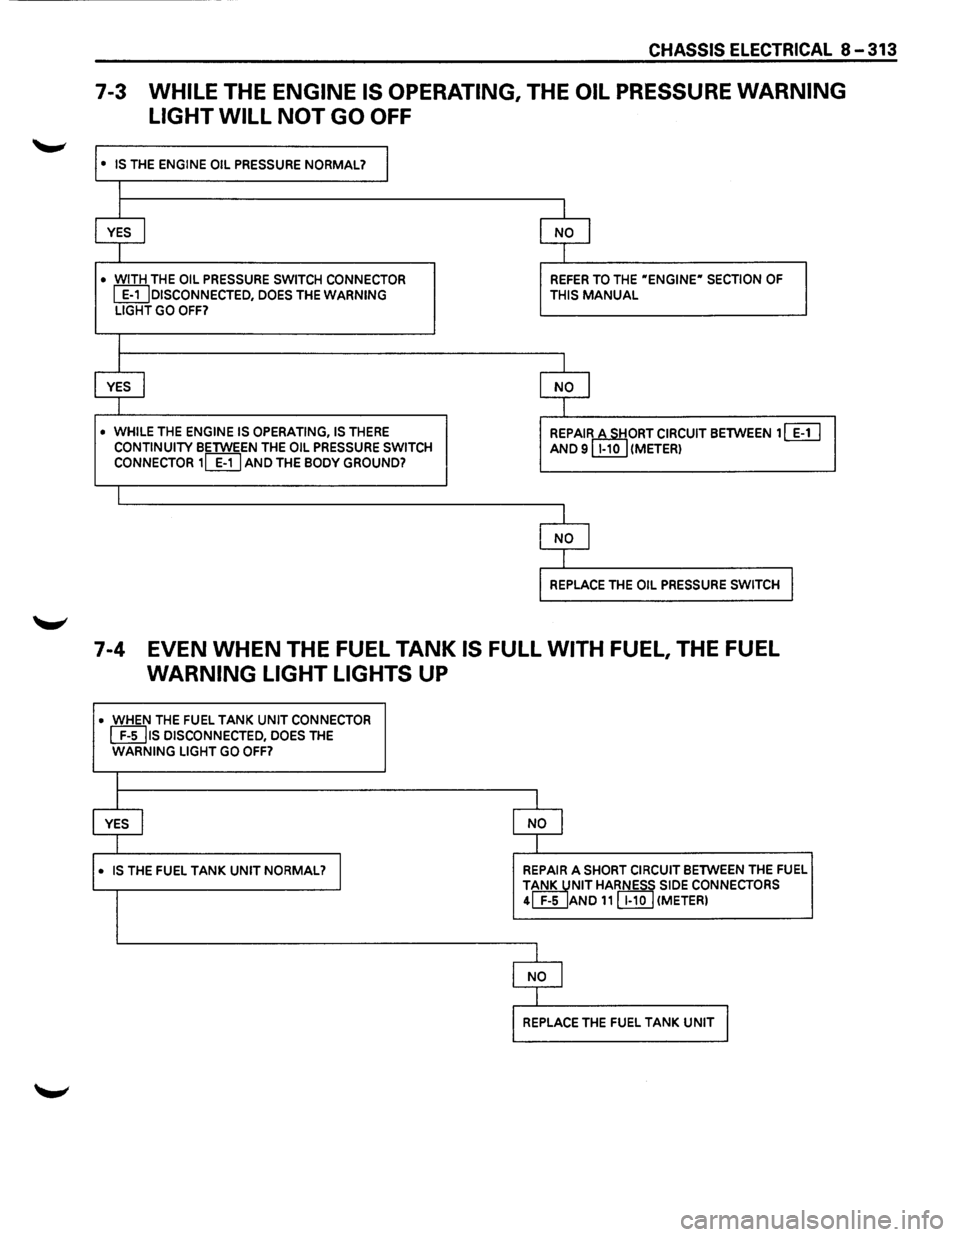
CHASSIS ELECTRICAL 8-313
7-3 WHILE THE ENGINE IS OPERATING, THE OIL PRESSURE WARNING
LIGHT WILL
NOT GO OFF
• IS THE ENGINE OIL PRESSURE NORMAL? I
I
I I
YES I NO I
I I
• WITH THE OIL PRESSURE SWITCH CONNECTOR REFER TO THE "ENGINE" SECTION OF
~DISCONNECTED, DOES THE WARNING THIS MANUAL LIGHT GO OFF?
I
I I
YES I NO I
I I
• WHILE THE ENGINE IS OPERATING, IS THERE REPAIRctTIORT CIRCUIT BETWEEN 1 [ill CONTINUITY BETWEEN THE OIL PRESSURE SWITCH AND 9 1-10 (METER) CONNECTOR 1~ AND THE BODY GROUND?
I
I
NO I
I
REPLACE THE OIL PRESSURE SWITCH I
7-4 EVEN WHEN THE FUEL TANK IS FULL WITH FUEL, THE FUEL
WARNING LIGHT LIGHTS UP
• WHEN THE FUEL TANK UNIT CONNECTOR
[EIJ1s DISCONNECTED, DOES THE WARNING LIGHT GO OFF?
l
YES I NO I
I
• IS THE FUEL TANK UNIT NORMAL? I REPAIR A SHORT CIRCUIT BETWEEN THE FUEL
TiNK JNIT HARNESS SIDE CONNECTORS 4 F-5 AND 11 [I!QJ (METER)
1
NO I
I
REPLACE THE FUEL TANK UNIT I
Page 1504 of 1928
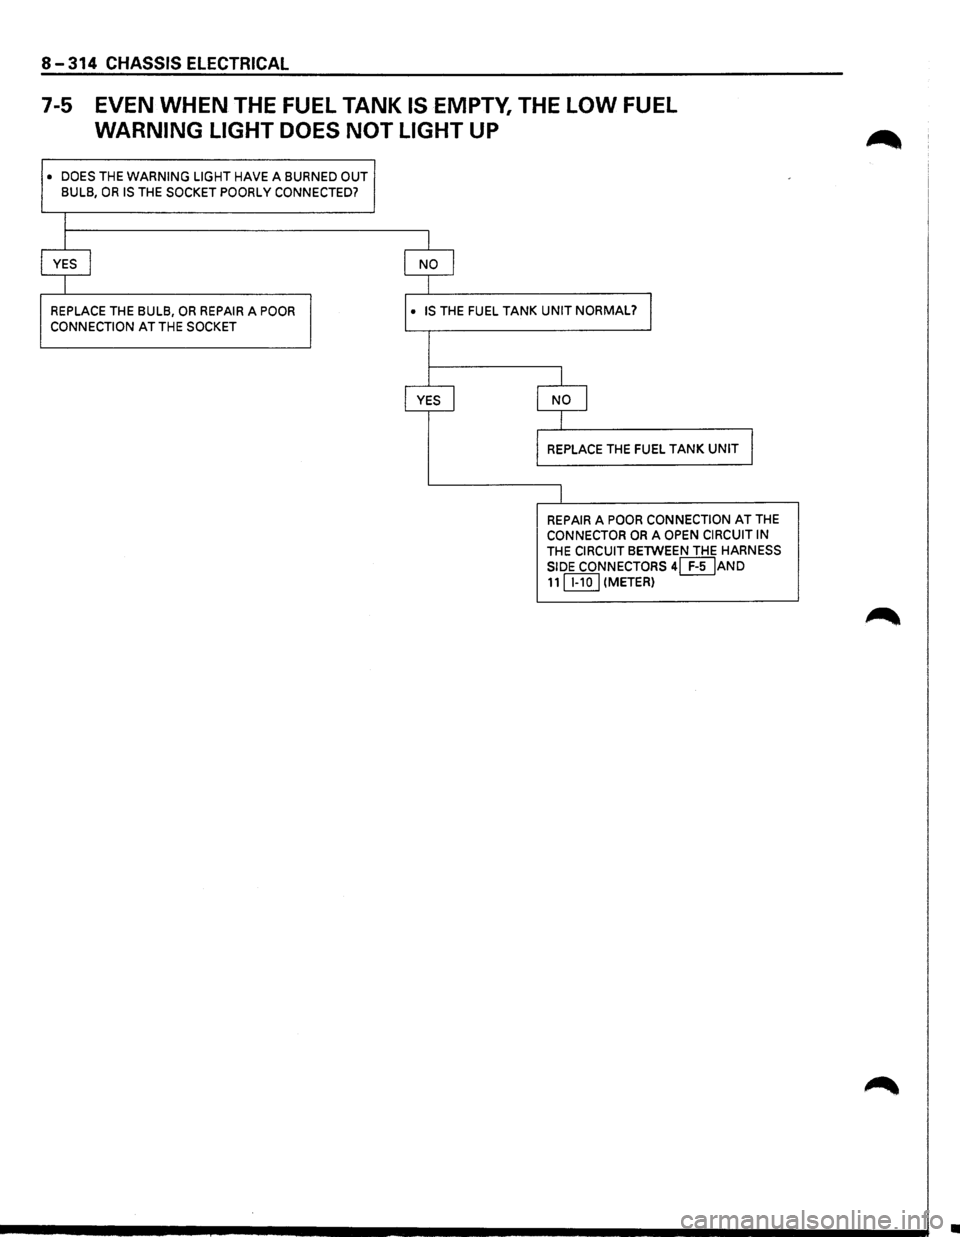
8-314 CHASSIS ELECTRICAL
7-5 EVEN WHEN THE FUEL TANK IS EMPTY, THE LOW FUEL
WARNING LIGHT DOES NOT LIGHT UP
• DOES THE WARNING LIGHT HAVE A BURNED OUT
BULB, OR IS THE SOCKET POORLY CONNECTED?
I
I
YES I
I
REPLACE THE BULB, OR REPAIR A POOR
CONNECTION
AT THE SOCKET
I NO I
I· IS THE FUEL TANK UNIT NORMAL? I
I YES I
J
NO I
I
REPLACE THE FUEL TANK UNIT I
I
REPAIR A POOR CONNECTION AT THE CONNECTOR OR A OPEN CIRCUIT IN
THE CIRCUIT BETWEEN THE HARNESS
SIDE CONNECTORS
4[}IJAND 11 IT.IQJ (METER)
•
Page 1505 of 1928
STARTER SWITCH
Refer to "START AND CHARGING" in this section.
'--LIGHTING SWITCH/DIMMER •
PASSING SWITCH/HEADLIGHT
Refer to "HEADLIGHT AND FOG LIGHT" in this sec-
tion.
TURN SIGNAL SWITCH
Refer to "TURN SIGNAL LIGHT, HAZARD WARNING
LIGHT, CORNERING LIGHT, BACKUP LIGHT AND
HORN" in this section.
ILLUMINATION CONTROLLER
Refer to the "FRONT SIDE MARKER LIGHT, PARKING
LIGHT, TAILLIGHT, LICENSE PLATE LIGHT AND ILLU
MINATION LIGHT"
in this section.
CHASSIS ELECTRICAL 8-315