oil ISUZU TROOPER 1995 Manual Online
[x] Cancel search | Manufacturer: ISUZU, Model Year: 1995, Model line: TROOPER, Model: ISUZU TROOPER 1995Pages: 1928
Page 289 of 1928
__,.
9. Ball retainer
10. Ball guide
11. Bellows
12. Band
13. 14.
15.
16.
17.
18.
19.
20.
21.
22.
23.
24. 25.
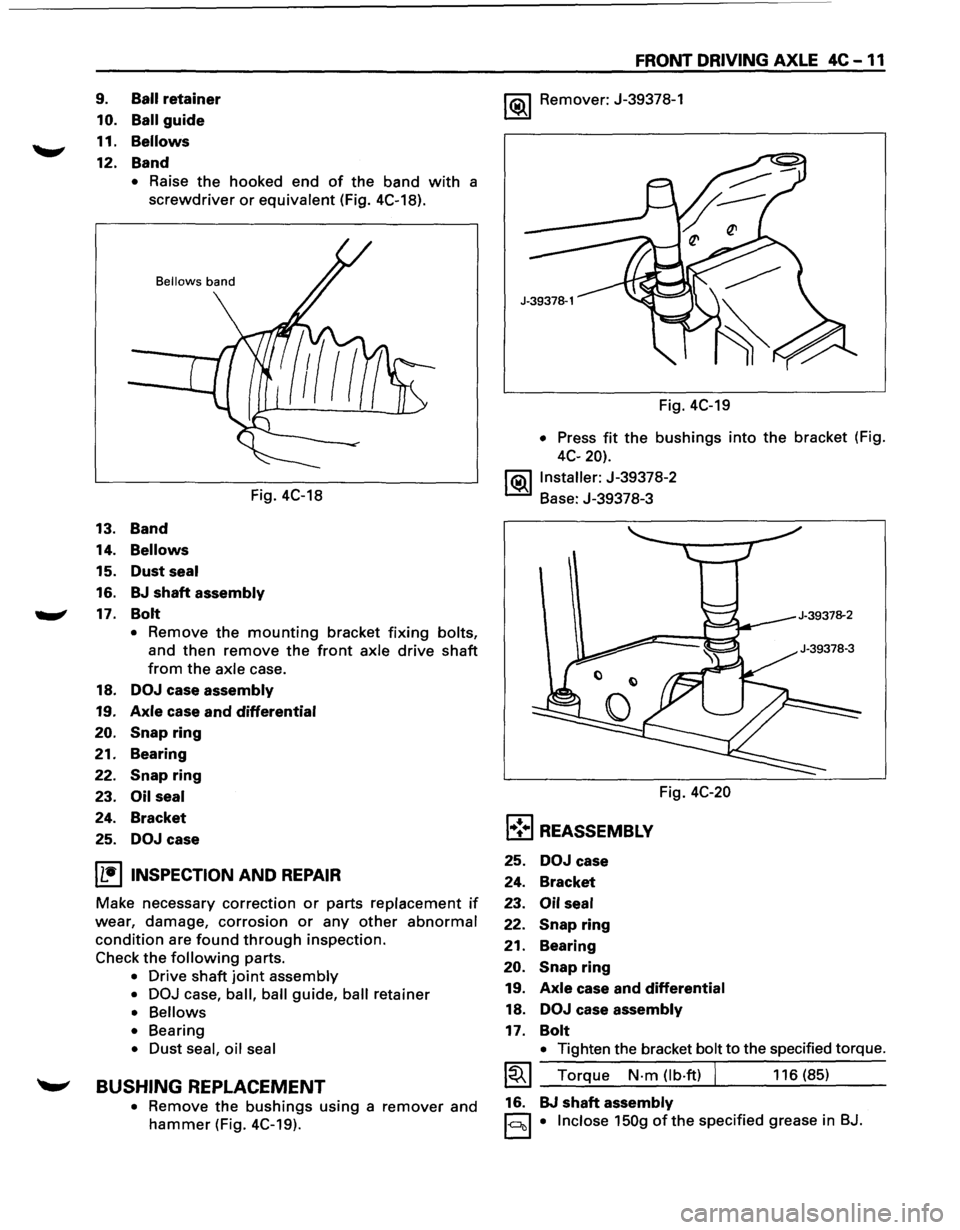
• Raise the hooked end of the band with a
screwdriver or equivalent (Fig. 4C-18).
Bellows band
Fig. 4C-18
Band
Bellows
Dust seal
BJ shaft assembly
Bolt
• Remove the mounting bracket fixing bolts,
and then remove the front axle drive shaft
from the axle case.
DOJ case assembly
Axle case and differential
Snap ring
Bearing
Snap ring
Oil seal
Bracket
DOJ case
I L•IINSPECTION AND REPAIR
Make necessary correction or parts replacement if
wear, damage, corrosion or any other abnormal
condition are found through inspection.
Check
the following parts.
• Drive shaft joint assembly
• DOJ
case, ball, ball guide, ball retainer
• Bellows
• Bearing
• Dust seal, oil seal
~ BUSHING REPLACEMENT
• Remove the bushings using a remover and
hammer (Fig. 4C-19).
FRONT DRIVING AXLE 4C -11
1 (ij),_j Remover: J-39378-1
Fig. 4C-19
• Press fit the bushings into the bracket (Fig.
4C-20).
j(ij),_jlnstaller:
J-39378-2
Base: J-39378-3
Fig.
4C-20
l•!•l REASSEMBLY
25. DOJ case
24. Bracket
23.
Oil seal
22. Snap ring
21.
Bearing
20.
Snap ring
19. Axle case and differential
18. DOJ case assembly
17. Bolt
• Tighten the bracket bolt to the specified torque.
~~~ Torque N-m (lb-ft) I 116 (85)
16. BJ
shaft assembly
1-c:::lcll • Inclose 150g ofthe specified grease in BJ.
Page 292 of 1928
4C-14 FRONT DRIVING AXLE
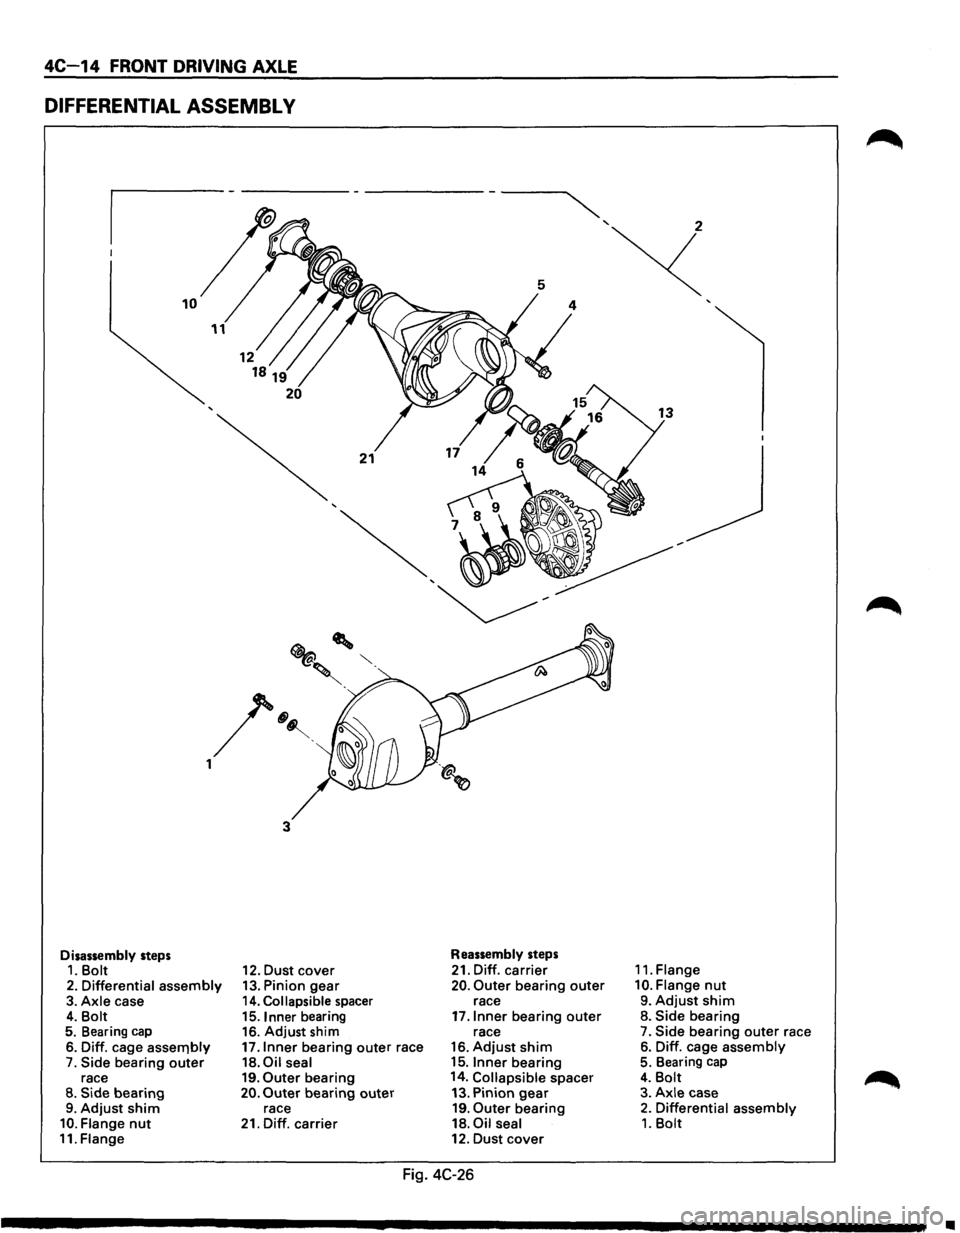
DIFFERENTIAL ASSEMBL V
Disassembly steps 1. Bolt
2. Differential assembly 3. Axle case 4. Bolt 5. Bearing cap
6. Diff. cage assernbly 7. Side bearing outer race 8. Side bearing 9. Adjust shim 10. Flange nut 11. Flange
3
12. Dust cover 13. Pinion gear 14. Collapsible spacer
15. Inner bearing
16. Adjust shim
17.1nner bearing outer race 18.0il seal 19. Outer bearing 20. Outer bearing outer race
21. Diff. carrier
Reassembly steps
21. Diff. carrier 20. Outer bearing outer race
17.1nner bearing outer race
16. Adjust shim 15.1nner bearing
14. Collapsible spacer
13. Pinion
gear 19. Outer bearing
18. Oil seal 12. Dust cover
Fig. 4C-26
11. Flange
10. Flange nut
9. Adjust shim 8. Side bearing 7. Side bearing outer race
6. Diff. cage assembly 5. Bearing cap
4. Bolt 3. Axle case 2. Differential assembly 1. Bolt
..
Page 294 of 1928
4C-16 FRONT DRIVING AXLE
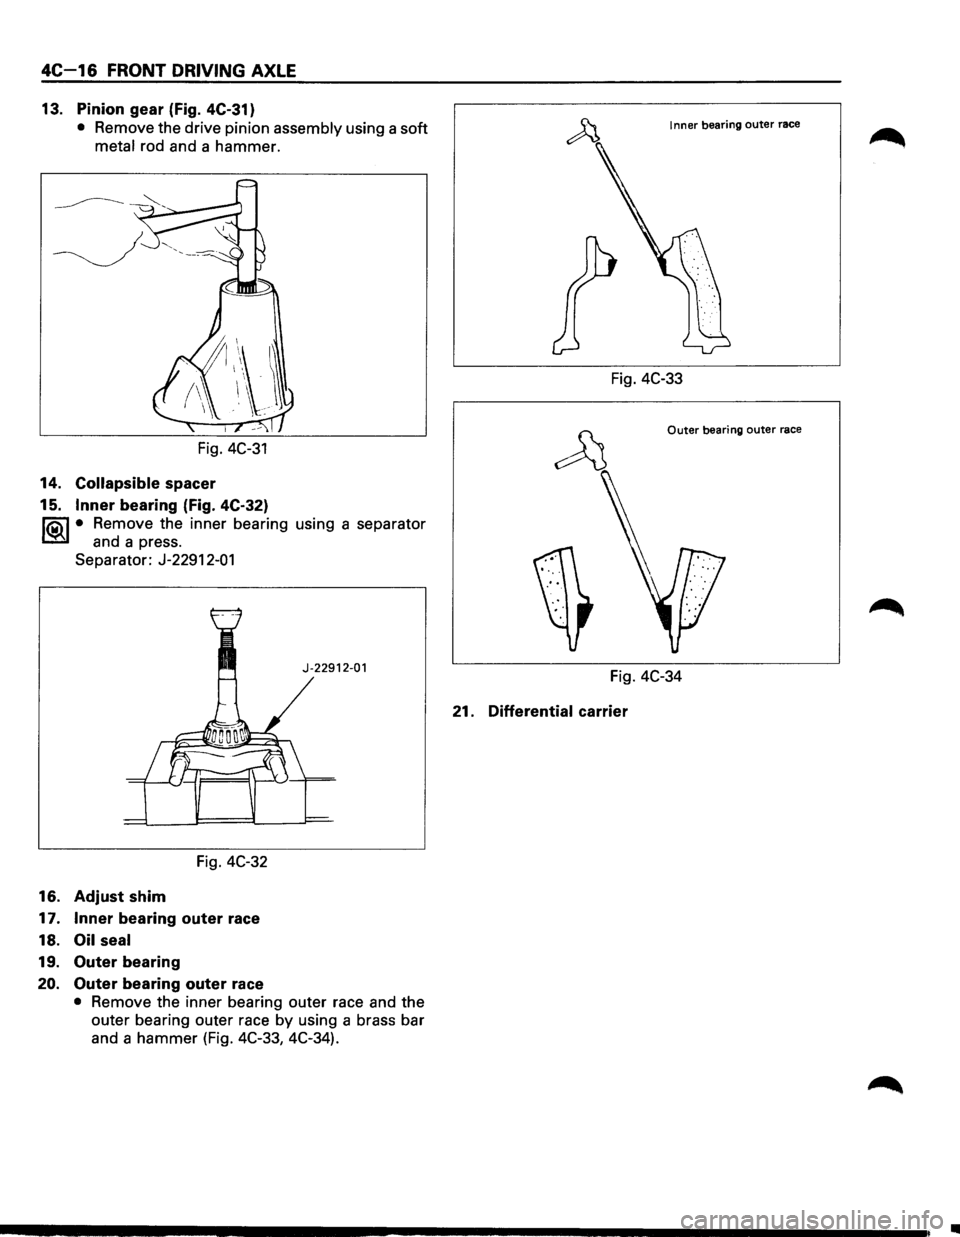
13. Pinion gear (Fig. 4C-31)
• Remove the drive pinion assembly using a soft
metal rod and a hammer.
Fig.
4C-31
14. Collapsible spacer
15.
Inner bearing (Fig. 4C-32)
li5\l • Remove the inner bearing using a separator
CSil and a press.
Separator: J-22912-01
J-22912-01
Fig. 4C-32
16. Adjust shim
17. Inner bearing outer race
18.
Oil seal
19. Outer bearing
20. Outer bearing outer race
• Remove the inner bearing outer race and the
outer bearing outer race
by using a brass bar
and a
hammer (Fig. 4C-33, 4C-34).
Inner bearing outer race
Fig. 4C-33
Outer bearing outer race
Fig. 4C-34
21. Differential carrier
•
Page 295 of 1928
l•!•l REASSEMBLY
21. Differential carrier
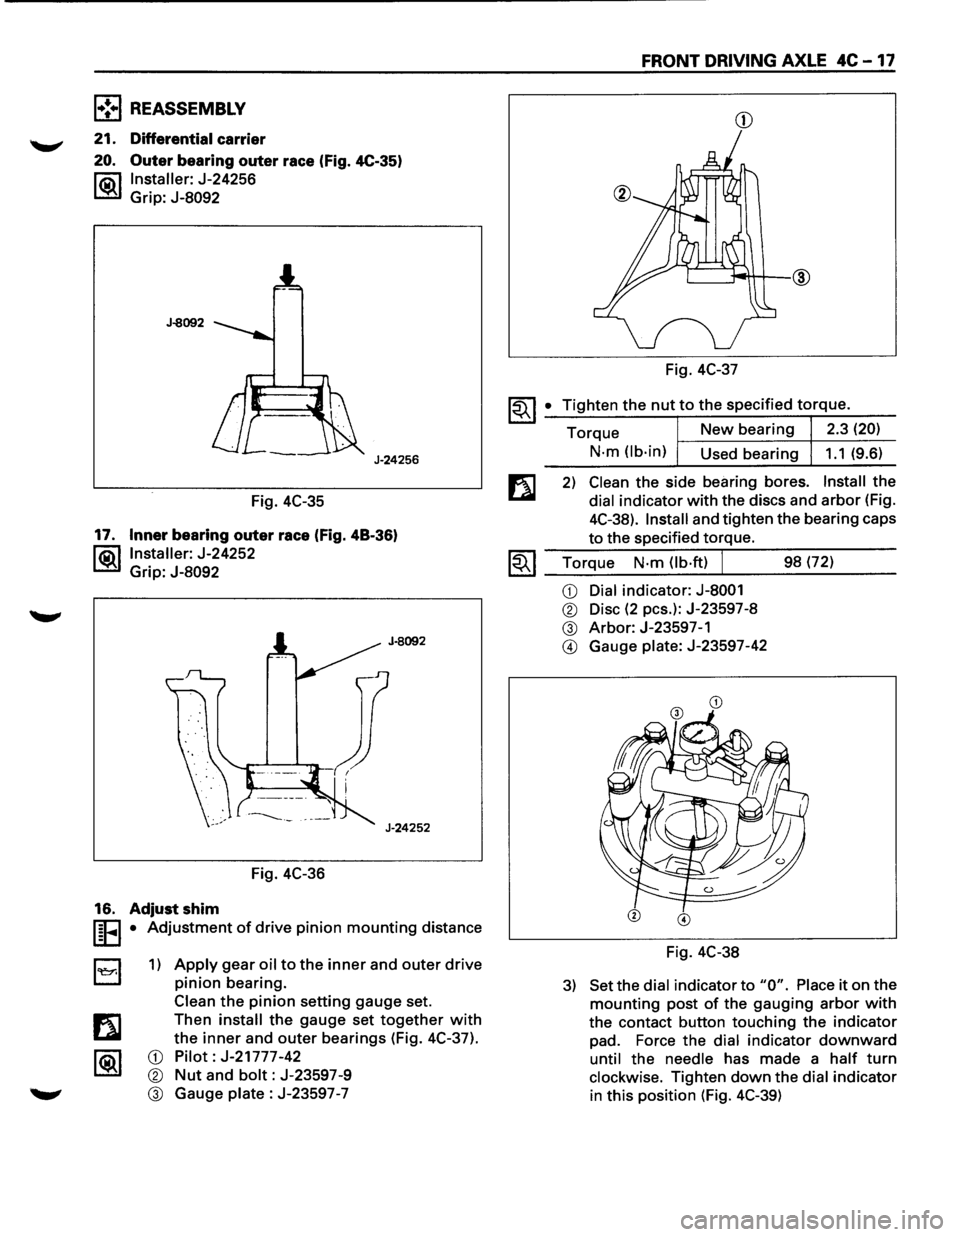
20. Outer bearing outer race (Fig. 4C-35)
l"ii\1 Installer: J-24256
~ Grip: J-8092
J-8092
J-24256
Fig. 4C-35
17. Inner bearing outer race (Fig. 48-36)
l®.llnstaller: J-24252
Grip:
J-8092
Fig. 4C-36
16. Adjust shim
I§FI • Adjustment of drive pinion mounting distance
B 1) Apply gear oil to the inner and outer drive
pinion bearing.
Clean
the pinion setting gauge set.
Then
install the gauge set together with
the inner and outer bearings (Fig. 4C-37).
CD Pilot: J-21777-42
® Nut and bolt: J-23597-9
® Gauge plate : J-23597 -7
FRONT DRIVING AXLE 4C -17
CD
Fig. 4C-37
~~I _• _T:.:i:?.g.:.:h.:.:te:.:..n:...:t:.:..:h~e...:.n.:..:u:..:.t,..:.to.::......:.:th..:...e:.....:.:sp:....e:....:c_if_ie_d_t_orr-=-q-ue_. __
Torque New bearing 2.3 (20)
N-m (lb-in)
Used bearing 1.1 (9.6)
2) Clean the side bearing bores. Install the
dial indicator with the discs and arbor (Fig.
4C-38).
Install and tighten the bearing caps
to the specified torque.
1.;-. I Torque N-m (lb·ft) J 98 (72) ~ ~~--~~.---------
CD Dial indicator: J-8001
® Disc (2 pes.): J-23597-8
® Arbor: J-23597-1
@ Gauge plate: J-23597-42
Fig. 4C-38
3) Set the dial indicator to "0". Place it on the
mounting post of the gauging arbor with
the contact button touching the indicator
pad. Force the dial indicator downward
until the needle has made a half turn
clockwise. Tighten down the dial indicator
in this position (Fig. 4C-39)
Page 297 of 1928
FRONT DRIVING AXLE 4C-19
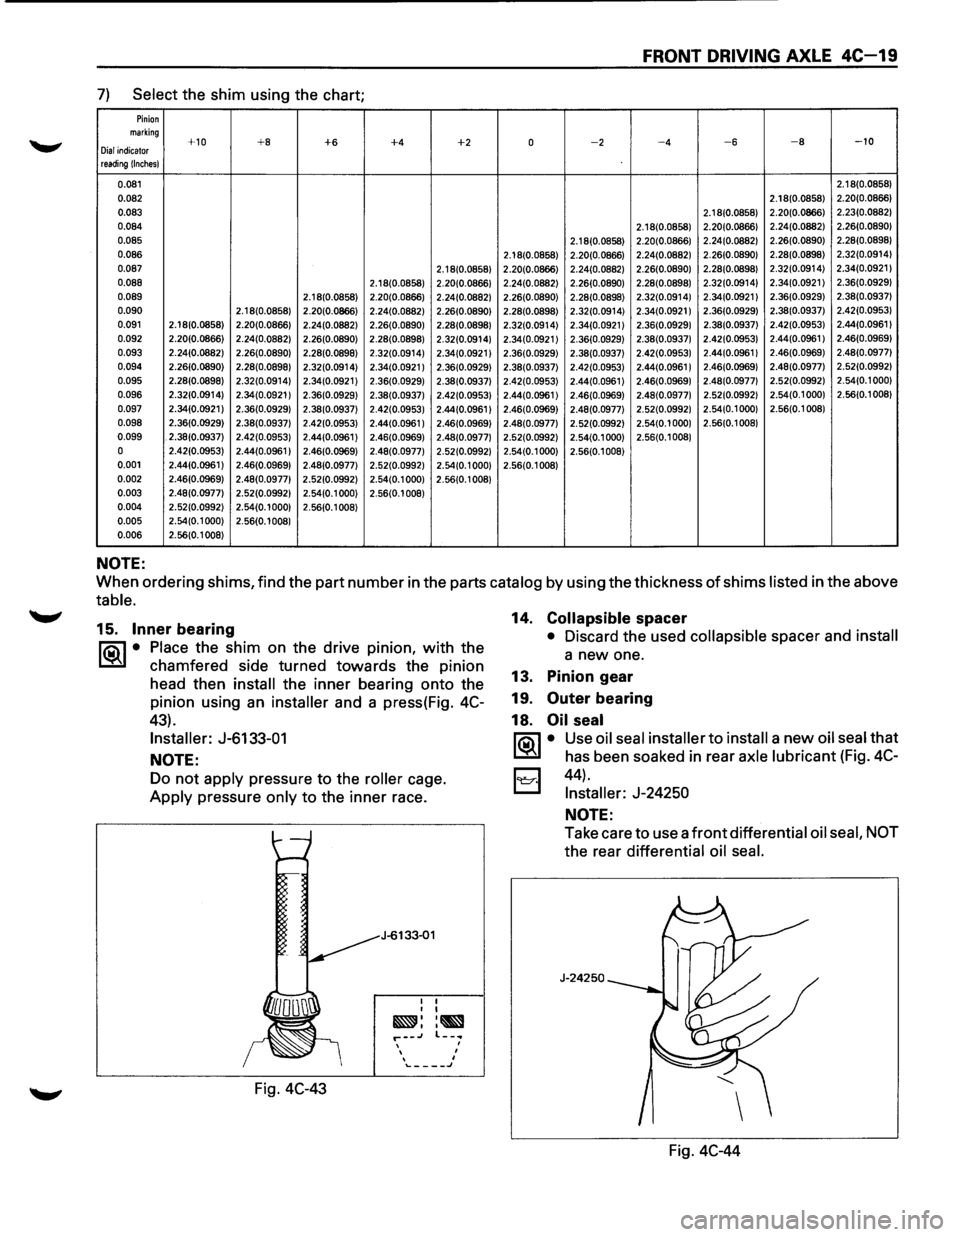
7) Select the shim using the chart;
Pinion marking +10 +8 +6 +4 +2 0 -2 -4 -6 -8 -10 Dial indicator reading !Inches)
0.081 2.18(0.0858)
0.082 2.18(0.0858) 2.20(0.0866)
0.083
2.1 8(0.0858) 2.20(0.0866)
2.23(0.0882)
0.084 2.1 8(0.0858) 2.20(0.0866) 2.24(0.0882) 2.26(0.0890)
0.085 2.18(0.0858) 2.20(0.0866) 2.24(0.0882)
2.26(0.0890) 2.28(0.0898)
0.086 2.18(0.0858) 2.20(0.0866) 2.24(0.0882)
2.26(0.0890) 2.28(0.0898) 2.32(0.0914)
0.087 2.18(0.0858) 2.20(0.0866)
2.24(0.0882) 2.26(0.0890) 2.28(0.0898) 2.32(0.0914) 2.34(0.0921) 0.088 2.18(0.0858) 2.20(0.0866) 2.24(0.0882) 2.26(0.0890) 2.28(0.0898) 2.32(0.0914) 2.34(0.0921) 2.36(0.0929) 0.089 2.18(0.0858) 2.20(0.0866) 2.24(0.0882) 2.26(0.0890)
2.28(0.0898) 2.32(0.0914) 2.34(0.0921) 2.36(0.0929) 2.38(0.0937)
0.090 2.18(0.0858) 2.20(0.0866) 2.24(0.0882) 2.26(0.0890) 2.28(0.0898) 2.32(0.0914) 2.34(0.0921) 2.36(0.0929)
2.38(0.0937)
2.42(0.0953)
0.091 2.18(0.0858)
2.20(0.0866) 2.24(0.0882) 2.26(0.0890) 2.28(0.0898) 2.32(0.0914) 2.34(0.0921) 2.36(0.0929) 2.38(0.0937) 2.42(0.0953) 2.44(0.0961
I
0.092 2.20(0.0866) 2.24(0.0882) 2.26(0.0890) 2.28(0.0898) 2.32(0.0914) 2.34(0.0921) 2.36(0.0929) 2.38(0.0937) 2.42(0.0953) 2.44(0.0961)
2.46(0.0969) 0.093 2.24(0.0882)
2.26(0.0890) 2.28(0.0898) 2.32(0.0914) 2.34(0.0921 I 2.36(0.0929) 2.38(0.0937) 2.42(0.0953) 2.44(0.0961 I 2.46(0.0969) 2.48(0.0977)
0.094 2.26(0.0890)
2.28(0.0898) 2.32(0.0914) 2.34(0.0921) 2.36(0.0929) 2.38(0.0937) 2.42(0.0953) 2.44(0.0961
I 2.46(0.0969) 2.48(0.0977) 2.52(0.0992)
0.095 2.28(0.0898) 2.32(0.0914)
2.34(0.0921 I 2.36(0.0929) 2.38(0.0937) 2.42(0.0953) 2.44(0.0961 I 2.46(0.0969) 2.48(0.0977) 2.52(0.0992) 2.54(0.1 000)
0.096 2.32(0.0914)
2.34(0.0921) 2.36(0.0929) 2.38(0.0937) 2.42(0.0953) 2.44(0.0961) 2.46(0.0969) 2.48(0.0977) 2.52(0.0992) 2.54(0.1000)
2.56(0.1
008)
0.097 2.34(0.0921) 2.36(0.0929)
2.38(0.0937) 2.42(0.0953) 2.44(0.0961 I 2.46(0.0969) 2.48(0.0977) 2.52(0.0992)
2.54(0.1 000) 2.56(0.1 008)
0.098 2.36(0.0929)
2.38(0.0937) 2.42(0.0953) 2.44(0.0961 I 2.46(0.0969) 2.48(0.0977)
2.52(0.0992) 2.54(0.1 000) 2.56(0.1 008)
0.099 . 2.38(0.0937) 2.42(0.0953) 2.44(0.0961) 2.46(0.0969)
2.48(0.0977) 2.52(0.0992)
2.54(0.1000) 2.56(0.1 008)
0 2.42(0.0953) 2.44(0.0961) 2.46(0.0969) 2.48(0.0977) 2.52(0.0992) 2.54(0.1 000) 2.56(0.1008)
0.001 2.44(0.0961)
2.46(0.0969) 2.48(0.0977) 2.52(0.0992) 2.54(0.1 000) 2.56(0.1008)
0.002 2.46(0.0969) 2.48(0.0977) 2.52(0.0992) 2.54(0.1 000) 2.56(0.1 008)
0.003 2.48(0.0977) 2.52(0.0992) 2.54(0.1 000) 2.56(0.1 008)
0.004 2.52(0.0992) 2.54(0.1 000) 2.56(0.1 008)
0.005 2.54(0.1 000) 2.56(0.1 008)
0.006 2.56(0.1 008)
NOTE:
When ordering shims, find the part number in the parts catalog by using the thickness of shims listed in the above
table.
15. Inner bearing
ria\~ • Place the shim on the drive pm1on, with the
~ chamfered side turned towards the pinion
head then
install the inner bearing onto the
pinion using an
installer and a press(Fig. 4C-
43).
Installer: J-6133-01
NOTE:
Do not apply pressure to the roller cage.
Apply pressure only to the inner race.
Fig.
4C-43
J-6133-01
I I I I
~::~ r--.J , I I '\...-___ J
14. Collapsible spacer
• Discard the used collapsible spacer and install
a new one.
13. Pinion gear
19.
Outer bearing
18.
Oil seal
ria\~ • Use oil seal installer to install a new oil seal that
~ has been soaked in rear axle lubricant (Fig. 4C-
I:;;:;I 44) .
t.::::::::.l Installer: J-24250
NOTE:
Take care to use a front differential oil seal, NOT
the rear differential oil seal.
J-24250
Fig. 4C-44
Page 303 of 1928
![ISUZU TROOPER 1995 Manual Online (1!] INSPECTION AND REPAIR
Make necessary correction or parts replacement if
~ wear, damage, corrosion or any other abnormal
condition are found through inspection.
Check the
following part](/img/61/57183/w960_57183-302.png "ISUZU TROOPER 1995 Manual Online (1!] INSPECTION AND REPAIR
Make necessary correction or parts replacement if
~ wear, damage, corrosion or any other abnormal
condition are found through inspection.
Check the
following part")
(1!] INSPECTION AND REPAIR
Make necessary correction or parts replacement if
~ wear, damage, corrosion or any other abnormal
condition are found through inspection.
Check the
following parts.
• Ring gear, pinion gear
• Bearing
• Side gear, pinion gear, cross pin
• Differential cage, carrier
• Thrust washer
• Oil seal
Ring gear replacement
1) The ring gear should always be replaced with
the drive pinion as a set.
2) Clean the ring gear threaded holes to remove
the
locking agent.
~~~3) When installing the ring gear, apply LOCTITE
271 or equivalent to all the threaded area and
half of the unthreaded area of the bolt.
4) Discard used bolts and install new ones.
I~I __ T_o_rq~u_e __ N_·m~(l_b·_ft~l_IL_ ___ 1_0_8~(8_0_l __ __
5) Tighten the fixing bolts in a diagonal
sequence as illustrated (Fig. 4C-63).
Fig. 4C-63
H'ffil Clearance between the differential pinion and
L!l!l the cross pin measurement (Fig. 4C-64).
mm (in)
Standard Limit
0.06 -0.12 (0.002 -0.005)
0.2 (0.008)
FRONT DRIVING AXLE 4C-25
Fig. 4C-64
rfi:i1 Clearance between the side gear and the
L!l!l differential box (Fig. 4C-65)
mm (in)
Standard Limit
0.03 -0.10 (0.001 -0.004)
0.15
(0.006)
Side gear
Differential box
Fig. 4C-65
rfi:il Play in splines between the side gear and the
L!l!l axle shaft (Fig. 4C-66)
mm (in)
Standard Limit
0.08 -0.36
(0.003 -0.014) 0.5 (0.02)
Page 306 of 1928
.
fi•28 FRONT DRIVINGk "
;: ~ ·~-¢,,
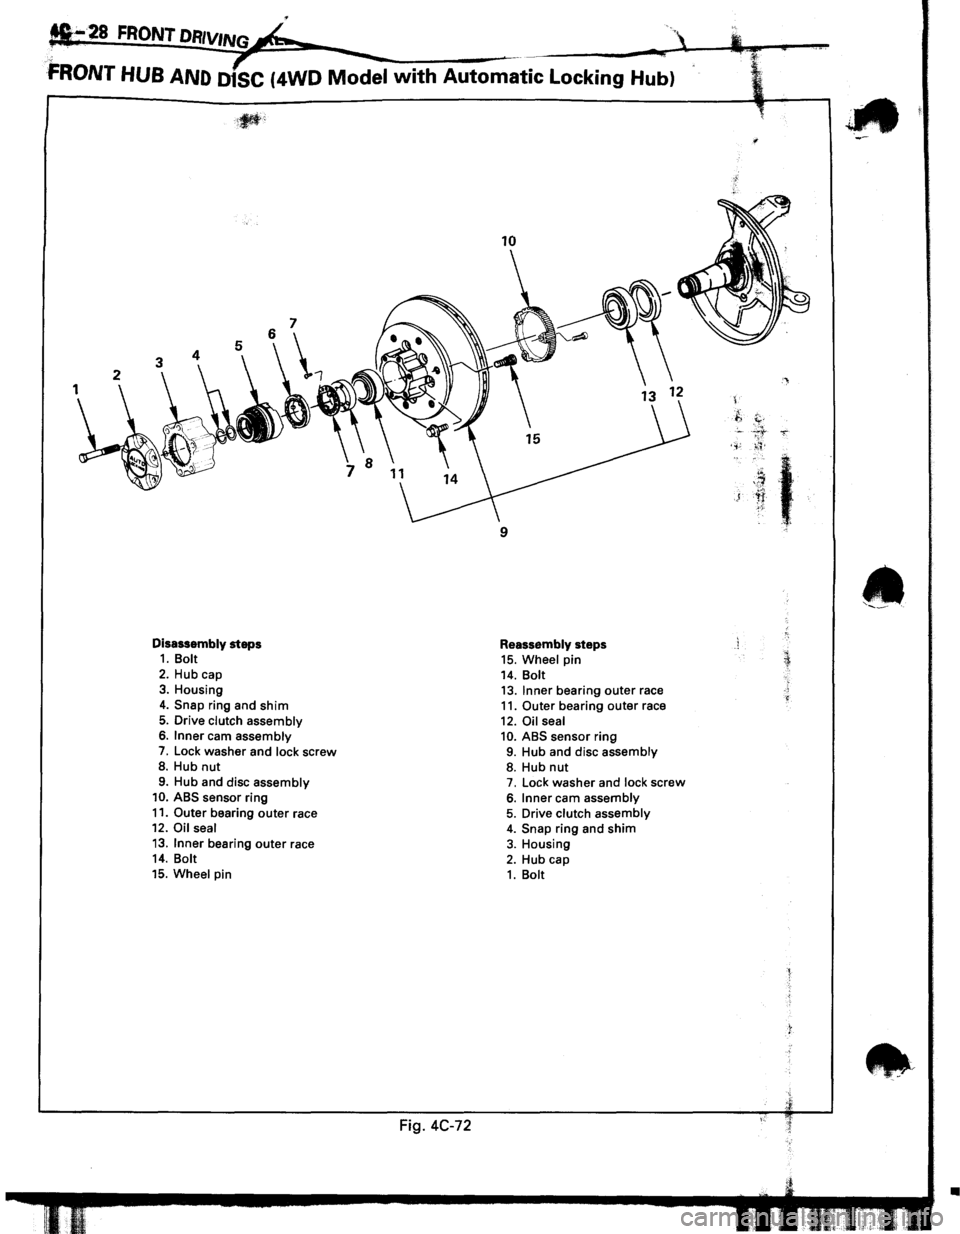
FRONT HUB AND D1SC (4WD Model with Automatic Locking Hub)
Disassembly steps 1. Bolt
2. Hub cap 3. Housing
4. Snap ring and shim
5. Drive clutch assembly 6. Inner cam assembly
7. Lock washer and lock screw 8. Hub nut
9. Hub and disc assembly 10. ABS sensor ring
11. Outer bearing outer race 12. Oil seal
13. Inner bearing outer race 14. Bolt
15. Wheel pin
Fig. 4C-72
10
9
Reassembly steps 15. Wheel pin 14. Bolt 13. Inner bearing outer race 11. Outer bearing outer race
12. Oil seal 10. ABS sensor ring 9. Hub and disc assembly 8. Hub nut 7. Lock washer and lock screw
6. Inner cam assembly 5. Drive clutch assembly 4. Snap ring and shim 3. Housing
2. Hub cap 1. Bolt
'
.f,
c. ' . .,;
)
t
~::
•
Page 307 of 1928
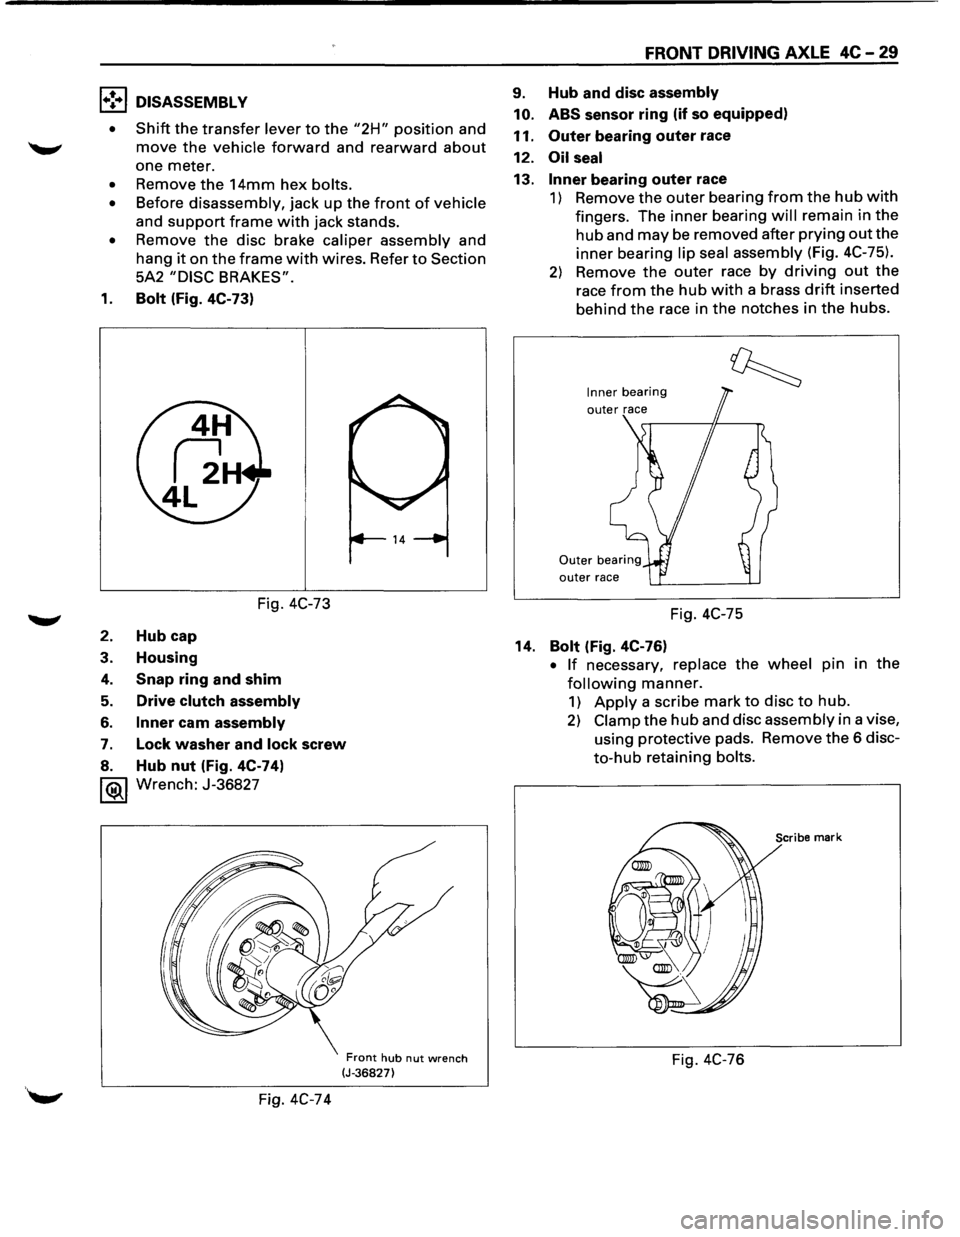
1•! .. 1 DISASSEMBLY
•
Shift the transfer lever to the "2H" position and
move the vehicle forward and rearward about
one meter.
• Remove the 14mm hex bolts.
• Before disassembly, jack up the front of vehicle
and
support frame with jack stands.
• Remove the disc brake caliper assembly and
hang
it on the frame with wires. Refer to Section
5A2
"DISC BRAKES".
1. Bolt (Fig. 4C-73)
Fig. 4C-73
2. Hub cap
3. Housing
4. Snap ring and shim
5. Drive clutch assembly
6. Inner cam assembly
7. Lock washer and lock screw
8. Hub nut (Fig. 4C-74)
1®.1 Wrench: J-36827
Fig. 4C-74
Front hub nut wrench (J-36827)
FRONT DRIVING AXLE 4C-29
9. Hub and disc assembly
10. ABS
sensor ring (if so equipped)
11.
Outer bearing outer race
12.
Oil seal
13. Inner bearing outer race
1) Remove the outer bearing from the hub with
fingers. The inner bearing will remain in the
hub and may be removed after prying out the
inner bearing lip seal assembly (Fig. 4C-75).
2) Remove the outer race by driving out the
race from the hub with a brass drift inserted
behind
the race in the notches in the hubs.
Inner bearing
outer race
Fig. 4C-75
14.
Bolt (Fig. 4C-76)
• If necessary, replace the wheel pin in the
following manner.
1) Apply a scribe mark to disc to hub.
2) Clamp the hub and disc assembly in a vise,
using protective pads. Remove
the 6 disc
to-hub retaining bolts.
Scribe mark
Fig. 4C-76
Page 308 of 1928
4C -30 FRONT DRIVING AXLE
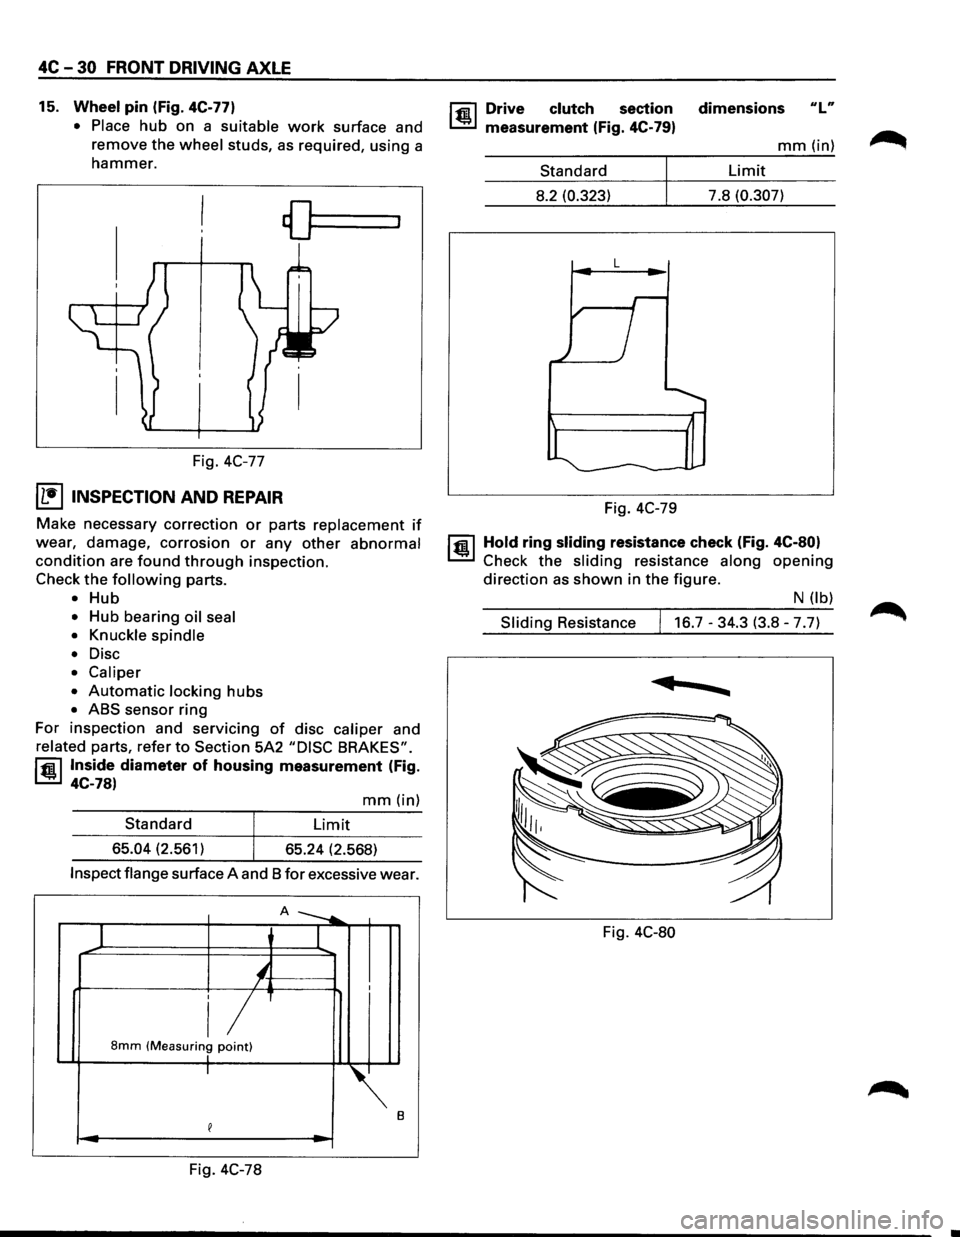
15. Wheel pin (Fig. 4C-77)
• Place
hub on a suitable work surface and
remove the
wheel studs, as required, using a
hammer.
Fig. 4C-77
I L•IINSPECTION AND REPAIR
Make necessary correction or parts replacement if
wear, damage, corrosion or any other abnormal
condition are found through inspection.
Check
the following parts.
• Hub
• Hub bearing oil seal
• Knuckle spindle
•
Disc
• Caliper
•
Automatic locking hubs
• ABS sensor ring
For inspection and servicing
of disc caliper and
related parts, refer to Section 5A2 "DISC BRAKES".
rfil Inside diameter of housing measurement (Fig.
~ 4C-78)
mm(in)
Standard Limit
65.04 (2.561)
65.24 (2.568)
Inspect flange surface A and 8 for excessive wear.
A ---....
1 I
'-/ I
i/ 8mm (Measuring point) I I
~.
e
Fig. 4C-78
rfil Drive clutch section
~ measurement (Fig. 4C-79)
Standard
8.2 (0.323)
L
Fig. 4C-79 dimensions
ulu
mm(in)
Limit
7.8
(0.307)
1@ 1 Hold ring sliding resistance check (Fig. 4C-80)
Check the sliding resistance along opening
direction as shown in the figure.
N (lb)
Sliding Resistance 16.7-34.3 (3.8-7.7)
......
Fig. 4C-80
Page 310 of 1928
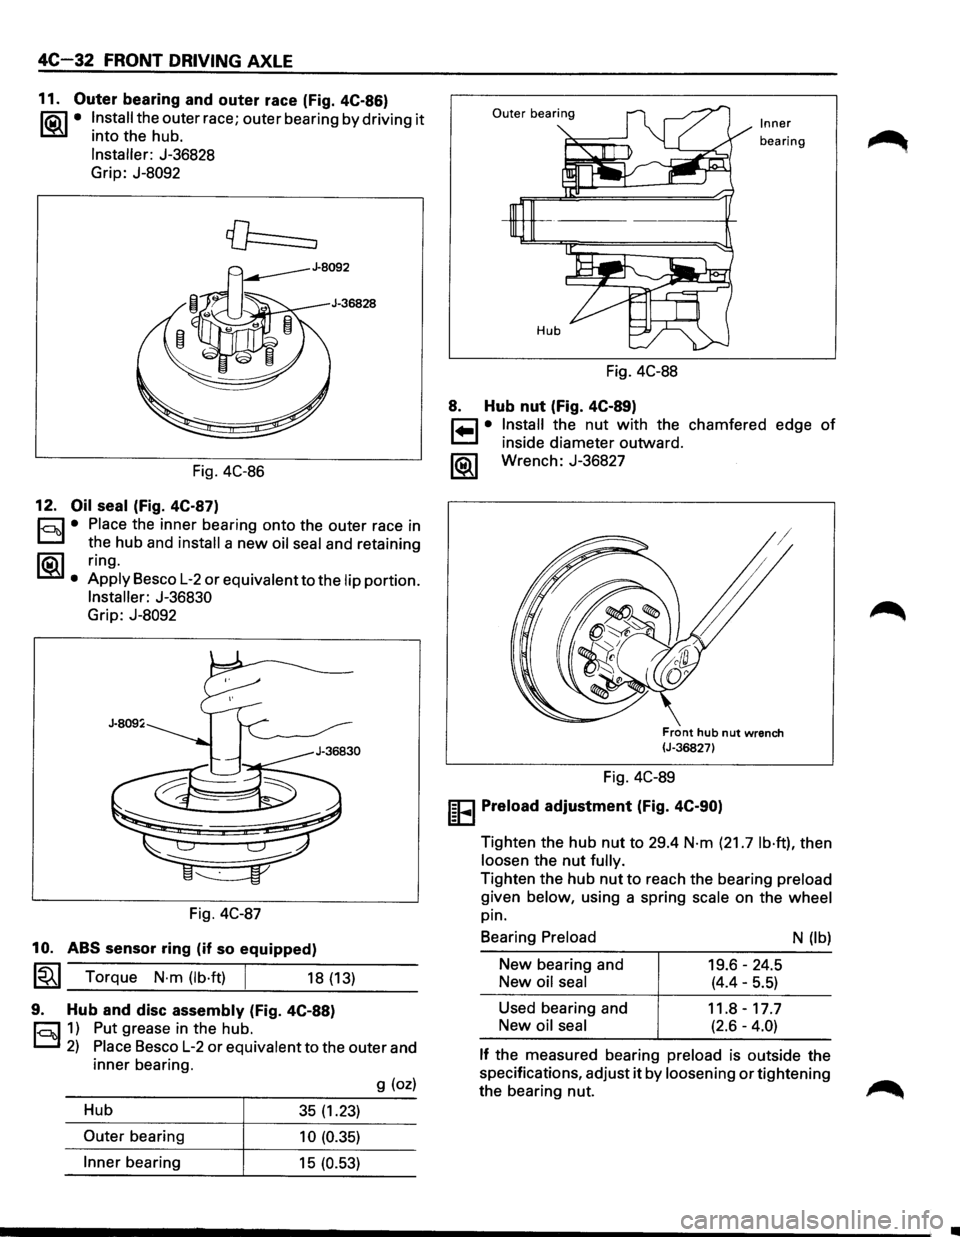
4C-32 FRONT DRIVING AXLE
11. Outer bearing and outer race (Fig. 4C-86)
li5\l • Install the outer race; outer bearing by driving it
L::!iil into the hub.
Installer: J-36828
Grip: J-8092
Fig. 4C-86
12. Oil seal (Fig. 4C-87)
r::::l • Place the inner bearing onto the outer race in
D the hub and install a new oil seal and retaining
~. ring.
Apply Besco L-2 or equivalent to the lip portion.
Installer: J-36830
Grip: J-8092
Fig. 4C-87
10. ABS sensor ring (if so equipped)
~~~ Torque N·m (lb·ft) [ 18 (13)
9. Hub and disc assembly (Fig. 4C-88)
r::::l 1) Put grease in the hub.
D 2) Place Besco L-2 or equivalent to the outer and
inner bearing.
g (oz)
Hub 35 (1.23)
Outer bearing 10 (0.35)
Inner bearing 15 (0.53)
Outer bearing Inner
bearing
Fig. 4C-88
8. Hub nut (Fig. 4C-89)
r=1 • Install the nut with the chamfered edge of
~ inside diameter outward.
1®..1 Wrench: J-36827
Front hub nut wrench (J-36827)
Fig. 4C-89
IEEI Preload adjustment (Fig. 4C-90)
Tighten the hub nut to 29.4 N·m (21.7 lb·ft), then
loosen the
nut fully.
Tighten the hub nut to reach the bearing preload
given below, using a spring scale on the wheel
pin.
Bearing
Preload
New bearing and
New oil seal
Used bearing and
New
oil seal
19.6-24.5
(4.4-5.5)
11.8-17.7
(2.6-4.0)
N (lb)
If the measured bearing preload is outside the
specifications, adjust
it by loosening or tightening
the bearing nut.
•