wheel alignment JAGUAR X308 1998 2.G User Guide
[x] Cancel search | Manufacturer: JAGUAR, Model Year: 1998, Model line: X308, Model: JAGUAR X308 1998 2.GPages: 2490, PDF Size: 69.81 MB
Page 116 of 2490

Align sp
ring pan with lower wishbone bolt locations.
Rot
ate tool adjuster to gradua
lly increase spring tension.
P
r
ogressively install but do no
t tighten spring pan securing
bolts.
Ti ghten spring pan
securing bolts to 70-90Nm.
Ensure spri
ng
lower rubber seat is correctly positioned in
spring pan.
6. WARNING: WHE N
ROTATING TOOL ADJUSTER, ENSURE
THAT TOOL STEM DOES NOT TU RN AND DISTURB POSITION OF
DOWEL IN SUSPENSION TURRET.
Remove Special Tool 204-111 from suspension.
Rotat
e adjuster of Special Tool to release tension on
spring.
R otate
tool stem to release dowel from turret.
With
draw tool and adaptor
.assembly.
7.
Lower vehi cle to work
ing heig
ht and support on stands.
8. Install road wheel. Re fer to Section 100-02.
9. Raise vehicle, remove stands and lower vehicle onto road
wheels.
10. Carry out steering geometry an d wheel alignment checks and
if necessary adjust. Refer to 57.65.01.
11. Carry out steering geometry an d wheel alignment checks and
if necessary adjust. Refer to 57.65.01.
Page 134 of 2490

17.
R
elease dowel of special tool 204-114 from suspension turret
slot.
18. Raise vehicle for access an d remove special tool from
suspension.
19. Fully lower vehicle.
20. Carry out steering geometry an d wheel alignment checks and
if necessary adjust. Refer to 57.65.01.
Page 140 of 2490

slots.
Install rotor nut spring-clip.
Inst al
l spring clip in hub retaining holes and castellated
slots of the rotor nut.
9. Inst al
l disc shield.
1. Position disc shield on vertical link.
2. Install bolts.
10. Install vertical link and hub as sembly on vehicle. Refer to
60.25.38.90.
11. Carry out steering geometry an d wheel alignment checks and
if necessary adjust. Refer to 57.65.01.
Page 146 of 2490

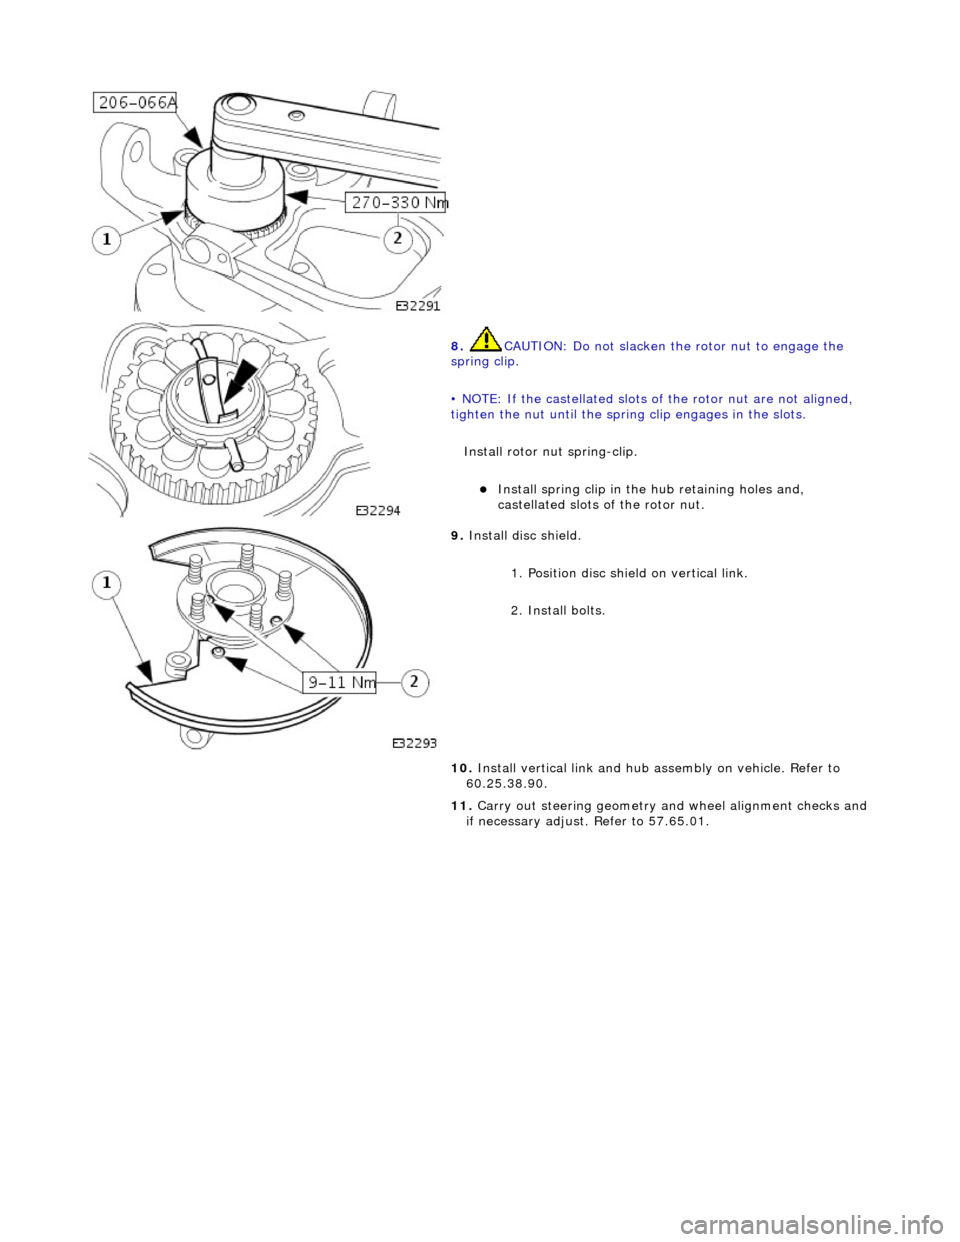
8.
CAUTIO
N: Do not slacken the rotor nut to engage the
spring clip.
• NOTE: If the castellated slots of the rotor nut are not aligned,
tighten the nut until the spring clip engages in the slots.
Install rotor nut spring-clip.
Inst
all spring clip in the hub retaining holes and,
castellated slots of the rotor nut.
9. Inst al
l disc shield.
1. Position disc shield on vertical link.
2. Install bolts.
10. Install vertical link and hub as sembly on vehicle. Refer to
60.25.38.90.
11. Carry out steering geometry an d wheel alignment checks and
if necessary adjust. Refer to 57.65.01.
Page 152 of 2490

tigh
ten the nut until the spring clip engages in the slots.
Install rotor nut spring-clip.
Inst al
l spring clip in hub retaining holes and castellated
slots of the rotor nut.
9. Ins t
all disc shield on vertical link.
1. Position disc shield.
2. Install bolts.
10. Install vertical link and hub as sembly on vehicle. Refer to
60.25.38.90.
11. Carry out steering geometry an d wheel alignment checks and
if necessary adjust. Refer to 57.65.01.
Page 158 of 2490

Re
move special tool and adaptor from spring.
9. Install road wheel. Refer to 74.20.05.
10. Raise front of vehicle, remove stands and lower vehicle.
11. Carry out steering geometry an d wheel alignment checks and
if necessary adjust. Refer to 57.65.01.
Page 165 of 2490

11
.
Tighten new link arm to wishbone nut and bolt to 41-54Nm.
12
.
Secure new link arm to stabilizer bar.
Tigh
ten link arm to stabilizer bar nut to 60-80Nm.
Check that ball
joint freed
om of movement has been
maintained.
13. Install road wheel. Refer to 74.20.05.
14. Repeat procedure steps 1 to 13 on opposite side of vehicle.
15. Raise front of vehicle, remove stands and lower vehicle.
16. Carry out steering geometry an d wheel alignment checks and
if necessary adjust. Refer to 57.65.01.
Page 179 of 2490

18
.
Install the brake caliper on to the carrier.
1. Position the caliper asse mbly on to the carrier.
2. Install the guide pins and tighten to 25-30 Nm.
3. Install the dust caps.
4. Install the brake caliper spring clip.
19
.
Connect the wheel speed sensor electrical connector.
20
.
Using a new tie strap, secure the wheel speed sensor harness
to the brake hose clip.
21. Install the rear wheels.
For additional informat ion, refer to Section 204
-04
Wheels and
Tire
s
.
22
.
Remove the axle stands and lower the vehicle.
For additional informat ion, refer to Section 100
-0
2 Jacking and
Liftin
g
.
23
.
Check and adjust the rear whee l alignment as necessary.
For additional informat ion, refer to Section 204
-00
Suspension
Sy
stem
- General
Information
.
Page 207 of 2490

28
.
Install the rear wheel.
For additional informat ion, refer to Section 204
-04
Wheels and
Tire
s
.
29
.
Remove the axle stands and lower the vehicle.
For additional informat ion, refer to Section 100
-0
2 Jacking and
Liftin
g
.
30
.
Check and adjust the rear whee l alignment as necessary.
For additional informat ion, refer to Section 204
-00
Suspension
Sy
stem
- General
Information
.
Page 267 of 2490

The
following explanations will help isolate the source of vibration.
Torque Sensitive
This
means that the condition can be impr
oved or made worse by accelerating, dece lerating, coasting, maintaining a steady
vehicle speed, or applying engine torque.
Ve
hicle Speed Sensitive
This means th
at the vibration al
ways occurs at the same vehicle speed and is not affected by engine torque, engine speed
or gear selection.
Engine Speed Sensit
ive
This means th
at the vibration
occurs at varying vehicle spee ds when a different gear is selected. It can sometimes be
isolated by increasing or decreasing engine speed with the tran smission in neutral or by stall testing with the transmission in
gear. If the condition is engine speed sensitive, the cause is probably not related to tires.
If the road test indicates that there is tire wine, but no shake or vibration, the noise originates with the contact between th e
tire and the road surface.
A thumping noise usually means that the tire is flat or has soft spots making a noise as they slap the roadway. Tire whine
can be distinguished from axle no ise, as tire whine remains the same over a range of speeds.
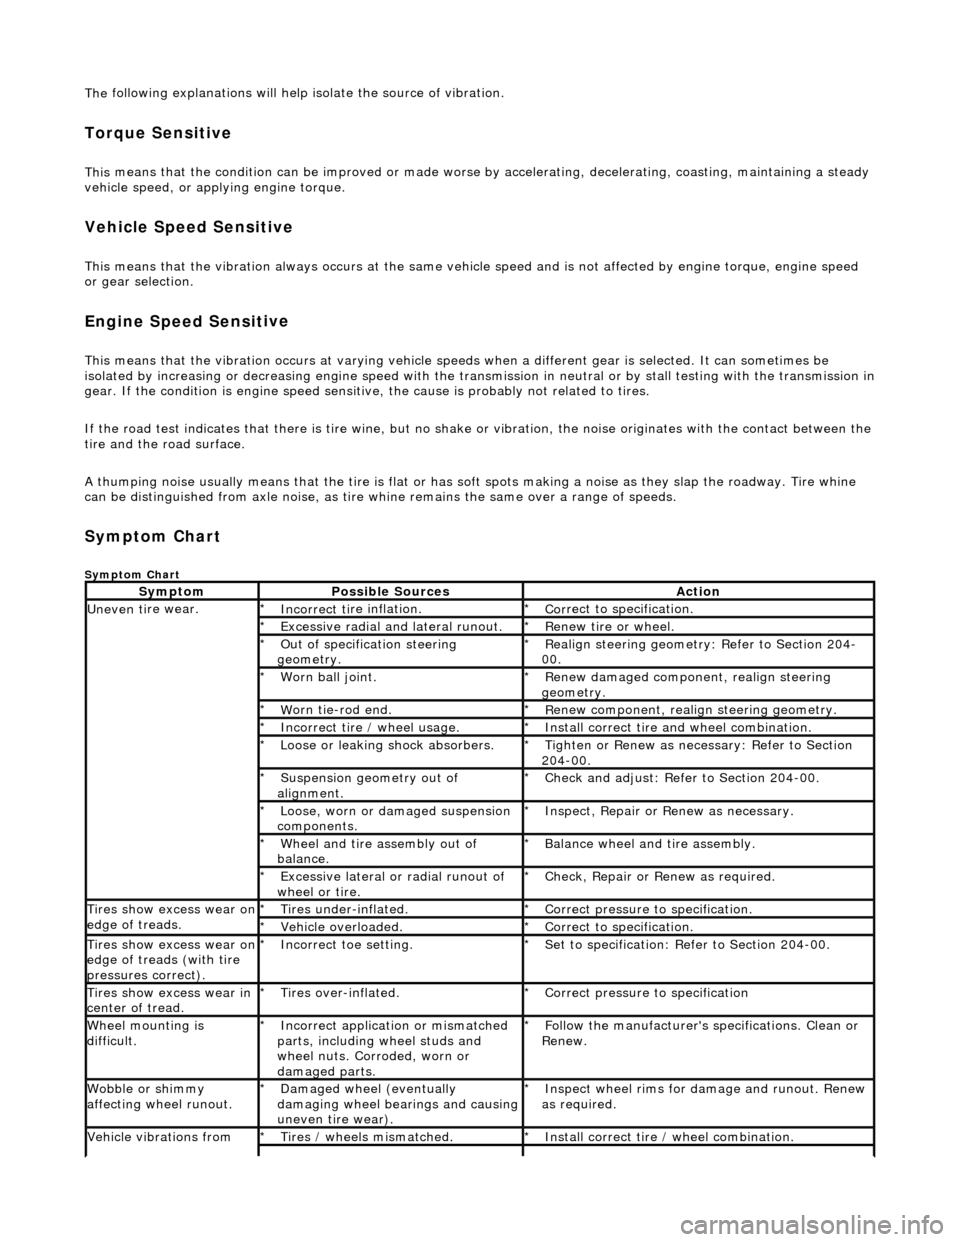
Sym
ptom Chart
Sy
mptom Chart
Sy
mptom
Possib
le Sources
Acti
on
Uneven ti
re wear.
Incorrect ti
re inflation.
*
Cor
rect to specification.
*
Exce
ssive radial an
d lateral runout.
*
Renew tire
or wheel.
*
O
ut of specification steering
geometry.
*
R
ealign steering geometry: Refer to Section 204-
00.
*
W
orn ball joint.
*
Renew
damaged component, realign steering
geometry.
*
W
orn tie-rod end.
*
R
enew component, realign steering geometry.
*
Incorrect
tire / wheel usage.
*
Inst
all correct tire and wheel combination.
*
Loose or leaki
ng shock absorbers.
*
Tigh
ten or Renew as nece
ssary: Refer to Section
204-00.
*
Suspensi
on geometry out of
alignment.
*
Che
ck and adjust: Refer to Section 204-00.
*
Loose, worn or da mage
d suspension
components.
*
In
spect, Repair or Renew as necessary.
*
Wh
eel and tire assembly out of
balance.
*
Balance wheel an
d tire assembly.
*
Excessive later
al or radial runout of
wheel or tire.
*
Check, Repair o
r
Renew as required.
*
Tire
s show excess wear on
edge of treads.
Ti
res under-inflated.
*
Cor
rect pressure to specification.
*
Vehi
cle overloaded.
*
Cor
rect to specification.
*
Tire
s show excess wear on
edge of treads (with tire
pressures correct).
Incorre
ct toe setting.
*
Se
t to specification: Refer to Section 204-00.
*
Tire
s show excess wear in
center of tread.
Tire
s over-inflated.
*
Cor
rect pressure to specification
*
W
heel mounting is
difficult.
Incorrect app
lication or mismatched
parts, including wheel studs and
wheel nuts. Corroded, worn or
damaged parts.
*
Fol
low the manufacturer's specifications. Clean or
Renew.
*
Wobble or sh
immy
affecting wheel runout.
Damaged wh
eel (eventually
damaging wheel bearings and causing
uneven tire wear).
*
Inspect wheel rims for
damage and runout. Renew
as required.
*
Vehicle vibrations from
Tire
s / wheels mismatched.
*
Inst
all correct tire / wheel combination.
*