climate control JAGUAR X308 1998 2.G Workshop Manual
[x] Cancel search | Manufacturer: JAGUAR, Model Year: 1998, Model line: X308, Model: JAGUAR X308 1998 2.GPages: 2490, PDF Size: 69.81 MB
Page 20 of 2490

В В В В В В В В В В В В 310‐01: В Fu elВ Tank В and В Lines В
В В В В В В В В В В В В В В В В RemovalВ and В Installation В
В В В В В В В В В В В В В В В В В В В В FuelВ Level В Sensor В (88.25.32) В
В В В В В В В В В В В В В В В В В В В В FuelВ Pump В (19.45.08) В
В В В В В В В В В В В В В В В В В В В В FuelВ Tank В (19.55.01) В
В
            310‐02
:
В Acceleration В Control В
В В В В В В В В В В В В В В В В GeneralВ Procedures В
В В В В В В В В В В В В В В В В В В В В Accelerator В CableВ Adjustment В (12.20.05) В
В В В В В В В В В В В В В В В В RemovalВ and В Installation В
В В В В В В В В В В В В В В В В В В В В Accelerator В CableВ (19.20.06) В
В
В В В В В В В В В В В В 310‐03: В Speed В Control В
В В В В В В В В В В В В В В В В Diagnosis В and В Testing В
В В В В В В В В В В В В В В В В В В В В SpeedВ Con
trolВ
В
В В В В 4: В Electrical В
В
В В В В В В В В 412: В Climate В Control В System В
В
В В В В В В В В В В В В 412‐00: В Climate В Control В System  ‐ General В InformationВ
В В В В В В В В В В В В В В В В Specification В
В В В В В В В В В В В В В В В В Description В and В Operation В
В В В В В В В В В В В В В В В В В В В В ClimateВ ControlВ System В
В В В В В В В В В В В В В В В В Diagnosis В and В Testing В
В В В В В В В В В В В В В В В В В В В В ClimateВ ControlВ System В
В В В В В В В В В В В В В В В В GeneralВ Procedures В
В В В В В В В В В В В В В В В В В В В В AirВ Conditioning В (A/C) В System В Check ‐ RetailВ Procedure В
В В В В В В В В В В В В В В В В В В В В AirВ Conditioning В (A/C) В System В Recovery, В Evacuation В and В ChargingВ (82.30.30) В
В В В В В В В В В В В В В В В В В В В В Contaminated В Refrigerant В Ha
ndling В
В В В В В В В В В В В В В В В В В В В В ManifoldВ GaugeВ SetВ Connection В
В В В В В В В В В В В В В В В В В В В В RefrigerantВ AddingВ (82.30.02) В
В В В В В В В В В В В В В В В В В В В В RefrigerantВ OilВ Adding В
В В В В В В В В В В В В В В В В В В В В RefrigerantВ SystemВ Tests В
В
В В В В В В В В В В В В 412‐01: В Air В Distribution В and В Filtering В
В В В В В В В В В В В В В В В В Description В and В Operation В
Page 22 of 2490

В В В В В В В В В В В В В В В В В В В В AmbientВ AirВ Temperature В Sensor В (82.20. 02)В
В В В В В В В В В В В В В В В В В В В В ColdВ Ai
r
В Bypass В Blend В Door В Actuator В (82.20.86) В
В В В В В В В В В В В В В В В В В В В В DefrostВ Vent/Register В Blend В Door В Actuator В (82.20.84) В
В В В В В В В В В В В В В В В В В В В В FootwellВ Vent/Duct В BlendВ DoorВ Actuator В (80.20.20 В or В 82.20.85) В
В В В В В В В В В В В В В В В В В В В В Instrument В PanelВ BlendВ Door В Actuator В (82.20.83) В
В В В В В В В В В В В В В В В В В В В В RemoteВ ClimateВ Control В ModuleВ LHDВ (82.20.65) В
В В В В В В В В В В В В В В В В В В В В RemoteВ ClimateВ Control В ModuleВ RHDВ (82.20.65) В
В
В В В В В В В В 413: В Instrumentation В andВ Warning В Sy
stems В
В
В В В В В В В В В В В В 413‐00: В Instrument В Cluster В and В Panel В Illumination В
В В В В В В В В В В В В В В В В Description В and В Operation В
В В В В В В В В В В В В В В В В В В В В Instrument В ClusterВ andВ PanelВ Illumination В
В В В В В В В В В В В В В В В В RemovalВ and В Installation В
В В В В В В В В В В В В В В В В В В В В Instrument В PanelВ Dimmer В Switch В (86.65.07) В
В
В В В В В В В В В В В В 413‐01: В Instrument В Cluster В
В В В В В В В В В В В В В В В В Description В and В Operation В
В В В В В В В В В В В В В В В В В В В В Instrument В Cluster В
В В В В В В В В В В В В В В В В Diagnosis В and В Testing В
В В В В В В В В В В В В В В В В В В В В Instrument В Cluster В
В В В В В В В В В В В В В В В В RemovalВ and В Installation В
В В В В В В В В В В В В В В В В В В В В InstrumentВ Clust
erВ (88.20.01) В
В
В В В В В В В В В В В В 413‐06: В Horn В
В В В В В В В В В В В В В В В В Description В and В Operation В
В В В В В В В В В В В В В В В В В В В В HornВ
В В В В В В В В В В В В В В В В Diagnosis В and В Testing В
В В В В В В В В В В В В В В В В В В В В HornВ
В
В В В В В В В В В В В В 413‐07: В Clock В
В В В В В В В В В В В В В В В В Description В and В Operation В
В В В В В В В В В В В В В В В В В В В В ClockВ
В В В В В В В В В В В В В В В В Diagnosis В and В Testing В
В В В В В В В В В В В В В В В В В В В В ClockВ
В В В В В В В В В В В В В В В В RemovalВ and В Installation В
В В В В В В В В В В В В В В В В В В В В ClockВ (88.15.07) В
Page 31 of 2490

В В В В В В В В В В В В В В В В В В В В FrontВ Doo r
В
Window В Regulator В and В Motor В (76.31.45) В
В В В В В В В В В В В В В В В В В В В В FrontВ DoorВ Window В Regulator В Motor В (76.31.45) В
В В В В В В В В В В В В В В В В В В В В FrontВ DoorВ Window В Control В Switch В (86.25.07) В
В В В В В В В В В В В В В В В В В В В В RearВ Door В Window В GlassВ (76.31.02) В
В В В В В В В В В В В В В В В В В В В В RearВ Door В Window В GlassВ Weatherstrip В (76.40.29) В
В В В В В В В В В В В В В В В В В В В В RearВ Door В Window В Regulator В and В Motor В (86.25.09) В
В В В В В В В В В В В В В В В В В В В В RearВ Door В Window В Regulator В Motor В (86.25.09) В
В В В В В В В В В В В В В В В В В В В В RearВ Door В Window В Control В Swi
tchВ (86.25.10) В
В В В В В В В В В В В В В В В В В В В В RearВ Quarter В Window В GlassВ (76.31.31) В
В В В В В В В В В В В В В В В В В В В В RearВ Window В GlassВ (76.81.11) В
В В В В В В В В В В В В В В В В В В В В Windshield В GlassВ (76.81.40) В
В
В В В В В В В В В В В В 501‐12: В Instrument В Panel В and В Console В
В В В В В В В В В В В В В В В В Specification В
В В В В В В В В В В В В В В В В Description В and В Operation В
В В В В В В В В В В В В В В В В В В В В Instrument В PanelВ andВ Instrument В Panel В Console В
В В В В В В В В В В В В В В В В RemovalВ and В Installation В
В В В В В В В В В В В В В В В В В В В В AudioВ Unit В Housing В (76.25.15) В
В В В В В В В В В В В В В В В В В В В В ClimateВ ControlВ AssemblyВ HousingВ
В В В В В В В В В В В В В В В В В В В В CoinВ Stowage В CompartmentВ (76.46.37) В
В В В В В В В В В В В В В В В В В В В В FloorВ Co
nsole В (76.25.01) В
В В В В В В В В В В В В В В В В В В В В FloorВ Console В Ashtray В (76.25.25) В
В В В В В В В В В В В В В В В В В В В В FloorВ Console В Extension В (76.25.05) В
В В В В В В В В В В В В В В В В В В В В FloorВ Console В Finish В Panel В (76.47.26) В
В В В В В В В В В В В В В В В В В В В В FloorВ Console В Finish В Panel В Bracket В (76.25.26) В
В В В В В В В В В В В В В В В В В В В В FloorВ Console В Stowage В CompartmentВ (76.25.16)В
В В В В В В В В В В В В В В В В В В В В FloorВ Console В Stowage В CompartmentВ LidВ (76.25.18) В
В В В В В В В В В В В В В В В В В В В В GloveВ CompartmentВ (76.52.03)В
В В В В В В В В В В В В В В В В В В В В GloveВ CompartmentВ LidВ (76.52.02) В
В В В В В В В В В В В В В В В В В В В В GloveВ CompartmentВ LidВ DamperВ (76.52.22) В
В В В В В В В В В В В В В В В В В В В В GloveВ Co
mpartment В Liner В (76.52.21) В
В В В В В В В В В В В В В В В В В В В В Instrument В ClusterВ FinishВ Panel В (76.47.24) В
В В В В В В В В В В В В В В В В В В В В Instrument В ClusterВ FinishВ Panel В Bezel В (88.20.33) В
В В В В В В В В В В В В В В В В В В В В Instrument В PanelВ (76.46.01) В
В В В В В В В В В В В В В В В В В В В В Instrument В PanelВ FinishВ PanelВ (76.47.06) В
В В В В В В В В В В В В В В В В В В В В Instrument В PanelВ Lower В Trim В Panel В (76.46.11) В
В В В В В В В В В В В В В В В В В В В В OverheadВ Console В (76.13.69) В
Page 35 of 2490
General Infor
mation - Gene
ral Service Information
Description an
d Operation
Safety Notice
Appropri
ate service me
thods and proper repair procedures are essential for the safe, reliable operation of all motor vehicles,
as well as the safety of the person do ing the work. This manual provides genera l directions for accomplishing service and
repair work with tested, effect ive, techniques. Following them will help assure reliability.
There are numerous variations in procedures, techniques, tools, and parts for servicing vehicles, as well as in the skill of the
person doing the work. This manual cannot possibly anticipate all such variations and provide advice or cautions as to each.
Accordingly, anyone who depart s from the instructions provided in the manua l must first establish that neither personal
safety nor vehicle integrity is compromised from choices of methods, tools or parts.
Notes, Ca
utions and Warnings
Throughout
this manual, important inform
ation is highlighted by the use of notes, cautions and warnings. NOTES give
additional information on a topic or proc edure, CAUTIONS are given to prevent da mage to the vehicle, and WARNINGS are
given to prevent personal injury.
Worksh
op Manual Organization
This
manual incorporates descript
ive, diagnostic, and repair information to help trained Jaguar technicians complete service
and rectification procedures. The informat ion can be accessed by choosing the appropriate five digit section number. For
example, Section 412-03 covers air conditioning , which is part of the Climate Control System.
The manual is organized into groups covering generic aspects of the vehicle systems; the first digit of the section
number represents a group se lected from the following:
1. General Information.
2. Chassis.
3. Powertrain.
4. Electrical.
5. Body and Paint.
Each of the groups comprises sections re lating to specific areas of the vehicle.
The second and third digits of the section number indicate the vehicle system.
The last two digits of the se ction number define the system covered, more specifically.
Each section comprises one or more of the following sub-sections:
Specification
Page 528 of 2490
пЃ¬Speed an
d load
пЃ¬Coo
l
ant temperature
пЃ¬Ti
me el
apsed from start up
пЃ¬Cl
osed l
oop fuelling
Determination of the vapour concentration is made by stepped opening of the EVAP valve and subsequent monitoring of the
fuelling correction. This function is performed prior to purging, so that at the onse t of purging the EVAP valve can be set to
the optimum position. Should the ECM be unable to determine the concentration before purging, a default value is
employed, which is then modified whilst purging is in progress.
When the purging process is operational th e ECM modifies the basic fuelling calculation to maintain the correct air / fuel
ratio.
Purging is inhibited during fuel cut-off and stability / traction control intervention.
Coolant Temperature Sen
sor
Th
e
sensor outputs a voltage to the ECM which decreases as temperature increases.
Cooling Fans
In response to engi
ne coolant temperat
u
re and climate control system demand, the ECM will energize the cooling fans.
Climate Control Compressor
The E
C
M will allow the compressor clutch to be engaged if th
e engine temperature and load demand are normal. Should the
driver require maximum engine powe r or the coolant temperature be high, the request will be denied.
Cranking Signal
The ECM reacts to a signal fr
om th
e Body Processor Module (BPM) when the starter motor relay is energi
zed. This signal is
used to trigger starting, fu el and ignition strategies.
Engine Speed and Cranksh
aft Position
Engine
speed and cran
k position are moni
tored by a sensor which is mounted on the cylinder block (flywheel housing)
behind the crankshaft drive plat e. It indicates rotational speed to the ECM in the form of 12 pulses per crank revolution.
Engine speed is used for synchronization of fuel an d ignition systems, as well as other functions.
Camshaft Position
The ca
mshaft position sensor is mounted at
the rear of Bank 2 cylinder head on the inlet side and provides one signal every
720 degrees of crankshaft rotation. The signal, in conjunction with the signal from the crankshaft position sensor, indicates
to the ECM that the piston of cylinder 1A is approaching TDC on the compression stroke.
Variable Valve
Timing (Where Fitted)
By energi
si
ng a solenoid to allow the pass
age of pressurized oil on each of the inle t camshaft drives, the ECM can vary by a
single stepped amount, the relati ve timing of the inlet valves.
Ign
ition
Ignit
i
on spark is produced by
individual on-plug coil units.
There are two ignition amplifiers; module #1 drives coils 1A, 2B, 3B and 4A, whilst module #2 drives coils 1B, 2A, 3A and
4B. The ECM controls the amplifiers.
Page 926 of 2490
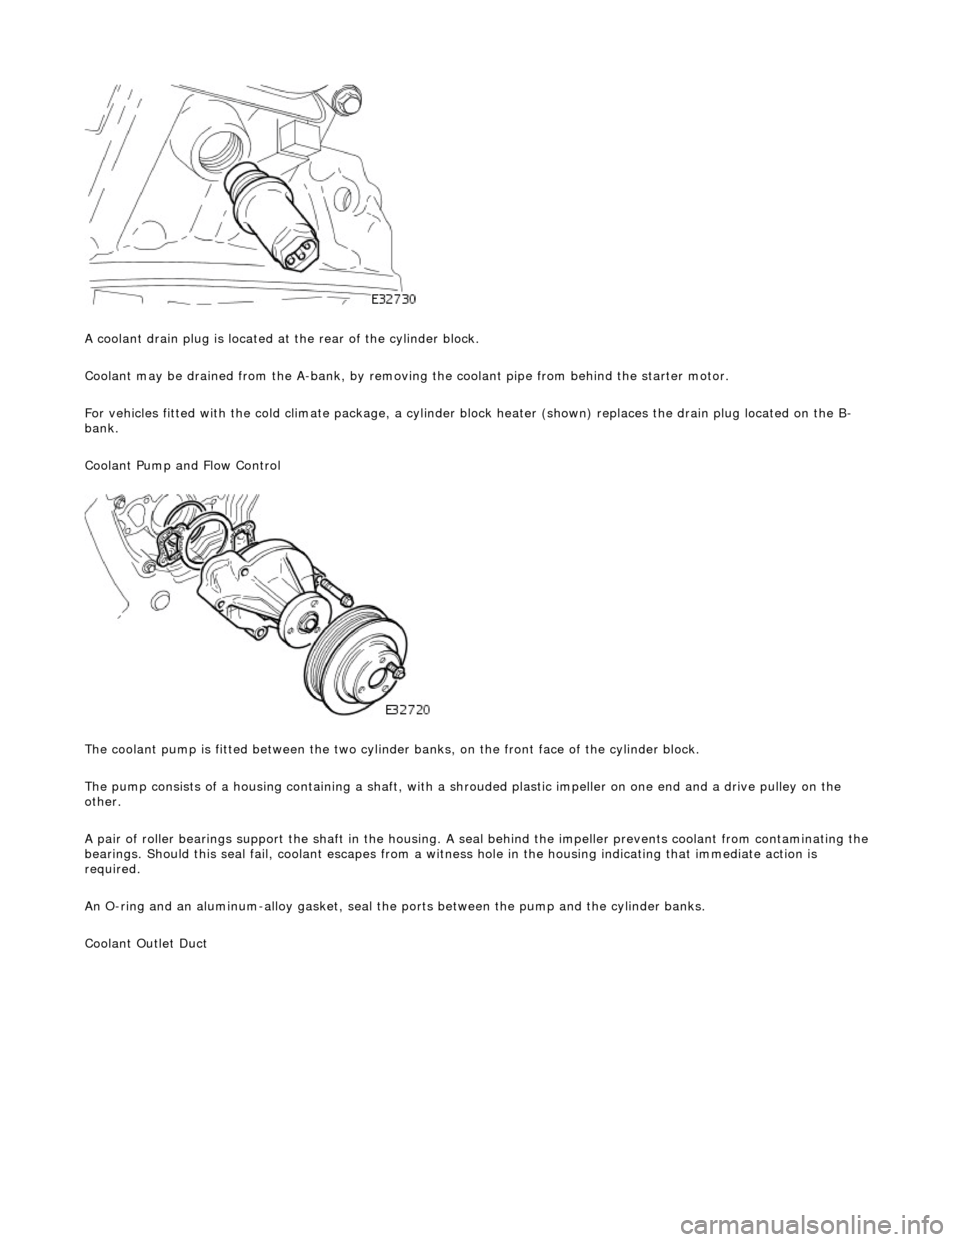
A coola n
t drain plug is located at the rear of the cylinder block.
Coolant may be drained from the A-bank, by removing the coolant pipe from behind the starter motor.
For vehicles fitted with the cold climate package, a cylinder block heater (shown) replaces the drain plug located on the B-
bank.
Coolant Pump and Flow Control
The coolant pump is fitted between the two cylinder banks, on the front face of the cylinder block.
The pump consists of a housing containing a shaft, with a sh rouded plastic impeller on one end and a drive pulley on the
other.
A pair of roller bearings support the shaft in the housing. A seal behind the impeller prevents coolant from contaminating the
bearings. Should this seal fail, coolant escapes from a witness hole in the housin g indicating that immediate action is
required.
An O-ring and an aluminum-alloy gasket, seal the ports between the pump and the cylinder banks.
Coolant Outlet Duct
Page 954 of 2490
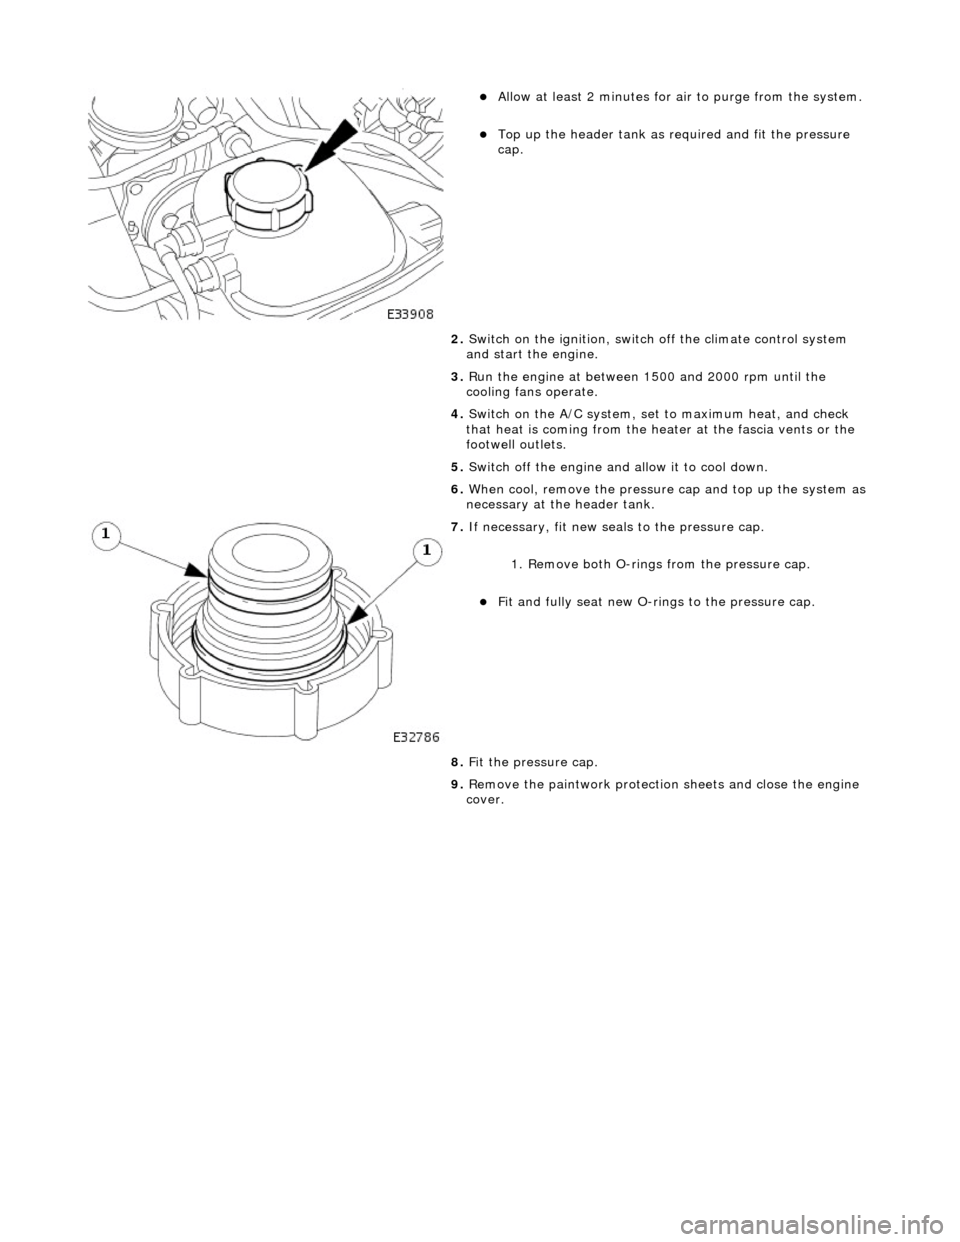
пЃ¬Allow at least 2 minutes f
or ai
r to purge from the system.
пЃ¬Top up the he
ader tank as re
quired and fit the pressure
cap.
2. Switch on the ignition, switch off the climate control system
and start the engine.
3. Run the engine at between 1500 and 2000 rpm until the
cooling fans operate.
4. Switch on the A/C system, set to maximum heat, and check
that heat is coming from the heat er at the fascia vents or the
footwell outlets.
5. Switch off the engine and allow it to cool down.
6. When cool, remove the pressure cap and top up the system as
necessary at the header tank.
7. If n e
cessary, fit new seals to the pressure cap.
1. Remove both O-rings from the pressure cap.
пЃ¬Fit and
fully seat new O-rings to the pressure cap.
8. Fit the pressure cap.
9. Remove the paintwork protection sheets and close the engine
cover.
Page 956 of 2490
• NOTE
: To ensure that
air is not drawn into the system during the following operations:
пЃ¬Do
not remove the cap from the header tank whilst the
charge air cooling system is open to atmosphere.
пЃ¬Do
not switch on the ignition when th
e charge air cooling system is open to atmosphere because the electrical
cooling pump may draw air into the system.
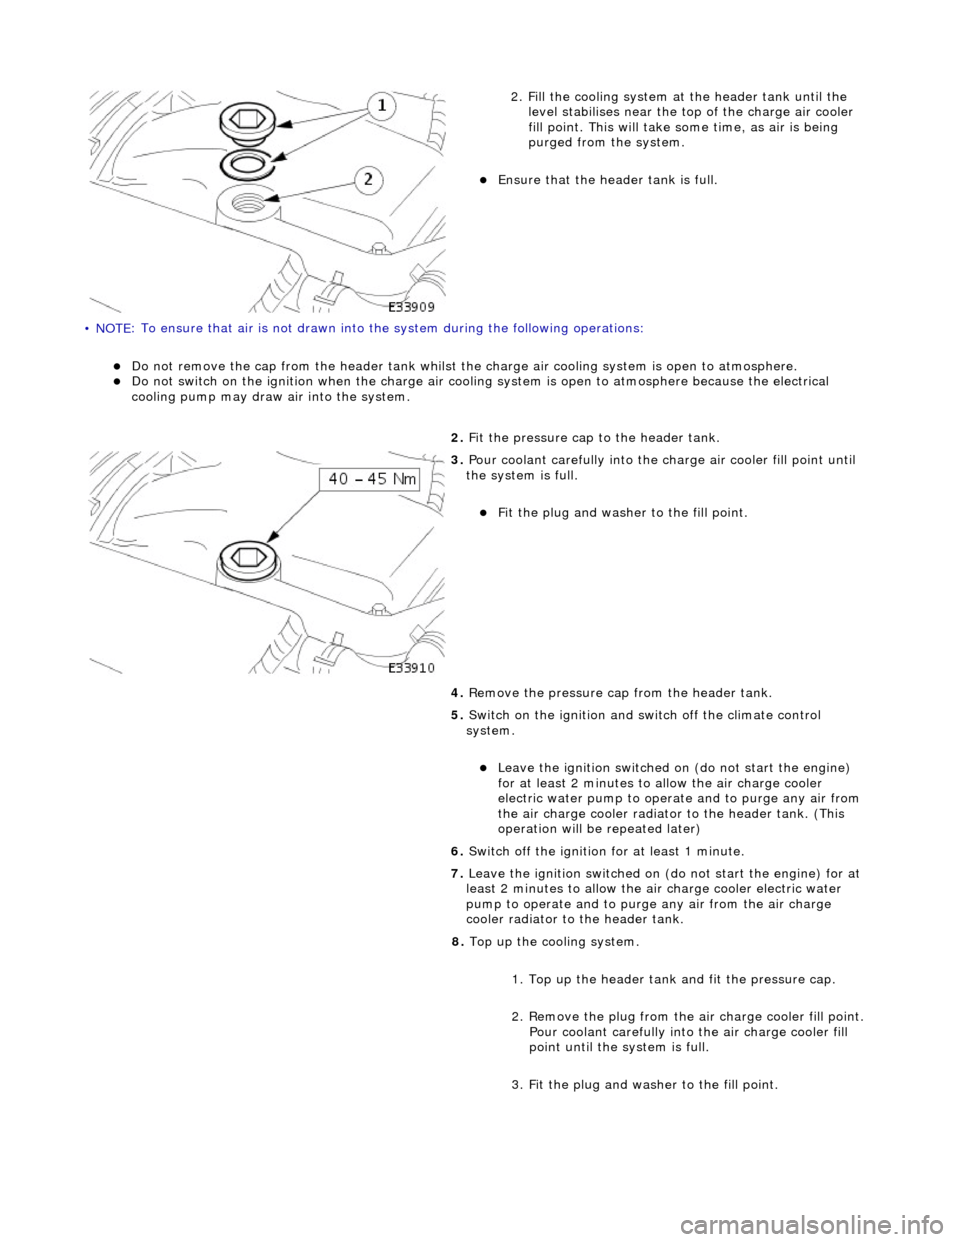
2. Fi
ll the cooling system at the header tank until the
level stabilises near the to p of the charge air cooler
fill point. This will take some time, as air is being
purged from the system.
пЃ¬Ensure that the head
er tank is full.
2. Fit the pressure cap to the header tank.
3. Pour coolant careful l
y into the charge air cooler fill point until
the system is full.
пЃ¬Fi t t
he plug and washer to the fill point.
4. Remove the pressure cap from the header tank.
5. Switch on the ignition and switch off the climate control
system.
пЃ¬Le ave
the ignition switched on (do not start the engine)
for at least 2 minutes to allow the air charge cooler
electric water pump to oper ate and to purge any air from
the air charge cooler radiator to the header tank. (This
operation will be repeated later)
6. Switch off the ignition for at least 1 minute.
7. Leave the ignition switched on (do not start the engine) for at
least 2 minutes to allow the air charge cooler electric water
pump to operate and to purg e any air from the air charge
cooler radiator to the header tank.
8. Top up the cooling system.
1. Top up the header tank and fit the pressure cap.
2. Remove the plug from the air charge cooler fill point. Pour coolant carefully into the air charge cooler fill
point until the system is full.
3. Fit the plug and washer to the fill point.
Page 957 of 2490
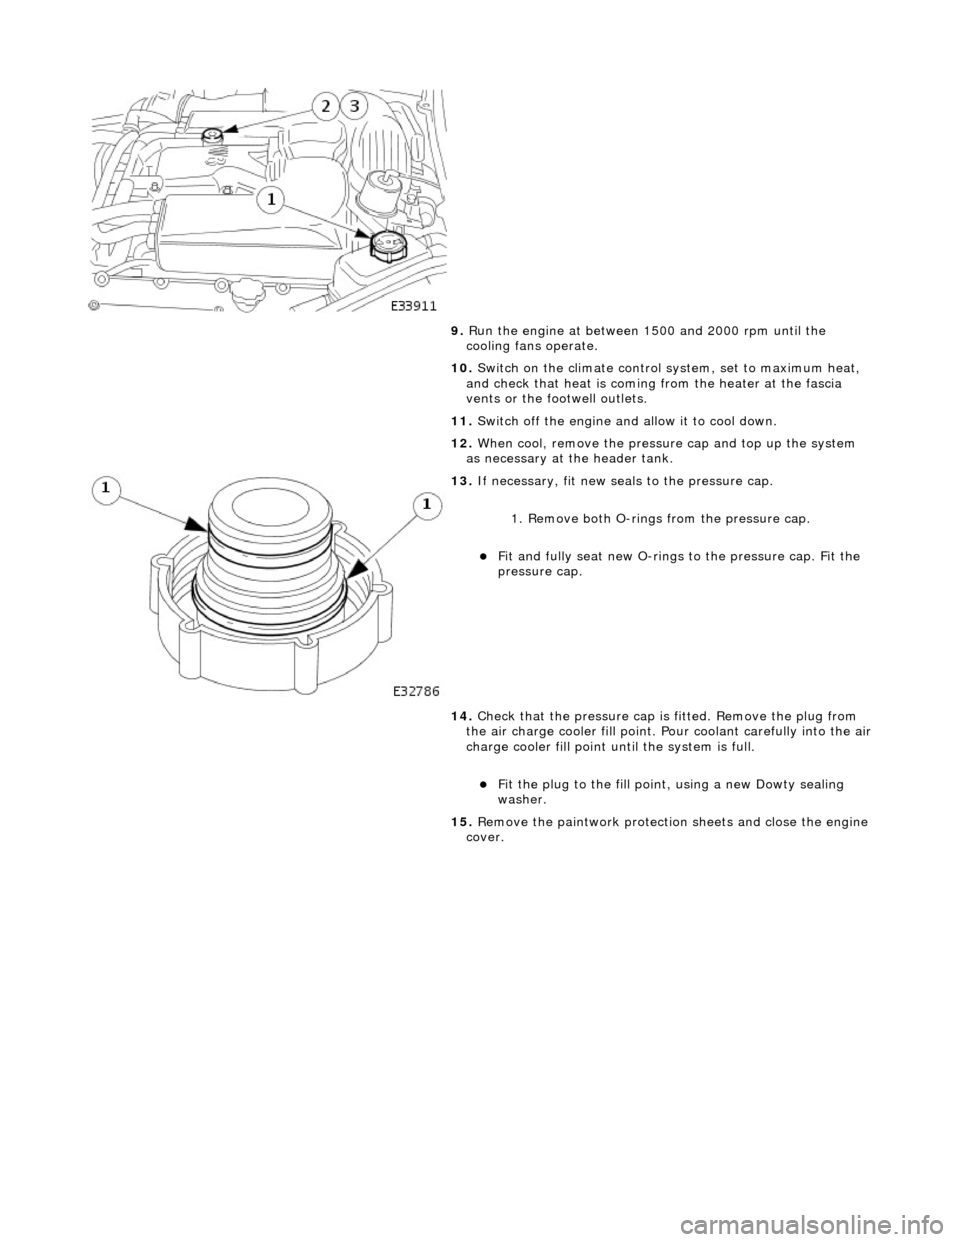
9.
R
un the engine at between 1500 and 2000 rpm until the
cooling fans operate.
10. Switch on the climate control system, set to maximum heat,
and check that heat is coming from the heater at the fascia
vents or the footwell outlets.
11. Switch off the engine and allow it to cool down.
12. When cool, remove the pressure cap and top up the system
as necessary at the header tank.
13
.
If necessary, fit new seals to the pressure cap.
1. Remove both O-rings from the pressure cap.
пЃ¬Fit and
fully seat new O-rings
to the pressure cap. Fit the
pressure cap.
14. Check that the pressure cap is fitted. Remove the plug from
the air charge cooler fill point. Pour coolant carefully into the air
charge cooler fill point until the system is full.
пЃ¬F
it the plug to the fill poin
t, using a new Dowty sealing
washer.
15. Remove the paintwork protection sheets and close the engine
cover.
Page 973 of 2490
Engine Cooling - Radiator4.0L NA V8 - AJ27/3.2L NA V8 - AJ26
Re
moval and Installation
Remov
al
1.
O
pen the engine compartment and fit paintwork protection
sheets.
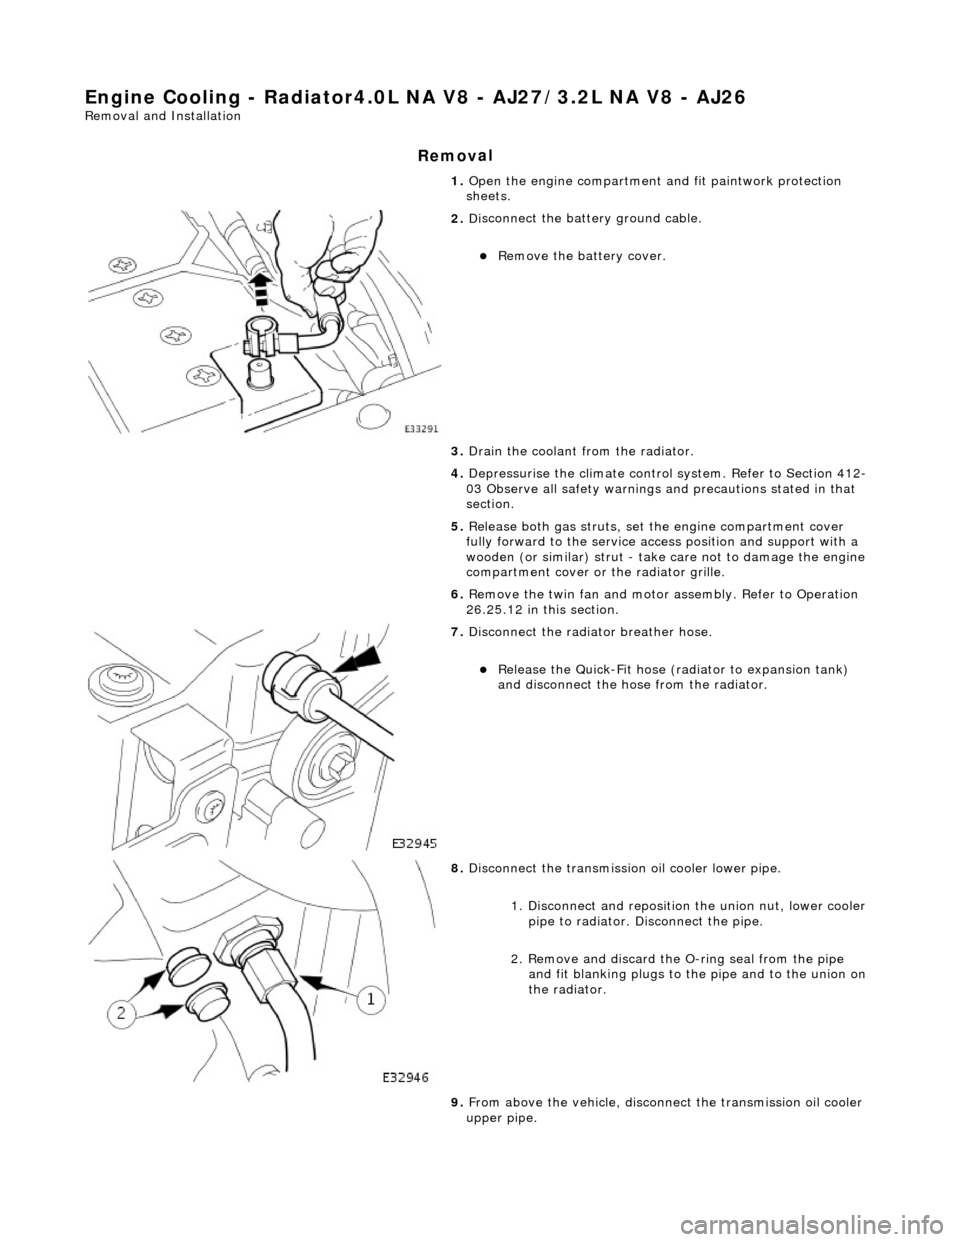
2. Di
sconnect the batt
ery ground cable.
пЃ¬R
emove the battery cover.
3. Drain the coolant from the radiator.
4. Depressurise the climate control system. Refer to Section 412-
03 Observe all safety warnings and precautions stated in that
section.
5. Release both gas struts, set the engine compartment cover
fully forward to the service acce ss position and support with a
wooden (or similar) strut - take care not to damage the engine
compartment cover or the radiator grille.
6. Remove the twin fan and motor assembly. Refer to Operation
26.25.12 in this section.
7. D
isconnect the radiator breather hose.
пЃ¬R
elease the Quick-Fit hose (radiator to expansion tank)
and disconnect the hose from the radiator.
8. Di
sconnect the transmission oil cooler lower pipe.
1. Disconnect and reposition the union nut, lower cooler pipe to radiator. Di sconnect the pipe.
2. Remove and discard the O- ring seal from the pipe
and fit blanking plugs to the pipe and to the union on
the radiator.
9. From above the vehicle, disconne ct the transmission oil cooler
upper pipe.