ECU JAGUAR X308 1998 2.G Workshop Manual
[x] Cancel search | Manufacturer: JAGUAR, Model Year: 1998, Model line: X308, Model: JAGUAR X308 1998 2.GPages: 2490, PDF Size: 69.81 MB
Page 628 of 2490

7.
Remove the coolant outlet pipe.
1. Remove the four bolts which secure the outlet pipe.
2. Remove the outlet pipe from the bypass hose and from the cylinder heads.
8. Remove and discard the sealing ring s from the outlet pipe grooves.
9.
Remove the nuts which secure the catalytic converter to the A-Bank
exhaust manifold flange.
10 . Re
move the VVT bush carrier.
1. Remove the three bolts which secure the carrier to the cylinder block.
2. Release the carrier from the two ring dowels and remove it.
11. R
emove the seals from the bush carrier.
1. Remove the sealing ring (scarf jointed) from the carrier bush groove.
2. Remove the O-ring from the carrier oil-way recess.
12. Raise the vehicle on a ramp.
13. Remove the crankshaft position sensor.
Page 629 of 2490
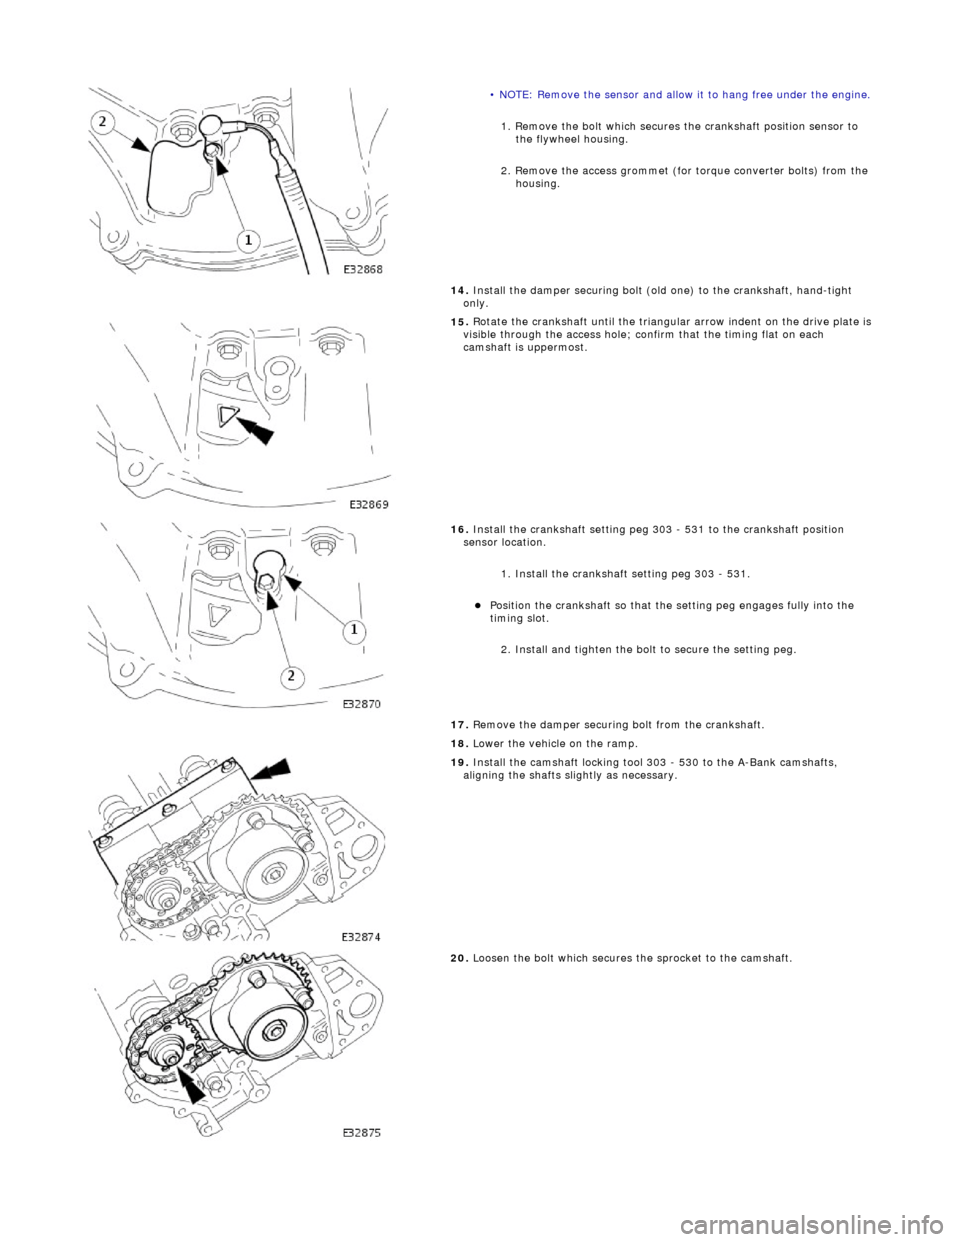
• N
OTE: Remove the sensor and allow it to hang free under the engine.
1
. Remove the bolt which secures the crankshaft position sensor to
the flywheel housing.
2. Remove the access grommet (for torque converter bolts) from the housing.
14. Install the damper securing bolt (old one) to the crankshaft, hand-tight
only.
15
.
Rotate the crankshaft until the triangular arrow indent on the drive plate is
visible through the access hole; confirm that the timing flat on each
camshaft is uppermost.
16
.
Install the crankshaft setting peg 3 03 - 531 to the crankshaft position
sensor location.
1. Install the crankshaft setting peg 303 - 531.
Position
the crankshaft so that the setting peg engages fully into the
timing slot.
2. Install and tighten the bolt to secure the setting peg.
17. Remove the damper securing bolt from the crankshaft.
18. Lower the vehicle on the ramp.
19
.
Install the camshaft locking tool 303 - 530 to the A-Bank camshafts,
aligning the shafts slightly as necessary.
20
.
Loosen the bolt which secures the sprocket to the camshaft.
Page 630 of 2490

21. L
oosen the bolt which secures the VVT unit to the camshaft.
22. Remove the camshaft locking tool 303 - 530 (installed for previous
operation).
23. R
emove the primary chain tensioner bolts.
24 . R
emove the tensioner assembly.
1. Remove the tensioner.
2. Remove the tens ioner back-plate.
25 . R
emove the primary chain tensioner blade.
1. Remove the pivot bolt which secures the tensioner blade.
2. Remove the tensioner blade.
26. Remove the primary chain from the VVT unit and from the crankshaft
pulley.
27 . R
emove the VVT unit and exhaust camshaft sprocket.
1. Remove the securing bolt from both the VVT unit and the exhaust cam sprocket.
2. Remove the VVT unit, exhaust sprocket and secondary chain as an assembly (release the chain from the tensioner which is still
secured to the cylinder head).
Re
move the secondary chain from
the VVT unit and the sprocket.
28. Remove the secondary chain tensioner.
Page 631 of 2490
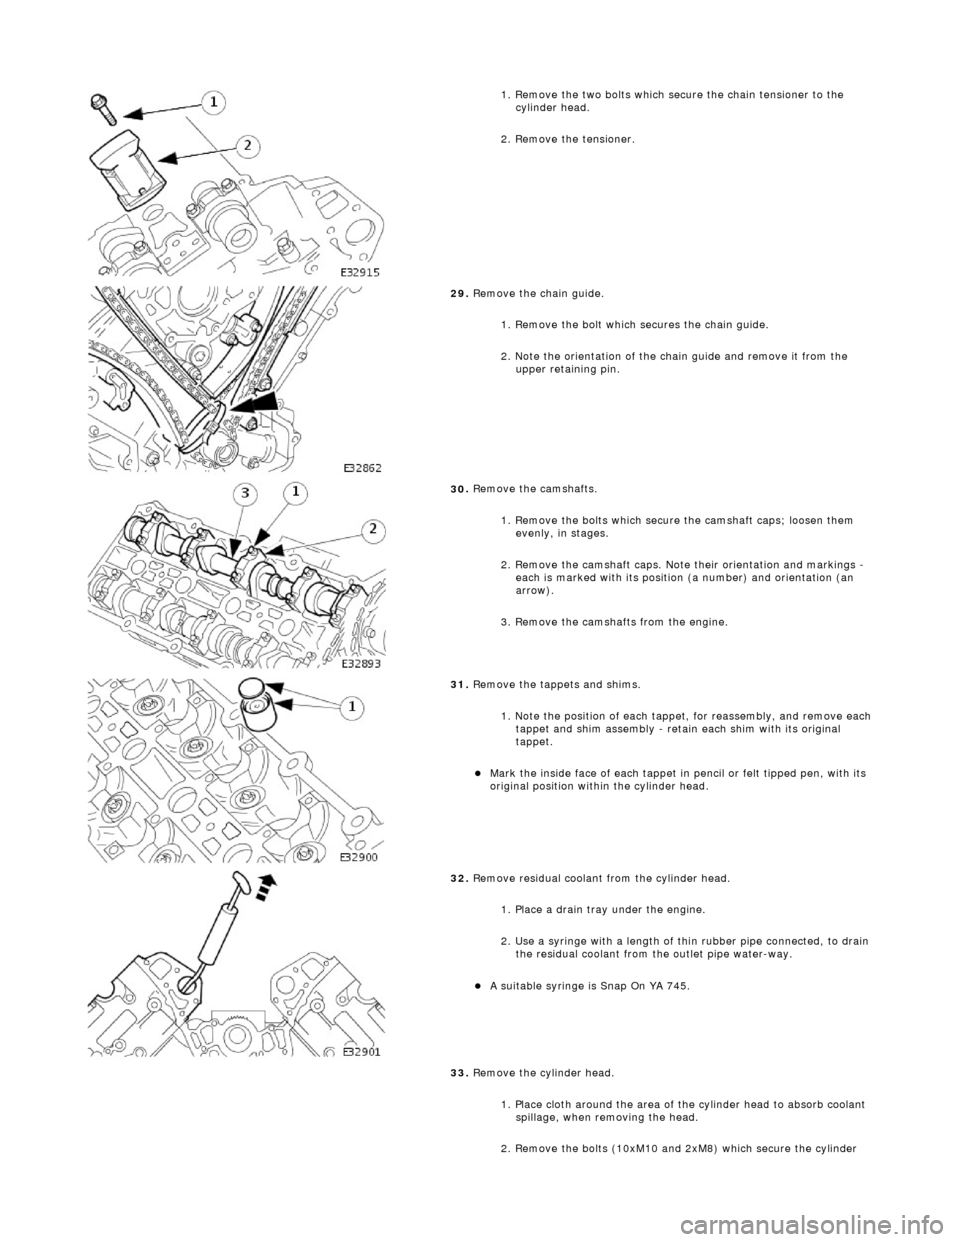
1.
Remove the two bolts which secure the chain tensioner to the
cylinder head.
2. Remove the tensioner.
29
.
Remove the chain guide.
1. Remove the bolt which secures the chain guide.
2. Note the orientation of the chain guide and remove it from the upper retaining pin.
30
.
Remove the camshafts.
1. Remove the bolts which secure the camshaft caps; loosen them evenly, in stages.
2. Remove the camshaft caps. Note their orientation and markings -
each is marked with its position (a number) and orientation (an
arrow).
3. Remove the camshafts from the engine.
31
.
Remove the tappets and shims.
1. Note the position of each tappet, for reassembly, and remove each
tappet and shim assembly - retain each shim with its original
tappet.
Mark
the inside face of each tappet in pencil or felt tipped pen, with its
original position within the cylinder head.
32
.
Remove residual coolant from the cylinder head.
1. Place a drain tray under the engine.
2. Use a syringe with a length of thin rubber pipe connected, to drain the residual coolant from the outlet pipe water-way.
A s
uitable syringe is Snap On YA 745.
33. Remove the cylinder head.
1. Place cloth around the area of th e cylinder head to absorb coolant
spillage, when removing the head.
2. Remove the bolts (10xM10 and 2xM8) which secure the cylinder
Page 637 of 2490

To th
e upper face of each bearing surface (two places) in the cylinder
head.
To th
e upper face of each bearing surface (two places) in each bearing
cap.
On
the cam lobes ONLY, not on the base circle area.
17
.
Install the camshafts.
1. Install the camshafts to position in the cylinder head, with the timing flats uppermost.
2. Install the camshaft caps to their respective locations (inlet 0 to 4 and exhaust 5 to 9 from the front) and in the correct orientation
(arrow to front of engine).
3. Install and tighten the cap securing bolts. Tighten evenly, in stages, to 10 Nm.
18. Install the camshaft locking tool 303 - 530, align the camshafts as
necessary.
19
.
Install the chain guide.
• NOTE: The chain guide must be installed so that the slotted hole is
towards the top, and the raised shoulder to the cylinder block. 1. Install the chain guide to the block and locate it onto the upper retaining pin.
2. Install the retaining bolt and tighten it to 12 Nm.
20
.
Push the secondary chain tensioner piston into the body to provide
clearance for installing the chain.
1. Insert a thin rigid wire through the hole in the end of the tensioner
piston to displace the ball from the non-return valve seat.
2. With the wire in position, press the piston fully into the tensioner body.
Re
move the wire.
21
.
Install the secondary chain tensioner to the engine.
1. Fully seat the tensioner to the cylinder head.
2. Install the two bolts which secure the tensioner and tighten to 12 Nm.
22. Install the VVT unit to the engine.
A
ssemble the VVT unit, the exhaust camshaft sprocket and the
Page 638 of 2490
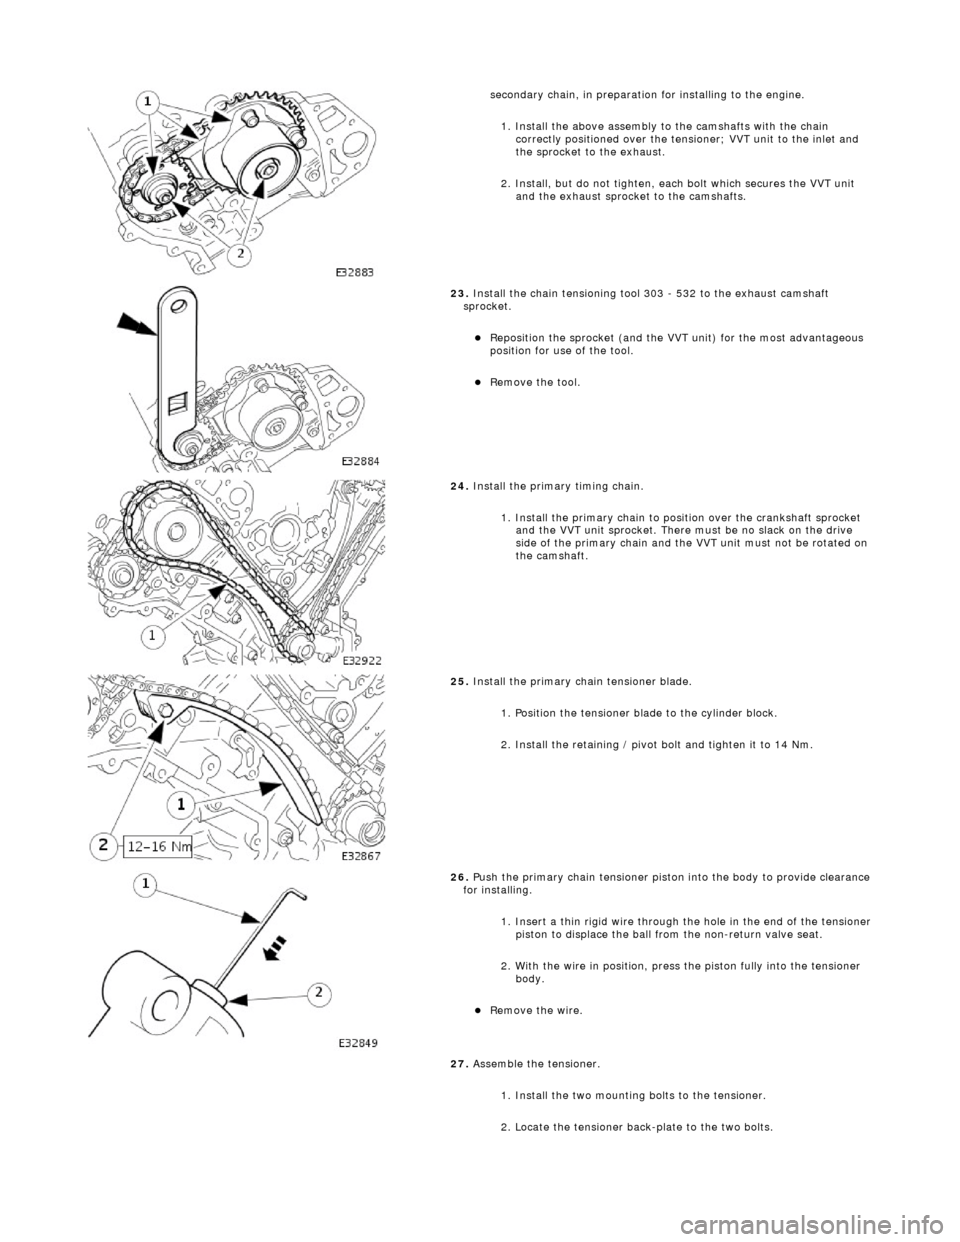
se
condary chain, in preparation for installing to the engine.
1. Install the above assembly to the camshafts with the chain correctly positioned over the tensioner; VVT unit to the inlet and
the sprocket to the exhaust.
2. Install, but do not tighten, each bolt which secures the VVT unit and the exhaust sprocket to the camshafts.
23 .
Install the chain t
ensioning tool 303 - 532 to the exhaust camshaft
sprocket.
Re p
osition the sprocket (and the VVT unit) for the most advantageous
position for use of the tool.
Re
move the tool.
24 . Install the
primary timing chain.
1. Install the primary chain to position over the crankshaft sprocket and the VVT unit sprocket. There mu st be no slack on the drive
side of the primary chain and the VVT unit must not be rotated on
the camshaft.
25 . Install the pri
mary chain tensioner blade.
1. Position the tensioner blade to the cylinder block.
2. Install the retaining / pivot bolt and tighten it to 14 Nm.
26 . P
ush the primary chain tensioner piston into the body to provide clearance
for installing.
1. Insert a thin rigid wire through the hole in the end of the tensioner
piston to displace the ball from the non-return valve seat.
2. With the wire in position, press the piston fully into the tensioner body.
Rem
ove the wire.
27. Assemble the tensioner.
1. Install the two mounting bolts to the tensioner.
2. Locate the tensioner back-plate to the two bolts.
Page 639 of 2490
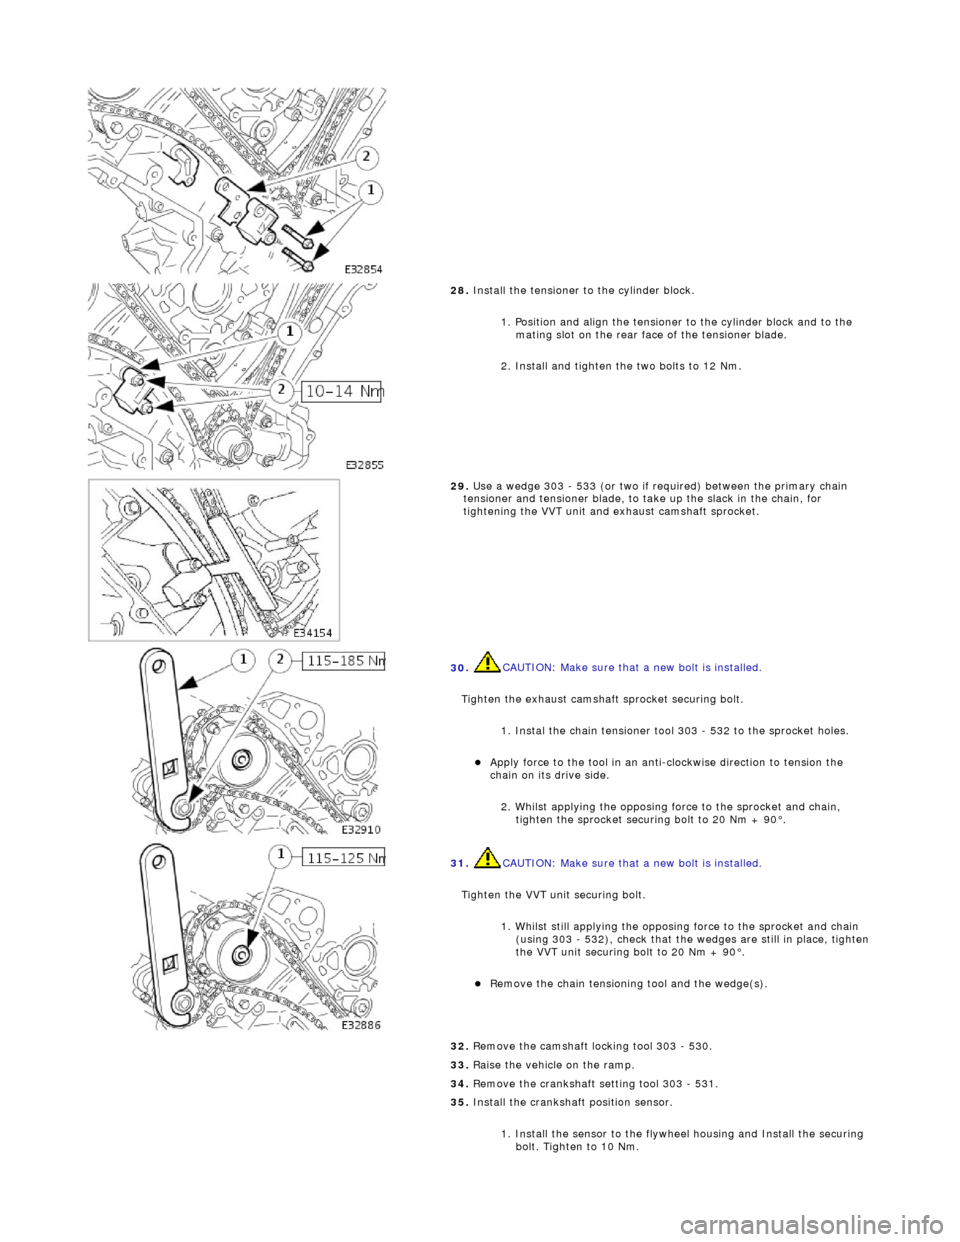
28
.
Install the tensioner to the cylinder block.
1. Position and align the tensioner to the cylinder block and to the mating slot on the rear face of the tensioner blade.
2. Install and tighten the two bolts to 12 Nm.
29
.
Use a wedge 303 - 533 (or two if required) between the primary chain
tensioner and tensioner blade, to ta ke up the slack in the chain, for
tightening the VVT unit and exhaust camshaft sprocket.
30
.
CAUTION: Make sure that a new bolt is installed.
Tighten the exhaust camshaft sprocket securing bolt. 1. Instal the chain tensioner t ool 303 - 532 to the sprocket holes.
Appl
y force to the tool in an anti
-clockwise direction to tension the
chain on its drive side.
2. Whilst applying the opposing force to the sprocket and chain, tighten the sprocket securing bolt to 20 Nm + 90°.
31
.
CAUTION: Make sure that a new bolt is installed.
Tighten the VVT unit securing bolt. 1. Whilst still applying the opposing force to the sprocket and chain (using 303 - 532), check that the wedges are still in place, tighten
the VVT unit securing bolt to 20 Nm + 90°.
R
emove the chain tensioning tool and the wedge(s).
32
.
Remove the camshaft locking tool 303 - 530.
33. Raise the vehicle on the ramp.
34. Remove the crankshaft setting tool 303 - 531.
35. Install the crankshaft position sensor.
1. Install the sensor to the flywheel housing and Install the securing bolt. Tighten to 10 Nm.
Page 640 of 2490
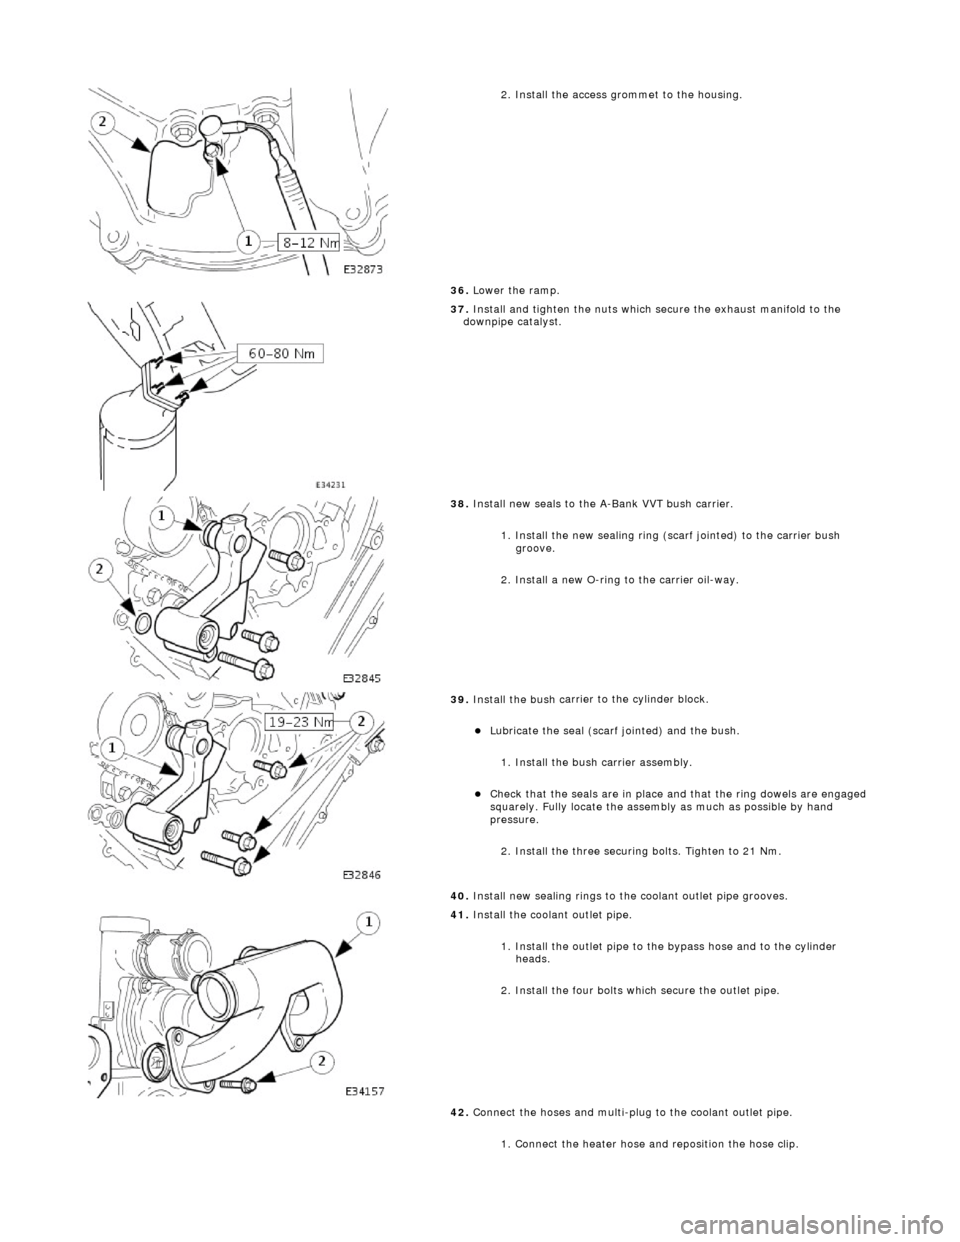
2. In
stall the access grommet to the housing.
36. Lower the ramp.
37. Ins
tall and tighten the nuts which secure the exhaust manifold to the
downpipe catalyst.
38 . In
stall new seals to the A-Bank VVT bush carrier.
1. Install the new sealing ring (scarf jointed) to the carrier bush groove.
2. Install a new O-ring to the carrier oil-way.
39 . Install the bush c
arrier to the cylinder block.
Lu
br
icate the seal (scarf
jointed) and the bush.
1. Install the bush carrier assembly.
Chec k that
the seals are
in place and that the ri ng dowels are engaged
squarely. Fully locate the assembly as much as possible by hand
pressure.
2. Install the three securing bolts. Tighten to 21 Nm.
40. Install new sealing rings to the coolant outlet pipe grooves.
41. Install the coolant
outlet pipe.
1. Install the outlet pipe to the bypass hose and to the cylinder heads.
2. Install the four bolts which secure the outlet pipe.
42. Connect the hoses and multi-plug to the coolant outlet pipe.
1. Connect the heater hose and reposition the hose clip.
Page 642 of 2490
Engine - Engine Front Cover
In-vehic
le Repair
Remov
a
l
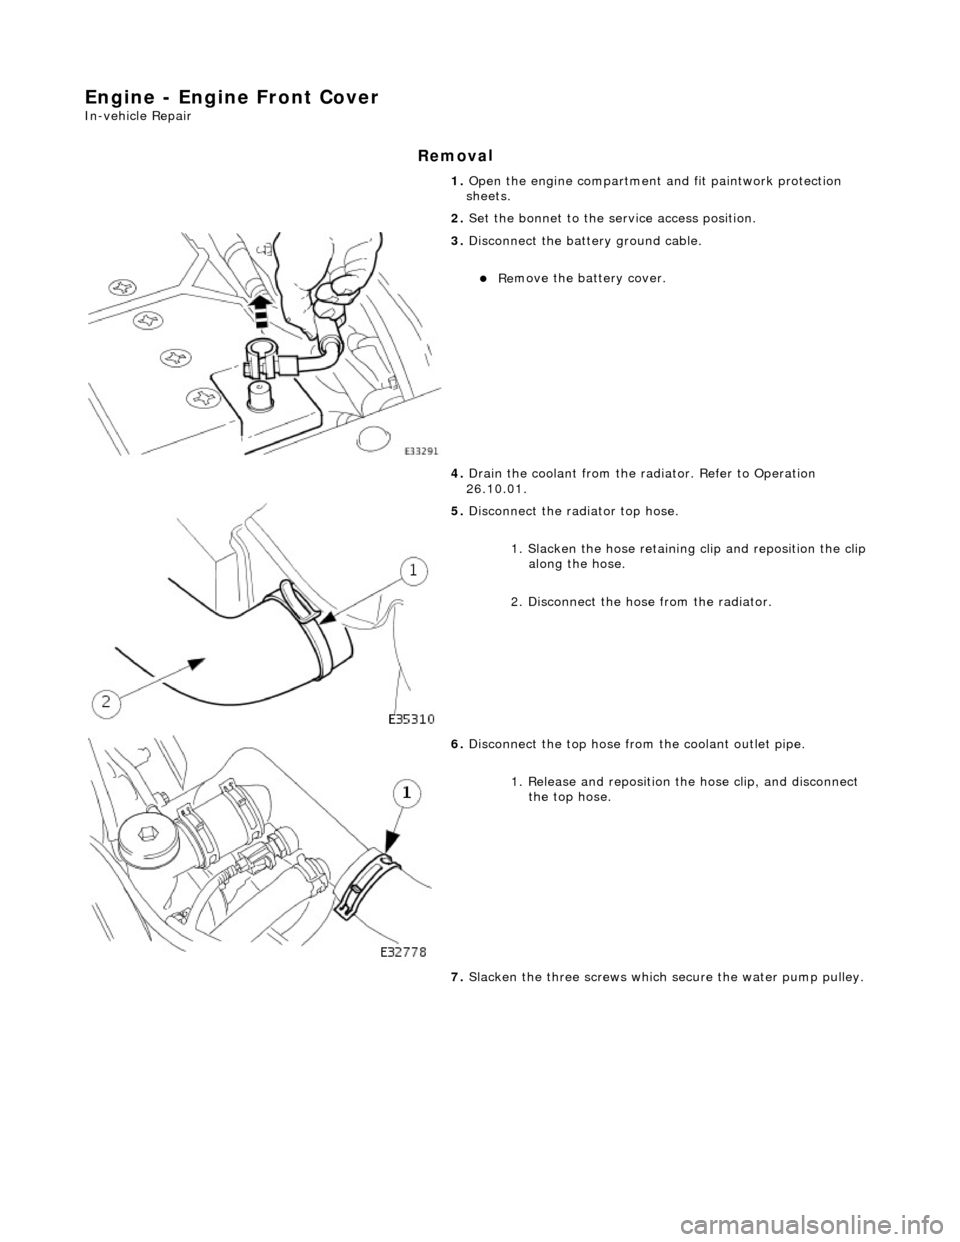
1.
Op
en the engine compartment and fit paintwork protection
sheets.
2. Set the bonnet to the service access position.
3. Disc
onnect the batt
ery ground cable.
Re
move the battery cover.
4. Drain the coolant from the radiator. Refer to Operation
26.10.01.
5. Disc onne
ct the radiator top hose.
1. Slacken the hose retaining clip and reposition the clip
along the hose.
2. Disconnect the hose from the radiator.
6. Disc
onnect the top hose from the coolant outlet pipe.
1. Release and reposition th e hose clip, and disconnect
the top hose.
7. Slacken the three screws which secure the water pump pulley.
Page 643 of 2490
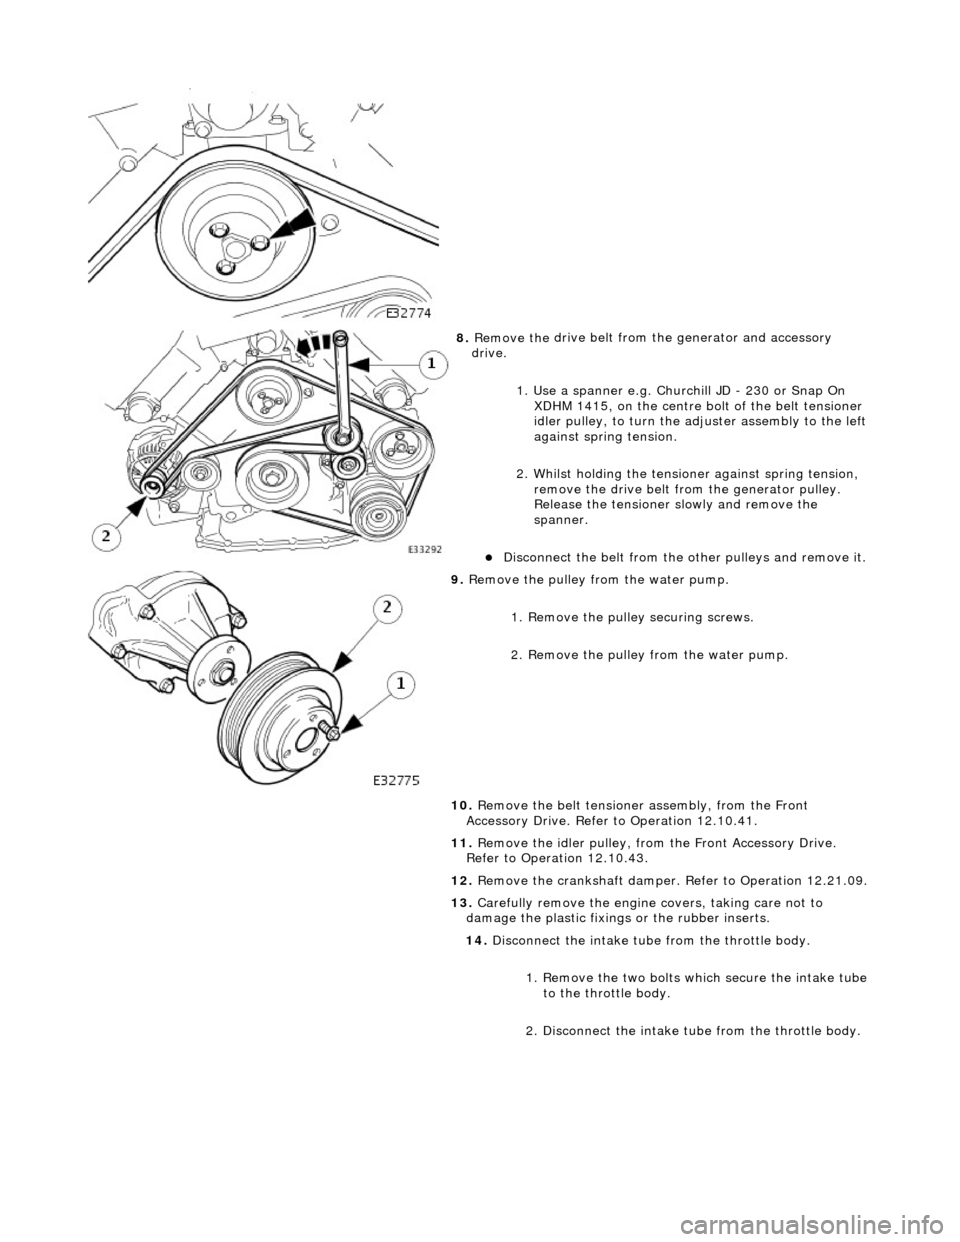
8. Remove the
drive belt from
the generator and accessory
drive.
1. Use a spanner e.g. Churchill JD - 230 or Snap On XDHM 1415, on the centre bo lt of the belt tensioner
idler pulley, to turn the adju ster assembly to the left
against spring tension.
2. Whilst holding the tensioner against spring tension, remove the drive belt from the generator pulley.
Release the tensioner sl owly and remove the
spanner.
D
isconnect the belt from the
other pulleys and remove it.
9. Re
move the pulley from the water pump.
1. Remove the pulley securing screws.
2. Remove the pulley from the water pump.
10. Remove the belt tensione r assembly, from the Front
Accessory Drive. Refer to Operation 12.10.41.
11. Remove the idler pulley, from the Front Accessory Drive.
Refer to Operation 12.10.43.
12. Remove the crankshaft damper. Refer to Operation 12.21.09.
13. Carefully remove the engine covers, taking care not to
damage the plasti c fixings or the rubber inserts.
14. Disconnect the intake tube from the throttle body.
1. Remove the two bolts which secure the intake tube to the throttle body.
2. Disconnect the intake tube from the throttle body.