ECU JAGUAR X308 1998 2.G Workshop Manual
[x] Cancel search | Manufacturer: JAGUAR, Model Year: 1998, Model line: X308, Model: JAGUAR X308 1998 2.GPages: 2490, PDF Size: 69.81 MB
Page 677 of 2490

Engine - Exhaust Camshaft Sprocket RH4.0L SC V8 - AJ26/3.2L NA V8 -
AJ26
In-vehicle Repair
Removal
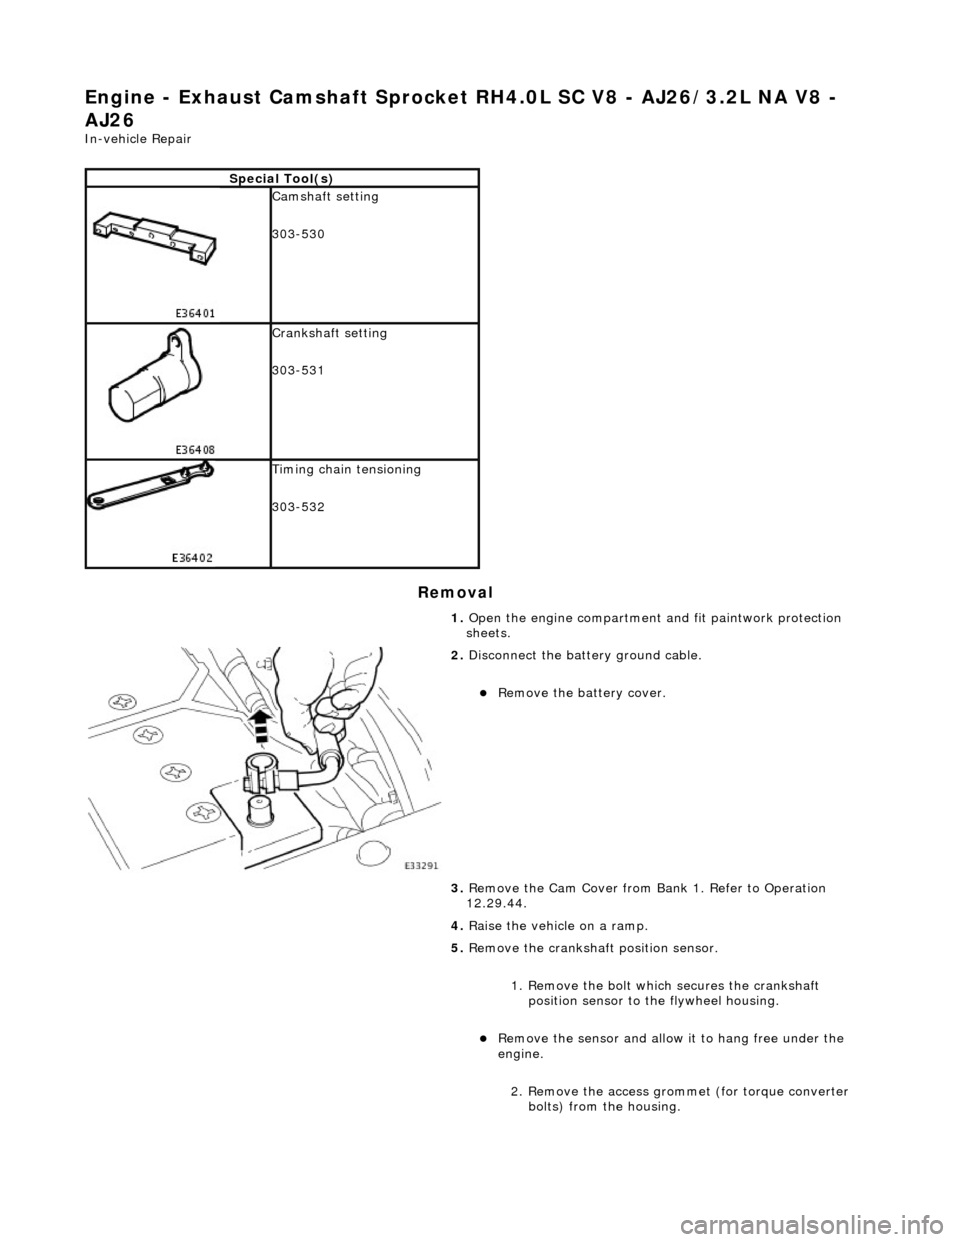
Special Tool(s)
Camshaft setting
303-530
Crankshaft setting
303-531
Timing chain tensioning
303-532
1. Open the engine compartment and fit paintwork protection
sheets.
2. Disconnect the batt ery ground cable.
Remove the battery cover.
3. Remove the Cam Cover from Ba nk 1. Refer to Operation
12.29.44.
4. Raise the vehicle on a ramp.
5. Remove the crankshaft position sensor.
1. Remove the bolt which secures the crankshaft position sensor to the flywheel housing.
Remove the sensor and allow it to hang free under the
engine.
2. Remove the access grommet (for torque converter bolts) from the housing.
Page 678 of 2490

6. Rotate the crankshaft until the triangular arrow indent on
the drive plate is visible thro ugh the access hole; confirm
that the timing flat on ea ch camshaft is uppermost.
7. Install the crankshaft setting peg 303-531 to the crankshaft
position sensor location.
1. Install the crankshaft setting peg 303-531.
Position the crankshaft so that the setting peg engages
fully into the timing slot.
2. Install and tighten the bolt to secure the setting peg.
8. Lower the vehicle on the ramp.
9. Install the camshaft locking tool 303-530 to Bank 1 camshafts,
aligning the shafts sl ightly as necessary.
10. CAUTION: Use a length of steel strip that will not fall
into the timing cover.
Protect the upper face of the ti ming cover from scratches, when
Page 679 of 2490

Installation
removing the bolt which secures the sprocket. 1. Place a flat piece of stee l strip along the timing cover
horizontal jointing face, adjacent to the exhaust
camshaft sprocket.
2. Secure the steel strip in place with adhesive tape.
11. A ball-ended hexagon drive bit is required to remove the
sprocket securing bolt. A suitable tool is available from Snap On as (FABLM10E) Long Series 10mm AF.
12. Remove the bolt which secures the sprocket to the exhaust
camshaft.
Move the sprocket forward from the camshaft boss.
13. Remove the secondary chain tensioner. The tensioner piston
cannot be pushed into the body with the assembly in position.
1. Remove the two bolts which secure the tensioner.
Lift the tensioner, sprocket (release it fully from the
camshaft) and ch ain assembly.
2. Remove the tensioner rearward from between the chain.
14. Remove the sprocket and leav e the chain resting on the
cylinder head.
15. Clean and inspect all relevant components.
1. Install the sprocket to the secondary chain.
1. With the sprocket installe d to the chain, temporarily
position (do not install the securing bolt) the sprocket
onto the camshaft.
2. Adjust the position of the sprocket within the chain to
Page 680 of 2490

allow the chain tensioning tool 303-532 to be approximately vertical, as shown.
Remove the chain tensioni ng tool; during future
operations, do not move the sprocket within the chain.
2. Push the tensioner piston into the body to provide clearance
for installing.
1. Insert a thin rigid wire th rough the hole in the end of
the tensioner piston to displace the ball from the non-
return valve seat.
2. With the wire in position, press the piston fully into the tensioner body.
Remove the wire.
3. Install the chain tensioner between the chain path.
1. Reposition the sprocket, still captive in the chain, upwards for access.
2. Install the chain tensioner between the sprockets.
Position the cam sprocket, chain and tensioner assembly
into position and locate the sprocket onto the camshaft
spigot.
4. Install the chain tensioner to the engine.
1. Fully seat the sprocket onto the camshaft and install the securing bolt, hand tight.
2. Install the two bolts which secure the tensioner and tighten to 10-14 Nm.
5. Install the cams haft sprocket.
Install the chain tensioner tool 303-532 to the sprocket
holes.
Apply force to the tool in an anti-clockwise direction to
tension the chain on its drive side.
Page 681 of 2490

Whilst applying the opposing force to the sprocket and
chain, tighten the sprocket securing bolt to 115-125 Nm.
Remove the chain tensioning tool.
6. Remove the tape and steel stri p from the timing cover upper
face. Wipe any residue of tape from the joint face.
7. Remove the camshaft locking tool.
8. Install the Cam Cover to Bank 1. Refer to Operation 12.29.44.
9. Raise the vehicle on the ramp.
10. Remove the crankshaft setting tool 303-531.
11. Install the crankshaft position sensor.
1. Install the sensor to the flywheel housing and fit the
securing bolt. Tighten to 8-12 Nm.
2. Install the access grommet to the housing.
12. Lower the ramp.
13. Remove the paint protection sheets and close the engine
compartment cover.
14. Connect the battery and in stall the battery cover.
Refer to the Battery Reconnection Procedure 86.15.15.
Page 682 of 2490

Engine - Exhaust Manifold LH
In-vehicle Repair
Removal
Installation
1.
Open the engine compartment and fit paintwork protection
sheets.
2. Remove the front silencer. Refer to Section 309-00.
3. Remove the downpipe catalytic converter, left hand side. Refer
to Section 309-00.
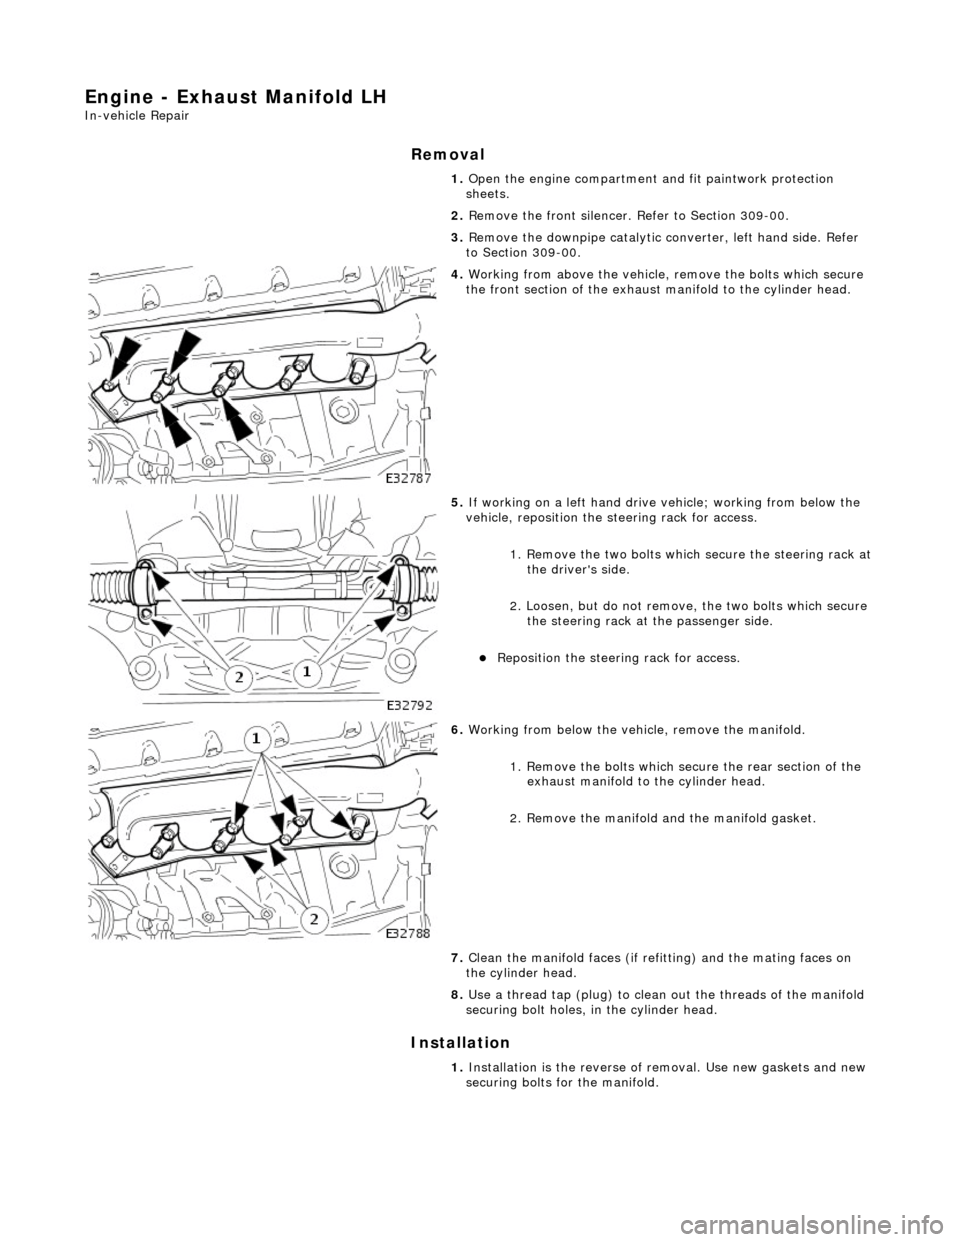
4. Working from above the vehicle, remove the bolts which secure
the front section of the exhaust manifold to the cylinder head.
5. If working on a left hand drive vehicle; working from below the
vehicle, reposition the steering rack for access.
1. Remove the two bolts which secure the steering rack at
the driver's side.
2. Loosen, but do not remove, the two bolts which secure the steering rack at the passenger side.
Reposition the steering rack for access.
6. Working from below the vehicle, remove the manifold.
1. Remove the bolts which secu re the rear section of the
exhaust manifold to the cylinder head.
2. Remove the manifold and the manifold gasket.
7. Clean the manifold faces (if refi tting) and the mating faces on
the cylinder head.
8. Use a thread tap (plug) to clean out the threads of the manifold
securing bolt holes, in the cylinder head.
1. Installation is the reverse of removal. Use new gaskets and new
securing bolts for the manifold.
Page 683 of 2490

Engine - Exhaust Manifold RH
In-vehicle Repair
Removal
1. Open the engine compartment and fit paintwork protection
sheets.
2. Remove the air cleaner assemb ly. Refer to Section 303-12.
3. Remove the front silencer. Refer to Section 309-00.
4. Remove the downpipe catalytic converter, right hand side.
Refer to Section 309-00.
5. From above the vehicle, disconnect the EGR pipe from the
exhaust manifold.
1. Remove the two nuts whic h secure the EGR flange to
the right hand exhaust manifold.
2. Reposition the EGR pipe from the manifold.
6. Remove the bolts which secure th e front section of the exhaust
manifold to the cylinder head.
7. If working on a right hand drive vehicle; reposition the steering rack for access.
1. Remove the two bolts which secure the steering rack at the passenger side.
2. Loosen, but do not remove, the two bolts which secure the steering rack at the driver's side.
Reposition the steering rack for access.
8. Working from below the vehicle, remove the manifold bolts.
1. Remove the bolts which secu re the rear section of the
exhaust manifold to the cylinder head.
Page 684 of 2490

Installation
9. Remove the manifold.
1. Remove the manifold and the manifold gasket from the cylinder head.
2. Remove the gasket from the EGR flange.
10. If fitting a new manifold, remove the two studs from the EGR
flange of the manifold. and transfer them to the new manifold.
11. Clean the manifold faces (if refi tting) and the mating faces on
the cylinder head.
12. Use a thread tap (plug) to clean out the threads of the
manifold securing bolt holes, in the cylinder head.
1. Fit a spacer to each new manifo ld securing bolt (8 bolts).
2. Fit the manifold and manifold gasket.
1. Fit and align the new gasket to the cylinder head.
2. Fit and align the manifo ld to the cylinder head.
3. Fit the rear four bolts wh ich secure the manifold, but
do not tighten.
3. Working from above the vehicle, fit and tighten the remaining
manifold securing bolts.
4. Working from below the vehicle, fu lly tighten the rear bolts on
each manifold.
5. Refit the steering rack (if removed for access).
1. Reposition th e steering rack.
2. Fit and tighten the rack mounting bolts on the passenger side.
Page 685 of 2490

3. Tighten the rack mounting bolts on the driver's side.
6. From above the vehicle, connect the EGR pipe to the exhaust
manifold.
1. Fit a new EGR gasket to the manifold.
2. Reposition the EGR pipe to the manifold.
3. Fit the two nuts which secure the EGR flange to the exhaust manifold.
7. Fit the downpipe catalytic converter, right hand side. Refer to
Section 309-00.
8. Fit the front silencer. Refer to Section 309-00.
9. Fit the air cleaner assembly . Refer to Section 303-12.
10. Remove paintwork protection sheets and close the engine
compartment.
Page 686 of 2490

Engine - Exhaust Manifold LH and RH
In-vehicle Repair
Removal
1. Open the engine compartment and fit paintwork protection
sheets.
2. Remove the downpipe catalytic converter, right hand side.
Refer to Section 309-00.
3. Remove the downpipe catalytic co nverter, left hand side. Refer
to Section 309-00.
4. Remove the front silencer. Refer to Section 309-00.
5. Remove the air cleaner assemb ly. Refer to Section 303-12.
6. Working from above the vehicl e, remove the bolts which
secure the front sectio n of the left hand exhaust manifold to
the cylinder head.
7. Working from below the vehicle, reposition the steering rack
for access.
1. Remove the two bolts which secure the steering rack at the driver's side.
2. Loosen, but do not remove, the two bolts which secure the steering rack at the passenger side.
Reposition the steering rack for access.
8. Working from below the vehicl e, remove the manifold.
1. Remove the bolts which secu re the rear section of the
exhaust manifold to the cylinder head.
2. Remove the manifold and the manifold gasket.
9. From above the vehicle, disconnect the EGR pipe from the
right hand exhaust manifold.
1. Remove the two nuts whic h secure the EGR flange to
the right hand exhaust manifold.
2. Reposition the EGR pipe from the manifold.