JAGUAR X308 1998 2.G Owner's Manual
X308 1998 2.G
JAGUAR
JAGUAR
https://www.carmanualsonline.info/img/21/7640/w960_7640-0.png
JAGUAR X308 1998 2.G Owner's Manual
Page 2422 of 2490
8. Remove generator front cooling duct.
Remove bolt.
Move duct rearwards to rele ase tang from undertray.
Release front duct from rear vertical duct.
9. Remove scrivets or screws se curing undertray to bumper
cover. Discard scrivets.
10. Remove and discard tiestrap securing undertray to body
brace.
11. At each side of vehicle, remo ve and discard scrivet securing undertray to wheelarch liner.
12. Remove undertray from vehicle.
13. Remove both front road wheels. Refer to Section 100-02.
14. Remove both front road springs. Refer to 60. 20.02.
15. Disconnect wheel speed sensor harness connectors.
Page 2436 of 2490
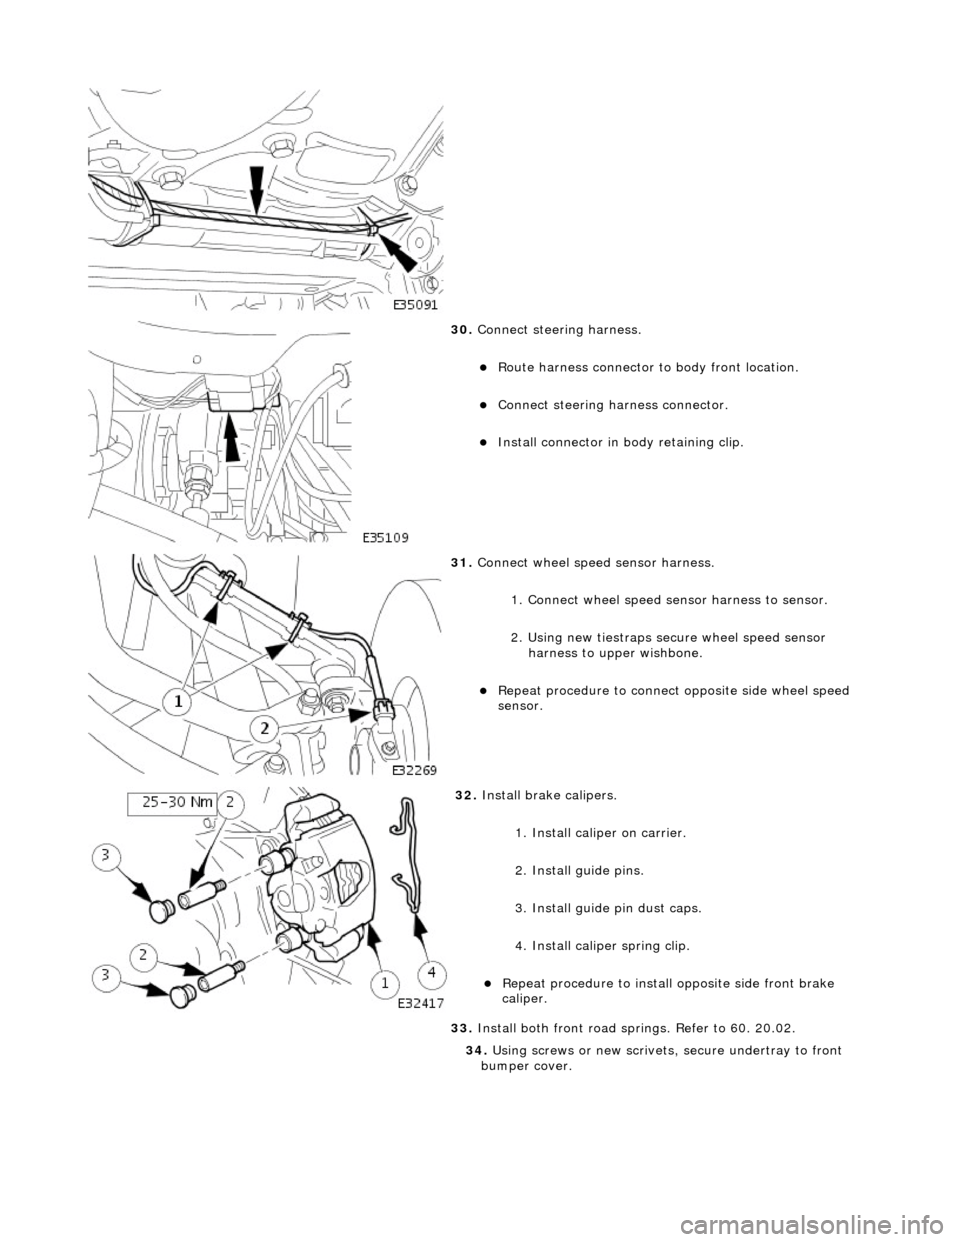
30. Connect steering harness.
Route harness connector to body front location.
Connect steering ha rness connector.
Install connector in body retaining clip.
31. Connect wheel speed sensor harness.
1. Connect wheel speed sensor harness to sensor.
2. Using new tiestraps secure wheel speed sensor harness to upper wishbone.
Repeat procedure to connect opposite side wheel speed
sensor.
32. Install brake calipers.
1. Install caliper on carrier.
2. Install guide pins.
3. Install guide pin dust caps.
4. Install caliper spring clip.
Repeat procedure to install opposite side front brake
caliper.
33. Install both front road sp rings. Refer to 60. 20.02.
34. Using screws or new scrivets , secure undertray to front
bumper cover.
Page 2437 of 2490
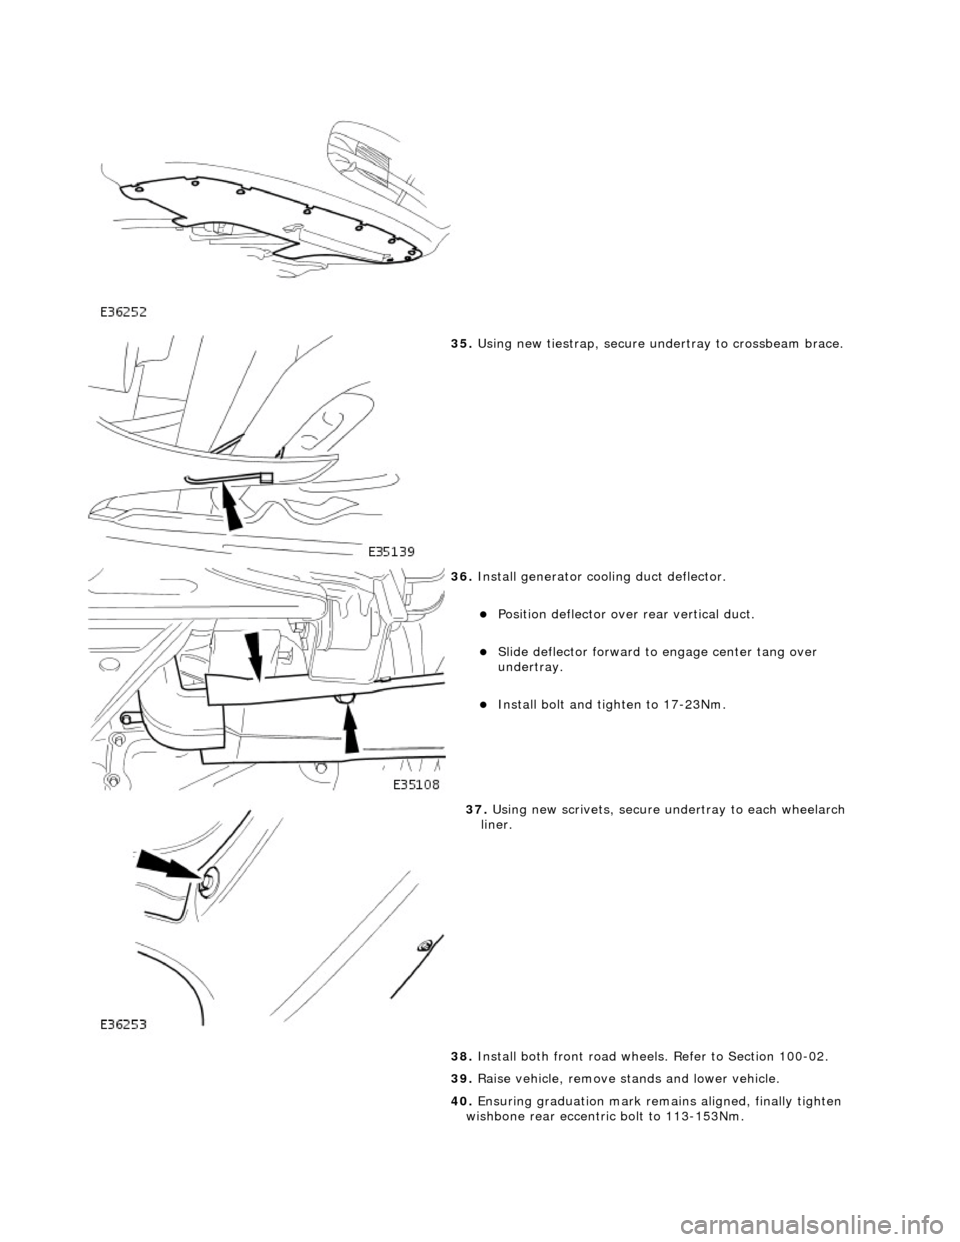
35. Using new tiestrap, secure undertray to crossbeam brace.
36. Install generator cool ing duct deflector.
Position deflector over rear vertical duct.
Slide deflector forward to engage center tang over
undertray.
Install bolt and ti ghten to 17-23Nm.
37. Using new scrivets, secure un dertray to each wheelarch
liner.
38. Install both front road wheels. Refer to Section 100-02.
39. Raise vehicle, remove st ands and lower vehicle.
40. Ensuring graduation mark remains aligned, finally tighten
wishbone rear eccentric bolt to 113-153Nm.
Page 2440 of 2490
9. Raise front of vehicle.
10. Remove generator cool ing duct deflector.
Remove bolt.
Move deflector rearwards to release tangs from undertray.
Release deflector from rear vertical duct.
11. Remove screws or scrivets securing undertray to bumper
cover. Discard scrivets.
12. Remove and discard tiestrap securing undertray to body
brace.
13. At each side of vehicle, remo ve and discard scrivet securing
undertray to wheelarch liner.
Page 2441 of 2490
14. Remove undertray from vehicle.
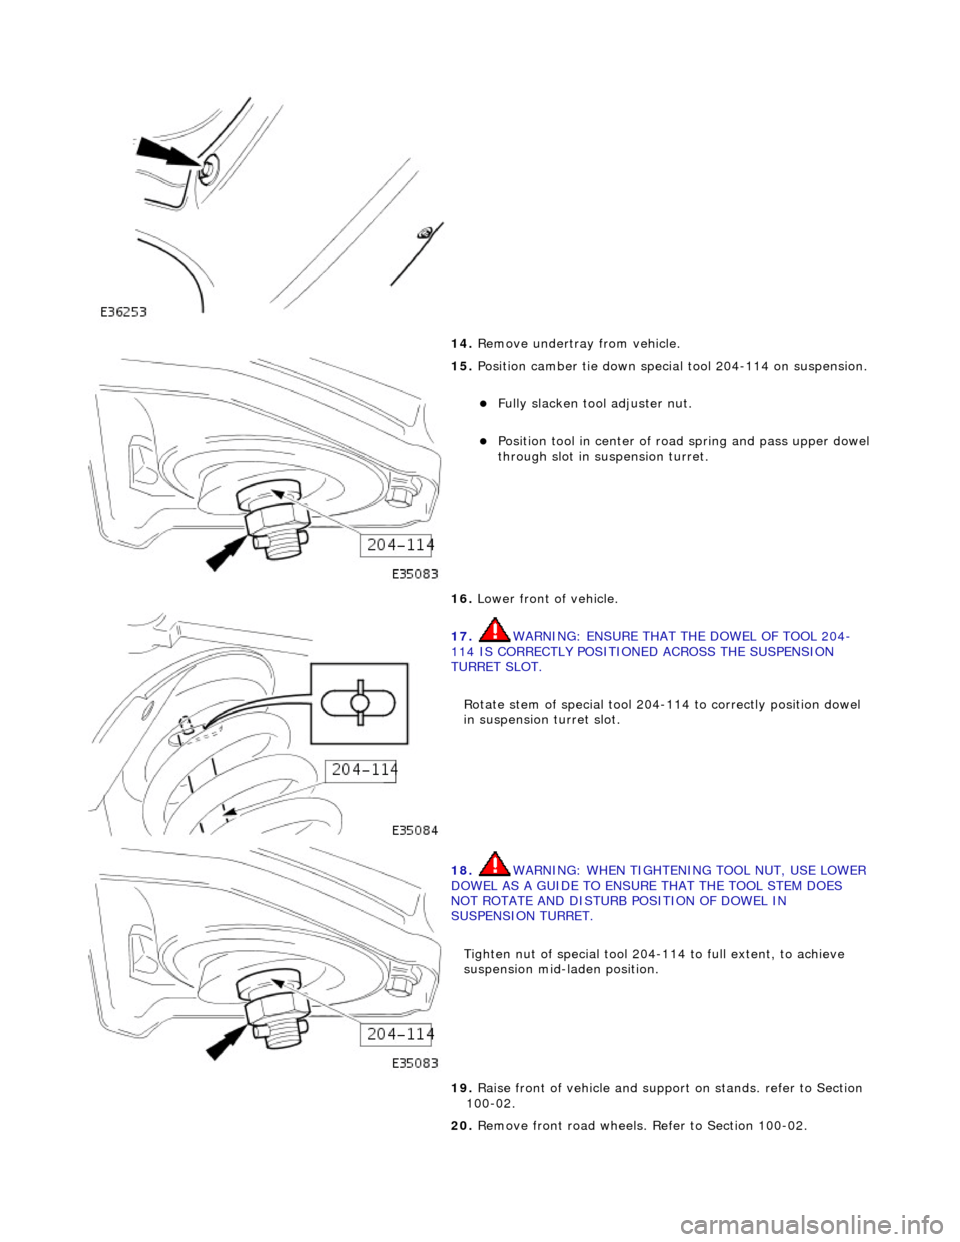
15. Position camber tie down special tool 204-114 on suspension.
Fully slacken tool adjuster nut.
Position tool in center of ro ad spring and pass upper dowel through slot in suspension turret.
16. Lower front of vehicle.
17. WARNING: ENSURE THAT THE DOWEL OF TOOL 204-
114 IS CORRECTLY POSITIONED ACROSS THE SUSPENSION
TURRET SLOT.
Rotate stem of special tool 204-114 to correctly position dowel
in suspension turret slot.
18. WARNING: WHEN TIGHTENING TOOL NUT, USE LOWER
DOWEL AS A GUIDE TO ENSURE THAT THE TOOL STEM DOES
NOT ROTATE AND DISTURB POSITION OF DOWEL IN
SUSPENSION TURRET.
Tighten nut of special tool 204-114 to full extent, to achieve
suspension mid-laden position.
19. Raise front of vehicle and support on stands. refer to Section
100-02.
20. Remove front road wheels. Refer to Section 100-02.
Page 2448 of 2490
15. Using screws or new scrivets , secure undertray to front
bumper cover.
16. Using new tiestrap, secure undertray to crossbeam brace.
17. Using new scrivets, secure un dertray to each wheelarch
liner.
18. Install generator cool ing duct deflector.
Position deflector over rear vertical duct.
Move deflector forward to engage center tang over
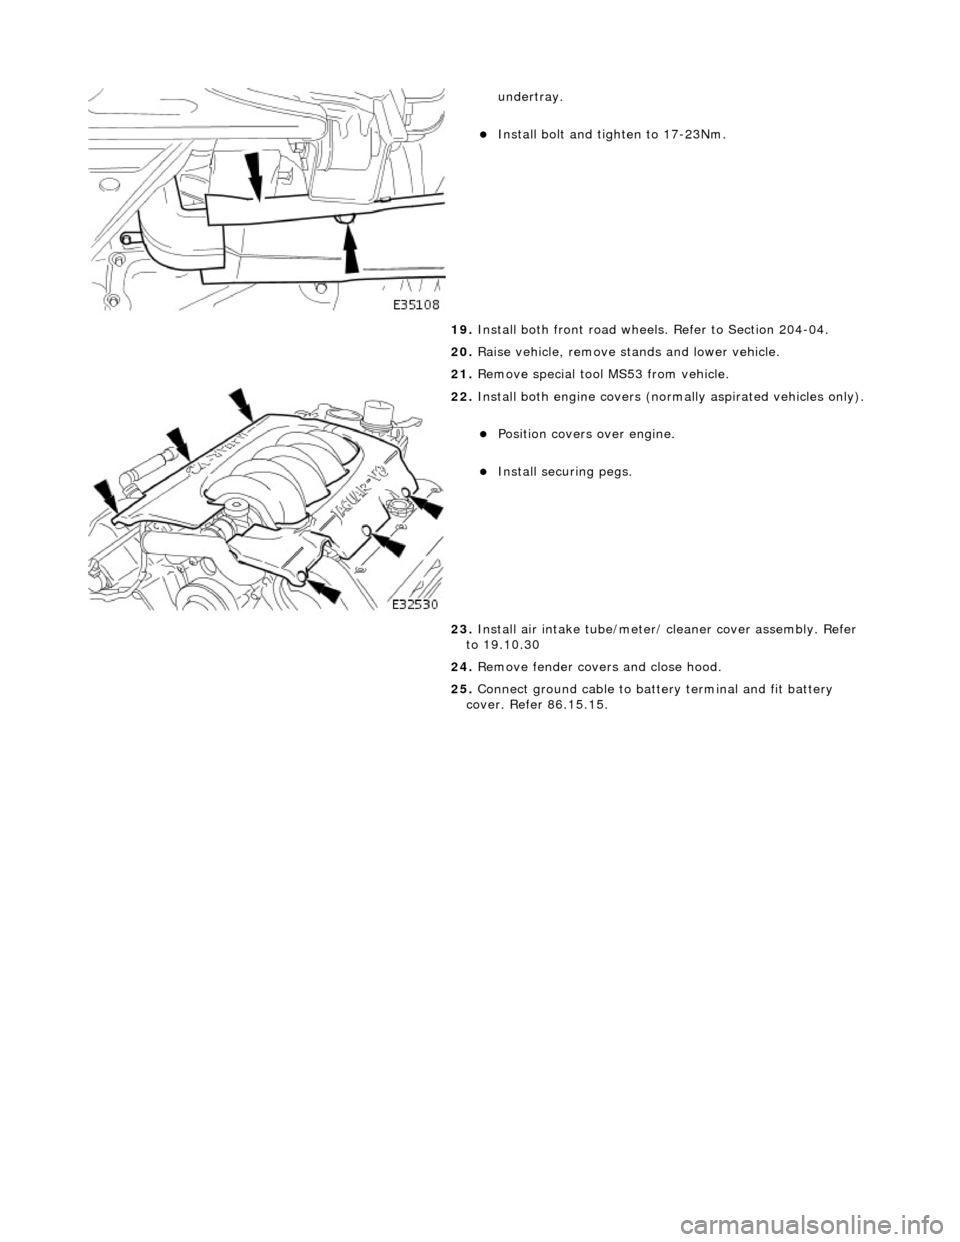
Page 2449 of 2490
undertray.
Install bolt and tighten to 17-23Nm.
19. Install both front road wheels. Refer to Section 204-04.
20. Raise vehicle, remove st ands and lower vehicle.
21. Remove special tool MS53 from vehicle.
22. Install both engine co vers (normally aspirated vehicles only).
Position covers over engine.
Install securing pegs.
23. Install air intake tube/meter/ cleaner cover assembly. Refer
to 19.10.30
24. Remove fender covers and close hood.
25. Connect ground cable to batt ery terminal and fit battery
cover. Refer 86.15.15.
Page 2451 of 2490
9. Raise front of vehicle.
10. Remove generator cool ing duct deflector.
Remove bolt.
Move deflector rearwards to release tangs from undertray.
Release deflector from rear vertical duct.
11. Remove screws or scrivets securing undertray to bumper
cover. Discard scrivets.
12. Remove and discard tiestrap securing undertray to body
brace.
13. At each side of vehicle, remo ve and discard scrivet securing
undertray to wheelarch liner.
Page 2452 of 2490
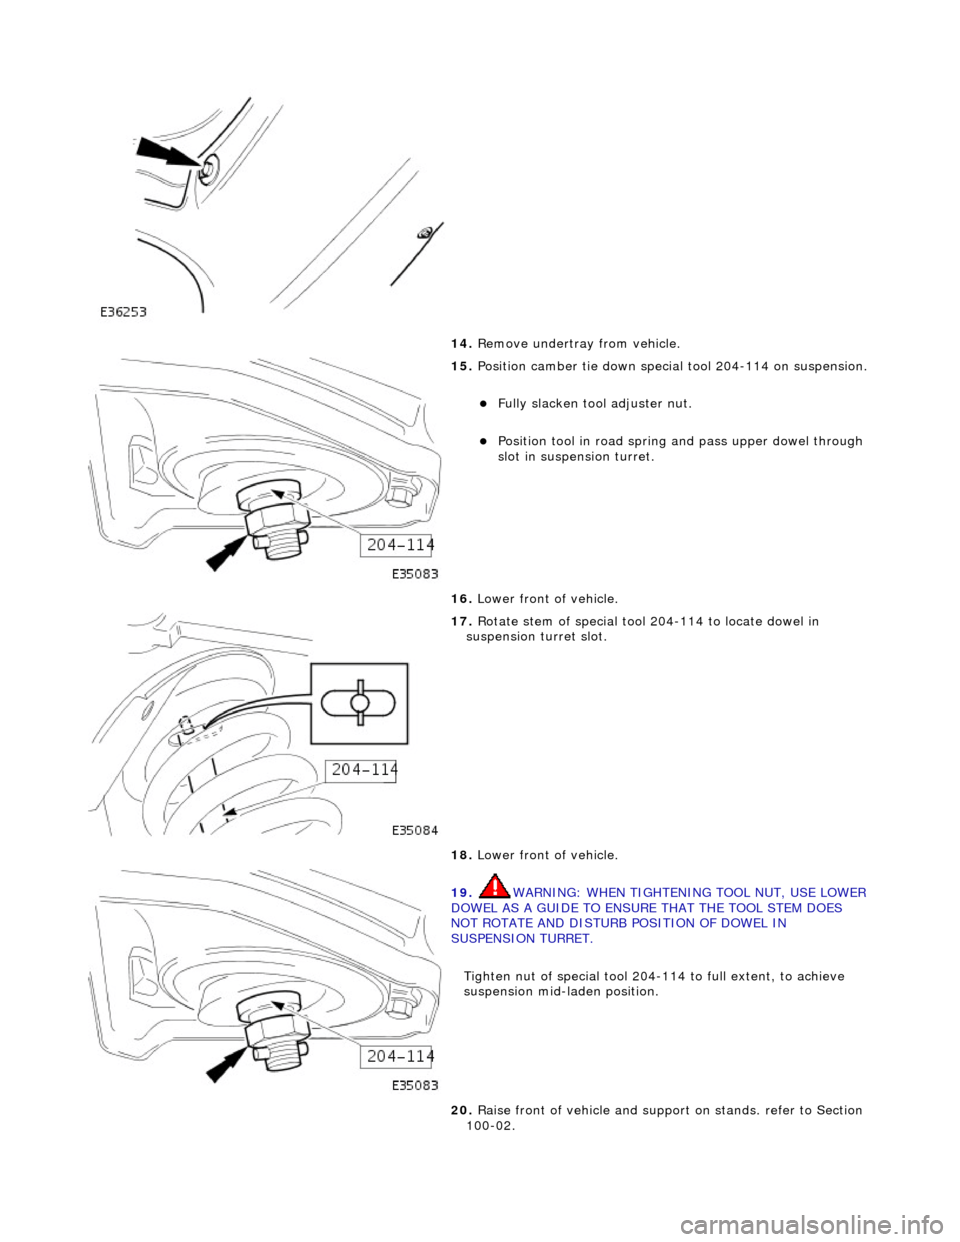
14. Remove undertray from vehicle.
15. Position camber tie down special tool 204-114 on suspension.
Fully slacken tool adjuster nut.
Position tool in road spring and pass upper dowel through
slot in suspen sion turret.
16. Lower front of vehicle.
17. Rotate stem of special tool 204-114 to locate dowel in
suspension turret slot.
18. Lower front of vehicle.
19. WARNING: WHEN TIGHTENING TOOL NUT, USE LOWER
DOWEL AS A GUIDE TO ENSURE THAT THE TOOL STEM DOES
NOT ROTATE AND DISTURB POSITION OF DOWEL IN
SUSPENSION TURRET.
Tighten nut of special tool 204-114 to full extent, to achieve
suspension mid-laden position.
20. Raise front of vehicle and support on stands. refer to Section
100-02.
Page 2459 of 2490
15. Using screws or new scrivets , secure undertray to front
bumper cover.
16. Using new tiestrap, secure undertray to crossbeam brace.
17. Using new scrivets, secure un dertray to each wheelarch
liner.
18. Install generator cool ing duct deflector.
Position deflector over rear vertical duct.
Move deflector forward to engage center tang over
undertray.

