JAGUAR X308 1998 2.G Repair Manual
X308 1998 2.G
JAGUAR
JAGUAR
https://www.carmanualsonline.info/img/21/7640/w960_7640-0.png
JAGUAR X308 1998 2.G Repair Manual
Page 1557 of 2490
Pinpoint test C: P0137, P0138
Measure the voltage between EM010/023 and EM015/002. 1
Is the voltage B+?
Yes Remove link lead and reconnect all connectors.
GO to B19
No Check EMS fuse F14 and that EMS control relay (relay 1) is
energized and with all connections made.
GO to B19
B19: END
Perform appropriate service drive cycle and check for the
presence of DTC 1
Has the fault code cleared?
Yes STOP
No Contact Jaguar Service
PINPOINT TEST C : P0137, P0138
TEST CONDITIONSDETAILS/RESULTS/ACTIONS
C1: RETRIEVE DTCS
• NOTE: Battery and or ECM disconnection prior to scanning wi ll erase all data, ensure that the correct DTC is present.
Page 1596 of 2490
Ignition switch to position 0 1
Remove EMS fuse F14. 2
Disconnect EM010 and EM015. 3
Using a link lead, bridge EM010/016 and EM010/022. 4
Measure the voltage between EM010/023 and
EM015/001. 5
Is the voltage 0 (zero) V?
Yes Replace EMS fuse F14 but retain link lead.
GO to E17
No Inspect harness / connecto rs EM010, EM015, and EM023
for corrosion, damaged / pushed back pins.
Repair as required an d reconnect plug(s).
GO to E18
E17: CHECK B+ AT O2 SENSOR HEATER CIRCUIT
Page 1597 of 2490
Pinpoint test F: P0153
With EM010 and EM015 disconnected, measure the
voltage between EM010/023 and EM015/001. 1
Is the voltage B+?
Yes Remove link lead and reconnect all connectors.
GO to E18
No Check integrity of EMS fuse F1 4, EMS control relay (relay
1) is energized and all connections are made.
GO to E18
E18: END
Perform appropriate service drive cycle and check for the
presence of DTC. 1
Has the fault code cleared?
Yes STOP
No Contact Jaguar Service
PINPOINT TEST F : P0153
TEST CONDITIONSDETAILS/RESULTS/ACTIONS
F1: RETRIEVE DTCS
• NOTE: Battery and or ECM disconnection prior to scanning wi ll erase all data, ensure that the correct DTC is present.
Page 1608 of 2490
Ignition switch to position 0 1
Remove EMS fuse F14. 2
Disconnect EM010 and EM015. 3
Using a link lead, bridge EM010/016 and EM010/022. 4
Measure the voltage between EM010/023 and
EM015/001. 5
Is the voltage 0 (zero) V?
Yes Replace EMS fuse F14 but retain link lead
GO to F18
No Inspect connectors EM010, EM015, and EM023 for
corrosion, damaged / pushed back pins or repair the
harness; reconnect plug(s).
GO to F19
F18: CHECK B+ AT O2 SENSOR HEATER CIRCUIT
Page 1609 of 2490
Pinpoint test G: P0157, P0158
With EM010 and EM015 disconnected, measure the
voltage between EM010/023 and EM015/002. 1
Is the voltage B+?
Yes Remove link lead and reconnect all connectors.
GO to F19
No Check integrity of EMS fuse F1 4, EMS control relay (relay
1) is energized and all connections made.
GO to F19
F19: END
Perform appropriate service drive cycle and check for the
presence of DTC. 1
Has the fault code cleared?
Yes STOP
No Contact Jaguar Service
PINPOINT TEST G : P0157, P0158
TEST CONDITIONSDETAILS/RESULTS/ACTIONS
G1: RETRIEVE DTCS
• NOTE: Battery and or ECM disconnection prior to scanning wi ll erase all data, ensure that the correct DTC is present.
Page 1696 of 2490
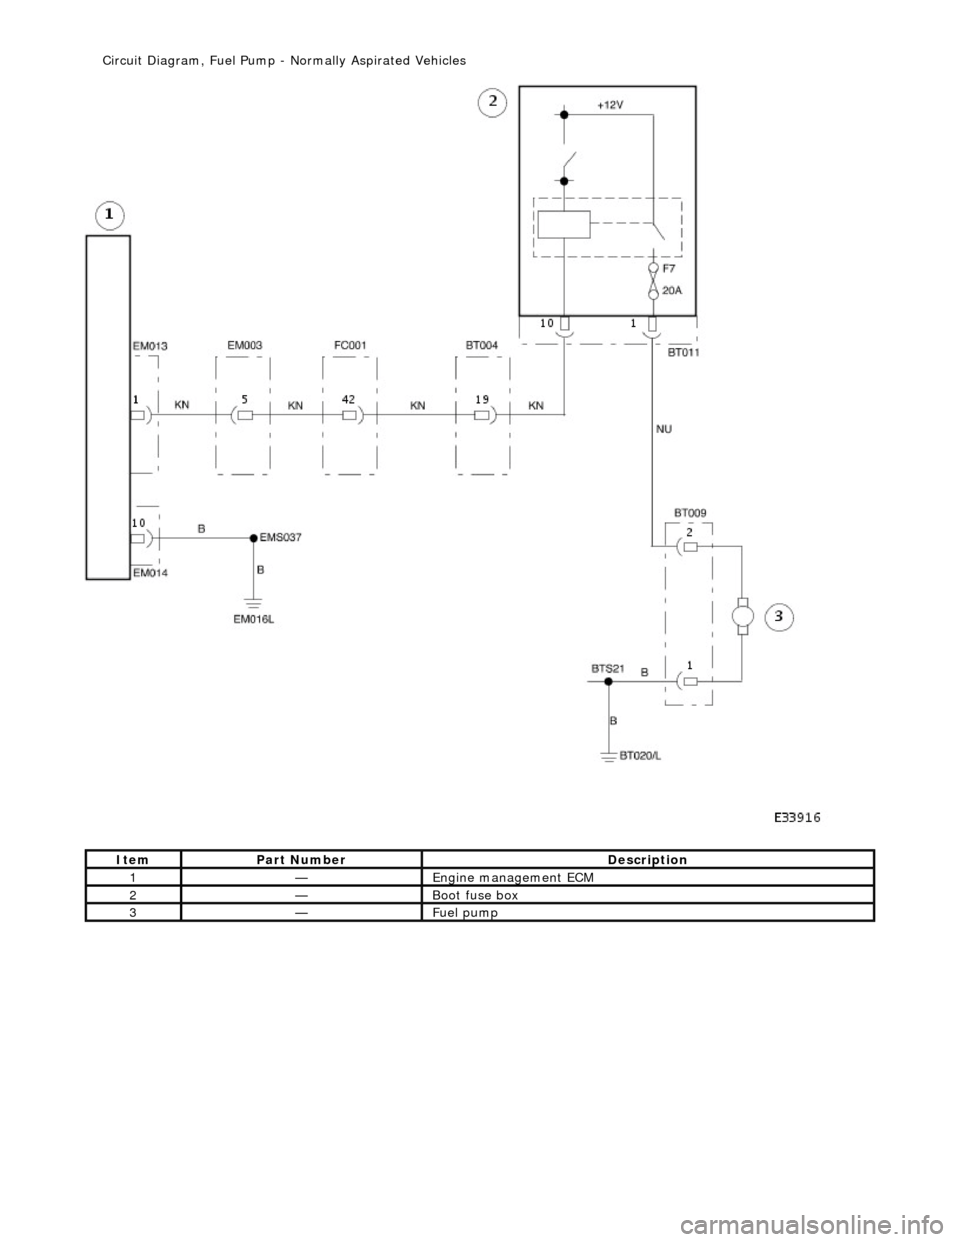
Ite
m
Par
t
Number
De
scr
iption
1—Engine
m
anagement ECM
2—Boot fuse box
3—Fue
l
pump
Ci
rcui
t Diagram, Fuel Pump -
Normally Aspirated Vehicles
Page 1697 of 2490
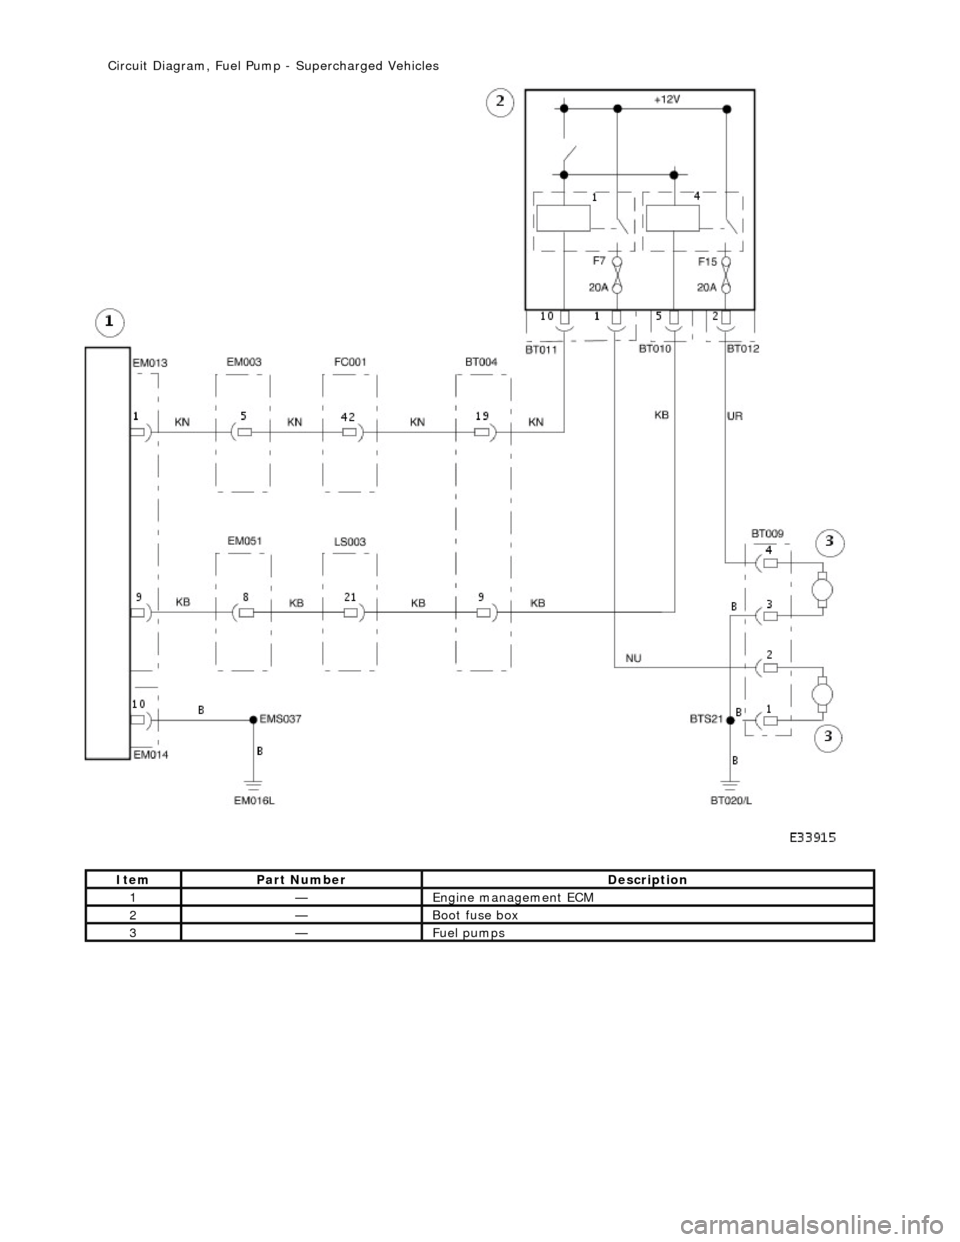
It
em
Par
t Number
De
scription
1—Engine
management ECM
2—Boot fuse box
3—Fue
l pumps
Ci
rcuit Diagram, Fuel Pump
- Supercharged Vehicles
Page 1699 of 2490
Conne
ct the scan tool
1
Have the DTC(s) and fr
eeze
frame data been recorded?
Yes GO to A2
A2
: CHECK FUSE
•
NOTE: See further steps for poss
ible cause of fuse failure.
Chec
k fuse F7 integrity (located in the trunk).
1
OK
?
Yes GO to A3
No Renew fuse and test the syst em for normal operation.
A3:
CHECK SHORT TO SUPPLY
Page 1709 of 2490
Wi
th BT009 disconnected an
d relay 4 removed, measure
the resistance between BT009/002 and relay socket pin
5.
1
I
s the resistance < 0.5 OHM?
Yes GO to A13
No Inspect harness / connector BT 009, fuse holder F7 and
BT011/001 for corrosion, damage, bent or pushed back
pins. Repair as required and test the system for normal
operation.
A13: CHECK HARNESS SHO
RT TO GROUND
Page 1713 of 2490
Conne
ct the scan tool
1
Have the DTC(s) and fr
eeze
frame data been recorded?
Yes GO to B2
B2
: CHECK FUSE
•
NOTE: See further steps for poss
ible cause of fuse failure.
Chec
k fuse 15 integrity (located in the trunk)
1
OK
?
Yes GO to B3
No Renew fuse and test the syst em for normal operation.
B3:
CHECK SHORT TO SUPPLY


