pedal JAGUAR X308 1998 2.G Repair Manual
[x] Cancel search | Manufacturer: JAGUAR, Model Year: 1998, Model line: X308, Model: JAGUAR X308 1998 2.GPages: 2490, PDF Size: 69.81 MB
Page 422 of 2490
Power Brake Actuation - Brake Booster
Description and Operation
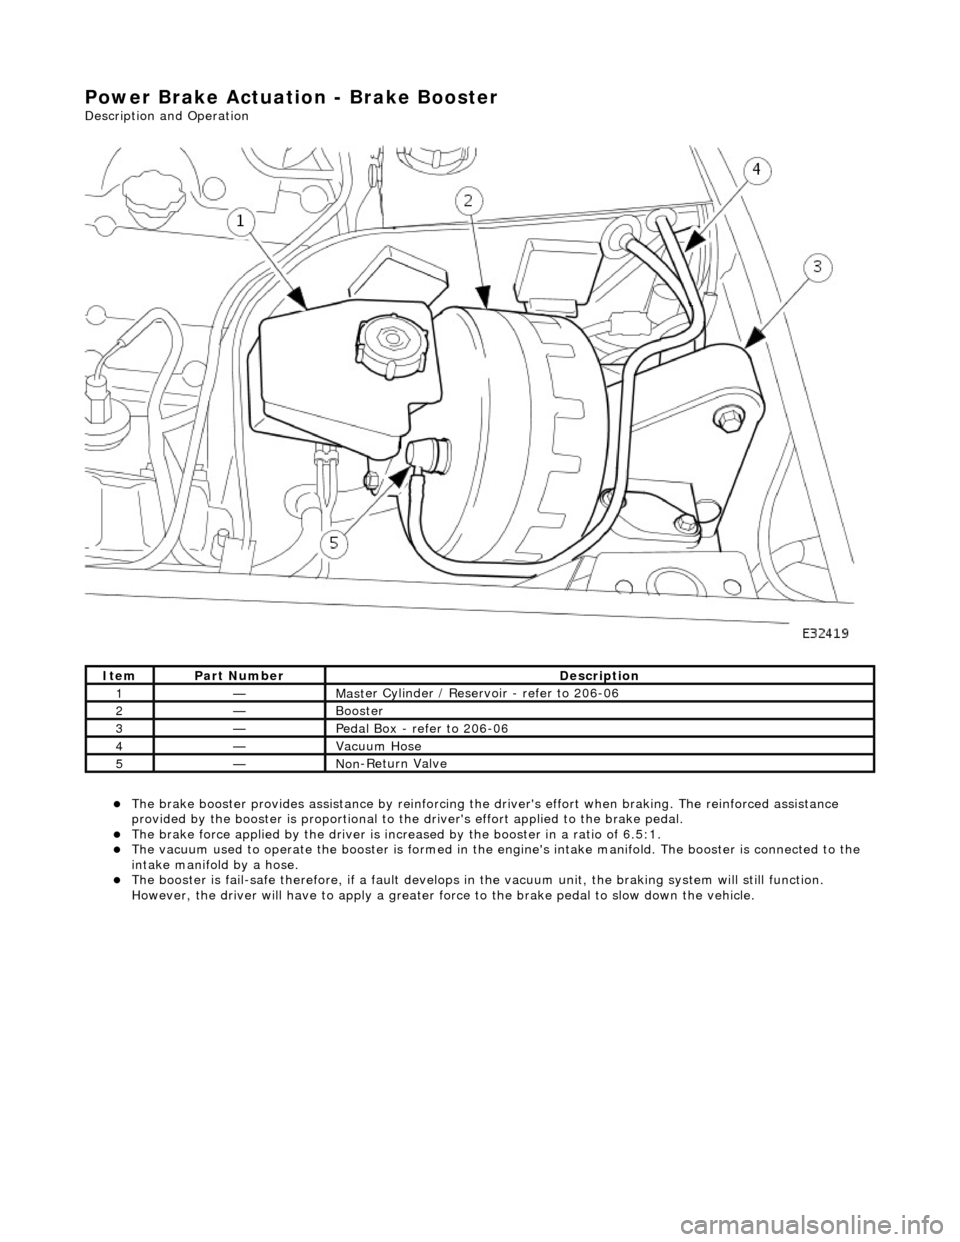
The brake b
ooster provides assi
stance by reinforcing the driver's effort when brakin g. The reinforced assistance
provided by the booster is proportional to the driver's effort applied to the brake pedal.
The brake force applied by
the driver is incr
eased by the booster in a ratio of 6.5:1.
Th
e vacuum used to operate the booster
is formed in the engine's intake manifold. The booster is connected to the
intake manifold by a hose.
The boost
er is fail-safe therefore, if a fault develops in
the vacuum unit, the braking system will still function.
However, the driver will have to apply a greater fo rce to the brake pedal to slow down the vehicle.
It e
m
Par
t
Number
De
scr
iption
1—Mas
t
er Cylinder / Reservoir - refer to 206-06
2—Booster
3—Pedal Box
- refer to 206-06
4—Vacuu
m
Hose
5—No
n
-Return Valve
Page 423 of 2490
Power Brake Actuatio
n - Brake Booster
Re
moval and Installation
Remov
al
• C
AUTIONS:
Replacement of nuts and bolts: Various thread-locking de vices are used on nuts and bolts throughout the vehicle.
These devices restrict the number of times a nut or bolt can be used. See section 100-00 for information.
Remove brake fluid spilla ge immediately from paint work, with clean water.
I
nstallation
1.
Position vehi
cle on a four-post lift.
2. Open engine compartment and fit paint work protection covers
to fenders.
3. Disconnect battery ground cable (IMPORTANT, see operation
86.15.19 for further information).
4. Remove engine compartment rear cover. Refer to operation
76.11.35.
5. Remove pedal housing, brake booster and master cylinder
assembly. Refer to operation 70.35.39.
6. Remove brake booster and master cylinder assembly. Refer to
operation 70.50.18.
7. R
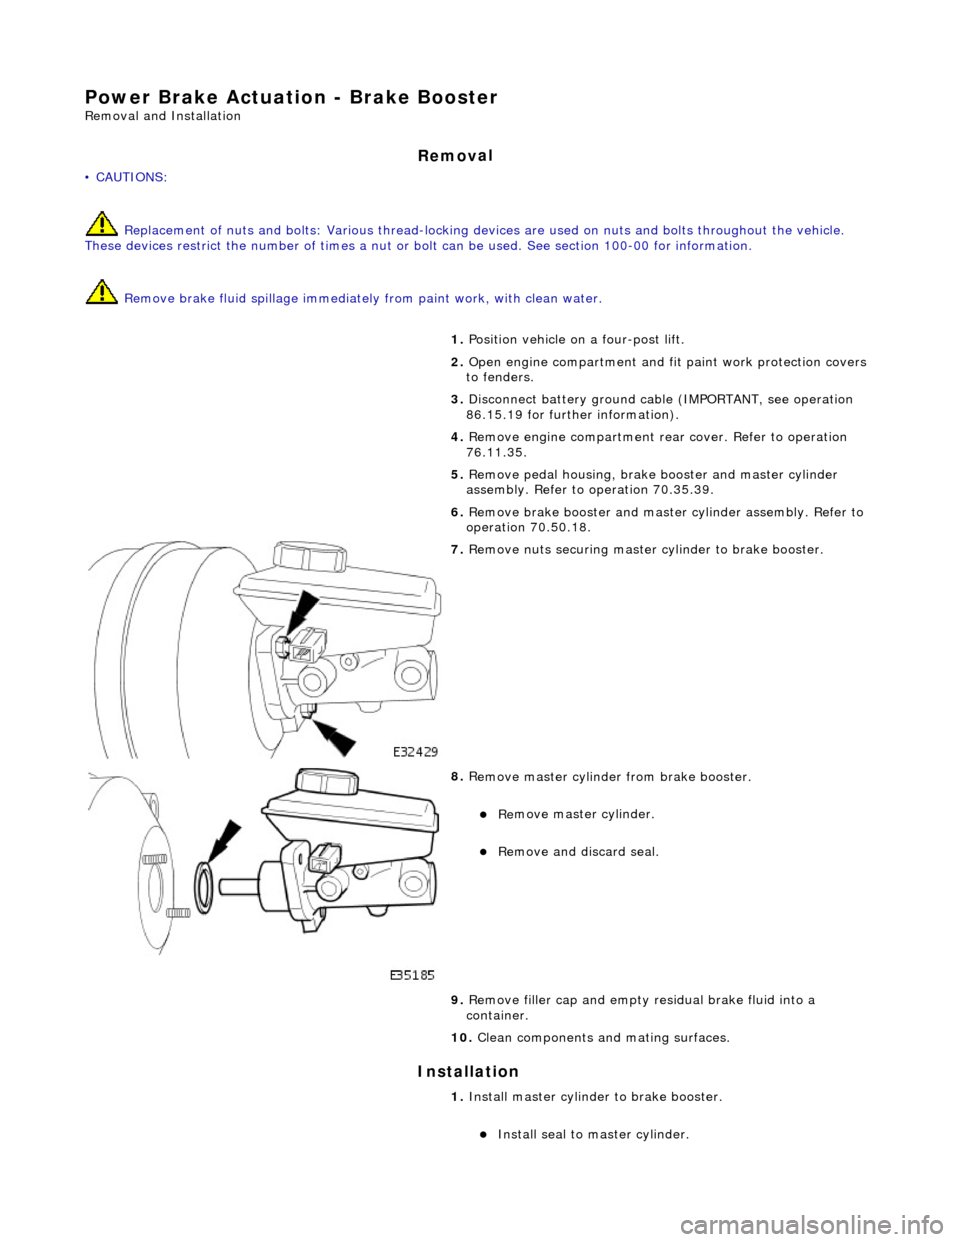
emove nuts securing master cylinder to brake booster.
8. R
emove master cylinder from brake booster.
Re
move master cylinder.
Remove an
d discard seal.
9. Remove filler cap and empty residual brake fluid into a
container.
10. Clean components and mating surfaces.
1. Install master cylinder to brake booster.
Inst
all seal to master cylinder.
Page 424 of 2490
Instal
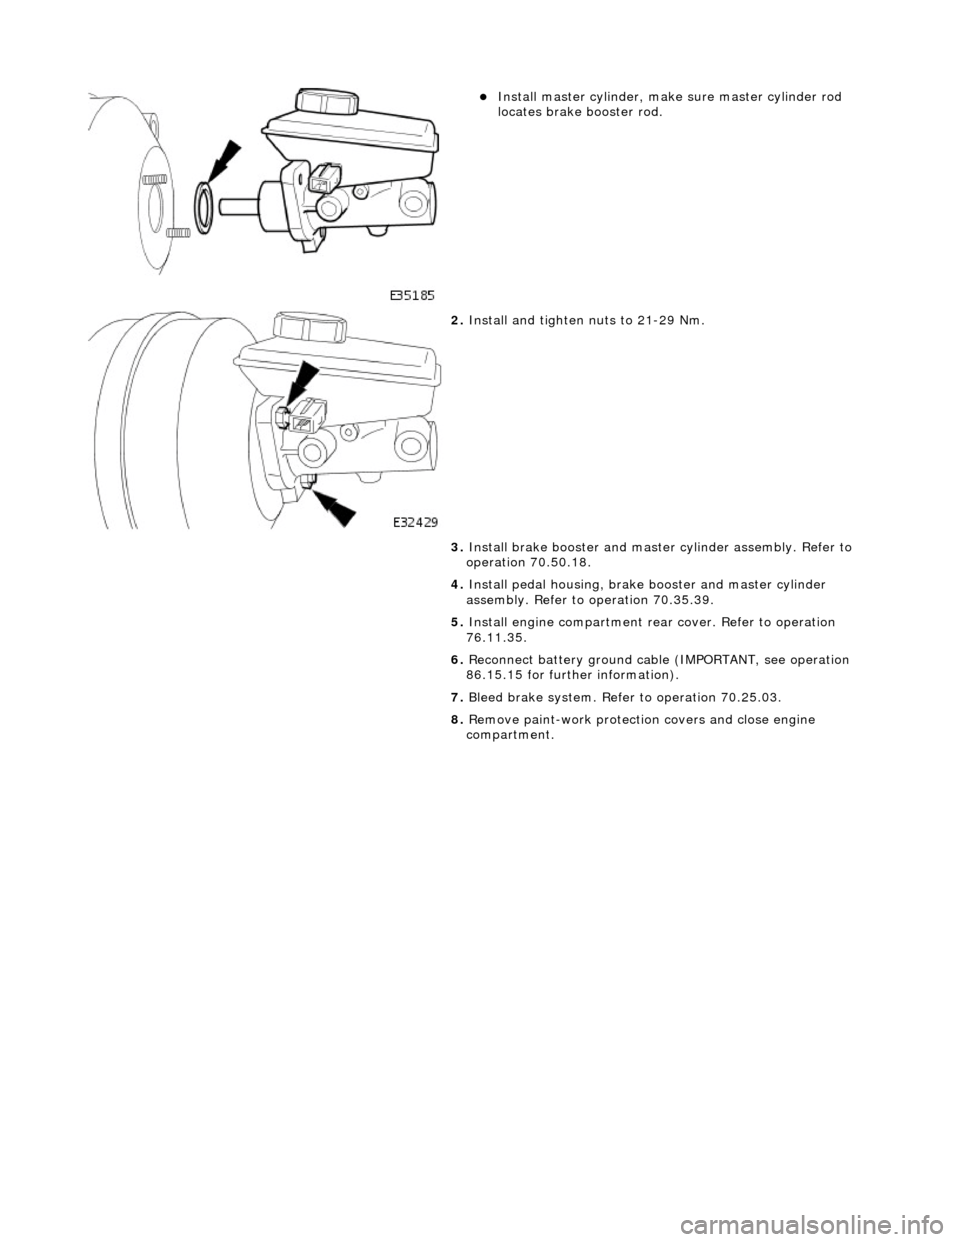
l master cylinder, make sure master cylinder rod
locates brake booster rod.
2. Inst al
l and tighten nuts to 21-29 Nm.
3. Install brake booster and master cylinder assembly. Refer to
operation 70.50.18.
4. Install pedal housing, brake booster and master cylinder
assembly. Refer to operation 70.35.39.
5. Install engine compartment rear cover. Refer to operation
76.11.35.
6. Reconnect battery ground cable (IMPORTANT, see operation
86.15.15 for further information).
7. Bleed brake system. Refer to operation 70.25.03.
8. Remove paint-work protection covers and close engine
compartment.
Page 425 of 2490
Power Brake Actuatio
n - Brake Boos
ter and Brake Master Cylinder
Re
moval and Installation
Remov
al
• C
AUTIONS:
Replacement of nuts and bolts: Various thread-locking de vices are used on nuts and bolts throughout the vehicle.
These devices restrict the number of times a nut or bolt can be used. See section 100-00 for information.
Remove brake fluid spilla ge immediately from paint work, with clean water.
1. Position vehi
cle on a four-post lift.
2. Move driver's seat fully rearward.
3. Open engine compartment and fit paint work protection covers
to fenders.
4. Disconnect battery ground cable (IMPORTANT, see operation
86.15.19 for further information).
5. Remove engine compartment rear cover. Refer to operation
76.11.35.
6. Remove pedal housing, brake booster and master cylinder
assembly. Refer to operation 70.35.39.
7. Remove reservoir filler cap and po ur residual brake fluid into a
container. Refit cap.
8. R
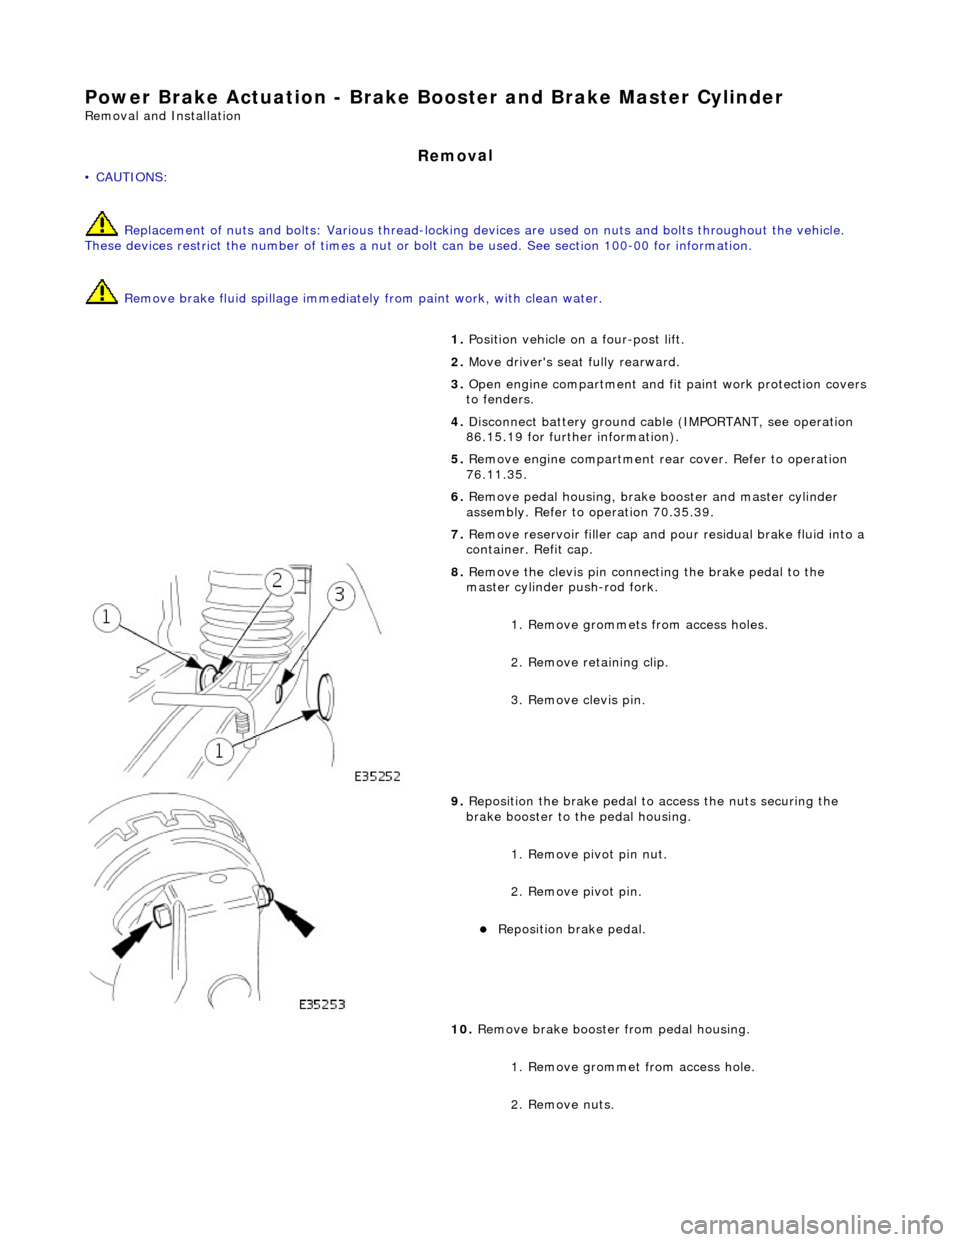
emove the clevis pin connecting the brake pedal to the
master cylinder push-rod fork.
1. Remove grommets from access holes.
2. Remove retaining clip.
3. Remove clevis pin.
9. Re
position the brake pedal to access the nuts securing the
brake booster to the pedal housing.
1. Remove pivot pin nut.
2. Remove pivot pin.
Reposition brake pedal.
10
.
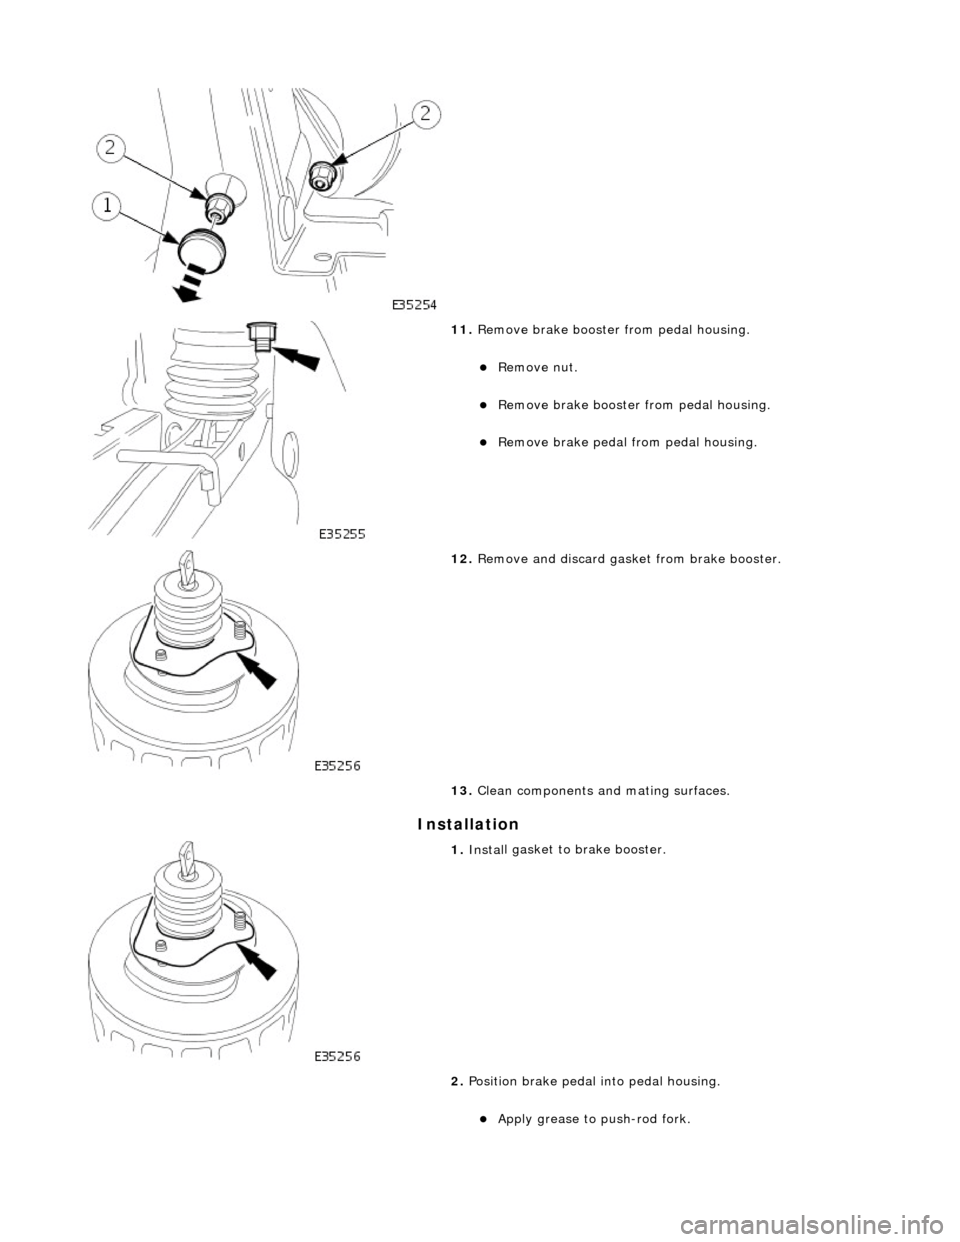
Remove brake booster from pedal housing.
1. Remove grommet from access hole.
2. Remove nuts.
Page 426 of 2490
In
stallation
11.
Remove brake
booster
from pedal housing.
Remo
ve nut.
Remove brake
booster
from pedal housing.
Remove brake
pedal
from pedal housing.
12 . Remove an
d discard gask
et from brake booster.
13. Clean components and mating surfaces.
1. Inst al
l gasket to brake booster.
2. Position brake pedal into pedal housing.
Apply grease to
push-rod fork.
Page 427 of 2490
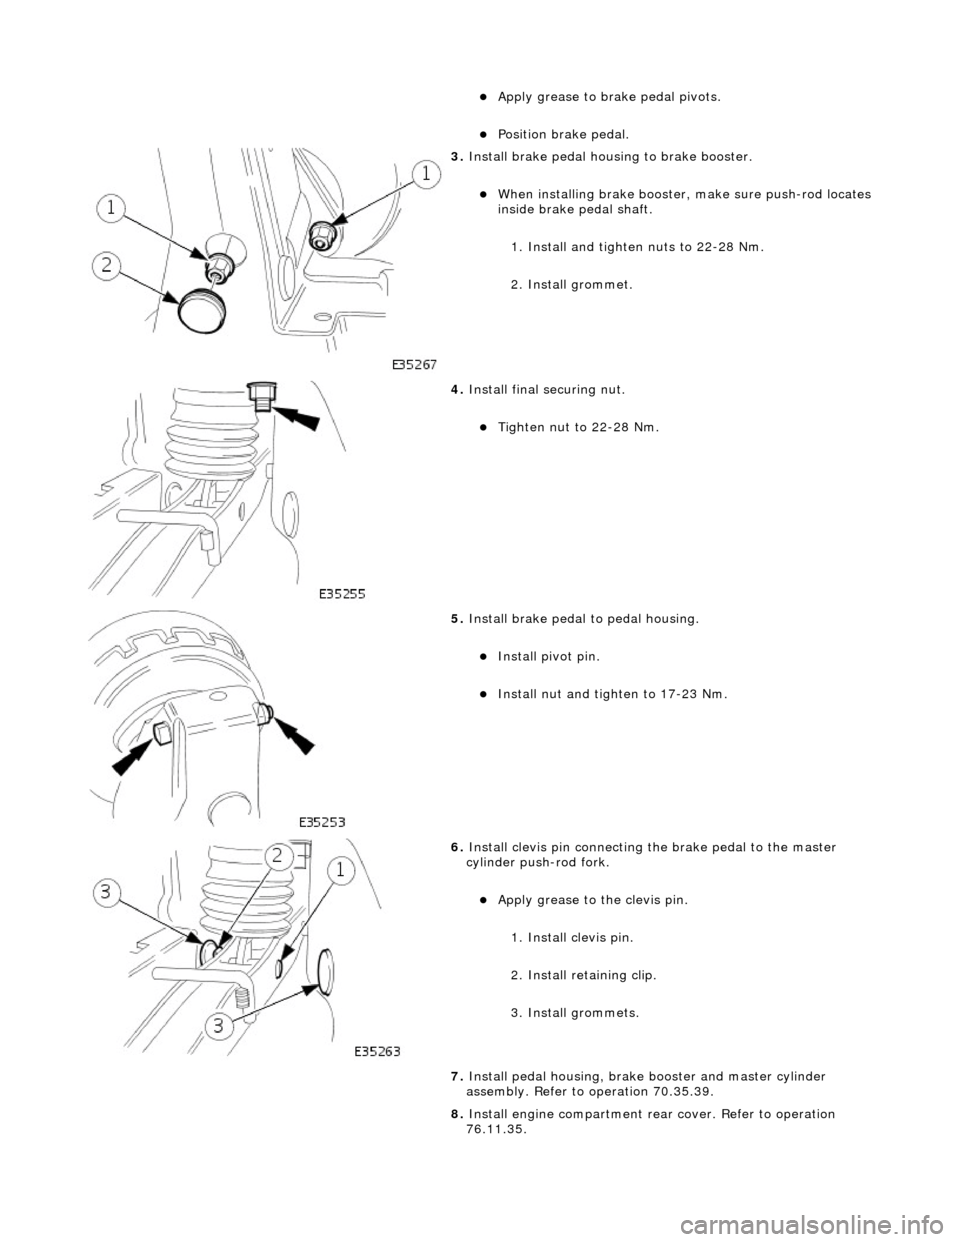
Apply grease to
brake pedal pivots.
Position brake pedal.
3. Install brake pedal hou
s
ing to brake booster.
Wh
en installing brake booster,
make sure push-rod locates
inside brake pedal shaft.
1. Install and tighten nuts to 22-28 Nm.
2. Install grommet.
4. Install
final securing nut.
Tigh
ten nut to 22-28 Nm.
5. Install brake pedal to pedal h
ousing.
Install piv
ot pin.
Install nu
t and tighten to 17-23 Nm.
6. Inst
all clevis pin connecting
the brake pedal to the master
cylinder push-rod fork.
Apply grease to
the clevis pin.
1. Install clevis pin.
2. Install retaining clip.
3. Install grommets.
7. Install pedal housing, brake booster and master cylinder
assembly. Refer to operation 70.35.39.
8. Install engine compartment rear cover. Refer to operation
76.11.35.
Page 440 of 2490
Anti-Lock Control - Anti-Lock Brake System (ABS) Module
Remo
val and Installation
Remov
a
l
• C
A
UTIONS:
Replacement of nuts and bolts: Various thread-locking de vices are used on nuts and bolts throughout the vehicle.
These devices restrict the number of times a nut or bolt can be used. See section 100-00 for information.
Remove brake fluid spilla ge immediately from paint work, with clean water.
Sp
ecial Tool(s)
Brake Pedal
H
old Tool
JDS 9013
1. Disc onne
ct battery ground cable (IMPORTANT, see operation
86.15.19 for further information).
2. Position vehicle on a four-post lift.
3. Open engine compartment and fit paint work protection covers
to fenders.
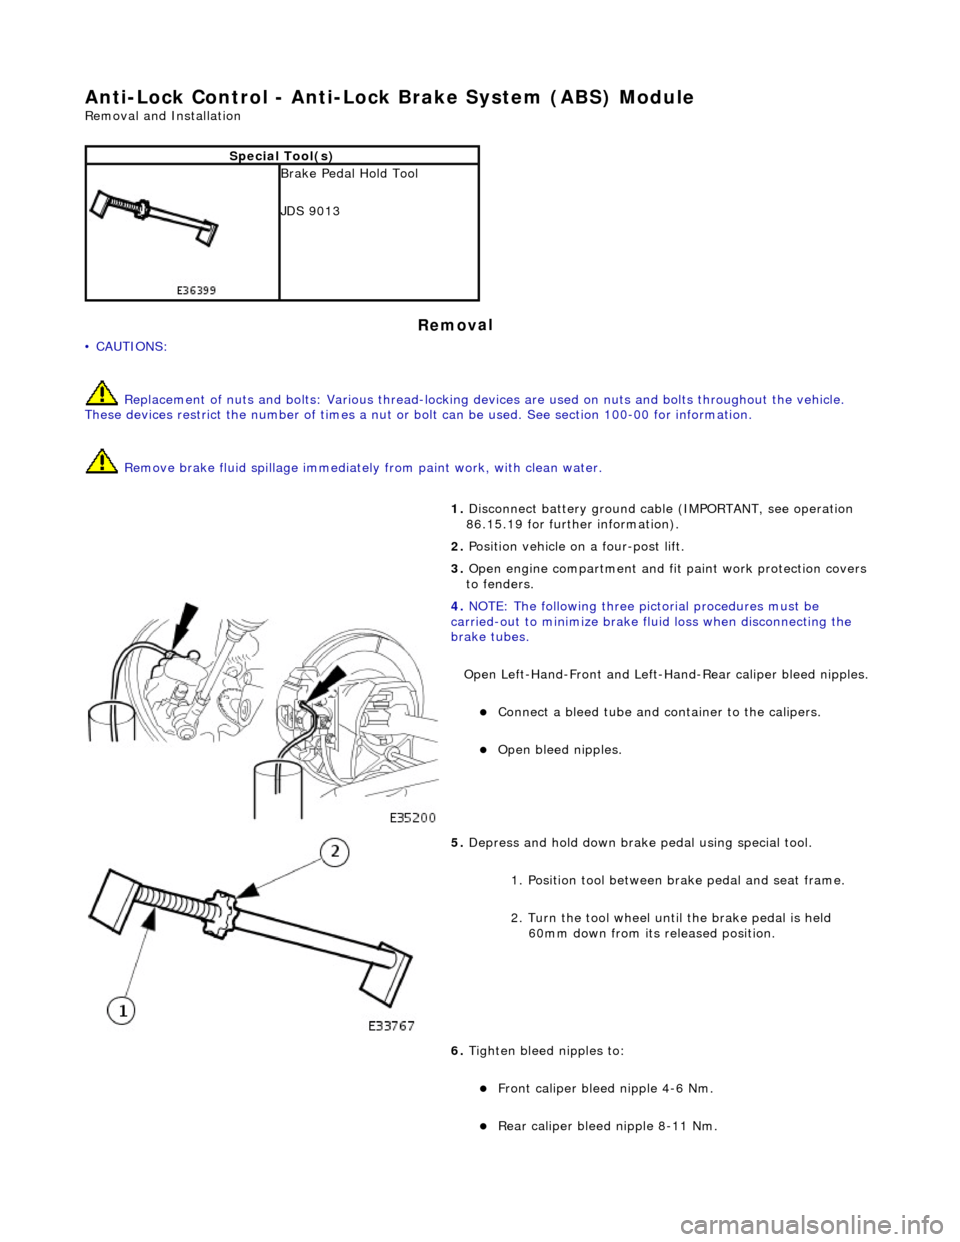
4. NOTE : Th
e following three pictorial procedures must be
carried-out to minimize brake fl uid loss when disconnecting the
brake tubes.
Open Left-Hand-Front and Left-H and-Rear caliper bleed nipples.
Connect a
bleed tube and co
ntainer to the calipers.
Op
en bleed nipples.
5. Depress and hold down brake pedal u s
ing special tool.
1. Position tool between brake pedal and seat frame.
2. Turn the tool wheel unti l the brake pedal is held
60mm down from its released position.
6. Tighten bleed nipples to:
Front caliper blee d nipple 4-6 Nm.
Rear
caliper bleed nip
ple 8-11 Nm.
Page 443 of 2490
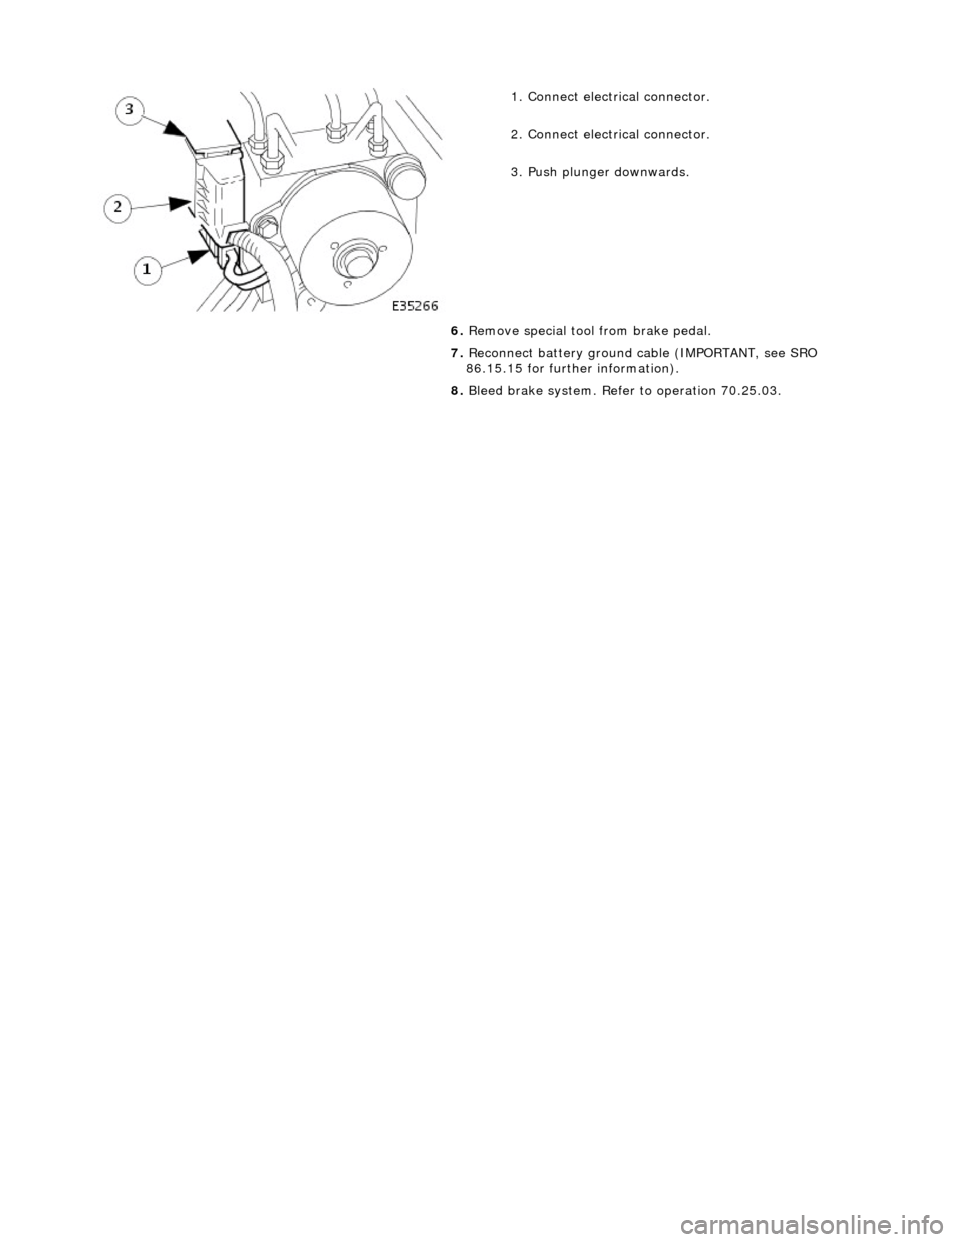
1.
Connect electrical connector.
2. Connect electrical connector.
3. Push plunger downwards.
6. Remove special tool from brake pedal.
7. Reconnect battery ground cable (IMPORTANT, see SRO
86.15.15 for further information).
8. Bleed brake system. Refer to operation 70.25.03.
Page 445 of 2490
Anti-Lock Control - Hydraulic Contro
l Unit (HCU)
Re
moval and Installation
Remov
al
• C
AUTIONS:
Replacement of nuts and bolts: Various thread-locking de vices are used on nuts and bolts throughout the vehicle.
These devices restrict the number of times a nut or bolt can be used. See section 100-00 for information.
Remove brake fluid spilla ge immediately from paint work, with clean water.
S
pecial Tool(s)
Brake Pedal
Hold Tool
JDS 9013
1. Disc
onnect battery ground cable (IMPORTANT, see operation
86.15.19 for further information).
2. Position vehicle on a four-post lift.
3. Open engine compartment and fit paint work protection covers
to fenders.
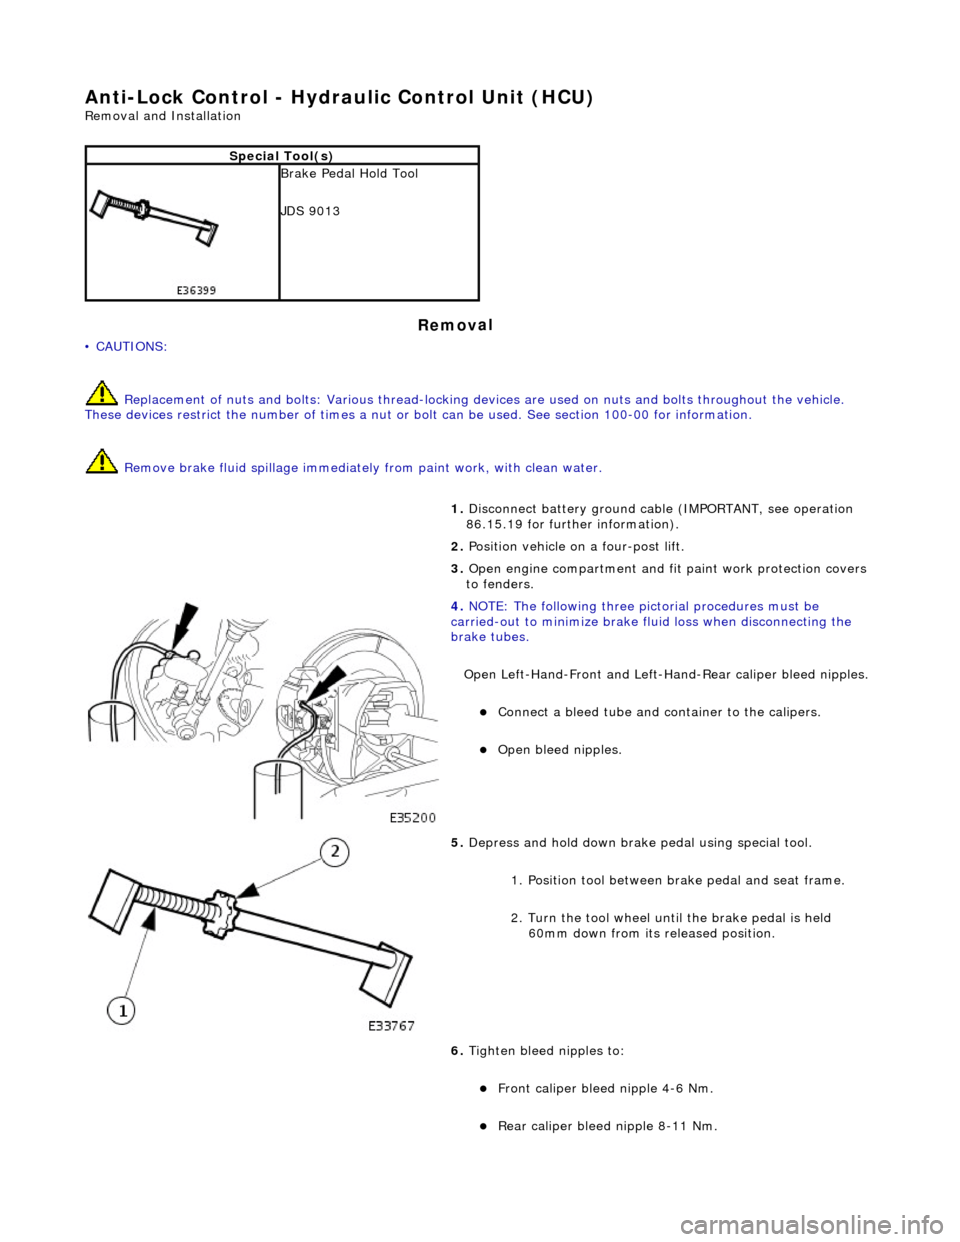
4. NOTE
: The following three pictorial procedures must be
carried-out to minimize brake fl uid loss when disconnecting the
brake tubes.
Open Left-Hand-Front and Left-H and-Rear caliper bleed nipples.
Connect
a bleed tube and co
ntainer to the calipers.
O
pen bleed nipples.
5. Depress and hold down brake pedal u
sing special tool.
1. Position tool between brake pedal and seat frame.
2. Turn the tool wheel unti l the brake pedal is held
60mm down from its released position.
6. Tighten bleed nipples to:
Front caliper blee d nipple 4-6
Nm.
Rear
caliper bleed nipple 8-11 Nm.
Page 448 of 2490
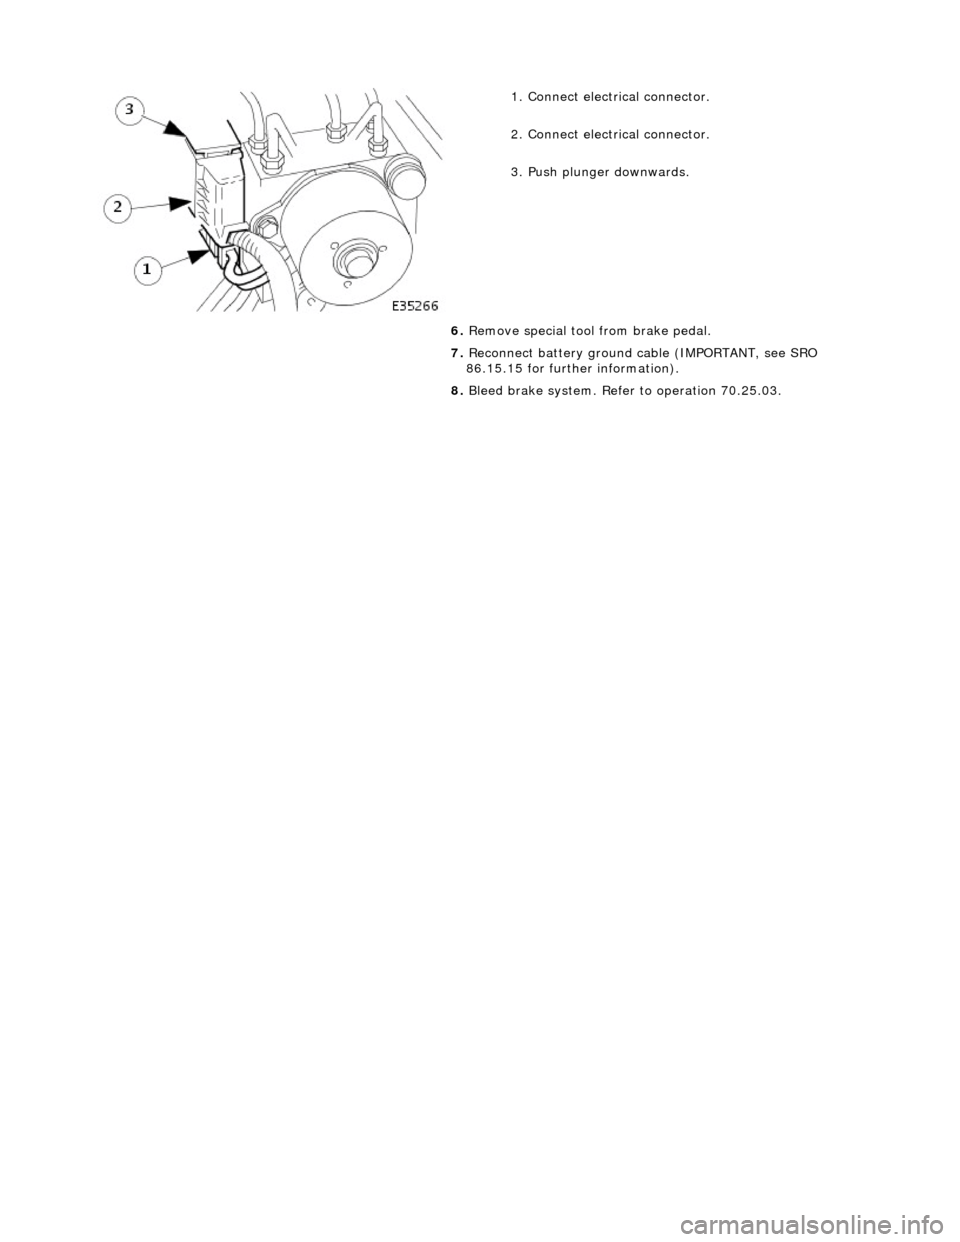
1. Conne
ct electrical connector.
2. Connect electrical connector.
3. Push plunger downwards.
6. Remove special tool from brake pedal.
7. Reconnect battery ground cable (IMPORTANT, see SRO
86.15.15 for further information).
8. Bleed brake system. Refer to operation 70.25.03.