veneer JAGUAR X308 1998 2.G Repair Manual
[x] Cancel search | Manufacturer: JAGUAR, Model Year: 1998, Model line: X308, Model: JAGUAR X308 1998 2.GPages: 2490, PDF Size: 69.81 MB
Page 2297 of 2490

Handles, Locks, Latches and Entry Systems - Exterior Passenger Door
Handle
Removal and Installation
Removal
1. Remove battery cover and disconnect ground cable from
battery terminal. Refer to 86.15.19.
2. Remove door casing veneer panel. Refer to 76.47.11.
3. Remove door casing for access. Refer to 76.34.01.
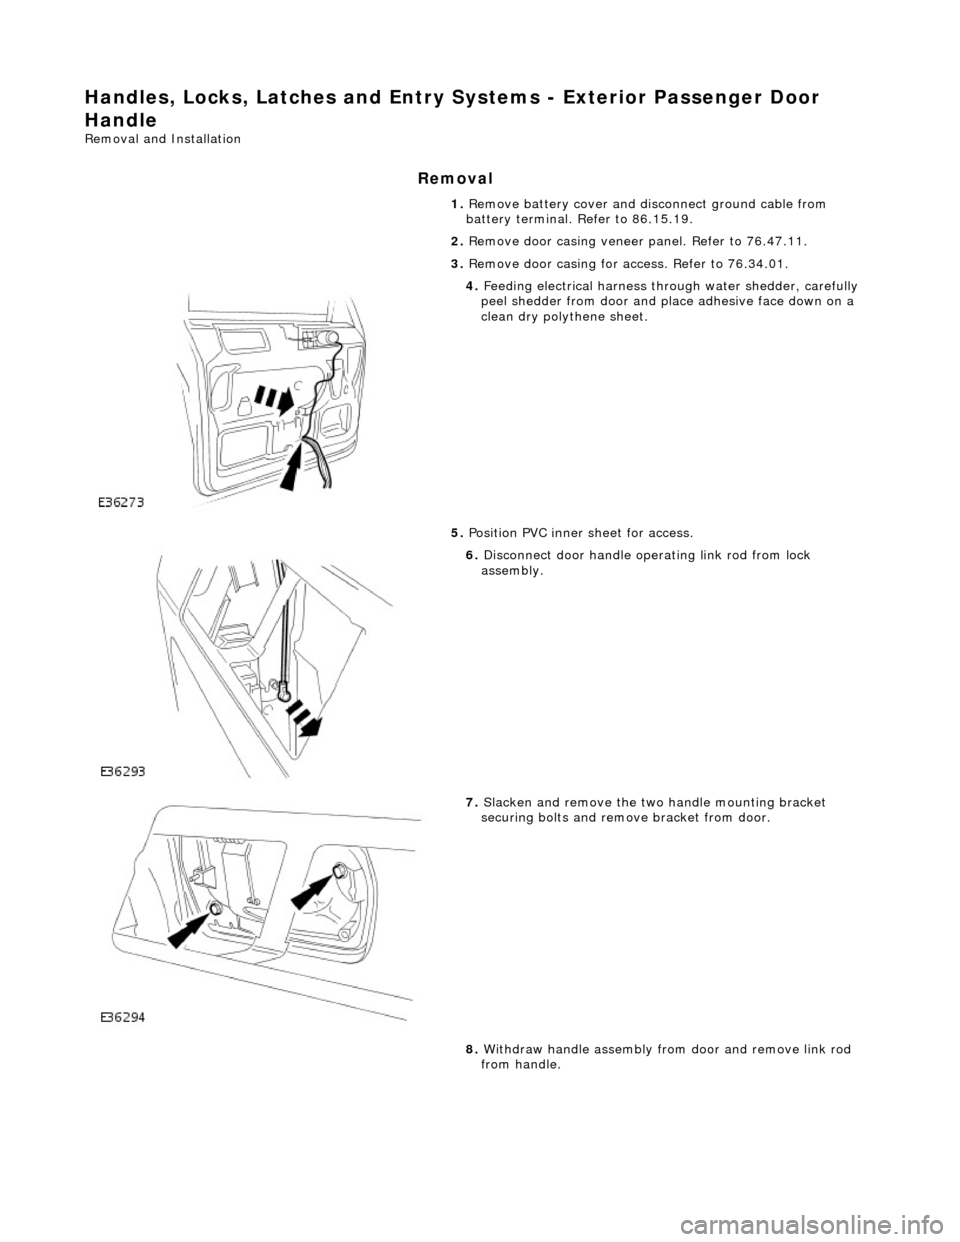
4. Feeding electrical harness thro ugh water shedder, carefully
peel shedder from door and pl ace adhesive face down on a
clean dry polythene sheet.
5. Position PVC inner sheet for access.
6. Disconnect door handle operating link rod from lock
assembly.
7. Slacken and remove the two handle mounting bracket
securing bolts and remove bracket from door.
8. Withdraw handle assembly from door and remove link rod
from handle.
Page 2298 of 2490

Installation
1. Fit link rod to door handle.
2. Position handle assembly on door.
3. Position mounting bracket on insi de of door and connect lock
link rod.
4. Fit and tighten mounting bracket securing bolts.
5. Reposition PVC inner sheet in door.
6. Check for satisfactory door handle operation.
7. Connect ground cable to battery terminal. Refer to 86.15.15.
8. Check for satisfactory operation of locking system.
9. Disconnect ground cable from battery terminal. Refer to
86.15.15.
10. Ensure that water shedder contact area of door is clean and
dry.
11. Position water shedder at door and carefully pass harness
through.
12. Fit and firmly seat water shedder on door ensuring
satisfactory adhesion.
13. Fit door casing. Refer to 76.34.01.
14. Fit door casing veneer panel. Refer to 76.47.11.
15. Fit ground cable to battery term inal and fit cover to battery.
Refer to 86.15.15.
Page 2302 of 2490

Installation
8. Remove lock link rod from door handle assembly.
1. Fit link rod to handle assembly.
2. Position handle assembly on door.
3. Position mounting bracket on insi de of door and connect lock
link rod.
4. Fit and tighten mounting bracket securing bolts.
5. Reposition PVC inner sheet in door.
6. Check for satisfactory door handle operation.
7. Connect ground cable to battery terminal. Refer to 86.15.15.
8. From driver door check for satisfactory operation of locking
system.
9. Disconnect ground cable from battery terminal. Refer to
86.15.15.
10. Ensure that water shedder contact area of door is clean and
dry.
11. Position water shedder at door and carefully pass harness
through.
12. Fit and firmly seat water shedder on door ensuring
satisfactory adhesion.
13. Fit door casing. Refer to 76.34.01.
14. Fit door casing veneer panel. Refer to 76.47.11.
15. Fit ground cable to battery term inal and fit cover to battery.
Refer to 86.15.15.
Page 2303 of 2490

Handles, Locks, Latches and Entry Systems - Rear Door Latch
Removal and Installation
Removal
1. Remove battery cover and disco nnect earth cable from battery
terminal. Refer to 86.15.19.
2. Remove rear door casing veneer panel. Refer to 76.47.12.
3. Remove rear door casing. Refer to 76.34.04.
4. Carefully withdraw water shedder passing harness through it
and remove water shedder from door.
5. Place water shedder adhesive face down on clean dry plastic
sheet.
6. Release door lock actuator ha rness multiplug from mounting
bracket and disconnect multiplug.
7. Position PVC inner sheet for access and disconnect door
outer handle operating ro d from lock mechanism.
8. Disconnect inner door lock operating rod from lock
mechanism and remove rod assembly.
Page 2305 of 2490

1.
Position lock mechanism at door and connect operating cable.
2. Fit and fully seat cable rear abutment securing clip.
3. Fit and fully seat lock mechanism in door and fit and tighten
securing bolts.
4. Align glass guide and fit and tighten securing bolts.
5. Fit and fully seat inner cheater finisher.
6. Align and connect inner operating rod to lock mechanism.
7. Fit outer door handle operating rod to lock
8. Check for satisfactory door handle operation.
9. Reposition inner plastic sheet.
10. Connect lock actuator harness multiplug and fit to mounting
bracket.
11. Connect ground cable to battery terminal. Refer to 86.15.15.
12. From driver door, check for satisfactory operation of locking
system.
13. Disconnect ground cable from battery terminal. Refer to
86.15.19.
14. Ensure that water shedder contact area of door is clean and
dry.
15. Position water shedder at d oor and carefully pass door
harness through.
16. Fit and firmly seat water shedde r on door ensuring satifactory
adhesion.
17. Fit door casing. Refer to 76.34.04.
18. Fit door casing veneer panel. Refer to 76.47.12.
19. Connect ground cable to battery terminal and fit battery
cover. Refer to 86.15.15.
Page 2371 of 2490

Supplemental Restraint System - Air Bag Control Module
Removal and Installation
Removal
Installation
1.
WARNING: FOLLOWING DISCONNECTION OF THE
BATTERY, A PERIOD OF AT LEAST ONE MINUTE MUST BE
ALLOWED TO ELAPSE BEFORE ANY WORK IS CARRIED OUT ON
AN AIR BAG SYSTEM COMPONENT.
Remove battery cover and disc onnect ground cable from
battery terminal. Refer to 86.15.19.
2. Remove 'J' gate surroun d. Refer to 76.25.24.
3. Remove centre console veneer panel. Refer to 76.47.26.
4. Remove radio. Re fer to 86.50.03.
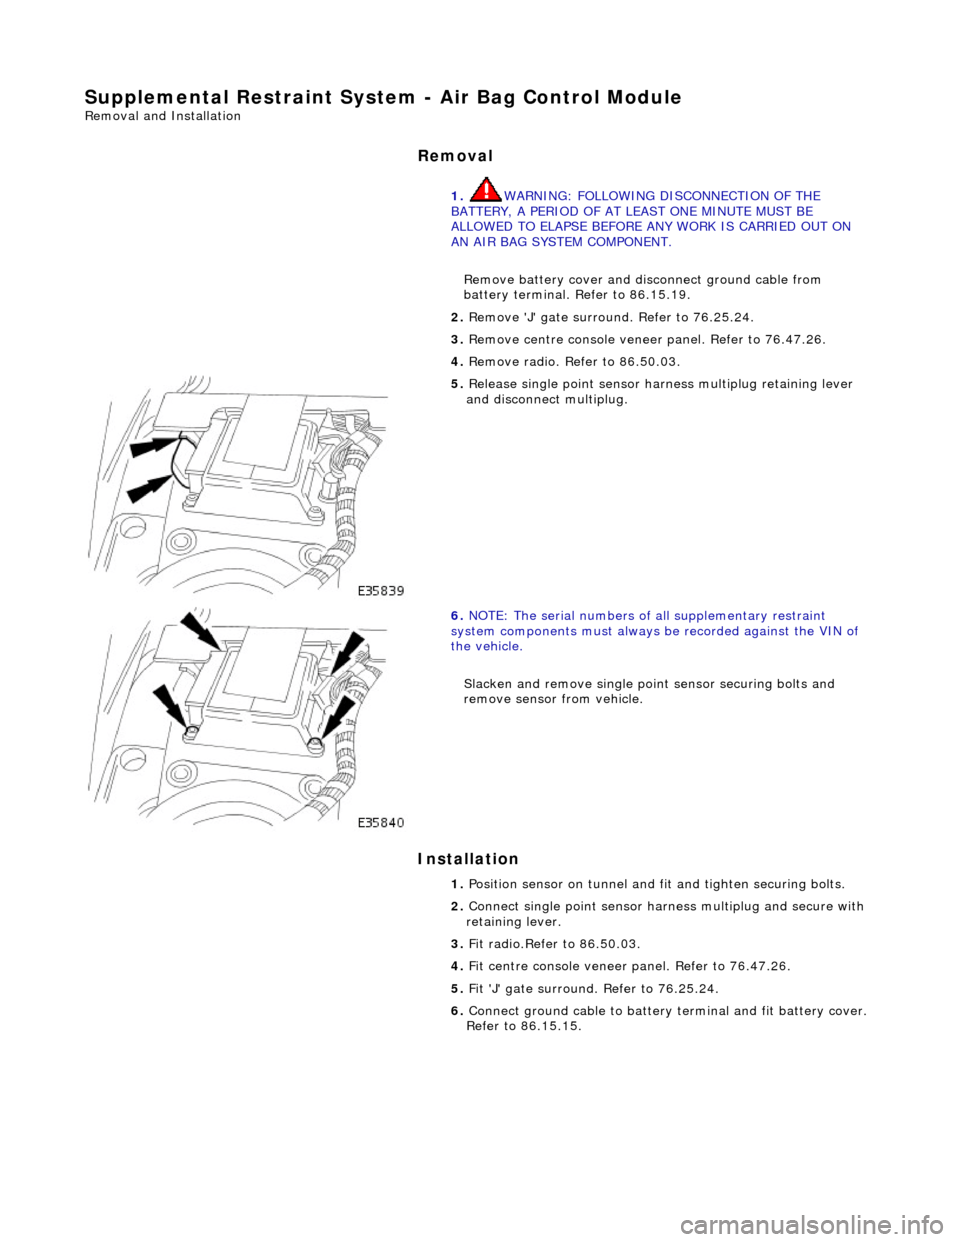
5. Release single point sensor ha rness multiplug retaining lever
and disconnect multiplug.
6. NOTE: The serial num bers of all supplementary restraint
system components must always be recorded against the VIN of
the vehicle.
Slacken and remove single point sensor securing bolts and
remove sensor from vehicle.
1. Position sensor on tunnel and fit and tighten securing bolts.
2. Connect single point sensor harn ess multiplug and secure with
retaining lever.
3. Fit radio.Refer to 86.50.03.
4. Fit centre console veneer panel. Refer to 76.47.26.
5. Fit 'J' gate surround. Refer to 76.25.24.
6. Connect ground cable to battery terminal and fit battery cover.
Refer to 86.15.15.