partic JAGUAR X308 1998 2.G Workshop Manual
[x] Cancel search | Manufacturer: JAGUAR, Model Year: 1998, Model line: X308, Model: JAGUAR X308 1998 2.GPages: 2490, PDF Size: 69.81 MB
Page 36 of 2490
Gener
al specifications (including setting-up information, capacities, lubricants, fluids, sealants and adhesives).
To
r
que specifications.
Description and Operation
A g
eneral illustration and part
s list to identify the components which comp rise a particular system or assembly.
A b
rief description of the system operating characteristics or description of the assembly.
A d
escription of each component and its function.
Diagnosis and Testing
D e
scriptions of how to iden
tify system problems.
Inspection and verifi
cation information.
S
y
mptom charts comprising fault conditions, possible sources and actions.
General Procedures
G e
neral maintenance procedures, including adjustment, alig
nment, bleeding and filling, with illustrated steps and
supporting text.
Tigh te
ning torque specifications, shown in the illustrations.
Removal and Installation
Com p
onent removal and installation maintenance proced
ures, with illustrated steps and supporting text.
Tighte
ning torque specifications, shown in the illustrations.
An i
llustrated tool
chart for each proced
ure requiring the use of special tools.
Disassembly and Assembly
Compon ent disassembly and
assembly
maintenance procedures, with illust rated steps and supporting text.
Tighte
ning torque specifications, shown in the illustrations.
An i
llustrated tool
chart for each proced
ure requiring the use of special tools.
Repairs and Replacem
ents
Wh
en s
ervice parts are required, it is essential that only genuine Jaguar/Daimler replacements are used.
Attention is drawn to the following points concerning repa irs and the fitting of replacement parts and accessories:
Safety feat
ures embodied in the vehicle
may be impaired if other than genuine parts are fitted. In certain territories,
legislation prohibits the fitting of pa rts which are not produced to the vehi cle manufacturer's specification.
Torque wrench setting figures given i
n this manual must be strictly adhered to. Locking devices, where specified,
must be fitted. If the efficiency of a locking device is impaired during removal it must be renewed.
O w
ners purchasing accessories
while travelling abroad should ensure that the accessory and its fitted location on the
vehicle conform to mandatory requirements existing in their country of origin.
The vehicle warranty may be invali
dated by the fitting
of other than genuine Ja guar/Daimler parts. All
Jaguar/Daimler replacements have the fu ll backing of the factory warranty.
Jaguar/Daimler dealers are obliged to
supply only genuine service parts.
Thread Locking Devices
P a
tched Fasteners
Two types
of
patched fastener are essentially used on certai
n suspension, steering and other critical components, where
operational movement of the component necessitates positive thread locking. Standard patched fasteners have part
numbers bearing the suffix le tter M. For identification of special patched fa steners, refer to the list of patched fasteners
below, or the relevant component drawings.
Jaguar Specification JFS 02.01.02 patched fasteners incorporate a micro-encapsulated adhesive which is released into the
mating threads during tightening. Following final tightening, the adhesive in this type of patched fastener must be allowed a
period to cure before the component/vehicle is used. On removal, this type of fastener must be discarded and a new
Page 37 of 2490
patc
hed fastener of the same specification fitted. All mating th
reads must be thoroughly cleaned prior to fitting of the new
fastener.
Jaguar Specification JFS 02.01.04 patched fasteners incorporat e a plastic/polyester on the thread. Acting as a wedge
between the mating threads, this compound imposes a prevaili ng torque during tightening. Whilst this type of patched
fastener can be re-used, the imposed torq ue diminishes. It is therefore recommended that following third removal, this type
of patched fastener is discarded and a new fast ener of the same specification is fitted.
Special fasteners bearing the following pa rt numbers are of the micro-encapsulated adhesive type and following removal,
must be discarded and replaced by ne w items of the same specification:
CAC 8223
JZB 10060; JZB 10061; JZB 10078.
JZH 100027.
JZS 100082; JZS100087; JZS 100088; JZS 100089; JZS 100090; JZS 100118; JZS 100157; JZS 100164; JZS 100166.
NCA 1451 AA.
Vehicle Specifications
Purchasers are advised th
at th
e specification details set out in this manual apply to a range of vehicles and not to any
specific one. For the specificatio n of a particular vehicle, purchasers should consult their dealer.
The Manufacturer reserves the right to vary the specifications, with or without notice, and at such times and in such manner
as the Manufacturer thinks fit. Major as well as minor changes may be involved , in accordance with the Manufacturer's
policy of continuous improvement.
Whilst every effort is made to ensure the accuracy of the pa rticulars contained in this manual, neither the Manufacturer nor
the Dealer, by whom the manual is supplied, shall in any circumstances be held liable for any inaccuracy or the
consequences thereof.
Serv
ice Repair Operation Numbering
A
master index of numbered operations has been compiled for
universal application to all vehicles manufactured by Jaguar
Cars Ltd.
Each operation is allocated a number from the master index and cross-refers with an identical number in the Repair
Operation Times schedule. The number consists of six digits arranged in three pairs.
Each maintenance procedure in this manual is described in the sequence necessary to complete the operation in the
minimum time, as specified in the Repair Operation Times schedule for this range of vehicles.
Re
ferences to Left- and Right-Hand
R
eferences to the left- or
right-hand side of the vehicle are made as if viewing from the driver's seat.
Ref
erences to Engine Banks
Wi
th the engine installed in the vehicle, the right-hand cylinder
bank is designated Bank A, and the left-hand cylinder bank
is designated Bank B.
Specia
l Tools
Any special too
ls and equipment required
to perform a maintenance procedure, are shown at the beginning of each
maintenance procedure.
Page 38 of 2490
Torque Specifications
Torque sp
ecifications are shown in maintenance procedure illustra
tions and also in the torque specifications chart located at
the front of the relevant section.
Disconnecting/Connecting the Battery
Ow ing t
o the electronic components used on the vehicle, it is important that the battery is disconnected when specified in a
maintenance procedure.
When the battery is connected, the specified procedure must be followed, to ensure the correct operation of all vehicle
systems; refer to Section 414-01.
Use of Control Modules
Control modu les may
only be used on the ve
hicle to which they were originally fitted. Do not attempt to use or test a control
module on any other vehicle.
Function
al Test
On
completion of a maintenance procedure, a thorough test should be carried out, to ensu
re that the relevant vehicle
systems are working correctly.
Protecting the Vehicle
Al ways
fit covers to protect
the fenders before commencing work in the engi ne compartment. Cover the seats and carpets,
wear clean overalls and wash hands or wear gloves before working inside the vehicle. Avoid spilling hydraulic fluid,
antifreeze or battery acid on the paintwork. In the event of spillage, wash off with water imme diately. Use polythene sheets
in the trunk to protect carpets. Always use the recommended service tool, or a satisfactory equivalent, where specified.
Protect temporarily exposed screw thread s by replacing nuts or fitting caps.
Preparation
Before disassembly, clean the surrounding ar ea
as thoroughly as possible. When co
mponents have been removed, blank off
any exposed openings using grease-proof paper and masking tape. Immediately seal fuel, oil and hydraulic lines when
separated, using plastic caps or plugs, to prevent loss of fluid and the entry of dirt. Close the open ends of oilways, exposed
by component removal, with tapered hardw ood plugs or readily visible plastic plugs. Immediately a component is removed,
place it in a suitable container; use a se parate container for each component and its associated pa rts. Before dismantling a
component, clean it thoroughly with a recommended cleaning agent; check that the agent will not damage any of the
materials within the component. Clean the bench and obtain ma rking materials, labels, containers and locking wire before
dismantling a component.
Dismantling
O b
serve scrupulous cleanliness when dismantling components,
particularly when parts of the brake, fuel or hydraulic
systems are being worked on. A particle of dirt or a fragment of cloth could caus e a dangerous malfunction if trapped in
these systems. Clean all tapped holes, crev ices, oilways and fluid passages with compressed air. Do not permit compressed
air to enter an open wound. Always use ey e protection when using compressed air.
Ensure that any O-rings used for sealing are correctly refitted or renewed if disturbed. Mark mating parts to ensure that
they are replaced as dismantled. Whenever possible use markin g materials which avoid the possibilities of causing distortion
or the initiation of cracks, which could occur if a center pu nch or scriber were used. Wire together mating parts where
necessary to prevent accidental interchange (e.g roller bearing components). Tie labels on to all parts to be renewed and to
parts requiring further inspection before being passed fo r reassembly. Place labelled parts and other parts for rebuild in
separate containers. Do not disc ard a part which is due for renewal until it ha s been compared with the new part, to ensure
that the correct part has been obtained.
Page 40 of 2490
irri
tation and dermatitis. In addition, used engine oil contains potentially harmful contaminants which may cause skin
cancer. Washing facilities and adequate means of skin protection should be provided.
Observe these recommendations:
Wear pro t
ective clothing and impe
rvious gloves when necessary.
Do not put oily
rags in pockets. Avoid contaminat
ing clothes, particularly underwear, with oil.
Overal
ls must be cleaned re
gularly; discard oil impregna ted clothing and footwear wh ich cannot be washed or
cleaned.
Fi rst
Aid treatment should be obtained
immediately for open cuts or wounds.
Use barrier
creams, applying before each work period, to en
able easier removal of dirty oil and grease from the skin.
Wa
sh with soap and water to ensure th
at all oil is removed (skin cleaner and a nail brush will help). The use of
preparations containing lanolin will help to replace the natural skin oils which have been removed.
Do
not use petrol, kerosene, gas oil, th
inners or solvents for washing skin.
If
skin disorders develop, obtain medical advice immediately.
Wh
ere prac
ticable, degrease components prior to handling.
W
h
ere there is a risk of fluids coming into contact with th
e eyes, suitable eye protection should be worn - goggles or
face shield. An eye wash facility should be provided.
Ensure that a
dequate ventilation is provided when volatile degreasing agents are being used.
E
n
vironmental Protection
In so
m
e countries it is illegal to pour used oil onto the ground
, down sewers or drains, or into water courses. The burning of
used engine oil in small space heaters or boilers is not reco mmended unless emission control equipment is fitted. Dispose of
used oil through authorized waste disposal contractors, to licensed waste disposal sites or to the waste oil reclamation
trade. If in doubt, contact the Local Authority for advice on disposal facilities.
On-Board Diagnostics (OBD)
Ve
hicles use programmed electronic control systems to prov
ide engine management and emission regulation, automatic
transmission operation and anti -lock braking control. These control systems ha ve an integral On-Board Diagnostics (OBD)
facility for use in conjunction with either Jaguar diagnostic equipment or a scan t ool which is capable of retrieving DTCs,
PIDs and performing active commands.
The OBD information in this manual provid es diagnostic and rectification procedures for emission related electrical and
mechanical systems. The informat ion is intended to facilitate fault diagnosis and the subsequent rectification of vehicles
without recourse to the portab le diagnostic unit (PDU).
OBD related information can be fo und in the following sections:
General Information
Engine M
anagement System
Auto
matic Transmission
Anti-lock Br
aking System
Where appropriate a section comprises the following sub-sections:
Description and Operation
A ge
neral illustration and parts list to help the identi
fication of the particular system or component.
A b
rief description of the system operating characteristics and monitoring procedure
accompanied by a component
illustration.
Addi ti
onal information, where appropriat
e, is provided in the form of component calibrations, characteristics and
cross sectional views.
A localized circui
t diagram is included to provide circuit iden
tification and details of connectors, splices, fuses, wire
gauge and colors. See Circuit Diagrams.
Diagnosis and Testing (dedicated to fault analysis and rectification)
Recommended special tools. Symptom chart; a ch
art contai
ning all relevant Diagnostic Trouble Code s (DTC), their possible causes and an
indication of the appropriate test.
Sp
ecific pinpoint test(s), de
signed so that fault diagnosis can be carr ied out in a logical and efficient manner.
Page 46 of 2490
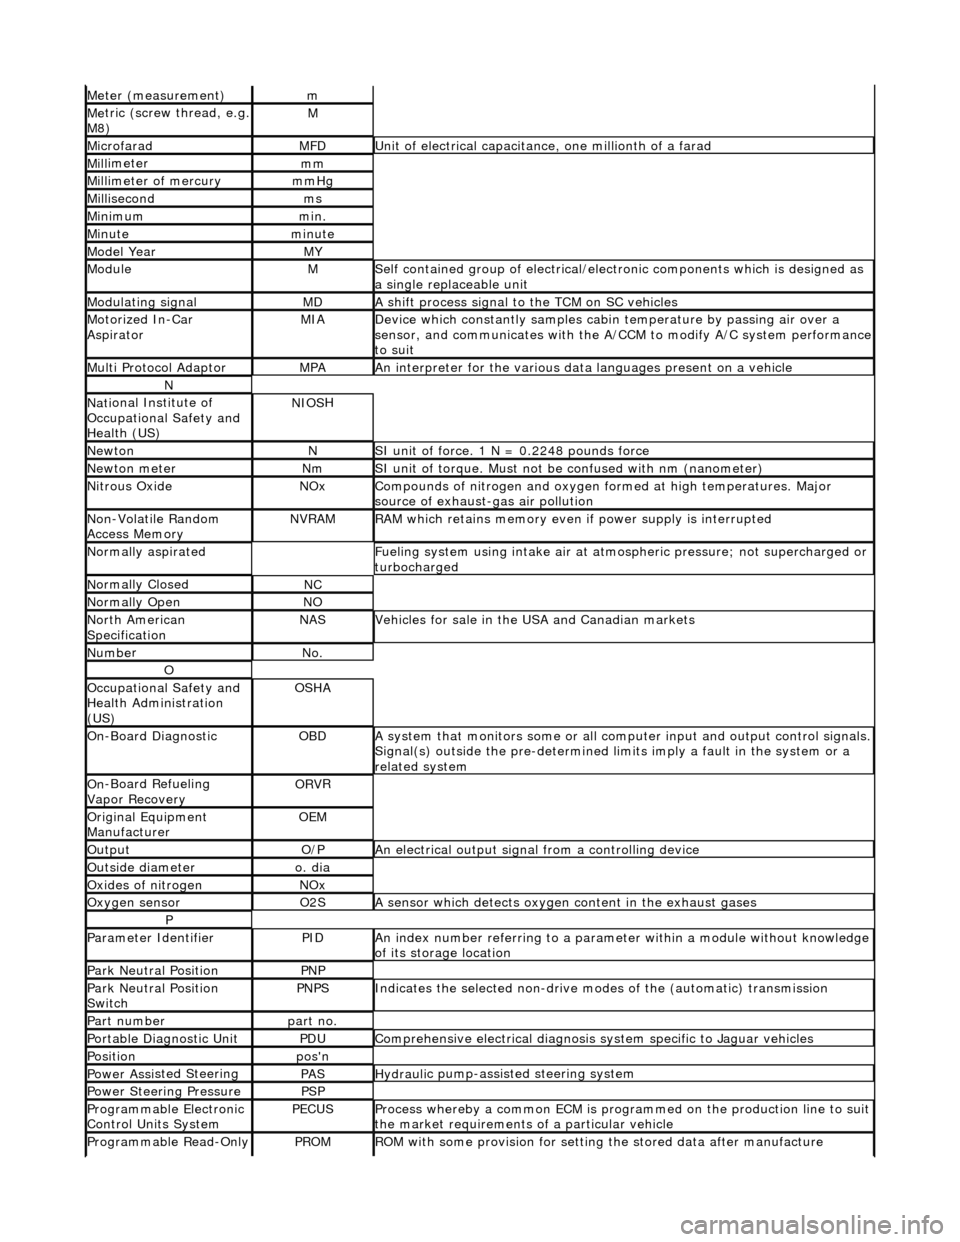
Meter (measurement)m
Me
tric (screw thread, e.g.
M8)
M
MicrofaradMFDUni t
of electrical capacitance, one millionth of a farad
Mi
ll
imeter
mm
Mi
ll
imeter of mercury
mm
Hg
Mill
isecond
ms
Min
i
mum
mi
n.
Min u
te
minut
e
Model YearMY
ModuleMSelf
contained group of electrical/electronic components which is designed as
a single replaceable unit
Modulating signalMDA sh
ift process signal to the TCM on SC vehicles
Motorized In
-Car
AspiratorMIAD e
vice which constantly samples cabi
n temperature by passing air over a
sensor, and communicates with the A/ CCM to modify A/C system performance
to suit
Mult i Prot
ocol Adaptor
MPAAn i
n
terpreter for the various data
languages present on a vehicle
N
Nati
onal Institute of
Occupational Safety and
Health (US)
NIO S
H
Ne
wto
n
NSI unit of force. 1
N = 0.224
8 pounds force
Ne
wto
n meter
NmSI unit of torque. Must not be
co
nfused with nm (nanometer)
Ni
tr
ous Oxide
NO
xCompounds of nit rogen and oxygen fo rmed at high temperatures. Major
sourc
e of exhaust-gas air pollution
No
n
-Volatile Random
Access Memory
NVR A
M
R
A
M which retains memory even
if power supply is interrupted
Normal
ly aspirated
F
u
eling system using intake air at atmo
spheric pressure; not supercharged or
turbocharged
N ormal
ly Closed
NC
N
o
rmally Open
NO
No
r
th American
Specification
NASVehicles f or sal
e in the USA and Canadian markets
Nu
mbe
r
No
.
O
Oc
cupational Safety and
Health Administration
(US)
OS H
A
O
n
-Board Diagnostic
OB
DA system that moni
tors some or all co
mputer input and output control signals.
Signal(s) outside the pre-de termined limits imply a fault in the system or a
related system
O n
-Board Refueling
Vapor Recovery
OR V
R
O
riginal
Equipment
Manufacturer
OE M
Outp
ut
O/
PAn electrical o u
tput signal from a controlling device
Ou
ts
ide diameter
o.
d
ia
O
xides of
nitrogen
NO
x
Oxygen senso
r
O2
SA s
ensor which detects oxygen content in the exhaust gases
P
Parameter Identifi
erPIDAn in
dex number referring to a parame
ter within a module without knowledge
of its storage location
Park N e
utral Position
PN
P
Park N e
utral Position
Switch
PN PSIndic
ates the selected non-drive modes of the (automatic) transmission
Part numberpart no.
Portable Diag
nostic Un
it
PD
UCompre hen
sive electrical diagnosis system specific to Jaguar vehicles
Posi
ti
on
po
s'n
Power As si
sted Steering
PASHydraul
i
c pump-assisted steering system
Power Steer
i
ng Pressure
PSP
Programmable Elect
r
onic
Control Units System
PECU SProcess whereb y
a common ECM is progra
mmed on the production line to suit
the market requirements of a particular vehicle
Programmable Read-O
nly
PROMRO
M with some provision for setting
the stored data after manufacture
Page 75 of 2490
I
nstallation
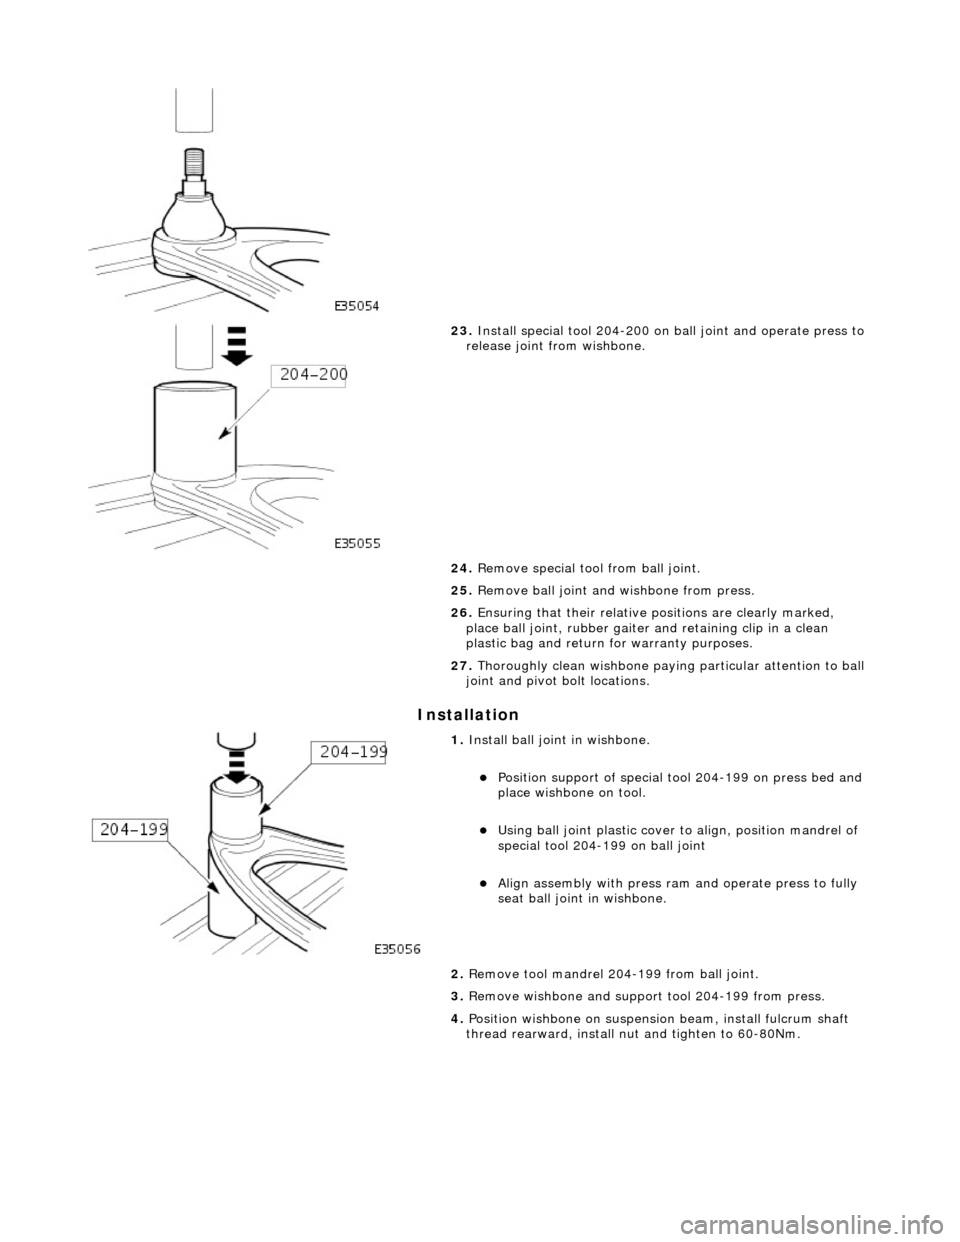
23
.
Install special tool 204-200 on ball joint and operate press to
release joint from wishbone.
24. Remove special tool from ball joint.
25. Remove ball joint and wishbone from press.
26. Ensuring that their relative positions are clearly marked,
place ball joint, rubber gaiter and retaining clip in a clean
plastic bag and return for warranty purposes.
27. Thoroughly clean wishbone paying particular attention to ball
joint and pivot bolt locations.
1. Inst
all ball joint in wishbone.
Pos
ition support of special tool 204-199 on press bed and
place wishbone on tool.
U
sing ball joint plastic cover to align, position mandrel of
special tool 204-199 on ball joint
Ali
gn assembly with press ram and operate press to fully
seat ball joint in wishbone.
2. Remove tool mandrel 204-199 from ball joint.
3. Remove wishbone and support tool 204-199 from press.
4. Position wishbone on suspensi on beam, install fulcrum shaft
thread rearward, install nu t and tighten to 60-80Nm.
Page 131 of 2490

I
nstallation
14
.
To prevent damage to lower ball joint, secure vertical link to
road spring using strong wire.
15
.
Remove upper wishbone fulcrum nut and shaft and withdraw
wishbone from crossbeam.
16. Secure upper wishbone in a vise.
17
.
Remove bush assemblies from wishbone.
1. Using a drift, remove thru st washer and spacer tube
from each inner and outer half-bush.
2. Remove inner and outer half bushes from wishbone.
Repeat
procedure to remove
remaining bush assembly.
18. Clean wishbone paying particular attention to bush locations.
19. Check that ball joint gaiter is not punctured or deeply
abraded.
1. Install thrust washer and spacer tube in first wishbone half-
bush.
Page 243 of 2490

I
nstallation
33
.
Using approved cleaning agents:
Wash an
d thoroughly dry inner and outer bearings.
Thorough
ly clean hub carrier payi
ng particular attention to
bearing cups.
Thoroughl
y clean hub.
1. Grease bearings.
Pack inner and outer bea
ring races with Shell Retinax 'A'
grease:
Appl
y a film of shell Retinax
'A' grease to bearing cups
2. Install outer bearing in hu
b carrier and fully seat new seal
using special tool 205-234.
3. Apply a th
in film of Shell Retinax 'A' grease to hub shaft and
install hub in carrier /bearing assembly.
4. Install inner bearing assembly and seal.
1. Install bearing spacer.
Page 433 of 2490
clos
ed outlet valves.
Traction Control
Trac
tion control has the same capabilities as ASC but with th
e added ability to actuate the brakes of the spinning wheel.
This enhances ASC by improving acceleration particularly on surfaces with uneven friction , e.g. one wheel on ice the other
on tarmac.
When wheelspin occurs, brake line pressure to the slipping wheel is generated, to operate that wheel's brake. The BCM
achieves this by closing the cut-off solenoid valve and oper ating the hydraulic pump. Brake fluid is then drawn from the
reservoir through the non-actuated mast er cylinder to the brake caliper.
A 'TRAC' amber warning light flashes on the instrument panel when the system detects a spinning wheel.
The traction control system uses a brake control modulator with nine solenoid valv es: four normally open inlet valves and
four normally closed outlet valves and one special isolating va lve. The outlet valves control the brakes of each each rear
wheel individually on the traction control system.
Rear Wheel Speed Senso
rs and ABS/TCCM Circuit Diagram
Page 1503 of 2490

Dual-Linear Switch (DLS)
The TCM detects gear selection by means of a switch fitted to the 'J' gate; the DLS contains two multi-track slider switches,
of which the upper controls P R N D and the lower 4 3 2 .
Output from the DLS is changed as the select or lever is moved, thus indicating selected gear position. The parallel signal is
input to the TCM by 4 discrete logic wires W0, W1, W2 and W3. The particular sequence, or gray code, will indicate which
shift position is selected, as shown in the following table where 0 = low and 1 = high:
Gray code
Transmission Unit Gear Selector
The gear selector at the transmission unit:
Is connected to the operator's selector module by cable Operates the selector valve, at the electro-hydraulic control unit
Selector PositionW3W2W1W0
P0111
R1110
N1101
D0100
41000
30010
20001