radiator cap JAGUAR X308 1998 2.G Workshop Manual
[x] Cancel search | Manufacturer: JAGUAR, Model Year: 1998, Model line: X308, Model: JAGUAR X308 1998 2.GPages: 2490, PDF Size: 69.81 MB
Page 530 of 2490
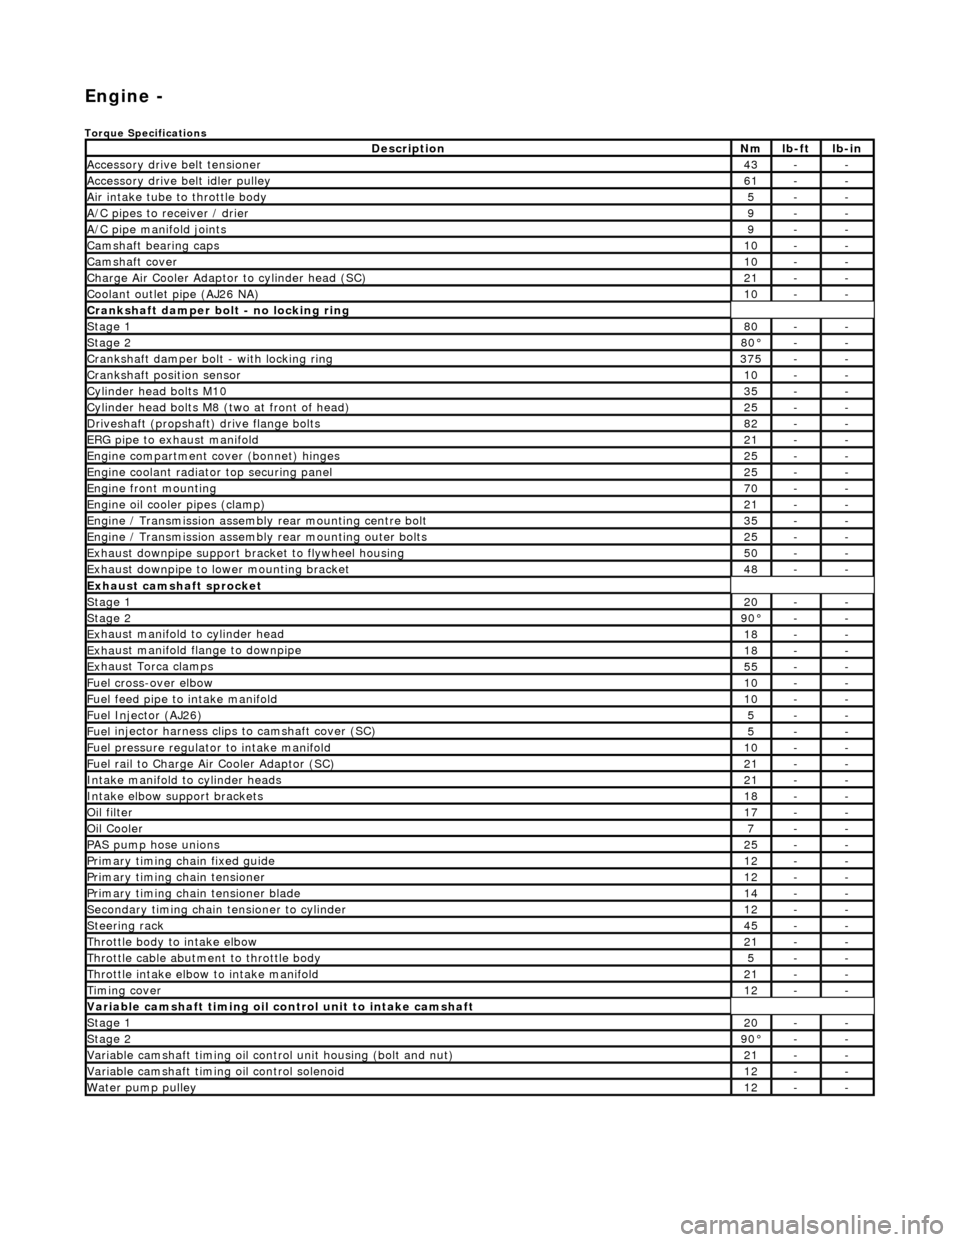
Engi
ne -
Torqu
e Specifications
De
s
cription
Nmlb
-
ft
lb
-
in
A
ccessory
drive belt tensioner
43--
A
ccessory
drive belt idler pulley
61--
Air in
ta
ke tube to throttle body
5--
A/C
pipes t
o receiver / drier
9--
A/C pipe m
anifold joints
9--
Camsh
aft bearin
g caps10--
Ca
msh
aft cove
r10--
Ch
arge Air Co
oler Adaptor to cylinder head (SC)
21--
Co
olan
t outlet pipe (AJ26 NA)
10--
Cran
kshaft damper bolt - no lockin
g ring
St
ag
e 1
80--
Stag
e 2
80°--
C
r
ankshaft damper bolt - with locking ring
37
5--
Cra
nkshaft position sensor
10--
Cy
li
nder head bolts M10
35--
Cy
lin
der head bolts M8 (two at front of head)
25--
Driv
es
haft (propshaft) drive flan
ge bo
l
ts
82--
ERG p
i
pe to exhaust manifold
21--
Engi
ne compartment cover (bonnet) hinges
25--
En
gine
coolant radiator top securing panel
25--
E
ng
ine front mounting
70--
En
gine
oil cooler pipes (clamp)
21--
En
gi
ne / Transmission assembly rear mounting centre bolt
35--
En
gi
ne / Transmission assembly rear mounting outer bolts
25--
Ex
ha
ust downpipe support bracket to flywheel housing
50--
Ex
ha
ust downpipe to lower mounting bracket
48--
E
x
haust camshaft sprocket
St
age 120--
Stage 290 °--
Ex
haust manifold to cylinder head
18--
Ex
ha
ust manifold flange to downpipe
18--
E
x
haust Torca clamps
55--
Fuel cross-over elbo
w
10--
Fu
el f
eed pipe to intake manifold
10--
Fuel
Injector (AJ
26)
5--
Fuel
injector ha
rness clips to camshaft cover (SC)
5--
Fu
el p
ressure re
gu
l
ator to intake manifold
10--
F
u
el rail to Char
ge
A
ir Cooler Adaptor (SC)
21--
In
ta
ke manifold to cylinder heads
21--
Inta
ke elbow support brackets
18--
Oil f
i
lter
17--
Oil C
o
oler
7--
P
AS pu
mp hose unions
25--
P
r
imary timing chain fixed guide
12--
P
r
imary timing chain tensioner
12--
Pr
imary timing chain tensioner blade
14--
S
e
condary timing chain tensioner to cylinder
12--
S
t
eerin
g ra
ck45--
Thro
ttle body to intake elbow
21--
Th
ro
ttle cable abutment to throttle body
5--
Th
ro
ttle intake elbow to intake manifold
21--
Ti
mi
ng cover
12--
Variable camshaft t
i
ming oil control unit to intake camshaft
St
ag
e 1
20--
St
ag
e 2
90
°--
Var
iable camshaft timing oil control unit housing (bolt and nut)
21--
Va
ria
ble camshaft timi
ng oil control solenoid
12--
Wa
ter pump pulley
12--
Page 729 of 2490
Engine - Intake Manifold LH
In-vehicle Repair
Removal
WARNING: BEFORE PROCEEDING, IT IS ESSENTIAL THAT THE WARNINGS GIVEN IN SECTION 100-00 (UNDER THE
HEADING 'SAFETY PRECAUTIONS') ARE READ AND UNDERSTOOD. 1.
Open the engine compartment and fit paintwork protection
sheets.
2. Disconnect the batt ery ground cable.
Remove the battery cover.
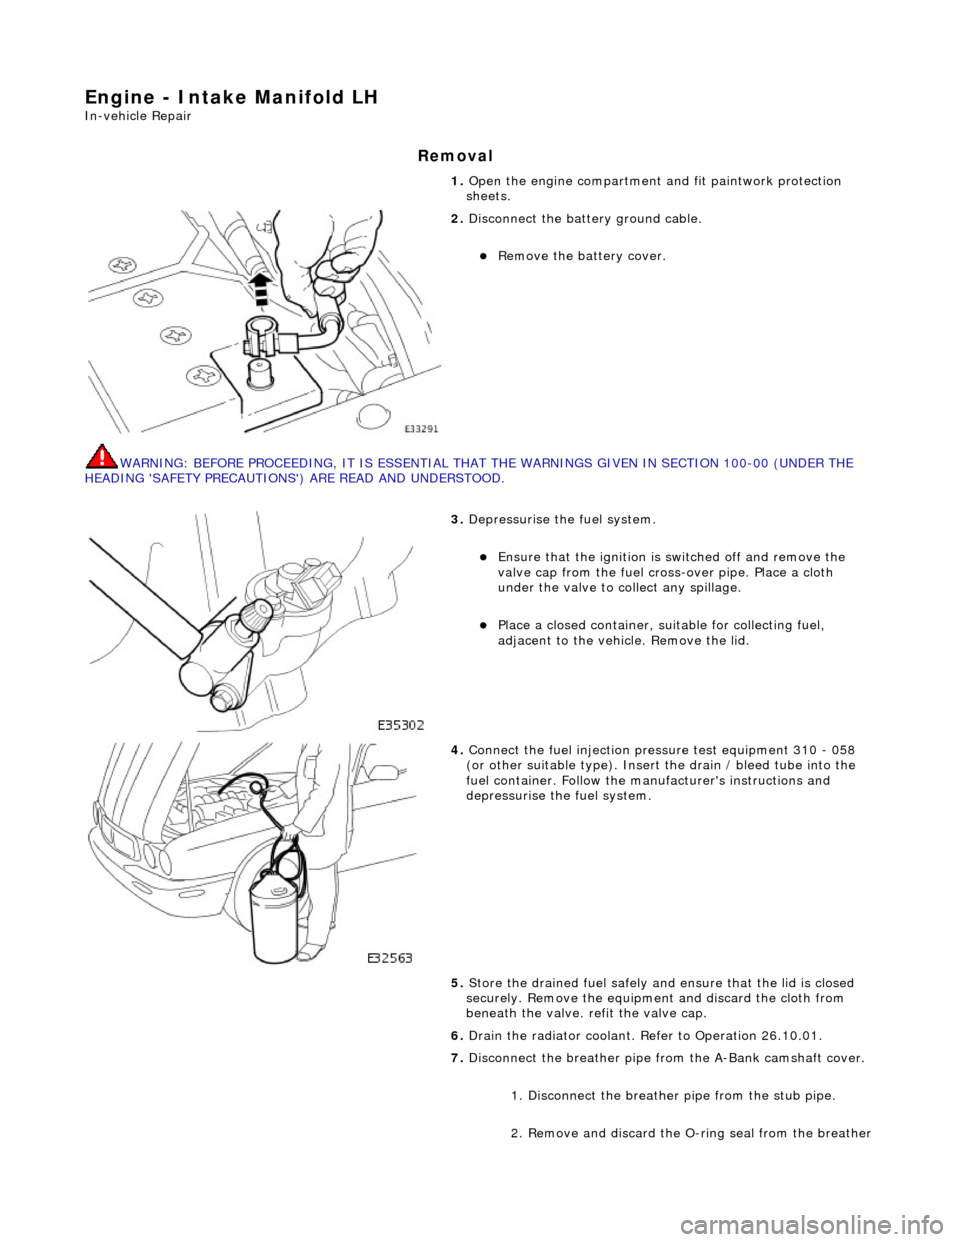
3. Depressurise the fuel system.
Ensure that the ignition is switched off and remove the
valve cap from the fuel cross-over pipe. Place a cloth
under the valve to collect any spillage.
Place a closed container, su itable for collecting fuel,
adjacent to the vehicle. Remove the lid.
4. Connect the fuel injection pres sure test equipment 310 - 058
(or other suitable type). Insert the drain / bleed tube into the
fuel container. Follow the ma nufacturer's instructions and
depressurise the fuel system.
5. Store the drained fuel safely and ensure that the lid is closed
securely. Remove the equipmen t and discard the cloth from
beneath the valve. refit the valve cap.
6. Drain the radiator coolant. Refer to Operation 26.10.01.
7. Disconnect the breather pipe fro m the A-Bank camshaft cover.
1. Disconnect the breather pipe from the stub pipe.
2. Remove and discard the O-ring seal from the breather
Page 734 of 2490
Engine - Intake Manifold RH
In-vehicle Repair
Removal
WARNING: BEFORE PROCEEDING, IT IS ESSENTIAL THAT THE WARNINGS GIVEN IN SECTION 100-00 (UNDER THE
HEADING 'SAFETY PRECAUTIONS') ARE READ AND UNDERSTOOD. 1.
Open the engine compartment and fit paintwork protection
sheets.
2. Disconnect the batt ery ground cable.
Remove the battery cover.
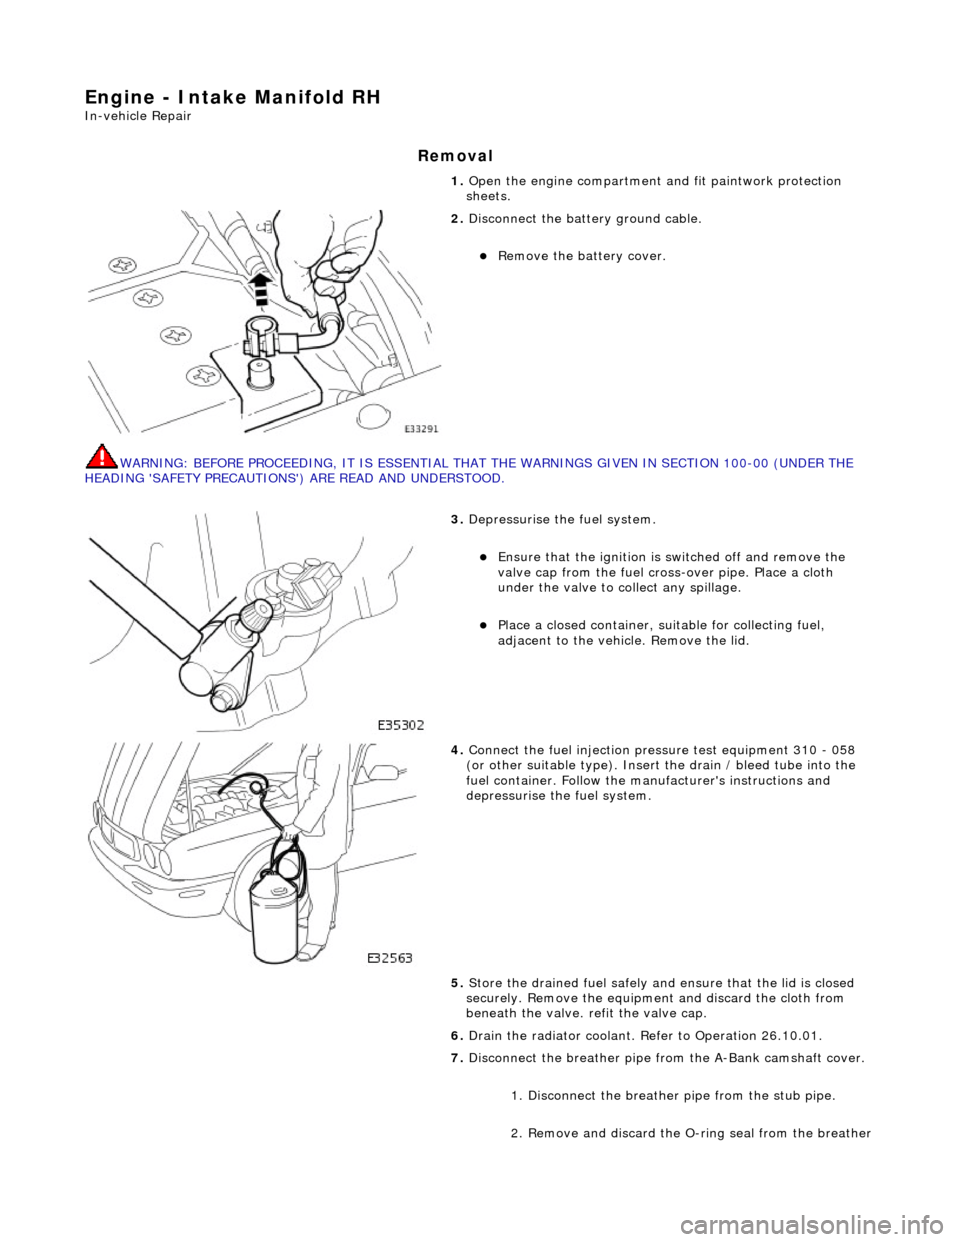
3. Depressurise the fuel system.
Ensure that the ignition is switched off and remove the
valve cap from the fuel cross-over pipe. Place a cloth
under the valve to collect any spillage.
Place a closed container, su itable for collecting fuel,
adjacent to the vehicle. Remove the lid.
4. Connect the fuel injection pres sure test equipment 310 - 058
(or other suitable type). Insert the drain / bleed tube into the
fuel container. Follow the ma nufacturer's instructions and
depressurise the fuel system.
5. Store the drained fuel safely and ensure that the lid is closed
securely. Remove the equipmen t and discard the cloth from
beneath the valve. refit the valve cap.
6. Drain the radiator coolant. Refer to Operation 26.10.01.
7. Disconnect the breather pipe fro m the A-Bank camshaft cover.
1. Disconnect the breather pipe from the stub pipe.
2. Remove and discard the O-ring seal from the breather
Page 739 of 2490
Engine - Intake Manifold Gasket LH
In-vehicle Repair
Removal
WARNING: BEFORE PROCEEDING, IT IS ESSENTIAL THAT THE WARNINGS GIVEN IN SECTION 100-00 (UNDER THE
HEADING 'SAFETY PRECAUTIONS') ARE READ AND UNDERSTOOD. 1.
Open the engine compartment and fit paintwork protection
sheets.
2. Disconnect the batt ery ground cable.
Remove the battery cover.
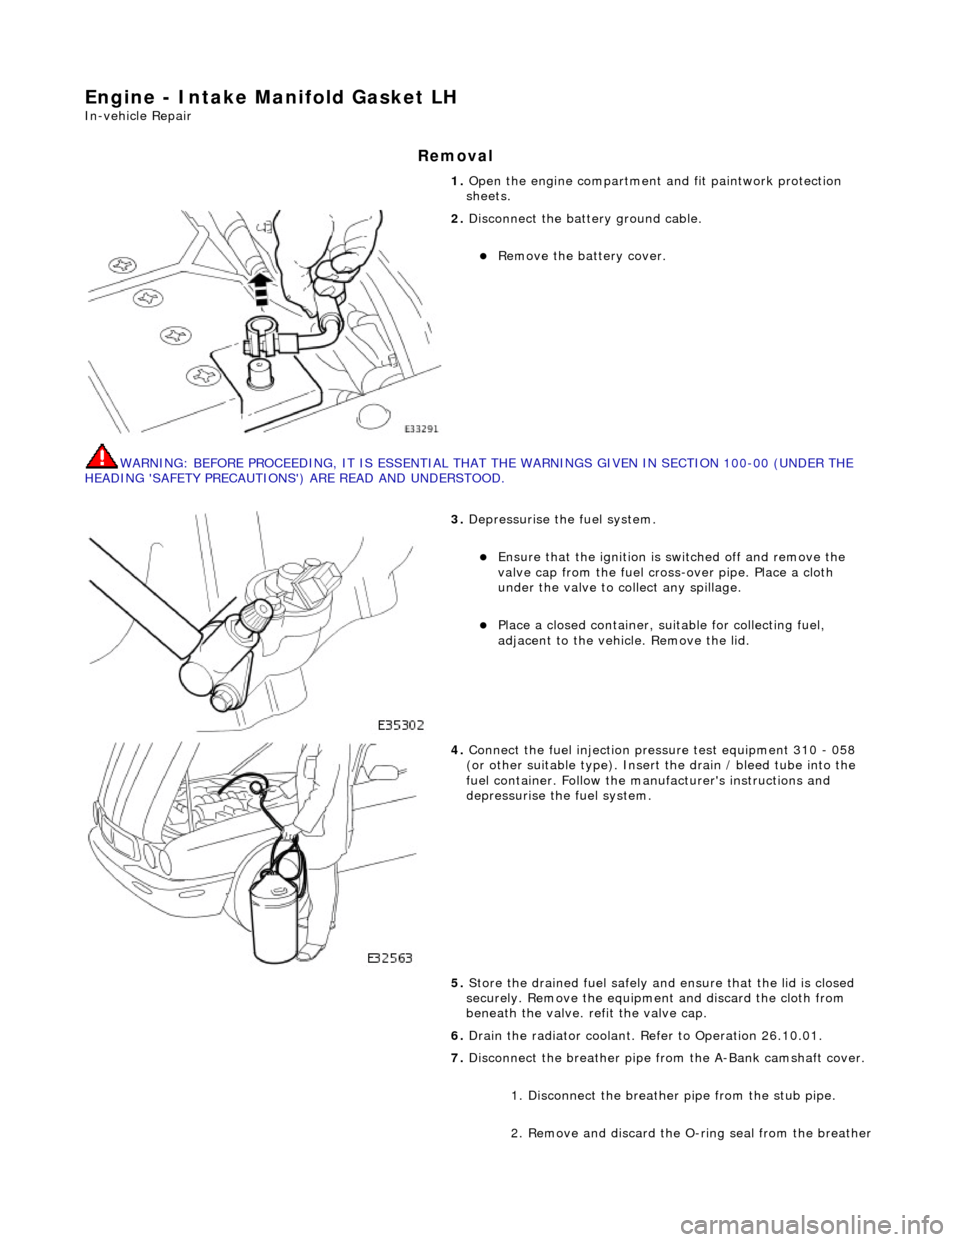
3. Depressurise the fuel system.
Ensure that the ignition is switched off and remove the
valve cap from the fuel cross-over pipe. Place a cloth
under the valve to collect any spillage.
Place a closed container, su itable for collecting fuel,
adjacent to the vehicle. Remove the lid.
4. Connect the fuel injection pres sure test equipment 310 - 058
(or other suitable type). Insert the drain / bleed tube into the
fuel container. Follow the ma nufacturer's instructions and
depressurise the fuel system.
5. Store the drained fuel safely and ensure that the lid is closed
securely. Remove the equipmen t and discard the cloth from
beneath the valve. refit the valve cap.
6. Drain the radiator coolant. Refer to Operation 26.10.01.
7. Disconnect the breather pipe fro m the A-Bank camshaft cover.
1. Disconnect the breather pipe from the stub pipe.
2. Remove and discard the O-ring seal from the breather
Page 744 of 2490
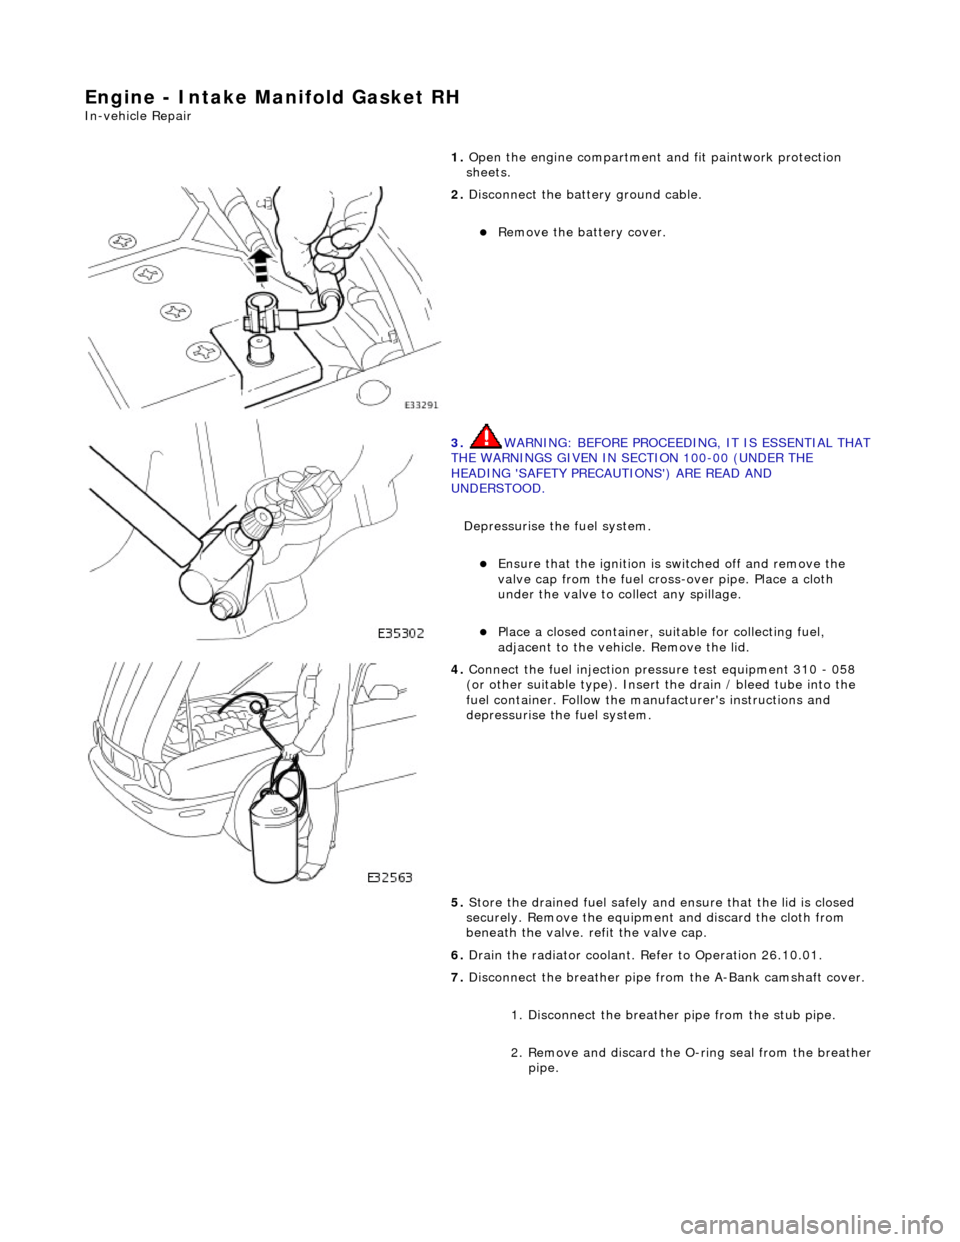
Engine - Intake Manifold Gasket RH
In-vehicle Repair
1. Open the engine compartment and fit paintwork protection
sheets.
2. Disconnect the batt ery ground cable.
Remove the battery cover.
3. WARNING: BEFORE PROCEEDING, IT IS ESSENTIAL THAT THE WARNINGS GIVEN IN SECTION 100-00 (UNDER THE
HEADING 'SAFETY PRECAUTIONS') ARE READ AND
UNDERSTOOD.
Depressurise the fuel system.
Ensure that the ignition is switched off and remove the
valve cap from the fuel cross-over pipe. Place a cloth
under the valve to collect any spillage.
Place a closed container, su itable for collecting fuel,
adjacent to the vehicle. Remove the lid.
4. Connect the fuel injection pres sure test equipment 310 - 058
(or other suitable type). Insert the drain / bleed tube into the
fuel container. Follow the ma nufacturer's instructions and
depressurise the fuel system.
5. Store the drained fuel safely and ensure that the lid is closed
securely. Remove the equipmen t and discard the cloth from
beneath the valve. refit the valve cap.
6. Drain the radiator coolant. Refer to Operation 26.10.01.
7. Disconnect the breather pipe fro m the A-Bank camshaft cover.
1. Disconnect the breather pipe from the stub pipe.
2. Remove and discard the O-ring seal from the breather
pipe.
Page 928 of 2490
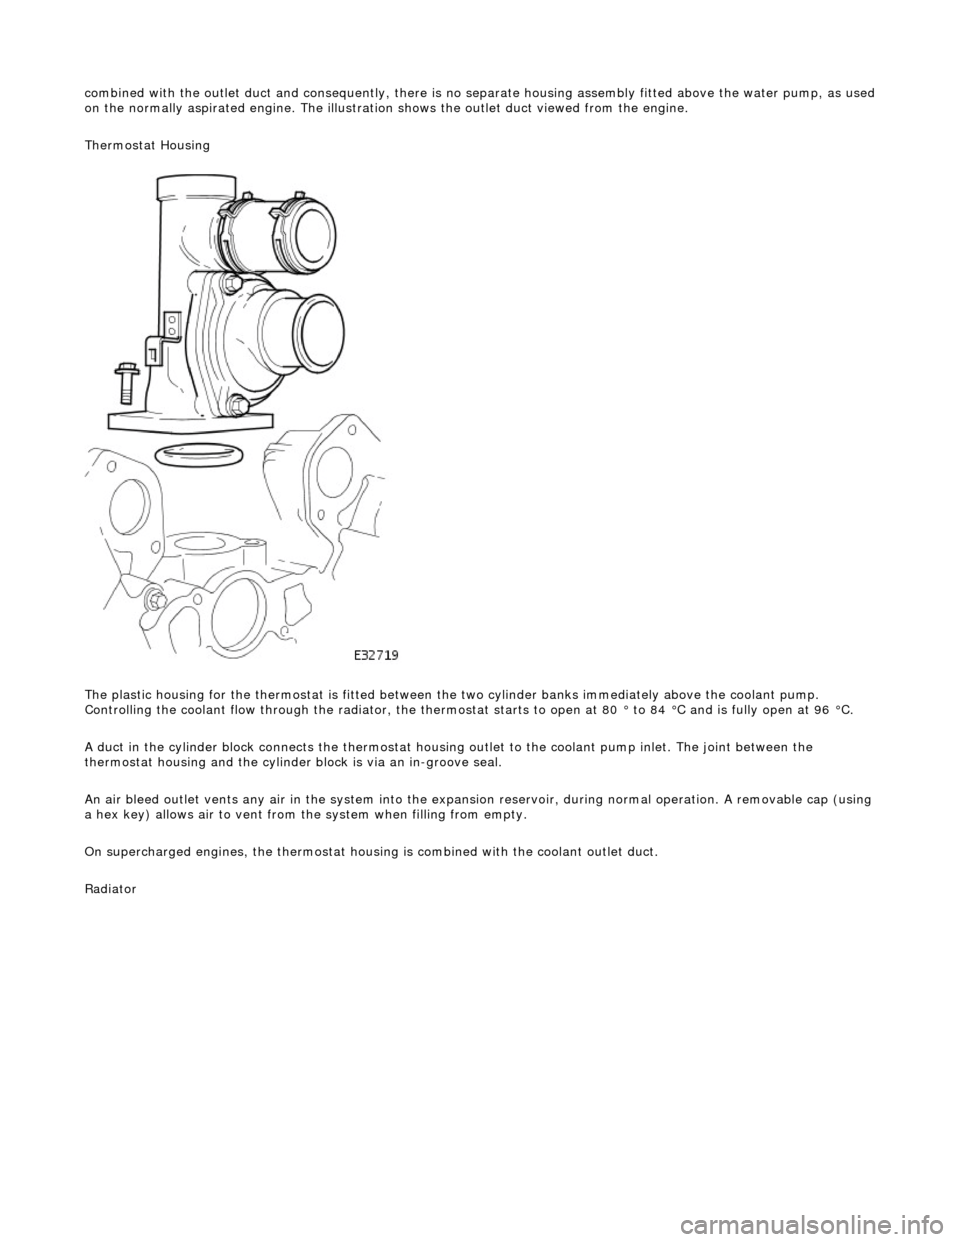
combin
ed with the outlet duct and consequently, there is no separate housin
g assembly fitted above the water pump, as used
on the normally aspirated engine. The illustration shows the outlet duct viewed from the engine.
Thermostat Housing
The plastic housing for the thermostat is fitted between th e two cylinder banks immediately above the coolant pump.
Controlling the coolant flow through the radiator, the thermostat starts to open at 80 ° to 84 °C and is fully open at 96 °C.
A duct in the cylinder block connects the thermostat housing outlet to the coolant pump inlet. The joint between the
thermostat housing and the cylinder block is via an in-groove seal.
An air bleed outlet vents an y air in the system into the expansion reservoir, durin
g normal operation. A removable cap (usin g
a hex key) allows air to vent from the system when filling from empty.
On supercharged engines, the thermostat housin g is combined with the coolant outlet duct.
Radiator
Page 953 of 2490
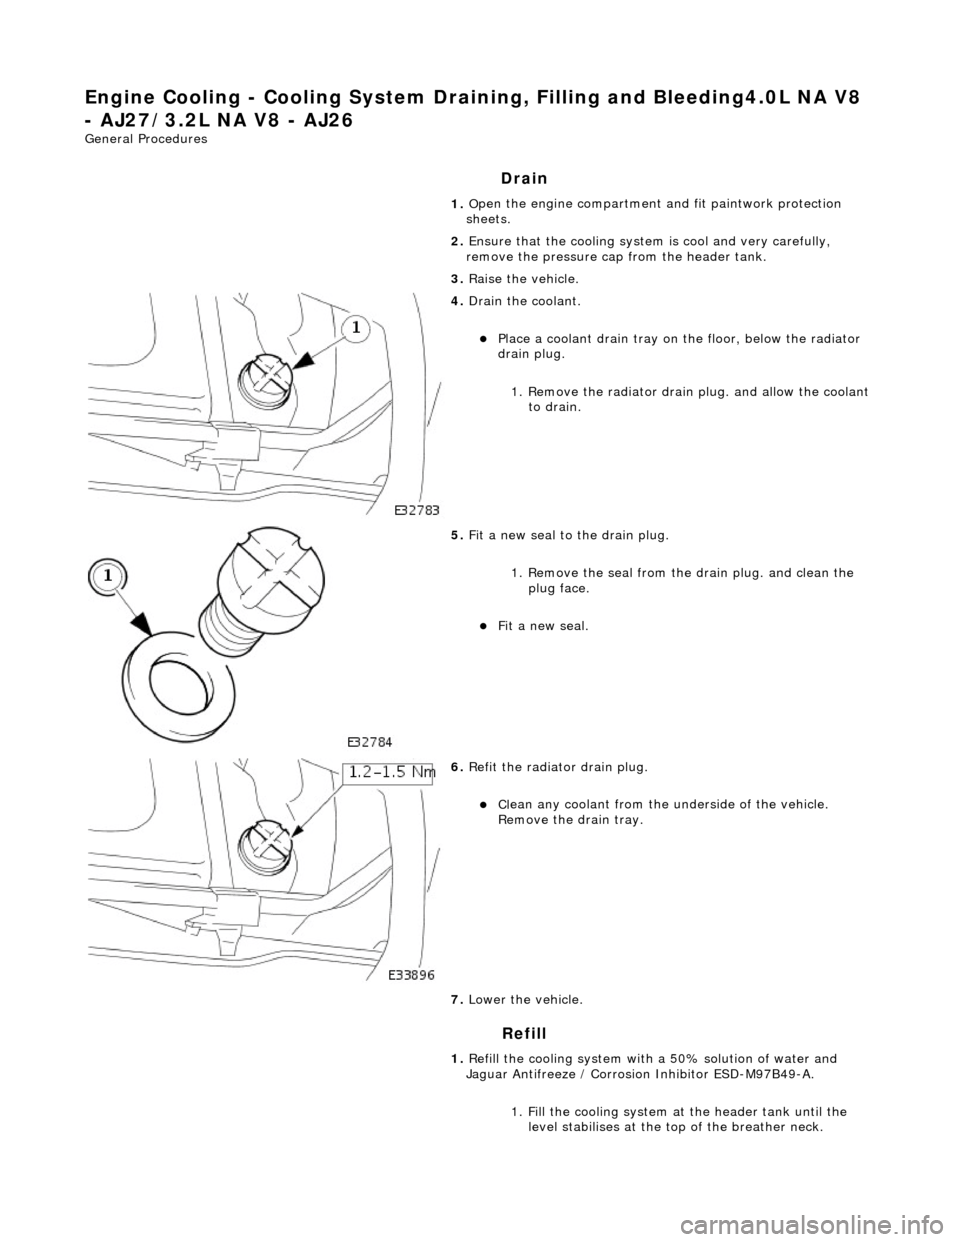
Engine Cooling - Cooling System Draining,
Filling and Bleeding4.0L NA V8
- AJ27/3.2L NA V8 - AJ26
Gen
eral Procedures
Drain
Refill
1. O
pen the engine compartment and fit paintwork protection
sheets.
2. Ensure that the cooling system is cool and very carefully,
remove the pressure cap from the header tank.
3. Raise the vehicle.
4. Drain th
e coolant.
Pla
ce a coolant drain tray on
the floor, below the radiator
drain plug.
1. Remove the radiator drain plug. and allow the coolant to drain.
5. Fit a new seal to the
drain plug.
1. Remove the seal from the drain plug. and clean the plug face.
Fit a new seal.
6. Re
fit the radiator drain plug.
Cl
ean any coolant from the
underside of the vehicle.
Remove the drain tray.
7. Lower the vehicle.
1. Refill the cooling system with a 50% solution of water and
Jaguar Antifreeze / Corrosion Inhibitor ESD-M97B49-A.
1. Fill the cooling system at the header tank until the level stabilises at the top of the breather neck.
Page 955 of 2490
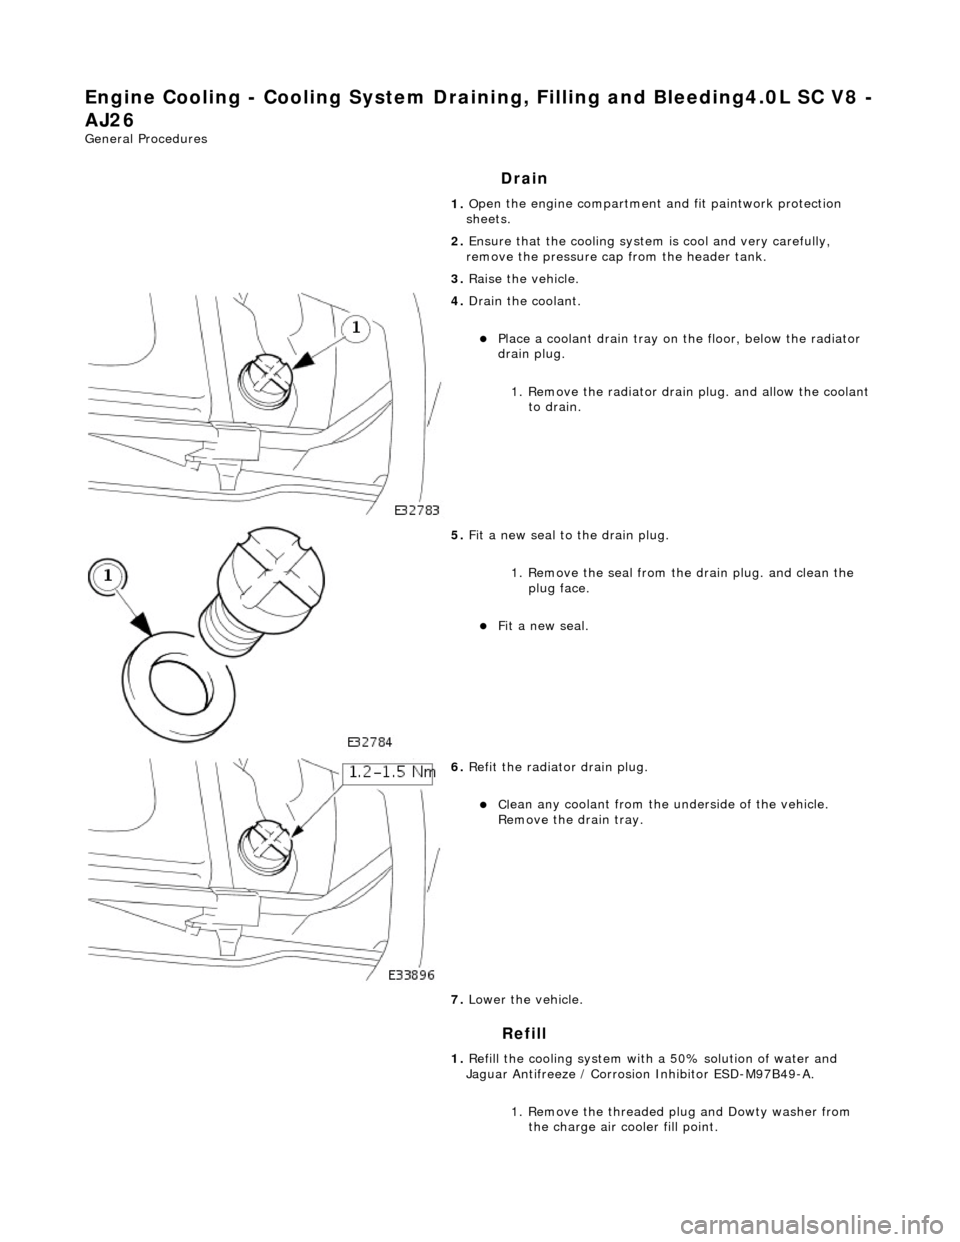
Engine Cooling - Cooling System Draining, Filling and Bleeding4.0L SC V8 -
AJ26
Gen
eral Procedures
Drain
Refill
1. O
pen the engine compartment and fit paintwork protection
sheets.
2. Ensure that the cooling system is cool and very carefully,
remove the pressure cap from the header tank.
3. Raise the vehicle.
4. Drain th
e coolant.
Pla
ce a coolant drain tray on
the floor, below the radiator
drain plug.
1. Remove the radiator drain plug. and allow the coolant to drain.
5. Fit a new seal to the
drain plug.
1. Remove the seal from the drain plug. and clean the plug face.
Fit a new seal.
6. Re
fit the radiator drain plug.
Cl
ean any coolant from the
underside of the vehicle.
Remove the drain tray.
7. Lower the vehicle.
1. Refill the cooling system with a 50% solution of water and
Jaguar Antifreeze / Corrosion Inhibitor ESD-M97B49-A.
1. Remove the threaded plug and Dowty washer from the charge air cooler fill point.
Page 956 of 2490
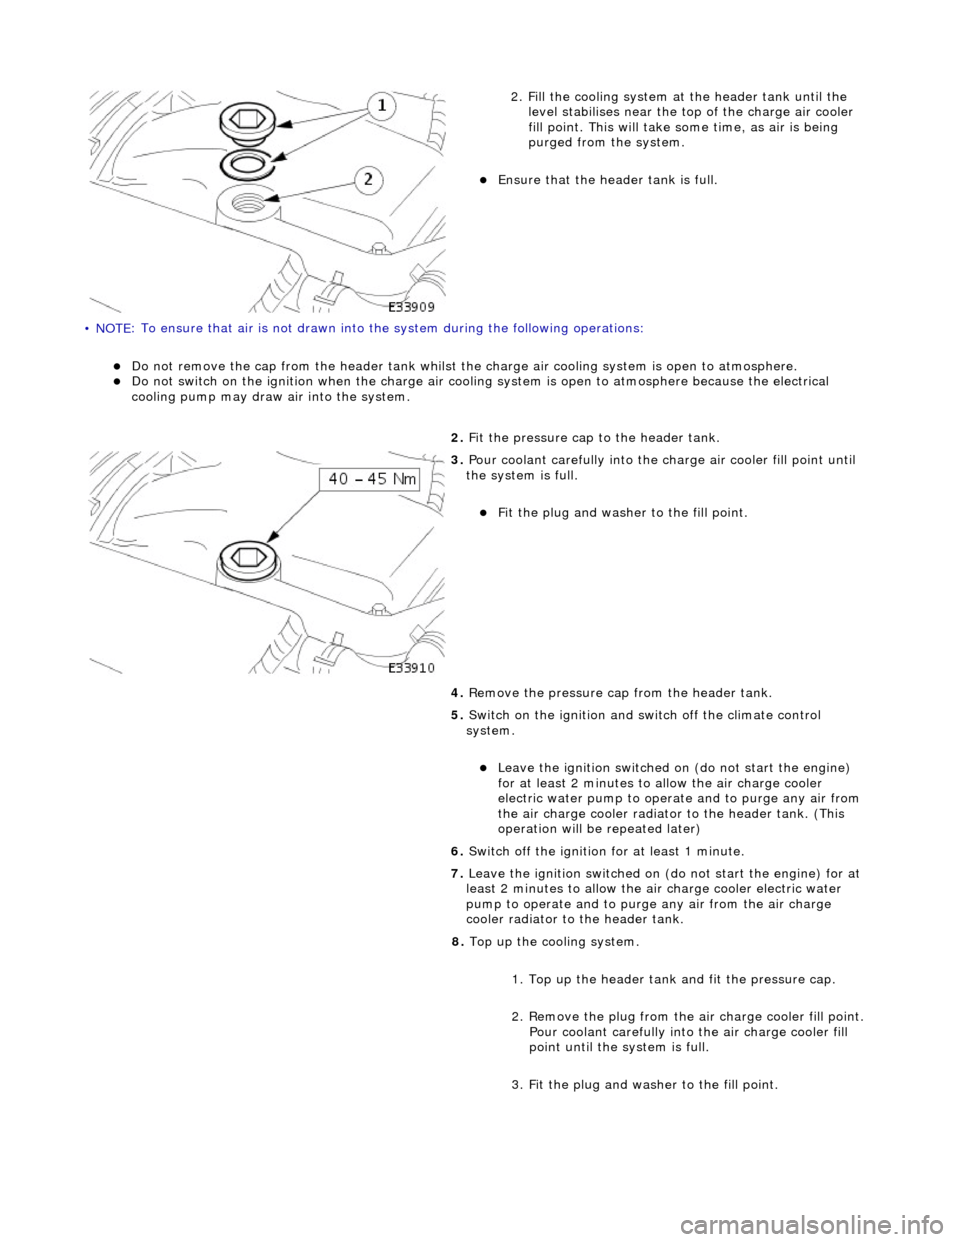
• NOTE
: To ensure that
air is not drawn into the system during the following operations:
Do
not remove the cap from the header tank whilst the
charge air cooling system is open to atmosphere.
Do
not switch on the ignition when th
e charge air cooling system is open to atmosphere because the electrical
cooling pump may draw air into the system.
2. Fi
ll the cooling system at the header tank until the
level stabilises near the to p of the charge air cooler
fill point. This will take some time, as air is being
purged from the system.
Ensure that the head
er tank is full.
2. Fit the pressure cap to the header tank.
3. Pour coolant careful l
y into the charge air cooler fill point until
the system is full.
Fi t t
he plug and washer to the fill point.
4. Remove the pressure cap from the header tank.
5. Switch on the ignition and switch off the climate control
system.
Le ave
the ignition switched on (do not start the engine)
for at least 2 minutes to allow the air charge cooler
electric water pump to oper ate and to purge any air from
the air charge cooler radiator to the header tank. (This
operation will be repeated later)
6. Switch off the ignition for at least 1 minute.
7. Leave the ignition switched on (do not start the engine) for at
least 2 minutes to allow the air charge cooler electric water
pump to operate and to purg e any air from the air charge
cooler radiator to the header tank.
8. Top up the cooling system.
1. Top up the header tank and fit the pressure cap.
2. Remove the plug from the air charge cooler fill point. Pour coolant carefully into the air charge cooler fill
point until the system is full.
3. Fit the plug and washer to the fill point.
Page 958 of 2490
Engine Cooling - Cooling System Draining and Vacuum Filling
Gene
ral Procedures
WARNING: To avoid having scalding ho t coolant or steam blowing out of the cooling system, use extreme care when
removing the coolant pressure cap from a hot cooling system. Wait until the engine has cooled, then wrap a thick cloth
around the coolant pressure cap and turn it slowly until the pressure begins to release. Step ba ck while the pressure is
released from the system. When certain al l the pressure has been released (still with a cloth) turn and remove the coolant
pressure cap from the coolant expansion tank. Failure to fo llow these instructions may result in personal injury.
• CAUTIONS:
The engine cooling syst em must be maintained with the correct concentration and type of anti-freeze solution to
prevent corrosion and frost damage. Failure to follow th is instruction may result in damage to the vehicle.
Engine coolant will damage the paint finished surfaces. If spilt, immediately remove the coolant and clean the area
with water.
• NOTE: Vehicles fitted with supercharged engines shown, V8 NA engines similar.
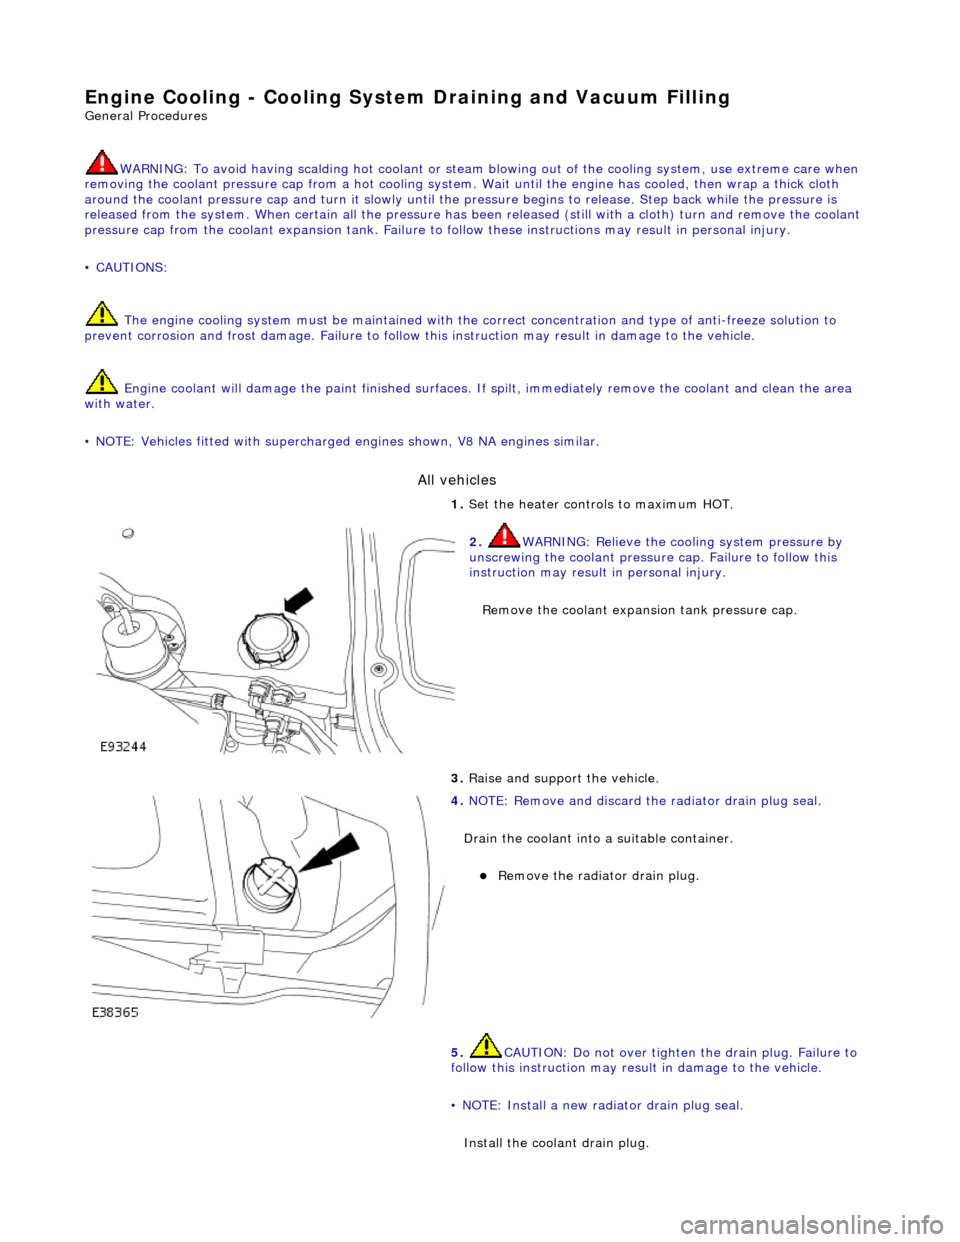
All vehicles
1. Set
the heater controls to maximum HOT.
2. WARN
ING: Relieve the cooling system pressure by
unscrewing the coolant pressure cap. Failure to follow this
instruction may result in personal injury.
Remove the coolant expans ion tank pressure cap.
3. Raise a
nd support the vehicle.
4. NOTE : Remov
e and discard the
radiator drain plug seal.
Drain the coolant into a suitable container.
Remove the radiato
r drain plug.
5. CAUTION: Do not over tighten the drain plug. Failure to
follow this instruction may result in damage to the vehicle.
• NOTE: Install a new radiator drain plug seal.
Install the coolant drain plug.