trunk release JAGUAR X308 1998 2.G Workshop Manual
[x] Cancel search | Manufacturer: JAGUAR, Model Year: 1998, Model line: X308, Model: JAGUAR X308 1998 2.GPages: 2490, PDF Size: 69.81 MB
Page 1116 of 2490

Intake Air Distribution and Filtering - Air Cleaner
Remo
val and Installation
Remov
a
l
1.
Op
en the engine compartment and fit paintwork protection
sheets.
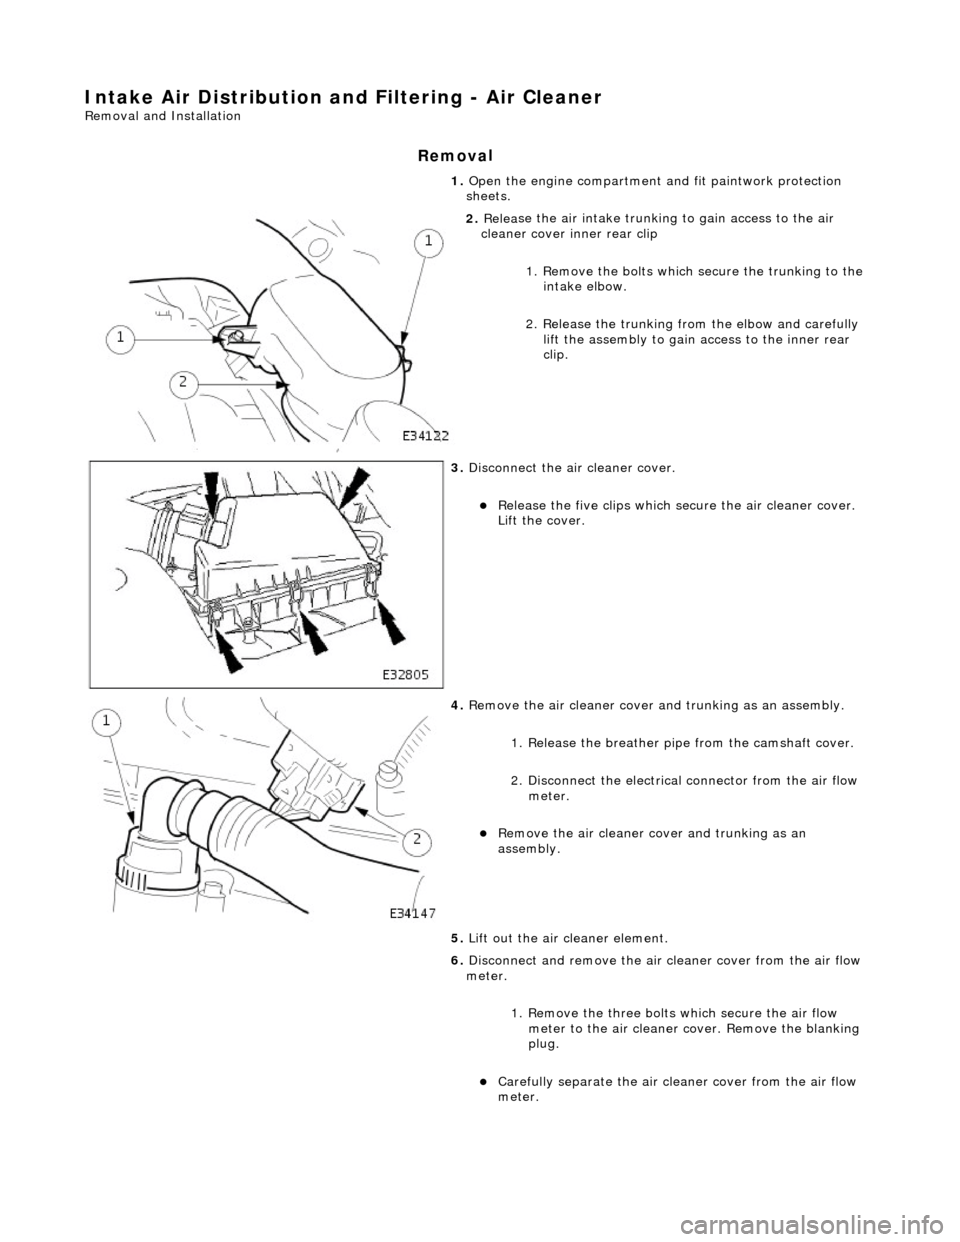
2. Relea
se the air intake trunking
to gain access to the air
cleaner cover inner rear clip
1. Remove the bolts which secure the trunking to the intake elbow.
2. Release the trunking from the elbow and carefully lift the assembly to gain access to the inner rear
clip.
3. Disc
onnect the air cleaner cover.
R
e
lease the five clips which se
cure the air cleaner cover.
Lift the cover.
4. Re
move the air cleaner cover an
d trunking as an assembly.
1. Release the breather pipe from the camshaft cover.
2. Disconnect the electrical connector from the air flow meter.
Re
move the air cleaner cover and trunking as an
assembly.
5. Lift out the air cleaner element.
6. Disconnect and remove the air cleaner cover from the air flow
meter.
1. Remove the three bolts which secure the air flow
meter to the air cleaner co ver. Remove the blanking
plug.
Carefull y separate the ai
r clea
ner cover from the air flow
meter.
Page 1735 of 2490

10
.
Disconnect the fuel feed and return pipes from the fuel tank
F
it special tool JD-203 around
the pipe as shown. Press
the tool in between the fuel pipe and tank connector to
release the quick-fit tangs. While holding the tool firmly in,
pull out the fuel pipe.
Repeat
for the second pipe.
Plu
g the tank outlet connectors and the fuel pipes.
11
.
From the underside of the vehicl e, release the fuel filler latch
box drain pipe from the clip on the spare wheel well.
12
.
Disconnect and reposition the tr unk harness if it is routed
between the filler tube and the ta nk breather or pressure relief
pipe.
1. Disconnect the lefthand re ar lamp harness connector.
2. Disconnect the fuel flap lock actuator connector.
3. If fitted, disconnect the lefthand side marker lamp
connector and harness fro m the underside of the
vehicle. Withdraw the marker lamp harness and
grommet through the trunk floor access hole.
4. Release the harness securi ng clip from the mounting
bracket.
Wi
thdraw the trunk harness from between the filler tube
and the breather pipe or pressure relief pipe.
13. Disconnect the tank harness connections.
Page 1737 of 2490

I
nstallation
18
.
On non-ORVR vehicles, disconnect the trunk lid lefthand strut
rear pivot.
Pl
ace a suitable support under
trunk lid or tie to exterior
mirror.
1. Using a screwdriver, release clip at rear end of strut,
withdraw end from trunk lid pivot and lower strut.
19
.
Disconnect the tank ground cable from the vehicle body.
20. Remove the tank from the vehicle.
21. Drain any remaining fuel from the tank.
1. Fit the fuel tank assembly.
2. Re
-connect the tank ground cable to the vehicle.
Tigh
ten to 12 Nm.
3. On non-ORVR fuel tanks, positi on the trunk lid lefthand strut
between the filler tube and the breather pipe.
Page 1969 of 2490

Interior Lighting - Luggage Compartment Lamp
Removal and Installation
Removal
Installation
1.
Remove battery cover and disc onnect ground cable from
battery terminal.Refer to 86.15.19.
2. Carefully release lamp tangs from trunk lid trim, position lamp
for access, disconnect harness multiplug and remove lamp from trunk.
1. Position lamp at trunk lid and connect harness multiplug.
2. Ensuring that harness is routed correctly, finally position and
fully seat lamp in trunk lid liner.
3. Connect ground cable to battery terminal and fit battery cover.
Refer to 86.15.15.
Page 1978 of 2490

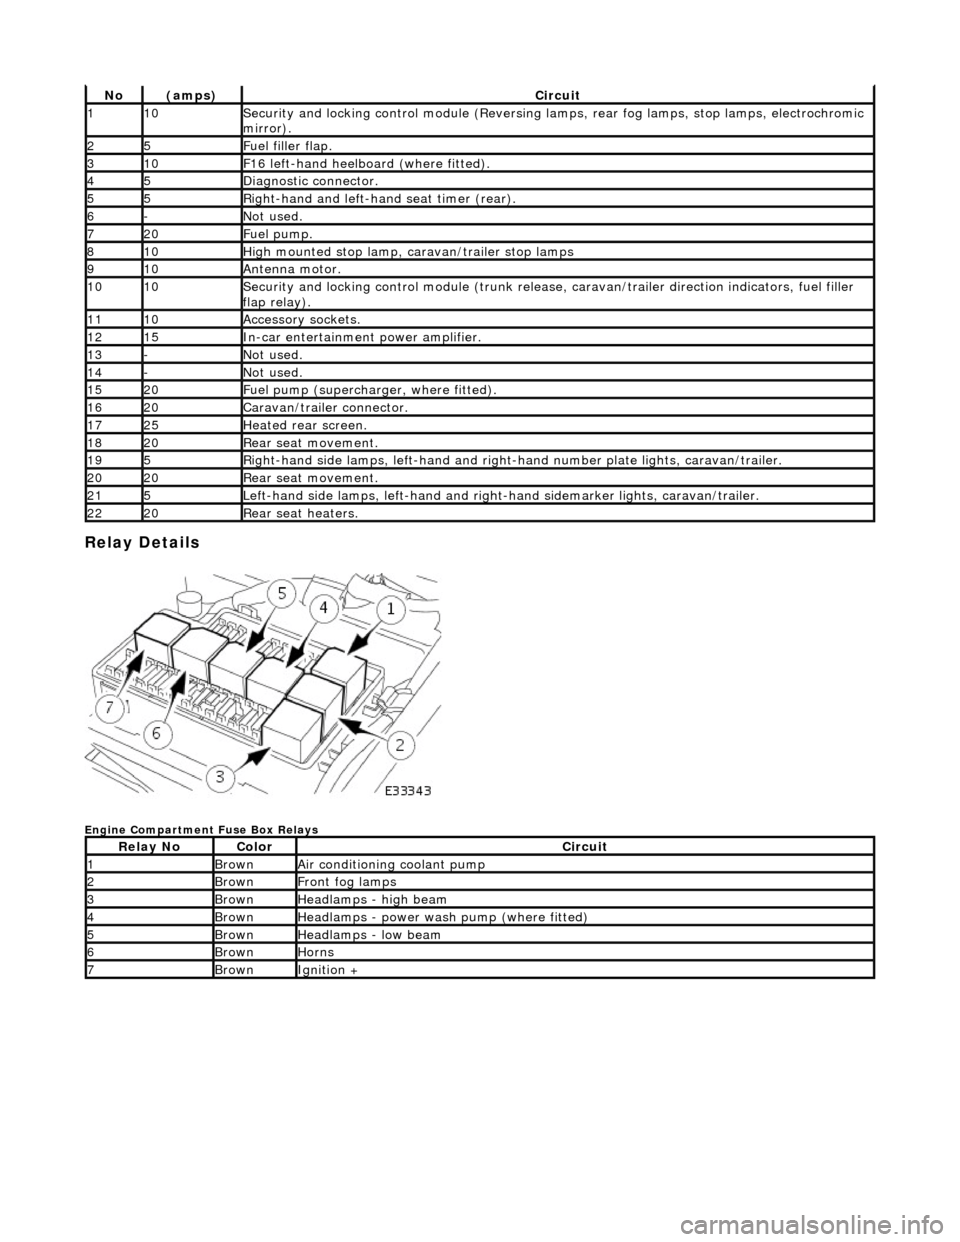
Relay Details
Engine Compartment Fuse Box Relays
No(amps)Circuit
110Security and locking control module (Reversing lamps, rear fog lamps, stop lamps, electrochromic
mirror).
25Fuel filler flap.
310F16 left-hand heelboard (where fitted).
45Diagnostic connector.
55Right-hand and left-han d seat timer (rear).
6-Not used.
720Fuel pump.
810High mounted stop lamp, caravan/trailer stop lamps
910Antenna motor.
1010Security and locking control module (trunk release, caravan/trailer direction indicators, fuel filler
flap relay).
1110Accessory sockets.
1215In-car entertainment power amplifier.
13-Not used.
14-Not used.
1520Fuel pump (supercharger, where fitted).
1620Caravan/trailer connector.
1725Heated rear screen.
1820Rear seat movement.
195Right-hand side lamps, left-h and and right-hand number pl ate lights, caravan/trailer.
2020Rear seat movement.
215Left-hand side lamps, left-hand and right-hand sidemarker lights, caravan/trailer.
2220Rear seat heaters.
Relay NoColorCircuit
1BrownAir conditioning coolant pump
2BrownFront fog lamps
3BrownHeadlamps - high beam
4BrownHeadlamps - power wash pump (where fitted)
5BrownHeadlamps - low beam
6BrownHorns
7BrownIgnition +
Page 1988 of 2490

Installation
1. Release securing tangs and remove cover.
2. Remove relay.
3. Identify each fuse and remove them.
The value and position of each fuse is illustrated on the lid
of the trunk compartment fuse box - for all fuse boxes on
the vehicle.
1. Installation is reverse of removal.
2. Reconnect battery ground cable; refer to 86.15.15.
Page 2052 of 2490

Body Closures - Luggage Compartment Lid Strut
Removal and Installation
Removal
Installation
1.
Remove trunk front liner. Refer to 76.19.31.
2. Place a suitable support under trunk lid.
3. Release strut from pivots.
1. Using a screwdriver, rele ase clip at rear end of
strut, withdraw end from trunk lid pivot and lower
strut for access.
2. Using a long screwdriver, release clip at front end of strut, withdraw end fro m pivot and remove strut
from vehicle.
1. Extend strut and fit front end onto pivot ensuring that retaining
clip fully seats.
2. Fit rear end of strut onto lid pi vot ensuring that retaining clip
fully seats.
3. Remove lid support and check that lid closes correctly.
4. Fit trunk front liner. Refer to 76.19.31.
Page 2081 of 2490

Interior Trim and Ornamentation - Luggage Compartment Lid Trim Panel
Removal and Installation
Removal
Installation
1. Remove trunk lamp assemblies. Refer to 86.45.16.
2. Release the three warning triang le securing clips and remove
warning triangle.
3. Slacken and remove warning triangle mounting bracket
securing screws an d remove bracket.
4. Remove covers from trunk latc h finisher securing bolts,
slacken and remove bolts and remove finisher.
5. Remove and discard the eighteee n trunk lid liner fasteners and
remove liner from vehicle.
Page 2083 of 2490

Interior Trim and Ornamentation - Luggage Compartment Rear Trim Panel
Removal and Installation
Removal
Installation
1. Remove tail lamp covers.
2. Remove trunk floor and battery cover. Refer to operations in
this section.
3. Remove and discard the two fir tr ee fasteners securing finisher
to trunk rear panel.
4. Pull rear finisher upwards to release upper spring clips and
remove finisher from trunk.
1. Position finisher on trunk rear panel and press firmly
downwards to engage spring clips.
2. Fit and fully seat fir tree fasteners.
3. Fit trunk floor and battery cover. Refer to operations in this
section.
4. Fit tail lamp covers.
Page 2106 of 2490

Exterior Trim and Ornamentation - Luggage Comp artment Lid Moulding
Removal and Installation
Removal
1. Remove battery cover and disc onnect ground cable from
battery terminal. Refer to 86.15.19.
2. Disconnect and remove trunk lamp assemblies. Refer to
86.45.16.
3. Remove covers from trunk latc h finisher securing bolts,
slacken and remove bolts and remove finisher.
4. Remove and discard trunk li d liner rear fasteners and
position liner for access.
5. Free trunk lid release button harness from retaining clip and
disconnect multiplug.
6. NOTE: The pressed steel fasteners fitted to Jaguar models
should be discarded on removal.
Slacken and remove nuts/fasteners securing trim finisher to
trunk lid.