Engine JAGUAR XF 2009 1.G User Guide
[x] Cancel search | Manufacturer: JAGUAR, Model Year: 2009, Model line: XF, Model: JAGUAR XF 2009 1.GPages: 391, PDF Size: 19.32 MB
Page 38 of 391
Alarm
38
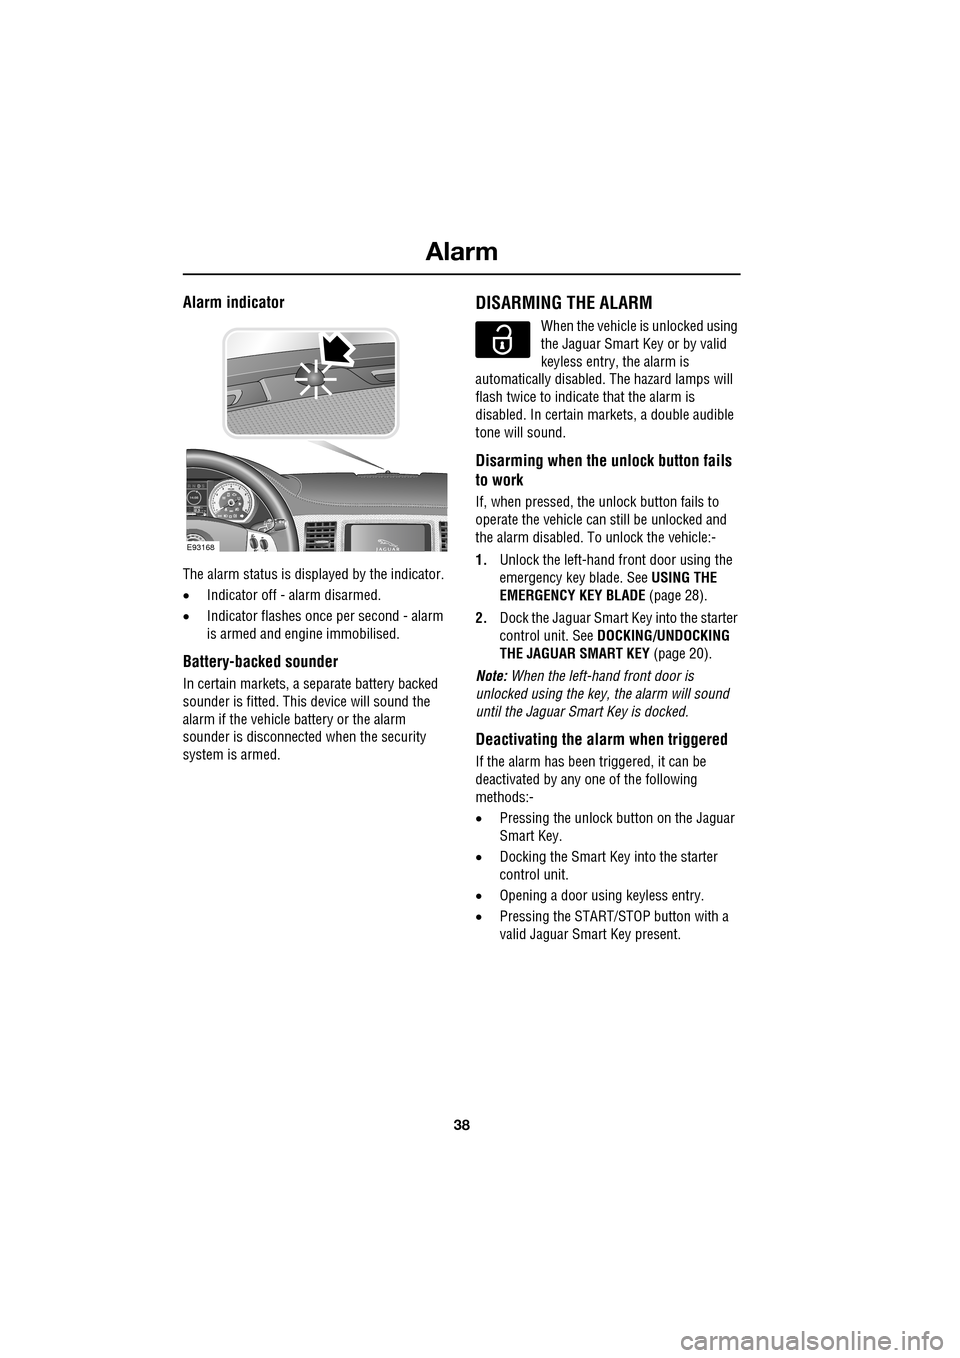
Alarm indicator
The alarm status is displayed by the indicator.
•Indicator off - alarm disarmed.
• Indicator flashes onc e per second - alarm
is armed and engine immobilised.
Battery-backed sounder
In certain markets, a separate battery backed
sounder is fitted. This device will sound the
alarm if the vehicle battery or the alarm
sounder is disconnected when the security
system is armed.
DISARMING THE ALARM
When the vehicle is unlocked using
the Jaguar Smart Key or by valid
keyless entry, the alarm is
automatically disabled. The hazard lamps will
flash twice to indicate that the alarm is
disabled. In certain ma rkets, a double audible
tone will sound.
Disarming when the unlock button fails
to work
If, when pressed, the unlock button fails to
operate the vehicle can still be unlocked and
the alarm disabled. To unlock the vehicle:-
1. Unlock the left-hand front door using the
emergency key blade. See USING THE
EMERGENCY KEY BLADE (page 28).
2. Dock the Jaguar Smart Key into the starter
control unit. See DOCKING/UNDOCKING
THE JAGUAR SMART KEY (page 20).
Note: When the left-hand front door is
unlocked using the key, the alarm will sound
until the Jaguar Smart Key is docked.
Deactivating the alarm when triggered
If the alarm has been triggered, it can be
deactivated by any one of the following
methods:-
• Pressing the unlock button on the Jaguar
Smart Key.
• Docking the Smart Key into the starter
control unit.
• Opening a door using keyless entry.
• Pressing the START/ST OP button with a
valid Jaguar Smart Key present.
km/ 0 km
E93168
Page 47 of 391
47
Seats
Raising the rear seats
The process for raising the rear seat is the
reverse of folding.
HEATED SEATS
Note: To prevent the battery from becoming
discharged the seat heaters will only operate
when the engine is running.
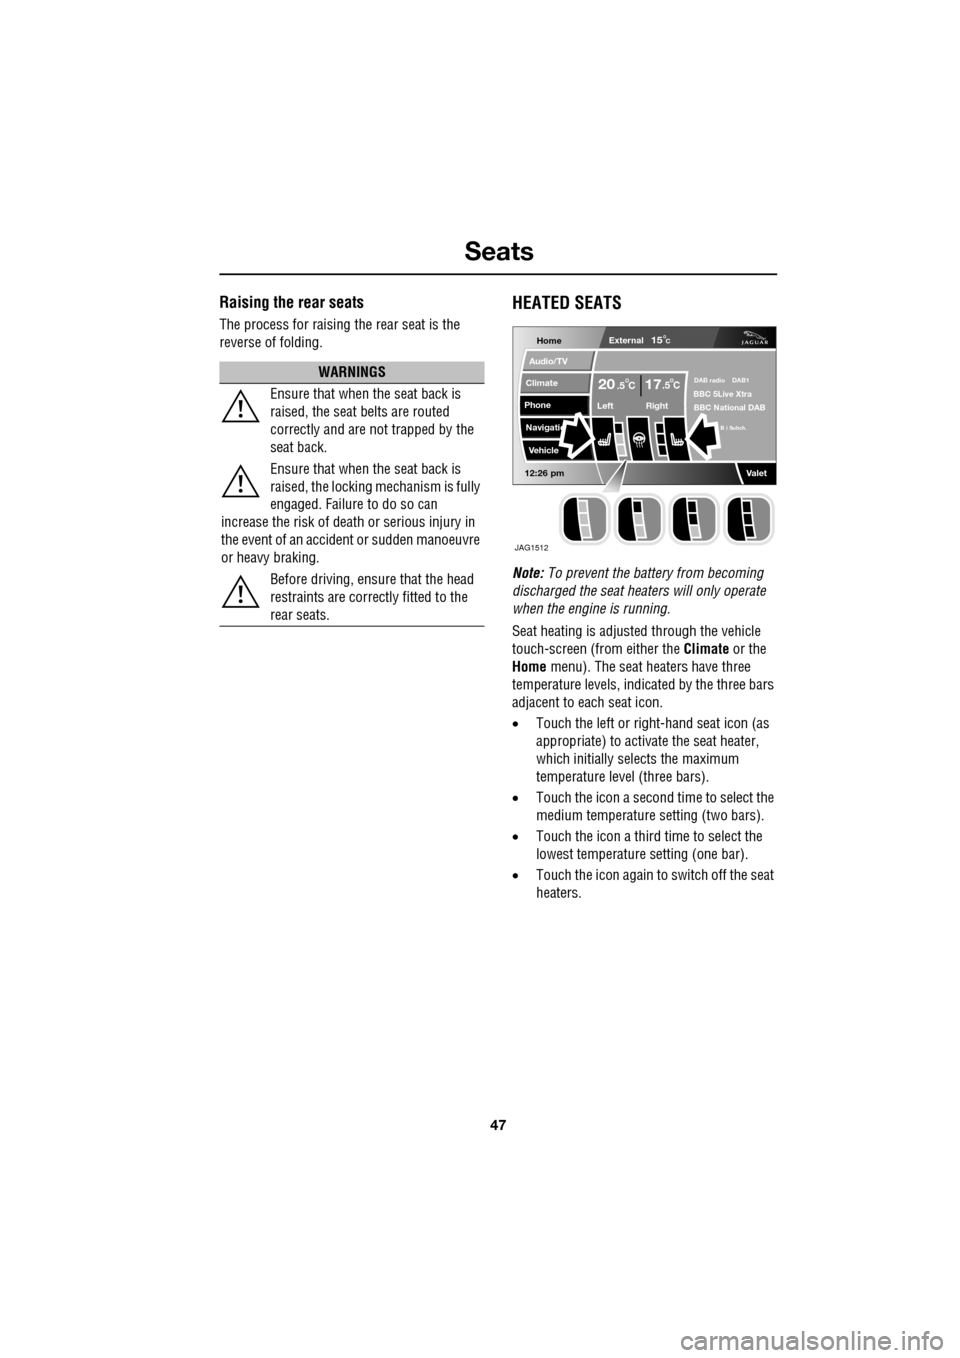
Seat heating is adjusted through the vehicle
touch-screen (from either the Climate or the
Home menu). The seat heaters have three
temperature levels, indica ted by the three bars
adjacent to each seat icon.
• Touch the left or right -hand seat icon (as
appropriate) to activate the seat heater,
which initially selects the maximum
temperature level (three bars).
• Touch the icon a second time to select the
medium temperature setting (two bars).
• Touch the icon a third time to select the
lowest temperature setting (one bar).
• Touch the icon again to switch off the seat
heaters.
WARNINGS
Ensure that when the seat back is
raised, the seat belts are routed
correctly and are not trapped by the
seat back.
Ensure that when the seat back is
raised, the locking mechanism is fully
engaged. Failure to do so can
increase the risk of death or serious injury in
the event of an accident or sudden manoeuvre
or heavy braking.
Before driving, ensure that the head
restraints are correctly fitted to the
rear seats.
Home
Audio/TV
Climate
Phone
Navigatio
Vehicle
Left Right
20 17CC.5 .5
Valet12:26 pm
External15C
DAB radio DAB1BBC 5Live Xtra
BBC National DAB
B i Subch.
JAG1512
Page 48 of 391
Seats
48
CLIMATE SEATS
Note: To prevent the battery from becoming
discharged the climate seats will only operate
when the engine is running.
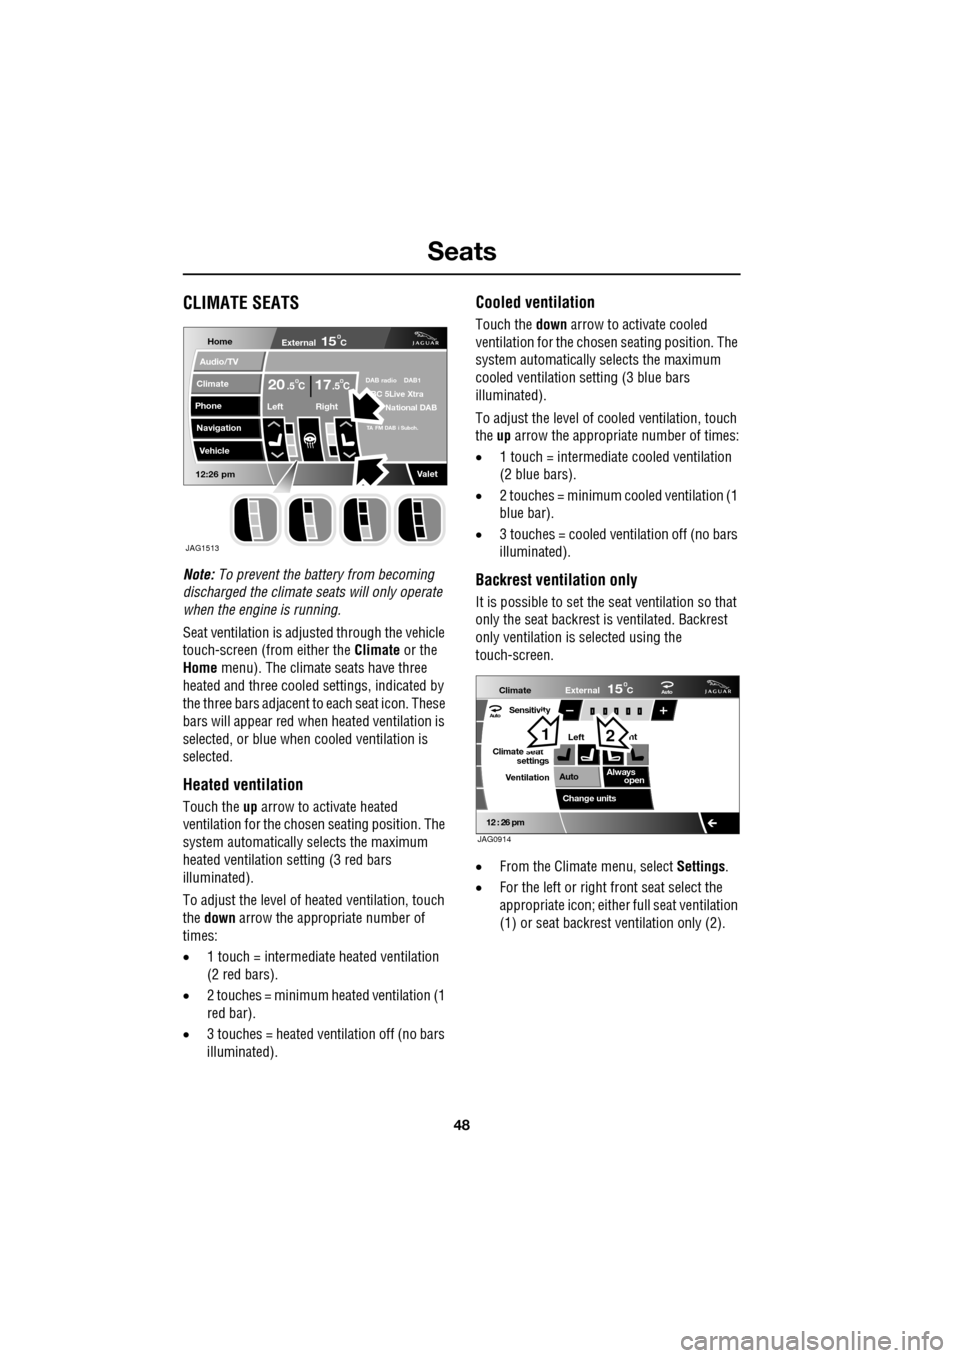
Seat ventilation is adjusted through the vehicle
touch-screen (from either the Climate or the
Home menu). The climate seats have three
heated and three cooled settings, indicated by
the three bars adjacent to each seat icon. These
bars will appear red wh en heated ventilation is
selected, or blue when cooled ventilation is
selected.
Heated ventilation
Touch the up arrow to activate heated
ventilation for the chosen seating position. The
system automatically selects the maximum
heated ventilation setting (3 red bars
illuminated).
To adjust the level of he ated ventilation, touch
the down arrow the appropriate number of
times:
• 1 touch = intermediate heated ventilation
(2 red bars).
• 2 touches = minimum heated ventilation (1
red bar).
• 3 touches = heated ventilation off (no bars
illuminated).
Cooled ventilation
Touch the down arrow to activate cooled
ventilation for the chosen seating position. The
system automatically selects the maximum
cooled ventilation se tting (3 blue bars
illuminated).
To adjust the level of co oled ventilation, touch
the up arrow the appropriate number of times:
• 1 touch = intermediate cooled ventilation
(2 blue bars).
• 2 touches = minimum cooled ventilation (1
blue bar).
• 3 touches = cooled ventilation off (no bars
illuminated).
Backrest ventilation only
It is possible to set the se at ventilation so that
only the seat backrest is ventilated. Backrest
only ventilation is se lected using the
touch-screen.
• From the Climate menu, select Settings.
• For the left or right front seat select the
appropriate icon; either full seat ventilation
(1) or seat backrest ventilation only (2).
Home
Audio/TV
Climate
Phone
Navigation
Vehicle
Valet12:26 pm
External15C
Left Right
20 17CC.5 .5DAB radio DAB1BC 5Live Xtra
National DAB
TA FM DAB i Subch.
JAG1513
Aut o
12 : 26 pm
Aut oClimate
VentilationExternal
Left
Sensitivity
Climate seat settings
Change units ht
Always open
Auto
15C
JAG0914
12
Page 66 of 391
Pedestrian protection
66
PRINCIPLE OF OPERATION
The pedestrian protection system has been
designed to reduce lower leg and head injuries
in the event of a frontal collision with a
pedestrian.
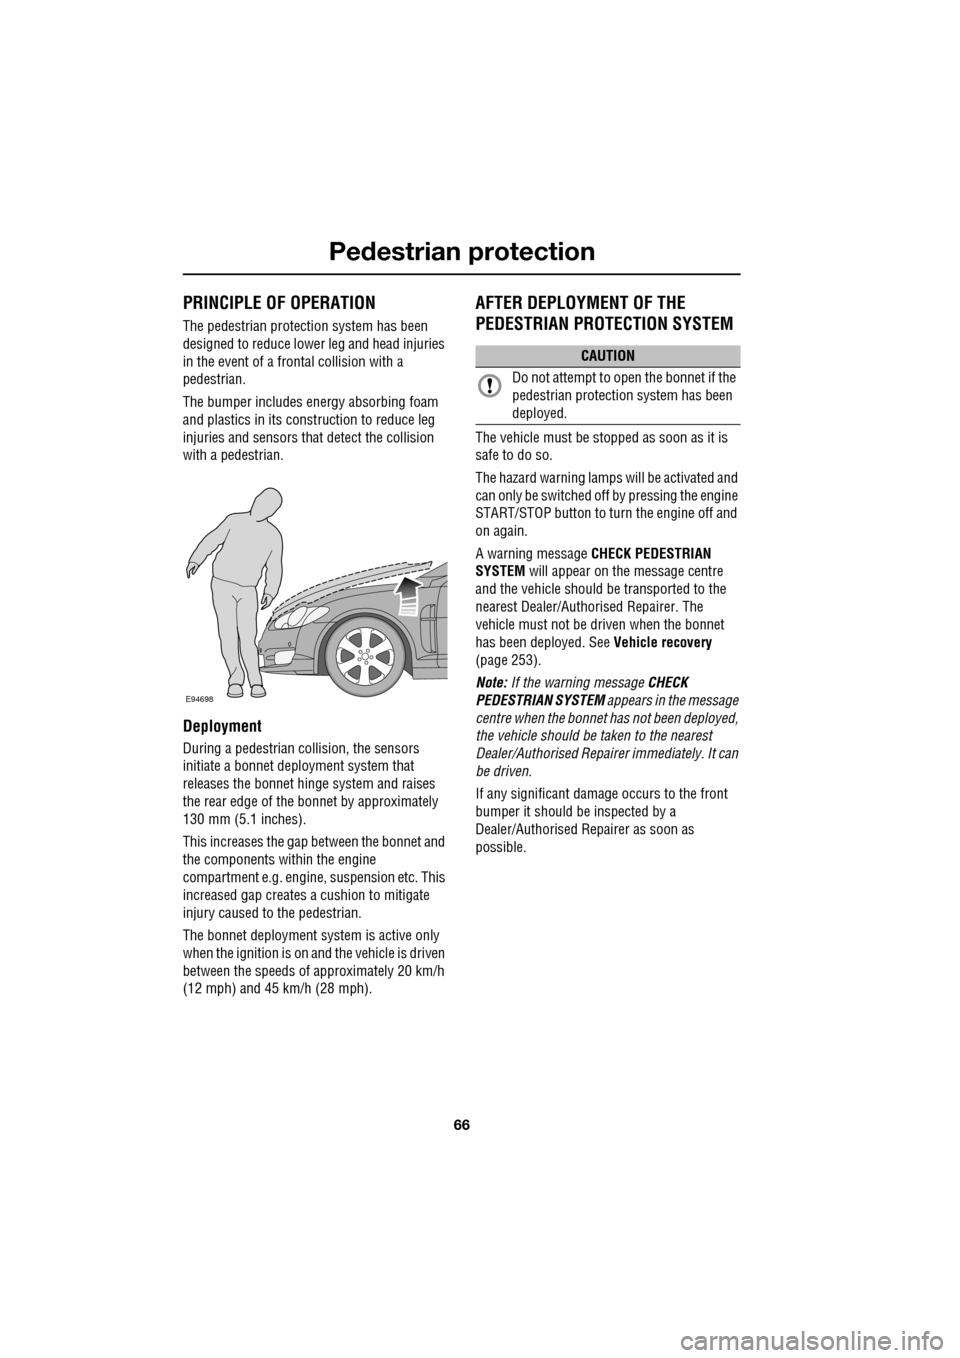
The bumper includes energy absorbing foam
and plastics in its cons truction to reduce leg
injuries and sensors th at detect the collision
with a pedestrian.
Deployment
During a pedestrian co llision, the sensors
initiate a bonnet deploy ment system that
releases the bonnet hinge system and raises
the rear edge of the bonnet by approximately
130 mm (5.1 inches).
This increases the gap between the bonnet and
the components within the engine
compartment e.g. engine, suspension etc. This
increased gap creates a cushion to mitigate
injury caused to the pedestrian.
The bonnet deployment system is active only
when the ignition is on and the vehicle is driven
between the speeds of approximately 20 km/h
(12 mph) and 45 km/h (28 mph).
AFTER DEPLOYMENT OF THE
PEDESTRIAN PROTECTION SYSTEM
The vehicle must be stopped as soon as it is
safe to do so.
The hazard warning lamp s will be activated and
can only be switched off by pressing the engine
START/STOP button to turn the engine off and
on again.
A warning message CHECK PEDESTRIAN
SYSTEM will appear on the message centre
and the vehicle should be transported to the
nearest Dealer/Author ised Repairer. The
vehicle must not be driven when the bonnet
has been deployed. See Vehicle recovery
(page 253).
Note: If the warning message CHECK
PEDESTRIAN SYSTEM appears in the message
centre when the bonnet ha s not been deployed,
the vehicle should be taken to the nearest
Dealer/Authorised Repairer immediately. It can
be driven.
If any significant damage occurs to the front
bumper it should be inspected by a
Dealer/Authorised Repairer as soon as
possible.
E94698
CAUTION
Do not attempt to open the bonnet if the
pedestrian protection system has been
deployed.
Page 68 of 391
Steering wheel
68
HORN
The dual tone horn is operated by pressing the
centre pad on the steering wheel.
The horn also operates as the alarm sounder, if
the vehicle alarm system is activated.
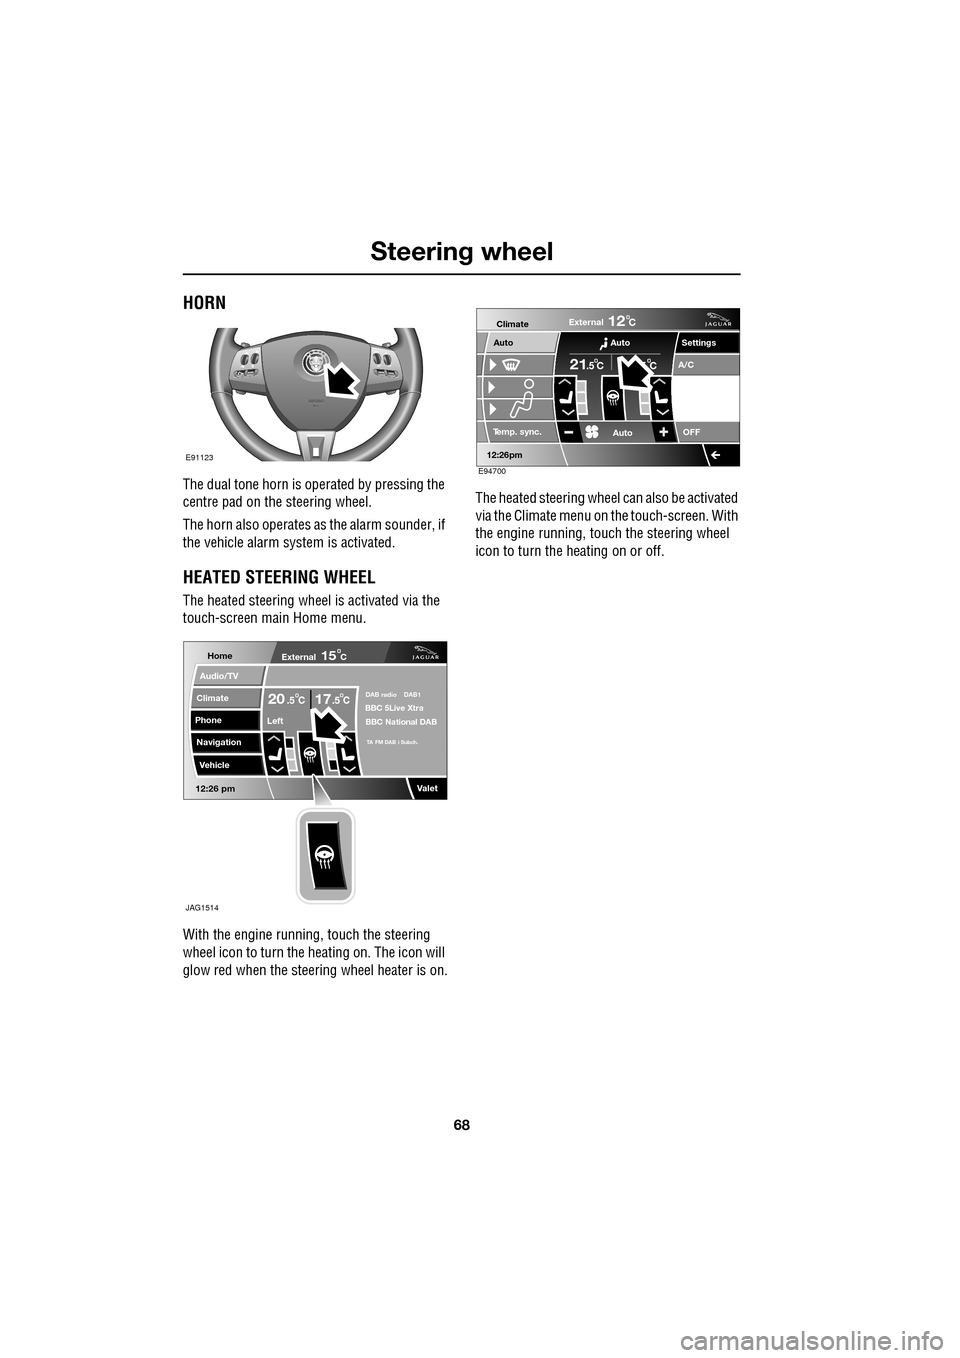
HEATED STEERING WHEEL
The heated steering wheel is activated via the
touch-screen main Home menu.
With the engine running, touch the steering
wheel icon to turn the heating on. The icon will
glow red when the steering wheel heater is on. The heated steering wheel
can also be activated
via the Climate menu on the touch-screen. With
the engine running, touch the steering wheel
icon to turn the heating on or off.
E91123
Home
Audio/TV
Climate
Phone
Navigation
Vehicle
Valet12:26 pm
External15C
Left
20 17CC.5 .5DAB radio DAB1BBC 5Live Xtra
BBC National DAB
TA FM DAB i Subch.
JAG1514
Settings
Te m p . sync. External
12C
Auto
21C5 C
Auto
A/C
OFF
.5
Climate
12 : 26 pm
Auto
E94700
Page 81 of 391
81
Lighting
Note: For lamps controlled by proximity
sensors, the wearing of gloves may interfere
with operation. If you are wearing gloves, it
may be necessary to touch the proximity
switch to operate the lamps.
Ambience lighting
Ambience lighting. Automatically illuminates
when the headlamps are on. Ambience lighting
creates a blue glow ar ound the centre console
and front door armrests.
Luggage compartment lamp
Automatically illuminates when the luggage
compartment is opened.
APPROACH LAMPS
This feature is activated by pressing
the headlamp icon button on the
Jaguar Smart Key. See USING THE
REMOTE CONTROL (page 17). The headlamps
will remain on for 25 seconds or until the
button is pressed again, or until the engine
START/STOP button is pressed.
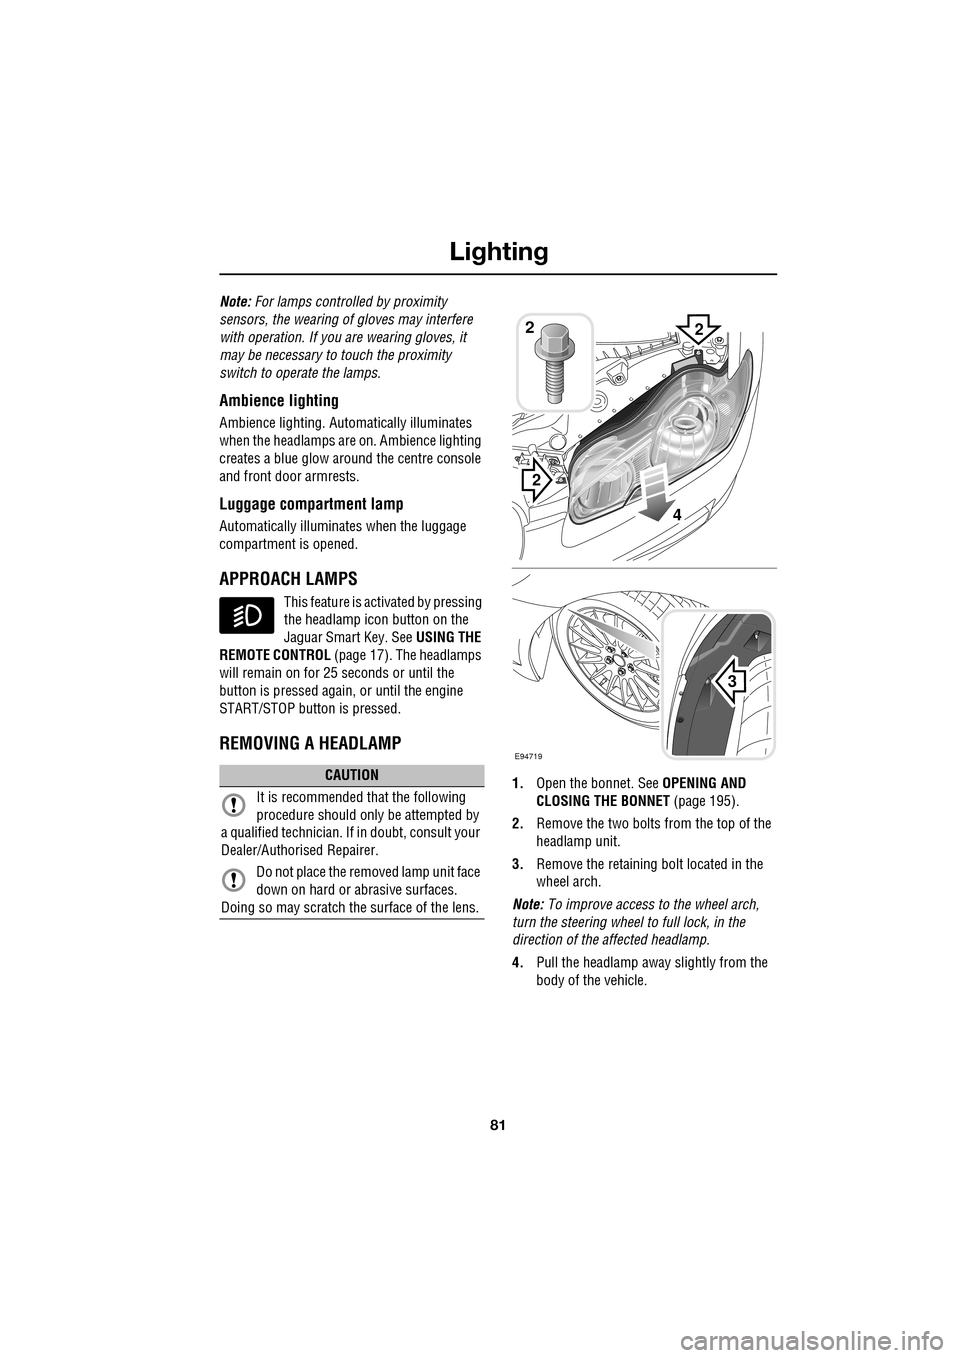
REMOVING A HEADLAMP
1. Open the bonnet. See OPENING AND
CLOSING THE BONNET (page 195).
2. Remove the two bolts from the top of the
headlamp unit.
3. Remove the retaining bolt located in the
wheel arch.
Note: To improve access to the wheel arch,
turn the steering wheel to full lock, in the
direction of the affected headlamp.
4. Pull the headlamp away slightly from the
body of the vehicle.CAUTION
It is recommended that the following
procedure should only be attempted by
a qualified technician. If in doubt, consult your
Dealer/Authorised Repairer.
Do not place the removed lamp unit face
down on hard or abrasive surfaces.
Doing so may scratch the surface of the lens.
3
2
2
E94719
2
4
Page 93 of 391
93
Windows and mirrors
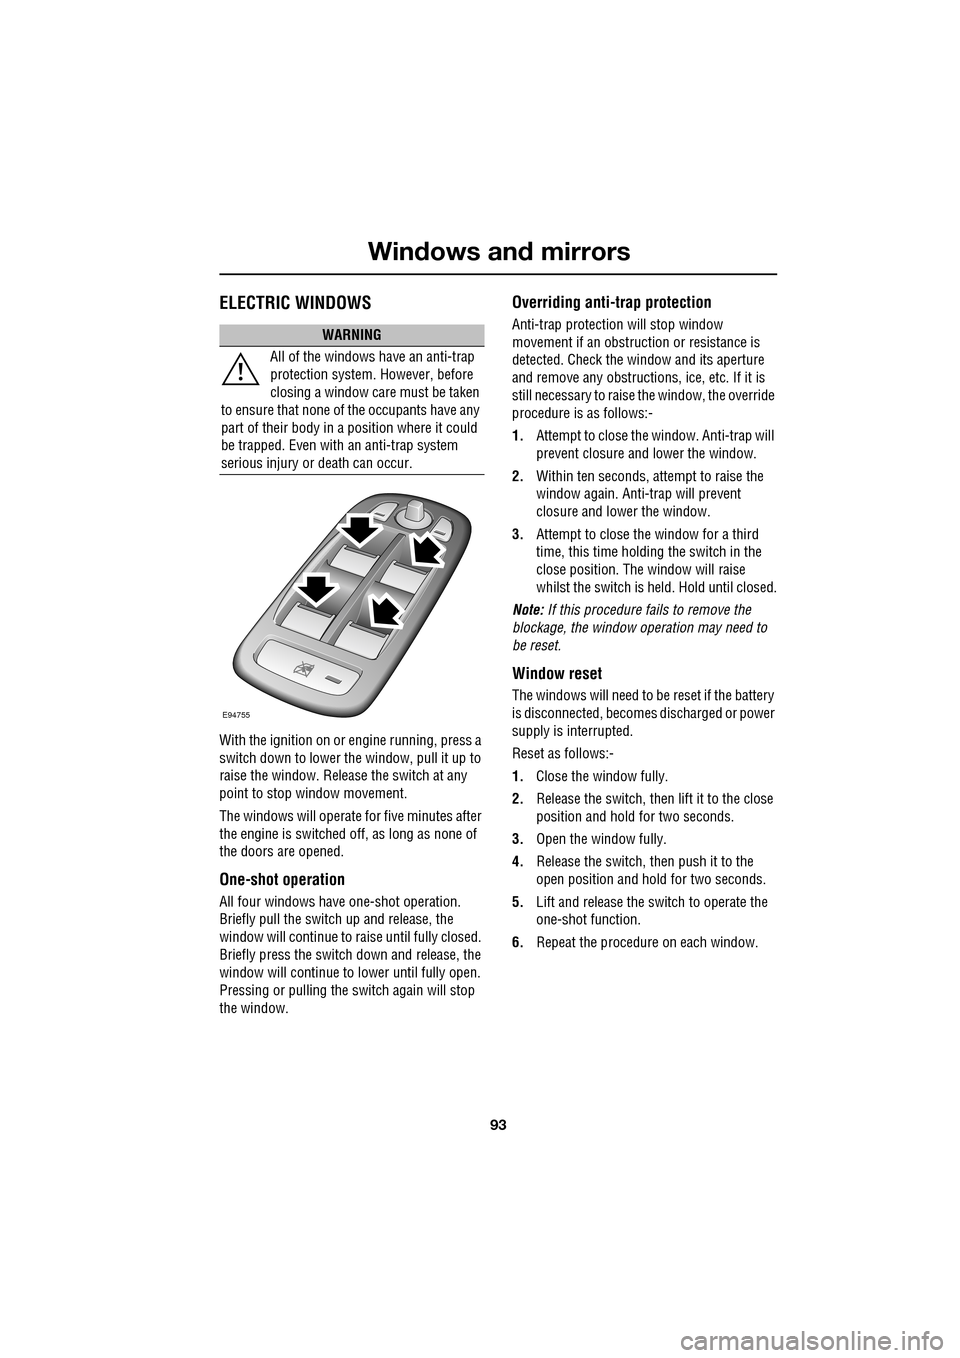
ELECTRIC WINDOWS
With the ignition on or engine running, press a
switch down to lower the window, pull it up to
raise the window. Release the switch at any
point to stop window movement.
The windows will operate for five minutes after
the engine is switched off, as long as none of
the doors are opened.
One-shot operation
All four windows have one-shot operation.
Briefly pull the switch up and release, the
window will continue to raise until fully closed.
Briefly press the switch down and release, the
window will continue to lower until fully open.
Pressing or pulling the switch again will stop
the window.
Overriding anti-trap protection
Anti-trap protection will stop window
movement if an obstruction or resistance is
detected. Check the window and its aperture
and remove any obstructions, ice, etc. If it is
still necessary to raise the window, the override
procedure is as follows:-
1. Attempt to close the window. Anti-trap will
prevent closure and lower the window.
2. Within ten seconds, attempt to raise the
window again. Anti-t rap will prevent
closure and lower the window.
3. Attempt to close the window for a third
time, this time holding the switch in the
close position. The window will raise
whilst the switch is held. Hold until closed.
Note: If this procedure fails to remove the
blockage, the window operation may need to
be reset.
Window reset
The windows will need to be reset if the battery
is disconnected, becomes discharged or power
supply is interrupted.
Reset as follows:-
1. Close the window fully.
2. Release the switch, then lift it to the close
position and hold for two seconds.
3. Open the window fully.
4. Release the switch, then push it to the
open position and hold for two seconds.
5. Lift and release the switch to operate the
one-shot function.
6. Repeat the procedure on each window.
WARNING
All of the windows have an anti-trap
protection system. However, before
closing a window care must be taken
to ensure that none of the occupants have any
part of their body in a position where it could
be trapped. Even with an anti-trap system
serious injury or death can occur.
E94755
Page 98 of 391
Windows and mirrors
98
BSM is designed to work most effectively when
driving on multi-lane highways.
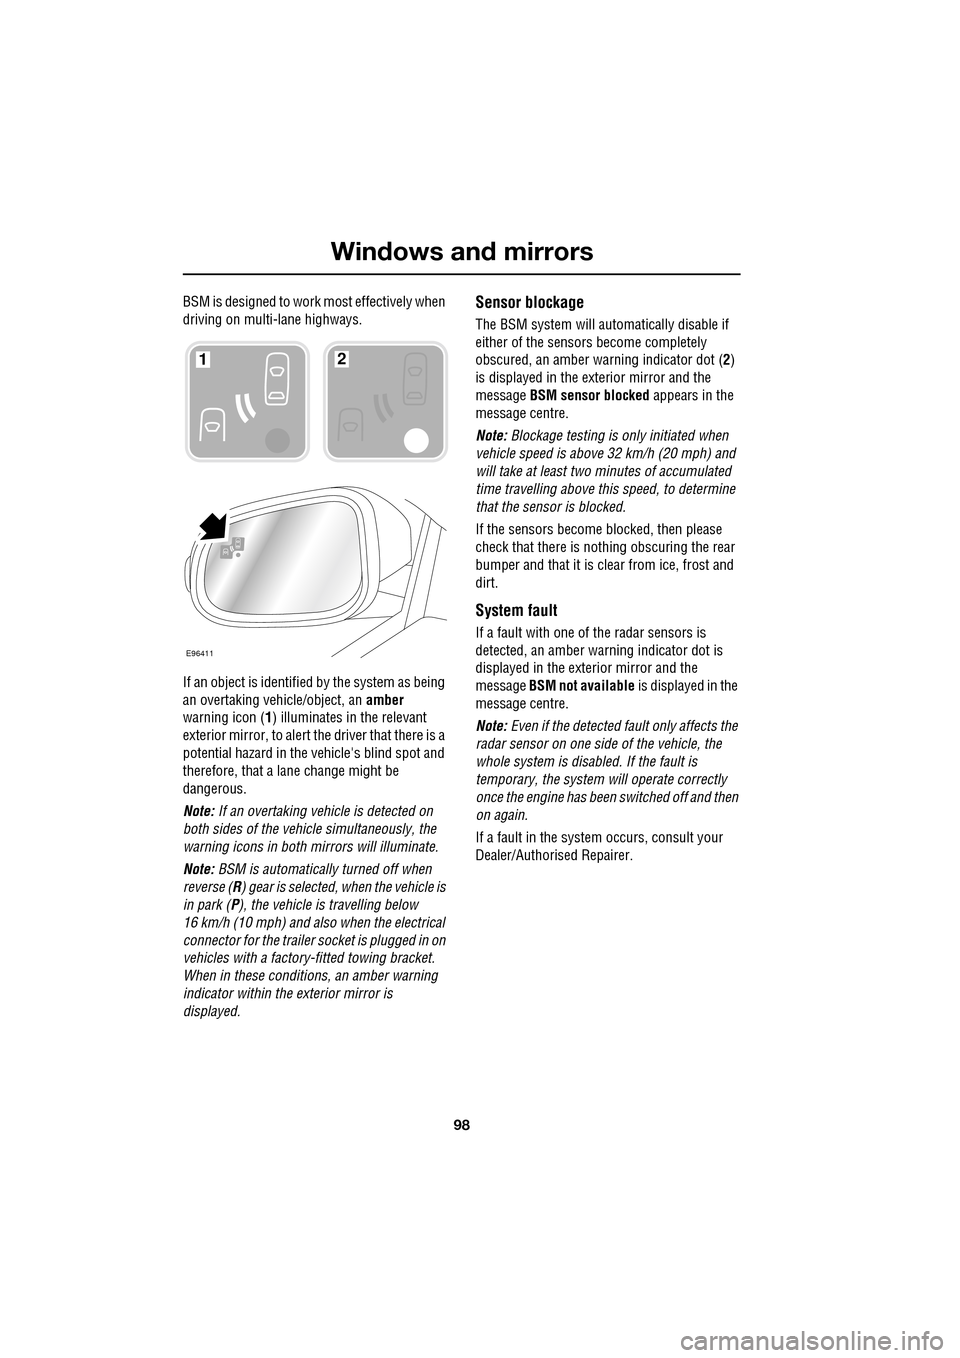
If an object is identified by the system as being
an overtaking vehicle/object, an amber
warning icon ( 1) illuminates in the relevant
exterior mirror, to alert the driver that there is a
potential hazard in the vehicle's blind spot and
therefore, that a lane change might be
dangerous.
Note: If an overtaking vehicle is detected on
both sides of the vehicle simultaneously, the
warning icons in both mirrors will illuminate.
Note: BSM is automatically turned off when
reverse ( R) gear is selected, when the vehicle is
in park ( P), the vehicle is travelling below
16 km/h (10 mph) and also when the electrical
connector for the trailer socket is plugged in on
vehicles with a factory-fitted towing bracket.
When in these conditions, an amber warning
indicator within the exterior mirror is
displayed.Sensor blockage
The BSM system will automatically disable if
either of the sensors become completely
obscured, an amber wa rning indicator dot (2)
is displayed in the exterior mirror and the
message BSM sensor blocked appears in the
message centre.
Note: Blockage testing is only initiated when
vehicle speed is above 32 km/h (20 mph) and
will take at least two minutes of accumulated
time travelling above th is speed, to determine
that the sensor is blocked.
If the sensors become blocked, then please
check that there is nothing obscuring the rear
bumper and that it is cl ear from ice, frost and
dirt.
System fault
If a fault with one of the radar sensors is
detected, an amber warn ing indicator dot is
displayed in the exterior mirror and the
message BSM not available is displayed in the
message centre.
Note: Even if the detected fault only affects the
radar sensor on one side of the vehicle, the
whole system is disabled. If the fault is
temporary, the system will operate correctly
once the engine has been switched off and then
on again.
If a fault in the system occurs, consult your
Dealer/Authorised Repairer.
E96411
12
Page 99 of 391
99
Instruments
INSTRUMENT PANEL OVERVIEW
Instrument panel
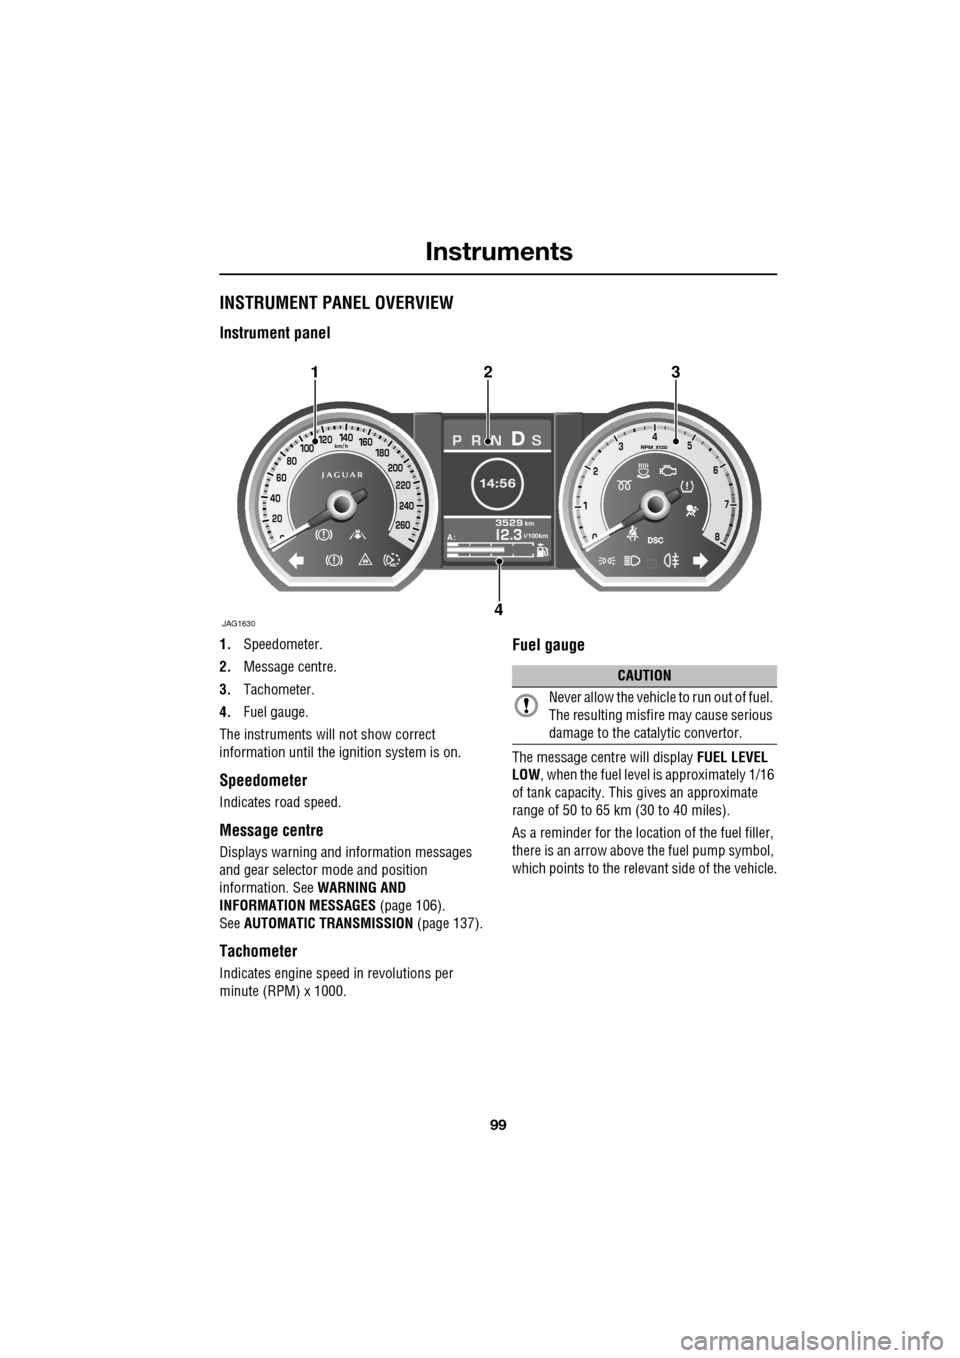
1.Speedometer.
2. Message centre.
3. Tachometer.
4. Fuel gauge.
The instruments will not show correct
information until the i gnition system is on.
Speedometer
Indicates road speed.
Message centre
Displays warning and information messages
and gear selector mode and position
information. See WARNING AND
INFORMATION MESSAGES (page 106).
See AUTOMATIC TRANSMISSION (page 137).
Tachometer
Indicates engine speed in revolutions per
minute (RPM) x 1000.
Fuel gauge
The message centre will display FUEL LEVEL
LOW , when the fuel level is approximately 1/16
of tank capacity. This gives an approximate
range of 50 to 65 km (30 to 40 miles).
As a reminder for the location of the fuel filler,
there is an arrow above the fuel pump symbol,
which points to the releva nt side of the vehicle.
Akm
l/100km
JAG1630
123
4
CAUTION
Never allow the vehicle to run out of fuel.
The resulting misfire may cause serious
damage to the catalytic convertor.
Page 100 of 391
Instruments
100
WARNING LAMPS AND INDICATORS
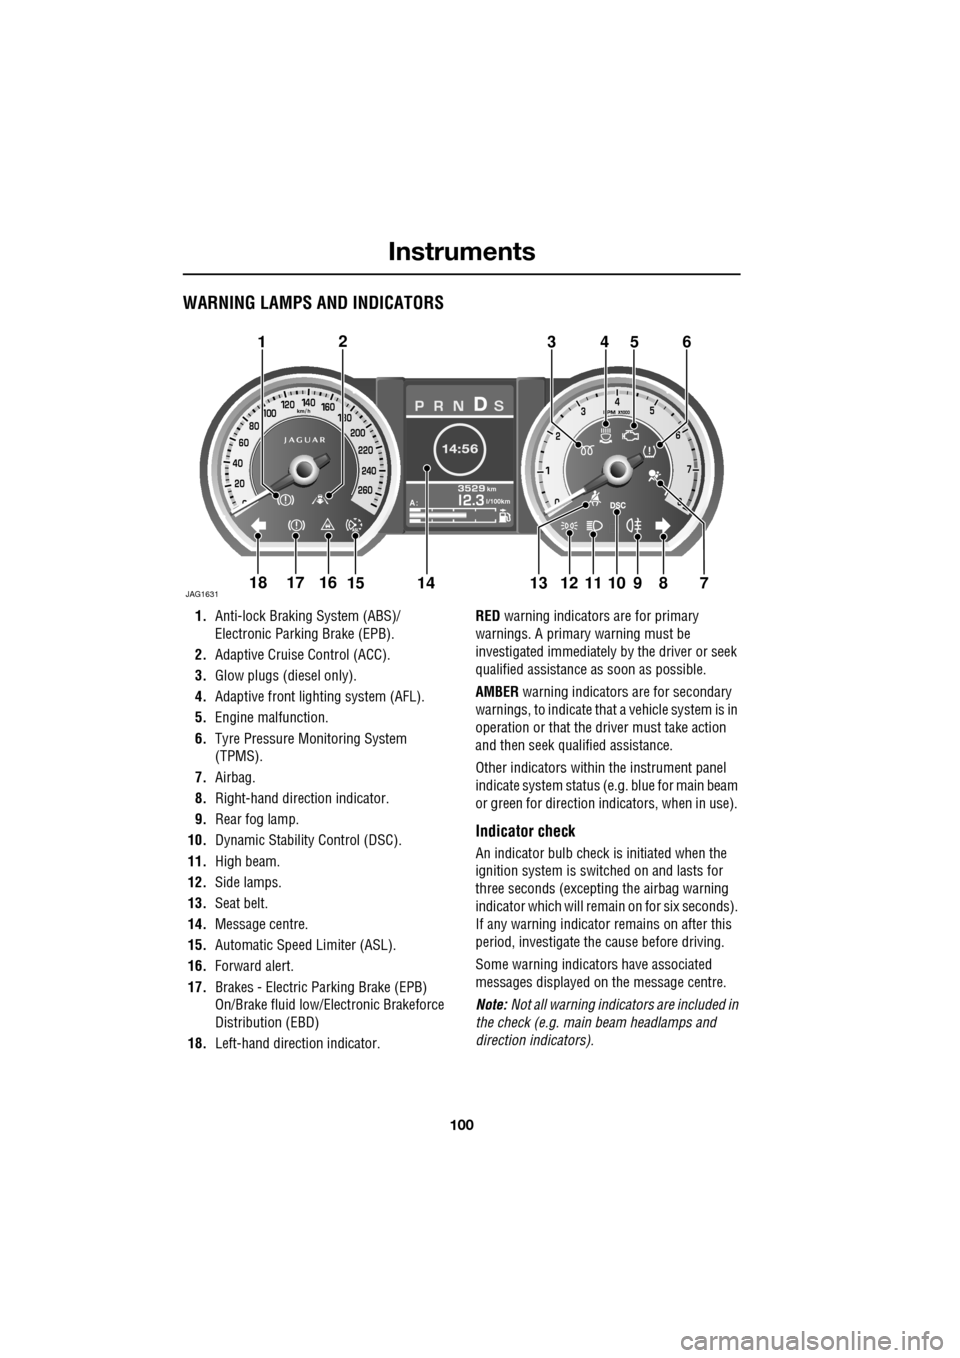
1.Anti-lock Braking System (ABS)/
Electronic Parking Brake (EPB).
2. Adaptive Cruise Control (ACC).
3. Glow plugs (diesel only).
4. Adaptive front lighting system (AFL).
5. Engine malfunction.
6. Tyre Pressure M onitoring System
(TPMS).
7. Airbag.
8. Right-hand direct ion indicator.
9. Rear fog lamp.
10. Dynamic Stability Control (DSC).
11. High beam.
12. Side lamps.
13. Seat belt.
14. Message centre.
15. Automatic Speed Limiter (ASL).
16. Forward alert.
17. Brakes - Electric Parking Brake (EPB)
On/Brake fluid low/El ectronic Brakeforce
Distribution (EBD)
18. Left-hand direction indicator. RED
warning indicators are for primary
warnings. A primary warning must be
investigated immediately by the driver or seek
qualified assistance as soon as possible.
AMBER warning indicators are for secondary
warnings, to indicate that a vehicle system is in
operation or that the driver must take action
and then seek qualified assistance.
Other indicators within the instrument panel
indicate system status (e .g. blue for main beam
or green for direction indicators, when in use).
Indicator check
An indicator bulb check is initiated when the
ignition system is switched on and lasts for
three seconds (excepting the airbag warning
indicator which will remain on for six seconds).
If any warning indicator remains on after this
period, investigate the cause before driving.
Some warning indicators have associated
messages displayed on the message centre.
Note: Not all warning indicators are included in
the check (e.g. main beam headlamps and
direction indicators).
Akm
l/100km
JAG1631
123456
789101817161514131211