JAGUAR XF 2009 1.G Manual PDF
Manufacturer: JAGUAR, Model Year: 2009, Model line: XF, Model: JAGUAR XF 2009 1.GPages: 391, PDF Size: 19.32 MB
Page 71 of 391
71
Steering wheel
Cancelling voice control
To cancel a voice command, press and hold the
Voice button on the steering wheel until a
double tone is heard.
Note: If a phone call is received during a voice
session, voice control is cancelled.
Voice system tutorial
To listen to a tutorial on how to use
JaguarVoice, press and release the voice
button and, after the tone, say VOICE
TUTORIAL .
The tutorial is divided into four lessons and has
a total duration of approximately four minutes.
The tutorial can only be undertaken with the
vehicle stationary and parked.
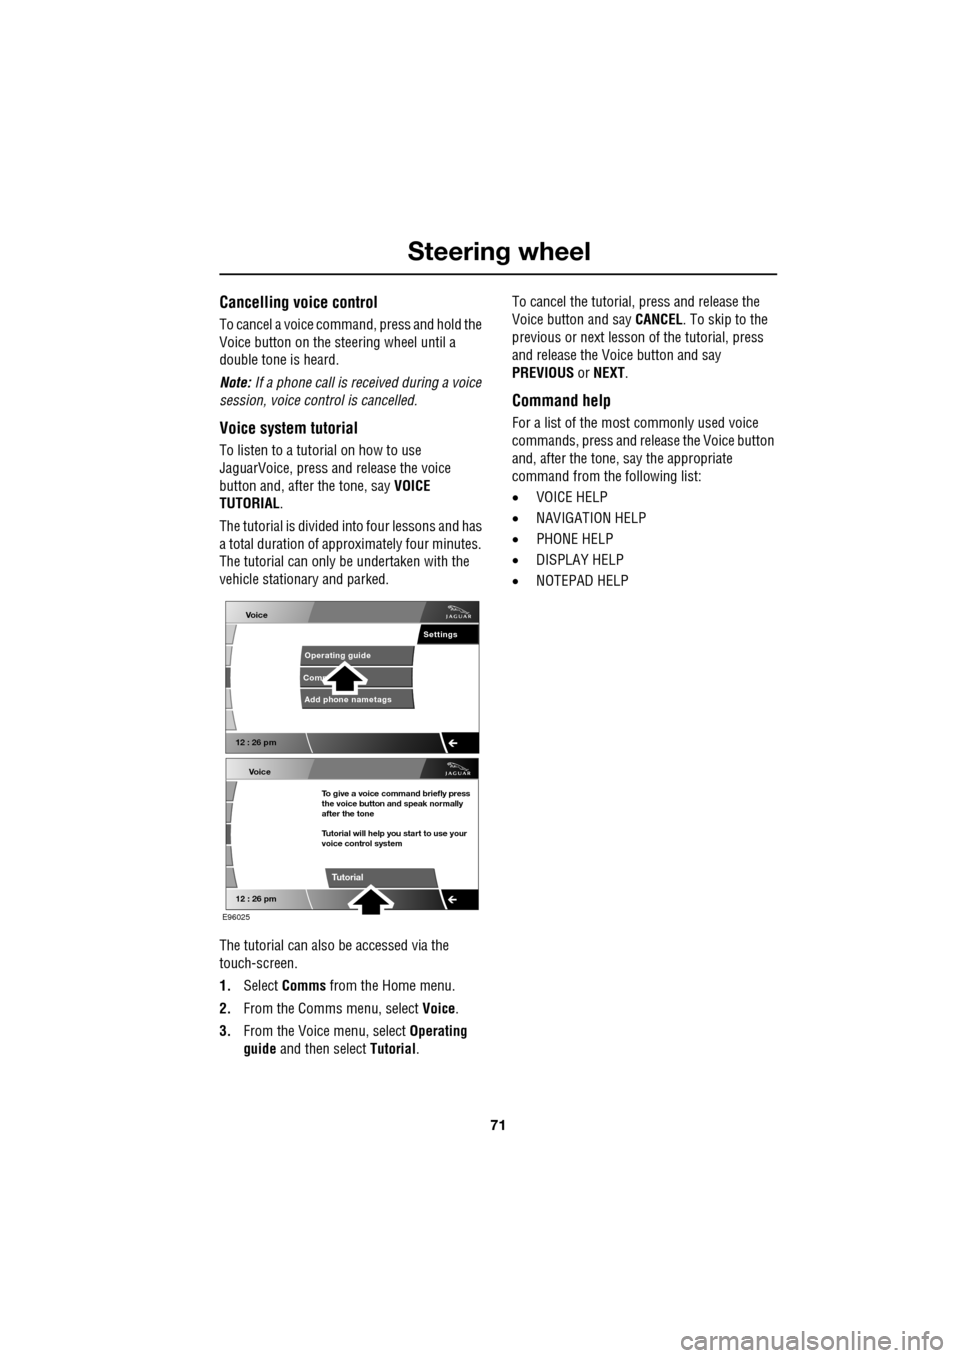
The tutorial can also be accessed via the
touch-screen.
1. Select Comms from the Home menu.
2. From the Comms menu, select Voice.
3. From the Voice menu, select Operating
guide and then select Tutorial. To cancel the tutorial, press and release the
Voice button and say
CANCEL. To skip to the
previous or next lesson of the tutorial, press
and release the Voice button and say
PREVIOUS or NEXT .
Command help
For a list of the most commonly used voice
commands, press and release the Voice button
and, after the tone, say the appropriate
command from the following list:
• VOICE HELP
• NAVIGATION HELP
• PHONE HELP
• DISPLAY HELP
• NOTEPAD HELP
Voice
12 : 26 pm
Add phone nametags
Comm Operating guide
Settings
E96025
Voice
12 : 26 pm
To give a voice command briefly press
the voice button and speak normally
after the tone
Tutorial will help you start to use your
voice control system
Tutorial
Page 72 of 391
Steering wheel
72
Full command list
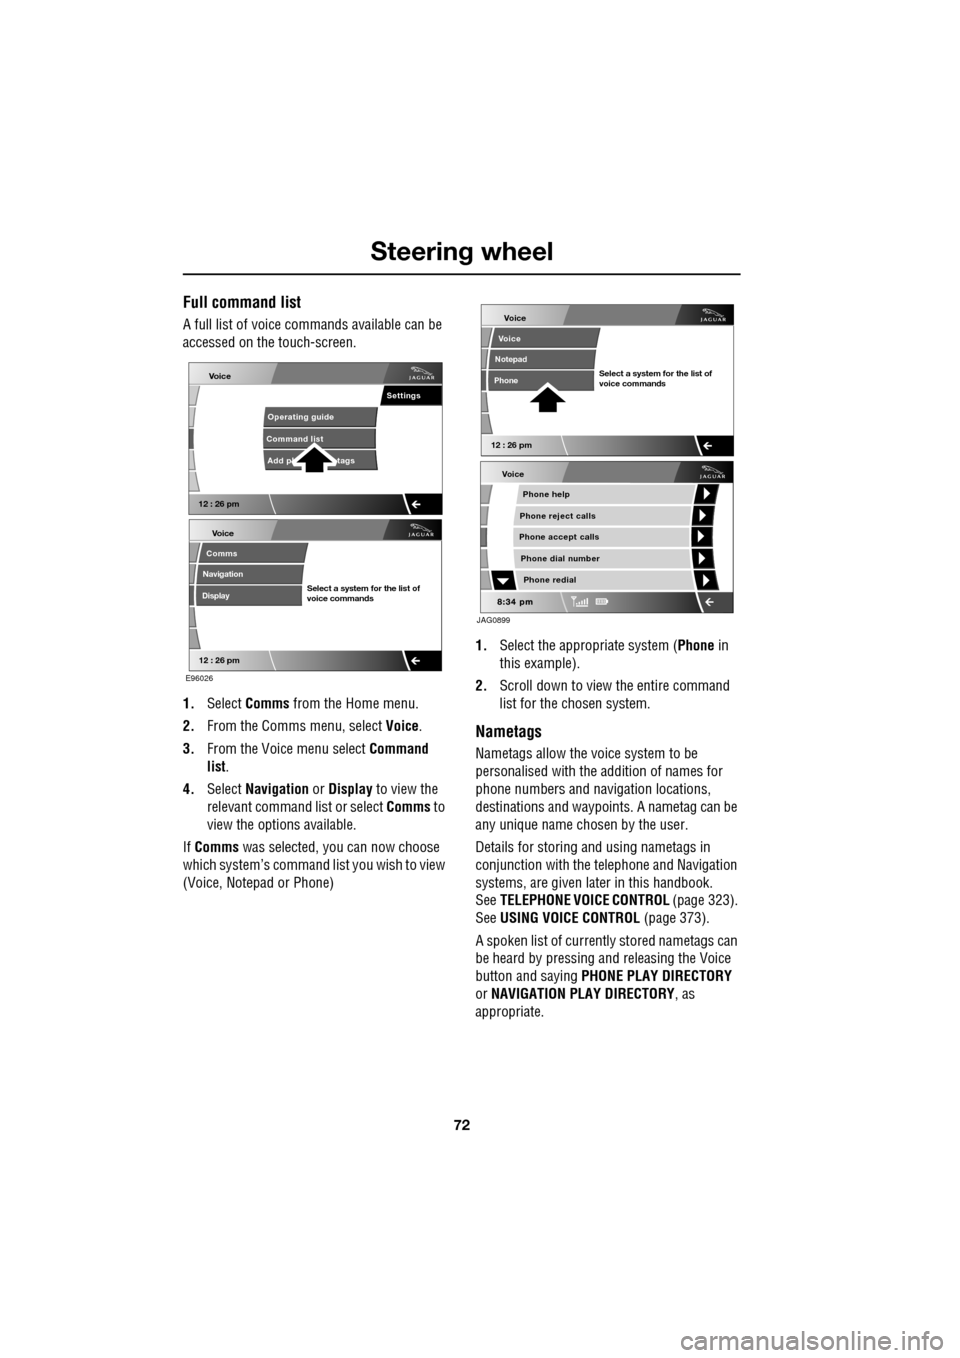
A full list of voice commands available can be
accessed on the touch-screen.
1. Select Comms from the Home menu.
2. From the Comms menu, select Voice.
3. From the Voice menu select Command
list.
4. Select Navigation or Display to view the
relevant command list or select Comms to
view the options available.
If Comms was selected, you can now choose
which system’s command list you wish to view
(Voice, Notepad or Phone) 1.
Select the appropriate system ( Phone in
this example).
2. Scroll down to view the entire command
list for the chosen system.
Nametags
Nametags allow the voice system to be
personalised with the addition of names for
phone numbers and navigation locations,
destinations and waypoi nts. A nametag can be
any unique name chosen by the user.
Details for storing and using nametags in
conjunction with the telephone and Navigation
systems, are given later in this handbook.
See TELEPHONE VOICE CONTROL (page 323).
See USING VOICE CONTROL (page 373).
A spoken list of current ly stored nametags can
be heard by pressing an d releasing the Voice
button and saying PHONE PLAY DIRECTORY
or NAVIGATION PLAY DIRECTORY , as
appropriate.
Voice
12 : 26 pm
Add ph tags
Command list Operating guide
Settings
E96026
Voice
12 : 26 pm
Select a system for the list of
voice commands
Comms
Navigation
Display
Voice
Phone help
Phone reject calls
Phone accept calls
Phone redial
Phone dial number
JAG0899
Voice
12 : 26 pm
Select a system for the list of
voice commands
Voice
Notepad
Phone
Page 73 of 391
73
Steering wheel
Notepad
The notepad facility enables the user to record
a note, up to a maximum of 30 seconds
duration, which can be subsequently recalled.
Note: To hear information on notepad
commands, press the Voice button, wait for the
tone to sound and then say NOTEPAD HELP.
Recording a note
1.Press and release the Voice button, wait
for the tone to sound, then say RECORD
NOTE .
2. Say the words of the note to be recorded,
then press and hold the Voice button to
end and save the note.
Note: The maximum length of a note is 30
seconds, after wh ich time the recording of the
note will be ended automatically.
Playing a note
Press and release the Voice button, wait for the
tone to sound, then say PLAY NOTEPAD. If
multiple notes are stored on the system, press
and release the Voice button during playback
and say NEXT, to skip to the next note.
Deleting notes
To delete an individual note, press and release
the Voice button during playback of the note to
be deleted and say DELETE.
To delete all notes stored on the system, press
and release the Voice button and say CLEAR
NOTEPAD .
Voice volume adjustment
The volume level for voice recognition can be
adjusted independently, either by using the
steering wheel controls or using the
touch-screen:
•Press the voice button on the steering
wheel, to initiate a voice session. Use the
volume control thumbwheel on the
steering wheel to adjust the volume, as
required.
• Select Vehicle from the touch-screen
Home menu, then select Veh. settings.
Find the correct entry from the menu of
infotainment volume settings and adjust as
required.
Voice commands
This is a list and a de scription of the basic
Voice commands used to operate the system.
A list and description of telephone and
Navigation system commands, is detailed later
in this handbook. See TELEPHONE VOICE
CONTROL (page 323). See NAVIGATION
SYSTEM VOICE COMMANDS (page 374).
Command Description
VOICE HELP Plays information on
operating the Voice
system.
VOICE TUTORIAL Initiates a four-part tutorial on use of the
Voice system.
DISPLAY HELP Plays information on touch-screen display
voice commands.
DISPLAY SHOW
PHONE The Phone menu is
displayed on the
touch-screen.
Page 74 of 391
Steering wheel
74
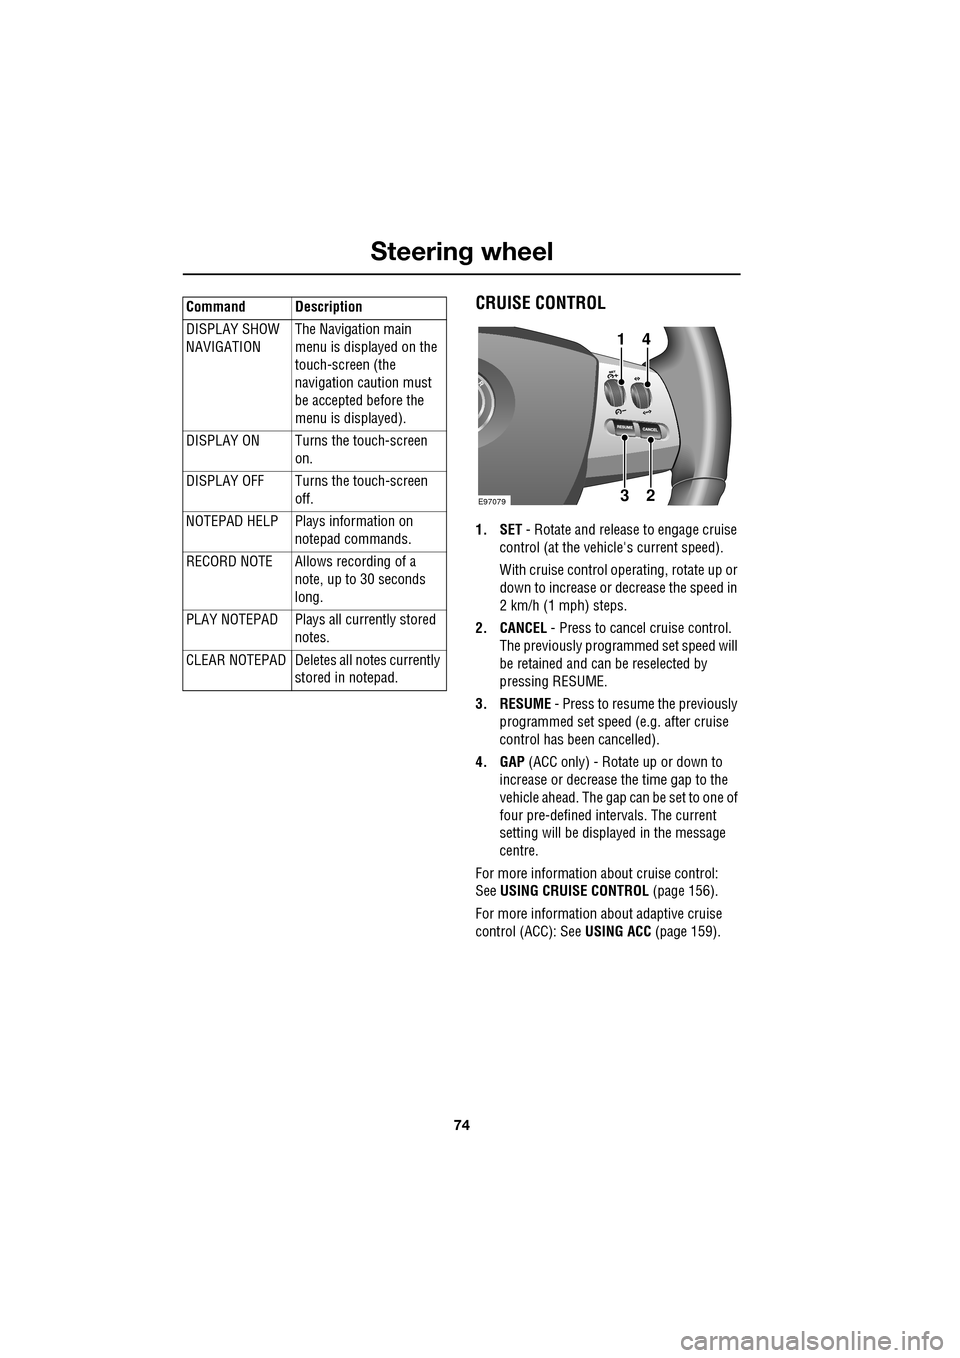
CRUISE CONTROL
1. SET - Rotate and releas e to engage cruise
control (at the vehicle's current speed).
With cruise control operating, rotate up or
down to increase or decrease the speed in
2 km/h (1 mph) steps.
2. CANCEL - Press to cancel cruise control.
The previously programmed set speed will
be retained and can be reselected by
pressing RESUME.
3. RESUME - Press to resume the previously
programmed set speed (e.g. after cruise
control has been cancelled).
4. GAP (ACC only) - Rotate up or down to
increase or decrease the time gap to the
vehicle ahead. The gap can be set to one of
four pre-defined inte rvals. The current
setting will be displayed in the message
centre.
For more information about cruise control:
See USING CRUISE CONTROL (page 156).
For more information about adaptive cruise
control (ACC): See USING ACC (page 159).
DISPLAY SHOW
NAVIGATION
The Navigation main
menu is displayed on the
touch-screen (the
navigation caution must
be accepted before the
menu is displayed).
DISPLAY ON Turns the touch-screen on.
DISPLAY OFF Turns the touch-screen off.
NOTEPAD HELP Play s information on
notepad commands.
RECORD NOTE Allows recording of a note, up to 30 seconds
long.
PLAY NOTEPAD Plays all currently stored notes.
CLEAR NOTEPAD Deletes all notes currently
stored in notepad.
Command Description
E9707923
41
Page 75 of 391
75
Lighting
LIGHTING CONTROL
Note: If the ignition system is switched off and
the lamps are left on, the message centre will
display LIGHTS ON.
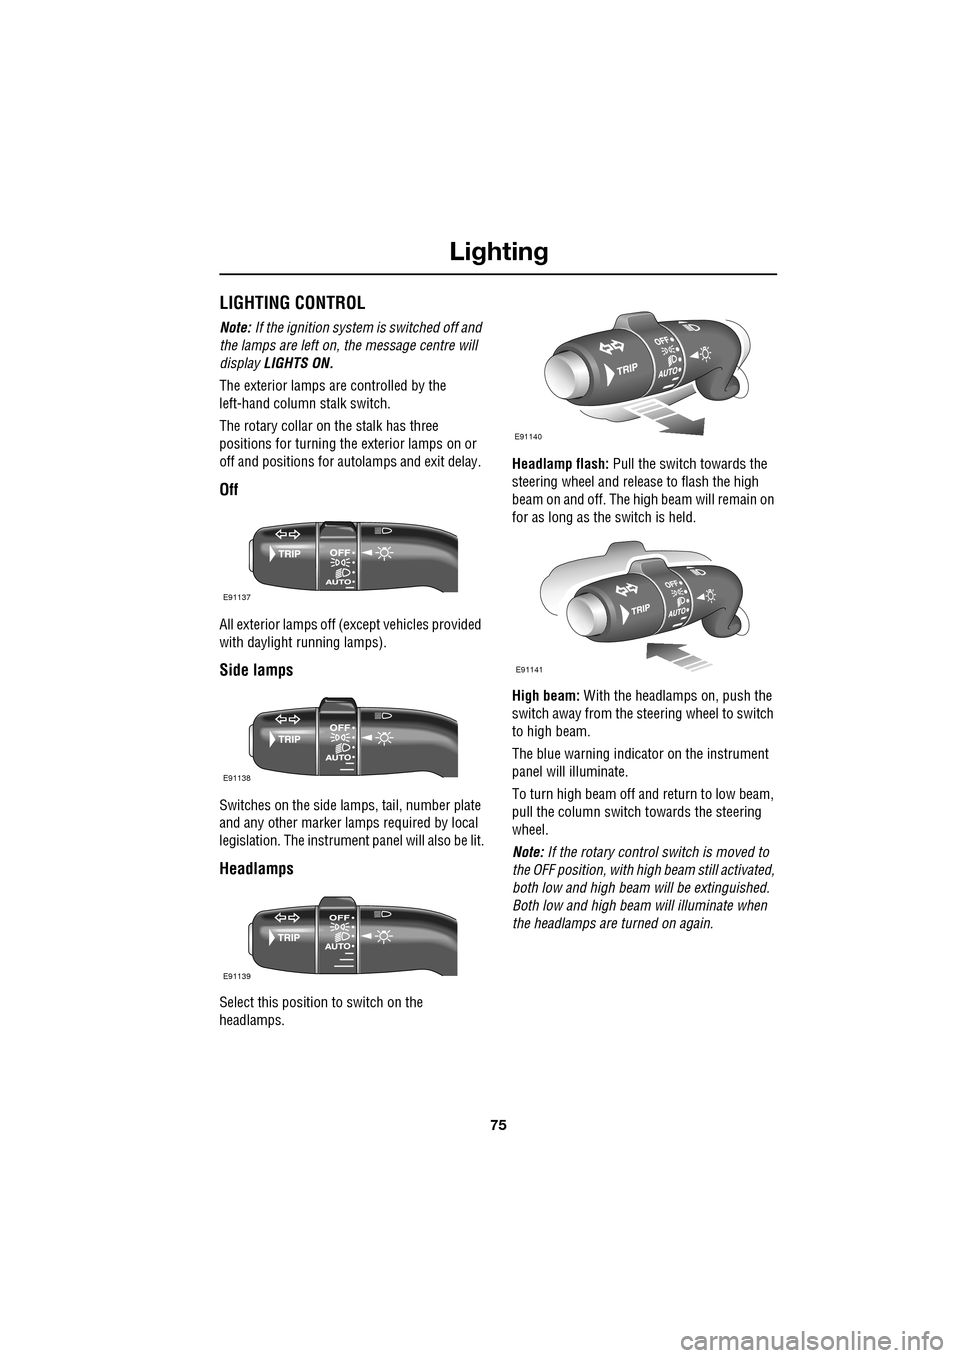
The exterior lamps are controlled by the
left-hand column stalk switch.
The rotary collar on the stalk has three
positions for turning the exterior lamps on or
off and positions for auto lamps and exit delay.
Off
All exterior lamps off (except vehicles provided
with daylight running lamps).
Side lamps
Switches on the side lamps, tail, number plate
and any other marker lamps required by local
legislation. The instrument panel will also be lit.
Headlamps
Select this positi on to switch on the
headlamps. Headlamp flash:
Pull the switch towards the
steering wheel and release to flash the high
beam on and off. The high beam will remain on
for as long as the switch is held.
High beam: With the headlamps on, push the
switch away from the steering wheel to switch
to high beam.
The blue warning indicator on the instrument
panel will illuminate.
To turn high beam off and return to low beam,
pull the column switch towards the steering
wheel.
Note: If the rotary control switch is moved to
the OFF position, with hi gh beam still activated,
both low and high beam will be extinguished.
Both low and high beam will illuminate when
the headlamps are turned on again.
E91137
E91138
E91139
E91140
E91141
Page 76 of 391
Lighting
76
Daylight running lamps
In certain countries it is a legal requirement for
the lamps to be on during the hours of daylight.
With the rotary collar in the OFF position, low
beam headlamps, side lamps, tail, number
plate lamps and, where fitted, side marker
lamps will switch on automatically with the
following conditions:
• The ignition is on (market dependent).
• The vehicle gear selector out of park.
• The park brake is not applied (is released).
Condensation
In certain circumstances, misting may occur
on the inside of a lamp lens. This is caused by
natural changes in environmental conditions.
This misting is not detrimental to lamp
performance and will clear during normal
usage.
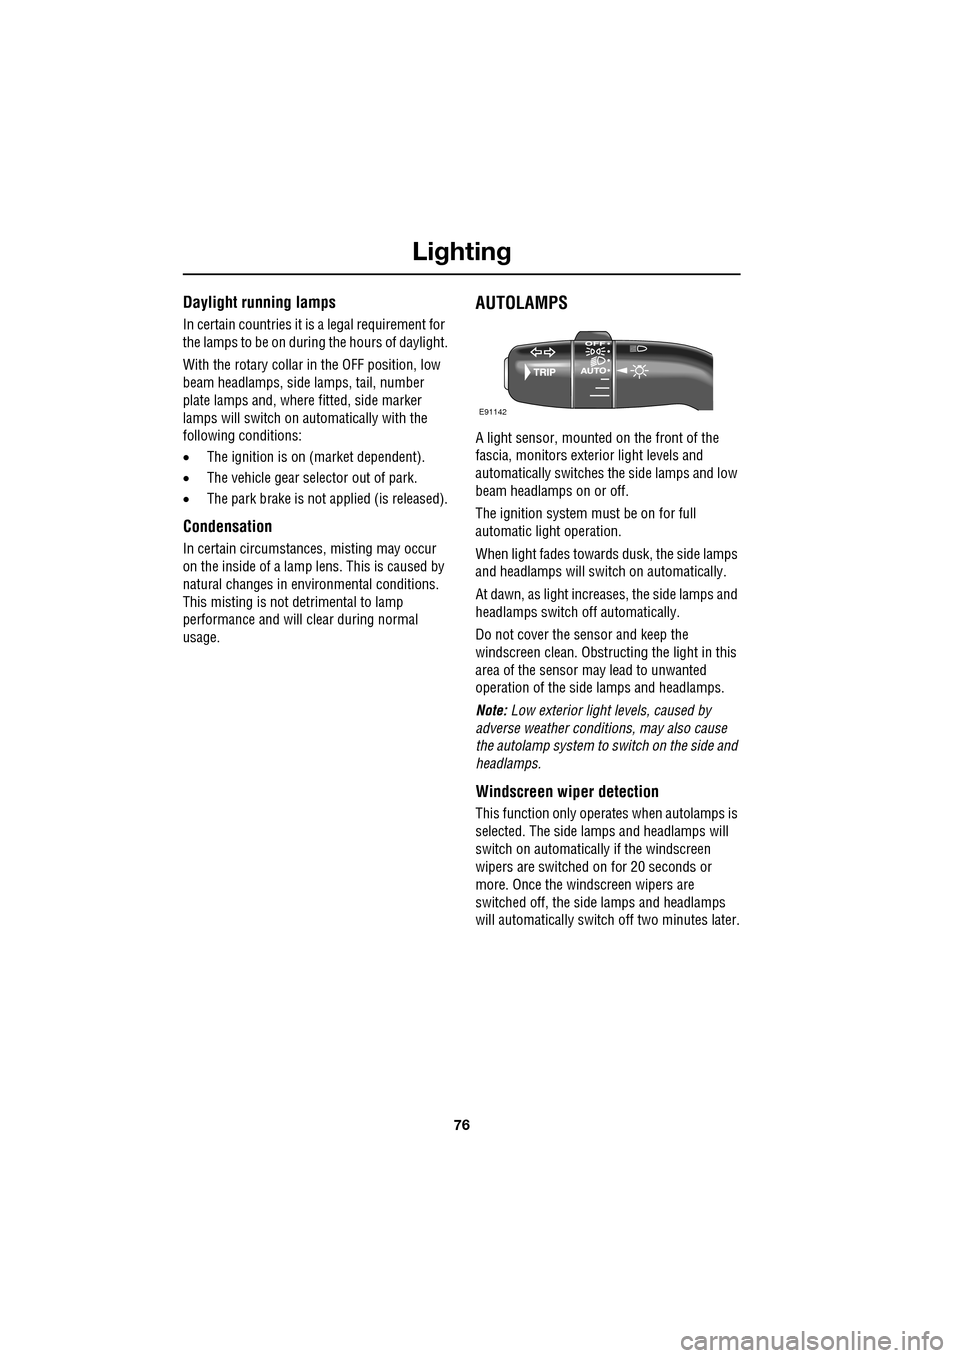
AUTOLAMPS
A light sensor, mounted on the front of the
fascia, monitors exteri or light levels and
automatically switches the side lamps and low
beam headlamps on or off.
The ignition system must be on for full
automatic light operation.
When light fades towards dusk, the side lamps
and headlamps will sw itch on automatically.
At dawn, as light increases, the side lamps and
headlamps switch off automatically.
Do not cover the sensor and keep the
windscreen clean. Obstruct ing the light in this
area of the sensor may lead to unwanted
operation of the side lamps and headlamps.
Note: Low exterior light levels, caused by
adverse weather conditi ons, may also cause
the autolamp system to switch on the side and
headlamps.
Windscreen wiper detection
This function only operat es when autolamps is
selected. The side lamps and headlamps will
switch on automatically if the windscreen
wipers are switched on for 20 seconds or
more. Once the windscreen wipers are
switched off, the side lamps and headlamps
will automatically switch off two minutes later.
E91142
Page 77 of 391
77
Lighting
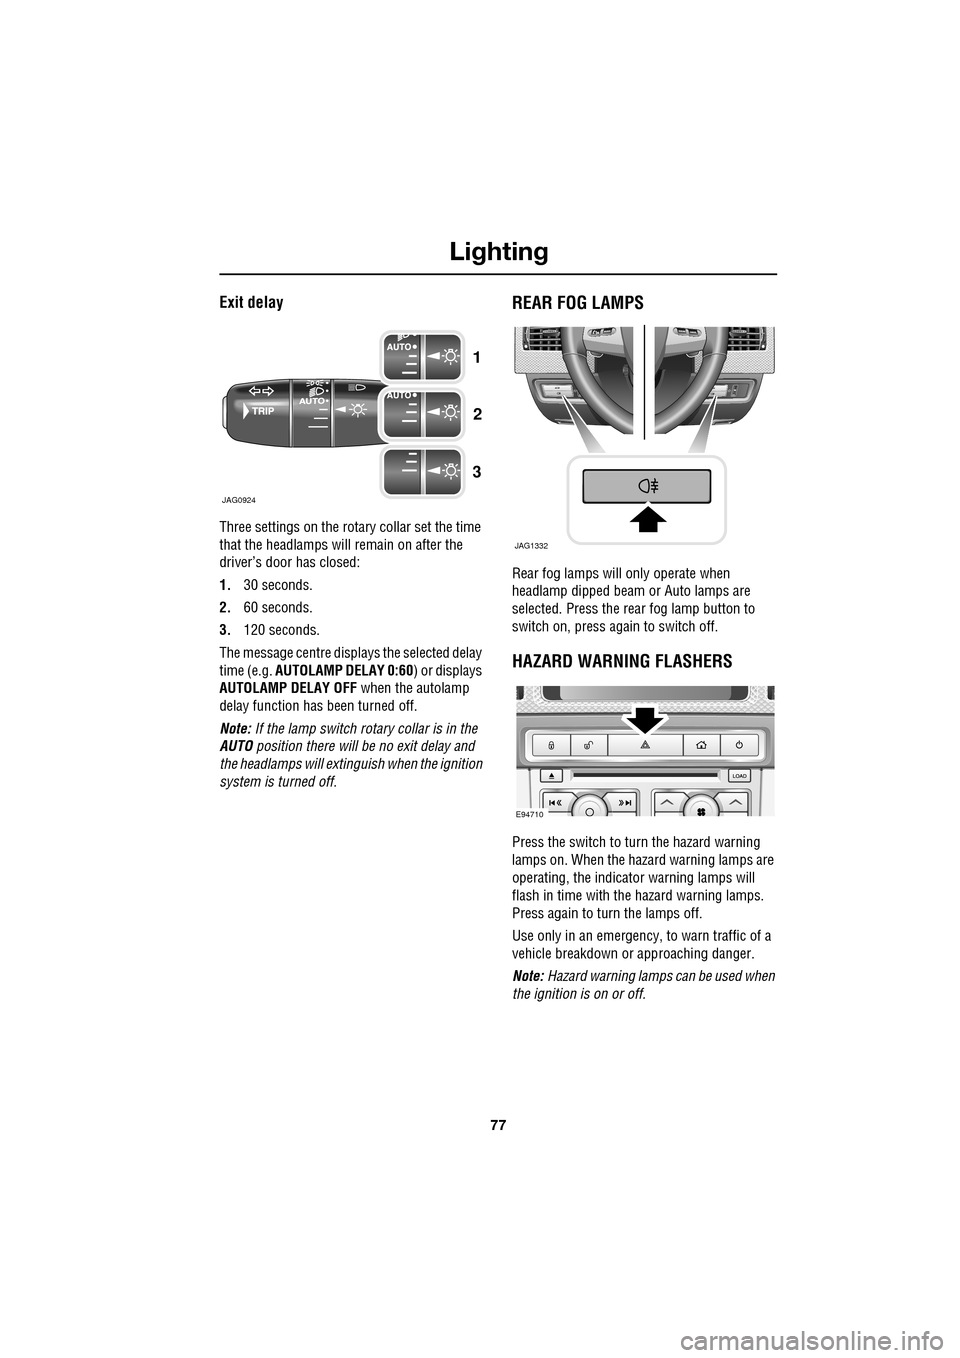
Exit delay
Three settings on the rotary collar set the time
that the headlamps will remain on after the
driver’s door has closed:
1.30 seconds.
2. 60 seconds.
3. 120 seconds.
The message centre displays the selected delay
time (e.g. AUTOLAMP DELAY 0:60 ) or displays
AUTOLAMP DELAY OFF when the autolamp
delay function has been turned off.
Note: If the lamp switch ro tary collar is in the
AUTO position there will be no exit delay and
the headlamps will extinguish when the ignition
system is turned off.
REAR FOG LAMPS
Rear fog lamps will only operate when
headlamp dipped beam or Auto lamps are
selected. Press the rear fog lamp button to
switch on, press again to switch off.
HAZARD WARNING FLASHERS
Press the switch to turn the hazard warning
lamps on. When the hazard warning lamps are
operating, the indicator warning lamps will
flash in time with the hazard warning lamps.
Press again to turn the lamps off.
Use only in an emergency, to warn traffic of a
vehicle breakdown or approaching danger.
Note: Hazard warning lamps can be used when
the ignition is on or off.
JAG0924
1
2
3
JAG1332
E94710
Page 78 of 391
Lighting
78
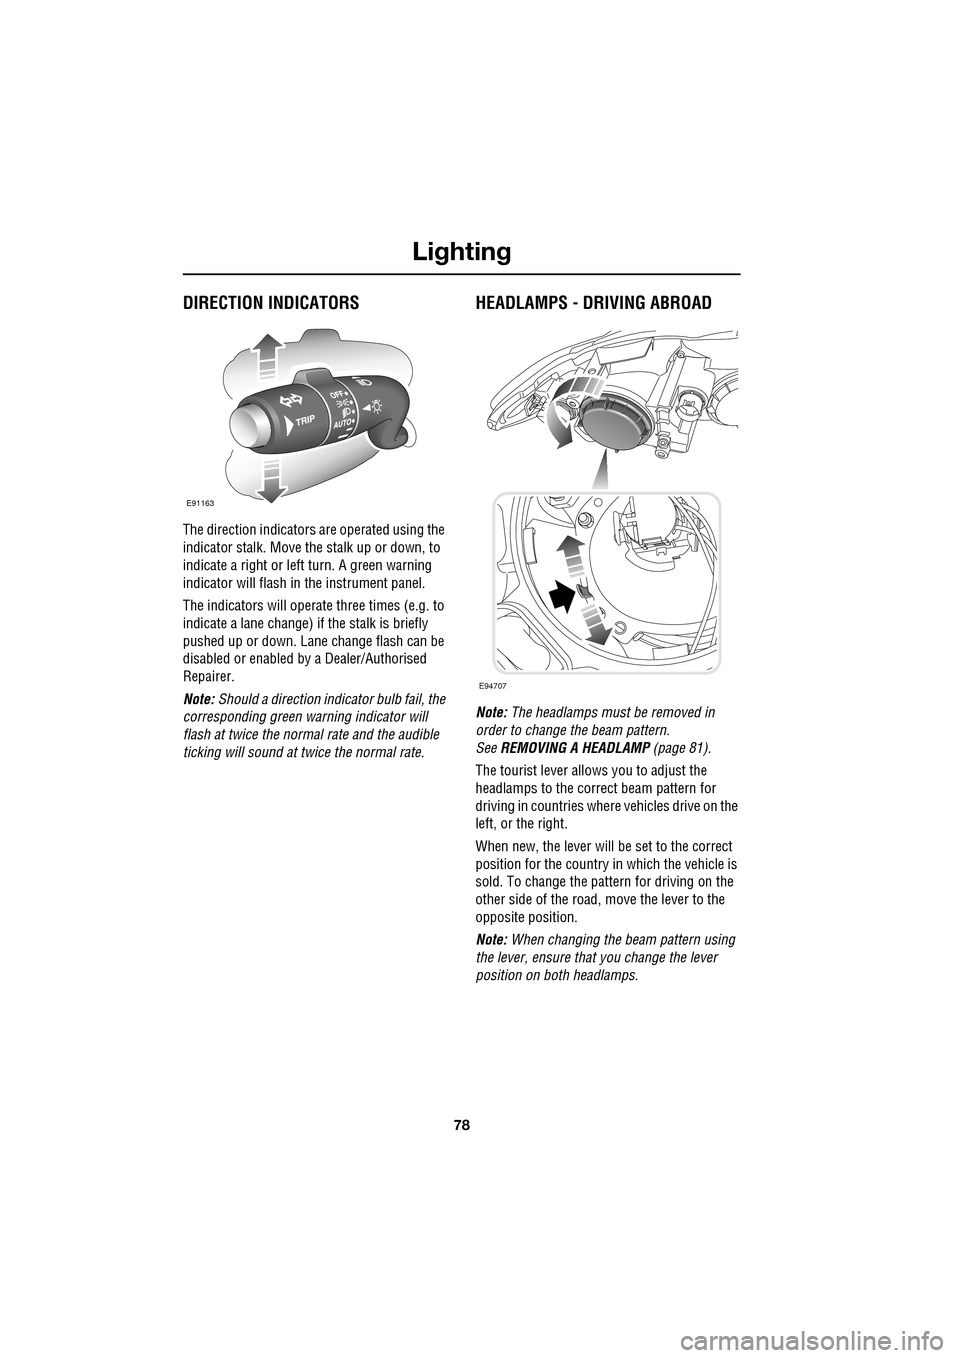
DIRECTION INDICATORS
The direction indicators are operated using the
indicator stalk. Move the stalk up or down, to
indicate a right or left turn. A green warning
indicator will flash in the instrument panel.
The indicators will operate three times (e.g. to
indicate a lane change) if the stalk is briefly
pushed up or down. Lane change flash can be
disabled or enabled by a Dealer/Authorised
Repairer.
Note: Should a direction indicator bulb fail, the
corresponding green warning indicator will
flash at twice the normal rate and the audible
ticking will sound at twice the normal rate.
HEADLAMPS - DRIVING ABROAD
Note: The headlamps must be removed in
order to change the beam pattern.
See REMOVING A HEADLAMP (page 81).
The tourist lever allows you to adjust the
headlamps to the correct beam pattern for
driving in countries wher e vehicles drive on the
left, or the right.
When new, the lever will be set to the correct
position for the country in which the vehicle is
sold. To change the pattern for driving on the
other side of the road, move the lever to the
opposite position.
Note: When changing the beam pattern using
the lever, ensure that you change the lever
position on both headlamps.
E91163
E94707
Page 79 of 391
79
Lighting
HEADLAMP LEVELLING
Halogen headlamps
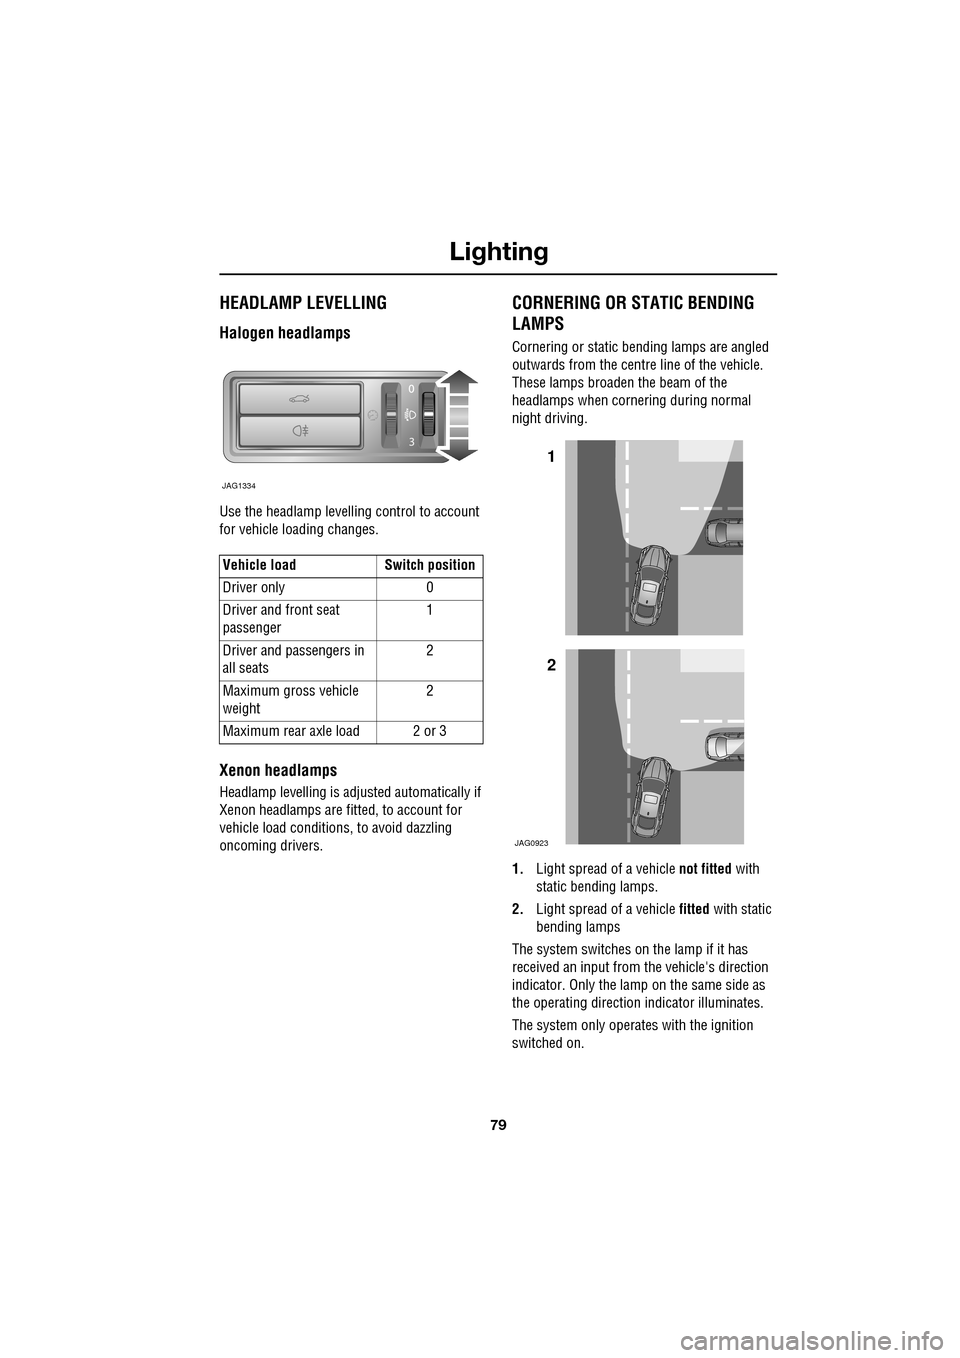
Use the headlamp levelling control to account
for vehicle loading changes.
Xenon headlamps
Headlamp levelling is adjusted automatically if
Xenon headlamps are fitted, to account for
vehicle load conditions, to avoid dazzling
oncoming drivers.
CORNERING OR STATIC BENDING
LAMPS
Cornering or static bending lamps are angled
outwards from the centre line of the vehicle.
These lamps broaden the beam of the
headlamps when cornering during normal
night driving.
1. Light spread of a vehicle not fitted with
static bending lamps.
2. Light spread of a vehicle fitted with static
bending lamps
The system switches on the lamp if it has
received an input from the vehicle's direction
indicator. Only the lamp on the same side as
the operating direction indicator illuminates.
The system only operate s with the ignition
switched on.
Vehicle load Switch position
Driver only 0
Driver and front seat
passenger
1
Driver and pa ssengers in
all seats 2
Maximum gross vehicle
weight 2
Maximum rear axle load 2 or 3
JAG1334
1
2
JAG0923
Page 80 of 391
Lighting
80
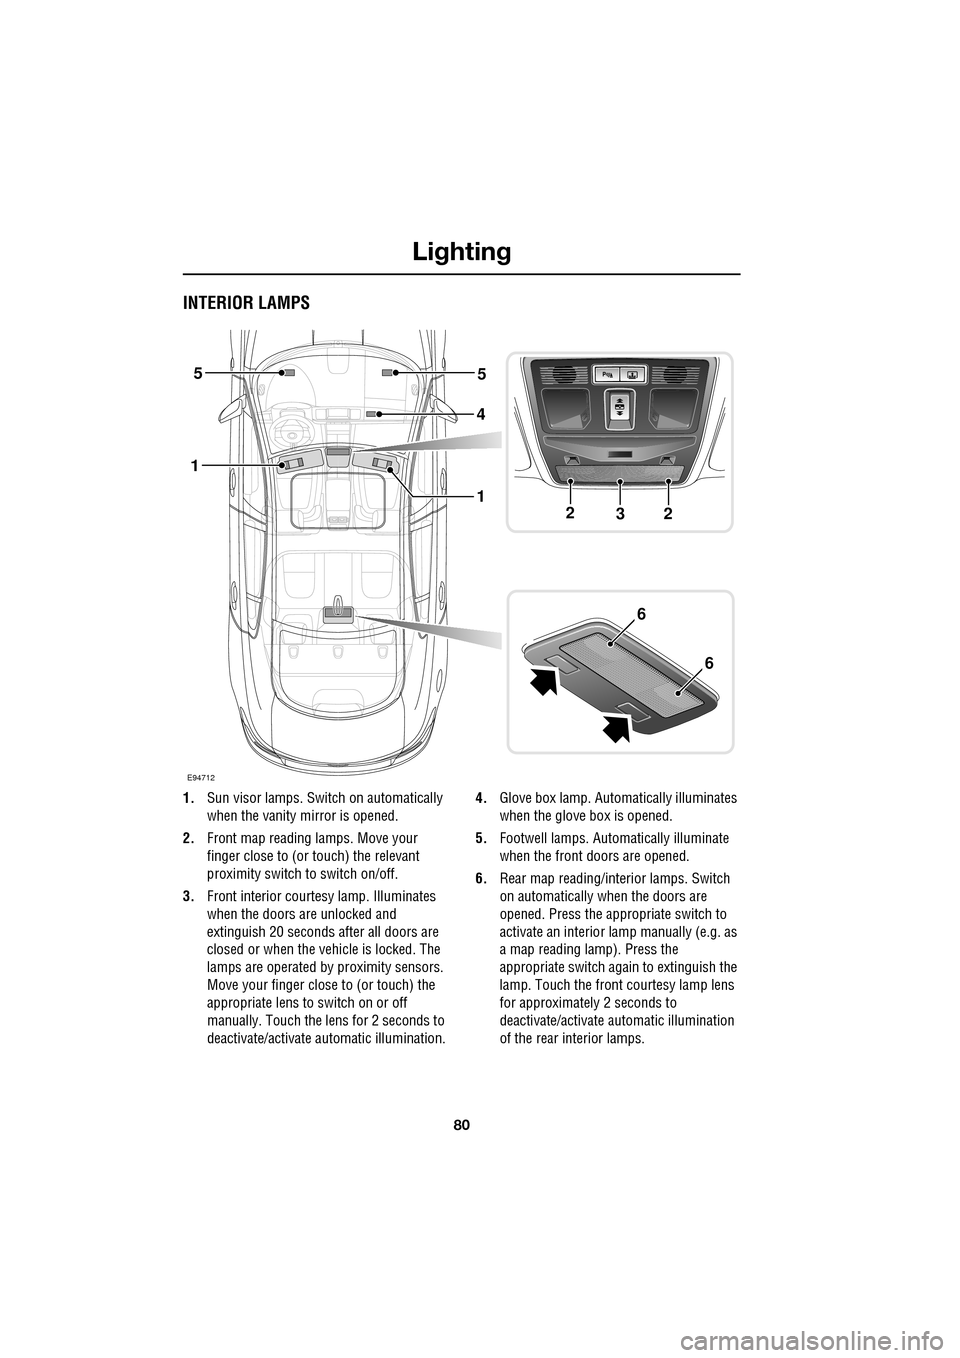
INTERIOR LAMPS
1.Sun visor lamps. Switch on automatically
when the vanity mirror is opened.
2. Front map reading lamps. Move your
finger close to (or touch) the relevant
proximity switch to switch on/off.
3. Front interior courtesy lamp. Illuminates
when the doors are unlocked and
extinguish 20 seconds after all doors are
closed or when the vehicle is locked. The
lamps are operated by proximity sensors.
Move your finger close to (or touch) the
appropriate lens to switch on or off
manually. Touch the lens for 2 seconds to
deactivate/activate automatic illumination. 4.
Glove box lamp. Automatically illuminates
when the glove box is opened.
5. Footwell lamps. Automatically illuminate
when the front doors are opened.
6. Rear map reading/interior lamps. Switch
on automatically when the doors are
opened. Press the appropriate switch to
activate an interior lamp manually (e.g. as
a map reading lamp). Press the
appropriate switch again to extinguish the
lamp. Touch the front c ourtesy lamp lens
for approximatel y 2 seconds to
deactivate/activate automatic illumination
of the rear interior lamps.
E94712
4
5
1
5
223
1
6
6