trip computer JAGUAR XF 2009 1.G Owners Manual
[x] Cancel search | Manufacturer: JAGUAR, Model Year: 2009, Model line: XF, Model: JAGUAR XF 2009 1.GPages: 391, PDF Size: 19.32 MB
Page 4 of 391
Contents
4
SIDE REPEATER LAMP .................................. 85
REAR LAMP BULBS ....................................... 85
BULB SPECIFICATION CHART ........................ 87
Wipers and washers
WINDSCREEN WIPERS .................................. 88
RAIN SENSOR ................................................ 89
WINDSCREEN WASHERS............................... 89
HEADLAMP WASHERS................................... 90
CHECKING THE WIPER BLADES .................... 90
CHANGING THE WIPER BLADES .................... 91
Windows and mirrors
ELECTRIC WINDOWS ..................................... 93
INTERIOR MIRROR ........................................ 94
EXTERIOR MIRRORS ..................................... 95
BLIND SPOT MONITOR .................................. 97
Instruments
INSTRUMENT PANEL OVERVIEW .................. 99
WARNING LAMPS AND INDICATORS .......... 100
AUDIBLE WARNINGS AND INDICATORS ..... 104
Information displays
GENERAL INFORMATION ............................. 105
WARNING AND INFORMATION MESSAGES. 106
TRIP COMPUTER ......................................... 107
TOUCH-SCREEN ........................................... 109
PERSONALISED SETTINGS .......................... 111
Climate control
AIR VENTS ................................................... 115
AUTOMATIC CLIMATE CONTROL ................. 116
ELECTRIC SUNROOF .................................... 121
Convenience features
SUN VISORS ................................................ 123
SUN BLINDS................................................. 123
INSTRUMENT LIGHTING DIMMER ............... 123
CLOCK .......................................................... 124
AUXILIARY POWER SOCKETS ..................... 125
GLOVE BOX .................................................. 125
CUP HOLDERS ............................................. 126
STORAGE COMPARTMENTS ........................ 127
GARAGE DOOR TRANSCEIVER .................... 128
PORTABLE AUDIO INTERFACE..................... 131
Starting the engine
GENERAL INFORMATION.............................. 132
KEYLESS STARTING ..................................... 133
SWITCHING OFF THE ENGINE....................... 134
DIESEL PARTICULATE FILTER (DPF)............ 135
Transmission
AUTOMATIC TRANSMISSION ....................... 137
Brakes
PRINCIPLE OF OPERATION .......................... 144
HINTS ON DRIVING WITH ABS ..................... 144
ELECTRIC PARKING BRAKE (EPB) ............... 146
Parking aid
PRINCIPLE OF OPERATION .......................... 148
USING THE PARKING AID ............................. 148
Rear view camera
PRINCIPLE OF OPERATION .......................... 152
Driving hints
RUNNING-IN ................................................. 154
ECONOMICAL DRIVING ................................ 155
Cruise control
PRINCIPLE OF OPERATION .......................... 156
USING CRUISE CONTROL............................. 156
Adaptive cruise control (ACC)
PRINCIPLE OF OPERATION .......................... 159
USING ACC ................................................... 159
FORWARD ALERT FUNCTION ....................... 164
ADVANCED EMERGENCY BRAKE ASSIST..... 165
Automatic speed limiter (ASL)
PRINCIPLE OF OPERATION .......................... 167
USING THE ASL ............................................ 167
Driving dynamics
GENERAL INFORMATION.............................. 169
WINTER MODE ............................................. 169
DYNAMIC MODE ........................................... 170
STABILITY CONTROL.................................... 170
Fuel and refuelling
SAFETY PRECAUTIONS................................. 174
Page 105 of 391
105
Information displays
GENERAL INFORMATION
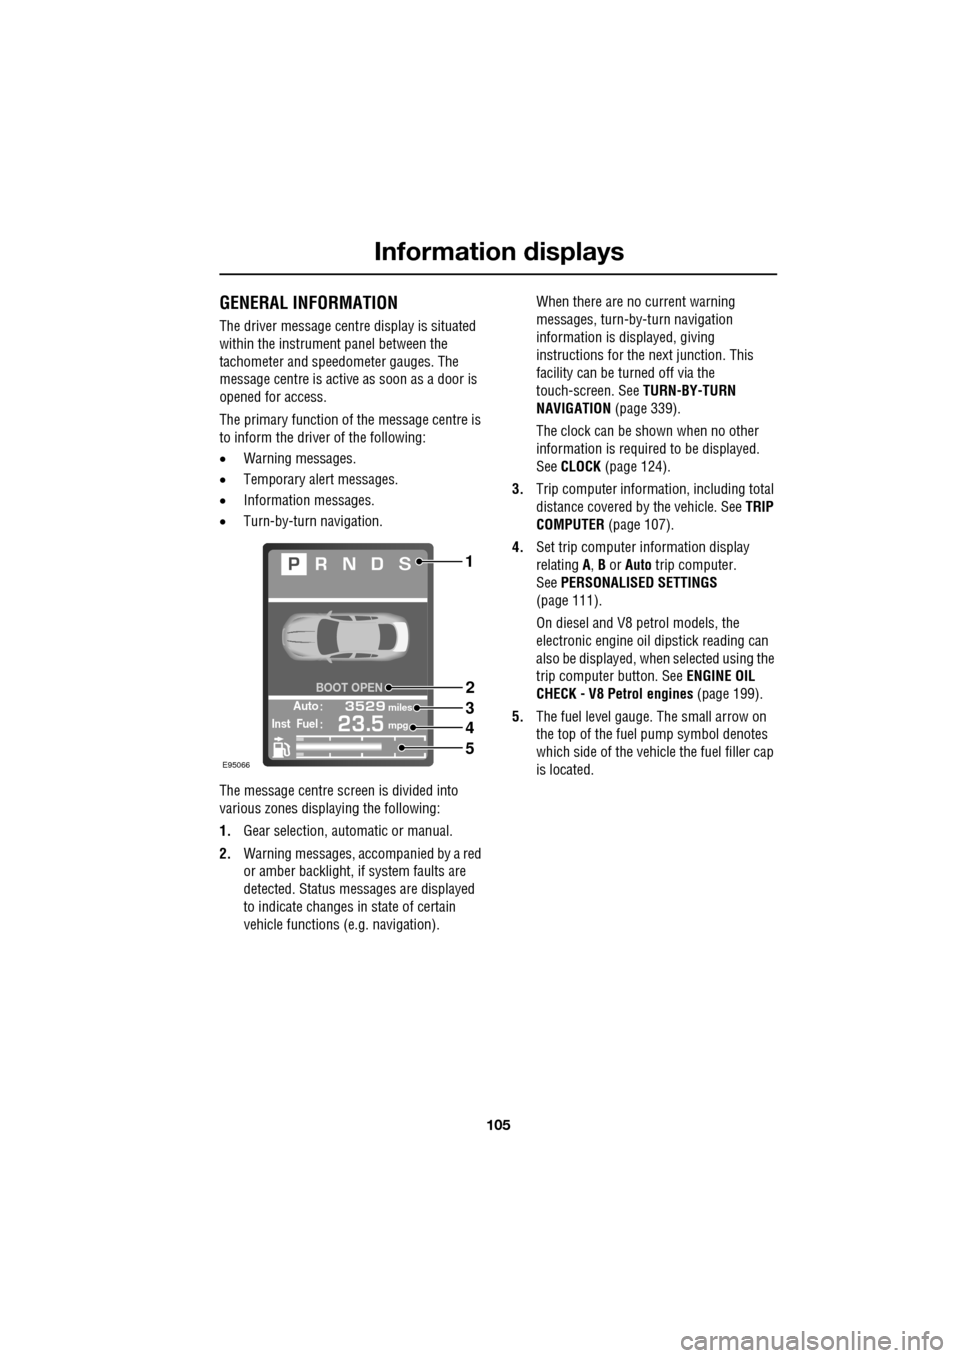
The driver message centre display is situated
within the instrument panel between the
tachometer and speedometer gauges. The
message centre is active as soon as a door is
opened for access.
The primary function of the message centre is
to inform the driver of the following:
• Warning messages.
• Temporary alert messages.
• Information messages.
• Turn-by-turn navigation.
The message centre screen is divided into
various zones displaying the following:
1. Gear selection, automatic or manual.
2. Warning messages, accompanied by a red
or amber backlight, if system faults are
detected. Status messages are displayed
to indicate changes in state of certain
vehicle functions (e.g. navigation). When there are no current warning
messages, turn-by-turn navigation
information is displayed, giving
instructions for the next junction. This
facility can be turned off via the
touch-screen. See
TURN-BY-TURN
NAVIGATION (page 339).
The clock can be shown when no other
information is required to be displayed.
See CLOCK (page 124).
3. Trip computer information, including total
distance covered by the vehicle. See TRIP
COMPUTER (page 107).
4. Set trip computer information display
relating A, B or Auto trip computer.
See PERSONALISED SETTINGS
(page 111).
On diesel and V8 petrol models, the
electronic engine oil dipstick reading can
also be displayed, when selected using the
trip computer button. See ENGINE OIL
CHECK - V8 Petrol engines (page 199).
5. The fuel level gauge. The small arrow on
the top of the fuel pump symbol denotes
which side of the vehi cle the fuel filler cap
is located.
Automiles
Inst Fuelmpg
BOOT OPEN
E95066
1
2
3
4
5
Page 106 of 391
Information displays
106
WARNING AND INFORMATION
MESSAGES
Most displayed warning messages have an
associated warning indicator, which will
illuminate on to indicate the message priority.
Also from time to time information messages
will be displayed.
If more than one message is active, each is
displayed in turn for two seconds in order of
priority.
Messages take priority over the trip computer
data and will be displayed when the ignition is
on.
Note: The message centre information
messages and their meanings, are detailed
where necessary within the appropriate subject
sections.
Clearing messages from the display
It is possible to temporarily clear certain
warning or information messages from the
message centre.
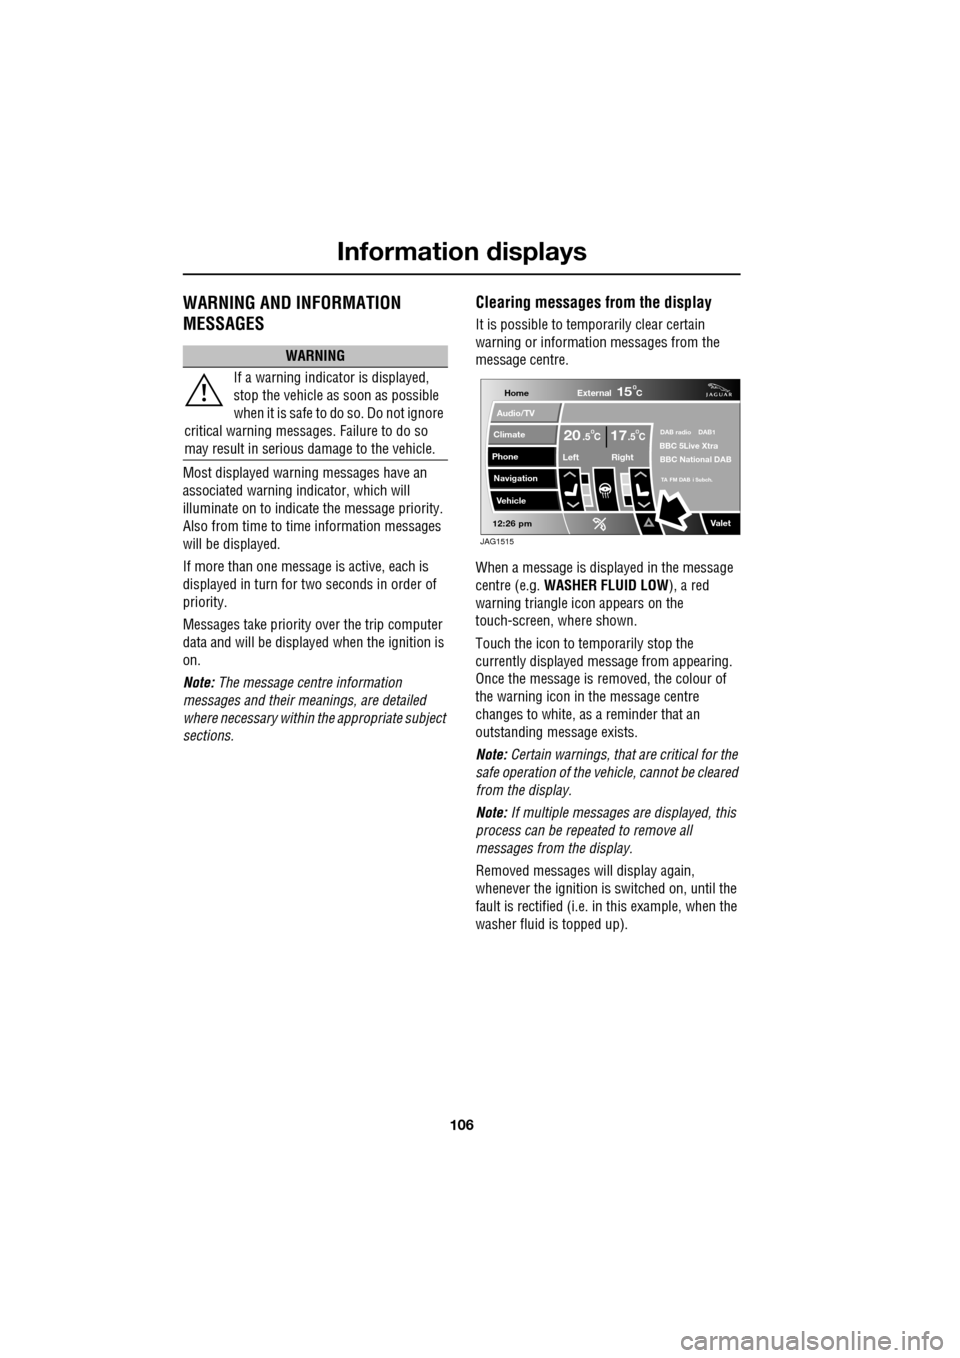
When a message is displayed in the message
centre (e.g. WASHER FLUID LOW ), a red
warning triangle icon appears on the
touch-screen, where shown.
Touch the icon to temporarily stop the
currently displayed message from appearing.
Once the message is removed, the colour of
the warning icon in the message centre
changes to white, as a reminder that an
outstanding message exists.
Note: Certain warnings, that are critical for the
safe operation of the vehi cle, cannot be cleared
from the display.
Note: If multiple messages are displayed, this
process can be repeated to remove all
messages from the display.
Removed messages will display again,
whenever the ignition is switched on, until the
fault is rectified (i.e. in this example, when the
washer fluid is topped up).
WARNING
If a warning indicato r is displayed,
stop the vehicle as soon as possible
when it is safe to do so. Do not ignore
critical warning messages. Failure to do so
may result in serious damage to the vehicle.
Home
Audio/TV
Climate
Phone
Navigation
Vehicle
Valet12:26 pm
External15C
Left Right
20 17CC.5 .5DAB radio DAB1BBC 5Live Xtra
BBC National DAB
TA FM DAB i Subch.
JAG1515
Page 107 of 391
107
Information displays
TRIP COMPUTER
The computer memory stores data for a
journey or series of journeys until it is reset to
zero.
The displayed information is for guidance only,
as it can be affected by traffic, road and
weather conditions.
Three independent memories are available, A,
B and Auto. A and B me mories can be set
independently, while the Auto trip will reset
after every ignition cycle as the vehicle moves.
Full trip computer information for the trip
memories can be displayed on the vehicle
touch-screen located in the centre console,
while current selected trip computer
information is displayed on the instrument
panel message centre.
To access the trip computer touch-screen
settings:
• From the touch-screen Home menu, select
Vehicle .
• Select Trip computer .
• Select requirement s from the menu.
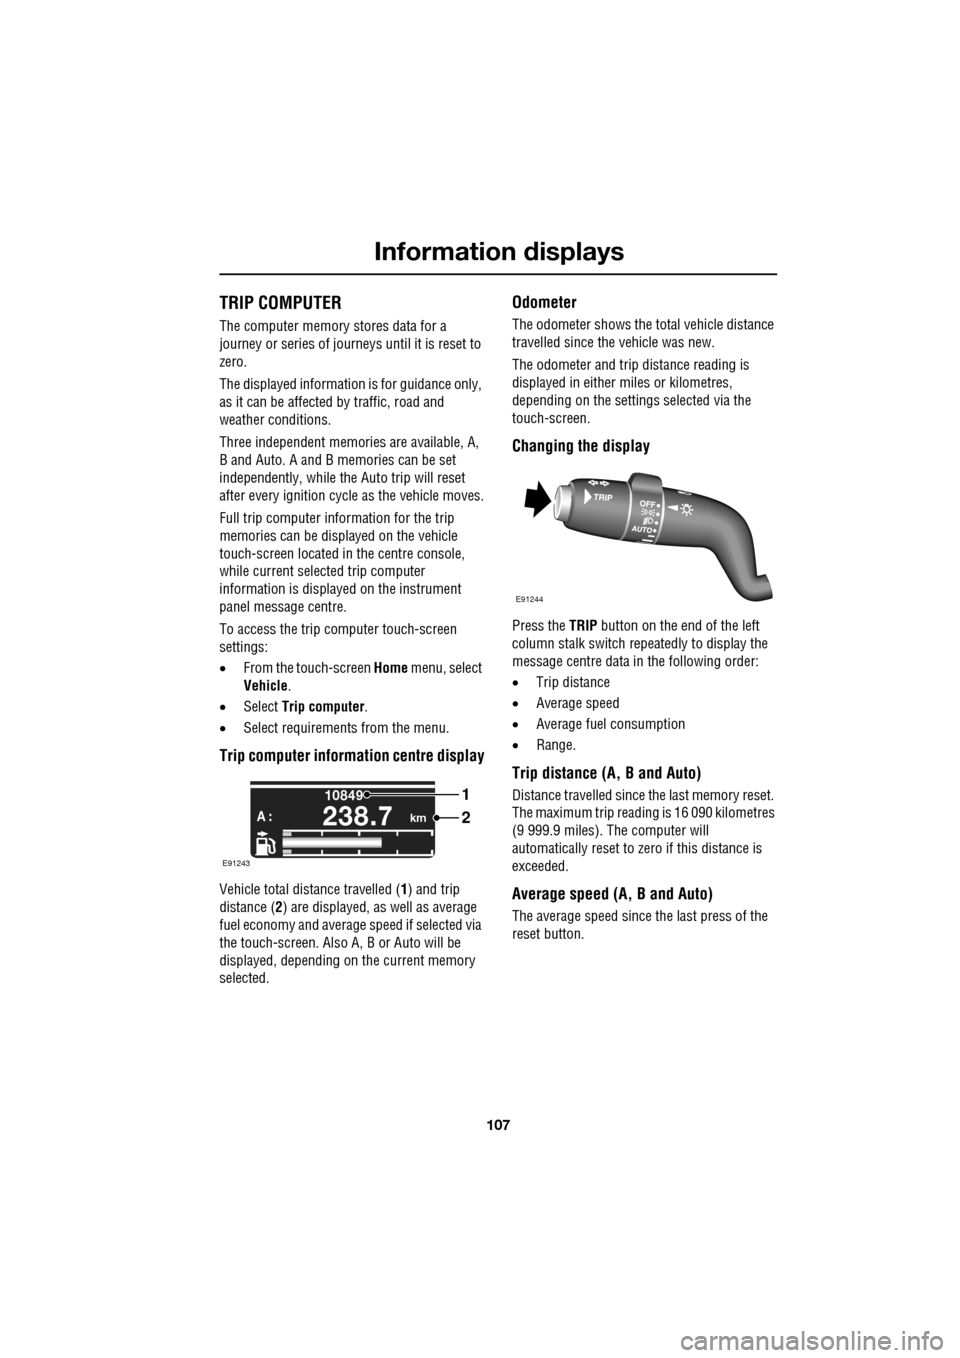
Trip computer information centre display
Vehicle total distance travelled ( 1) and trip
distance ( 2) are displayed, as well as average
fuel economy and average speed if selected via
the touch-screen. Also A, B or Auto will be
displayed, depending on the current memory
selected.
Odometer
The odometer shows the total vehicle distance
travelled since the vehicle was new.
The odometer and trip distance reading is
displayed in either miles or kilometres,
depending on the settings selected via the
touch-screen.
Changing the display
Press the TRIP button on the end of the left
column stalk switch repeatedly to display the
message centre data in the following order:
• Trip distance
• Average speed
• Average fuel consumption
• Range.
Trip distance (A, B and Auto)
Distance travelled since the last memory reset.
The maximum trip reading is 16 090 kilometres
(9 999.9 miles). The computer will
automatically reset to zero if this distance is
exceeded.
Average speed (A, B and Auto)
The average speed since the last press of the
reset button.
km
10849
A :238.7
1
2
E91243
E91244
Page 109 of 391
109
Information displays
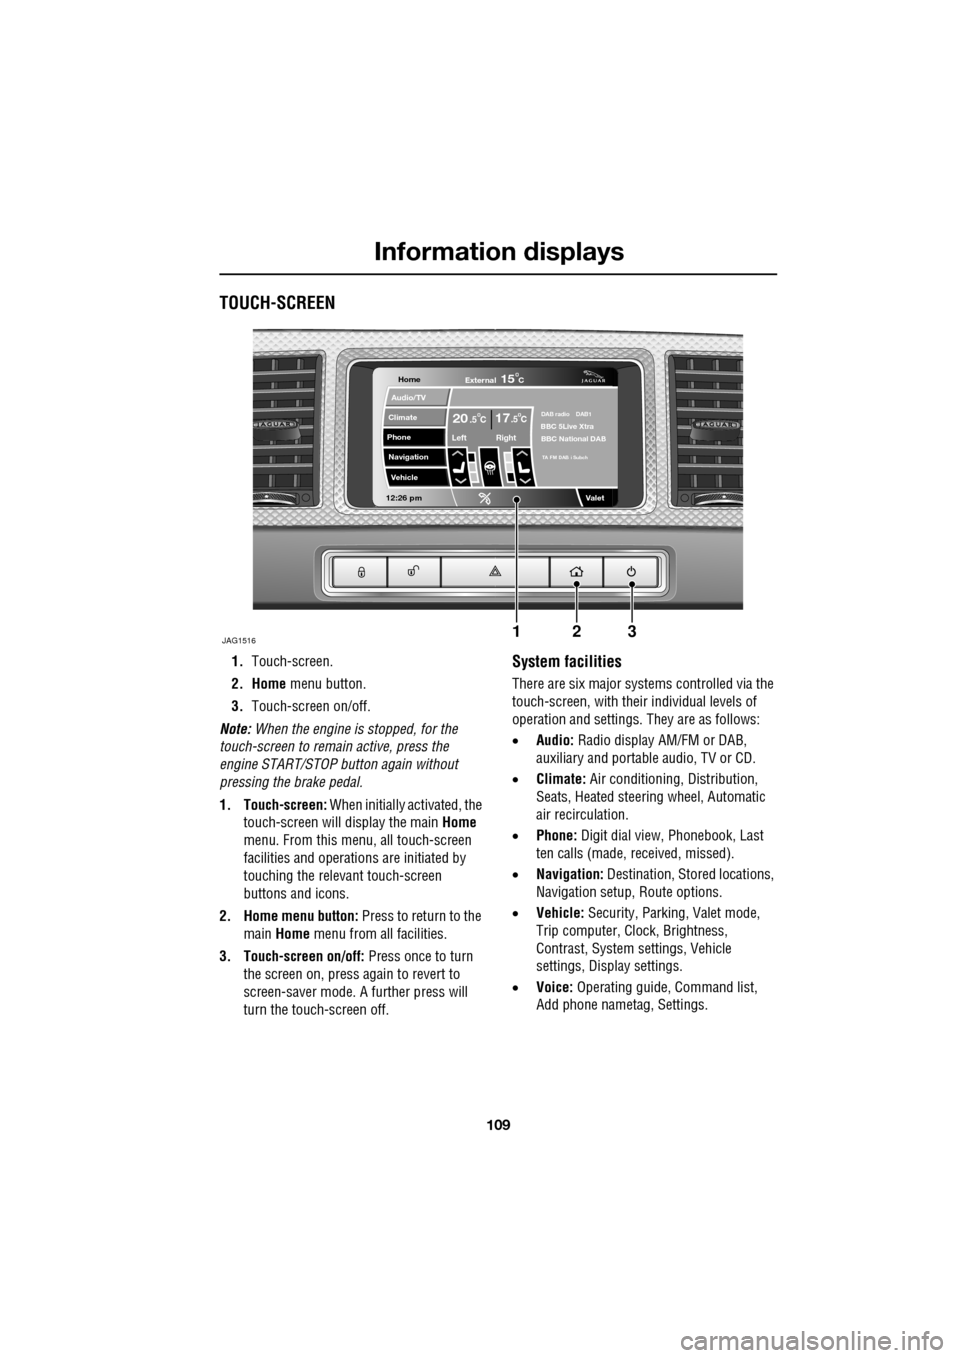
TOUCH-SCREEN
1.Touch-screen.
2. Home menu button.
3. Touch-screen on/off.
Note: When the engine is stopped, for the
touch-screen to remain active, press the
engine START/STOP button again without
pressing the brake pedal.
1. Touch-screen: When initially activated, the
touch-screen will display the main Home
menu. From this menu, all touch-screen
facilities and operati ons are initiated by
touching the relevant touch-screen
buttons and icons.
2. Home menu button: Press to return to the main Home menu from all facilities.
3. Touch-screen on/off: Press once to turn
the screen on, press again to revert to
screen-saver mode. A further press will
turn the touch-screen off.System facilities
There are six major systems controlled via the
touch-screen, with their individual levels of
operation and settings. They are as follows:
• Audio: Radio display AM/FM or DAB,
auxiliary and portable audio, TV or CD.
• Climate: Air conditioning, Distribution,
Seats, Heated steering wheel, Automatic
air recirculation.
• Phone: Digit dial view, Phonebook, Last
ten calls (made, received, missed).
• Navigation: Destination, St ored locations,
Navigation setup, Route options.
• Vehicle: Security, Parking, Valet mode,
Trip computer, Clock, Brightness,
Contrast, System settings, Vehicle
settings, Displa y settings.
• Voice: Operating guide, Command list,
Add phone nametag, Settings.
Home
Audio/TV
Climate
Phone
Navigation
Vehicle
Valet12:26 pm
JAG1516
External15C
Left Right
20 17CC.5 .5DAB radio DAB1BBC 5Live Xtra
BBC National DAB
TA FM DAB i Subch
123
Page 111 of 391
111
Information displays
Touch-screen care
Do not use any abrasive cleaners to clean your
touch-screen. For approved screen cleaners,
you should contact your Dealer/Authorised
Repairer.
The touch-screen inner bezel must be kept
clean to maintain optimum performance.
Finger marks and attracted dust should be
regularly removed usi ng a soft cloth and a
Jaguar approved cleaning agent.
Where possible, avoid exposing the
touch-screen to dire ct sunlight for long
periods.
PERSONALISED SETTINGS
General Information
The touch-screen provides touch-control of the
vehicle Audio, Climate, Phone, Navigation and
Vehicle systems, as fitted.
Note: When the engine is stopped, the
touch-screen reverts to the stand-by mode. To
activate the touch-screen press the engine
Start/Stop button again.
Home menu display
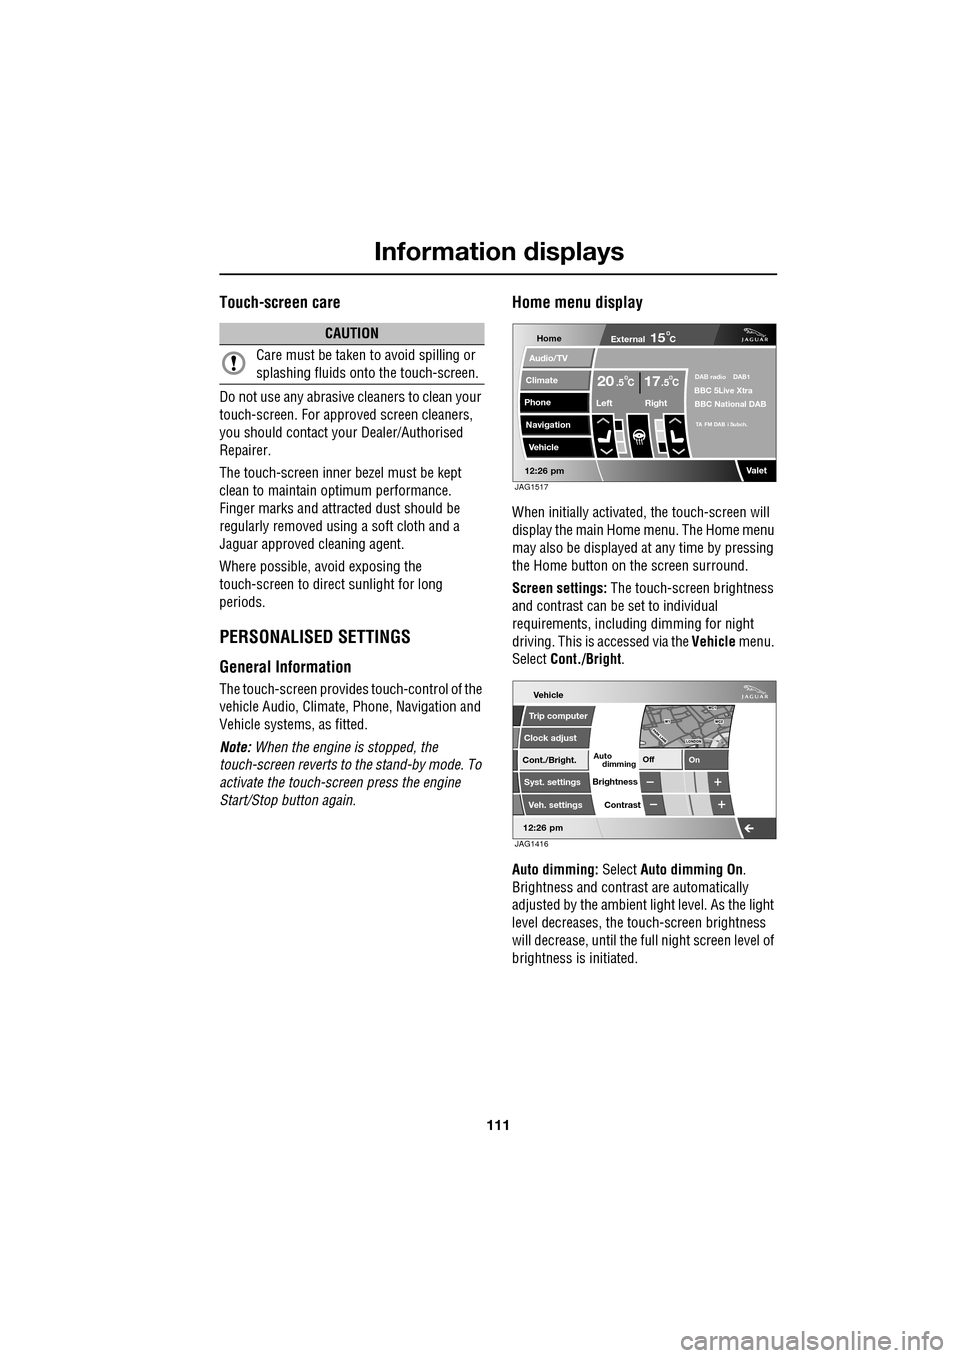
When initially activated, the touch-screen will
display the main Home menu. The Home menu
may also be displayed at any time by pressing
the Home button on the screen surround.
Screen settings: The touch-screen brightness
and contrast can be set to individual
requirements, including dimming for night
driving. This is accessed via the Vehicle menu.
Select Cont./Bright .
Auto dimming: Select Auto dimming On.
Brightness and contra st are automatically
adjusted by the ambient light level. As the light
level decreases, the t ouch-screen brightness
will decrease, until the fu ll night screen level of
brightness is initiated.
CAUTION
Care must be taken to avoid spilling or
splashing fluids onto the touch-screen.Home
Audio/TV
Climate
Phone
Navigation
Vehicle
Valet12:26 pm
External15C
Left Right
20 17CC.5 .5DAB radio DAB1BBC 5Live Xtra
BBC National DAB
TA FM DAB i Subch.
JAG1517
Vehicle
Off On
Auto
Trip computer
Clock adjust
Cont./Bright.
Syst. settings
Veh. settings Contrast
12:26 pm
dimming
Brightness
JAG1416
Page 113 of 391
113
Information displays
Vehicle system
The following system functions are set using
the touch-screen:
•Trip computer
• Clock adjust
• Brightness and contrast
• System settings
• Vehicle settings
Languages and distance units
The screen text and distance units are available
in various languages and either Imperial or
Metric units.
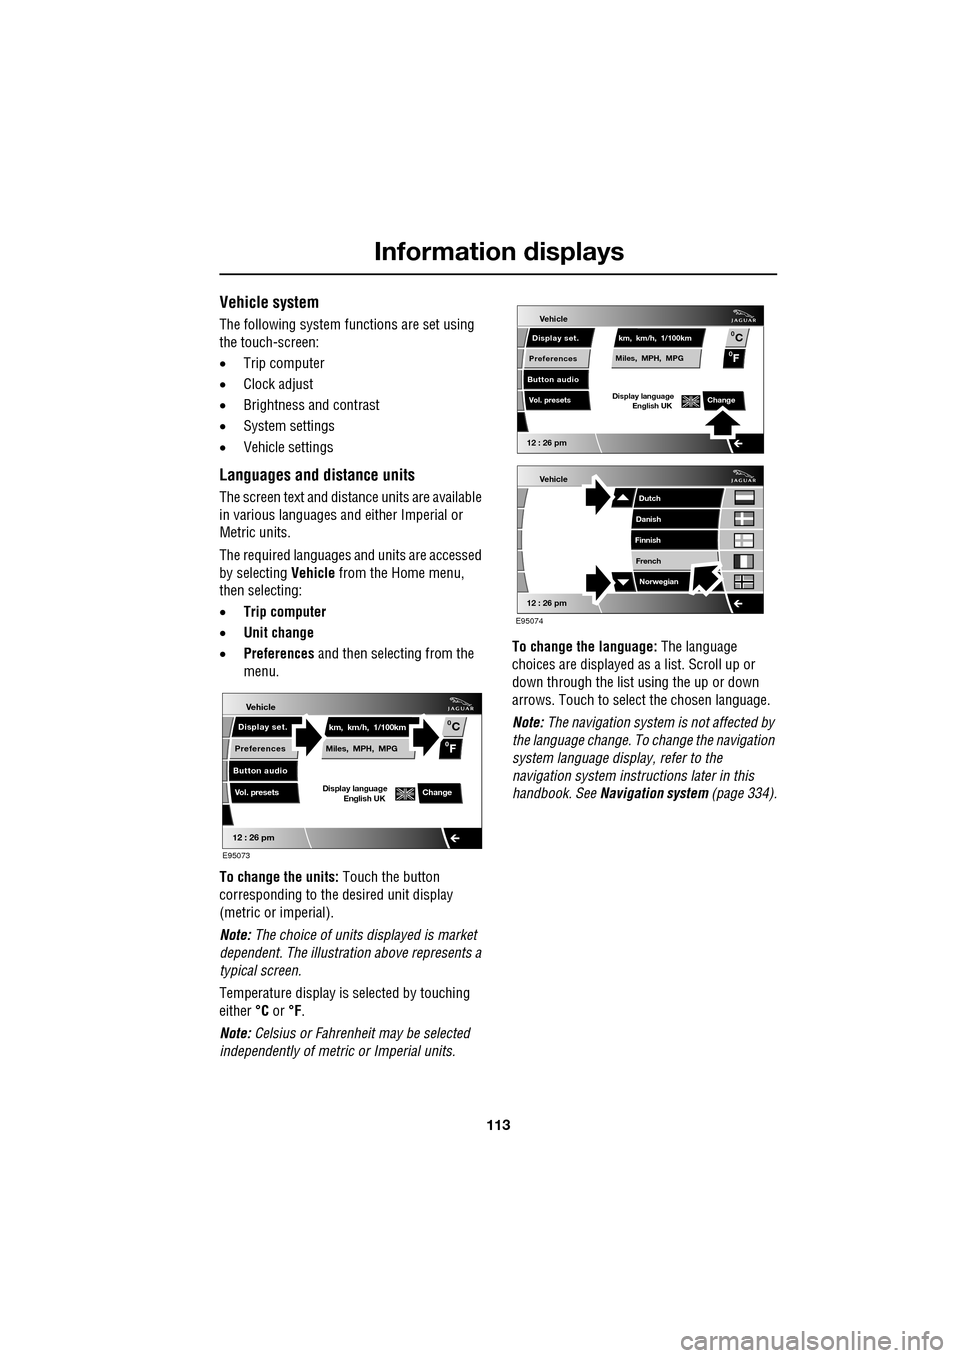
The required languages a nd units are accessed
by selecting Vehicle from the Home menu,
then selecting:
• Trip computer
• Unit change
• Preferences and then selecting from the
menu.
To change the units: Touch the button
corresponding to the desired unit display
(metric or imperial).
Note: The choice of units displayed is market
dependent. The illustrati on above represents a
typical screen.
Temperature display is selected by touching
either °C or °F.
Note: Celsius or Fahrenheit may be selected
independently of metric or Imperial units. To change the language:
The language
choices are displayed as a list. Scroll up or
down through the list using the up or down
arrows. Touch to select the chosen language.
Note: The navigation sy stem is not affected by
the language change. To change the navigation
system language display, refer to the
navigation system instru ctions later in this
handbook. See Navigation system (page 334).
Vehicle
12 : 26 pm
Display set.
Preferences
Button audio
Miles, MPH, MPG km, km/h, 1/100kmF
C
0
0
Display language English UKVol. presetsChange
E95073
Vehicle
12 : 26 pm
Display set.
Preferences
Button audio
Miles, MPH, MPG km, km/h, 1/100kmF
C
0
0
Display language English UKVol. presetsChange
Vehicle
12 : 26 pm
Dutch
Danish
Finnish
French Norwegian
E95074
Page 114 of 391
Information displays
114
Timeout to home menu
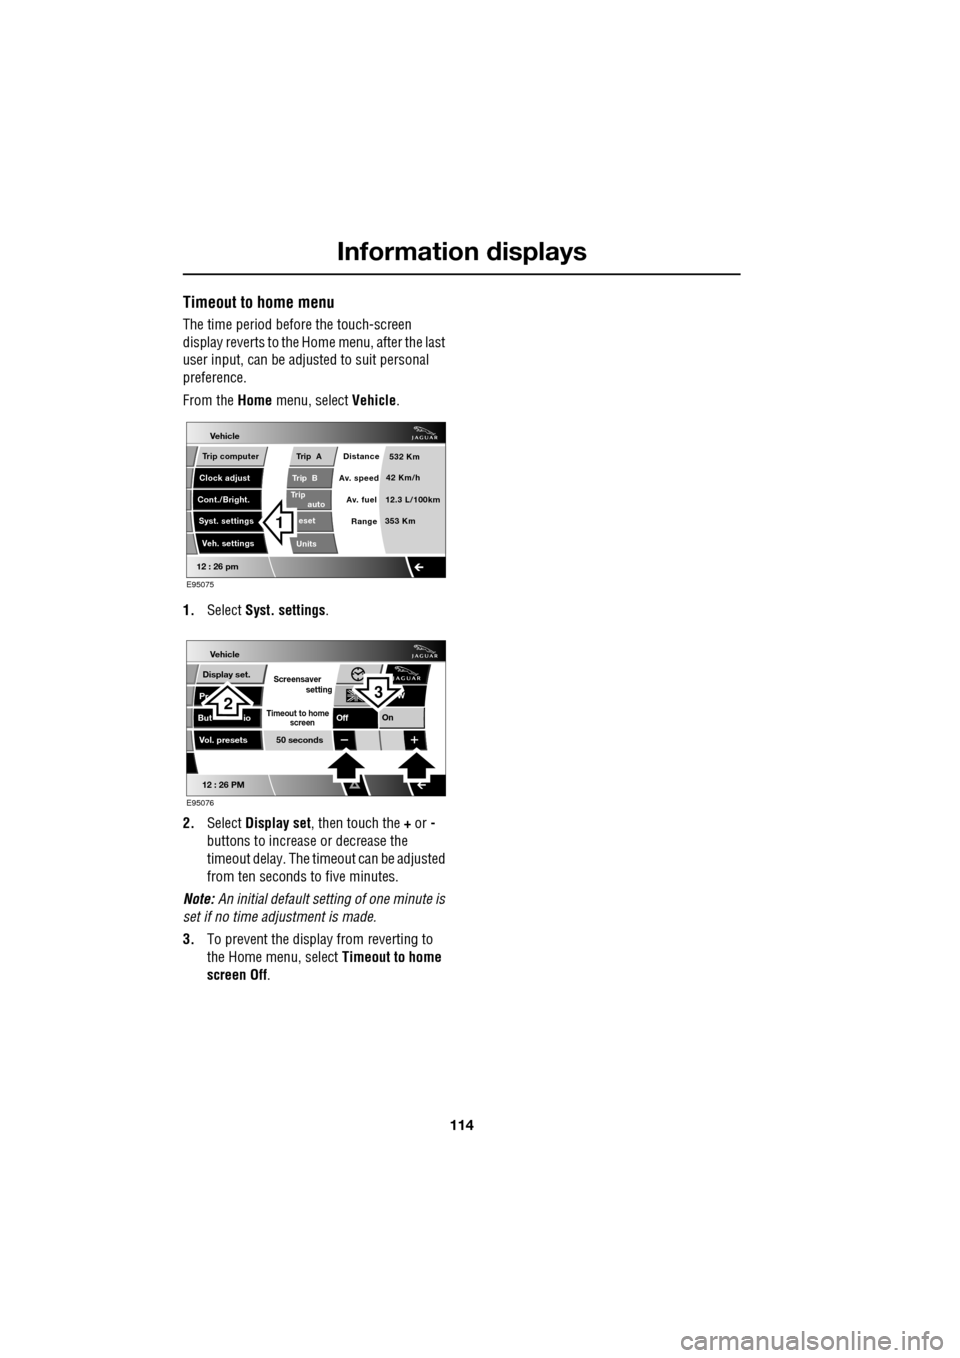
The time period before the touch-screen
display reverts to the Home menu, after the last
user input, can be adjusted to suit personal
preference.
From the Home menu, select Vehicle.
1. Select Syst. settings .
2. Select Display set , then touch the + or -
buttons to increase or decrease the
timeout delay. The time out can be adjusted
from ten seconds to five minutes.
Note: An initial defa ult setting of one minute is
set if no time adjustment is made.
3. To prevent the display from reverting to
the Home menu, select Timeout to home
screen Off .
Vehicle
Trip B
Trip
auto eset
Units Distance
Av. speed
Av. fuel 532 Km
42 Km/h
12.3 L/100km
353 Km
RangeClock adjust
Cont./Bright. Trip computer
Syst. settings Veh. settings
Trip A
12 : 26 pm
E95075
1
Vehicle
Display set.
Pr
But io
Vol. presets
12 : 26 PM
50 seconds
OnOff
Screensaver
Timeout to home
setting
screen
W
E95076
32
Page 124 of 391
Convenience features
124
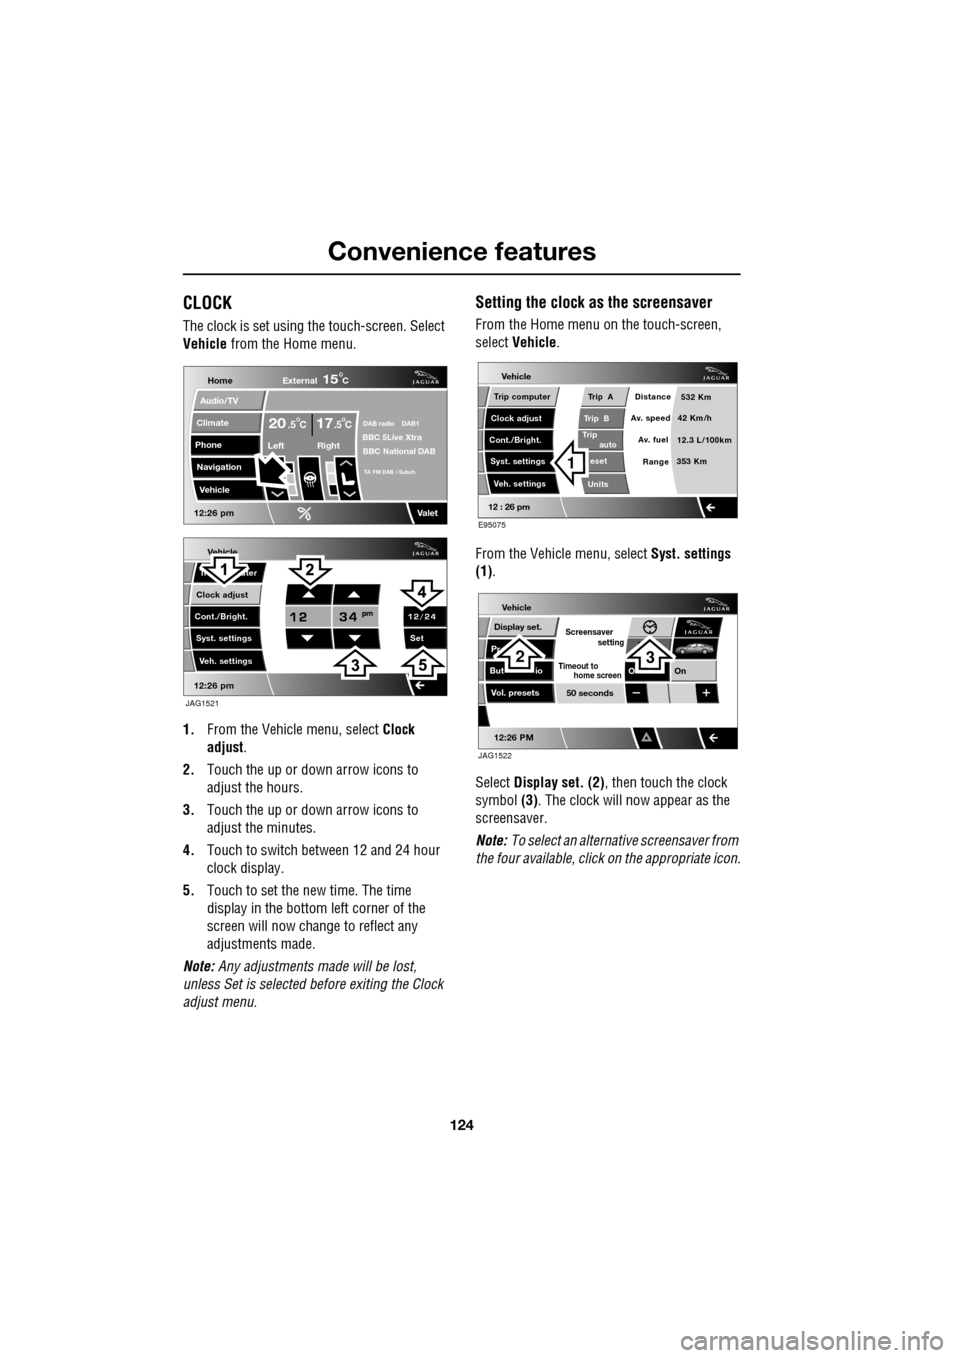
CLOCK
The clock is set using the touch-screen. Select
Vehicle from the Home menu.
1. From the Vehicl e menu, select Clock
adjust .
2. Touch the up or down arrow icons to
adjust the hours.
3. Touch the up or down arrow icons to
adjust the minutes.
4. Touch to switch between 12 and 24 hour
clock display.
5. Touch to set the new time. The time
display in the bottom left corner of the
screen will now change to reflect any
adjustments made.
Note: Any adjustments made will be lost,
unless Set is selected before exiting the Clock
adjust menu.
Setting the clock as the screensaver
From the Home menu on the touch-screen,
select Vehicle.
From the Vehicle menu, select Syst. settings
(1) .
Select Display set. (2) , then touch the clock
symbol (3). The clock will now appear as the
screensaver.
Note: To select an alternative screensaver from
the four available, click on the appropriate icon.
Vehicle
Clock adjust
Cont./Bright. Tr uter
Syst. settings Veh. settings Set
12:26 pm
JAG1521
Home
Audio/TV
Climate
Phone
Navigation
Vehicle
DAB radio DAB1BBC 5Live XtraBBC National DAB
TA FM DAB i Subch.
Va l e t12:26 pm
External15C
Left Right
20 17CC.5 .5
Vehicle
Trip B
Trip
auto eset
Units Distance
Av. speed
Av. fuel 532 Km
42 Km/h
12.3 L/100km
353 Km
RangeClock adjust
Cont./Bright. Trip computer
Syst. settings Veh. settings
Trip A
12 : 26 pm
E95075
1
Vehicle
Display set.
Pr
But io
Vol. presets
12:26 PM
50 seconds
OnO
Screensaver
Timeout to
setting
home screen
JAG1522
23
Page 202 of 391
Maintenance
202
Oil level warnings
Warnings will be displayed in the message
centre if the oil level is not maintained within
the safe operating le vels (minimum and
maximum). A warning will also be displayed if
there is a fault with the oil level monitoring
system.
• ENGINE OIL LOW (amber): The oil is at the
minimum level for sa fe operation. Top-up
with 1 litre (1.8 pints) of oil.
• ENGINE OIL HIGH (amber): This warning
is displayed when the e ngine is started, if
the oil is above the maximum level for safe
operation. Seek qualified assistance to
have the engine oil drained, before driving
the vehicle.
• ENGINE OIL CRITICALLY LOW (red): The
oil is below the minimum level for safe
operation. Stop the vehicle as soon as
safety permits and top-up with 1.5 litres
(2.6 pints) of oil. Wait for 5 minutes,
recheck the oil level reading and top-up
again if necessary.
• ENGINE OIL LEVEL MONITOR SYSTEM
FAULT (amber): A fault with the oil level
monitoring system is indicated. Seek
qualified assistance as soon as possible.
Checking the oil level
The engine oil level is automatically monitored
and is displayed in the trip computer area of the
message centre.
The current oil level can be viewed with the
ignition on, with the engine stopped and the
transmission in Park (P ).
To view the current oil level, allow 5 minutes
after stopping the engine (to allow the oil level
to stabilise), then press the TRIP button on the
end of the left column stalk repeatedly, until the
oil can icon is displayed at the bottom of the
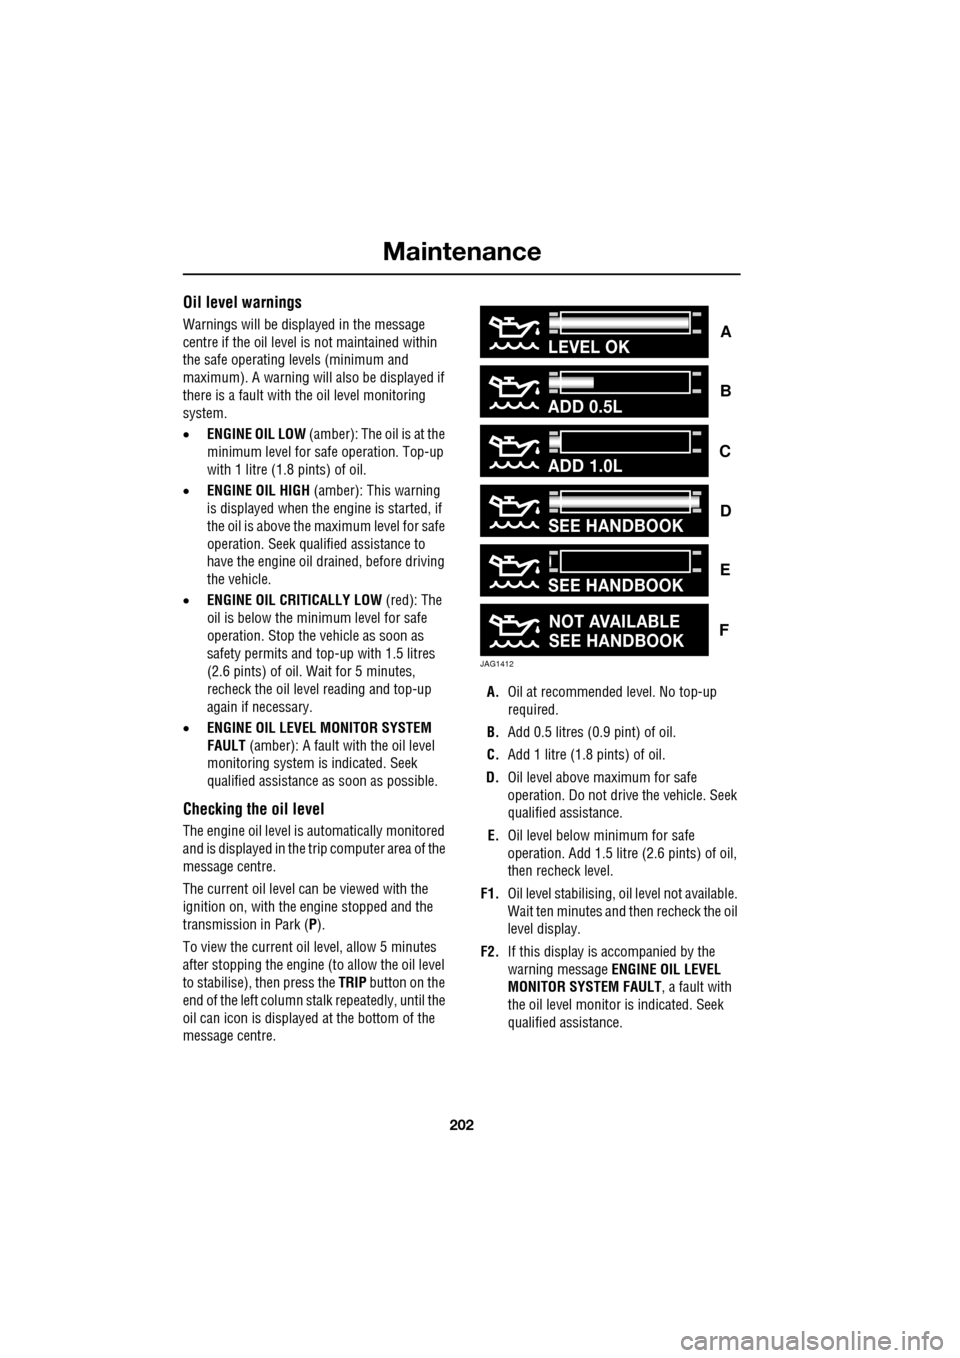
message centre. A.
Oil at recommended level. No top-up
required.
B. Add 0.5 litres (0.9 pint) of oil.
C. Add 1 litre (1.8 pints) of oil.
D. Oil level above maximum for safe
operation. Do not driv e the vehicle. Seek
qualified assistance.
E. Oil level below minimum for safe
operation. Add 1.5 litre (2.6 pints) of oil,
then recheck level.
F1. Oil level stabilising, oil level not available.
Wait ten minutes and then recheck the oil
level display.
F2. If this display is accompanied by the
warning message ENGINE OIL LEVEL
MONITOR SYSTEM FAULT , a fault with
the oil level monitor is indicated. Seek
qualified assistance.
ADD 0.5L
ADD 1.0L
LEVEL OK
JAG1412
SEE HANDBOOK
NOT AVAILABLE
SEE HANDBOOK
SEE HANDBOOK
C
B
A
F
E
D