Transmission mount JAGUAR XFR 2010 1.G Workshop Manual
[x] Cancel search | Manufacturer: JAGUAR, Model Year: 2010, Model line: XFR, Model: JAGUAR XFR 2010 1.GPages: 3039, PDF Size: 58.49 MB
Page 292 of 3039
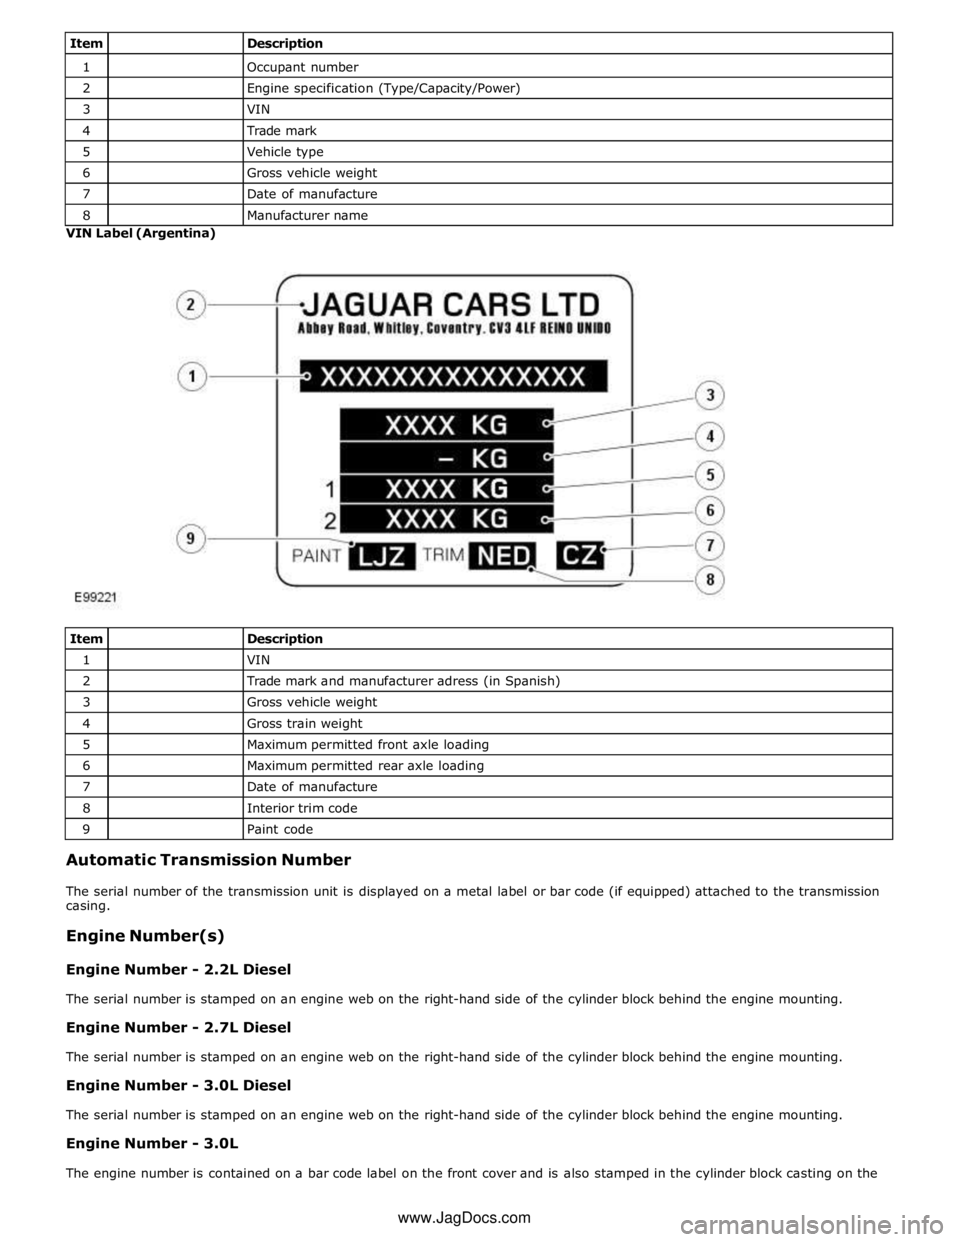
1
Occupant number 2
Engine specification (Type/Capacity/Power) 3
VIN 4
Trade mark 5
Vehicle type 6
Gross vehicle weight 7
Date of manufacture 8
Manufacturer name VIN Label (Argentina)
Item
Description 1
VIN 2
Trade mark and manufacturer adress (in Spanish) 3
Gross vehicle weight 4
Gross train weight 5
Maximum permitted front axle loading 6
Maximum permitted rear axle loading 7
Date of manufacture 8
Interior trim code 9
Paint code Automatic Transmission Number
The serial number of the transmission unit is displayed on a metal label or bar code (if equipped) attached to the transmission
casing.
Engine Number(s)
Engine Number - 2.2L Diesel
The serial number is stamped on an engine web on the right-hand side of the cylinder block behind the engine mounting.
Engine Number - 2.7L Diesel
The serial number is stamped on an engine web on the right-hand side of the cylinder block behind the engine mounting.
Engine Number - 3.0L Diesel
The serial number is stamped on an engine web on the right-hand side of the cylinder block behind the engine mounting.
Engine Number - 3.0L
The engine number is contained on a bar code label on the front cover and is also stamped in the cylinder block casting on the www.JagDocs.com
Page 293 of 3039

left-hand side of the engine below the engine mounting.
Engine Number - 4.2L and 4.2L Supercharged
The serial number is stamped on an engine web on the left-hand side of the cylinder block behind the engine mounting. The
emission code is also located here, on the transmission flange.
Engine Number - 5.0L and 5.0L Supercharged
The serial number is stamped on an engine web on the left-hand side of the cylinder block behind the engine mounting.
Page 298 of 3039

Published: 11-May-2011
Noise, Vibration and Harshness - Noise, Vibration and Harshness (NVH)
Description and Operation
Noise, vibration and harshness (NVH) is becoming more important as vehicles become more sophisticated and passenger
comfort levels increase. This section is designed to aid in the diagnosis, testing and repair of NVH concerns.
Noise is defined as sounds not associated with the operation of passenger compartment equipment that interface with
customer satisfaction.
Vibration is defined as impulses felt by the customer that are not caused by road surface changes.
Harshness is a ride quality issue where the customer feels that the vehicle response to the road surface is sharply
transmitted to the customer.
Diagnostic Theory
Diagnosis is more than just following a series of interrelated steps in order to find the solution to the specific condition. It is a
way of looking at systems that are not functioning the way they should and finding out why. Also it is knowing how the system
should work and whether it is working correctly.
There are basic rules for diagnosis. If these rules are followed, the cause of the condition is usually found the first time
through the system.
Know the System
Know how the parts go together.
Know how the system operates as well as its limits and what happens when the system goes wrong.
Sometimes this means checking the system against one that is known to be working correctly.
Know the History of the System
A clue in any one of these areas may save time:
How old or new is the system?
What kind of treatment has it had?
Has it been repaired in the past in such a manner that might relate to the present condition?
What is the repair history?
Know the History of the Condition
Did it start suddenly or appear gradually?
Was it related to some other occurrence such as a collision or previous part renewal?
Know how the condition made itself known; it may be an important clue to the cause.
Know the Probability of Certain Conditions Developing
Look for the simple rather than the complex.
For example:
- Electrical conditions usually occur at connections rather than components.
- An engine no-start is more likely to be caused by a loose wire or small adjustment rather than a sheared-off
camshaft.
Know the difference between impossible and improbable. Certain failures in a system can be improbable but still
happen.
New parts are just that, new. It does not mean they are always good functioning parts.
Do Not Cure the Symptom and Leave the Cause
Lowering the pressure in a front tire may correct the condition of a vehicle leaning to one side, but it does not correct the
original condition.
Be Positive the Cause is Found
Double check the findings.
What caused a worn component?
A loose transmission or engine mount could indicate that other mounts are also loose.
Diagnostic Charts
Charts are a simple way of expressing the relationship between basic logic and a physical system of components. They help
discover the cause of a condition in the least time. Diagnostic charts combine many areas of diagnosis into one visual display:
probability of certain things occurring in a system
speed of checking certain components or functions before others
simplicity of carrying out certain tests before others
elimination of checking huge portions of a system by carrying out simple tests
certainty of narrowing down the search to a small portion before carrying out in-depth testing
The fastest way to find a condition is to work with the tools that are available. This means working with proven diagnostic
charts and the correct special equipment for the system.
Page 300 of 3039
Noise Conditions
Gear noise is typically a howling or whining due to gear damage or incorrect bearing preload. It can occur at various
speeds and driving conditions, or it can be continuous
Chuckle is a particular rattling noise that sounds like a stick against the spokes of a spinning bicycle wheel. It occurs
while decelerating from approximately 64 km/h (40 miles/h) and can usually be heard all the way to a stop. The
frequency varies with vehicle speed
Knock is very similar to chuckle, though it may be louder and occurs on acceleration or deceleration. The tear down will
disclose what has to be corrected
Check and rule out tires, exhaust and trim items before disassembling the transmission to diagnose and correct gear noise.
The noises described under Road Test usually have specific causes that can be diagnosed by observation as the unit is
disassembled. The initial clues are the type of noise heard on the road test and the driving conditions.
Vibration Conditions
wear. NOTE: New Constant Velocity (CV) joints should not be installed unless disassembly and inspection revealed unusual
Clicking, popping or grinding noises may be caused by the following:
Cut or damaged CV joint boots resulting in inadequate or contaminated lubricant in the outboard or inboard CV joint
bearing housings
Loose CV joint boot clamps
Another component contacting the rear drive half shaft
Worn, damaged or incorrectly installed wheel bearing, suspension or brake component
Vibration at highway speeds may be caused by the following:
Out-of-balance front or rear wheels
Out-of-round tires
Driveline imbalance
Driveline run-out (alignment)
NOTE: Rear drive half shafts are not balanced and are not likely to contribute to rotational vibration disturbance.
Shudder or vibration during acceleration (including from rest) may be caused by the following:
Driveline alignment
Excessively worn or damaged outboard or inboard CV joint bearing housing
Excessively high CV joint operating angles caused by incorrect ride height. Check ride height, verify correct spring rate
and check items under Inoperative Conditions
Excessively worn driveshaft components
Leakage Conditions
1. Inspect the CV joint boots for evidence of cracks, tears or splits.
2. Inspect the underbody for any indication of grease splatter in the vicinity of the rear drive half shaft, outboard and
inboard CV joint boot locations, which is an indication of CV joint boot or CV joint boot clamp damage.
3. Inspect the inboard CV joint bearing housing seal for leakage.
Inoperative Conditions
If a CV joint or rear drive half shaft pull-out occurs, check the following:
suspension components for correct location, damage or wear
bushings for wear
subframe for damage
bent or worn components
- Stabilizer bar link
- Left-hand rear suspension lower arm and bushing
- Right-hand rear suspension lower arm and bushing
- Rear wheel hub and rear drive half shaft
Road Test
A gear-driven unit will produce a certain amount of noise. Some noise is acceptable and may be audible at certain speeds or
under various driving conditions as on a newly paved blacktop road. The slight noise is in no way detrimental and must be
considered normal.
The road test and customer interview (if available) provide information needed to identify the condition and give direction to
the correct starting point for diagnosis.
1. Make notes throughout the diagnosis routine. Make sure to write down even the smallest piece of information, because
Page 302 of 3039
and drive half shaft failure, which could cause serious personal injury and extensive vehicle damage. Failure to follow these
instructions may result in personal injury.
CAUTION: The suspension should not be allowed to hang free. When the CV joint is run at a very high angle, extra
vibration as well as damage to the seals and joints can occur.
The rear suspension lower arm should be supported as far outboard as possible. To bring the vehicle to its correct ride height,
the full weight of the vehicle should be supported in the rear by floor jacks. REFER to: (100-02 Jacking and Lifting)
Jacking (Description and Operation), Lifting (Description and Operation).
1. Raise and support the vehicle. REFER to: (100-02 Jacking and Lifting)
Jacking (Description and Operation), Lifting (Description and Operation).
2. Explore the speed range of interest using the Road Test Quick Checks as previously described.
3. Carry out a coast down in neutral. If the vehicle is free of vibration when operating at a steady indicated speed and
behaves very differently in drive and coast, a transmission concern is likely.
Note, however, that a test on the lift may produce different vibrations and noises than a road test because of the effect of the
lift. It is not unusual to find vibrations on the lift that were not found in the road test. If the condition found on the road can
be duplicated on the lift, carrying out experiments on the lift may save a great deal of time.
Exhaust Neutralization Procedure
1. Raise vehicle on lift and slacken all exhaust fixings.
2. With all fixings loose, neutralize the exhaust system.
3. Tighten all fixings to correct torque, starting at the rear-most point working towards the front of the vehicle.
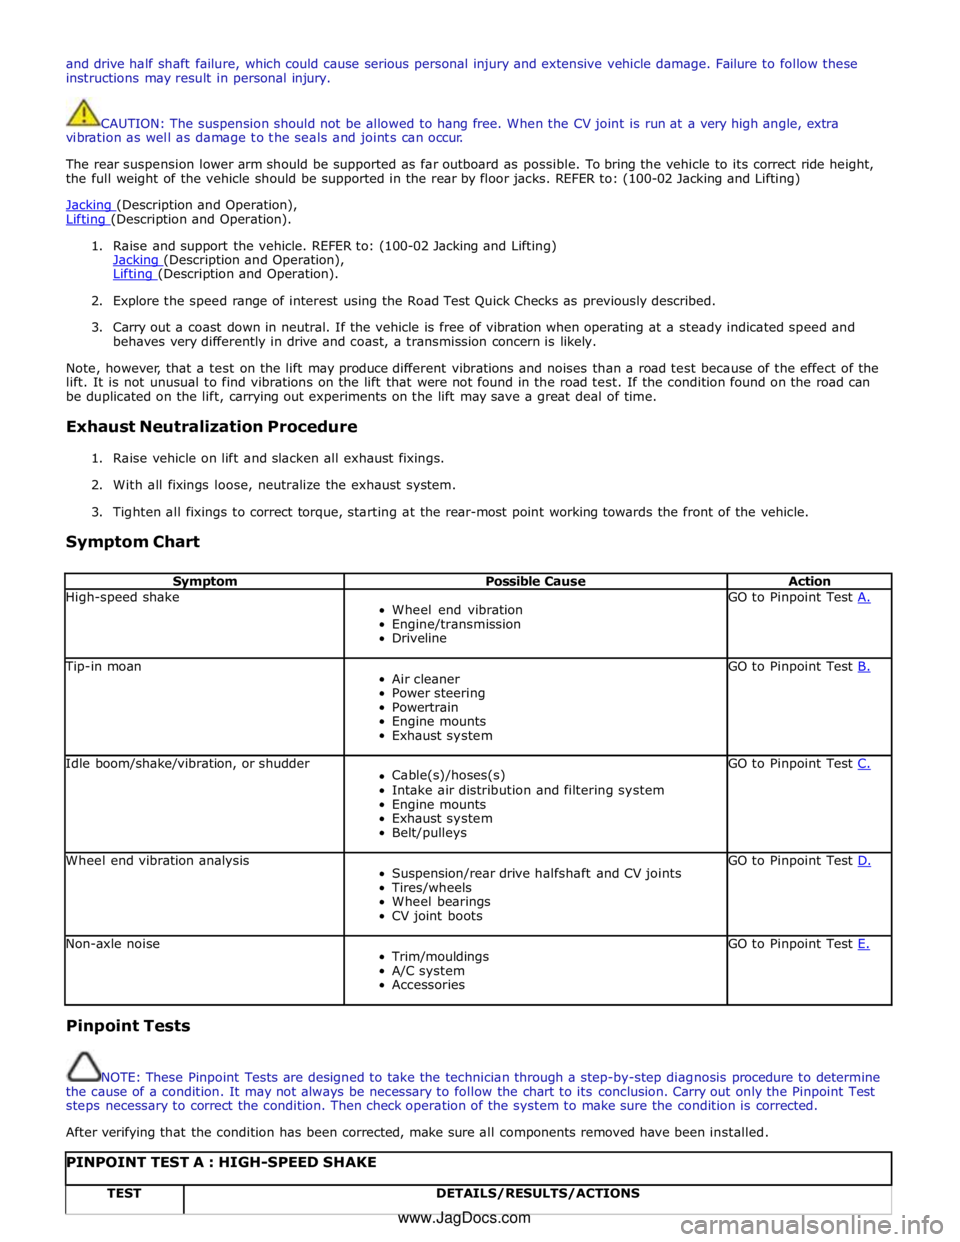
Symptom Chart
Symptom Possible Cause Action High-speed shake
Wheel end vibration
Engine/transmission
Driveline GO to Pinpoint Test A. Tip-in moan
Air cleaner
Power steering
Powertrain
Engine mounts
Exhaust system GO to Pinpoint Test B. Idle boom/shake/vibration, or shudder
Cable(s)/hoses(s)
Intake air distribution and filtering system
Engine mounts
Exhaust system
Belt/pulleys GO to Pinpoint Test C. Wheel end vibration analysis
Suspension/rear drive halfshaft and CV joints
Tires/wheels
Wheel bearings
CV joint boots GO to Pinpoint Test D. Non-axle noise
Trim/mouldings
A/C system
Accessories GO to Pinpoint Test E. Pinpoint Tests
NOTE: These Pinpoint Tests are designed to take the technician through a step-by-step diagnosis procedure to determine
the cause of a condition. It may not always be necessary to follow the chart to its conclusion. Carry out only the Pinpoint Test
steps necessary to correct the condition. Then check operation of the system to make sure the condition is corrected.
After verifying that the condition has been corrected, make sure all components removed have been installed.
PINPOINT TEST A : HIGH-SPEED SHAKE TEST DETAILS/RESULTS/ACTIONS www.JagDocs.com
Page 303 of 3039
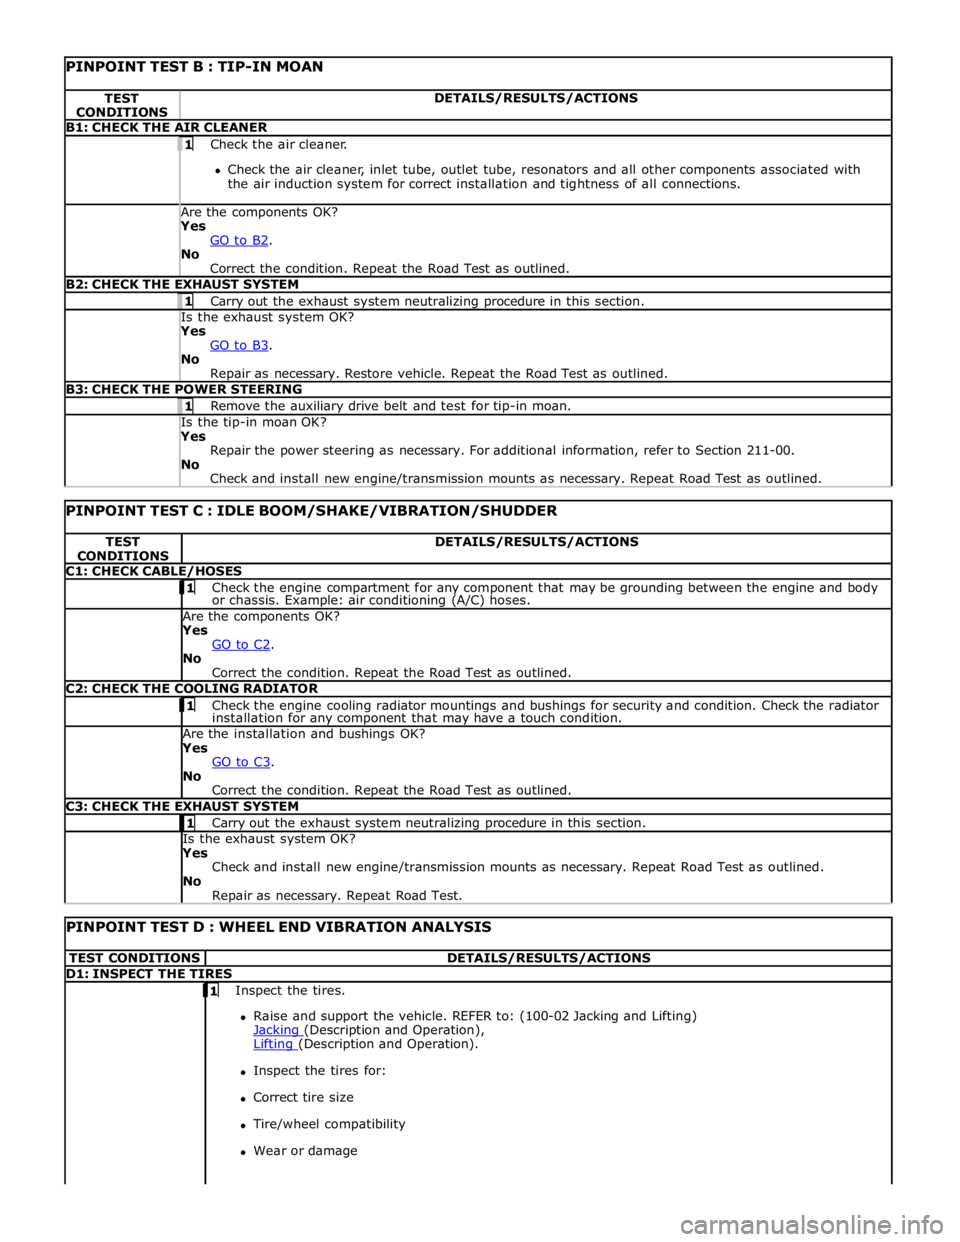
PINPOINT TEST B : TIP-IN MOAN TEST
CONDITIONS DETAILS/RESULTS/ACTIONS B1: CHECK THE AIR CLEANER 1 Check the air cleaner.
Check the air cleaner, inlet tube, outlet tube, resonators and all other components associated with
the air induction system for correct installation and tightness of all connections. Are the components OK? Yes
GO to B2. No
Correct the condition. Repeat the Road Test as outlined. B2: CHECK THE EXHAUST SYSTEM 1 Carry out the exhaust system neutralizing procedure in this section. Is the exhaust system OK? Yes
GO to B3. No
Repair as necessary. Restore vehicle. Repeat the Road Test as outlined. B3: CHECK THE POWER STEERING 1 Remove the auxiliary drive belt and test for tip-in moan. Is the tip-in moan OK? Yes
Repair the power steering as necessary. For additional information, refer to Section 211-00.
No
Check and install new engine/transmission mounts as necessary. Repeat Road Test as outlined.
PINPOINT TEST C : IDLE BOOM/SHAKE/VIBRATION/SHUDDER TEST
CONDITIONS DETAILS/RESULTS/ACTIONS C1: CHECK CABLE/HOSES 1 Check the engine compartment for any component that may be grounding between the engine and body or chassis. Example: air conditioning (A/C) hoses. Are the components OK? Yes
GO to C2. No
Correct the condition. Repeat the Road Test as outlined. C2: CHECK THE COOLING RADIATOR 1 Check the engine cooling radiator mountings and bushings for security and condition. Check the radiator installation for any component that may have a touch condition. Are the installation and bushings OK? Yes
GO to C3. No
Correct the condition. Repeat the Road Test as outlined. C3: CHECK THE EXHAUST SYSTEM 1 Carry out the exhaust system neutralizing procedure in this section. Is the exhaust system OK? Yes
Check and install new engine/transmission mounts as necessary. Repeat Road Test as outlined.
No
Repair as necessary. Repeat Road Test.
PINPOINT TEST D : WHEEL END VIBRATION ANALYSIS TEST CONDITIONS DETAILS/RESULTS/ACTIONS D1: INSPECT THE TIRES 1 Inspect the tires.
Raise and support the vehicle. REFER to: (100-02 Jacking and Lifting)
Jacking (Description and Operation), Lifting (Description and Operation).
Inspect the tires for:
Correct tire size
Tire/wheel compatibility
Wear or damage
Page 495 of 3039
Published: 11-May-2011
Ride and Handling Optimization - Ride and Handling Optimization - System
Operation and Component Description
Description and Operation
JAGUARDRIVE CONTROL OPERATION
Engine Management System System Operation
The Engine Management System (EMS) varies the accelerator pedal maps to change the amount of torque per percentage of
pedal travel. The EMS can also change the accelerator pedal response to control the allowed torque change relative to the
speed of pedal travel.
Each driving mode uses a combination of operating parameters for each sub-system. Changing between driving modes initiates
a different set of operating characteristics, which will be noticeable to the driver. The driver will notice differences in engine
response when, for example, the accelerator pedal is held in a constant position and the driving mode is changed from Winter
to Dynamic, the driver will notice the torque and engine speed increase. Similarly, if the mode is changed from Normal or
Dynamic to Winter the driver will notice a reduction in torque and engine speed.
NOTE: The change in torque and engine speed can take approximately 30 seconds and care must be taken not to confuse
the JaguarDrive Control system operation with an EMS fault.
Transmission Control
The TCM (transmission control module) changes the shift maps for the JaguarDrive Control mode selected. This changes the
shift points providing early or late upshifts and downshifts. For example, on slippery surfaces in Winter mode the transmission
will select 2nd gear for starting from a standstill on a flat surface to minimize wheel slip.
Anti-lock Braking System Control
The ABS (anti-lock brake system) module controls several vehicle functions and adjusts the operating parameters of these
functions to optimize the selected JaguarDrive Control mode. Traction control uses different slip/acceleration thresholds to
improve traction and vehicle composure. For example, the system sensitivity is increased on slippery surfaces to reduce wheel
spin.
If TracDSC is selected or DSC is switched off, then subsequently the JaguarDrive Control mode is changed, DSC is automatically
switched back on (or to TracDSC for Dynamic mode).
The stability control uses different threshold values for the selected mode, reducing the requirement for the driver to change
the DSC system mode for optimum performance in various driving scenarios.
Incorrect Mode Usage
Selection of an inappropriate mode is discouraged in the following ways:
The active mode icon is continually displayed in the instrument cluster message center
In any special mode, when the ignition has been in the off position continuously for more than 6 hours, the JaguarDrive
Control system defaults to the special modes off (DSC on).
Selection of an inappropriate mode for the conditions will not endanger the driver or immediately cause damage to the vehicle.
Continued use of an inappropriate mode may reduce the life of some components. The driver may notice a different vehicle
response, with the engine and transmission responses being different than in the special modes off.
Driver Information
The instrument cluster contains a message center, which displays vehicle information to the driver. The message center
contains the JaguarDrive Control mode icons, which display the currently selected mode. If no symbol is displayed, no special
mode is selected and the system is in special modes off.
Any required changes to the subsystems are also passed to the driver in the form of warning illumination in the instrument
cluster or appropriate messages in the message center, DSC off for example.
In Dynamic mode when the transmission is in manual mode, the gear information is displayed in amber when the appropriate
engine speed is reached for optimum sporty change point.
DIAGNOSTICS
JaguarDrive Control relies on the correct functionality of the sub-systems. If one of the sub-systems develops a fault, the
JaguarDrive Control system will not function, even though the fault is not in the JaguarDrive Control system.
The JaguarDrive Selector module and rotary control should only be investigated if there are no apparent faults in any of the
sub-systems. If a fault in a sub-system is subsequently corrected, the JaguarDrive Control system will function normally after
an ignition on and off cycle.
Page 501 of 3039
Clunk
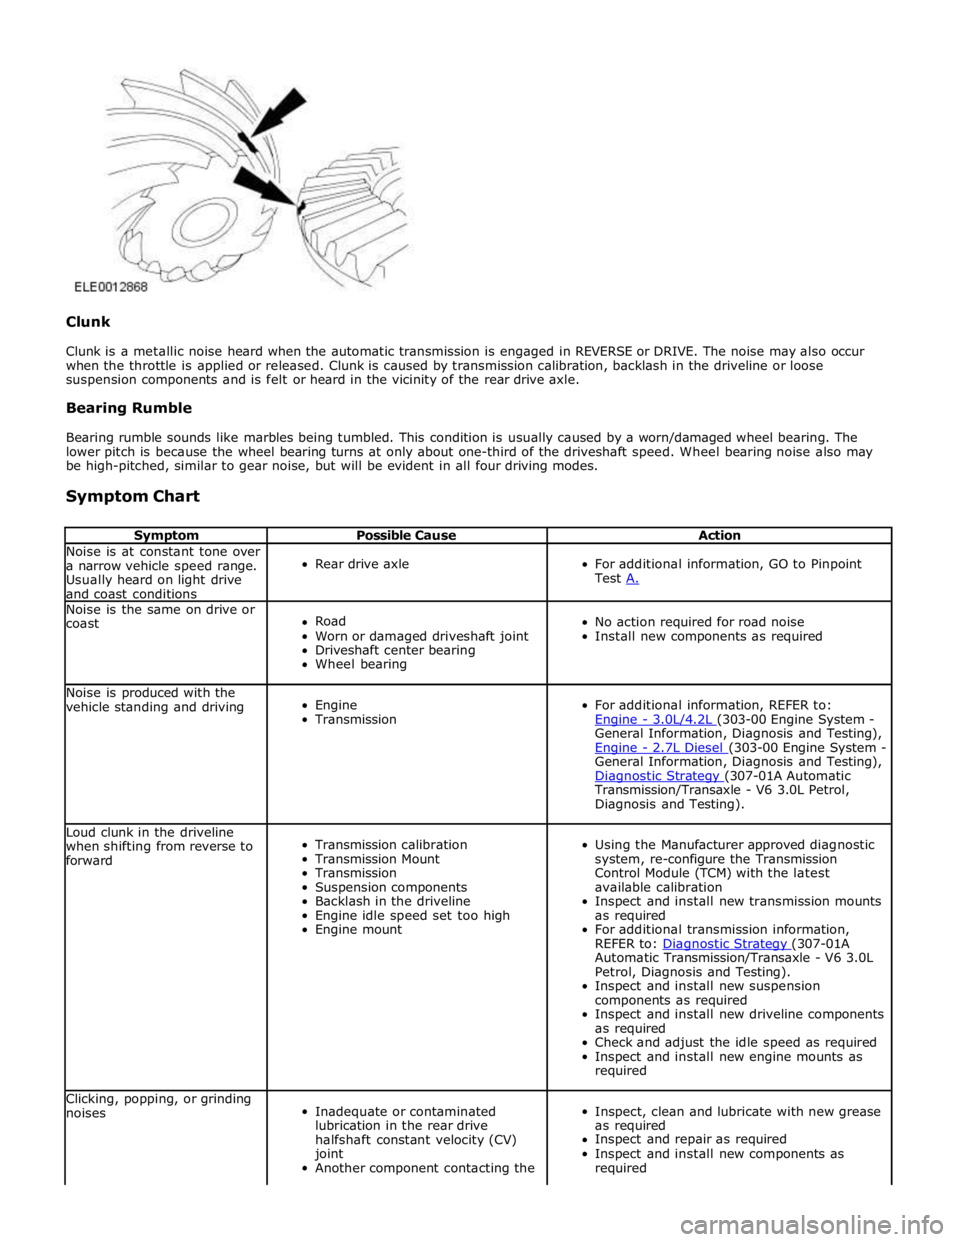
Clunk is a metallic noise heard when the automatic transmission is engaged in REVERSE or DRIVE. The noise may also occur
when the throttle is applied or released. Clunk is caused by transmission calibration, backlash in the driveline or loose
suspension components and is felt or heard in the vicinity of the rear drive axle.
Bearing Rumble
Bearing rumble sounds like marbles being tumbled. This condition is usually caused by a worn/damaged wheel bearing. The
lower pitch is because the wheel bearing turns at only about one-third of the driveshaft speed. Wheel bearing noise also may
be high-pitched, similar to gear noise, but will be evident in all four driving modes.
Symptom Chart
Symptom Possible Cause Action Noise is at constant tone over
a narrow vehicle speed range.
Usually heard on light drive
and coast conditions
Rear drive axle
For additional information, GO to Pinpoint
Test A. Noise is the same on drive or
coast
Road
Worn or damaged driveshaft joint
Driveshaft center bearing
Wheel bearing
No action required for road noise
Install new components as required Noise is produced with the
vehicle standing and driving
Engine
Transmission
For additional information, REFER to:
Engine - 3.0L/4.2L (303-00 Engine System - General Information, Diagnosis and Testing),
Engine - 2.7L Diesel (303-00 Engine System - General Information, Diagnosis and Testing),
Diagnostic Strategy (307-01A Automatic Transmission/Transaxle - V6 3.0L Petrol,
Diagnosis and Testing). Loud clunk in the driveline
when shifting from reverse to
forward
Transmission calibration
Transmission Mount
Transmission
Suspension components
Backlash in the driveline
Engine idle speed set too high
Engine mount
Using the Manufacturer approved diagnostic
system, re-configure the Transmission
Control Module (TCM) with the latest
available calibration
Inspect and install new transmission mounts
as required
For additional transmission information,
REFER to: Diagnostic Strategy (307-01A Automatic Transmission/Transaxle - V6 3.0L
Petrol, Diagnosis and Testing).
Inspect and install new suspension
components as required
Inspect and install new driveline components
as required
Check and adjust the idle speed as required
Inspect and install new engine mounts as
required Clicking, popping, or grinding
noises
Inadequate or contaminated
lubrication in the rear drive
halfshaft constant velocity (CV)
joint
Another component contacting the
Inspect, clean and lubricate with new grease
as required
Inspect and repair as required
Inspect and install new components as
required
Page 502 of 3039
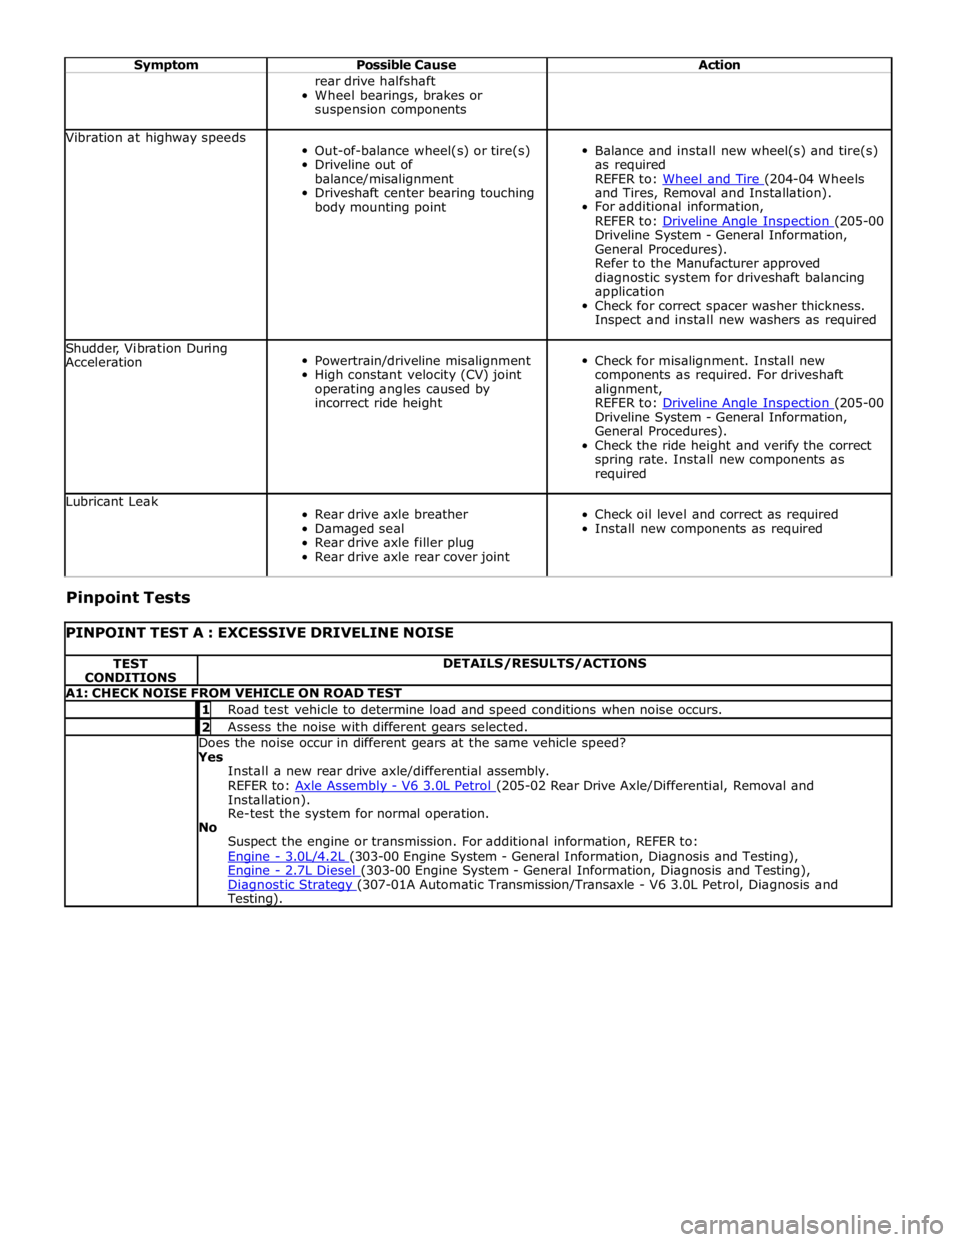
Symptom Possible Cause Action rear drive halfshaft
Wheel bearings, brakes or
suspension components Vibration at highway speeds
Out-of-balance wheel(s) or tire(s)
Driveline out of
balance/misalignment
Driveshaft center bearing touching
body mounting point
Balance and install new wheel(s) and tire(s)
as required
REFER to: Wheel and Tire (204-04 Wheels and Tires, Removal and Installation).
For additional information,
REFER to: Driveline Angle Inspection (205-00 Driveline System - General Information,
General Procedures).
Refer to the Manufacturer approved
diagnostic system for driveshaft balancing
application
Check for correct spacer washer thickness.
Inspect and install new washers as required Shudder, Vibration During
Acceleration
Powertrain/driveline misalignment
High constant velocity (CV) joint
operating angles caused by
incorrect ride height
Check for misalignment. Install new
components as required. For driveshaft
alignment,
REFER to: Driveline Angle Inspection (205-00 Driveline System - General Information,
General Procedures).
Check the ride height and verify the correct
spring rate. Install new components as
required Lubricant Leak
Rear drive axle breather
Damaged seal
Rear drive axle filler plug
Rear drive axle rear cover joint
Check oil level and correct as required
Install new components as required Pinpoint Tests
PINPOINT TEST A : EXCESSIVE DRIVELINE NOISE TEST
CONDITIONS DETAILS/RESULTS/ACTIONS A1: CHECK NOISE FROM VEHICLE ON ROAD TEST 1 Road test vehicle to determine load and speed conditions when noise occurs. 2 Assess the noise with different gears selected. Does the noise occur in different gears at the same vehicle speed? Yes
Install a new rear drive axle/differential assembly.
REFER to: Axle Assembly - V6 3.0L Petrol (205-02 Rear Drive Axle/Differential, Removal and Installation).
Re-test the system for normal operation.
No
Suspect the engine or transmission. For additional information, REFER to:
Engine - 3.0L/4.2L (303-00 Engine System - General Information, Diagnosis and Testing), Engine - 2.7L Diesel (303-00 Engine System - General Information, Diagnosis and Testing), Diagnostic Strategy (307-01A Automatic Transmission/Transaxle - V6 3.0L Petrol, Diagnosis and Testing).
Page 537 of 3039
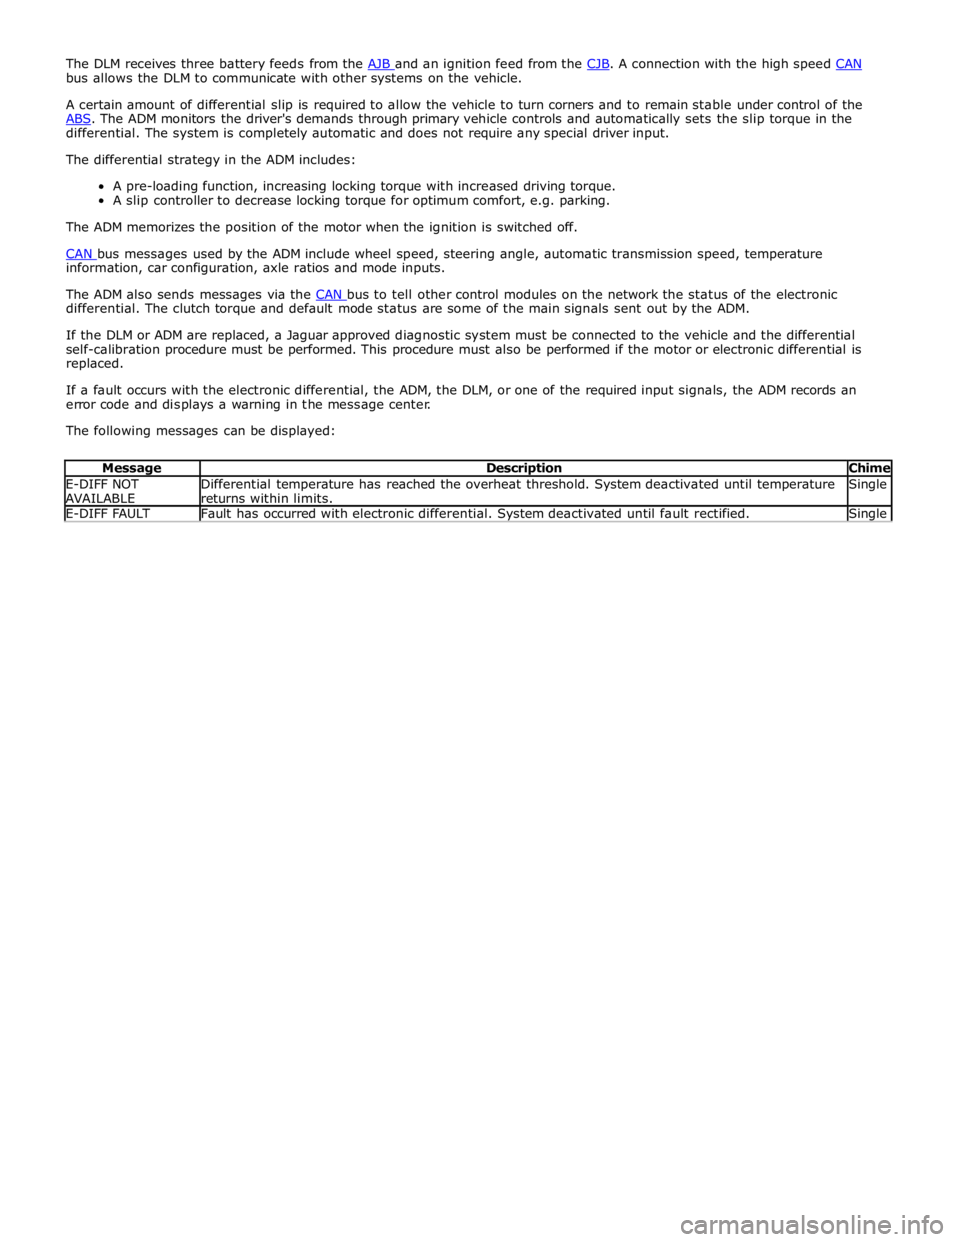
bus allows the DLM to communicate with other systems on the vehicle.
A certain amount of differential slip is required to allow the vehicle to turn corners and to remain stable under control of the
ABS. The ADM monitors the driver's demands through primary vehicle controls and automatically sets the slip torque in the differential. The system is completely automatic and does not require any special driver input.
The differential strategy in the ADM includes:
A pre-loading function, increasing locking torque with increased driving torque.
A slip controller to decrease locking torque for optimum comfort, e.g. parking.
The ADM memorizes the position of the motor when the ignition is switched off.
CAN bus messages used by the ADM include wheel speed, steering angle, automatic transmission speed, temperature information, car configuration, axle ratios and mode inputs.
The ADM also sends messages via the CAN bus to tell other control modules on the network the status of the electronic differential. The clutch torque and default mode status are some of the main signals sent out by the ADM.
If the DLM or ADM are replaced, a Jaguar approved diagnostic system must be connected to the vehicle and the differential
self-calibration procedure must be performed. This procedure must also be performed if the motor or electronic differential is
replaced.
If a fault occurs with the electronic differential, the ADM, the DLM, or one of the required input signals, the ADM records an
error code and displays a warning in the message center.
The following messages can be displayed:
Message Description Chime E-DIFF NOT
AVAILABLE Differential temperature has reached the overheat threshold. System deactivated until temperature
returns within limits. Single E-DIFF FAULT Fault has occurred with electronic differential. System deactivated until fault rectified. Single