Module JAGUAR XFR 2010 1.G Workshop Manual
[x] Cancel search | Manufacturer: JAGUAR, Model Year: 2010, Model line: XFR, Model: JAGUAR XFR 2010 1.GPages: 3039, PDF Size: 58.49 MB
Page 534 of 3039
A motor and reduction gearbox, attached to the cover.
A temperature sensor installed in the cover.
The DLM (differential locking module) operates the motor of the electronic differential under the control of the ADM (adaptive
damping module).
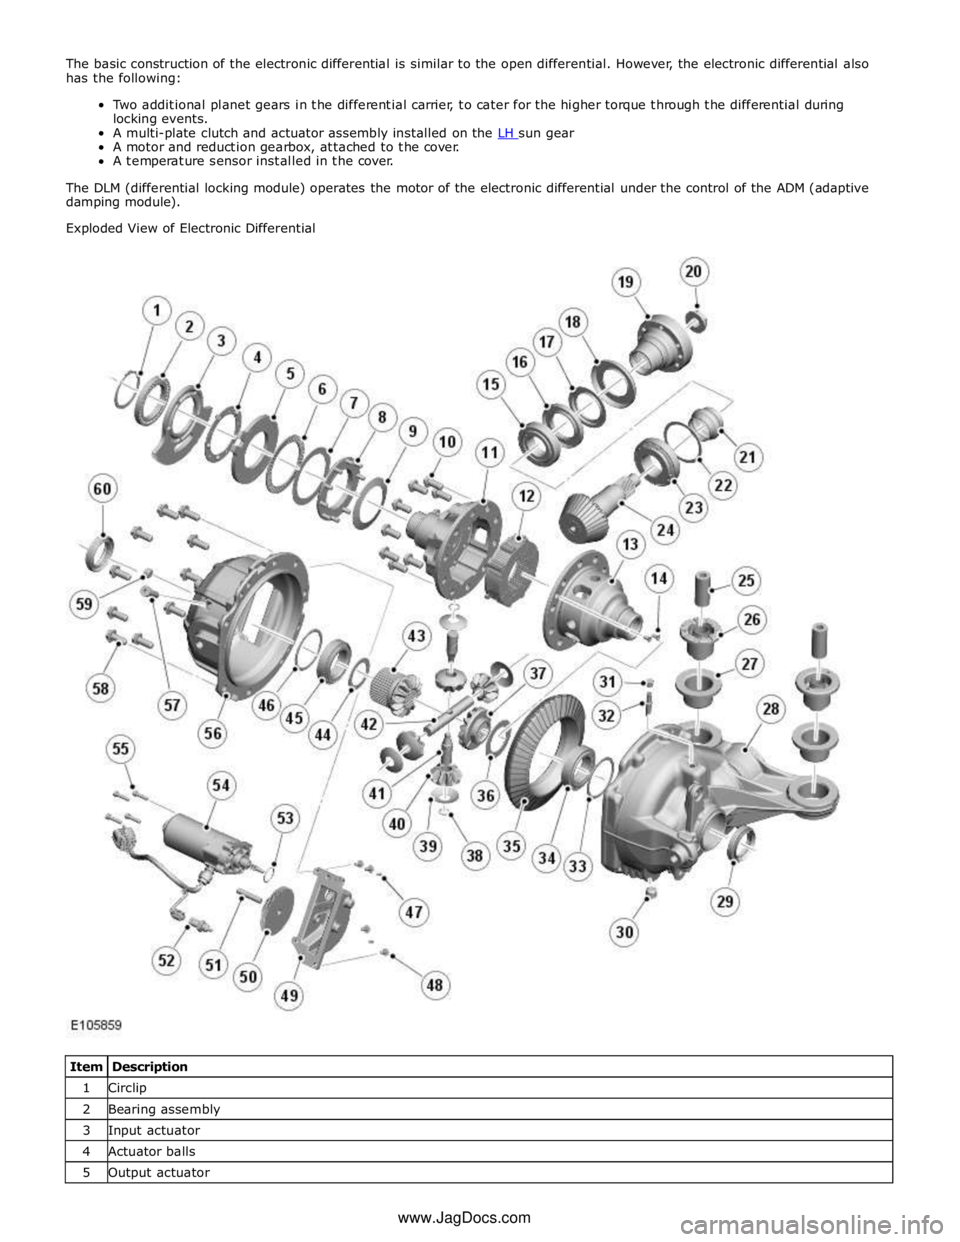
Exploded View of Electronic Differential
Item Description 1 Circlip 2 Bearing assembly 3 Input actuator 4 Actuator balls 5 Output actuator www.JagDocs.com
Page 536 of 3039
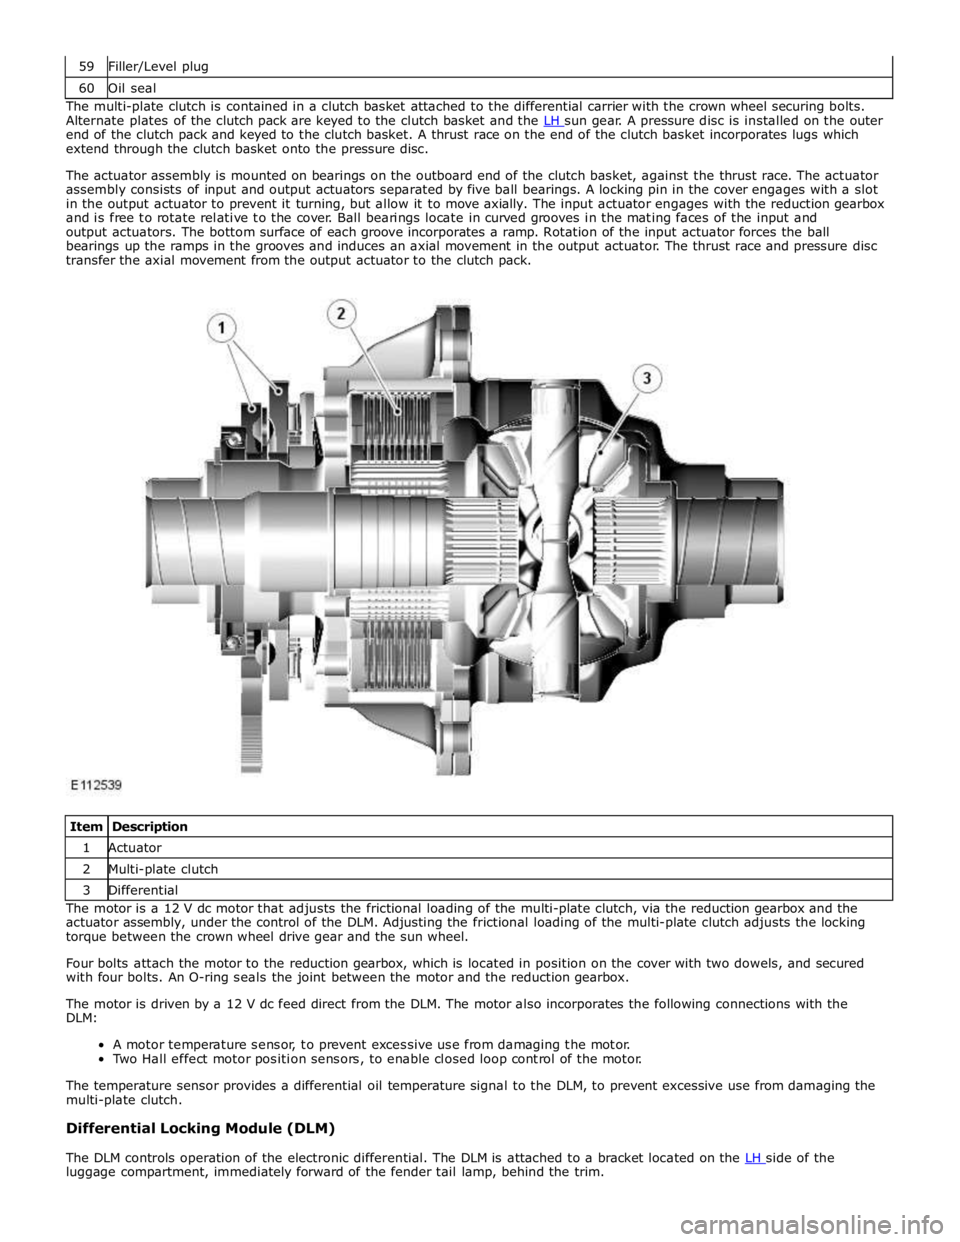
60 Oil seal The multi-plate clutch is contained in a clutch basket attached to the differential carrier with the crown wheel securing bolts.
Alternate plates of the clutch pack are keyed to the clutch basket and the LH sun gear. A pressure disc is installed on the outer end of the clutch pack and keyed to the clutch basket. A thrust race on the end of the clutch basket incorporates lugs which
extend through the clutch basket onto the pressure disc.
The actuator assembly is mounted on bearings on the outboard end of the clutch basket, against the thrust race. The actuator
assembly consists of input and output actuators separated by five ball bearings. A locking pin in the cover engages with a slot
in the output actuator to prevent it turning, but allow it to move axially. The input actuator engages with the reduction gearbox
and is free to rotate relative to the cover. Ball bearings locate in curved grooves in the mating faces of the input and
output actuators. The bottom surface of each groove incorporates a ramp. Rotation of the input actuator forces the ball
bearings up the ramps in the grooves and induces an axial movement in the output actuator. The thrust race and pressure disc
transfer the axial movement from the output actuator to the clutch pack.
Item Description 1 Actuator 2 Multi-plate clutch 3 Differential The motor is a 12 V dc motor that adjusts the frictional loading of the multi-plate clutch, via the reduction gearbox and the
actuator assembly, under the control of the DLM. Adjusting the frictional loading of the multi-plate clutch adjusts the locking
torque between the crown wheel drive gear and the sun wheel.
Four bolts attach the motor to the reduction gearbox, which is located in position on the cover with two dowels, and secured
with four bolts. An O-ring seals the joint between the motor and the reduction gearbox.
The motor is driven by a 12 V dc feed direct from the DLM. The motor also incorporates the following connections with the
DLM:
A motor temperature sensor, to prevent excessive use from damaging the motor.
Two Hall effect motor position sensors, to enable closed loop control of the motor.
The temperature sensor provides a differential oil temperature signal to the DLM, to prevent excessive use from damaging the
multi-plate clutch.
Differential Locking Module (DLM)
The DLM controls operation of the electronic differential. The DLM is attached to a bracket located on the LH side of the luggage compartment, immediately forward of the fender tail lamp, behind the trim.
Page 537 of 3039

bus allows the DLM to communicate with other systems on the vehicle.
A certain amount of differential slip is required to allow the vehicle to turn corners and to remain stable under control of the
ABS. The ADM monitors the driver's demands through primary vehicle controls and automatically sets the slip torque in the differential. The system is completely automatic and does not require any special driver input.
The differential strategy in the ADM includes:
A pre-loading function, increasing locking torque with increased driving torque.
A slip controller to decrease locking torque for optimum comfort, e.g. parking.
The ADM memorizes the position of the motor when the ignition is switched off.
CAN bus messages used by the ADM include wheel speed, steering angle, automatic transmission speed, temperature information, car configuration, axle ratios and mode inputs.
The ADM also sends messages via the CAN bus to tell other control modules on the network the status of the electronic differential. The clutch torque and default mode status are some of the main signals sent out by the ADM.
If the DLM or ADM are replaced, a Jaguar approved diagnostic system must be connected to the vehicle and the differential
self-calibration procedure must be performed. This procedure must also be performed if the motor or electronic differential is
replaced.
If a fault occurs with the electronic differential, the ADM, the DLM, or one of the required input signals, the ADM records an
error code and displays a warning in the message center.
The following messages can be displayed:
Message Description Chime E-DIFF NOT
AVAILABLE Differential temperature has reached the overheat threshold. System deactivated until temperature
returns within limits. Single E-DIFF FAULT Fault has occurred with electronic differential. System deactivated until fault rectified. Single
Page 538 of 3039
Rear Drive Axle/Differential - Rear Drive Axle and Differential
Diagnosis and Testing
Principle of Operation Published: 12-May-2014
For a detailed description of the Rear Drive Axle and Differential, refer to the relevant Description and Operation section in the
workshop manual. REFER to: Rear Drive Axle and Differential (205-02 Rear Drive Axle/Differential, Description and Operation).
Inspection and Verification
CAUTION: Diagnosis by substitution from a donor vehicle is NOT acceptable. Substitution of control modules does not
guarantee confirmation of a fault, and may also cause additional faults in the vehicle being tested and/or the donor vehicle.
1. Verify the customer concern.
2. Visually inspect for obvious signs of damage and system integrity.
Mechanical Electrical
Fixings that secure Rear Differential Control Module (Heat path
for Module Heatsink)
Fuses/Relays
Damaged, Loose or Corroded Connector(s)
Damage to Wiring Loom/Incorrect Location,
Stretched or Taught
3. If an obvious cause for an observed or reported concern is found, correct the cause (if possible) before proceeding to
the next step.
4. If the cause is not visually evident, check the system for any logged Diagnostic Trouble Codes (DTCs) and refer to the
DTC index.
DTC Index
For a list of diagnostic trouble codes that could be logged on this vehicle, please refer to Section 100-00. REFER to: Diagnostic Trouble Code (DTC) Index - DTC: Rear Differential Control Module (RDCM) (100-00 General Information, Description and Operation).
Page 557 of 3039
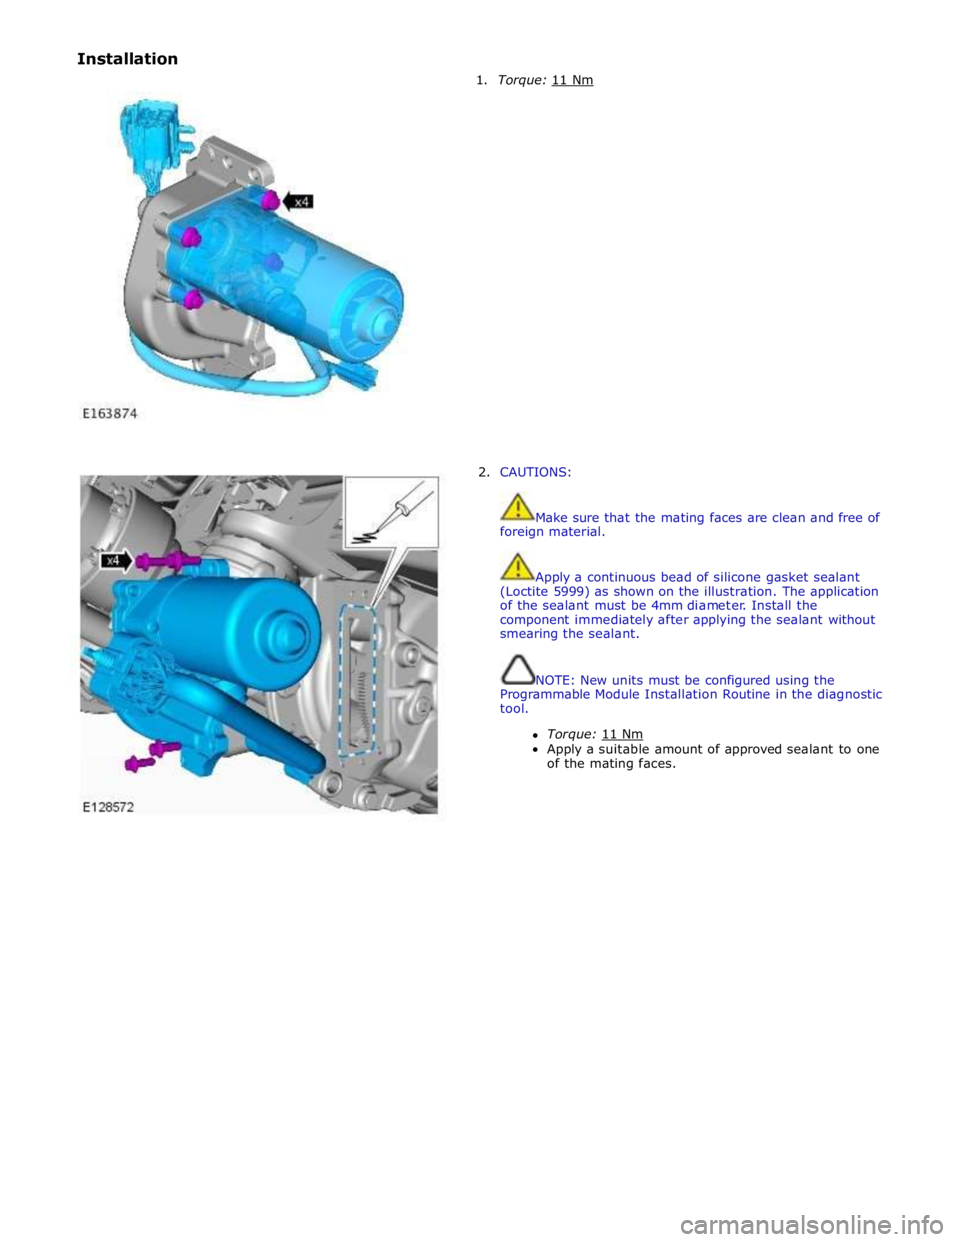
Installation
1. Torque: 11 Nm
2. CAUTIONS:
Make sure that the mating faces are clean and free of
foreign material.
Apply a continuous bead of silicone gasket sealant
(Loctite 5999) as shown on the illustration. The application
of the sealant must be 4mm diameter. Install the
component immediately after applying the sealant without
smearing the sealant.
NOTE: New units must be configured using the
Programmable Module Installation Routine in the diagnostic
tool.
Torque: 11 Nm Apply a suitable amount of approved sealant to one
of the mating faces.
Page 582 of 3039
Brake System - General Information - Brake System
Diagnosis and Testing
Principle of Operation Published: 11-May-2011
For a detailed description of the brake system, refer to the relevant Description and Operation sections in the workshop
manual. REFER to:
Front Disc Brake (206-03, Description and Operation),
Front Disc Brake (206-03, Description and Operation),
Front Disc Brake (206-03, Description and Operation),
Rear Disc Brake (206-04, Description and Operation),
Rear Disc Brake (206-04, Description and Operation),
Rear Disc Brake (206-04, Description and Operation),
Parking Brake (206-05 Parking Brake and Actuation, Description and Operation), Parking Brake (206-05 Parking Brake and Actuation, Description and Operation), Parking Brake (206-05 Parking Brake and Actuation, Description and Operation), Hydraulic Brake Actuation (206-06 Hydraulic Brake Actuation, Description and Operation), Hydraulic Brake Actuation (206-06 Hydraulic Brake Actuation, Description and Operation), Hydraulic Brake Actuation (206-06 Hydraulic Brake Actuation, Description and Operation), Brake Booster (206-07 Power Brake Actuation, Description and Operation), Brake Booster (206-07 Power Brake Actuation, Description and Operation), Brake Booster (206-07, Description and Operation).
Inspection and Verification
Visually examine the front and rear wheel and tire assemblies for damage such as uneven wear patterns, tread worn out or
sidewall damage. Verify the tires are the same size, type and, where possible, same manufacturer. Replace the damaged
wheel or excessively worn tire.
Wheels and tires must be cleared of any foreign matter and tire pressures adjusted to the correct specification.
If the tires exhibit uneven wear or feathering, the cause must be corrected. Check the steering and suspension components for
damage or wear and, if necessary, check and adjust front wheel alignment. REFER to: (204-00 Suspension System - General
Information)
Specifications (Specifications), Front Toe Adjustment (General Procedures).
Visual Inspection
Mechanical Electrical
Brake master cylinder
Brake caliper piston(s)
Brake discs
Wheel bearings
Brake pads
Power brake booster
Brake pedal linkage
Brake booster vacuum hose
Tires
Debris
Parking brake actuator
Parking brake module
Parking brake switch
Damaged or corroded wiring harness
Brake master cylinder fluid level switch Road Test
Carry out a road test to compare actual vehicle braking performance with the performance standards expected by the driver.
The ability of the test driver to make valid comparisons and detect performance deficiencies will depend on experience.
The driver should have a thorough knowledge of brake system operation and accepted general performance guidelines to make
good comparisons and detect performance concerns.
An experienced brake technician will always establish a route that will be used for all brake diagnosis road tests. The roads
selected will be reasonably smooth and level. Gravel or bumpy roads are not suitable because the surface does not allow the
tires to grip the road equally. Crowned roads should be avoided because of the large amount of weight shifted to the low set
of wheels on this type of road. Once the route is established and consistently used, the road surface variable can be
eliminated from the test results.
Before a road test, obtain a complete description of the customer concerns or suspected condition. From the description, the
technician's experience will allow the technician to match possible causes with symptoms. Certain components will be tagged
as possible suspects while others will be eliminated by the evidence. More importantly, the customer description can reveal
unsafe conditions which should be checked or corrected before the road test. The description will also help form the basic
approach to the road test by narrowing the concern to specific components, vehicle speed or conditions.
Begin the road test with a general brake performance check. Keeping the description of the concern in mind, test the brakes at
different vehicle speeds using both light and heavy pedal pressure. To determine if the concern is in the front or rear braking
system, use the brake pedal and then use the parking brake control. If the condition (pull, vibration, pulsation) occurs only
with the parking brake, the concern is in the rear brake system.
Page 644 of 3039

Parking brake module retaining bolts 4 - 35 Parking brake release actuator retaining bolts 20 15 -
Page 645 of 3039
Published: 11-May-2011
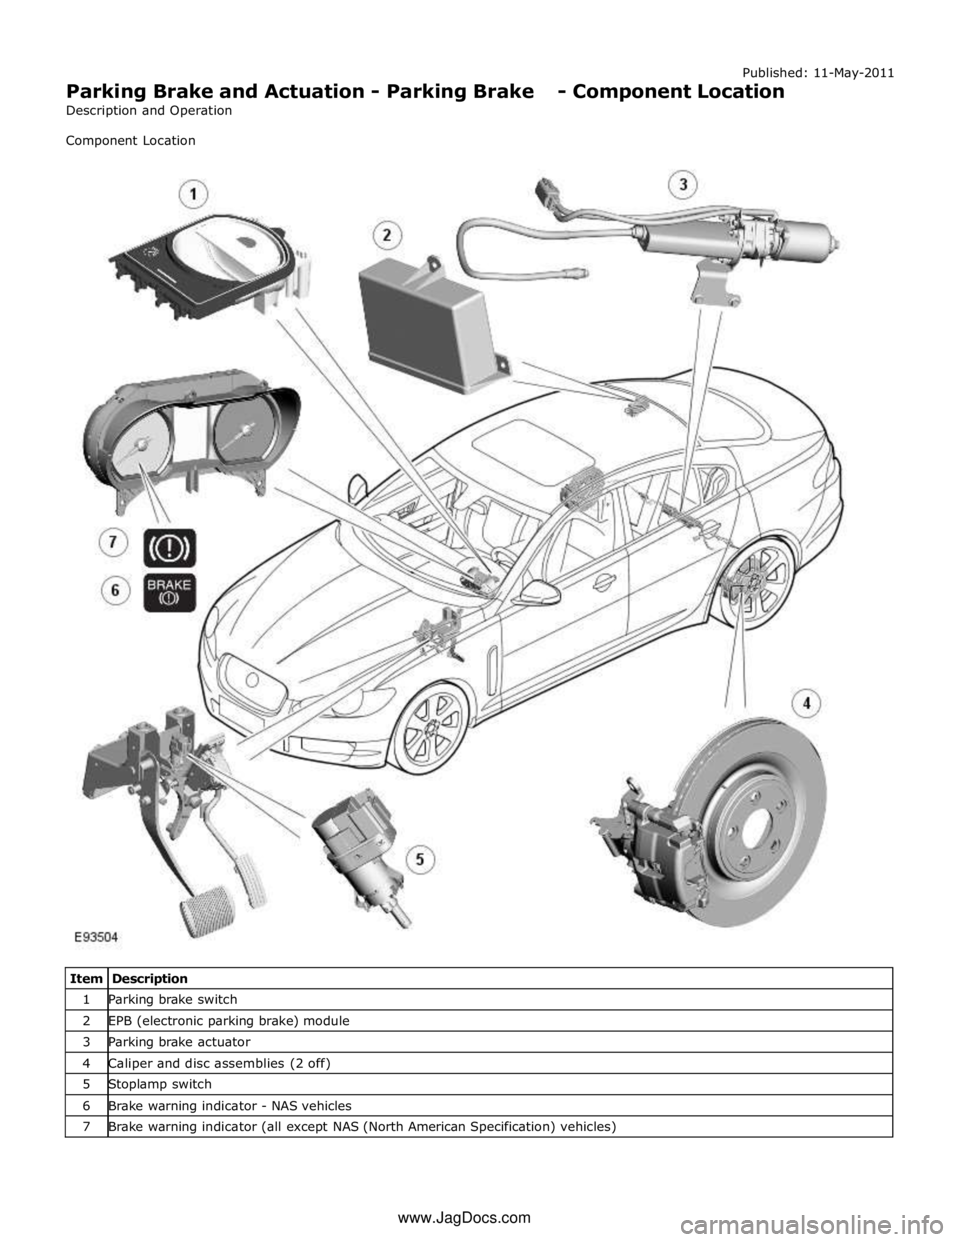
Parking Brake and Actuation - Parking Brake - Component Location
Description and Operation
Component Location
Item Description 1 Parking brake switch 2 EPB (electronic parking brake) module 3 Parking brake actuator 4 Caliper and disc assemblies (2 off) 5 Stoplamp switch 6 Brake warning indicator - NAS vehicles 7 Brake warning indicator (all except NAS (North American Specification) vehicles) www.JagDocs.com
Page 647 of 3039
Published: 11-May-2011
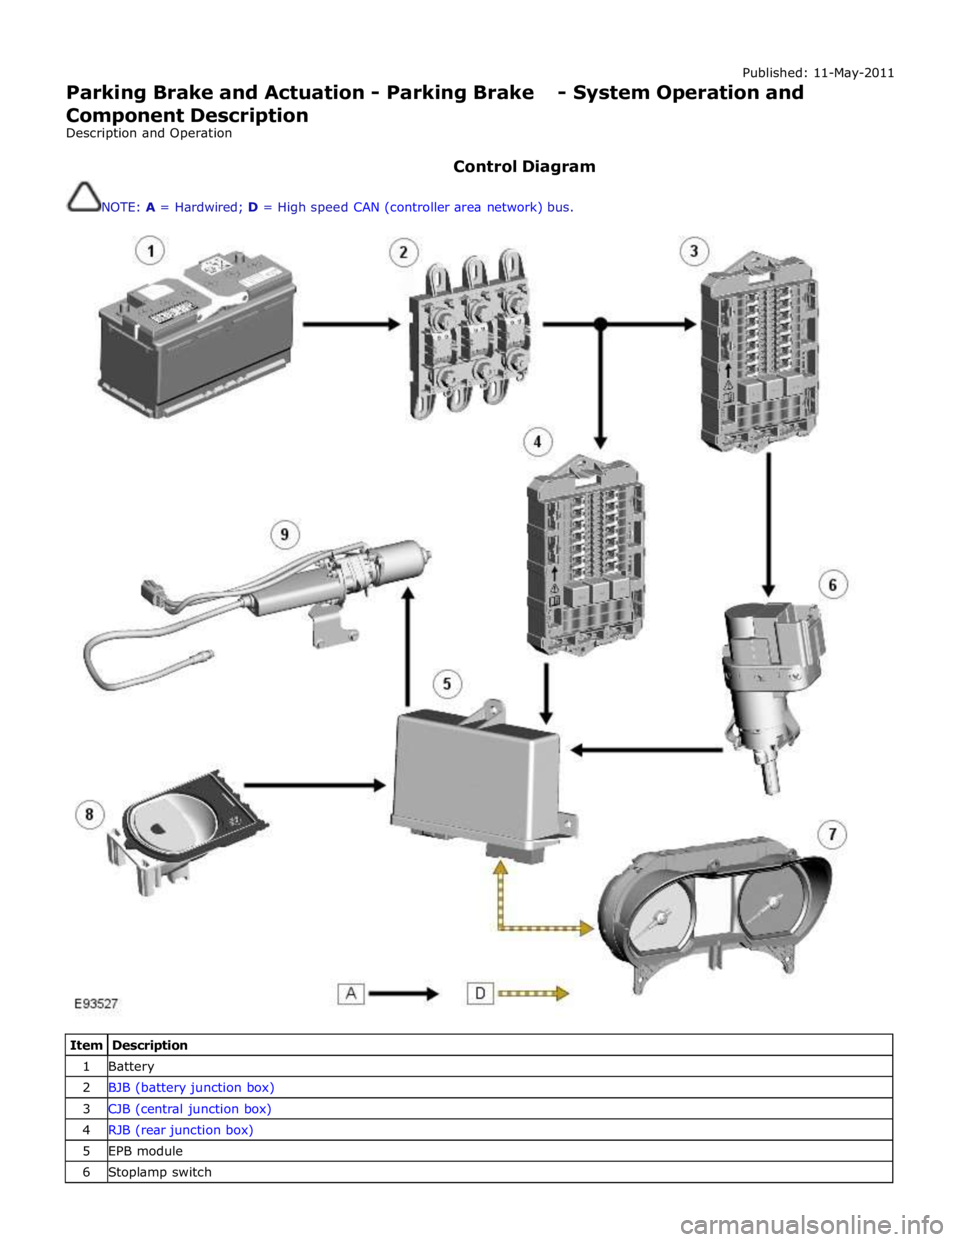
Parking Brake and Actuation - Parking Brake - System Operation and
Component Description
Description and Operation
Control Diagram
NOTE: A = Hardwired; D = High speed CAN (controller area network) bus.
Item Description 1 Battery 2 BJB (battery junction box) 3 CJB (central junction box) 4 RJB (rear junction box) 5 EPB module 6 Stoplamp switch
Page 648 of 3039
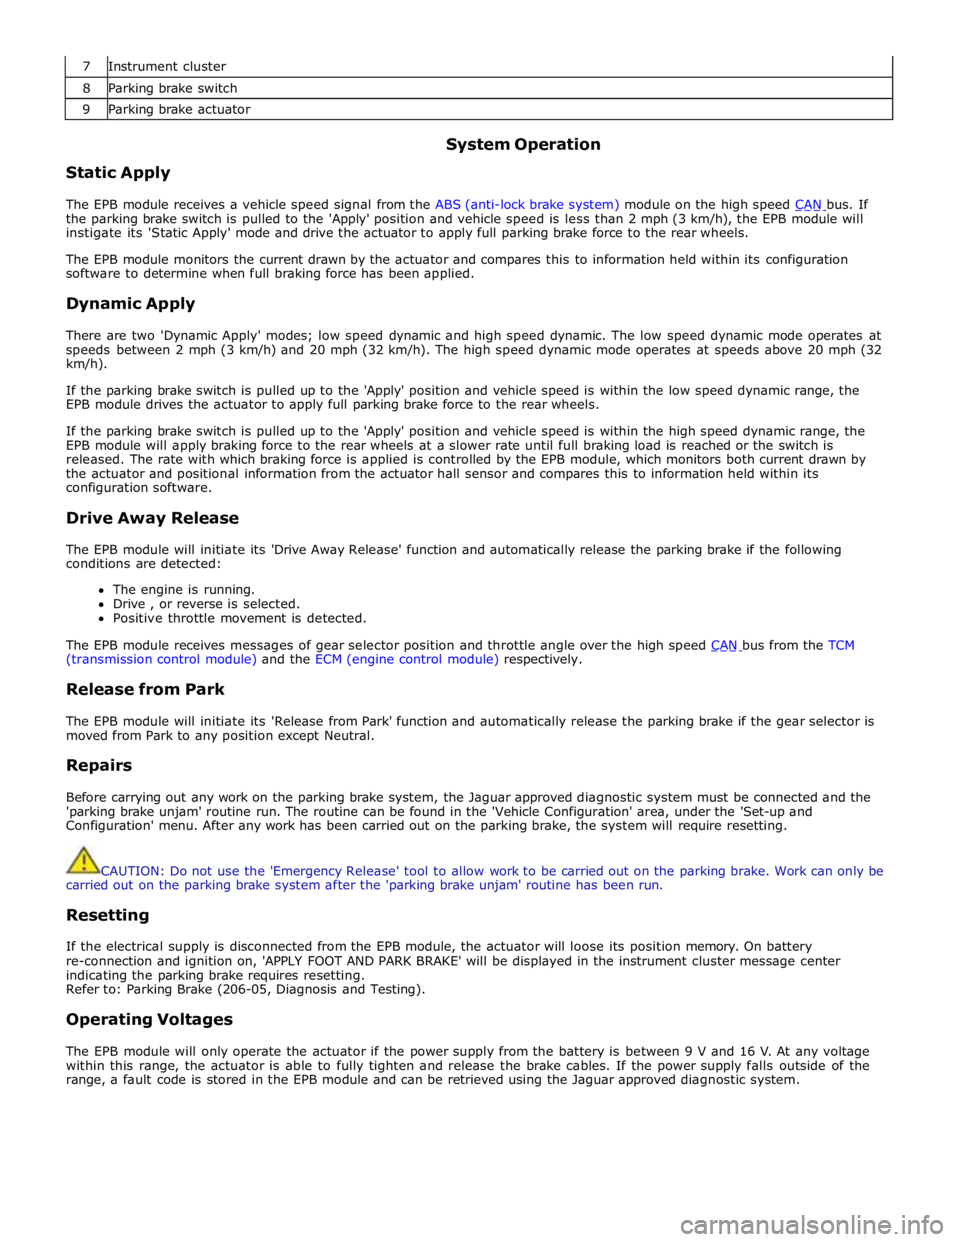
7 Instrument cluster 8 Parking brake switch 9 Parking brake actuator
Static Apply System Operation
The EPB module receives a vehicle speed signal from the ABS (anti-lock brake system) module on the high speed CAN bus. If the parking brake switch is pulled to the 'Apply' position and vehicle speed is less than 2 mph (3 km/h), the EPB module will
instigate its 'Static Apply' mode and drive the actuator to apply full parking brake force to the rear wheels.
The EPB module monitors the current drawn by the actuator and compares this to information held within its configuration
software to determine when full braking force has been applied.
Dynamic Apply
There are two 'Dynamic Apply' modes; low speed dynamic and high speed dynamic. The low speed dynamic mode operates at
speeds between 2 mph (3 km/h) and 20 mph (32 km/h). The high speed dynamic mode operates at speeds above 20 mph (32
km/h).
If the parking brake switch is pulled up to the 'Apply' position and vehicle speed is within the low speed dynamic range, the
EPB module drives the actuator to apply full parking brake force to the rear wheels.
If the parking brake switch is pulled up to the 'Apply' position and vehicle speed is within the high speed dynamic range, the
EPB module will apply braking force to the rear wheels at a slower rate until full braking load is reached or the switch is
released. The rate with which braking force is applied is controlled by the EPB module, which monitors both current drawn by
the actuator and positional information from the actuator hall sensor and compares this to information held within its
configuration software.
Drive Away Release
The EPB module will initiate its 'Drive Away Release' function and automatically release the parking brake if the following
conditions are detected:
The engine is running.
Drive , or reverse is selected.
Positive throttle movement is detected.
The EPB module receives messages of gear selector position and throttle angle over the high speed CAN bus from the TCM (transmission control module) and the ECM (engine control module) respectively.
Release from Park
The EPB module will initiate its 'Release from Park' function and automatically release the parking brake if the gear selector is
moved from Park to any position except Neutral.
Repairs
Before carrying out any work on the parking brake system, the Jaguar approved diagnostic system must be connected and the
'parking brake unjam' routine run. The routine can be found in the 'Vehicle Configuration' area, under the 'Set-up and
Configuration' menu. After any work has been carried out on the parking brake, the system will require resetting.
CAUTION: Do not use the 'Emergency Release' tool to allow work to be carried out on the parking brake. Work can only be
carried out on the parking brake system after the 'parking brake unjam' routine has been run.
Resetting
If the electrical supply is disconnected from the EPB module, the actuator will loose its position memory. On battery
re-connection and ignition on, 'APPLY FOOT AND PARK BRAKE' will be displayed in the instrument cluster message center
indicating the parking brake requires resetting.
Refer to: Parking Brake (206-05, Diagnosis and Testing).
Operating Voltages
The EPB module will only operate the actuator if the power supply from the battery is between 9 V and 16 V. At any voltage
within this range, the actuator is able to fully tighten and release the brake cables. If the power supply falls outside of the
range, a fault code is stored in the EPB module and can be retrieved using the Jaguar approved diagnostic system.