warning JAGUAR XFR 2010 1.G Owner's Manual
[x] Cancel search | Manufacturer: JAGUAR, Model Year: 2010, Model line: XFR, Model: JAGUAR XFR 2010 1.GPages: 3039, PDF Size: 58.49 MB
Page 76 of 3039
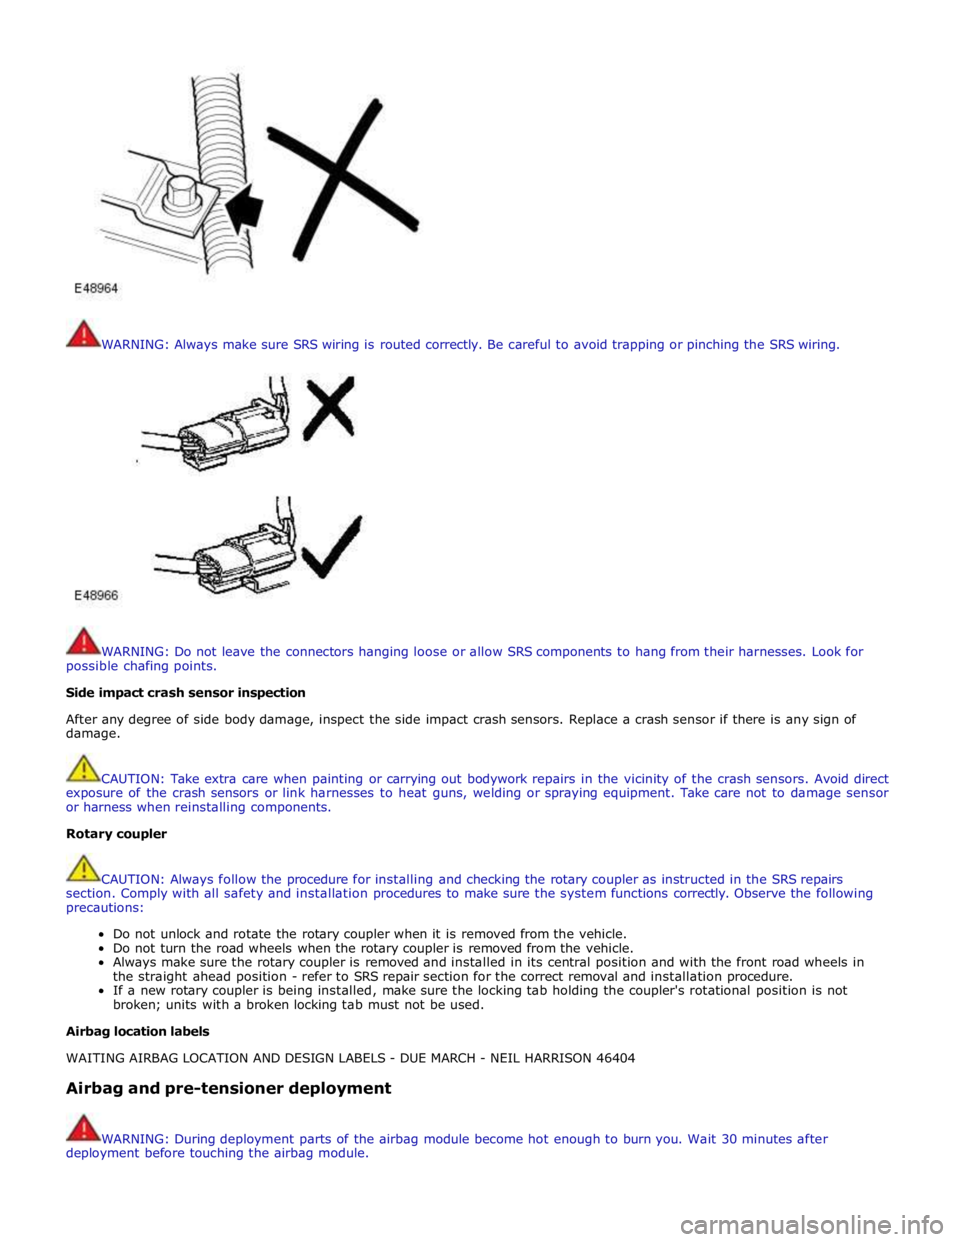
WARNING: Always make sure SRS wiring is routed correctly. Be careful to avoid trapping or pinching the SRS wiring.
WARNING: Do not leave the connectors hanging loose or allow SRS components to hang from their harnesses. Look for
possible chafing points.
Side impact crash sensor inspection
After any degree of side body damage, inspect the side impact crash sensors. Replace a crash sensor if there is any sign of
damage.
CAUTION: Take extra care when painting or carrying out bodywork repairs in the vicinity of the crash sensors. Avoid direct
exposure of the crash sensors or link harnesses to heat guns, welding or spraying equipment. Take care not to damage sensor
or harness when reinstalling components.
Rotary coupler
CAUTION: Always follow the procedure for installing and checking the rotary coupler as instructed in the SRS repairs
section. Comply with all safety and installation procedures to make sure the system functions correctly. Observe the following
precautions:
Do not unlock and rotate the rotary coupler when it is removed from the vehicle.
Do not turn the road wheels when the rotary coupler is removed from the vehicle.
Always make sure the rotary coupler is removed and installed in its central position and with the front road wheels in
the straight ahead position - refer to SRS repair section for the correct removal and installation procedure.
If a new rotary coupler is being installed, make sure the locking tab holding the coupler's rotational position is not
broken; units with a broken locking tab must not be used.
Airbag location labels
WAITING AIRBAG LOCATION AND DESIGN LABELS - DUE MARCH - NEIL HARRISON 46404
Airbag and pre-tensioner deployment
WARNING: During deployment parts of the airbag module become hot enough to burn you. Wait 30 minutes after
deployment before touching the airbag module.
Page 77 of 3039
Deployment procedures and precautions as detailed in this manual should be strictly adhered to. Only personnel who have
undergone the appropriate training should undertake deployment of airbag and pre-tensioner modules. The following
precautions must be complied with:
Only use deployment equipment approved for the intended purpose.
Deployment of airbag / pre-tensioner modules must be performed in a well ventilated area which has been designated
for the purpose.
Make sure airbag / pre-tensioner modules are not damaged or ruptured before attempting to deploy.
Where local legislation exists, notify the relevant authorities of intention to deploy airbag and pretensioner units.
When deploying airbag pre-tensioner units, make sure that all personnel are at least 15 metres (45 feet) away from the
deployment zone.
Make sure deployment tool is connected correctly, in compliance with the instructions detailed in the SRS section of this
manual. In particular, make sure deployment tool is NOT connected to battery supply before connecting to airbag
module connector.
When deploying seat belt pre-tensioners, make sure pre-tensioner unit is secured correctly to the seat.
When removing deployed airbag modules and pre-tensioner units, wear protective clothing. Use gloves and seal
deployed units in a plastic bag.
Following deployment of any component of the SRS system within the vehicle, all SRS components must be replaced.
DO NOT reuse or salvage any parts of the SRS system.
Do not lean over an airbag module when connecting deployment equipment.
If a vehicle is to be scrapped, undeployed airbag modules and pre-tensioner units must be manually deployed. In this case
airbags can be deployed in the vehicle. Before deployment, make sure the airbag module is secure within its correct mounting
position. Deployment of the driver's airbag in the vehicle may damage the steering wheel; if the vehicle is not being scrapped,
deploy the module outside of the vehicle.
SRS Component Replacement Policy
CAUTIONS:
The Restraints Control Module (RCM) will log a crash fault after every impact which is severe enough to cause airbag
deployment. It is possible to have three crashes/impacts logged after one event where, for example, a front, side and
rollover has occurred. After the third fault is logged, the SRS warning lamp will be illuminated and the RCM must be
installed. After any airbag deployment a new RCM must be installed.
The SRS side impact sensor must be replaced if there are any signs of physical damage or if the restraints control module
(RCM) is registering a fault.
The following information details the policy for replacement of SRS components as a result of a vehicle accident.
Impacts which do not deploy the airbags or pre-tensioners
Check for structural damage in the area of the impact paying particular attention to bumper armatures, longitudinals and
bracketry.
Impacts which deploy the airbags or pre-tensioners
The replacement and inspection policy is dependent on the type and severity of the crash condition. The following guidelines
are the minimum that should be exercised as a result of the deployment of specific SRS components.
Check for structural damage in the area of impact paying particular attention to bumper armatures, longitudinals and
bracketry.
Front Airbag Deployment - Driver and Passenger
CAUTION: If the front airbags are deployed, the following components must be replaced:
Driver airbag module
Passenger airbag module
Fly leads (where applicable) connecting front airbag modules to SRS harness
Front seat belt buckle pre-tensioner
Rear seat belt pre-tensioners - if installed
Driver's seat belt retractor - if installed
Rotary coupler
Any front impact sensors that have been physically damaged or if a fault is being registered
Restraints control module (RCM) if the three crashes/impacts have been stored
Additionally, the following items must be inspected for damage and replaced as necessary:
Front passenger's seat belt retractor and webbing, tongue latching function, 'D' loop and body anchorage point
Rear seat belt buckles, webbing, buckle covers, body anchorage points and tongue latching function
Fascia moulding adjacent to passenger airbag module
Steering wheel
Front seat frames and head restraints
Steering column - if adjustment is lost or if there are signs of collapse
Seat belt height adjusters
Page 99 of 3039
7
No grinding Warning symbols - Health and safety and component damage
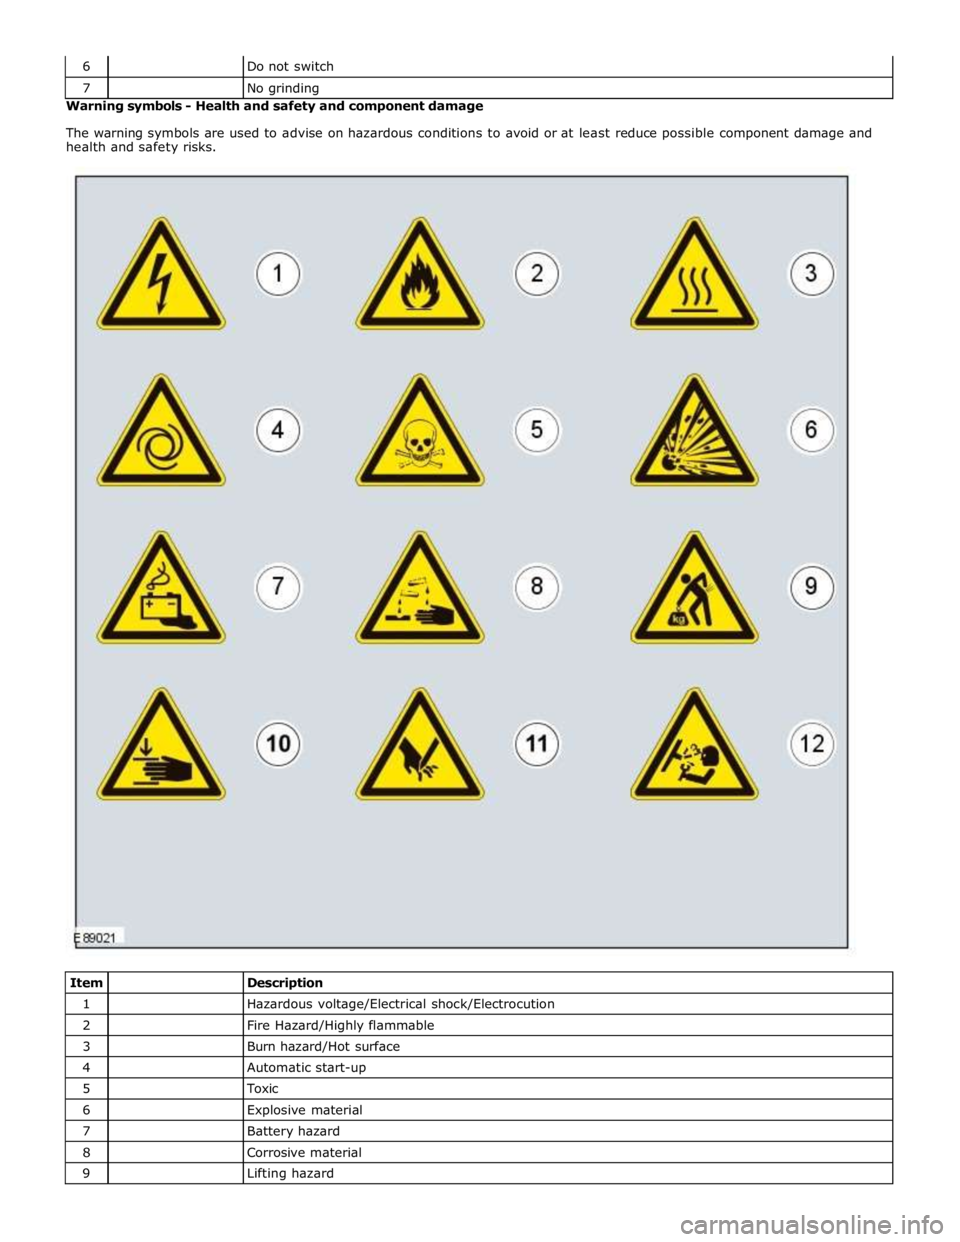
The warning symbols are used to advise on hazardous conditions to avoid or at least reduce possible component damage and
health and safety risks.
Item
Description 1
Hazardous voltage/Electrical shock/Electrocution 2
Fire Hazard/Highly flammable 3
Burn hazard/Hot surface 4
Automatic start-up 5
Toxic 6
Explosive material 7
Battery hazard 8
Corrosive material 9
Lifting hazard
Page 101 of 3039
Published: 11-May-2011
General Information - Supplemental Restraint System (SRS) Health and
Safety Precautions
Description and Operation
WARNINGS:
Only qualified technicians are allowed to work on pyrotechnic components.
INHALED: Exposure to pyrotechnic residue may cause low blood pressure, severe headache, irritation of mucous
membranes, fainting, shortness of breath or rapid pulse. Move a victim to fresh air. Seek immediate medical attention.
EYE CONTACT: Exposure to unburned pyrotechnic residue may cause irritation, burning and etching of the eyes. Flush
immediately with plenty of cold running water for at least 15 minutes. Seek immediate medical attention.
EYE CONTACT: Exposure to burned pyrotechnic residue may cause irritation, burning and etching of the eyes. Flush
immediately with diluted boric acid solution. Seek immediate medical attention.
SKIN CONTACT: Unburned pyrotechnic residue may be rapidly absorbed through the skin in toxic quantities. Wash
immediately with plenty of soap and water. Seek medical attention.
SKIN CONTACT: Burned pyrotechnic residue may be rapidly absorbed through the skin in toxic quantities. Wash with
plenty of water. Do not use soap. Seek medical attention.
SWALLOWED: Unburned pyrotechnic residue is extremely toxic. If conscious drink plenty of water then induce vomiting.
Seek immediate medical attention. If unconscious, or in convulsions do not attempt to induce vomiting or give anything by
mouth. Seek immediate medical attention.
SWALLOWED: Burned pyrotechnic residue is extremely toxic. Drink plenty of water and seek immediate medical attention.
The deployment key must only be accessible to authorized personnel.
Make sure that the deployment key remains removed from the deployment equipment except during deployment.
If permenantly disabling or enabling the passenger air bag a new seat belt for vehicles without or with a passenger air
bag must be installed.
Undeployed pyrotechnic components must not be deployed in the vehicle.
Pyrotechnic components must be deployed following local regulations.
Check thoroughly that no loose objects can be spread during the deployment of pyrotechnic components.
Pyrotechnic components must be transported following local regulations.
Never carry out any electrical measurement on disconnected, undeployed pyrotechnic components.
Pyrotechnic components must not be disassembled.
Pyrotechnic components are not interchangeable between vehicles.
Always carry a live air bag module away from the body with the air bag or trim cover pointing upwards.
Page 103 of 3039
General Information - Road/Roller Testing
Description and Operation Published: 11-May-2011
Road or roller testing may be carried out for various reasons and a procedure detailing pre-test checks, through engine starting
and stopping, pre-driving checks, on-test checks to final checks on completion of the test is given in this section.
Unless complete vehicle performance is being checked, the full road test procedure need not be carried out. Instead, those
items particularly relevant to the system/s being checked can be extracted.
Pre - Test Checks
WARNING: If the brake system hydraulic fluid level is low, pedal travel is excessive or a hydraulic leak is found, do not
attempt to road test the vehicle until the reason for the low fluid level, excessive pedal travel or hydraulic leak is found and
rectified.
It is suggested that pre-test checks, and functional tests of those systems/circuits which affect the safe and legal operations
of the vehicle, such as brakes, lights and steering, should always be carried out before the road or roller test.
Engine oil level
Engine coolant level
Tires, for correct pressure, compatible types and tread patterns, and wear within limits
There is sufficient fuel in the tank to complete the test
All around the engine, transmission and under the vehicle for oil, coolant, hydraulic and fuel leaks. Make a note of any
apparent leaks and wipe off the surrounding areas to make it easier to identify the extent of the leak on completion of
the test
Starting the Engine
CAUTION: On initial drive away from cold and within the first 1.5 km (1 mile), do not depress accelerator pedal beyond
half travel until the vehicle has attained a minimum speed of 25 km/h (15 miles/h). Never operate at high engine speed or
with the accelerator pedal at full travel whilst the engine is cold.
With the ignition switched off, check:
The parking brake is applied
The transmission selector lever is in Park
All instrument gauges (except fuel gauge) read zero
With the ignition switched on, check:
Ignition controlled warning lamps come on
Engine coolant temperature gauge registers a reading compatible with the engine coolant temperature
Fuel gauge registers a reading appropriate to the fuel level in the tank
The operation of the parking brake and brake fluid level warning lamps
On Road or Roller Test Check:
CAUTION: If road testing, check the brake operation while still travelling at low speed before continuing with the test. If
the brakes pull to one side, or appear to be otherwise faulty, do not continue with the road test until the fault has been found
and rectified.
Initial gear engagement is smooth
Parking brake control operates smoothly and the parking brake releases quickly and completely
Transmission takes up the drive smoothly, without judder
The engine power output is satisfactory, full power is achieved, acceleration is smooth and pedal operation not stiff or
heavy, and engine speed returns to idle correctly
There is no excessive or abnormally colored smoke from the engine under normal driving, heavy load or overrun
conditions
Steering operation, including power steering, is smooth, accurate, not excessively heavy or with excessive free play or
vibration. Does not pull to one side and self centres smoothly after cornering
Speedometer, oil pressure warning lamp, coolant temperature gauge and tachometer register the correct readings or
operate correctly
Switches and controls operate smoothly and positively, warning lamps operate correctly and the direction indicator
control self cancels when the steering is returned to the straight ahead position
Heating and ventilation systems work correctly and effectively
Brake operation and efficiency
Brake Testing
WARNING: When brake testing, avoid breathing the smoke or fumes from hot brakes, this may contain asbestos dust
which is hazardous to health, see Health and Safety Precautions.
Page 105 of 3039
Published: 11-May-2011
General Information - Window Glass Health and Safety Precautions
Description and Operation
WARNINGS:
Cured polyurethane (PU) adhesive can degrade if subjected to high temperatures. Isocyanide compounds can be released
when grinding or welding in close proximity to cured PU adhesive.
SKIN CONTACT: Prolonged exposure to polyurethane (PU) adhesive may cause skin irritation. If PU adhesive comes into
contact with the skin, remove any contaminated clothing. Immediately wash the skin with soap and water. Seek medical
attention for any persistent skin irritation or abnormality.
EYE CONTACT: Polyurethane (PU) adhesive may cause severe irritation or damage. If PU adhesive comes into contact with
the eyes, immediately flush eyes with plenty of running water for at least 15 minutes. Seek immediate medical attention.
SWALLOWED: If polyurethane (PU) adhesive is swallowed, flush the mouth thoroughly. Do not induce vomiting. Provide
rest, warmth and fresh air. Seek immediate medical attention.
INHALED: Persons having a respiratory allergy may have an allergic reaction when handling polyurethane (PU) adhesive.
INHALED: Polyurethane (PU) adhesive can cause asthma like symptoms. Isocyanate vapor from primer or PU adhesive can
cause allergies in the respiratory tract.
INHALED: If polyurethane (PU) adhesive fumes are inhaled, move victim to fresh air. Provide oxygen if necessary. If
breathing stops, provide artificial respiration. Keep a victim warm and at rest. Seek immediate medical attention.
CAUTIONS:
Make sure that the direct glazing for bonded glass cutting blades are changed where the cutting depth changes to avoid
damage to the body and trim panels.
During the curing period of the PU adhesive, the door windows must be left open to avoid a build up of pressure when the
doors are opened and closed.
www.JagDocs.com
Page 131 of 3039
Published: 17-Apr-2014
General Information - Diagnostic Trouble Code (DTC) Index DTC: Blind Spot Monitoring System Module (SODL/SODR)
Description and Operation
Blind Spot Monitoring System Module (SODL/SODR)
CAUTION: Diagnosis by substitution from a donor vehicle is NOT acceptable. Substitution of control modules does not
guarantee confirmation of a fault and may also cause additional faults in the vehicle being checked and/or the donor vehicle.
NOTES:
If the control module or a component is suspect and the vehicle remains under manufacturer warranty, refer to the
Warranty Policy and Procedures manual, or determine if any prior approval programme is in operation, prior to the installation
of a new module/component.
Generic scan tools may not read the codes listed, or may read only 5-digit codes. Match the 5 digits from the scan tool to
the first 5 digits of the 7-digit code listed to identify the fault (the last 2 digits give extra information read by the
manufacturer approved diagnostic system).
When performing voltage or resistance tests, always use a digital multimeter (DMM) accurate to three decimal places,
and with an up-to-date calibration certificate. When testing resistance, always take the resistance of the DMM leads into
account.
Check and rectify basic faults before beginning diagnostic routines involving pinpoint tests.
If DTCs are recorded and, after performing the pinpoint tests a fault is not present, an intermittent concern may be the
cause. Always check for loose connections and corroded terminals.
Where an 'on demand self-test' is referred to, this can be accessed via the 'DTC Monitor' tab on the manufacturers
approved diagnostic system.
Check DDW for open campaigns. Refer to the corresponding bulletins and SSMs which may be valid for the specific
customer complaint and carry out the recommendations as required.
The table below lists all Diagnostic Trouble Codes (DTCs) that could be logged in the Blind Spot Monitoring System Module, for
additional Diagnosis and Testing information refer to the relevant Diagnosis and Testing Section.
For additional information, refer to: Warning Devices (413-09 Warning Devices, Diagnosis and Testing).
DTC Description Possible Causes Action B11C9-11
Driver Display Status
LED - Circuit short to
ground
Circuit short to ground
Refer to the electrical circuit diagrams and check
driver display status LED circuit for short to
ground B11C9-15
Driver Display Status
LED - Circuit short to
battery or open
Circuit short to power or
open circuit
Refer to the electrical circuit diagrams and check
driver display status LED circuit for short to
ground B11D6-11
Driver Display Alert LED -
Circuit short to ground
Circuit short to ground
Refer to the electrical circuit diagrams and check
driver display status LED circuit for short to
ground B11D6-15
Driver Display Alert LED -
Circuit short to battery
or open
Circuit short to power or
open circuit
Refer to the electrical circuit diagrams and check
driver display status LED circuit for short to
ground U0010-00
Medium Speed CAN
Communication Bus - No
sub type information
No sub type information
Refer to the electrical circuit diagrams and check
the power and ground connections to the module.
Using the manufacturer approved diagnostic
system, complete a CAN network integrity test.
Refer to the electrical circuit diagrams and check
Page 164 of 3039
Published: 18-Apr-2014
General Information - Diagnostic Trouble Code (DTC) Index V8 S/C 5.0L
Petrol, DTC: Engine Control Module (ECM)
Description and Operation
Engine Control Module (PCM) 5.0L SC V8 - AJ133
WARNING: Fuel injector voltage will reach 65 Volts during operation and have a high current requirement.
CAUTION: Diagnosis by substitution from a donor vehicle is NOT acceptable. Substitution of control modules does not
guarantee confirmation of a fault, and may also cause additional faults in the vehicle being tested and/or the donor vehicle
NOTES:
If the control module or a component is suspect and the vehicle remains under manufacturer warranty, refer to the
Warranty Policy and Procedures manual, or determine if any prior approval programme is in operation, prior to the installation
of a new module/component.
Generic scan tools may not read the codes listed, or may read only five digit codes. Match the five digits from the scan
tool to the first five digits of the seven digit code listed to identify the fault (the last two digits give additional information
read by the manufacturer-approved diagnostic system).
When performing electrical voltage or resistance tests, always use a digital multimeter (DMM) accurate to three decimal
places, and with an up-to-date calibration certificate. When testing resistance, always take the resistance of the DMM leads
into account.
Check and rectify basic faults before beginning diagnostic routines involving pinpoint tests.
If DTCs are recorded and, after performing the pinpoint tests, a fault is not present, an intermittent concern may be the
cause. Always check for loose connections and corroded terminals.
Check DDW for open campaigns. Refer to the corresponding bulletins and SSMs which may be valid for the specific
customer complaint and carry out the recommendations as required.
The table below lists all diagnostic trouble codes (DTCs) that could be logged in the electronic engine control module, for
additional diagnosis and testing information refer to the relevant diagnosis and testing section.
For additional information, refer to: Electronic Engine Controls (303-14 Electronic Engine Controls - V8 S/C 5.0L Petrol,
Diagnosis and Testing).
DTC Description Possible Causes Action B10A2-31 Crash Input - No signal
NOTE: - Circuit SRS_SIGNAL -
Loss of communication between
restraints control module and
engine control module
Refer to the electrical circuit
diagrams and check restraints
control module pulse width
modulated SRS signal line circuit,
hard wired connection between
engine control module and restraints
control module for short circuit to
ground, short circuit to power, open
circuit. Repair circuit as required,
clear the DTC and retest B10AC-81
Cruise Control Switch -
Invalid serial data received
The engine control module has
received an invalid command from
the steering wheel switch pack
Clear the DTC and press all the
steering wheel switches, re-check for
DTCs. Refer to the electrical circuit
diagrams and check the speed
control switch circuit for open circuit,
short circuit to power, short circuit to
ground, disconnected
Check and install a new steering
wheel module as required. Refer to
the warranty policy and procedures
manual, or determine if any prior
approval programme is in operation,
prior to the installation of a new
Page 215 of 3039
Published: 18-Apr-2014
General Information - Diagnostic Trouble Code (DTC) Index DTC: Pedestrian
Protection System Control Module (PPSCM)
Description and Operation
Pedestrian Protection System Control Module (PPSCM)
WARNING: TO AVOID ACCIDENTAL DEPLOYMENT AND POSSIBLE PERSONAL INJURY, THE BACKUP POWER SUPPLY MUST
BE DEPLETED BEFORE REPAIRING OR REPLACING ANY PEDESTRIAN PROTECTION SYSTEM COMPONENTS. TO DEPLETE THE
BACKUP POWER SUPPLY ENERGY, DISCONNECT THE BATTERY GROUND CABLE AND WAIT TWO MINUTES. FAILURE TO FOLLOW
THIS INSTRUCTION MAY RESULT IN PERSONAL INJURY.
CAUTION: Diagnosis by substitution from a donor vehicle is NOT acceptable. Substitution of control modules does not
guarantee confirmation of a fault, and may also cause additional faults in the vehicle being tested and/or the donor vehicle.
NOTES:
If the control module or a component is suspect and the vehicle remains under manufacturer warranty, refer to the
Warranty Policy and Procedures manual, or determine if any prior approval programme is in operation, prior to the installation
of a new module/component.
Generic scan tools may not read the codes listed, or may read only 5-digit codes. Match the 5 digits from the scan tool to
the first 5 digits of the 7-digit code listed to identify the fault (the last 2 digits give extra information read by the
manufacturer-approved diagnostic system).
When performing voltage or resistance tests, always use a digital multimeter accurate to three decimal places, and with
an up-to-date calibration certificate. When testing resistance always take the resistance of the digital multimeter leads into
account.
Check and rectify basic faults before beginning diagnostic routines involving pinpoint tests.
Inspect connectors for signs of water ingress, and pins for damage and/or corrosion.
If DTCs are recorded and, after performing the pinpoint tests, a fault is not present, an intermittent concern may be the
cause. Always check for loose connections and corroded terminals.
Check DDW for open campaigns. Refer to the corresponding bulletins and SSMs which may be valid for the specific
customer complaint and carry out the recommendations as required.
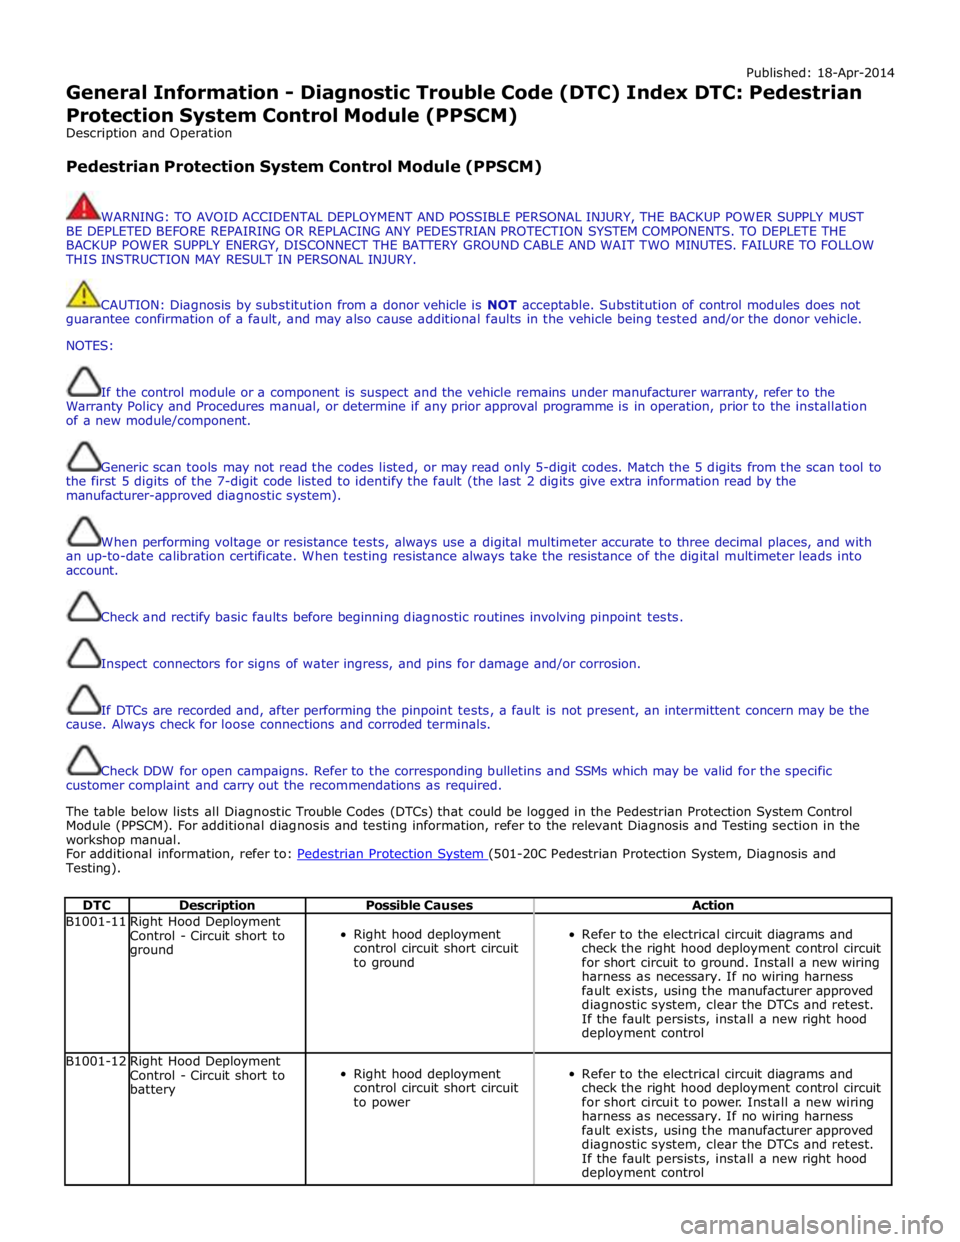
The table below lists all Diagnostic Trouble Codes (DTCs) that could be logged in the Pedestrian Protection System Control
Module (PPSCM). For additional diagnosis and testing information, refer to the relevant Diagnosis and Testing section in the
workshop manual.
For additional information, refer to: Pedestrian Protection System (501-20C Pedestrian Protection System, Diagnosis and Testing).
DTC Description Possible Causes Action B1001-11
Right Hood Deployment
Control - Circuit short to
ground
Right hood deployment
control circuit short circuit
to ground
Refer to the electrical circuit diagrams and
check the right hood deployment control circuit
for short circuit to ground. Install a new wiring
harness as necessary. If no wiring harness
fault exists, using the manufacturer approved
diagnostic system, clear the DTCs and retest.
If the fault persists, install a new right hood
deployment control B1001-12
Right Hood Deployment
Control - Circuit short to
battery
Right hood deployment
control circuit short circuit
to power
Refer to the electrical circuit diagrams and
check the right hood deployment control circuit
for short circuit to power. Install a new wiring
harness as necessary. If no wiring harness
fault exists, using the manufacturer approved
diagnostic system, clear the DTCs and retest.
If the fault persists, install a new right hood
deployment control
Page 221 of 3039

DTC Description Possible Causes Action B10AF-93
Blower Fan Relay - No
operation
High Side output not
driven - Diagnosis
feedback indicates
output is at open load
or short to power
Carry out any pinpoint test associated with this DTC
using the manufacturer approved diagnostic system.
Refer to the electrical circuit diagrams and check
blower motor supply circuit for short to power, open
circuit B10DD-11
Airbag Deployed -
Circuit short to ground
Airbag deployed digital
input signal circuit -
short to ground
Carry out any pinpoint test associated with this DTC
using the manufacturer approved diagnostic system.
Refer to the electrical circuit diagrams and check
airbag deployed digital input signal circuit for short
to ground B10DD-15
Airbag Deployed -
Circuit short to battery
or open
Airbag deployed digital
input signal circuit -
short to power, open
circuit
Carry out any pinpoint test associated with this DTC
using the manufacturer approved diagnostic system.
Refer to the electrical circuit diagrams and check
airbag deployed digital input signal circuit for short
to power, open circuit B10DD-38
Airbag Deployed - Signal
frequency incorrect
Signal frequency
incorrect
Check the RCM for related DTCs and refer to the
relevant DTC Index B10DE-11
Low Fuel Warning
Switch - Circuit short to
ground
Diesel run-dry switch
analogue input circuit -
short to ground
Carry out any pinpoint test associated with this DTC
using the manufacturer approved diagnostic system.
Refer to the electrical circuit diagrams and check
diesel run-dry switch analogue input circuit for short
to ground B10DE-15
Low Fuel Warning
Switch - Circuit short to
battery or open
Diesel run-dry switch
analogue input circuit -
short to power, open
circuit
Carry out any pinpoint test associated with this DTC
using the manufacturer approved diagnostic system.
Refer to the electrical circuit diagrams and check
diesel run-dry switch analogue input circuit for short
to power, open circuit B1112-11
Park Aid Ignition -
Circuit short to ground
Parking aid ignition
supply circuit - short to
ground
Carry out any pinpoint test associated with this DTC
using the manufacturer approved diagnostic system.
Refer to the electrical circuit diagrams and check
parking aid ignition supply circuit for short to ground B1112-12
Park Aid Ignition -
Circuit short to battery
Parking aid ignition
supply circuit - short to
power
Refer to the electrical circuit diagrams and check
parking aid ignition supply circuit for short to power B1115-11
High Mounted Stop
Lamp Control - Circuit
short to ground
High mounted stop lamp
control circuit - short to
ground
Carry out any pinpoint test associated with this DTC
using the manufacturer approved diagnostic system.
Refer to the electrical circuit diagrams and check
high mounted stop lamp control circuit for short to
ground B1116-11
Left Tail Lamp - Circuit
short to ground
Left hand tail lamp
control circuit - short to
ground
Carry out any pinpoint test associated with this DTC
using the manufacturer approved diagnostic system.
Refer to the electrical circuit diagrams and check left
hand tail lamp control circuit for short to ground B1117-11
Right Tail Lamp - Circuit
short to ground
Right hand tail lamp
control circuit - short to
ground
Carry out any pinpoint test associated with this DTC
using the manufacturer approved diagnostic system.
Refer to the electrical circuit diagrams and check
right hand tail lamp control circuit for short to
ground B111A-11
Number Plate Lamps -
Circuit short to ground
Right hand or left hand
number plate lamp
control circuits - short to
ground
Carry out any pinpoint test associated with this DTC
using the manufacturer approved diagnostic system.
Refer to the electrical circuit diagrams and check
right hand and left hand number plate lamp control
circuits for short to ground www.JagDocs.com