door panel removal JAGUAR XFR 2010 1.G Owner's Guide
[x] Cancel search | Manufacturer: JAGUAR, Model Year: 2010, Model line: XFR, Model: JAGUAR XFR 2010 1.GPages: 3039, PDF Size: 58.49 MB
Page 2916 of 3039

Interior Trim and Ornamentation, Removal and Installation).
9. Remove the front safety belt retractor.
For additional information, refer to: Front Safety Belt Retractor (501-20A Safety Belt System, Removal and Installation).
10. Remove the B-pillar side impact sensor.
For additional information, refer to: B-Pillar Side Impact Sensor (501-20B Supplemental Restraint System, Removal and Installation).
11. Remove the C-pillar side impact sensor.
For additional information, refer to: C-Pillar Side Impact Sensor (501-20B Supplemental Restraint System, Removal and Installation).
12. Release and position the floor covering to one side.
13. Release and position the inner rocker panel wiring harness to one side.
14. Remove the rocker panel outer moulding.
15. Remove the underfloor splash shield.
16. If the right-hand rocker panel front section is to be repaired, release and
position the underfloor wiring harness to one side.
17. Remove the front fender.
For additional information, refer to: Front Fender (501-27 Front End Sheet Metal Repairs, Removal and Installation).
18. Remove the front door.
For additional information, refer to: Front Door (501-03 Body Closures, Removal and Installation).
19. Remove the rear door.
For additional information, refer to: Rear Door (501-03 Body Closures, Removal and Installation).
20. Cut the new rocker panel front section from the new rocker panel service
panel.
Page 2932 of 3039

Interior Trim and Ornamentation, Removal and Installation).
9. Remove the front safety belt retractor.
For additional information, refer to: Front Safety Belt Retractor (501-20A Safety Belt System, Removal and Installation).
10. Remove the B-pillar side impact sensor.
For additional information, refer to: B-Pillar Side Impact Sensor (501-20B Supplemental Restraint System, Removal and Installation).
11. Remove the C-pillar side impact sensor.
For additional information, refer to: C-Pillar Side Impact Sensor (501-20B Supplemental Restraint System, Removal and Installation).
12. Release and position the floor covering to one side.
13. Release and position the inner rocker panel wiring harness to one side.
14. Remove the rear wheel and tire.
For additional information, refer to: Wheel and Tire (204-04 Wheels and Tires, Removal and Installation).
15. Remove the rear fender splash shield.
16.
Remove the rocker panel outer moulding.
17. Remove the underfloor splash shield.
18. If the right-hand rocker panel rear section is to be repaired, release and
position the underfloor wiring harness to one side.
19. Remove the front door.
For additional information, refer to: Front Door (501-03 Body Closures, Removal and Installation).
20. Remove the rear door.
Page 2933 of 3039
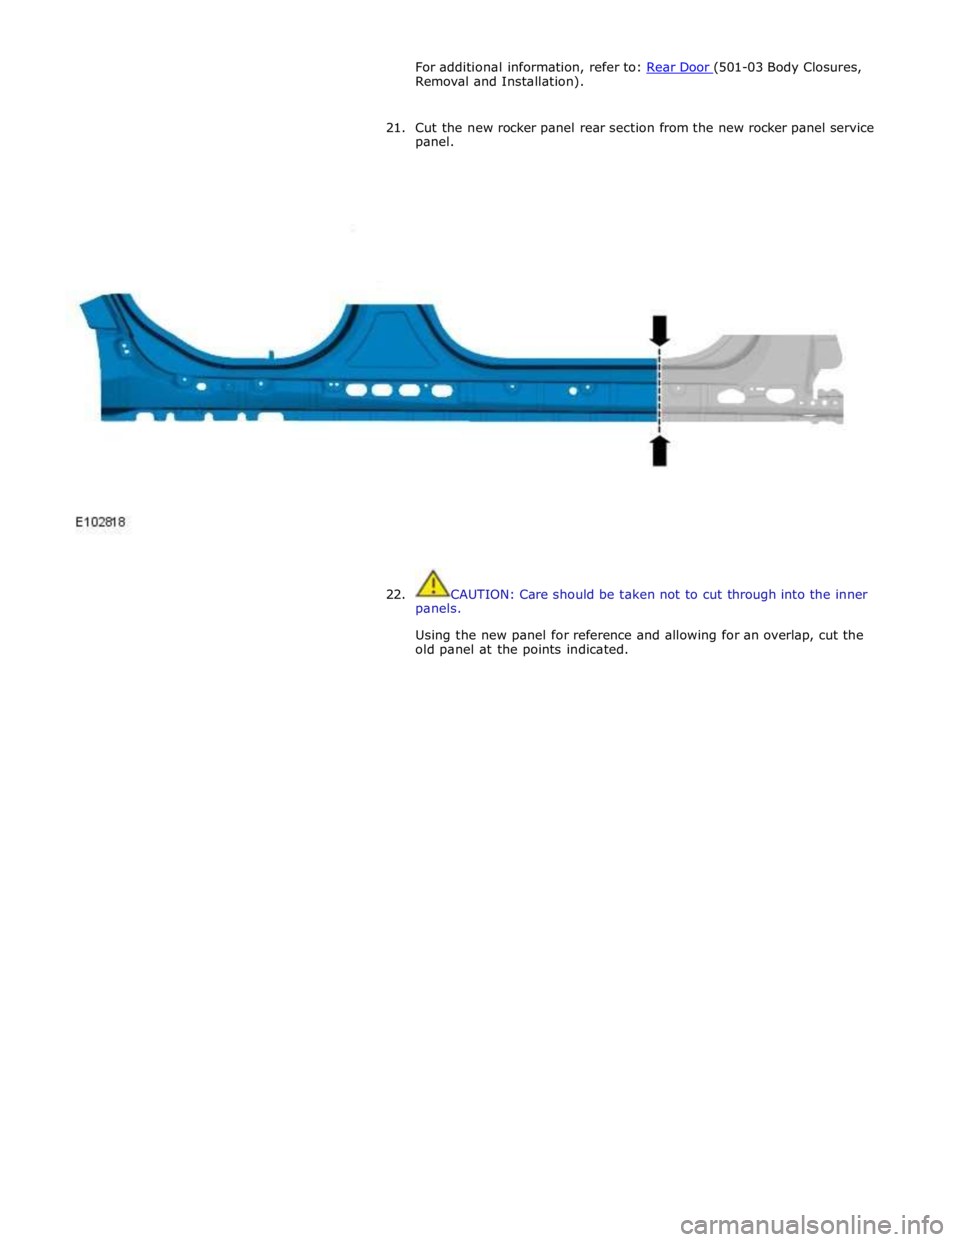
For additional information, refer to: Rear Door (501-03 Body Closures, Removal and Installation).
21. Cut the new rocker panel rear section from the new rocker panel service
panel.
22. CAUTION: Care should be taken not to cut through into the inner
panels.
Using the new panel for reference and allowing for an overlap, cut the
old panel at the points indicated.
Page 2950 of 3039

Supplemental Restraint System, Removal and Installation).
23. Remove the rear window glass.
24. Remove the audio unit antenna amplifier.
For additional information, refer to: Audio Unit Antenna Amplifier (415-01A Information and Entertainment System, Removal and
Installation).
25. If the left-hand rear quarter panel is to be repaired, remove the diversity
antenna module.
26. Remove the C-Pillar side impact sensor.
For additional information, refer to: C-Pillar Side Impact Sensor (501-20B Supplemental Restraint System, Removal and Installation).
27. Remove the rear door striker.
28. Remove the luggage compartment lid.
29. If the right-hand rear quarter panel is to be repaired, drain the fuel tank.
For additional information, refer to: Fuel Tank Draining (310-00 Fuel System - General Information, General Procedures).
30. If the right-hand rear quarter panel is to be repaired, remove the fuel
filler door.
31. If the right-hand rear quarter panel is to be repaired, remove the fuel
tank filler pipe.
For additional information, refer to: Fuel Tank Filler Pipe (310-01 Fuel
Tank and Lines - 3.0L, Removal and Installation) /
Fuel Tank Filler Pipe (310-01 Fuel Tank and Lines - 4.2L, Removal and
Installation).
32. Remove the luggage compartment lid hinge.