Can bus JAGUAR XFR 2010 1.G Repair Manual
[x] Cancel search | Manufacturer: JAGUAR, Model Year: 2010, Model line: XFR, Model: JAGUAR XFR 2010 1.GPages: 3039, PDF Size: 58.49 MB
Page 451 of 3039
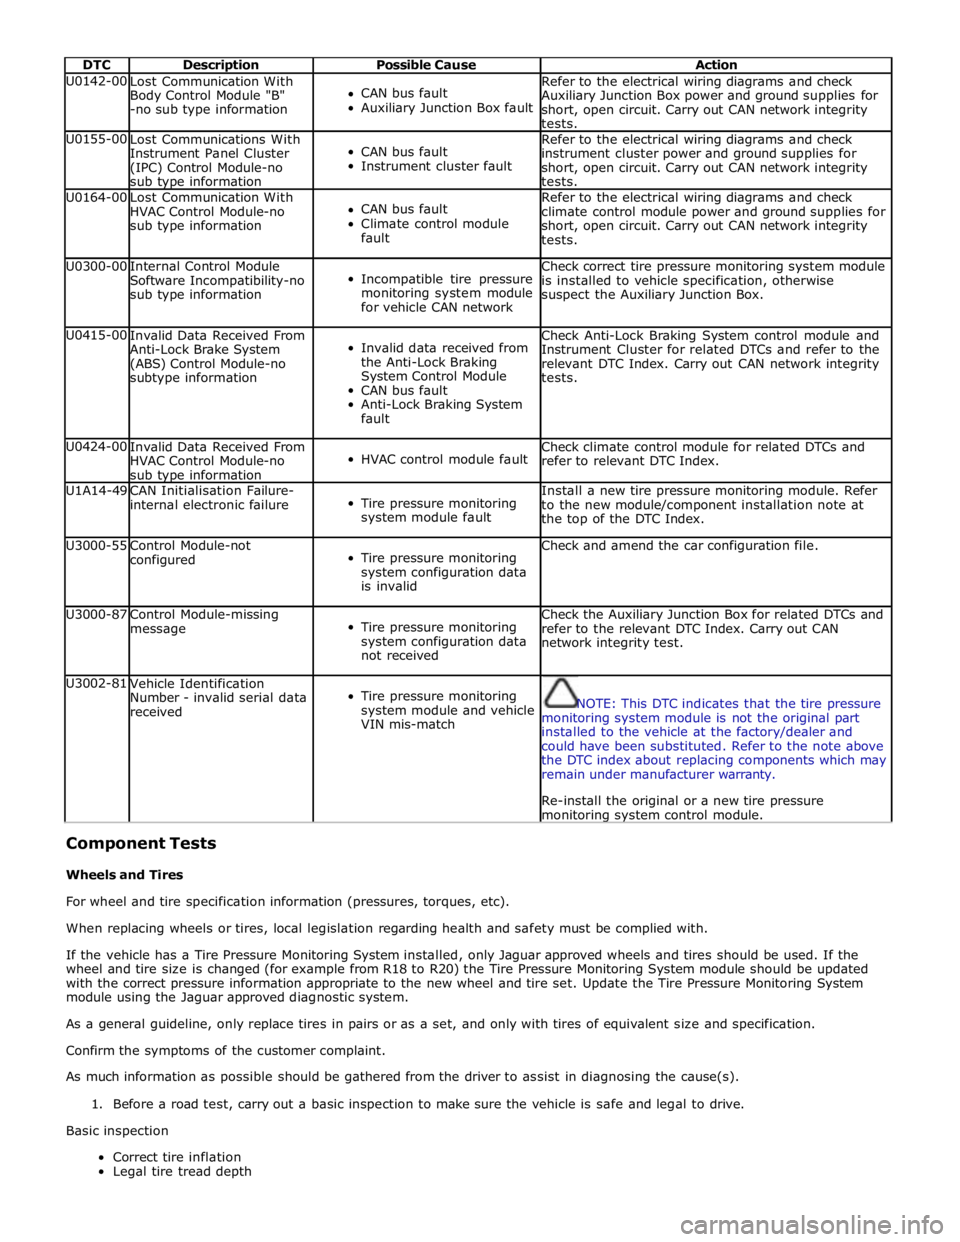
DTC Description Possible Cause Action U0142-00
Lost Communication With
Body Control Module "B"
-no sub type information
CAN bus fault
Auxiliary Junction Box fault Refer to the electrical wiring diagrams and check
Auxiliary Junction Box power and ground supplies for
short, open circuit. Carry out CAN network integrity
tests. U0155-00
Lost Communications With
Instrument Panel Cluster
(IPC) Control Module-no
sub type information
CAN bus fault
Instrument cluster fault Refer to the electrical wiring diagrams and check
instrument cluster power and ground supplies for
short, open circuit. Carry out CAN network integrity
tests. U0164-00
Lost Communication With
HVAC Control Module-no
sub type information
CAN bus fault
Climate control module
fault Refer to the electrical wiring diagrams and check
climate control module power and ground supplies for
short, open circuit. Carry out CAN network integrity
tests. U0300-00
Internal Control Module
Software Incompatibility-no
sub type information
Incompatible tire pressure
monitoring system module
for vehicle CAN network Check correct tire pressure monitoring system module
is installed to vehicle specification, otherwise
suspect the Auxiliary Junction Box. U0415-00
Invalid Data Received From
Anti-Lock Brake System
(ABS) Control Module-no
subtype information
Invalid data received from
the Anti-Lock Braking
System Control Module
CAN bus fault
Anti-Lock Braking System
fault Check Anti-Lock Braking System control module and
Instrument Cluster for related DTCs and refer to the
relevant DTC Index. Carry out CAN network integrity
tests. U0424-00
Invalid Data Received From
HVAC Control Module-no
sub type information
HVAC control module fault Check climate control module for related DTCs and
refer to relevant DTC Index. U1A14-49
CAN Initialisation Failure-
internal electronic failure
Tire pressure monitoring
system module fault Install a new tire pressure monitoring module. Refer
to the new module/component installation note at
the top of the DTC Index. U3000-55
Control Module-not
configured
Tire pressure monitoring
system configuration data
is invalid Check and amend the car configuration file. U3000-87
Control Module-missing
message
Tire pressure monitoring
system configuration data
not received Check the Auxiliary Junction Box for related DTCs and
refer to the relevant DTC Index. Carry out CAN
network integrity test. U3002-81
Vehicle Identification
Number - invalid serial data
received
Tire pressure monitoring
system module and vehicle
VIN mis-match
NOTE: This DTC indicates that the tire pressure
monitoring system module is not the original part
installed to the vehicle at the factory/dealer and
could have been substituted. Refer to the note above
the DTC index about replacing components which may
remain under manufacturer warranty.
Re-install the original or a new tire pressure monitoring system control module.
Component Tests
Wheels and Tires
For wheel and tire specification information (pressures, torques, etc).
When replacing wheels or tires, local legislation regarding health and safety must be complied with.
If the vehicle has a Tire Pressure Monitoring System installed, only Jaguar approved wheels and tires should be used. If the
wheel and tire size is changed (for example from R18 to R20) the Tire Pressure Monitoring System module should be updated
with the correct pressure information appropriate to the new wheel and tire set. Update the Tire Pressure Monitoring System
module using the Jaguar approved diagnostic system.
As a general guideline, only replace tires in pairs or as a set, and only with tires of equivalent size and specification.
Confirm the symptoms of the customer complaint.
As much information as possible should be gathered from the driver to assist in diagnosing the cause(s).
1. Before a road test, carry out a basic inspection to make sure the vehicle is safe and legal to drive.
Basic inspection
Correct tire inflation
Legal tire tread depth
Page 482 of 3039
Published: 11-May-2011
Vehicle Dynamic Suspension - Vehicle Dynamic Suspension V8 5.0L Petrol/V8 S/C 5.0L Petrol - System Operation and Component Description
Description and Operation
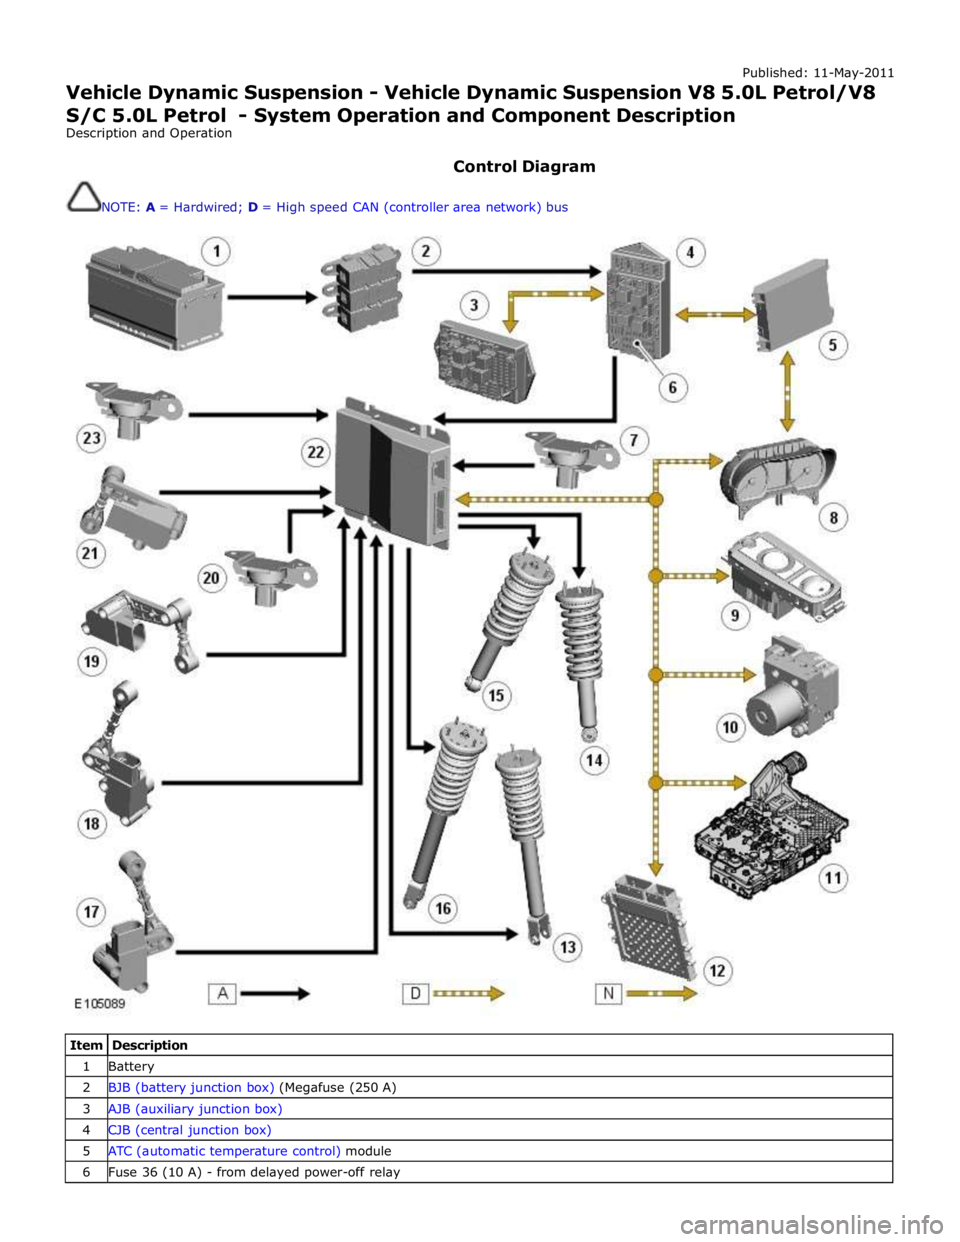
Control Diagram
NOTE: A = Hardwired; D = High speed CAN (controller area network) bus
Item Description 1 Battery 2 BJB (battery junction box) (Megafuse (250 A) 3 AJB (auxiliary junction box) 4 CJB (central junction box) 5 ATC (automatic temperature control) module 6 Fuse 36 (10 A) - from delayed power-off relay
Page 483 of 3039
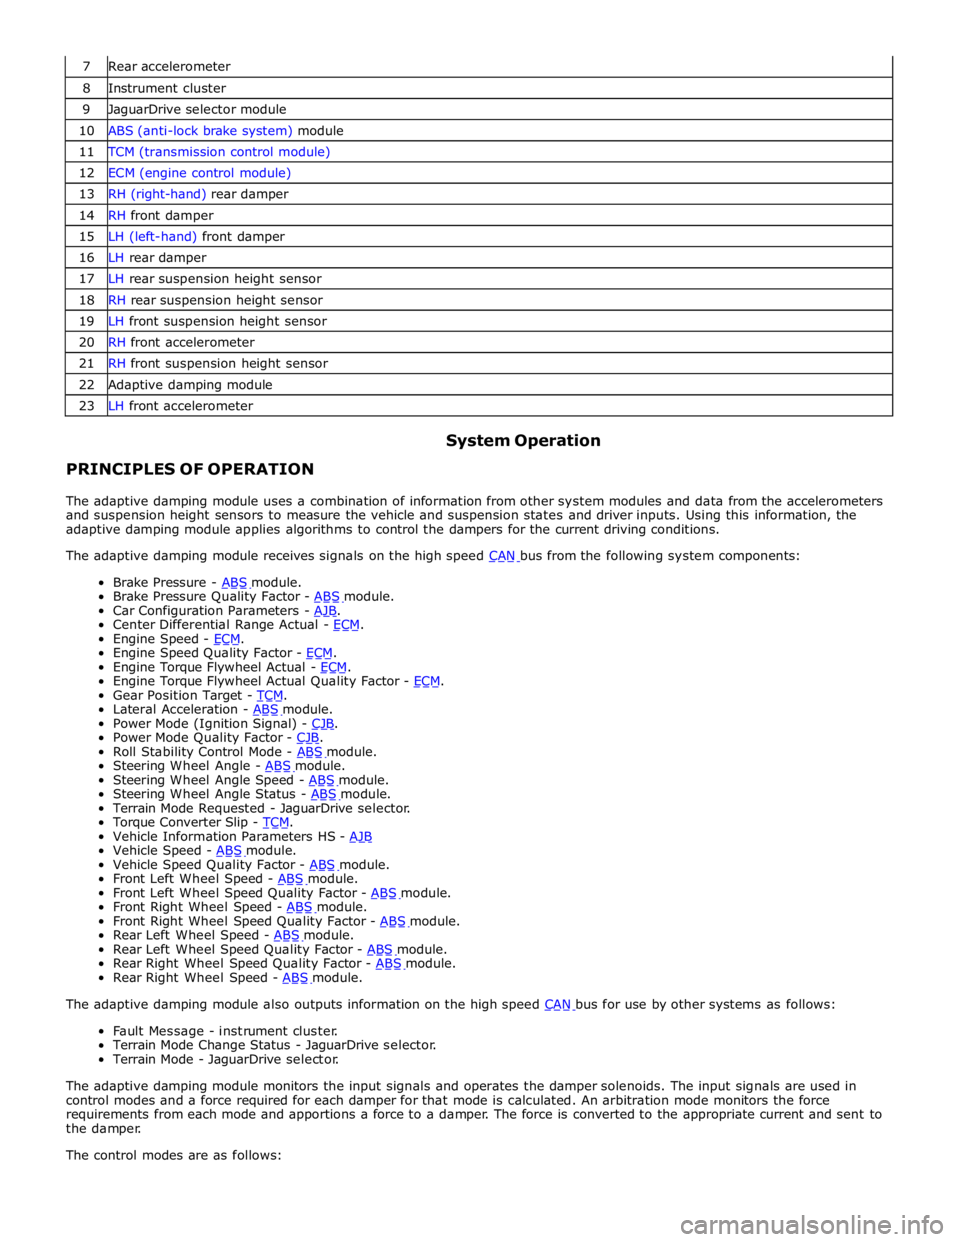
7 Rear accelerometer 8 Instrument cluster 9 JaguarDrive selector module 10 ABS (anti-lock brake system) module 11 TCM (transmission control module) 12 ECM (engine control module) 13 RH (right-hand) rear damper 14 RH front damper 15 LH (left-hand) front damper 16 LH rear damper 17 LH rear suspension height sensor 18 RH rear suspension height sensor 19 LH front suspension height sensor 20 RH front accelerometer 21 RH front suspension height sensor 22 Adaptive damping module 23 LH front accelerometer
PRINCIPLES OF OPERATION System Operation
The adaptive damping module uses a combination of information from other system modules and data from the accelerometers
and suspension height sensors to measure the vehicle and suspension states and driver inputs. Using this information, the
adaptive damping module applies algorithms to control the dampers for the current driving conditions.
The adaptive damping module receives signals on the high speed CAN bus from the following system components: Brake Pressure - ABS module. Brake Pressure Quality Factor - ABS module. Car Configuration Parameters - AJB. Center Differential Range Actual - ECM. Engine Speed - ECM. Engine Speed Quality Factor - ECM. Engine Torque Flywheel Actual - ECM. Engine Torque Flywheel Actual Quality Factor - ECM. Gear Position Target - TCM. Lateral Acceleration - ABS module. Power Mode (Ignition Signal) - CJB. Power Mode Quality Factor - CJB. Roll Stability Control Mode - ABS module. Steering Wheel Angle - ABS module. Steering Wheel Angle Speed - ABS module. Steering Wheel Angle Status - ABS module. Terrain Mode Requested - JaguarDrive selector.
Torque Converter Slip - TCM. Vehicle Information Parameters HS - AJB Vehicle Speed - ABS module. Vehicle Speed Quality Factor - ABS module. Front Left Wheel Speed - ABS module. Front Left Wheel Speed Quality Factor - ABS module. Front Right Wheel Speed - ABS module. Front Right Wheel Speed Quality Factor - ABS module. Rear Left Wheel Speed - ABS module. Rear Left Wheel Speed Quality Factor - ABS module. Rear Right Wheel Speed Quality Factor - ABS module. Rear Right Wheel Speed - ABS module. The adaptive damping module also outputs information on the high speed CAN bus for use by other systems as follows: Fault Message - instrument cluster.
Terrain Mode Change Status - JaguarDrive selector.
Terrain Mode - JaguarDrive selector.
The adaptive damping module monitors the input signals and operates the damper solenoids. The input signals are used in
control modes and a force required for each damper for that mode is calculated. An arbitration mode monitors the force
requirements from each mode and apportions a force to a damper. The force is converted to the appropriate current and sent to
the damper.
The control modes are as follows:
Page 496 of 3039
JaguarDrive Control Sub-System Faults
If a fault occurs in a sub-system, the driver is alerted by the illumination of a warning indicator and/or an appropriate message
for that sub-system in the instrument cluster message center. No JaguarDrive Control message will be shown when a failed
sub-system displays its own message.
When a sub-system fault is present and the driver attempts to select a different JaguarDrive Control mode or at the next
ignition on cycle, a message 'WINTER MODE FAULT' or 'DYNAMIC MODE FAULT' will appear in the message center. This
generally implies that the JaguarDrive Control system has a fault, but only because a sub-system fault is preventing its
operation. This message will be displayed once per ignition cycle, but is repeated if a further selection is made by the driver
using the JaguarDrive Control buttons or at the next ignition on cycle.
NOTE: The message 'WINTER MODE FAULT' or 'DYNAMIC MODE FAULT' can also in very rare circumstances be generated
by a fault in the JaguarDrive Control module.
It is not possible for the JaguarDrive Control module to cause any fault behavior (warning indicator illumination or message
generation) in any of the sub-systems. Illumination of a sub-system warning indicator and/or a sub-system related message
will never be associated with a JaguarDrive Control module or JaguarDrive Control system fault.
The sub-system control modules can detect a fault with the CAN (controller area network) bus signal from the transmission
selector module. If a fault in the JaguarDrive Control system is detected, the sub-system control modules will operate in the
'special modes off' setting. The sub-system control modules will record a fault code for a failure of the JaguarDrive Control CAN signal. These faults can be retrieved using the Jaguar approved diagnostic tool and will provide useful information to indicate
investigation of the JaguarDrive Selector module or the CAN bus network. JaguarDrive Control System or Control Module Fault
If a fault occurs in the JaguarDrive Control system, all button icon LED (light emitting diode)'s will be turned off (background
illumination will remain on) and pressing of the JaguarDrive Control buttons is ignored. The instrument cluster message center
will display a message 'WINTER MODE FAULT' or 'DYNAMIC MODE FAULT' when the fault occurs, if the fault is present and the
driver attempts to select a special mode (if the control module is able to do this) or at the next ignition on cycle.
The JaguarDrive Control buttons and control module (JaguarDrive Selector module) are an integral unit. If a fault occurs in
either component, the whole unit will require replacement, however, this is extremely unlikely.
CAN Bus Faults
If a CAN bus fault exists and prevents JaguarDrive Control system operation, all of the JaguarDrive Control button icon LED's will be illuminated and rotation pressing of the JaguarDrive Control buttons is ignored.
If the instrument cluster does not receive a JaguarDrive Control system CAN bus message from the JaguarDrive Control module, the message 'SPECIAL MODE UNAVAILABLE' will be displayed when the fault occurs and will be repeated at every
ignition on cycle.
User Error
A special mode change while DSC or ABS is active (this includes ABS cycling) may be misinterpreted as a system fault.
Page 497 of 3039
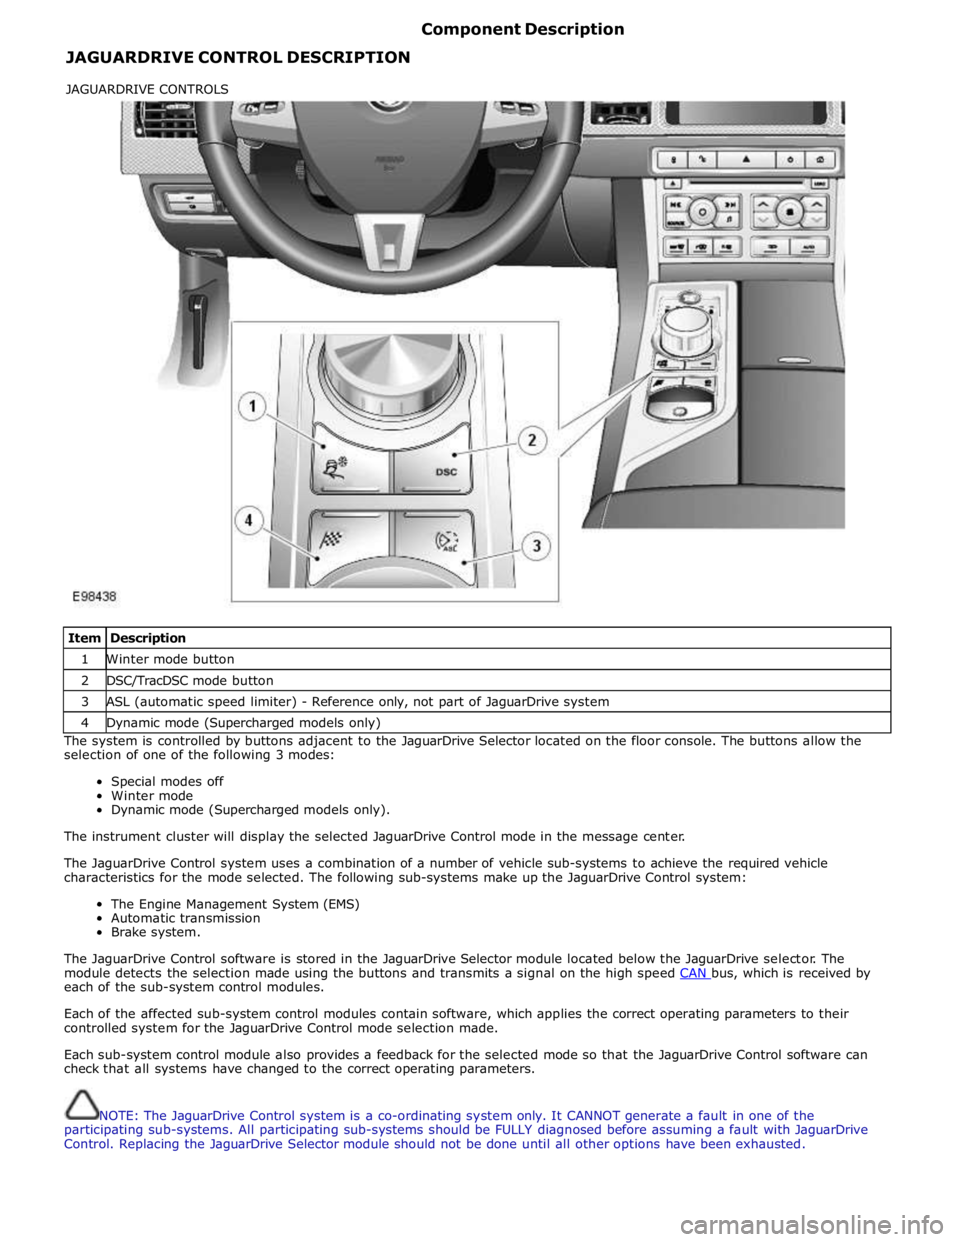
JAGUARDRIVE CONTROL DESCRIPTION Component Description
Item Description 1 Winter mode button 2 DSC/TracDSC mode button 3 ASL (automatic speed limiter) - Reference only, not part of JaguarDrive system 4 Dynamic mode (Supercharged models only) The system is controlled by buttons adjacent to the JaguarDrive Selector located on the floor console. The buttons allow the
selection of one of the following 3 modes:
Special modes off
Winter mode
Dynamic mode (Supercharged models only).
The instrument cluster will display the selected JaguarDrive Control mode in the message center.
The JaguarDrive Control system uses a combination of a number of vehicle sub-systems to achieve the required vehicle
characteristics for the mode selected. The following sub-systems make up the JaguarDrive Control system:
The Engine Management System (EMS)
Automatic transmission
Brake system.
The JaguarDrive Control software is stored in the JaguarDrive Selector module located below the JaguarDrive selector. The
module detects the selection made using the buttons and transmits a signal on the high speed CAN bus, which is received by each of the sub-system control modules.
Each of the affected sub-system control modules contain software, which applies the correct operating parameters to their
controlled system for the JaguarDrive Control mode selection made.
Each sub-system control module also provides a feedback for the selected mode so that the JaguarDrive Control software can
check that all systems have changed to the correct operating parameters.
NOTE: The JaguarDrive Control system is a co-ordinating system only. It CANNOT generate a fault in one of the
participating sub-systems. All participating sub-systems should be FULLY diagnosed before assuming a fault with JaguarDrive
Control. Replacing the JaguarDrive Selector module should not be done until all other options have been exhausted. JAGUARDRIVE CONTROLS
Page 531 of 3039
Published: 11-May-2011
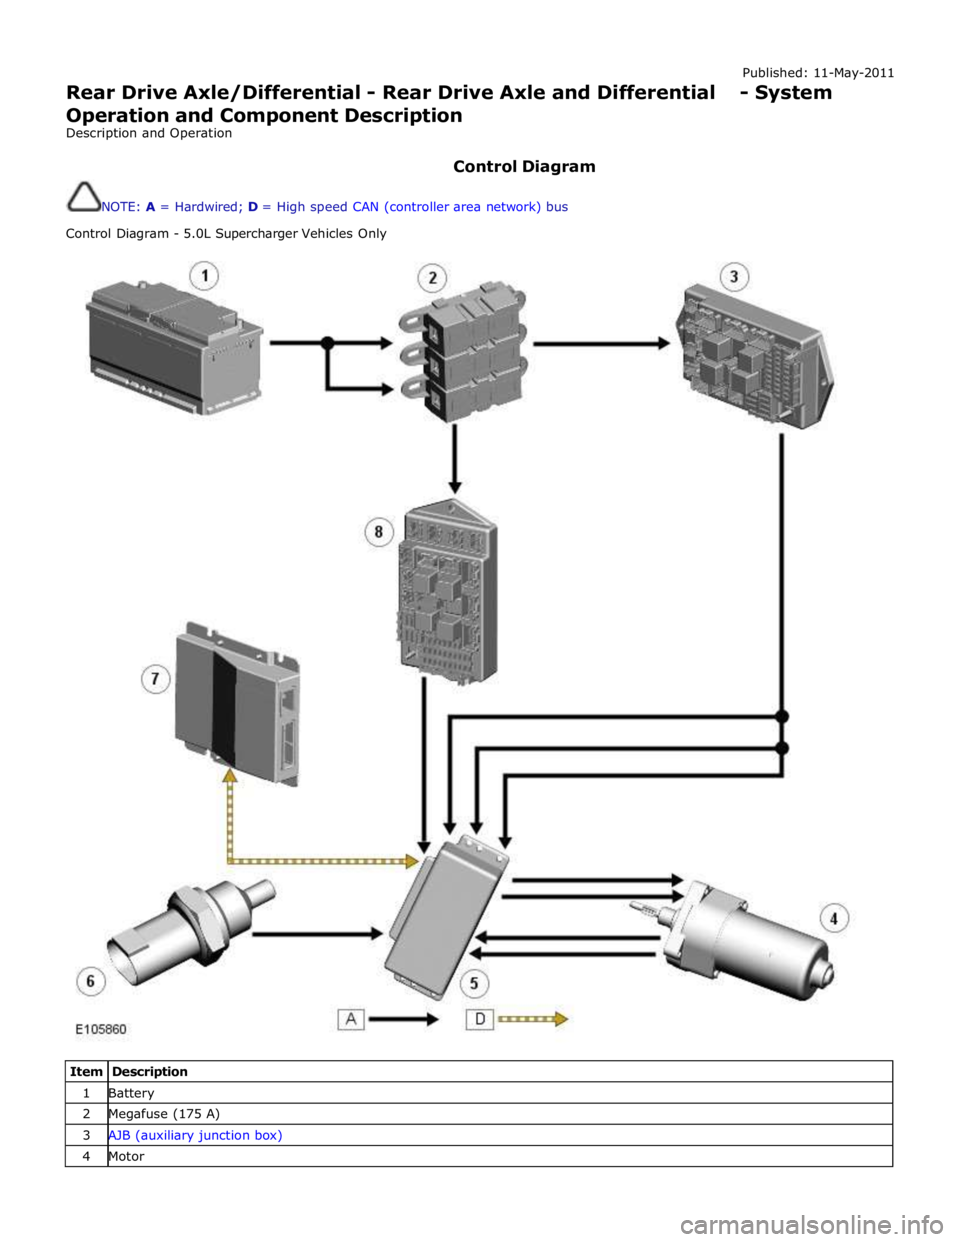
Rear Drive Axle/Differential - Rear Drive Axle and Differential - System
Operation and Component Description
Description and Operation
Control Diagram
NOTE: A = Hardwired; D = High speed CAN (controller area network) bus
Control Diagram - 5.0L Supercharger Vehicles Only
Item Description 1 Battery 2 Megafuse (175 A) 3 AJB (auxiliary junction box) 4 Motor
Page 537 of 3039

bus allows the DLM to communicate with other systems on the vehicle.
A certain amount of differential slip is required to allow the vehicle to turn corners and to remain stable under control of the
ABS. The ADM monitors the driver's demands through primary vehicle controls and automatically sets the slip torque in the differential. The system is completely automatic and does not require any special driver input.
The differential strategy in the ADM includes:
A pre-loading function, increasing locking torque with increased driving torque.
A slip controller to decrease locking torque for optimum comfort, e.g. parking.
The ADM memorizes the position of the motor when the ignition is switched off.
CAN bus messages used by the ADM include wheel speed, steering angle, automatic transmission speed, temperature information, car configuration, axle ratios and mode inputs.
The ADM also sends messages via the CAN bus to tell other control modules on the network the status of the electronic differential. The clutch torque and default mode status are some of the main signals sent out by the ADM.
If the DLM or ADM are replaced, a Jaguar approved diagnostic system must be connected to the vehicle and the differential
self-calibration procedure must be performed. This procedure must also be performed if the motor or electronic differential is
replaced.
If a fault occurs with the electronic differential, the ADM, the DLM, or one of the required input signals, the ADM records an
error code and displays a warning in the message center.
The following messages can be displayed:
Message Description Chime E-DIFF NOT
AVAILABLE Differential temperature has reached the overheat threshold. System deactivated until temperature
returns within limits. Single E-DIFF FAULT Fault has occurred with electronic differential. System deactivated until fault rectified. Single
Page 583 of 3039
If the concern becomes evident during this check, verify it fits the description given before the road test. If the concern is not
evident, attempt to duplicate the condition using the information from the description.
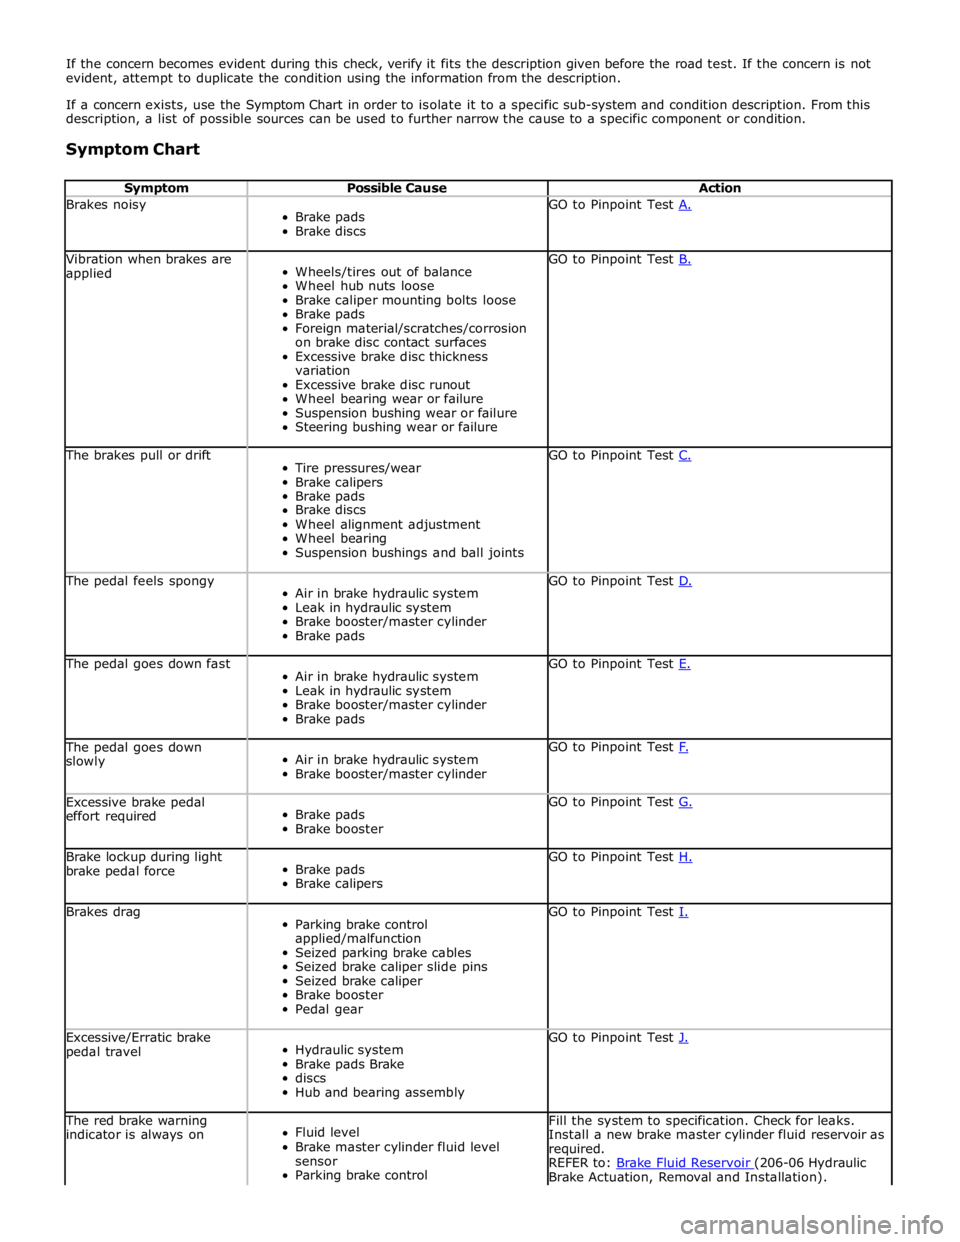
If a concern exists, use the Symptom Chart in order to isolate it to a specific sub-system and condition description. From this
description, a list of possible sources can be used to further narrow the cause to a specific component or condition.
Symptom Chart
Symptom Possible Cause Action Brakes noisy
Brake pads
Brake discs GO to Pinpoint Test A. Vibration when brakes are
applied
Wheels/tires out of balance
Wheel hub nuts loose
Brake caliper mounting bolts loose
Brake pads
Foreign material/scratches/corrosion
on brake disc contact surfaces
Excessive brake disc thickness
variation
Excessive brake disc runout
Wheel bearing wear or failure
Suspension bushing wear or failure
Steering bushing wear or failure GO to Pinpoint Test B. The brakes pull or drift
Tire pressures/wear
Brake calipers
Brake pads
Brake discs
Wheel alignment adjustment
Wheel bearing
Suspension bushings and ball joints GO to Pinpoint Test C. The pedal feels spongy
Air in brake hydraulic system
Leak in hydraulic system
Brake booster/master cylinder
Brake pads GO to Pinpoint Test D. The pedal goes down fast
Air in brake hydraulic system
Leak in hydraulic system
Brake booster/master cylinder
Brake pads GO to Pinpoint Test E. The pedal goes down
slowly
Air in brake hydraulic system
Brake booster/master cylinder GO to Pinpoint Test F. Excessive brake pedal
effort required
Brake pads
Brake booster GO to Pinpoint Test G. Brake lockup during light
brake pedal force
Brake pads
Brake calipers GO to Pinpoint Test H. Brakes drag
Parking brake control
applied/malfunction
Seized parking brake cables
Seized brake caliper slide pins
Seized brake caliper
Brake booster
Pedal gear GO to Pinpoint Test I. Excessive/Erratic brake
pedal travel
Hydraulic system
Brake pads Brake
discs
Hub and bearing assembly GO to Pinpoint Test J. The red brake warning
indicator is always on
Fluid level
Brake master cylinder fluid level
sensor
Parking brake control Fill the system to specification. Check for leaks.
Install a new brake master cylinder fluid reservoir as
required.
REFER to: Brake Fluid Reservoir (206-06 Hydraulic Brake Actuation, Removal and Installation).
Page 647 of 3039
Published: 11-May-2011
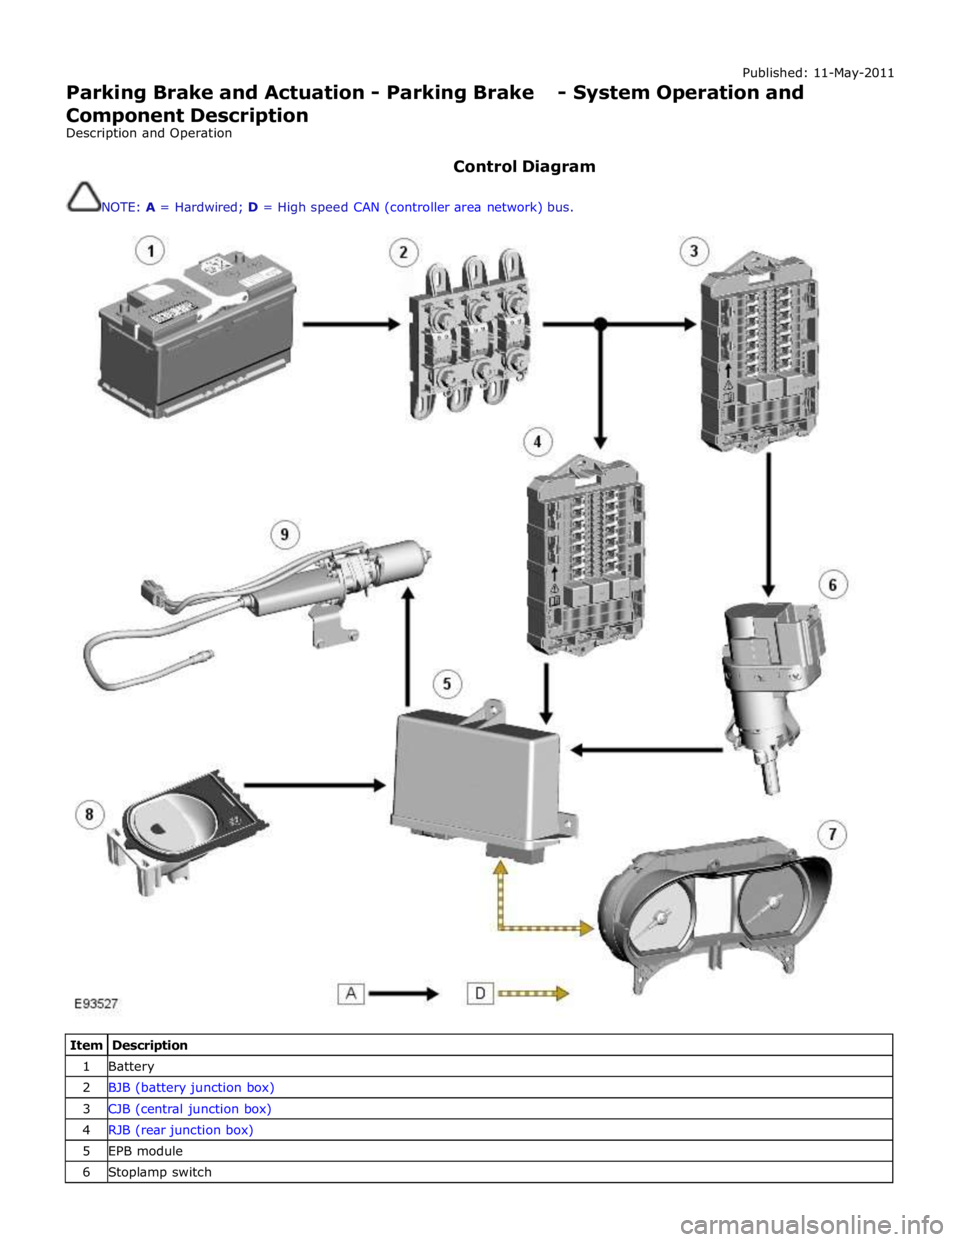
Parking Brake and Actuation - Parking Brake - System Operation and
Component Description
Description and Operation
Control Diagram
NOTE: A = Hardwired; D = High speed CAN (controller area network) bus.
Item Description 1 Battery 2 BJB (battery junction box) 3 CJB (central junction box) 4 RJB (rear junction box) 5 EPB module 6 Stoplamp switch
Page 648 of 3039
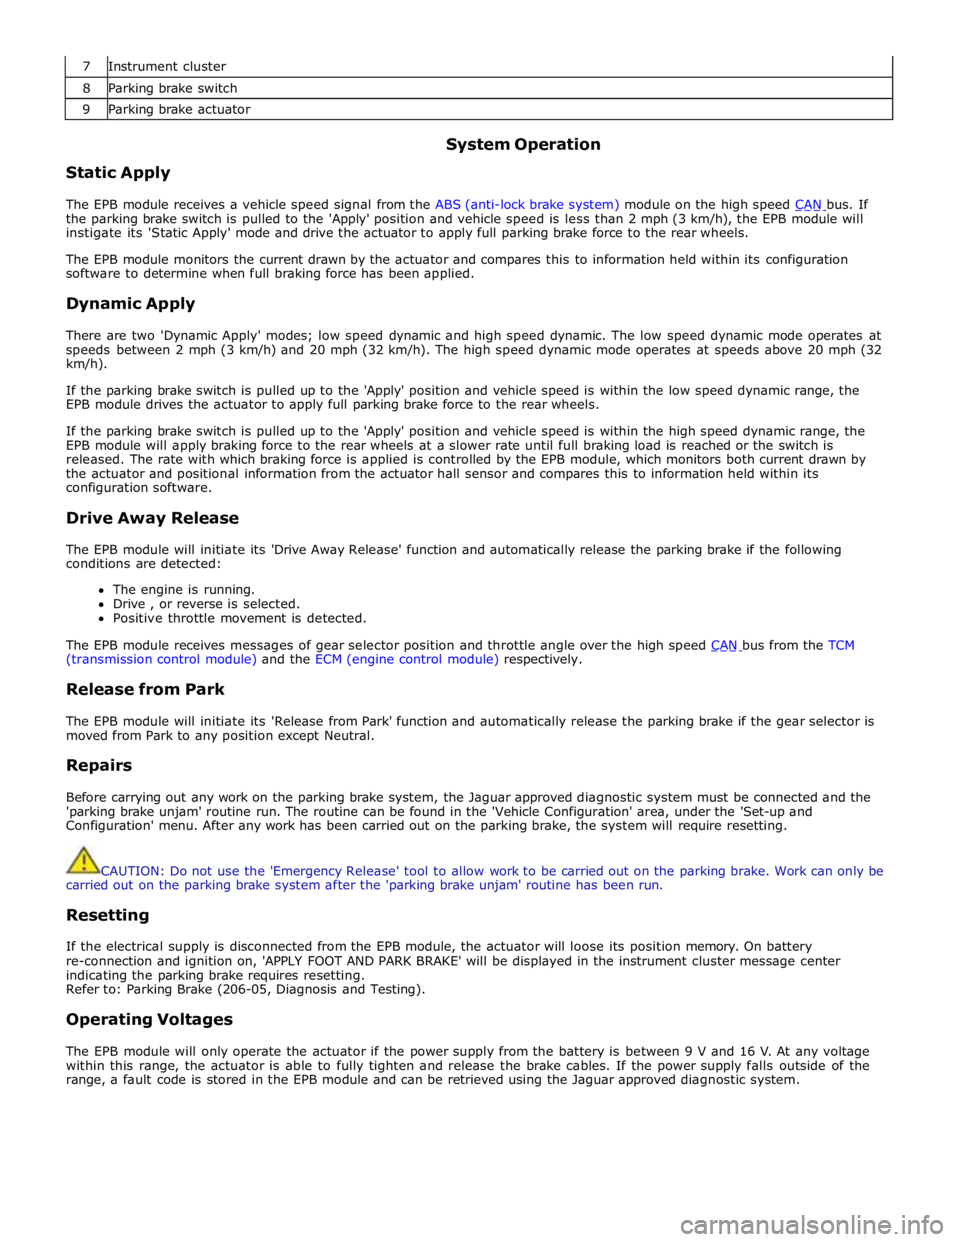
7 Instrument cluster 8 Parking brake switch 9 Parking brake actuator
Static Apply System Operation
The EPB module receives a vehicle speed signal from the ABS (anti-lock brake system) module on the high speed CAN bus. If the parking brake switch is pulled to the 'Apply' position and vehicle speed is less than 2 mph (3 km/h), the EPB module will
instigate its 'Static Apply' mode and drive the actuator to apply full parking brake force to the rear wheels.
The EPB module monitors the current drawn by the actuator and compares this to information held within its configuration
software to determine when full braking force has been applied.
Dynamic Apply
There are two 'Dynamic Apply' modes; low speed dynamic and high speed dynamic. The low speed dynamic mode operates at
speeds between 2 mph (3 km/h) and 20 mph (32 km/h). The high speed dynamic mode operates at speeds above 20 mph (32
km/h).
If the parking brake switch is pulled up to the 'Apply' position and vehicle speed is within the low speed dynamic range, the
EPB module drives the actuator to apply full parking brake force to the rear wheels.
If the parking brake switch is pulled up to the 'Apply' position and vehicle speed is within the high speed dynamic range, the
EPB module will apply braking force to the rear wheels at a slower rate until full braking load is reached or the switch is
released. The rate with which braking force is applied is controlled by the EPB module, which monitors both current drawn by
the actuator and positional information from the actuator hall sensor and compares this to information held within its
configuration software.
Drive Away Release
The EPB module will initiate its 'Drive Away Release' function and automatically release the parking brake if the following
conditions are detected:
The engine is running.
Drive , or reverse is selected.
Positive throttle movement is detected.
The EPB module receives messages of gear selector position and throttle angle over the high speed CAN bus from the TCM (transmission control module) and the ECM (engine control module) respectively.
Release from Park
The EPB module will initiate its 'Release from Park' function and automatically release the parking brake if the gear selector is
moved from Park to any position except Neutral.
Repairs
Before carrying out any work on the parking brake system, the Jaguar approved diagnostic system must be connected and the
'parking brake unjam' routine run. The routine can be found in the 'Vehicle Configuration' area, under the 'Set-up and
Configuration' menu. After any work has been carried out on the parking brake, the system will require resetting.
CAUTION: Do not use the 'Emergency Release' tool to allow work to be carried out on the parking brake. Work can only be
carried out on the parking brake system after the 'parking brake unjam' routine has been run.
Resetting
If the electrical supply is disconnected from the EPB module, the actuator will loose its position memory. On battery
re-connection and ignition on, 'APPLY FOOT AND PARK BRAKE' will be displayed in the instrument cluster message center
indicating the parking brake requires resetting.
Refer to: Parking Brake (206-05, Diagnosis and Testing).
Operating Voltages
The EPB module will only operate the actuator if the power supply from the battery is between 9 V and 16 V. At any voltage
within this range, the actuator is able to fully tighten and release the brake cables. If the power supply falls outside of the
range, a fault code is stored in the EPB module and can be retrieved using the Jaguar approved diagnostic system.