traction control JAGUAR XJ6 1994 2.G User Guide
[x] Cancel search | Manufacturer: JAGUAR, Model Year: 1994, Model line: XJ6, Model: JAGUAR XJ6 1994 2.GPages: 521, PDF Size: 17.35 MB
Page 246 of 521
Brakes
12.7 HYDRAULICCONTROL MODULE- RENEW
SRO 70.60.18
70.60.1
9
Refer to Section 12.4, Brake System Bleeding before carrying out this procedure. Pay particular attention to the warn- ings and cautions relating to brake fluid, cleanliness and cleaning materials.
W: The illustration shows the hydraulic control module of a 6 cyl. vehicle with traction control. Hydraulic control
modules on non-traction control vehicles have only three outlet ports. Apart from this, the removal procedure
is the same for all vehicles.
. Raise the vehicle.
Displace the bleeder screw dust cap of the front LH caliper.
The dust cap will remain captive
on the bleed screw.
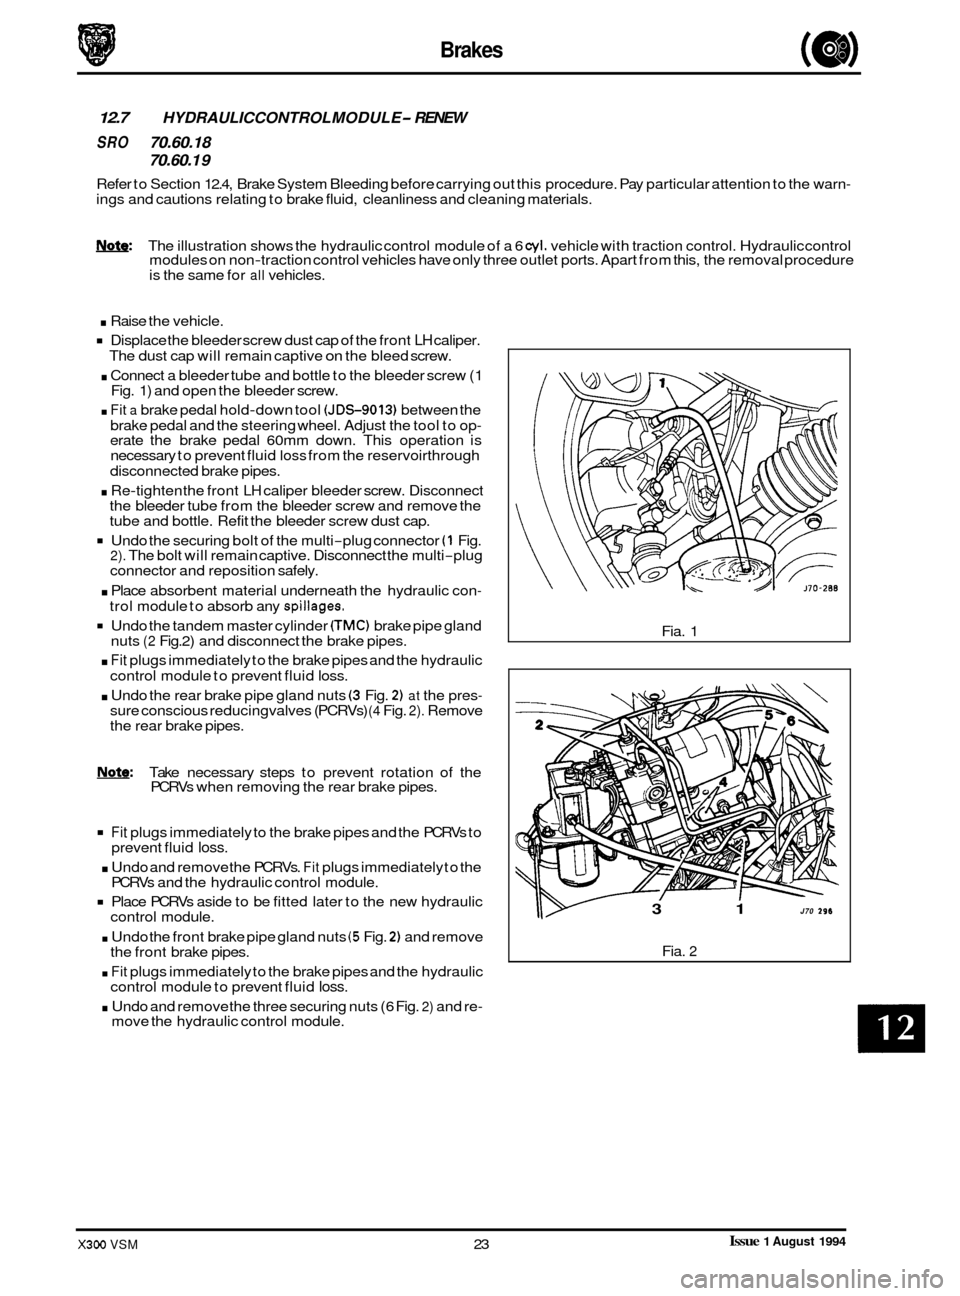
. Connect a bleeder tube and bottle to the bleeder screw (1
Fig. 1) and open the bleeder screw.
. Fit a brake pedal hold-down tool (JDS-9013) between the
brake pedal and the steering wheel. Adjust the tool to op
- erate the brake pedal 60mm down. This operation is
necessary to prevent fluid loss from the reservoirthrough
. Re-tighten the front LH caliper bleeder screw. Disconnect
the bleeder tube from the bleeder screw and remove the
tube and bottle. Refit the bleeder screw dust cap.
Undo the securing bolt of the multi-plug connector (1 Fig. 2). The bolt will remain captive. Disconnect the multi-plug
connector and reposition safely.
. Place absorbent material underneath the hydraulic con-
trol module to absorb any spillages.
Undo the tandem master cylinder CTMC) brake pipe gland
nuts (2 Fig.2) and disconnect the brake pipes.
. Fit plugs immediately to the brake pipes and the hydraulic
control module to prevent fluid
loss.
. Undo the rear brake pipe gland nuts (3 Fig. 2) at the pres- sure conscious reducing valves (PCRVs) (4 Fig. 2). Remove
the rear brake pipes.
disconnected brake pipes.
Note: Take necessary steps to prevent rotation of the
PCRVs when removing the rear brake pipes.
Fit plugs immediately to the brake pipes and the PCRVs to
. Undo and remove the PCRVs. Fit plugs immediately to the
Place PCRVs aside to be fitted later to the new hydraulic
. Undo the front brake pipe gland nuts (5 Fig. 2) and remove
. Fit plugs immediately to the brake pipes and the hydraulic
. Undo and remove the three securing nuts (6 Fig. 2) and re-
0 prevent fluid loss.
PCRVs and the hydraulic control module.
control module.
the front brake pipes.
control module to prevent fluid
loss.
move the hydraulic control module. Fia.
1
3 1 J70 296
Fia. 2
Issue 1 August 1994 X300 VSM 23
Page 248 of 521
Brakes
12.8
SRO 70.60.21
PRESSURE CONSCIOUS REDUCING VALVES - RENEW
Refer to Section 12.4, Brake System Bleeding before carrying out this procedure. Pay particular attention to the warn- ings and cautions relating to brake fluid, cleanliness and cleaning materials.
Note: The illustration shows the hydraulic control module of a 6 cyl. vehicle with traction control. Hydraulic control
modules on non-traction control vehicles have only three outlet ports. Apart from this, the removal procedure
is the same for all vehicles.
. Raise the vehicle.
Displace the bleeder screw dust cap of the front LH caliper.
The dust cap will remain captive on the bleed screw.
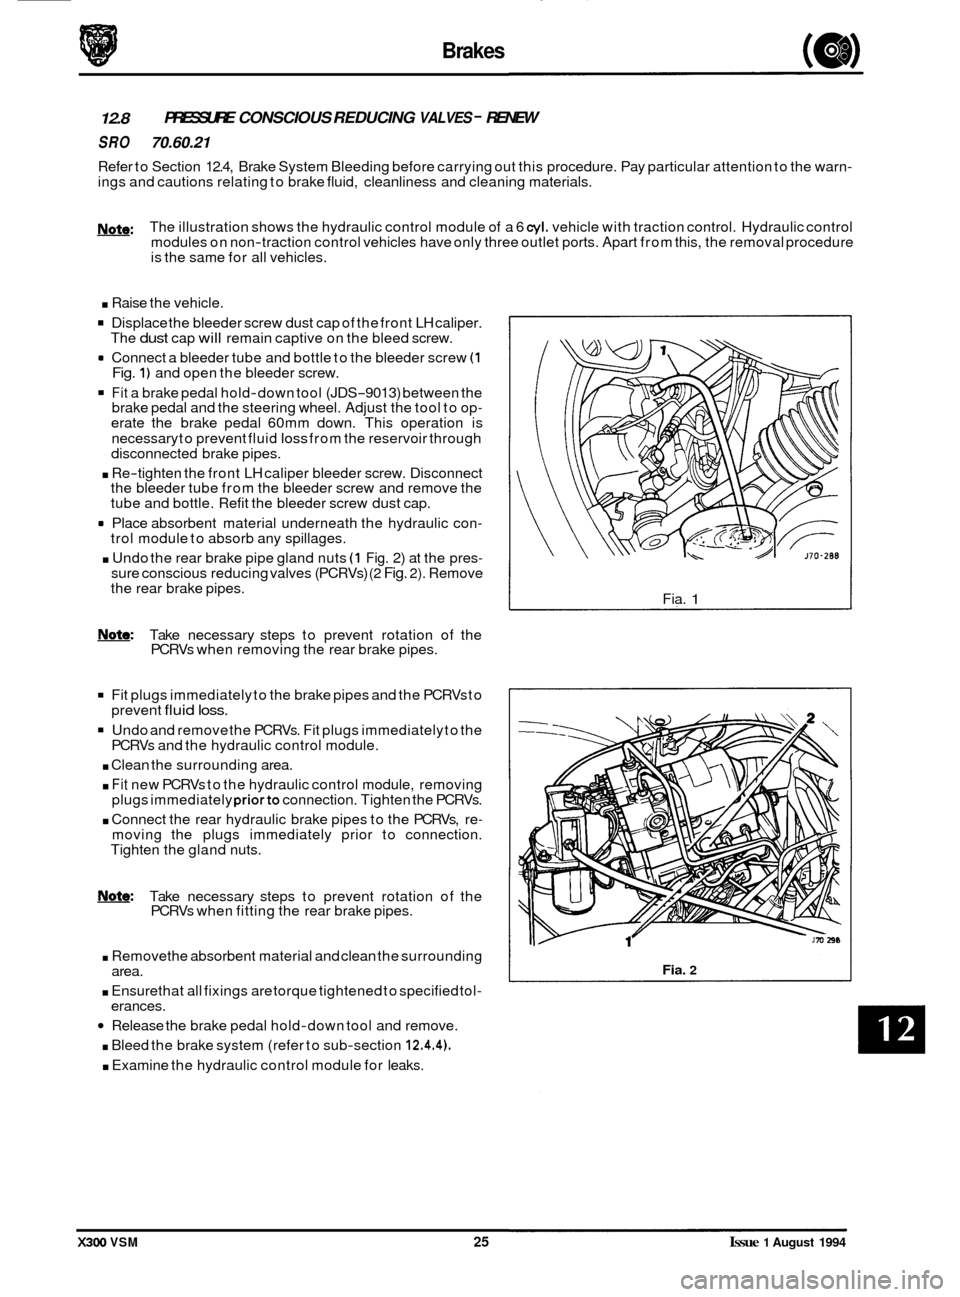
rn Connect a bleeder tube and bottle to the bleeder screw (1 Fig. 1) and open the bleeder screw.
Fit a brake pedal hold-down tool (JDS-9013) between the
brake pedal and the steering wheel. Adjust the tool to op- erate the brake pedal 60mm down. This operation is
necessary to prevent fluid
loss from the reservoir through
disconnected brake pipes.
. Re-tighten the front LH caliper bleeder screw. Disconnect
the bleeder tube from the bleeder screw and remove the
tube and bottle. Refit the bleeder screw dust cap.
rn Place absorbent material underneath the hydraulic con- trol module to absorb any spillages.
. Undo the rear brake pipe gland nuts (1 Fig. 2) at the pres- sure conscious reducing valves (PCRVs) (2 Fig. 2). Remove
the rear brake pipes.
m: Take necessary steps to prevent rotation of the
PCRVs when removing the rear brake pipes.
Fit plugs immediately to the brake pipes and the PCRVs to
Undo and remove the PCRVs. Fit plugs immediately to the
. Clean the surrounding area.
. Fit new PCRVs to the hydraulic control module, removing
plugs immediately priorto connection. Tighten the PCRVs.
. Connect the rear hydraulic brake pipes to the PCRVs, re- moving the plugs immediately prior to connection.
Tighten the gland nuts.
prevent
fluid loss.
PCRVs
and the hydraulic control module.
0
Note: Take necessary steps to prevent rotation of the
PCRVs when fitting the rear brake pipes.
. Removethe absorbent material and clean the surrounding
. Ensure that all fixings are torque tightened to specified tol-
Release the brake pedal hold-down tool and remove.
. Bleed the brake system (refer to sub-section 12.4.4).
. Examine the hydraulic control module for leaks.
area.
erances. Fia.
1
Fia. 2
X300 VSM 25 Issue 1 August 1994
Page 350 of 521
31
30
29
28 27
26
4 26 24 21 23 22 7 20 19 18 18 17 8
a
10
11
12
13
14
1s
1M-137
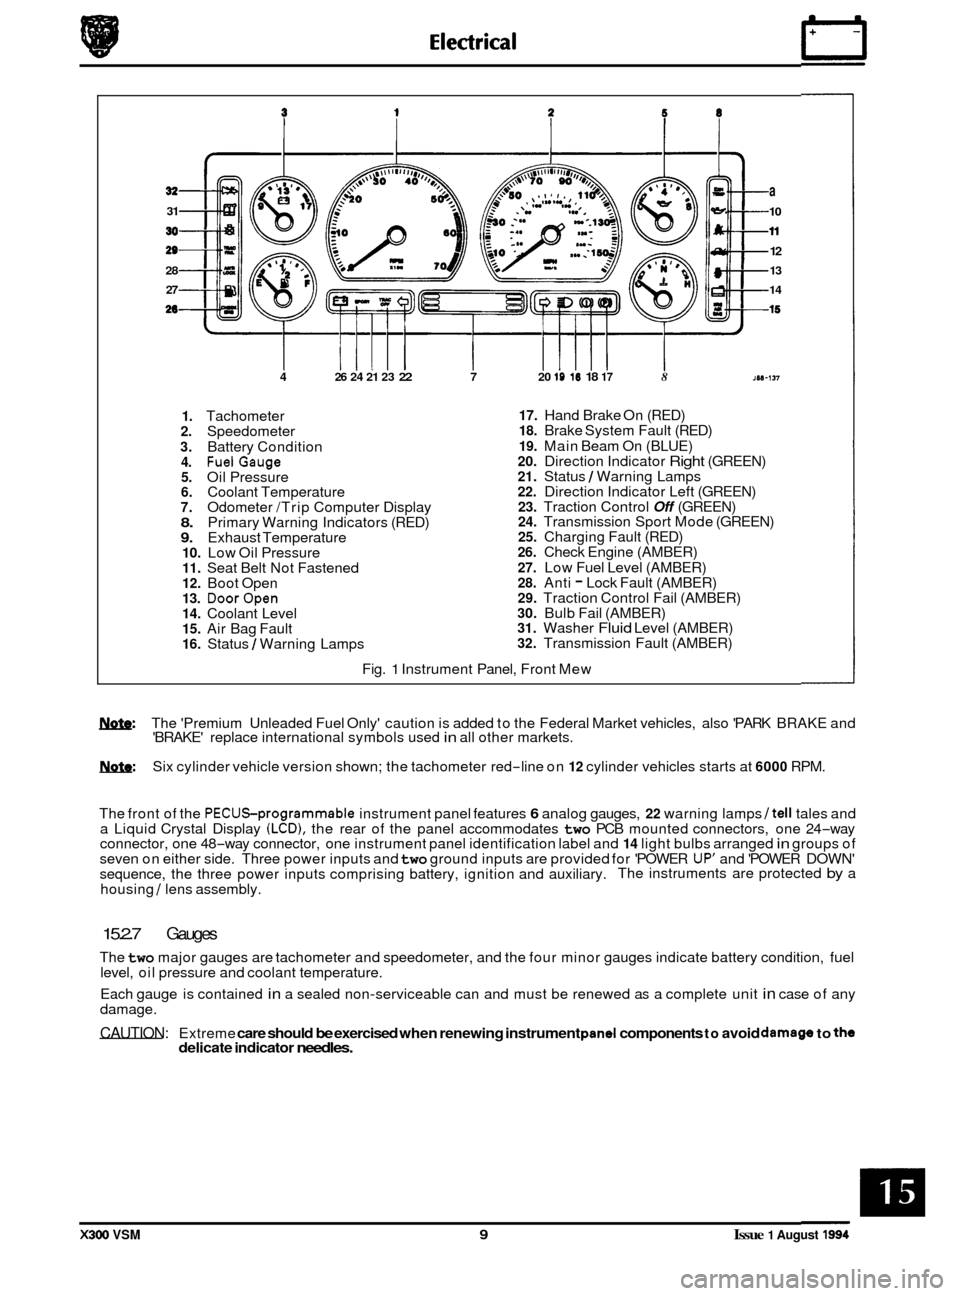
1. Tachometer 2. Speedometer
3. Battery Condition 4. FuelGauge 5. Oil Pressure 6. Coolant Temperature 7. Odometer /Trip Computer Display 8. Primary Warning Indicators (RED) 9. Exhaust Temperature 10. Low Oil Pressure 11. Seat Belt Not Fastened 12. Boot Open 13. DoorOpen 14. Coolant Level 15. Air Bag Fault 16. Status / Warning Lamps
17. Hand Brake On (RED) 18. Brake System Fault (RED)
19. Main Beam On (BLUE) 20. Direction Indicator Right (GREEN) 21. Status / Warning Lamps 22. Direction Indicator Left (GREEN) 23. Traction Control Off (GREEN) 24. Transmission Sport Mode (GREEN) 25. Charging Fault (RED) 26. Check Engine (AMBER)
27. Low Fuel Level (AMBER) 28. Anti - Lock Fault (AMBER) 29. Traction Control Fail (AMBER) 30. Bulb Fail (AMBER) 31. Washer Fluid Level (AMBER) 32. Transmission Fault (AMBER)
Fig.
1 Instrument Panel, Front Mew
w: The 'Premium Unleaded Fuel Only' caution is added to the Federal Market vehicles, also 'PARK BRAKE and
'BRAKE' replace international symbols used in all other markets.
m: Six cylinder vehicle version shown; the tachometer red-line on 12 cylinder vehicles starts at 6000 RPM.
The front of the
PECUSprogrammable instrument panel features 6 analog gauges, 22 warning lamps /tell tales and
a Liquid Crystal Display (LCD), the rear of the panel accommodates two PCB mounted connectors, one 24-way
connector, one 48-way connector, one instrument panel identification label and 14 light bulbs arranged in groups of
seven on either side. Three power inputs and two ground inputs are provided for 'POWER UP' and 'POWER DOWN'
sequence, the three power inputs comprising battery, ignition and auxiliary. The instruments are protected by a
housing
/ lens assembly.
15.2.7 Gauges
The two major gauges are tachometer and speedometer, and the four minor gauges indicate battery condition, fuel
level, oil pressure and coolant temperature.
Each gauge is contained
in a sealed non-serviceable can and must be renewed as a complete unit in case of any
damage.
CAUTION: Extreme care should be exercised when renewing instrument pand components to avoid damago to the delicate indicator needles.
X300 VSM 9 Issue 1 August 1994
Page 380 of 521
86.52.01
86.91 -83
19.75.21
86.80.24
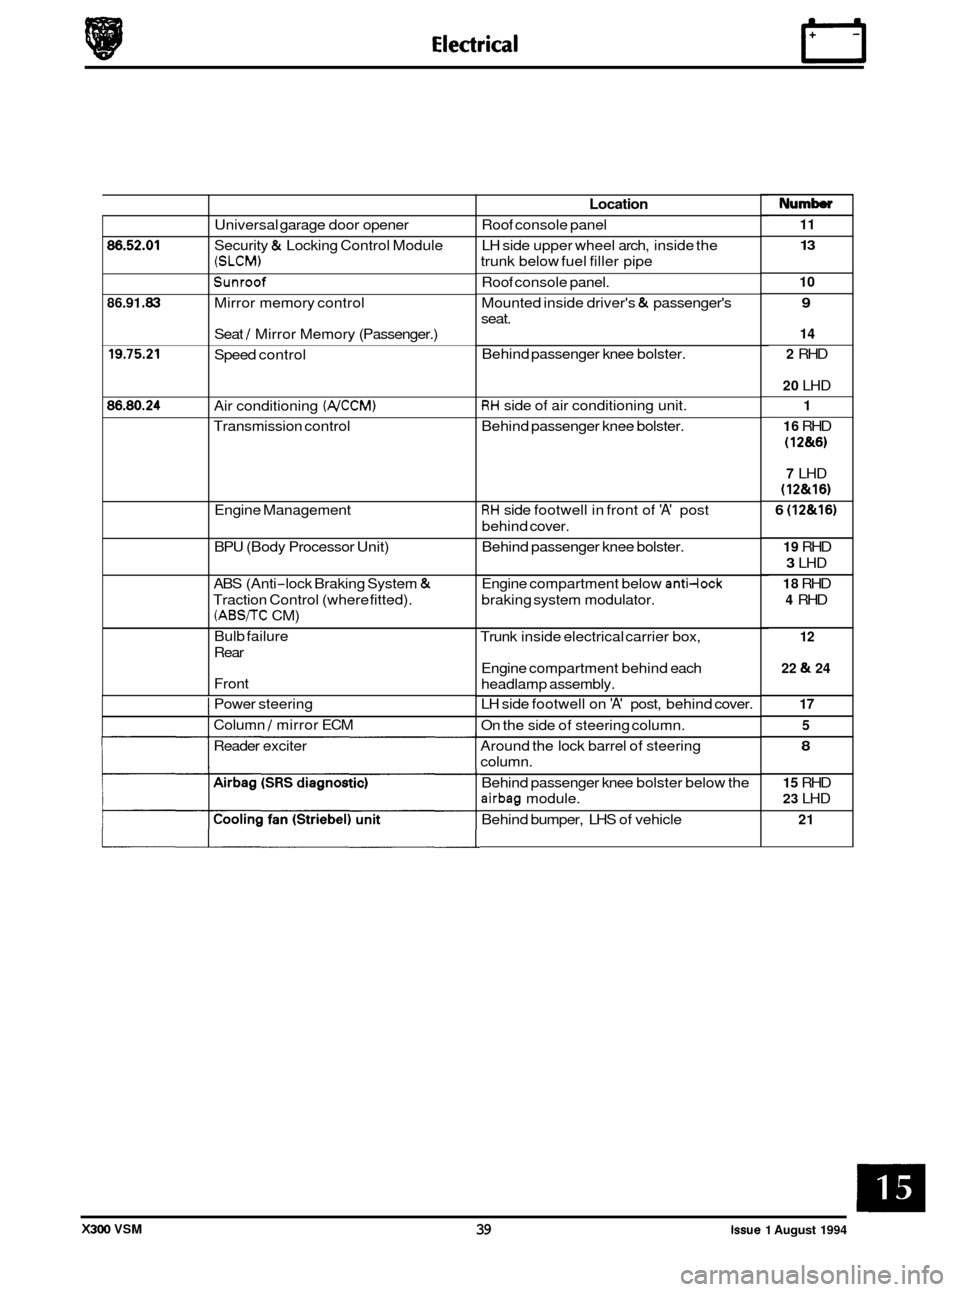
Universal garage door opener
Security
& Locking Control Module
(SLCM)
Sunroof
Mirror memory control
Seat
/ Mirror Memory (Passenger.)
Speed control
Air conditioning
(NCCM)
Transmission control
Engine Management
BPU (Body Processor Unit)
ABS (Anti
-lock Braking System &
Traction Control (where fitted).
(ABS/TC CM)
Bulb failure
Rear
Front
I Power steering
I Column / mirror ECM
Reader exciter
Location
Roof console panel
LH side upper wheel arch, inside the
trunk below fuel filler pipe
Roof console panel.
Mounted inside driver's
& passenger's
seat.
Behind passenger knee bolster.
RH side of air conditioning unit.
Behind passenger knee bolster.
RH side footwell in front of 'A' post
behind cover.
Behind passenger knee bolster.
Engine compartment below
anti-lock
braking system modulator.
Trunk inside electrical carrier box,
Engine compartment behind each
headlamp assembly.
LH side footwell on
'A' post, behind cover.
On the side of steering column.
Around the lock barrel of steering
column.
Behind passenger knee bolster below the
airbag module.
Behind bumper, LHS of vehicle
Numb
11
13
10
9
14
2
RHD
20 LHD
1
16
RHD
(1 2&6)
7 LHD
(12&16)
6 (12&16)
19 RHD
3 LHD
18 RHD
4 RHD
12
22
& 24
17 5
8
15 RHD
23 LHD
21
X300 VSM 39 issue 1 August 1994
Page 386 of 521
e LmmJ
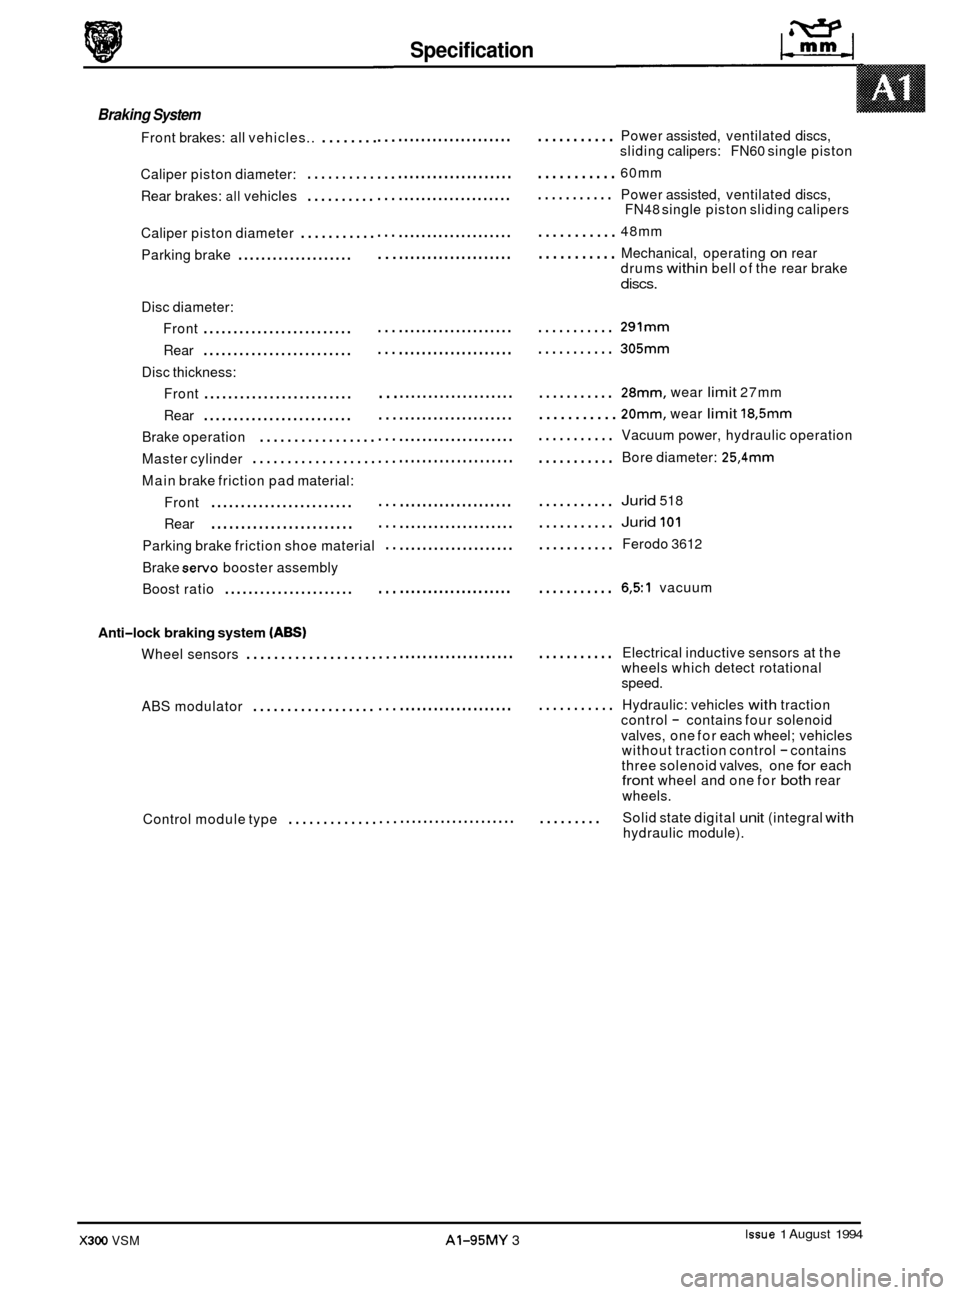
Power assisted, ventilated discs,
sliding calipers: FN60 single piston
60mm Power assisted, ventilated discs,
FN48 single piston sliding calipers
48mm Mechanical, operating
on rear
drums within bell of the rear brake
discs.
291mm
305mm
28mm. wear limit 27mm
20mm, wear limit 18,5mm
Vacuum power, hydraulic operation
Bore diameter:
25,4mm
Jurid 518
Jurid 101
Ferodo 3612
6,51 vacuum
Electrical inductive sensors at the
wheels which detect rotational
speed.
Hydraulic: vehicles
with traction
control - contains four solenoid
valves, one for each wheel; vehicles
without traction control
- contains
three solenoid valves, one for each front wheel and one for both rear
wheels.
Solid state digital
unit (integral with hydraulic module).
Specification
Braking System
Front brakes: all vehicles.. ........ .................... ........... ...
Caliper piston diameter: ..........
Rear brakes: all vehicles ..........
...
...
....................
....................
...........
...........
Caliper piston diameter ...........
Parking brake ....................
...
...
....................
....................
...........
...........
Disc diameter:
Front
.........................
Rear .........................
Front .........................
Rear .........................
Brake operation .................
Master cylinder ..................
Main brake friction pad material:
Front
........................
Rear ........................
Parking brake friction shoe material
Brake
servo booster assembly
Boost ratio
......................
Disc thickness:
...
... ....................
....................
...........
...........
...
...
...
...
....................
....................
....................
....................
...........
...........
...........
...........
...
...
.. ....................
....................
....................
...........
...........
...........
... .................... ...........
Anti-lock braking system (ABSI
Wheel sensors ................... ... .................... ...........
ABS modulator .................. ... .................... ...........
0
0
Control module type ............. ... .................... .........
Issue 1 August 1994 X300 VSM AI-95MY 3
Page 395 of 521
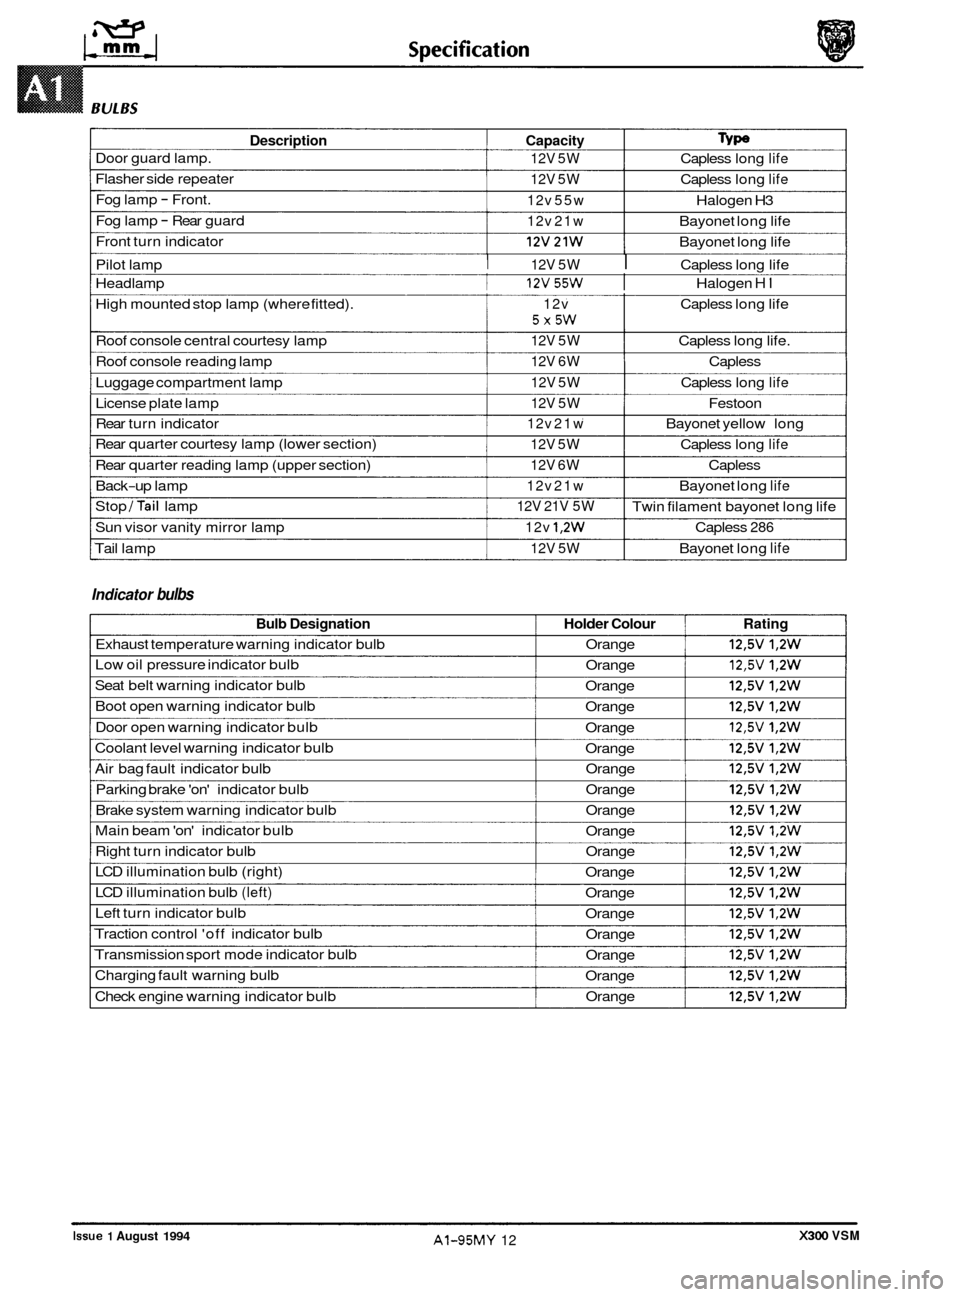
Description Capacity Type
Door guard lamp. 12V 5W Capless long life
Flasher side repeater 12V 5W Capless long life
Fog lamp - Front. 12v 55w Halogen H3
Fog lamp
- Rear guard 12v 21w Bayonet long life
Front turn indicator
I 12v21w I Bayonet long life
Pilot lamp
I 12V 5W I Capless long life
Headlamp
I 12v55w I Halogen HI
High mounted stop lamp (where fitted). 12v Capless long life
Roof console central courtesy lamp
12V 5W Capless long life.
Roof console reading lamp
12V 6W Capless
Luggage compartment lamp
12V 5W Capless long life
License plate lamp 12V 5W Festoon
Rear turn indicator
12v 21w Bayonet yellow long
Rear quarter courtesy lamp (lower section)
12V 5W Capless long life
Rear quarter reading lamp (upper section) 12V 6W Capless
Back
-up lamp 12v 21w Bayonet long life
Stop /Tail lamp
Sun visor vanity mirror lamp
12v 1,2w Capless 286
Tail lamp 12V 5W Bayonet long life
5X5W
12V 21V 5W Twin filament bayonet long life
Indicator bulbs
Bulb Designation Holder Colour Rating
Exhaust temperature warning indicator bulb Orange 12,5V 1,2W
Low oil pressure indicator bulb
Orange 12,5V 1,2W
Seat belt warning indicator bulb
Orange 12,5V 1,2W
Boot open warning indicator bulb
Orange 12,5V 1,2W
Door open warning indicator bulb
Orange 12,5V 1,2W
Coolant level warning indicator bulb
Orange 12,5V 1,2W
Air bag fault indicator bulb Orange 12,5V 1,2W
Parking brake 'on' indicator bulb Orange 12,5V 1,2W
Brake system warning indicator bulb Orange 12,5V 1,2W
Main beam 'on' indicator bulb
Orange 12,5V 1,2W
Right turn indicator bulb Orange 12,5V 1,2W
LCD illumination bulb (right)
Orange 12,5V 1,2W
LCD illumination bulb (left) Orange 12,5V 1,2W
Left turn indicator bulb
Orange 12,5V 1,2W
Traction control 'off indicator bulb
Orange 12,5V 1,2W
Transmission sport mode indicator bulb
Orange 12,5V 1,2W
Charging fault warning bulb
Orange 12,5V 1,2W
Check engine warning indicator bulb Orange 12,5V 1,2W
0
0
0
X300 VSM Issue 1 August 1994 AI-95MY 12
Page 396 of 521
0
0
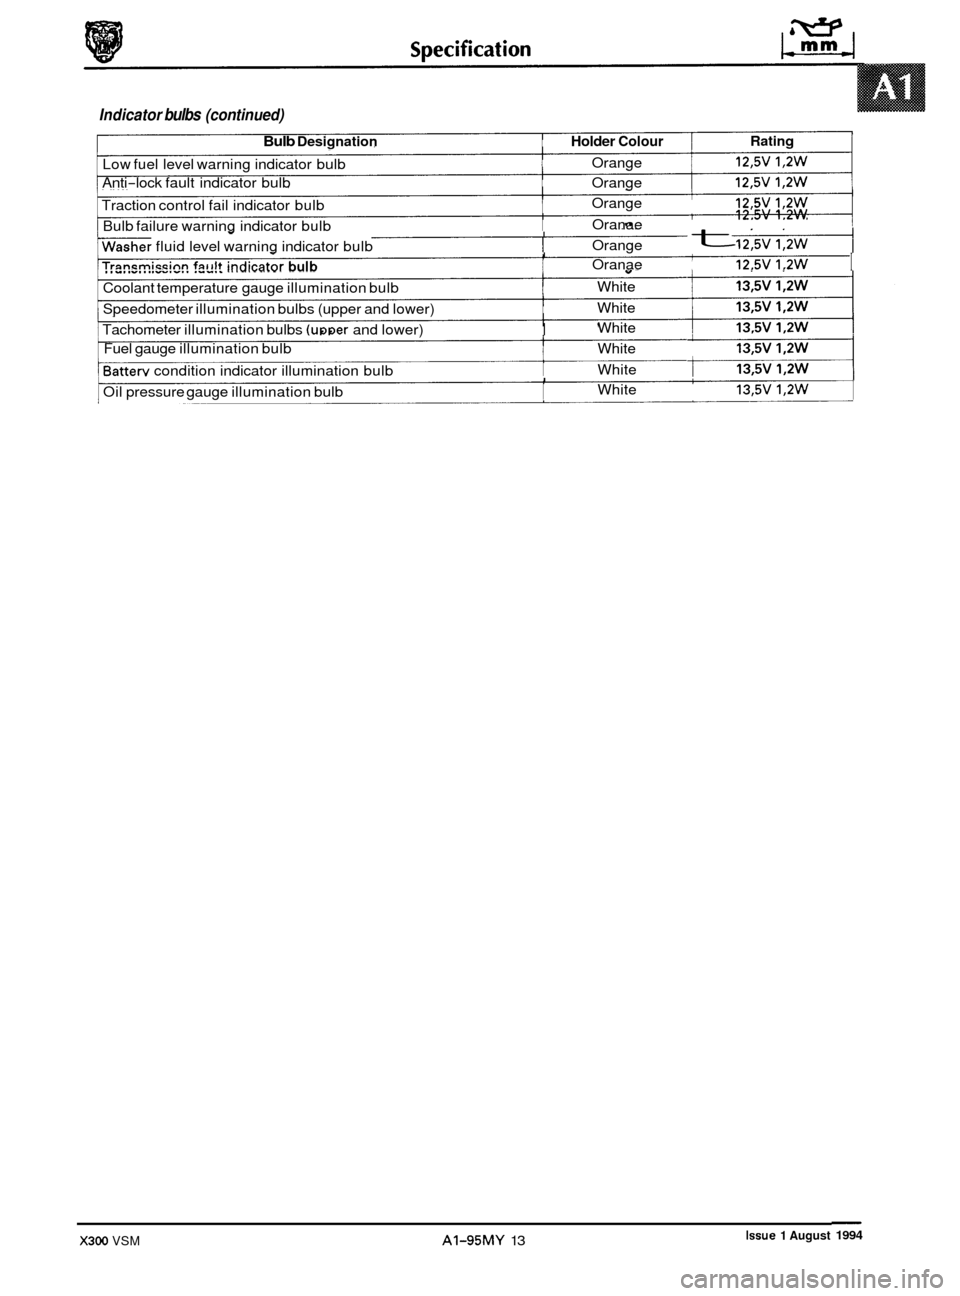
Indicator bulbs (continued)
Bulb Designation Holder Colour
Orange
Low fuel level warning indicator bulb
Anti
-lock fault indicator bulb Orange
Orange
12,5V 1,2W
Oranae
Traction
control fail indicator bulb
Bulb failure warning indicator bulb 12.5V 1.2W I - I -"-
\Washer fluid level warning indicator bulb Orange t - I I I Trancmiccinn faiilt indicator bulb Oranae 12.5V 1.2W ..I. .".. ..-.-.. .--.. Y-
Coolant temperature gauge
illumination bulb White
Speedometer illumination bulbs (upper and lower) White
.. White
Fuel gauge illumination bulb White
Batterv condition indicator illumination bulb White
1 Tachometer
illumination bulbs (utmer and lower) I 1
t
I I I White 13,5V 1,2W 1 Oil pressure gauge illumination bulb I
Issue 1 August X300 VSM AI-95MY 13
Rating
12,5V 1,2W
12,5V 1,2W
12,5V 1,2W
- 1994
I
t-
Page 400 of 521
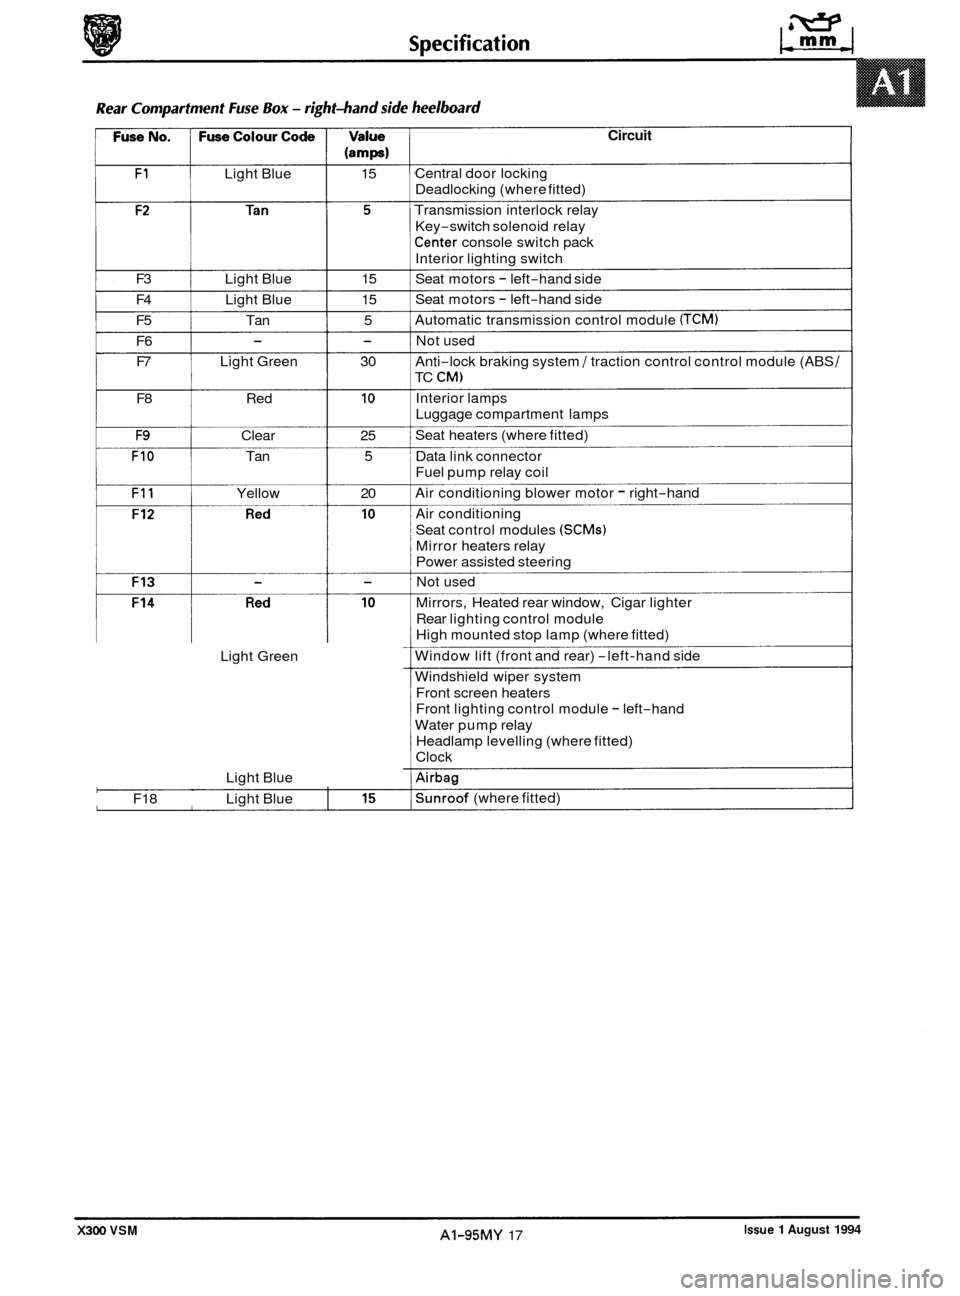
(amps)
F1 Light Blue 15
F3 Light Blue 15
F4 Light Blue 15
F5 Tan 5
F6 F7 Light Green 30
- -
F8 Red 10
F9 Clear 25
FIO Tan 5
F11 Yellow 20 0
Light Green
Light Blue
F18 Light Blue
0'
I
Circuit
Central door locking
Deadlocking (where fitted)
Transmission interlock relay
Key
-switch solenoid relay
Center console switch pack
Interior lighting switch
Seat motors
- left-hand side
Seat motors
- left-hand side
Automatic transmission control module
(TCM)
Not used
Anti
-lock braking system / traction control control module (ABS /
TC CM)
Interior lamps
Luggage compartment lamps
Seat heaters (where fitted)
Data link connector
Fuel pump relay coil
Air conditioning blower motor
- right-hand
Air conditioning
Seat control modules
(SCMs)
Mirror heaters relay
Power assisted steering
Not used
Mirrors, Heated rear window, Cigar lighter
Rear lighting control module
High mounted stop lamp (where fitted)
Window lift (front and rear)
-left-hand side
Windshield wiper system Front screen heaters
Front lighting control module
- left-hand
Water pump relay
Headlamp levelling (where fitted)
Clock
Airbag
Sunroof (where fitted)
Issue 1 August 1994 AI-95MY 17 X300 VSM
Page 412 of 521
used.
WARNING: FUME EXTRACTION EQUIPMENT MUST BE IN OPERATION WHEN SOLVENTS ARE USED E.G.
TRICHLOROETHANE, WHITE SPIRIT, SBPB, METHYLENE CHLORIDE, PERCHLORETHYLENE.
DO NOT SMOKE IN THE VICINITY OF VOLATILE DEGREASING AGENTS.
Adhere strictly to handling and safety instructions given on containers and labels. Keep oils and solvents away from
naked flames and other sources of ignition. Do not apply heat in an attempt to free seized nuts or fittings; as well as
causing damage to protective coatings, there is
a risk of damage from stray heat to electronic equipment and brake
lines. Do not leave tools, equipment, spilt oil etc. around or on work
area. Wear protective overalls and use barrier
cream when necessary.
0 A3.1.1 Used Engine Oils
Prolonged and repeated contact with mineral oil will result in the removal of natural oils from the skin, leading to dry- ness, irritation and dermatitis. In addition, used engine oil contains potentially harmful contaminants which may cause
skin cancer. Washing facilities and adequate means of skin protection should be provided.
A3.1.2 Health Protection Precautions
0 Avoid prolonged and repeated contact with oil; particularly used engine oils.
o Wear protective clothing, including impervious gloves where practicable
0 Do not put oily rags in pockets.
0 Avoid contaminating clothes, particularly underwear, with oil.
0 Overalls must be cleaned regularly. Discard unwashable clothing and footwear which is oil impregnated.
o First Aid treatment should be obtained immediately for open cuts or wounds.
0 Use barrier creams, applying before each work period, to enable easier removal of dirty oil / grease from the
skin.
0 Wash with soap and water to ensure that all oil is removed (skin cleaner and a nail brush will help). The use of
preparations containing lanolin will help to replace the natural skin oils which have been removed.
o Do not use petrol, kerosene, gas oil, thinners or solvents for washing skin.
0 If skin disorders develop, obtain medical advice immediately.
0 Where practicable, degrease components prior to handling.
0 Where there is a risk of fluids coming into contact with the eyes, eye protection should be worn, for example,
goggles or a face shield. An eye wash facility should be provided.
A3.1.3 Environmental Protection Precautions
A3.1 SAFETY PRECAUTIONS
Whenever possible, use a ramp or pit whilst working beneath a car, in preference to jacking. Position chocks at the
wheels as well as applying the handbrake. Never rely on a jack alone to support a car. Use axle stands, or blocks care- fully placed at the jacking points, to provide a rigid location. Checkthat any lifting equipment used has adequate capac- ity and is fully serviceable. Ensure that a suitable form of fire extinguisher is conveniently located.
When using
electrical tools and equipment, inspect the power lead for damage and check that it is properly earthed. Disconnect
the earth (grounded) terminal of the car battery. Do not disconnect any pipes of the air conditioning refrigeration sys-
tem unless you are trained and instructed to do so. A refrigerant is used which can cause blindness if allowed to come
into contact with the eyes. Ensure that adequate ventilation is provided when volatile degreasing agents are being
It is illegal to pour used oil on to the ground, down sewers or drains, or into water courses. The burning of used engine
oil in small space heaters or boilers is not recommended unless emission control equipment is fitted. Dispose of used
oil through authorized waste disposal contractors, to licensed waste disposal sites or to the waste oil reclamation trade.
If in doubt, contact the Local Authority for advice on disposal facilities.
X300 VSM 1 Issue 1 August 1994